Stardew Valley 100% Achievement Guide
 ponkberry
(3,135 ratings)
Mar 8, 2016 @ 2:38am84,9946,470
AchievementsCraftingGameplay BasicsLootWalkthroughsEnglish
Disclaimer
Also, many images are taken from stardewvalleywiki.com so their work is most definitely appreciated.
Many thanks to the modding community over at ChuckleFish for pushing out a script to extract various files for information.
Note: I do have a web based version of this guide up here.
https://htonyn.github.io/stardew-valley/
Many thanks to the modding community over at ChuckleFish for pushing out a script to extract various files for information.
Note: I do have a web based version of this guide up here.
https://htonyn.github.io/stardew-valley/
Permanent Choices
Farm Type
In Update 1.1, Stardew Valley introduces new farm types that each specialize in their own biome. Each corresponds to a skill group:Standard Farm: Best for Farming
Riverland Farm: Best for Fishing
Forest Farm: Best for Foraging
Hill-top Farm: Best for Mining
Wilderness Farm: Best for Combat
If you're starting this game for the first time, I would highly recommend going with the Standard Farm. It's the most balanced version and probably the easiest to play with.
Mutually Exclusive Achievement
Also introduced in Update 1.1 is a large fix regarding the two end-game like achievements: Local Legend and Joja Co. Member of the Year.Prior to this update, if you gained progress in both routes, you would miss both achievements. This has been fixed so that you are guaranteed at least one ending. As such, you can now mix and match completing bundles in the community center as well as purchasing upgrades through the Joja Membership.
Now, these achievements REMAIN mutually exclusive, so it is still impossible to obtain them in a single playthrough without reloading an older save after completing one.
Summary
- If you want to do the Joja route, make sure you do not finish the community center with a bundle.
- If you want to do the Local Legend route, make sure you do not buy the last upgrade in the Joja shop.
- If you want both, then back up a save near the end, complete a route, then reload and do a different route.
Skills
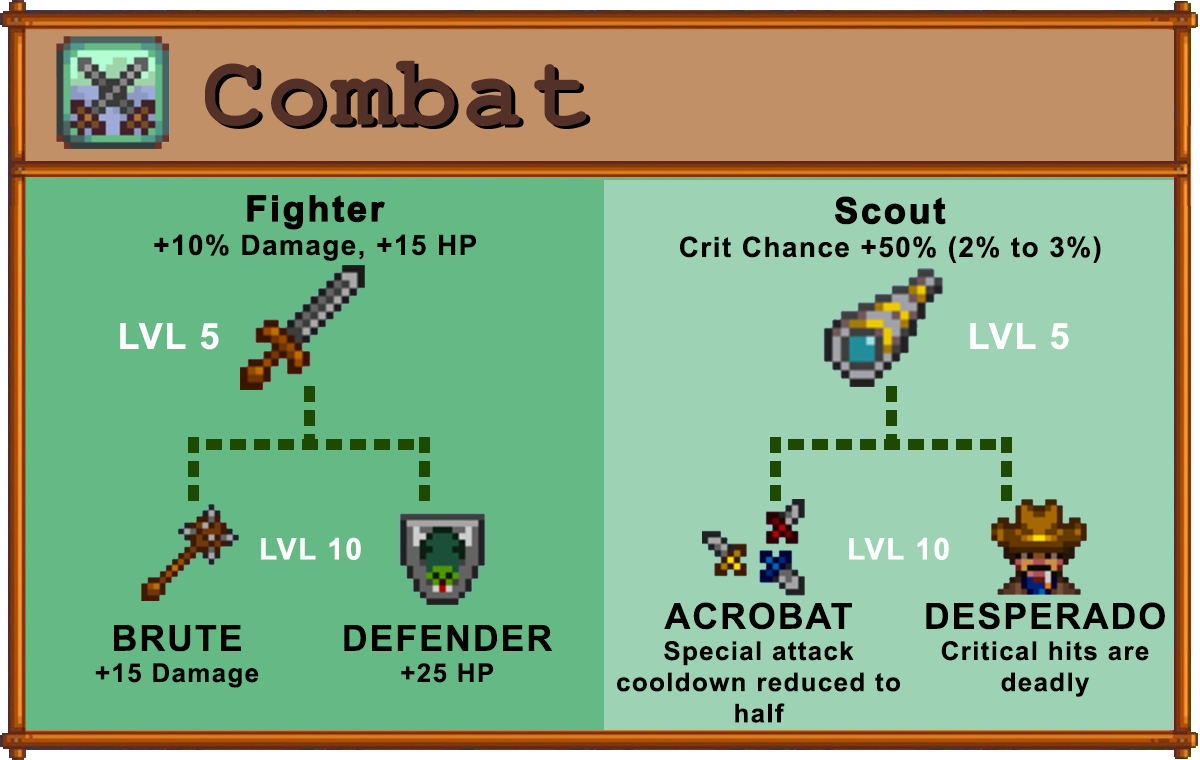
There are 5 different skills overall: Farming, Foraging, Mining, Fishing, and Combat. Each skill has two different professions that are made available at level 5. You can ONLY pick one of them. Then each profession has two specializations that is given at level 10. Again, you can ONLY pick one.See Master of the Five Ways for more details on skills
My Preference
Farming: Tiller -> Artisan (for Legend achievement)
Foraging: Gatherer -> Tracker (for Complete Collection achievement)
Mining: Geologist -> Excavator (for Complete Collection achievement)
Fishing: Fisher -> Pirate (for Complete Collection achievement)
Combat: Fighter -> Brute (Playstyle)
The Farm Cave
When you reach 25,000g earned, Demetrius will show up at your door proposing using your cave for one of two things: Mushrooms or Bats.Mushrooms
Grows all the mushrooms in your cave at random in 6 given mushroom plots
Bats
Fruitbats randomly leave fruits (regardless of season) in the cave.
Which to pick?
If your only goal is to simply complete the Community Center bundles, then I'd pick the fruitbats because planting saps could prove expensive and only grows during specific seasons. But the yields on trees are much better than mushrooms.
If you're going for the perfect setup, I'd pick mushrooms. Fruit trees bare 1 fruit every day as long as you're in season, and you don't have to regrow these trees. Mushrooms on the other hand, are grown primarily in the cave, and the secret woods.
Spring
Crops
Cauliflower
Green Beans
Kale
Parsnip
Potato
Strawberry (Egg Festival)
Rhubarb (Oasis)
Coffee Bean (Traveling Cart)
Garlic (Year 2)
Coffee Bean
Unmilled Rice
Carrot
On Spring 13, the Egg Festival takes place in town. There is a booth that sells Strawberry Seeds for 100g each.
Whenever you fix the bus, you will gain access to the Oasis as well as the shop there. That's how you purchase Rhubarb Seeds.
Every Friday & Sunday, the Traveling Cart will be located in the area south of your farm, known as Cindersap Forest. It'll be situated just above the lake here. Its inventory is randomized, so it has a chance of selling Coffee Beans at 2500g. Beans also drop from Dust Sprites at a 2% rate on Floors 40-79.
Garlic is a common crop, but only available on Year 2 and after. Sold at both Joja Mart and Pierre's General Store.
Coffee Bean is a common crop, but only available on Year 2 and after. Sold at both Joja Mart and Pierre's General Store. Also grows in Summer.
Unmilled Rice is a common crop, but only available on Year 2 and after. Sold at both Joja Mart and Pierre's General Store.
Carrot can be obtained from the Raccoon Wife, see Good Neighbor quest in 1.6
Flowers
Tulip
Blue Jazz
Fruits
Apricot
Cherry
Foraging
Wild Horseradish
Daffodil
Leek
Dandelion
Spring Onion (Cindersap Forest)
Common Mushroom
Morel
Salmonberry
Fishing
Anchovy
Sardine
Herring
Eel
Halibut
Smallmouth Bass
Sunfish
Shad
Catfish
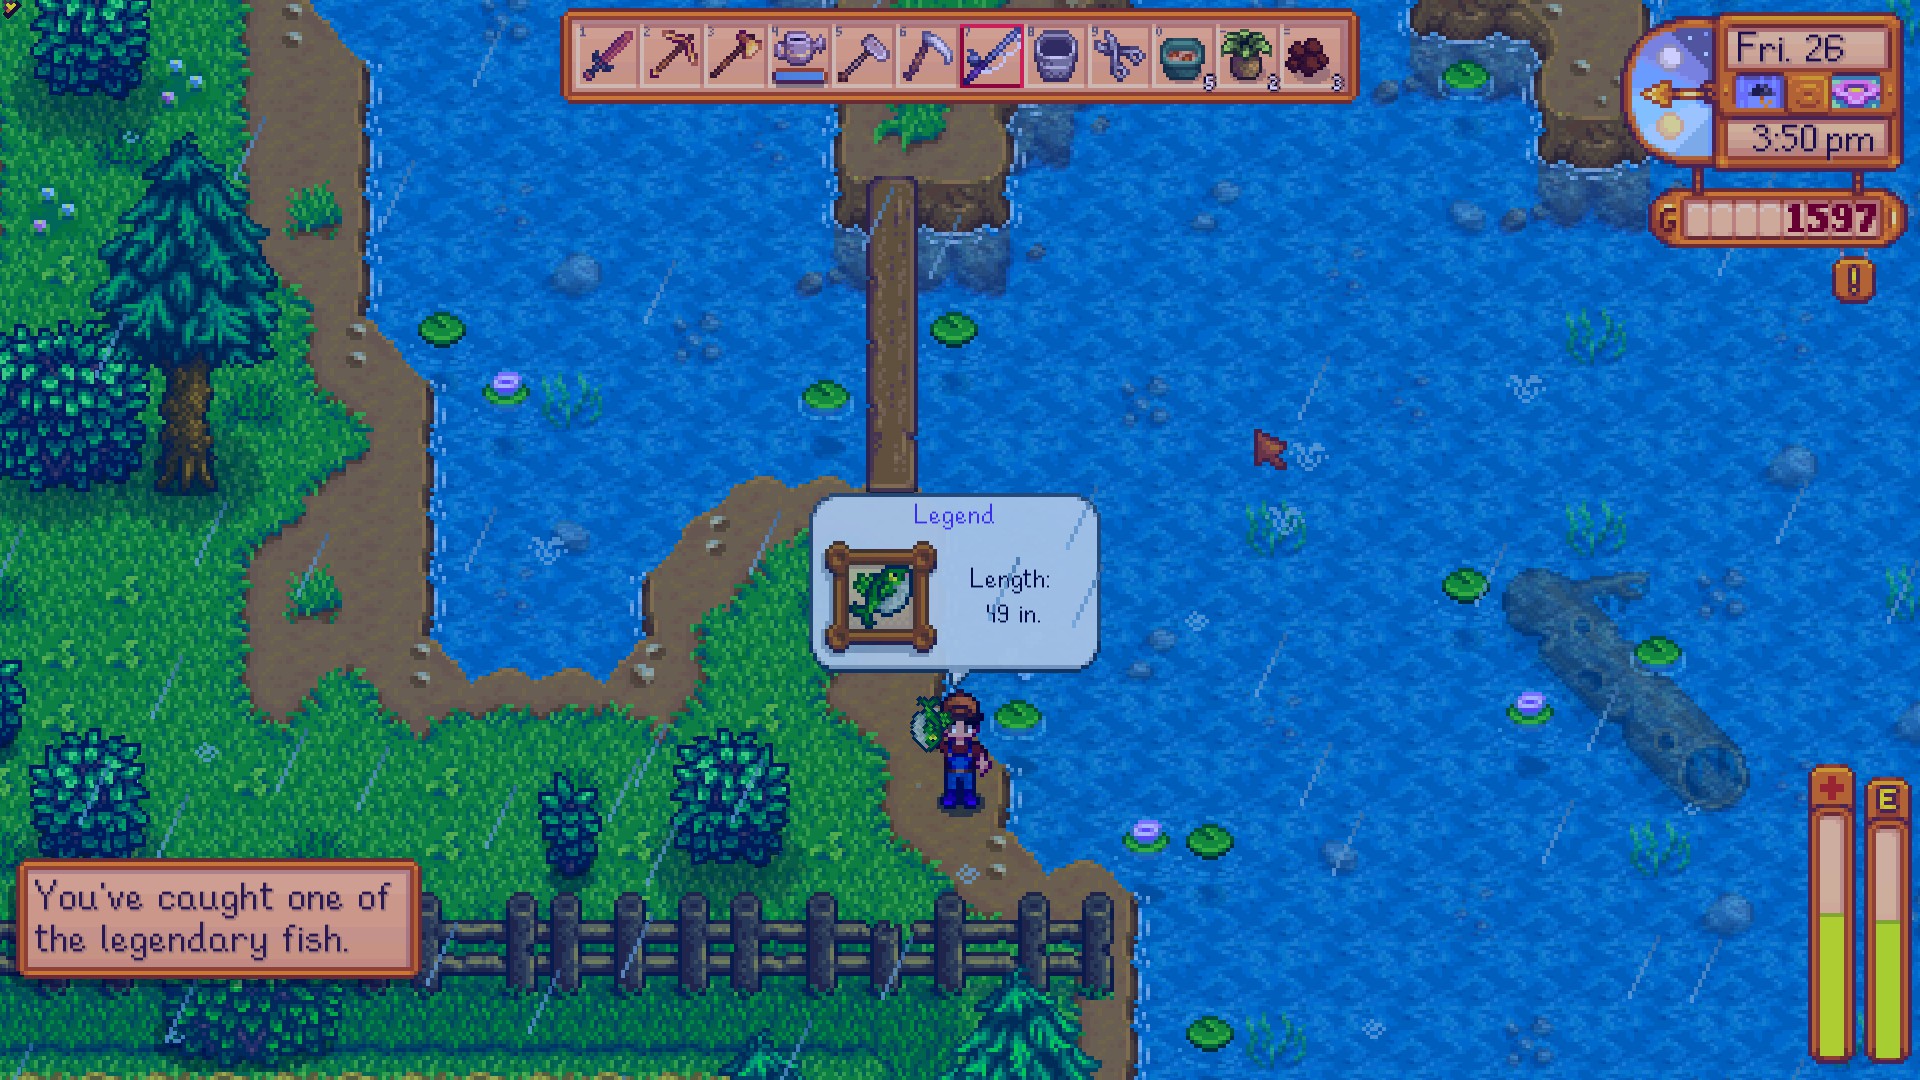
Legend
Summer
Crops
Blueberry
Corn
Hops
Hot Pepper
Melon
Radish
Tomato
Wheat
Starfruit (Oasis)
Red Cabbage (Year 2)
Coffee Bean (Year 2)
Summer Squash
Whenever you fix the bus, you will gain access to the Oasis as well as the shop there. That's how you purchase Starfruit Seeds.
Red Cabbage is a common crop, but only available on Year 2 and after. Sold at both Joja Mart and Pierre's General Store.
Coffee Beans are available in Year 2 from Pierre's and Joja Mart. Also grows in Spring.
Summer Squash can be obtained from the Raccoon Wife, see Good Neighbor quest in 1.6
Flowers
Poppy
Summer Spangle
Sunflower
Fruits
Orange
Peach
Foraging
Spice Berry
Sweet Pea
Fiddlehead Fern
Red Mushroom
Grape
Rainbow Shell
Fishing
Pufferfish
Tuna
Red Mullet
Octopus
Super Cucumber
Tilapia
Halibut
Red Snapper
Dorado
Sunfish
Shad
Pike
Rainbow Trout
Catfish (Secret Woods)
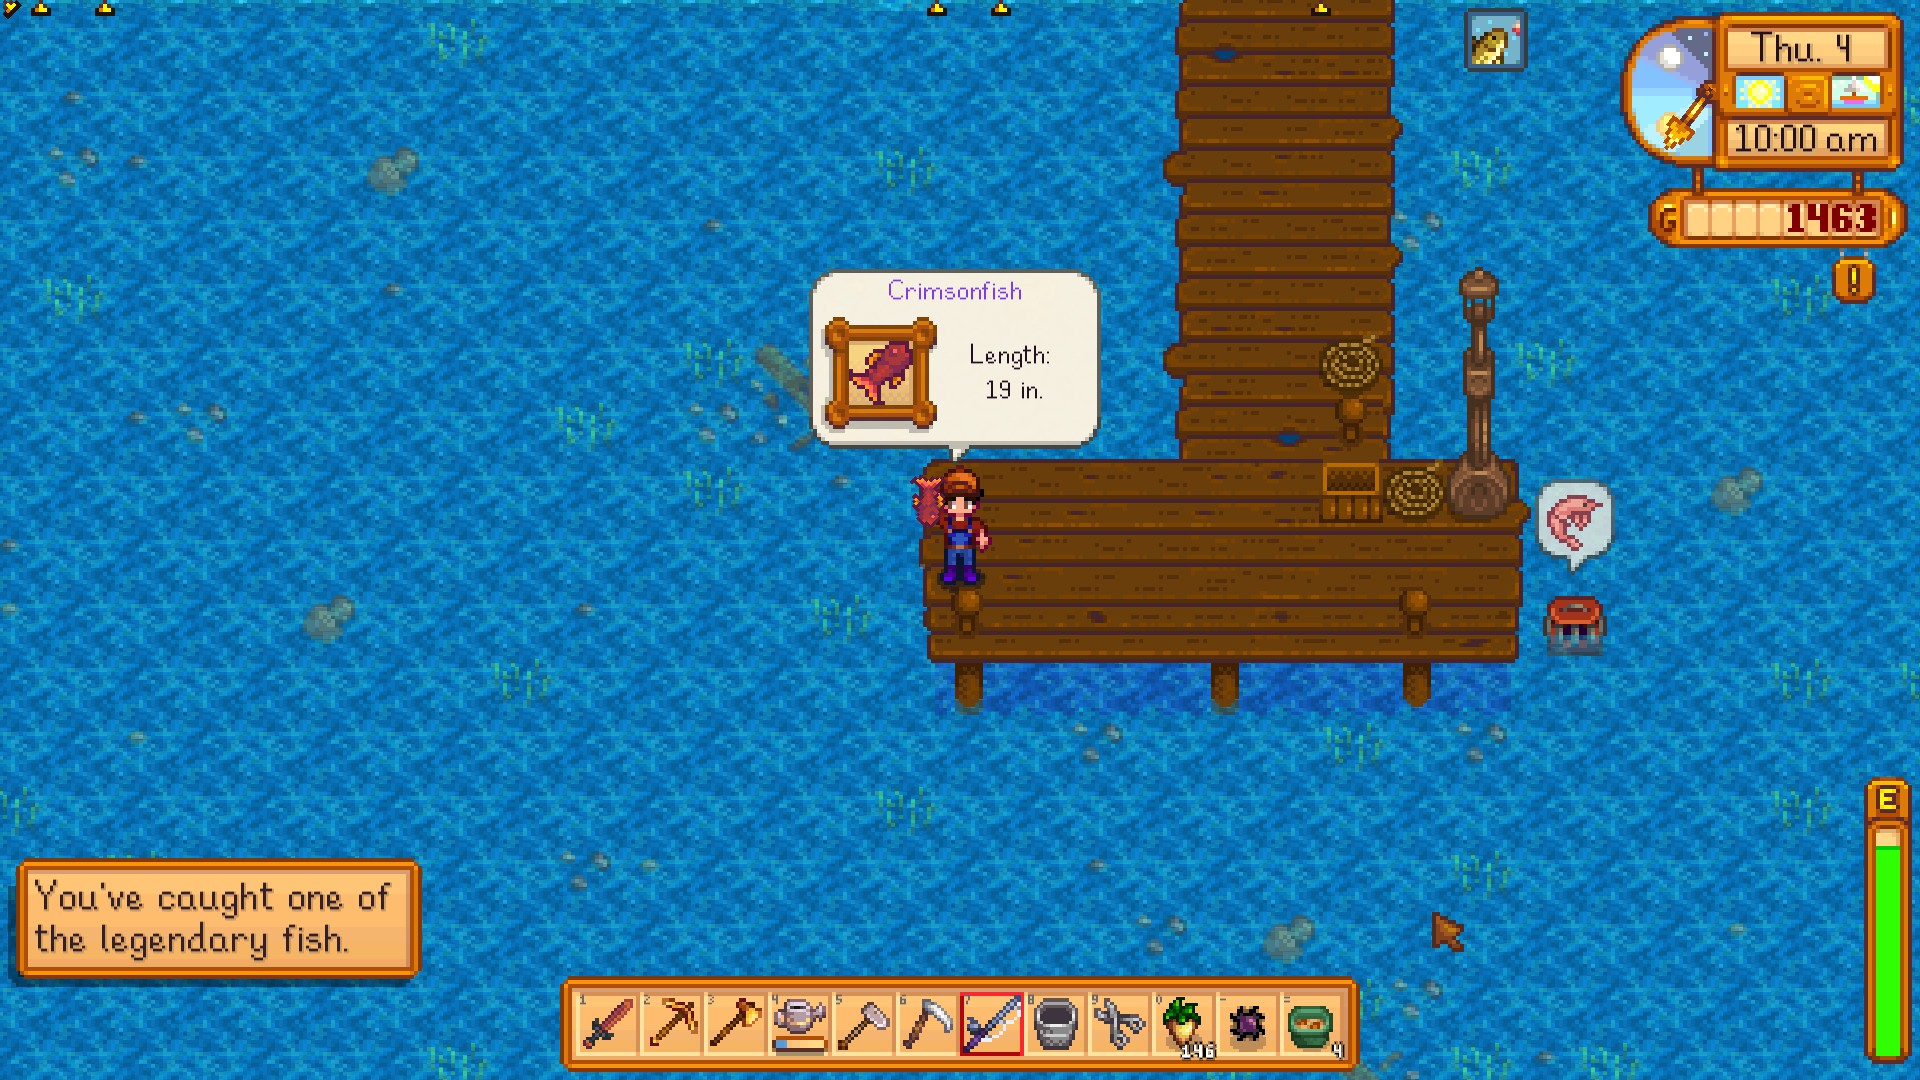
Crimsonfish
Fall
Crops
Amaranth
Bok Choy
Cranberries
Eggplant
Grape
Pumpkin
Yam
Beet (Oasis)
Rare Seed (Traveling Cart)
Artichoke (Year 2)
Broccoli
Whenever you fix the bus, you will gain access to the Oasis as well as the shop there. That's how you purchase Beet Seeds.
Every Friday & Sunday, the Traveling Cart will be located in the area south of your farm, known as Cindersap Forest. It'll be situated just above the lake here. Its inventory is randomized, so it has a chance of selling the Rare Seed for 1000g.
Artichoke is a common crop, but only available on Year 2 and after. Sold at both Joja Mart and Pierre's General Store.
Broccoli can be obtained from the Raccoon Wife, see Good Neighbor quest in 1.6
Flowers
Fairy Rose
Fruits
Apple
Pomegranate
Foraging
Hazelnut
Common Mushroom
Chanterelle
Blackberry
Wild Plum
Fishing
Anchovy
Sardine
Eel
Red Snapper
Sea Cucumber
Tilapia
Albacore
Smallmouth Bass
Salmon
Tiger Trout
Walleye
Catfish
Angler
Winter
Farming
Powdermelon
Powdermelon can be obtained from the Raccoon Wife, see Good Neighbor quest in 1.6
Flowers
N/AFruits
N/AForaging
Winter Root
Snow Yam
Crocus
Holly
Crystal Fruit
Fishing
Tuna
Sardine
Red Mullet
Herring
Squid
Sea Cucumber
Albacore
Halibut
Tiger Trout
Pike
Perch
Lingcod
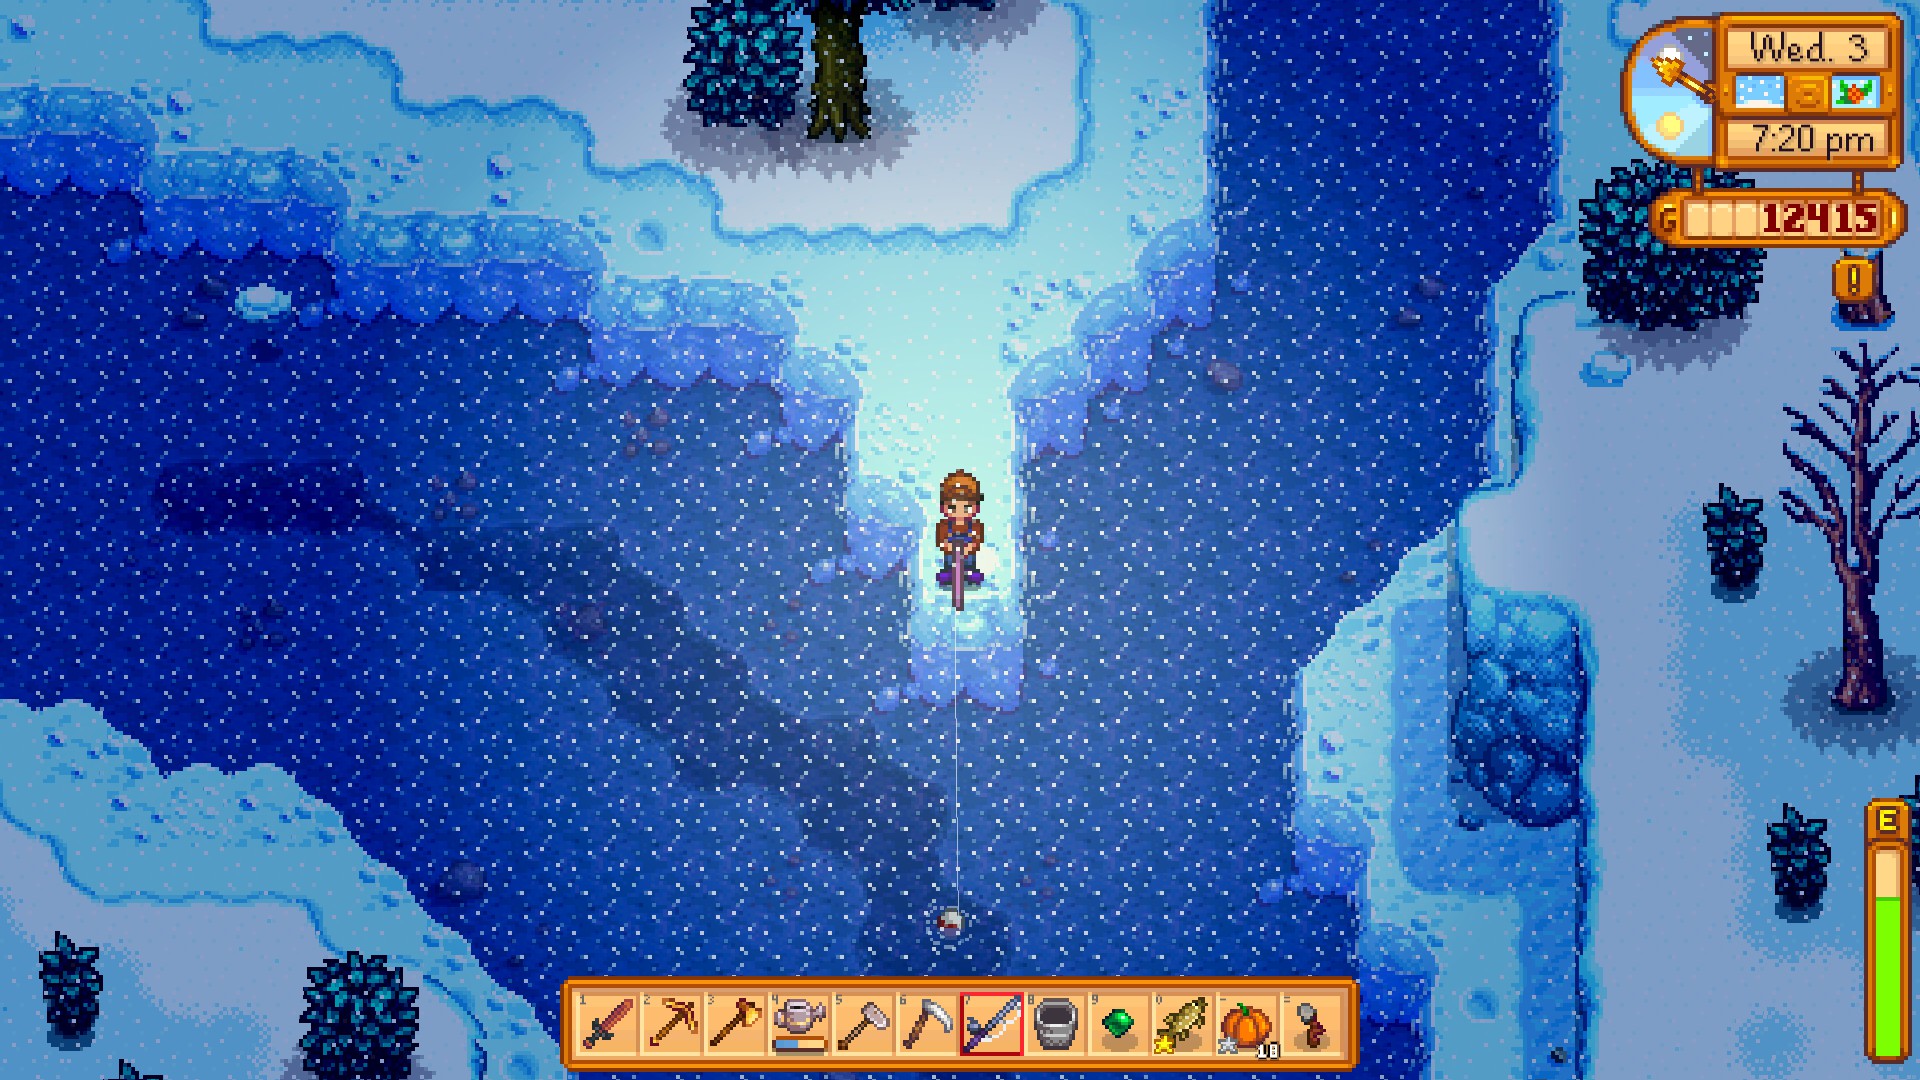
Glacierfish
Magical Construction Questline
This unlocks two new areas that have fishing related to them for the fishing achievement. Other than that, it unlocks new buildings.
Step 1: Complete Joja route or Community Center route.
- You can do either one, but this needs to be done to access this questline. So either you earned the Local Legend achievement, or the Joja Co. Member of the Year achievement.
Step 2: Visit the Railroad area for a Cutscene
- Here you will get a cutscene with the Wizard regarding his Magic Ink. In order to remove the seal to enter, you must have the Dark Talisman.
Step 3: Retrieving the Dark Talisman
- Visit Krobus who resides in the Sewers. In order to access the sewer, you must have turned in enough artifacts to the library.
- Krobus will unlock a new area, Mutant Bug Lair, that contains a chest at the end with the Dark Talisman.
- This new area has waters containing the Slimejack fish.
Step 4: Witch Swamp
- Returning to the Railroad area with the Dark Talisman, you can remove the seal. Enter the cavern and you'll be at the Swamp. Now, you can fish here for the final new fish: Void Salmon
- A goblin will prevent you from passing him. You need a Void Mayonnaise to move him. Void Egg + Mayonnaise Machine.
- Enter the house, the ink on the left table. Return to the Wizard's Tower, the red seal on the ground will teleport you there.
Ginger Island
Access
Upon completion of the third community bundle, visiting Willy's Fish Shop will trigger a cutscene where he reveals that restoring the Community Center will unlock something.After you've restored the Community Center, you'll get a letter from Willy to visit the Fish Shop again. This time, enter the back room to see a cutscene with the boat.
Repair the Boat
- 200 Hardwood
- 5 Iridium Bar
- 5 Battery Pack
Unlocking Qi's Walnut Room
For specifics on how to progress, feel free to use the following links. For achievements, you're going to need to collect 100 of 130 golden walnuts in order to unlock Qi's Walnut Room in order to obtain Qi Gems.https://stardewvalleywiki.com/Ginger_Island
https://stardewvalleywiki.com/Golden_Walnut
Qi's Walnut Room
You'll need to complete tasks on the board in order to obtain Qi Gems. You can also trade extra golden walnuts for these, but at a poor 1:2 ratio. What you're really focused on here are the recipes.Radioactive Material
The request board in Qi's Walnut Room will have two similar quests: - Danger in the Deep for hardmode mines in the Mountains
- Skull Cavern Invasion for hardmode mines in the Skull Caverns
These quests will enable a separate mode for the adventure areas and will also introduce new mining nodes for radioactive ore. These ores do not spawn on floors of multiples of 5.
For the mines, once you've reached Floor 120, there will be a Shrine of Challenge on Floor 120 that you can toggle the dangerous mod.
Perfection Tracker Statue
FYI: There's a statue here that tracks your completion of the game.https://stardewcommunitywiki.com/Perfection
A Big Help - Help Requests
 Gofer
GoferComplete 10 'Help Wanted' requests.
 A Big Help
Complete 40 'Help Wanted' requests.
If you go to Pierre's Shop, there are two things in front of his store.
1) A Calendar showing all birthdays of people you know, and festival dates
2) Help Request
Each help request is only available on that particular day, and the delivery time only spans 2 days. So you get the current day, and the next day to complete the delivery until it disappears.
Complete 40 of these to get the achievement. As far as I know, there are no counters that you can check naturally to figure out your progress.
Tip: For Clint's copper ores, and Willy's fish requests, it requires you to ACQUIRE new items as opposed to 'giving' them the items. So those items must be obtained after accepting their request. Acquire simply means it needs to be newly introduced to your inventory so dropping it and picking it back up is valid.
Complete Collection - Museum | Minerals
 Treasure Trove
Donate 40 different items to the museum.
 A Complete Collection
Complete the museum collection.
Note: There are more slots in the museum than there are artifacts, so do not worry about that.
There are 53 Minerals, and 42 Artifacts in the game to find. Minerals are either found as nodes in the Mines, Skull Cavern, or at the Quarry.
Artifacts can be obtained through using a hoe on the ground specifically on top of worms. The area you're at will determine what you get. Then the rest are item drops via monsters.
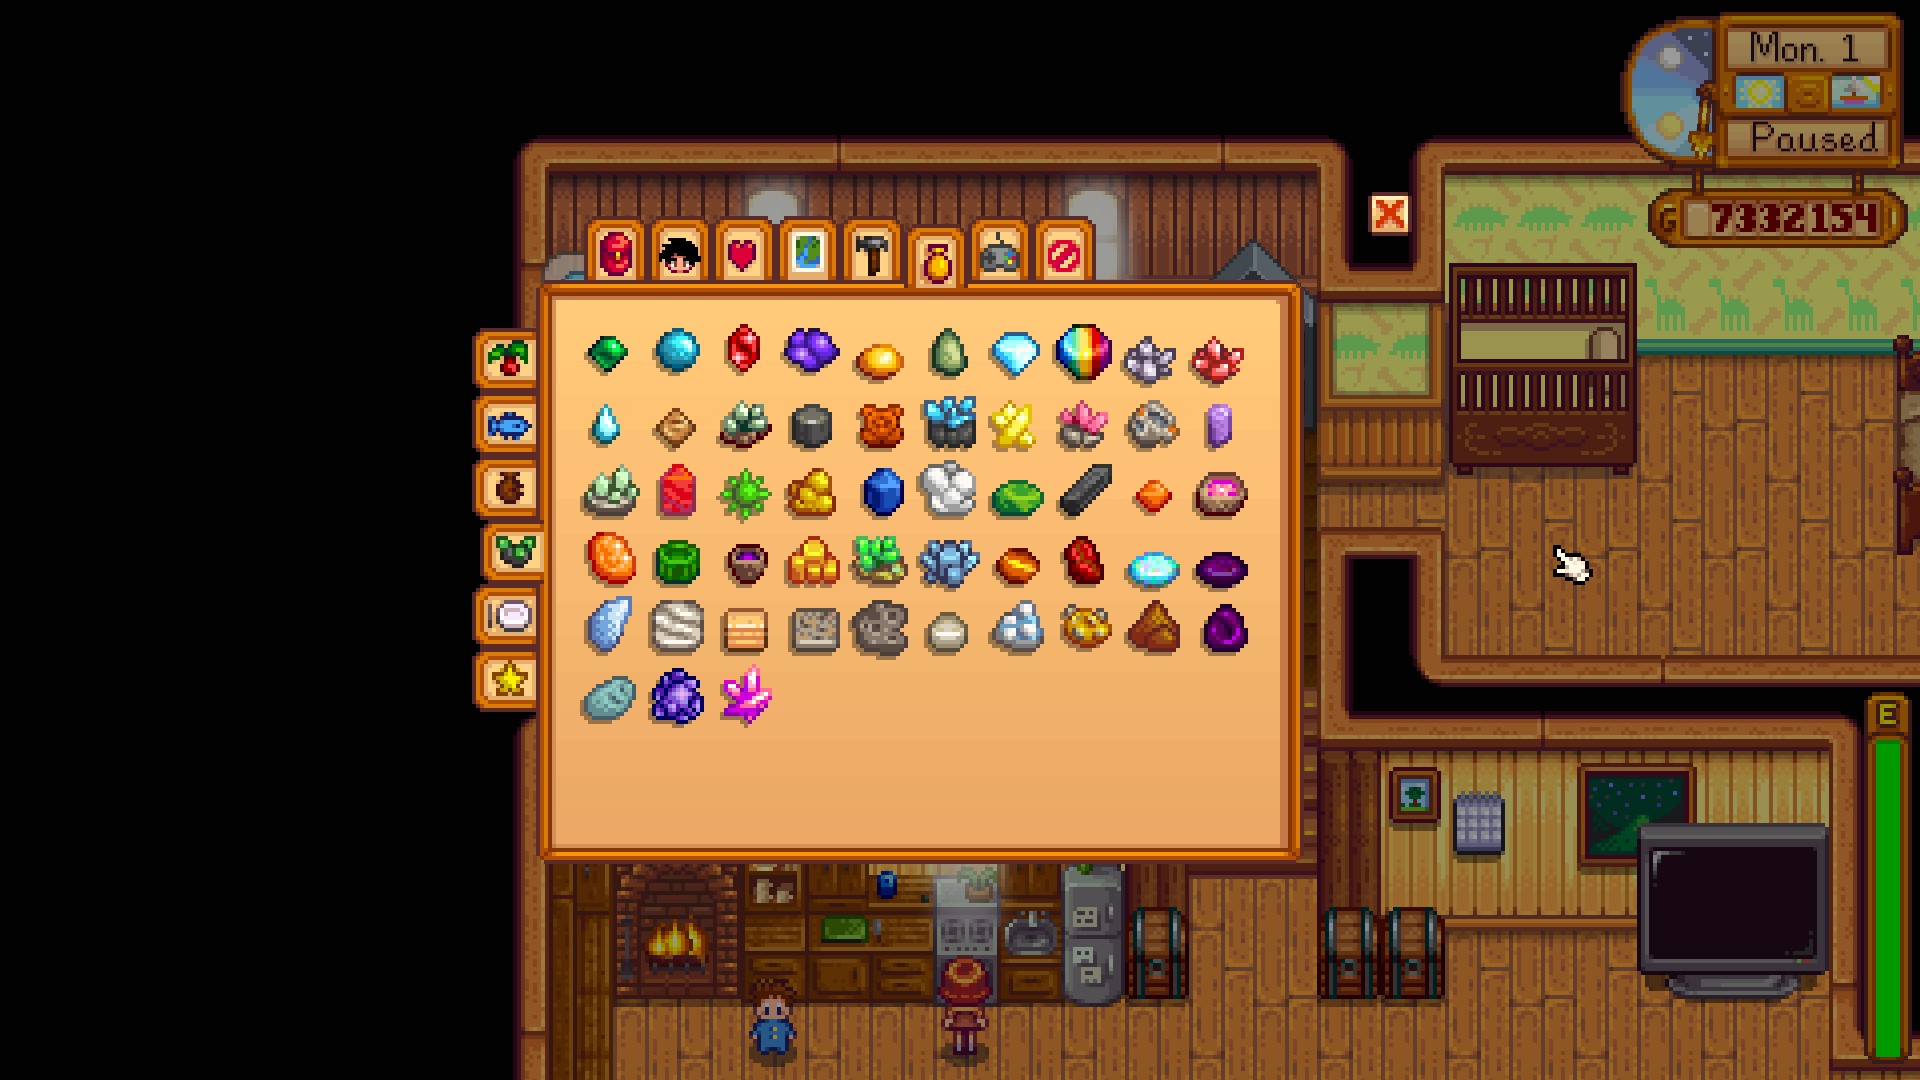
Mineral
Mineral
Location

Emerald
Mines | Panning

Aquamarine
Mines | Panning | Fishing

Ruby
Mines | Panning

Amethyst
Mines | Panning

Topaz
Mines | Panning

Jade
Mines | Panning

Diamond
Mines | Panning

Prismatic Shard
Iridium Node | Mystic Stone | Omni

Quartz
Mines

Fire Quartz
Mines

Frozen Tear
Mines

Earth Crystal
Mines

Alamite
Geode | Omni

Bixite
Magma | Omni

Baryte
Magma | Omni

Aerinite
Frozen | Omni

Calcite
Geode | Omni

Dolomite
Magma | Omni

Esperite
Frozen | Omni

Fluorapatite
Frozen | Omni

Geminite
Frozen | Omni

Helvite
Magma | Omni

Jamborite
Geode | Omni

Jagoite
Geode | Omni

Kyanite
Frozen | Omni

Lunarite
Frozen | Omni

Malachite
Geode | Omni

Neptunite
Magma | Omni

Lemon Stone
Magma | Omni

Nekoite
Geode | Omni

Orpiment
Geode | Omni

Petrified Slime
Geode | Omni

Thunder Egg
Geode | Omni

Pyrite
Frozen | Omni

Ocean Stone
Frozen | Omni

Ghost Crystal
Frozen | Omni

Tigerseye
Magma | Omni

Jasper
Magma | Omni

Opal
Frozen | Omni

Fire Opal
Magma | Omni

Celestine
Geode | Omni

Marble
Frozen | Omni

Sandstone
Geode | Omni

Granite
Geode | Omni

Basalt
Magma | Omni

Limestone
Geode | Omni

Soapstone
Frozen | Omni

Hematite
Frozen | Omni

Mudstone
Geode | Omni

Obsidian
Magma | Omni

Slate
Geode | Omni

Fairy Stone
Frozen | Omni

Star Shards
Magma | Omni
Complete Collection - Museum | Artifacts
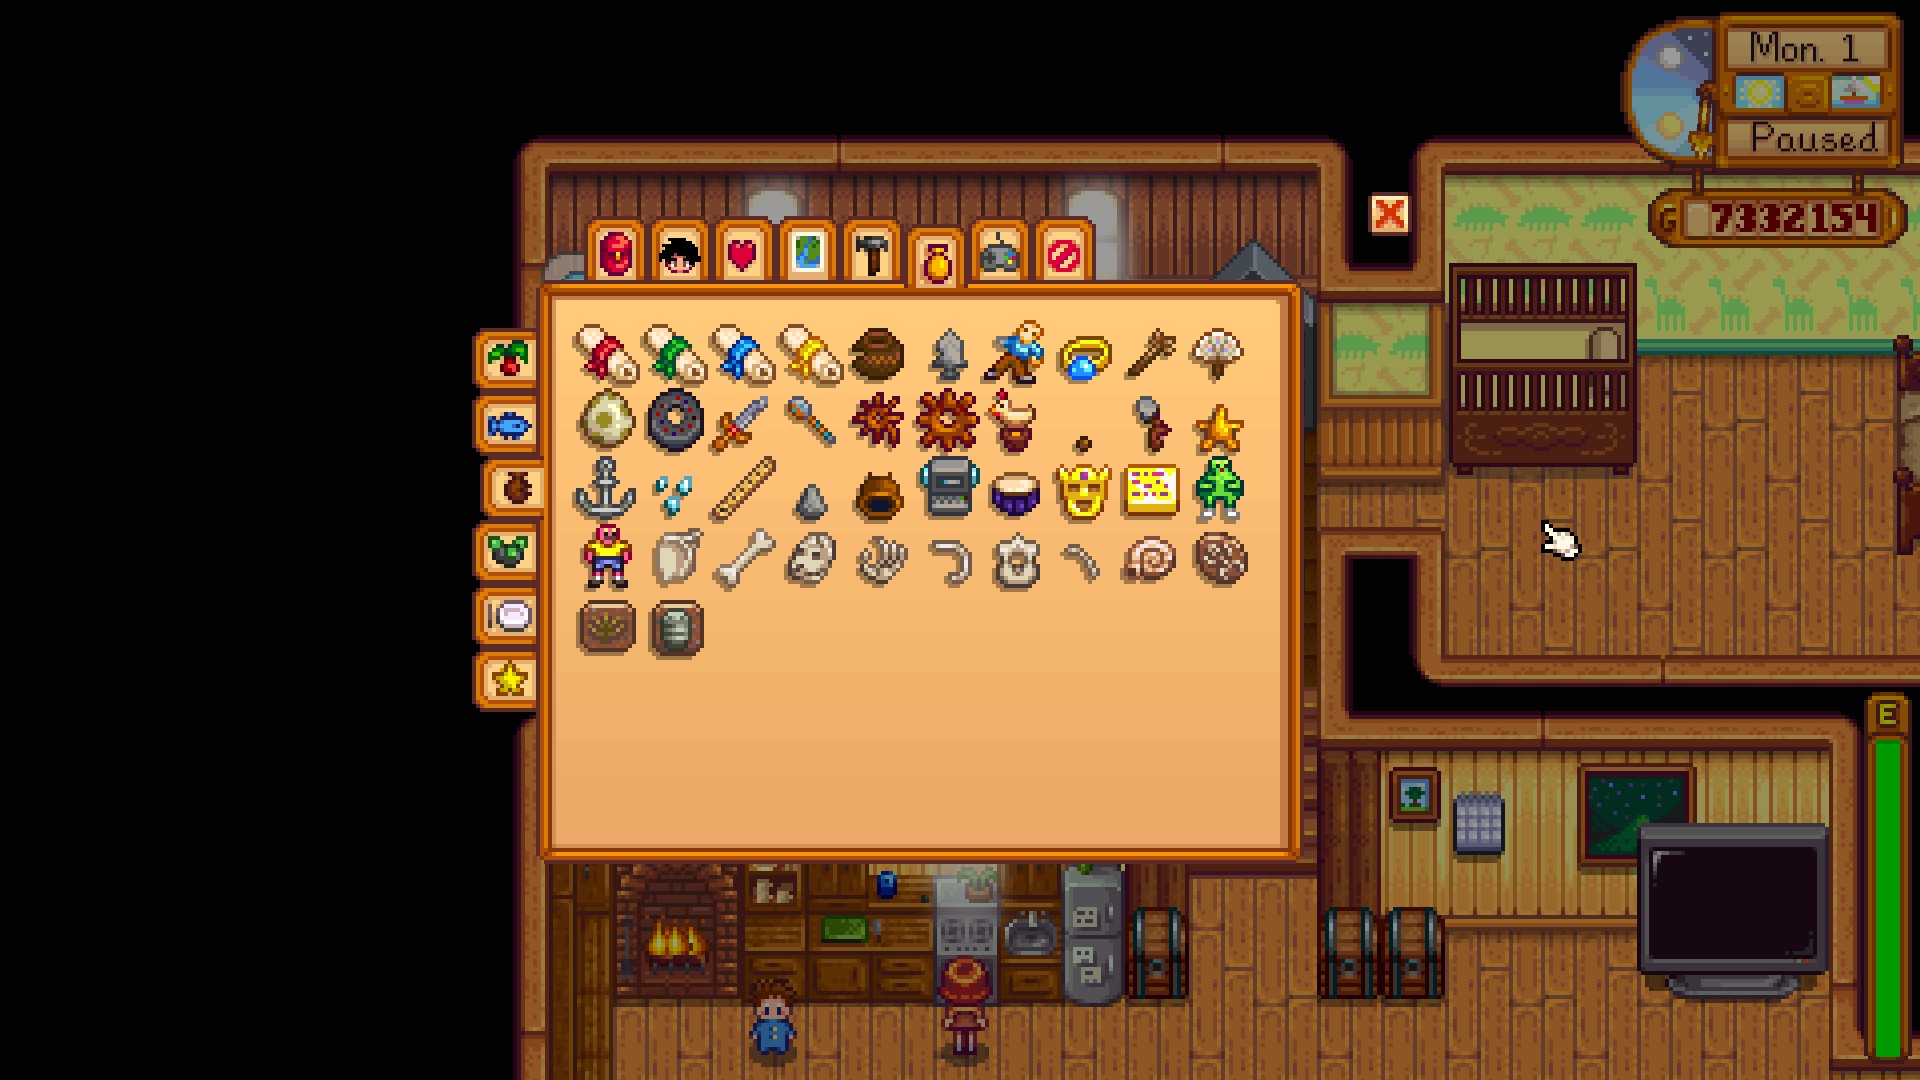
Now, digging for artifacts will most likely result in the most difficult of challenges. This is why in the first section, I highly recommend using the Tracker specialization for Forager. This specialization will throw arrows on the edge of your map that points towards ANYTHING that is forageable. That includes random fruits laying out, or worms on the ground. It's much more efficient to simply clear out all the forageable markers, then move to the next area.
Foraging: Gatherer --> Tracker
Artifact
Location

Dwarf Scroll I
Mines: All Monster Drops

Dwarf Scroll II
Mines: Frost Bats | Dust Sprite | Secret Wood: Blue Slimes

Dwarf Scroll III
Mines: Floor 40+ | Lava Bats | Skull Cavern

Dwarf Scroll IV
Mines: All Monster Drops | Lava Caverns: Dirt

Chipped Amphora
Town

Arrowhead
Mountain | Forest | Bus Stop

Ancient Doll
Mountain | Forest | Bus Stop | Town | Fishing Chest

Elvish Jewelry
Forest | Fishing Chest [River]

Chewing Stick
Mountain | Forest | Town | Fishing Chest

Ornamental Fan
Beach | Forest | Town | Fishing Chest [River]

Dinosaur Egg
Mine | Mountain | Fishing Chest [Ocean/River]

Rare Disc
Mines | Fishing Chest [Ocean/River]

Ancient Sword
Forest | Mountain | Fishing Chest [Ocean/River]

Rusty Spoon
Town | Fishing Chest [River]

Rusty Spur
Farm | Fishing Chest [Ocean/River]

Rusty Cog
Mines: Dirt | Mountain | Fishing Chest [Ocean/River]

Chicken Statue
Farm | Fishing Chest [River]

Ancient Seed
Seed Maker | Forest | Mountain | Fishing Chest [River]

Prehistoric Tool
Bus Stop | Mountain | Forest | Fishing Chest

Dried Starfish
Beach | Fishing Chest [River]

Anchor
Beach | Fishing Chest [Ocean]

Glass Shards
Beach | Fishing Chest [Ocean]

Bone Flute
Mines | Mountian | Forest | Town | Fishing Chest [River]

Prehistoric Handaxe
Mountain | Forest | Bus Stop

Dwarvish Helm
Mines | Omni Geode

Dwarvish Gadget
Mines | Omni Geode

Ancient Drum
Mines | Bus Stop | Forest | Town | Omni Geode

Golden Mask
Desert

Golden Relic
Desert

Strange Doll
Everywhere | Skull Cavern Hoeing

Strange Doll
Everywhere | Skull Cavern Hoeing

Prehistoric Scapula
Town | Forest

Prehistoric Tibia
Forest | Railroad

Prehistoric Skull
Mountain

Skeletal Hand
Beach | Backwoods

Prehistoric Rib
Town

Prehistoric Vertebrae
Bus Stop

Skeletal Tail
Mines | Fishing Chest

Nautilus Fossil
Beach | Fishing Chest [Ocean/River]

Amphibian Fossil
Forest | Mountain | Fishing Chest [Ocean]

Palm Fossil
Forest | Beach | Desert

Trilobite
Forest | Beach | Mountain
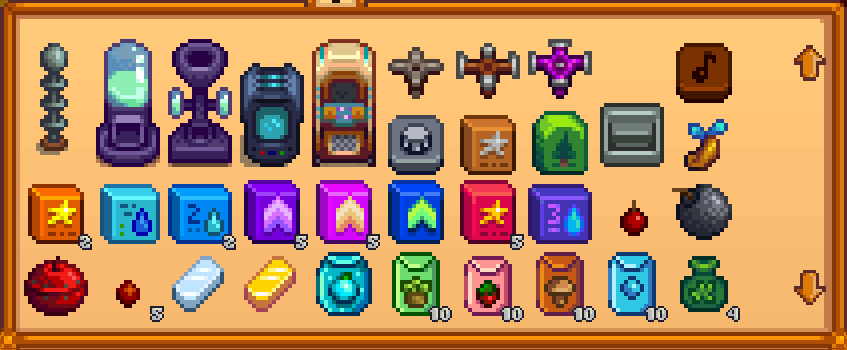
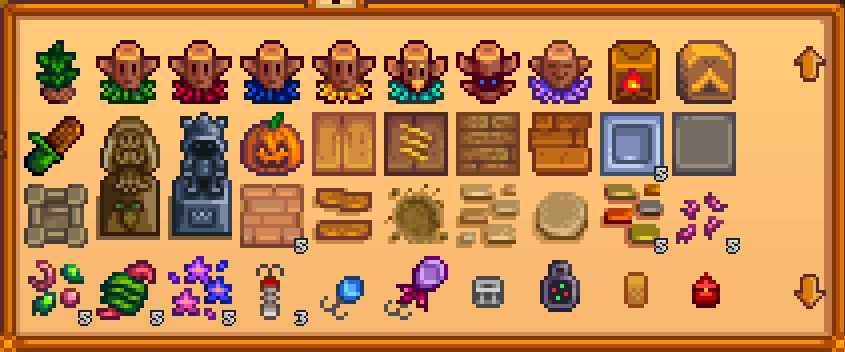
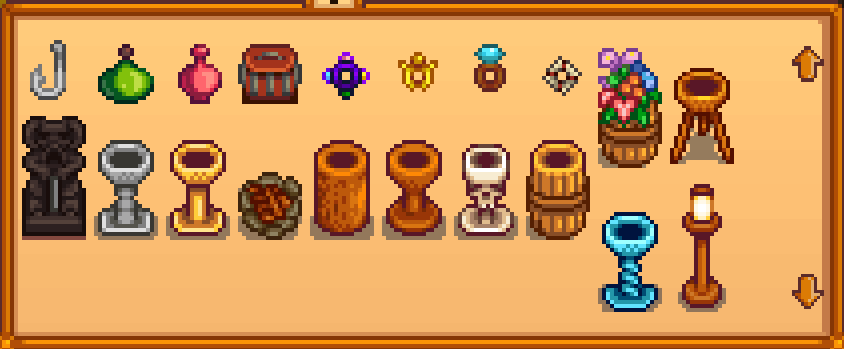
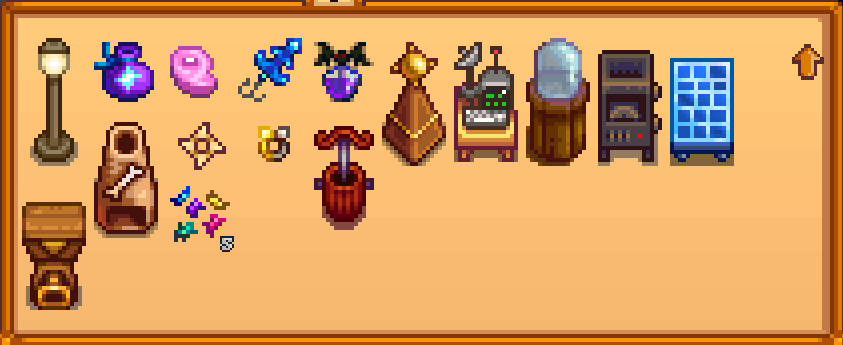
Craft Master - Page 1
 D.I.Y.
Craft 15 different items.
 Artisan
Craft 30 different items.
 Craft Master
Craft every item.
There are currently 148 different items you can craft. Recipes can be purchased, or earned through leveling up your skills.
- There are 2 Festive Recipe: Jack O' Lantern as the Spirit's Eve Festival and the Tub 'O Flower at the Flower Dance Festival.
Item
Ingredients
Recipe

Wood Fence
2x Wood
Default

Stone Fence
2x Stone
Lv 2 Farming

Iron Fence
1x Iron Bar
Lv 4 Farming

Hardwood Fence
1x Hardwood
Lv 6 Farming

Grass Starter
10x Fiber
Pierre's Shop (1,000g)

Blue Grass Starter
25x Fiber, 10x Moss, 1x Mystic Syrup
40 Qi Gems at Qi's Walnut Room

Gate
10x Wood
Default

Chest
50x Wood
Default

Big Chest
120x Wood, 2x Copper Bar
Robin's Shop (5,000g)

Stone Chest
50x Stone
Special Order Board - "Robin's Resource Rush"

Big Stone Chest
250x Stone
Dwarf (5,000g)

Torch
1x Wood, 2x Sap
Default

Scarecrow
50x Wood, 1x Coal, 20x Fiber
Lv 1 Farming

Deluxe Scarecrow*
50x Wood, 40x Fiber, 1x Iridium Ore
Collect all 8 Rare Scarecrows

Bee House
40x Wood, 8x Coal, 1x Iron Bar
Lv 3 Farming

Keg
30x Wood, 1x Clay, 1x Copper Bar, 1x Iron Bar
Lv 8 Farming

Cask
20x Wood, 1x Hardwood
House Cellar Upgrade

Dehydrator
30x Wood, 2x Clay, 1x Fire Quartz
Pierre's (10,000g)

Furnace
20x Copper Ore, 25x Stone
Clint post-mine entrance

Heavy Furnace
2x Furnace, 3x Iron Bar, 50x Stone
Mining Mastery

Anvil
50x Iron Bar
Combat Mastery
Craft Master - Part 2
Item
Ingredients
Recipe

Mini-Forge
5x Dragon Tooth, 10x Iron Bar, 10x Gold Bar, 5x Iridium Bar
Combat Mastery

Garden Pot
1x Clay, 10x Stone, 1x Refined Quartz
Evelyn cutscene after building Greenhouse

Wood Sign
25x Wood
None

Stone Sign
25x Stone
None

Dark Sign
5x Bat Wing, 5x Bone Fragment
Krobus Mail after 3+ Heart

Text Sign
25x Wood
N/A

Cheese Press
45x Wood, 45x Stone, 10x Hardwood, 1x Copper Bar
Lv 6 Farming

Mayonnaise Machine
15x Wood, 15x Stone, 1x Earth Crystal, 1x Copper Bar
Lv 2 Farming

Seed Maker
25x Wood, 10x Coal, 1x Gold Bar
Lv 9 Farming

Loom
60x Wood, 30x Fiber, 1x Pine Tar
Lv 7 Farming

Oil Maker
50x Slime, 20x Hardwood, 1x Gold Bar
Lv 8 Farming

Recycling Machine
25x Wood, 25x Stone, 1x Iron Bar
Lv 4 Fishing

Worm Bin
25x Hardwood, 1x Gold Bar, 1x Iron Bar, 50x Fiber
Lv 8 Fishing

Deluxe Worm Bin
1x Worm Bin, 30x Moss
Fishing 8

Bait Maker
3x Iron Bar, 3x Coral, 1x Sea Urchin
Fishing 6

Fish Smoker
10x Hardwood, 1x Sea Jelly, 1x River Jelly, 1x Cave Jelly
Fish Shop (10,000g)

Preserves Jar
50x Wood, 40x Stone, 8x Coal
Lv 4 Farming

Charcoal Kiln
20x Wood, 2x Copper Bar
Lv 4 Foraging

Tapper
40x Wood, 2x Copper Bar
Lv 3 Foraging

Mushroom Log
10x Hardwood, 10x Moss
Foraging 4
Craft Master - Part 3
Item
Ingredients
Recipe

Lightning Rod
1x Iron Bar, 1x Refined Quartz, 5x Bat Wing
Lv 6 Foraging

Slime Incubator
2x Iridium Bar, 100x Slime
Lv 8 Combat

Slime Egg-Press
25x Coal, 1x Fire Quartz, 1x Battery Pack
Lv 6 Combat

Crystalarium
99x Stone, 5x Gold Bar, 2x Iridium Bar, 1x Battery Pack
Lv 9 Mining

Mini-Jukebox
2x Iron Bar, 1x Battery Pack
Gus [5]

Sprinkler
1x Copper Bar, 1x Iron Bar
Lv 3 Farming

Quality Sprinkler
1x Iron Bar, 1x Gold Bar, 1x Refined Quartz
Lv 6 Farming

Iridium Sprinkler
1x Gold Bar, 1x Iridium Bar, 1x Battery Pack
Lv 9 Farming

Flute Block
10x Wood, 2x Copper Ore, 20x Fiber
Robin 6-Heart Event

Drum Block
10x Stone, 2x Copper Ore, 20x Fiber
Robin 6-heart Event

Basic Fertilizer
2x Sap
Lv 1 Farming

Tree Fertilizer
5x Fiber, 5x Stone
Lv 7 Foraging

Staircase
99x Stone
Lv 2 Mining

Mystic Tree Seed
5x Acorn, 5x Maple Seed, 5x Pine Cone, 5x Mahogany Seed
Foraging Mastery

Quality Fertilizer
2x Sap, 1x Fish
Lv 9 Farming

Basic Retaining Soil
2x Stone
Lv 4 Farming

Quality Retaining Soil
3x Stone, 1x Clay
Lv 7 Farming

Speed-Gro
1x Pine Tar, 1x Clam
Lv 3 Farming

Deluxe Speed-Gro
1x Oak Resin, 1x Coral
Lv 8 Farming

Hyper Speed-Gro
1x Radioactive Ore, 3x Bone Fragment, 1x Solar Essence
Qi's Walnut Room - 30 Qi Gems

Deluxe Fertilizer
1x Iridium Bar, 40x Sap
Qi's Walnut Room - 30 Qi Gems

Deluxe Retaining Soil
5x Stone, 3x Fiber, 1x Clay
Ginger Island Trader - 50x Cinder Shard

Cherry Bomb
4x Copper Ore, 1x Coal
Lv 1 Mining

Bomb
4x Iron Ore, 1x Coal
Lv 6 Mining

Mega Bomb
4x Gold Ore, 1x Solar Essence, 1x Void Essence
Lv 8 Mining

Explosive Ammo
1x Iron Bar, 2x Coal
Lv 8 Combat

Transmute (Fe)
3x Copper Bar
Lv 4 Mining

Transmute (Au)
2x Iron Bar
Lv 7 Mining

Ancient Seeds
1x Ancient Seed (Artifact)
Donate Ancient Seed to Museum

Wild Seeds (Sp)
1x Wild Horseradish, 1x Daffodil, 1x Leek, 1x Dandelion
Lv 1 Foraging

Wild Seeds (Su)
1x Spice Berry, 1x Grape, 1x Sweet Pea
Lv 4 Foraging

Wild Seeds (Fa)
1x Common Mushroom, 1x Wild Plum, 1x Hazelnut, 1x Blackberry
Lv 6 Foraging

Wild Seeds (Wi)
1x Winter Root, 1x Crystal Fruit, 1x Snow Yam, 1x Crocus
Lv 7 Foraging

Fiber Seeds
1x Mixed Seeds, 5x Sap, 1x Clay
Special Request Board
- "Community Cleanup" for Linus
- "Community Cleanup" for Linus
Craft Master - Part 4
Item
Ingredients
Recipe
Tea Sapling
2x WIld Seeds, 5x Fiber, 5x Wood
Caroline [2]

"Warp Totem: Farm"
1x Hardwood, 1x Honey, 20x Fiber
Lv 8 Foraging

"Warp Totem: Mountain"
1x Hardwood, 1x Iron Bar, 25x Stone
Lv 7 Foraging

"Warp Totem: Beach"
1x Hardwood, 2x Coral, 10x Fiber
Lv 6 Foraging
Warp Totem: Desert
2x Hardwood, 1x Coconut, 4x Iridium Ore
Buy from Oasis (10x Iridium Bar)

Warp Totem: Island
3x Hardwood, 1x Dragon Tooth, 1x Ginger
Volcano Dwarf [10000g]

Rain Totem
1x Hardwood, 1x Truffle Oil, 1x Pine Tar
Lv 9 Foraging

Treasure Totem
5x Hardwood, 1x Mystic Syrup, 10x Moss
Foraging Mastery

Cookout Kit
15x Wood, 10x Fiber, 3x Coal
Foraging Level 9

Tent Kit
10x Hardwood, 25x Fiber, 1x Cloth
Foraging 8

Field Snack
1x Acorn, 1x Maple Seed, 1x Pine cone
Lv 1 Foraging

Statue Of Blessings
999x Sap, 999x Fiber, 999x Stone, 333x Moss
Farming Mastery

Statue Of The Dwarf King
20x Iridium Bar
Mining Mastery

Jack-O-Lantern
1x Pumpkin, 1x Torch
Purchase during Spirit's Eve Festival [750g]

Wood Floor
1x Wood
Purchase from Robin [500g]

Straw Floor
1x Wood, 1x Fiber
Purchase from Robin [1000g]

Weathered Floor
1x Wood
Purchase from Dwarf [500g]

Rustic Plank Floor
1x Wood
Carpenter's Shop - 200g

Crystal Floor
1x Refined Quartz
Purchase from Krobus [600g]

Stone Floor
1x Stone
Purchase from Robin [500g]

Stone Walkway Floor
1x Stone
Carpenter's Shop - 200g

Brick Floor
2x Clay, 5x Stone
Carpenter's Shop [200g]

Wood Path
1x Wood
Default

Gravel Path
1x Stone
Default

Cobblestone Path
1x Stone
Default

Stepping Stone Path
1x Stone
Purchase from Robin [500g]

Crystal Path
1x Refined Quartz
Purchase from Robin [1000g]

Bait
1x Bug Meat
Lv 2 Fishing

Deluxe Bait
5x Bait, 2x Moss
Fishing 4

Wild Bait
10x Fiber, 5x Bug Meat, 5x Slime
Linus Friendship Event

Challenge Bait
2x Moss, 5x Bone Fragment
Fishing Mastery

Magnet
1x Iron Bar
Lv 9 Fishing

Spinner
2x Iron Bar
Lv 6 Fishing

Dressed Spinner
2x Iron Bar, 1x Cloth
Lv 8 Fishing

Trap Bobber
1x Copper Bar, 10x Sap
Lv 6 Fishing

Sonar Bobber
1x Iron Bar, 2x Refined Quartz
Lv 6 Fishing

Cork Bobber
10x Wood, 5x Hardwood, 10x Slime
Lv 7 Fishing

Treasure Hunter
2x Gold Bar
Lv 7 Fishing
Craft Master - Part 5
Wedding Ring is only required in MP games.
Item
Ingredients
Recipe

Barbed Hook
1x Copper Bar, 1x Iron Bar, 1x Gold Bar
Lv 8 Fishing

Oil of Garlic
10x Garlic, 1x Oil
Lv 6 Combat

Life Elixir
1x Red Mushroom, 1x Purple Mushroom, 1x Morel, 1x Chanterelle
Lv 2 Combat

Crab Pot
40x Wood, 3x Iron Bar
Lv 3 Fishing

Iridium Band
5x Iridium Bar, 50x Solar Essence, 50x Void Essence
Lv 9 Combat

Ring of Yoba
5x Gold Bar, 5x Iron Bar, 1x Diamond
Lv 7 Combat

Wedding Ring
5x Iridium Bar, 1x Prismatic Shard
Traveling Cart - 500g

Sturdy Ring
2x Copper Bar, 25x Bug Meat, 25x Slime
Lv 1 Combat

Warrior Ring
10x Iron Bar, 25x Coal, 10x Frozen Tear
Lv 4 Combat

Tub 'O Flower
15x Wood, 1x Tulip Bulb Seed, 1x Jazz Seed, 1x Poppy Seed, 1x Spangle Seed
Purchase at Flower Dance Festival [2000g]

Wooden Brazier
10x Wood, 1x Coal, 5x Fiber
Purchase from Robin [250g]

Wicked Statue
25x Stone, 5x Coal
Purchase from Krobus [1000g]

Stone Brazier
10x Stone, 1x Coal, 5x Fiber
Purchase from Robin [400g]

Gold Brazier
1x Gold Bar, 1x Coal, 5x Fiber
Purchase from Robin [1000g]

Campfire
10x Stone, 10x Wood, 10x Fiber
Default

Stump Brazier
5x Hardwood, 1x Coal
Purchase from Robin [800g]

Carved Brazier
10x Hardwood, 1x Coal
Purchase from Robin [2000g]

Skull Brazier
10x Hardwood, 1x Solar Essence, 1x Coal
Purchase from Robin [3000g]

Barrel Brazier
50x Wood, 1x Solar Essence, 1x Coal
Purchase from Robin [800g]

Marble Brazier
1x Marble, 1x Aquamarine, 100x Stone
Purchase from Robin [5000g]

Wood Lamp-post
50x Wood, 1x Battery Pack
Purchase from Robin [500g]
Craft Master - Part 6
Item
Ingredients
Recipe

Iron Lamp-post
1x Iron Bar, 1x Battery Pack
Purchase from Robin [1000g]

Fairy Dust
1x Diamond, 1x Fairy Rose
Ginger Island - The Pirate's Wife quest

Bug Steak
10x Bug Meat
Combat Level 1

Quality Bobber
1x Copper Bar, 20x Sap, 5x Solar Essence
Special Request Board - "Juicy Bugs Wanted" for Willy

Monster Musk
30x Slime, 30x Bat Wing
Special Order Board - "Prismatic Jelly" for Wizard

Mini-Obelisk
30x Hardwood, 20x Solar Essence, 3x Gold Bar
Special Order Board - "A Curious Substance" for Wizard

Farm Computer
1x Dwarf Gadget, 1x Battery Pack, 10x Refined Quartz
Special Order Board - "Biome Balance" for Demetrius

Ostrich Incubator
50x Bone Fragment, 50x Hardwood, 20x Cinder Shard
Complete all collections and surveys at Island Field Office

Geode Crusher
2x Gold Bar, 50x Stone, 1x Diamond
Special Order Board - "Cave Patrol" for Clint

Solar Panel
10x Refined Quartz, 5x Iron Bar, 5x Gold Bar
Special Order Board - "Island Ingredients" for Caroline

Bone Mill
10x Bone Fragment, 3x Clay, 20x Stone
Special Order Board - "Fragments of the past" for Gunther

Thorns Ring
50x Bone Fragment, 50x Stone, 1x Gold Bar
Combat Level 7

Glowstone Ring
5x Solar Essence, 5x Iron Bar
Mining Level 4

Heavy Tapper
30x Hardwood, 1x Radioactive Bar
Qi's Walnut Room - 20 Qi Gems

Hopper
10x Hardwood, 1x Iridium Bar, 1x Radioactive Bar
Qi's Walnut Room - 50 Qi Gems

Magic Bait
1x Radioactive Ore, 3x Bug Meat
Qi's Walnut Room - 20 Qi Gems
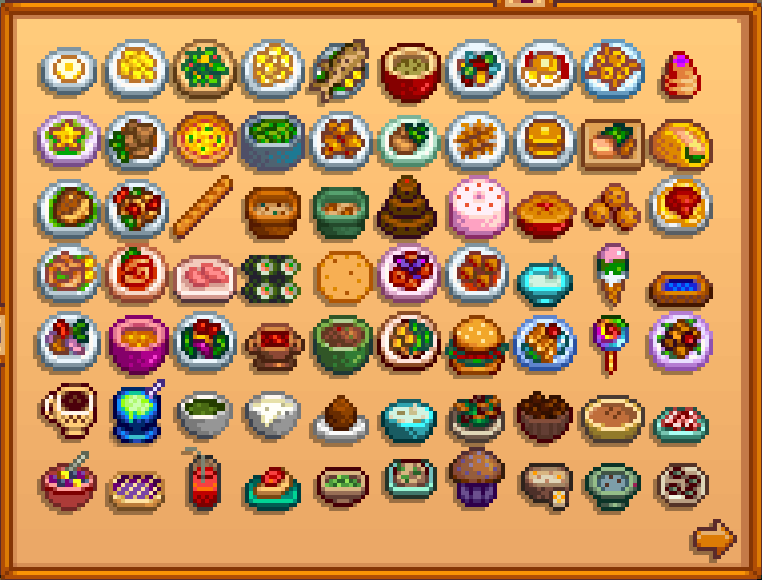
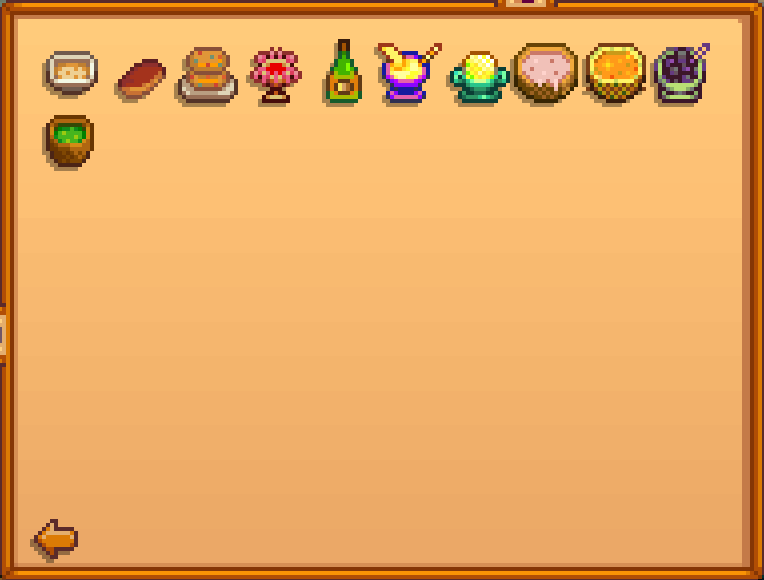
Gourmet Chef - Part 1
If you check the cooking tab, there are two more listed after the Crab Cakes which are actually craft items with a cooking label: Oil of Garlic and Life Elixir. These are not required for the Gourmet Chef achievement, and can't be revealed.
You are allowed to cook regardless of having the recipe, but this achievement REQUIRES it.
1. Every Wednesday and Sunday, a cooking show called 'The Queen of Sauces' comes on and you can learn 1 of 32 recipes. On Wednesdays, you will get a random re-run of something that has already been aired. On Sunday, you will get a SPECIFIC recipe depending on the day and year.
2. For the majority of the rest, you can get them by increasing your relationship with specific villagers. Most of the requirements are either 3 or 7 hearts to unlock the recipe via mail. The number next to the name will designate how many hearts you need.
3. Finally, the Stardrop Saloon, Gus' store, sells a few recipes.
 Cook
Cook
Cook 10 different recipes.
 Sous Chef
Cook 24 different recipes.
 Gourmet Chef
Cook every recipe.
Hot Fix: If you are missing Evelyn's Cookie Recipe, then read the following so you can re-see Evelyn's cutscene and relearn the recipe
Navigate to your save files at: %appdata%/Roaming/StardewValley/Saves/<your_save> then open both files in here. One has the same name as your folder, the other is named SaveGameInfo. Open these using a text editor, notepad works. Now search for 'eventsSeen' using CTRL+F and then go to the right until you find '<int>19</int>'. Delete this in both saves, save and reboot the game.


You are allowed to cook regardless of having the recipe, but this achievement REQUIRES it.
1. Every Wednesday and Sunday, a cooking show called 'The Queen of Sauces' comes on and you can learn 1 of 32 recipes. On Wednesdays, you will get a random re-run of something that has already been aired. On Sunday, you will get a SPECIFIC recipe depending on the day and year.
2. For the majority of the rest, you can get them by increasing your relationship with specific villagers. Most of the requirements are either 3 or 7 hearts to unlock the recipe via mail. The number next to the name will designate how many hearts you need.
3. Finally, the Stardrop Saloon, Gus' store, sells a few recipes.
CookCook 10 different recipes.
Sous ChefCook 24 different recipes.
Gourmet ChefCook every recipe.
Hot Fix: If you are missing Evelyn's Cookie Recipe, then read the following so you can re-see Evelyn's cutscene and relearn the recipe
Navigate to your save files at: %appdata%/Roaming/StardewValley/Saves/<your_save> then open both files in here. One has the same name as your folder, the other is named SaveGameInfo. Open these using a text editor, notepad works. Now search for 'eventsSeen' using CTRL+F and then go to the right until you find '<int>19</int>'. Delete this in both saves, save and reboot the game.
Name
Image
Ingredients
Recipe Source
Fried Egg
1x Egg
Default
Omelet
1x Egg, 1x Milk
The Stardrop Saloon | The Queen of Sauces [Odd Year: Spring 28]
Salad
1x Leek, 1x Dandelion, 1x Vinegar
Emily [3]
Cheese Cauliflower
1x Cauliflower, 1x Cheese
Pam [3]
Baked Fish
1x Sunfish, 1x Bream, 1x Wheat Flour
The Queen of Sauces [Odd Year: Summer 7]
Parsnip Soup
1x Parsnip, 1x Milk, 1x Vinegar
Caroline [3]
Vegetable Stew
1x Tomato, 1x Beet
Caroline [7]
Complete Breakfast
1x Fried Egg, 1x Milk, 1x Hashbrowns, 1x Pancakes
The Queen of Sauces [Even Year: Spring 21]
Fried Calamari
1x Squid, 1x Wheat Flour, 1x Oil
Jodi [3]
Strange Bun
1x Wheat Flour, 1x Periwinkle, 1x Void Mayonnaise
Shane [7]
Lucky Lunch
1x Sea Cucumber, 1x Tortilla, 1x Blue Jazz
The Queen of Sauces [Even Year: Spring 28]
Fried Mushroom
1x Common Mushroom, 1x Morel, 1x Oil
Demetrius [3]
Pizza
1x Wheat Flour, 1x Tomato, 1x Cheese
The Stardrop Saloon | The Queen of Sauces [Even Year: Spring 7]
Bean Hotpot
2x Green Bean
Clint [7]
Glazed Yams
1x Yam, 1x Sugar
The Queen of Sauces [Odd Year: Fall 21]
Carp Surprise
4x Carp
The Queen of Sauces [Even Year: Summer 7]
Hashbrowns
1x Potato, 1x Oil
The Stardrop Saloon | The Queen of Sauces [Even Year: Spring 14]
Pancakes
1x Wheat Flour, 1x Egg
The Stardrop Saloon | The Queen of Sauces [Odd Year: Summer 14]
Salmon Dinner
1x Salmon, 1x Amaranth, 1x Kale
Gus [3]
Fish Taco
1x Tuna, 1x Tortilla, 1x Red Cabbage, 1x Mayonnaise
Linus [7]
Crispy Bass
1x Largemouth Bass, 1x Wheat Flour, 1x Oil
Kent [3]
Pepper Poppers
1x Hot Pepper, 1x Cheese
Shane [3]
Bread
1x Wheat Flour
The Stardrop Saloon | The Queen of Sauces [Odd Year: Summer 28]
Tom Kha Soup
1x Coconut, 1x Shrimp, 1x Common Mushroom
Sandy [7]
Trout Soup
1x Rainbow Trout, 1x Green Algae
The Queen of Sauces [Odd Year: Fall 14]
Chocolate Cake
1x Wheat Flour, 1x Sugar, 1x Egg
The Queen of Sauces [Odd Year: Winter 14]
Pink Cake
1x Melon, 1x Wheat Flour, 1x Sugar, 1x Egg
The Queen of Sauces [Even Year: Summer 21]
Rhubarb Pie
1x Rhubarb, 1x Wheat Flour, 1x Sugar
Marnie [7]
Cookie
1x Wheat Flour, 1x Sugar, 1x Egg
Evelyn's 4 Heart Event* | Compliment her cookies
Spaghetti
1x Wheat Flour, 1x Tomato
Lewis [3]
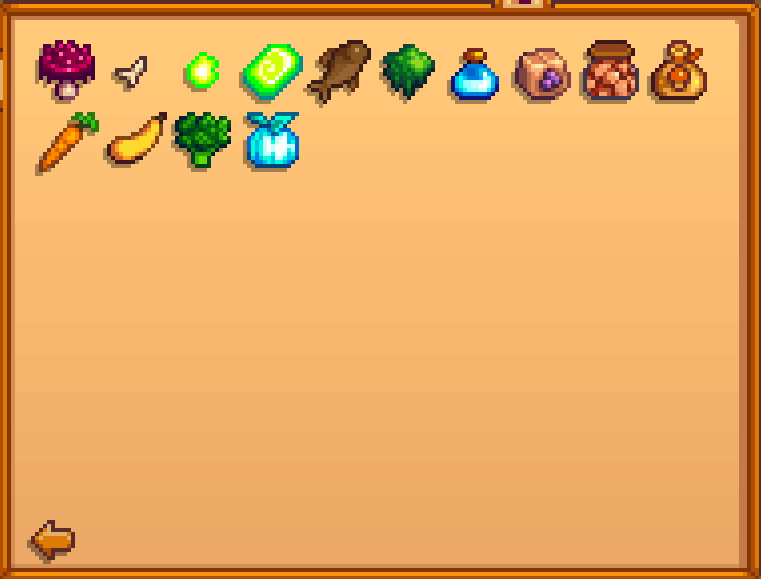
Gourmet Chef - Part 2
Name
Image
Ingredients
Recipe Source
Fried Eel

1x Eel, 1x Oil
George [3]
Spicy Eel

1x Eel, 1x Hot Pepper
George [7]
Sashimi

1x Fish
Linus [3]
Maki Roll

1x Fish, 1x Seaweed, 1x Rice
The Stardrop Saloon | The Queen of Sauces [Odd Year: Summer 21]
Tortilla

1x Corn
The Stardrop Saloon | The Queen of Sauces [Odd Year: Fall 7]
Red Plate

1x Red Cabbage, 1x Radish
Emily [7]
Eggplant Parmesan

1x Eggplant, 1x Tomato
Lewis [7]
Rice Pudding

1x Milk, 1x Sugar, 1x Rice
Evelyn [7]
Ice Cream

1x Milk, 1x Sugar
Jodi [7]
Blueberry Tart

1x Blueberry, 1x Wheat Flour, 1x Sugar, 1x Egg
Pierre [3]
Autumn's Bounty

1x Yam, 1x Pumpkin
Demetrius [7]
Pumpkin Soup

1x Pumpkin, 1x Milk
Robin [7]
Super Meal

1x Artichoke, 1x Bok Choy, 1x Cranberry
Kent [7]
Cranberry Sauce

1x Cranberry, 1x Sugar
Gus [7]
Stuffing

1x Bread, 1x Cranberry, 1x Hazelnut
Pam [7]
Farmer's Lunch

1x Omelet, 1x Parsnip
Level 3 Farming
Survival Burger

1x Bread, 1x Cave Carrot, 1x Eggplant
Level 2 Foraging
Dish O' The Sea

2x Sardines, 1x Hashbrowns
Level 3 Fishing
Miner's Treat

2x Cave Carrot, 1x Sugar, 1x Milk
Level 3 Mining
Roots Platter

1x Cave Carrot, 1x Winter Root
Level 3 Combat
Triple Shot Espresso

3x Coffee
Stardrop Saloon - 5,000g
Seafoam Pudding

1x Flounder, 1x Midnight Carp, 1x Squid Ink
Level 9 Fishing
Algae Soup

4x Green Algae
Clint [3]
Pale Broth

2x White Algae
Marnie [3]
Plum Pudding

2x Wild Plum, 1x Wheat Flour, 1x Sugar
The Queen of Sauces [Odd Year: Winter 7]
Artichoke Dip

1x Artichoke, 1x Milk
The Queen of Sauces [Odd Year: Fall 28]
Stir Fry

1x Cave Carrot, 1x Common Mushroom, 1x Kale, 1x Oil
The Queen of Sauces [Odd Year: Spring 7]
Roasted Hazelnuts

3x Hazelnut
The Queen of Sauces [Even Year: Summer 28]
Pumpkin Pie

1x Pumpkin, 1x Wheat Flour, 1x Milk, 1x Sugar
The Queen of Sauces [Odd Year: Winter 21]
Radish Salad

1x Oil, 1x Vinegar, 1x Radish
The Queen of Sauces [Odd Year: Spring 21]
Fruit Salad

1x Blueberry, 1x Melon, 1x Apricot
The Queen of Sauces [Even Year: Fall 7]
Blackberry Cobbler

1x Blackberry, 1x Sugar, 1x Wheat Flour
The Queen of Sauces [Even Year: Fall 14]
Cranberry Candy

1x Cranberry, 1x Apple, 1x Sugar
The Queen of Sauces [Odd Year: Winter 28]
Bruschetta

1x Bread, 1x Oil, 1x Tomato
The Queen of Sauces [Even Year: Winter 21]
Coleslaw

1x Red Cabbage, 1x Vinegar, 1x Mayonnaise
The Queen of Sauces [Odd Year: Spring 14]
Fiddlehead Risotto

1x Oil, 1x Fiddlehead Fern, 1x Garlic
The Queen of Sauces [Even Year: Fall 28]
Poppyseed Muffin

1x Poppy, 1x Wheat Flour, 1x Sugar
The Queen of Sauces [Even Year: Winter 7]
Chowder

1x Clam, 1x Milk
Willy [3]
Fish Stew

1x Crayfish, 1x Mussel, 1x Periwinkle, 1x Tomato
Willy [7]
Escargot

1x Snail, 1x Garlic
Willy [5]
Gourmet Chef - Part 3
Lobster Bisque

1x Lobster, 1x Milk
Willy [9] | The Queen of Sauces [Even Year: Winter 14]
Maple Bar

1x Maple Syrup, 1x Sugar, 1x Wheat Flour
The Queen of Sauces [Even Year: Summer 14]
Crab Cakes

1x Crab, 1x Wheat Flour, 1x Egg, 1x Oil
The Queen of Sauces [Even Year: Fall 21]
Shrimp Cocktail

1x Tomato, 1x Shrimp, 1x Wild Horseradish
The Queen of Sauces [Even Year: Winter 28]
Ginger Ale

3x Ginger, 1x Sugar
Dwarf Shop - Volcano Dungeon [5000g]
Banana Pudding

1x Banana, 1x Milk, 1x Sugar
Ginger Island Trader - 30x Bone Fragment
Mango Sticky Rice

1x Mango, 1x Coconut, 1x Rice
Leo [7]
Poi

4x Taro Root
Leo [3]
Tropical Curry

1x Coconut, 1x Pineapple, 1x Hot Pepper
Ginger Island Resort [2000g]
Squid Ink Ravioli

1x Squid Ink, 1x Wheat Flour, 1x Tomato
Combat Level 9
Moss Soup

20x Moss
Foraging 3
Note: If you already cooked all items before finding all recipes, find all the recipes, then cook any item to force a check.
Fector's Challenge - Journey of the Prairie King
 Prairie King
Beat 'Journey Of The Prairie King'.
 Fector's Challenge
Beat 'Journey Of The Prairie King' without dying.
If you visit The Stardrop Saloon, aka the bar, where Gus works, there is an arcade machine to the right. Well two of them. The left one is 'Journey of the Prairie King' and the right one is 'Jumino Kart' which can only be played using the Skull Key.
Anywho, in Journey of the Prairie King, there a total of 12 levels, including 3 boss levels which can be separated into 3 areas as well. To me, all the areas are pretty much the same, with slight differences so there isn't much for use for strategy except for one of the early levels that creates a box in the middle. You can sit inside the box in the corner and then have them come in 1-2 at a time making it really easy to beat.
Mechanics
- Each enemy has a specific number of health, so it takes a specific number of hits to kill a specific enemy depending on your bullet damage which can be upgraded
- If you get touched, you die.
- At the top of the screen, there is a bar. This is the amount of time you have to survive to prevent more enemies from spawning.
- Beat each level by clearing out all the enemies after time expires.
- Note: Boss levels will ALWAYS drop a life. Pick this up BEFORE you pick-up the item that the boss dropped.
Upgrades
At the end of every 2nd level, you'll see a guy come onto the map from the top of the map and go to the middle. He will let you buy an upgrade using coins from the game. Upgrades are listed from left to right. Each has 3 tiers.
- Boots: Increases movement speed
- Gun: Increases firing rate
- Ammo Box: Increases bullet damage (2x)
Power-ups
Whenever you kill an enemy, they have a chance to drop a power-up. One power-up can be saved in a slot at the top left and can be activated whenever you wish. If you pick up a power-up while the slot is occupied, that newly acquired power-up will be activated immediately.
- Coin: Comes in 1x or 5x, is a form of currency to purchase upgrades
- Tombstone: Has a yoba sigil on it, turns you into a zombie where touching enemies will now kill them.
- Extra Life: +1 Player Life, looks like the player's head
- Skull Bomb: Clears out the entire map of enemies
- Coffee: Increases movement speed
- Wheel: Shoots a bullet in all 8 directions simultaneously
- Shotgun: Shoots 3 bullets instead of 1 in a cone shape
- Machine Gun: Significantly increases firing rate
- Red Box: Teleports your character to a random part of the map and stops enemies from chasing you
- Star: Coffee + Shotgun + Machine Gun
Tips
- If an item drop is near a spawn, make sure you're shooting at the spawn in case something spawns as you get near it.
- Coins are the most important item-drop. Make sure you get them all.
- In terms of upgrades, the ammo box is by far the best upgrade giving you 2x damage each time you buy it. I would ignore the other two upgrades and make sure to save up enough coins for the damage. Less shots to kill = less enemies on the map to dodge/manage.
- Chaining power-ups is a powerful tactic especially if you're falling behind in the killing ratio. Using firing rate bonuses along with multi shot
- Occasionally, you will see a red fat dragon appear on the map flying in either a horizontal or vertical direction. This dragon will attract the attention of ALL enemies while it's on the map. Take advantage of this.
The rest is up to you. Journey far Prairie King.
Full House - Marriage & Kids
 Full House
Get married and have two kids.
Step 1: Pick a Marriage Candidate
Gender does not matter here. Don't argue with it, freedom of choice is beautiful. All marriage candidates have the (single) tag under their name in the relationship tab.
Step 2: Upgrade Your House
You cannot propose, until you get the first upgrade to your house. So make sure to do that.
Cost: 10,000g
Resources: 450 wood
Step 3: Repair the Bridge at the Beach
In order to do Step 5, you need to do this step. Costs 300 wood to repair.
Step 4: Reach 8-Hearts in Relationship
Once you get a single member to 8 hearts, you must buy a Bouquet from Pierre and then give it to the marriage candidate. Otherwise, you will never cross the 8-heart threshold. This gift will not count against your weekly gifting.
Step 5: Reach 10-Hearts in Relationship
Now that you've got to 10 hearts, you need to wait for a rainy day during a non-winter season. Snow during winter doesn't count as 'rain'. When it's raining, simply go to the beach and cross over to the eastern side and there will be a man there. Buy a Mermaid Pendant off of him for 5,000g.
I'll put a note here to be safe: there have been several bugs regarding mermaid pendants breaking and you can fix it via save file editing. The developer has made a hotfix allowing you to repurchase the mermaid pendant should something go wrong, but if you want to be careful, then back-up a save prior to giving to your future Significant Other (S.O.)
Step 6: Full House
In your post-wedding life, you will need room to have kids and that comes automatically when you get the second and final upgrade to your farmhouse. Hardwood is easily farmed everyday at the secret woods. Head south from your farm, go far west corner. Chop the fallen branch using a Steel Axe (or above), then go left.
Cost: 50,000g
Resources: 150 Hardwood
Step 7: 13/12 Hearts - Stardrop Occurrence
Once you're married, and got your house fully upgraded, all you need now is to increase your relationship to 13/12 hearts. The maximum hearts is 12 on the relationship menu, but in order to have babies you need to reach 13, which is why it's referred to as 13/12. Confusing, yes. From time to time when talking to people, you will see the relationship values next to their portraits. If you see 13/12, then you simply need to wait one day when you sleep.
These prompts occur on different nights and span over a couple of seasons, so if you're waiting for it to happen, don't. Just let it happen, and keep your SO happy. If your relationship is heterosexual, then you'll have a baby naturally. If your relationship is homosexual, then the adoption route is used.
Repeat Step 7 twice for your second child. I believe it's always one girl, and one boy.
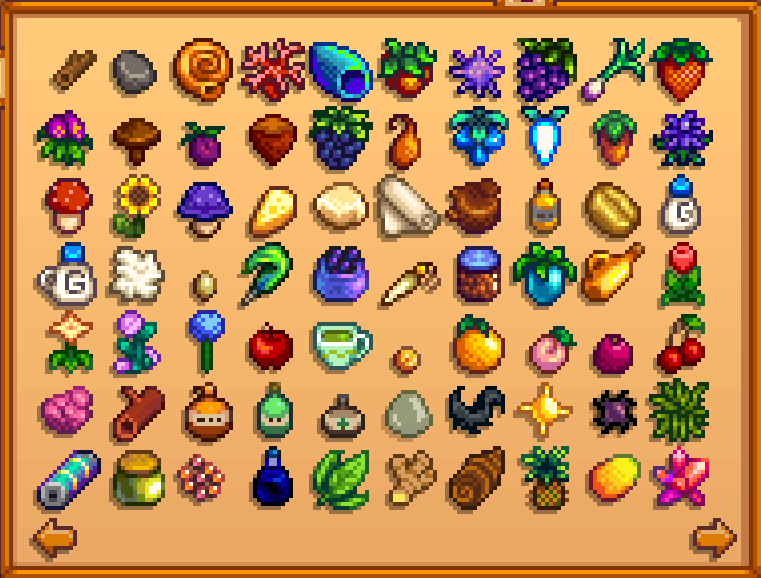
Full Shipment - Page 1 | Part 1
 Full Shipment
Ship every item.
If you check the collections tab, and the very first set of collections, you simply have to ship one of each item that's listed here.
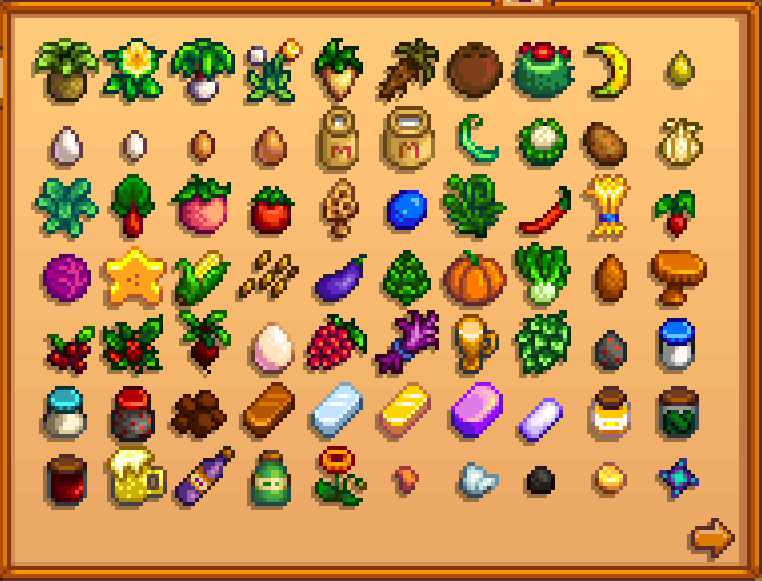
Item
Where to get

Wild Horseradish
Spring Foraging, Grow Wild Seeds (Sp)

Daffodil
Spring Foraging, Grow Wil[/previewimg]d Seeds (Sp)

Leek
Spring Foraging, Grow Wild Seeds (Sp)

Dandelion
Spring Foraging, Grow Wild Seeds (Sp)

Parsnip
Grow Parsnips in Spring

Cave Carrot
Found in mines (boxes) and monster drops

Coconut
Desert Forage

Cactus Fruit
Desert Forage

Banana
Ginger Island - Island Trader for Sapling

Sap
Cut a tree down

Large Egg (white)
Raise a white chicken with 2+ Hearts

Egg (white)
Raise a white chicken

Egg (brown)
Raise a brown chicken

Large Egg (brown)
Raise a brown chicken with 2+ Hearts

Milk
Adult cow produces milk every day

Large Milk
Cow produces more if more hearts

Green Bean
Grow in Spring

Cauliflower
Grow in Spring

Potato
Grow in Spring

Garlic
Grow in Spring Year 2

Kale
Grow in Spring

Rhubarb
Grow in Spring [Oasis]

Melon
Grow in Summer

Tomato
Grow in Summer

Morel
Secret Woods [Spring] | Mushroom Cave

Blueberry
Grow in Summer

Fiddlehead Fern
Secret Woods [Summer]

Hot Pepper
Grow in Summer

Wheat
Grow in Summer

Radish
Grow in Summer

Red Cabbage
Grow in Summer [Year 2]

Starfruit
Grow in Summer [Oasis]

Corn
Grow in Summer/Fall

Unmilled Rice
Grow in Spring [Year 2]

Eggplant
Grow in Fall

Artichoke
Grow in Fall [Year 2]

Pumpkin
Grow in Fall

Bok Choy
Grow in Fall

Yam
Grow in Fall

Chanterelle
Secret Woods [Fall] | Mushroom Cave

Cranberries
Grow in Fall

Holly
Winter Foraging

Beet
Grow in Fall [Oasis]

Ostrich Egg
[Ginger Island]

Salmonberry
Spring Foraging | Grow Wild Seed (Sp)

Amaranth
Grow in Fall

Pale Ale
Throw hops into a Keg

Hops
Grow in Summer

Void Egg
Witch Event [See FAQ] | Traveling Cart

Mayonnaise
Throw egg/dinosaur egg into Mayonnaise Machine
Full Shipment - Page 1 | Part 2

Duck Mayonnaise
Throw Duck Egg into Mayonnaise Machine

Void Mayonnaise
Throw Void Egg into Mayonnaise Machine or Fishing in Witch's Swamp

Clay
Use hoe on the ground/worms

Copper Bar
5x Copper Ore and 1x Coal into a Furnace

Iron Bar
5x Iron Ore and 1x Coal into a Furnace | Craft with 3x Copper Bar

Gold Bar
5x Gold Ore and 1x Coal into a Furnace | Craft with 3x Iron Bar

Iridium Bar
5x Iridium Ore and 1x Coal into a Furnace | Statue of Perfection | Statue of Fortune

Refined Quartz
1x Quartz and 1x Coal into a Furnace

Honey
Place a Bee House outside during non-Winter

Pickles
Throw ANY vegetable into a Preserves Jar

Jelly
Throw ANY fruit into a Preserves Jar

Beer
Throw Wheat into a Keg

Fruit Wine
Throw ANY fruit into a Keg

Vegetable Juice
Throw ANY vegetable into a Keg

Poppy
Grow in Summer

Copper Ore
Mines

Iron Ore
Mines 40+ Floor

Coal
Mines

Gold Ore
Mines 80+ Floor

Iridium Ore
Meteorite | Geodes | Quarry/Skull Dungeon
Full Shipment - Page 2 | Part 1

Wood
Chop trees

Stone
Mine rocks

Nautilus Shell
Beach Foraging

Coral
Beach Foraging

Rainbow Shell
Beach Foraging [Summer]

Spicy Berry
Summer Foraging | Grow Wild Seeds (Su)

Sea Urchin
Beach Foraging

Grape
Grow in Fall | Summer Foraging | Grow Wild Seeds (Su)

Spring Onion
Spring Foraging | Cindersap Forest [Southeast]

Strawberry
Grow in Spring [Egg Hunt Festival]

Sweet Pea
Summer Foraging | Grow Wild Seeds (Su)

Common Mushroom
Fall Foraging | Secret Woods [Spring/Fall] | Mushroom Cave

Wild Plum
Fall Foraging | Grow Wild Seeds (Fa)

Hazelnut
Fall Foraging | Grow Wild Seeds (Fa)

Blackberry
Fall Foraging | Grow Wild Seeds (Fa)

Winter Root
Winter Foraging | Grow Wild Seeds (Wi)

Crystal Fruit
Winter Foraging | Grow Wild Seeds (Wi)

Snow Yam
Winter Foraging | Grow Wild Seeds (Wi)

Sweet Gem Berry
Grow Rare Seed [Traveling Cart] in Fall

Crocus
Winter Foraging | Grow Wild Seeds (Wi)

Red Mushroom
Secret Woods [Spring] | Mines Foraging | Mushroom Cave

Sunflower
Grown in Fall

Purple Mushroom
Floor 80+ Mines | Mushroom Cave

Cheese
Use Milk on Cheese Press

Goat Cheese
Use Goat Milk on Cheese Press

Cloth
Use Wool on Loom

Truffle
Let a pig outside the Barn

Truffle Oil
Use Truffle on Oil Maker

Coffee Bean
Buy from Traveling Cart | Dust Sprite Drop

Goat Milk
Adult Goat produces milk every other day

Large Goat Milk
Goat produces more if more hearts

Wool
Harvest from Sheep and Rabbits

Duck Egg
Harvest from Ducks

Duck Feather
2+ Heart Random Harvest from Ducks | Traveling Cart

Caviar
Farm Sturgeon in Fish Pond for Sturgeon Roe | Use Sturgeon Roe on Preserves Jar

Rabbit's Foot
2+ Heart Random Harvest from Rabbits | Traveling Cart

Aged Roe
Build Fish Pond for Roe | Use Roe on Preserves Jar

Ancient Fruit
Must find ancient seed artifact | Grows in Spring to Fall

Mead
Throw honey into a keg

Tulip
Grow in Spring

Summer Spangle
Grow in Summer

Fairy Rose
Grow in Fall

Blue Jazz
Grow in Spring

Apple
Grow an apple tree | Traveling Cart | Fruitbat Cave

Green Tea
Use Tea Leaves on a Keg

Apricot
Grow an apricot tree | Traveling Cart | Fruitbat Cave

Orange
Grow an orange tree | Traveling Cart | Fruitbat Cave

Peach
Grow a peach tree | Traveling Cart | Fruitbat Cave

Pomegranate
Grow a pomegranate tree | Traveling Cart | Fruitbat Cave

Cherry
Grow a cherry tree | Traveling Cart | Fruitbat Cave
Full Shipment - Page 2 | Part 2

Bug Meat
Monster drop from bugs

Hardwood
Break down stump or fallen tree

Maple Syrup
Use tapper on Maple Tree

Oak Resin
Use tapper on Oak Tree

Pine Tar
Use tapper on Pine Tree

Slime
Monster drop from slimes

Bat Wing
Monster drop from bats

Solar Essence
Monster drop in Floor 50+

Void Essence
Monster drop in Floor 80+

Fiber
Harvest from Weeds

Battery Pack
Harvest from Lightning Rod | Gift from Pam

Dinosaur Mayonnaise
Use Dinosaur Egg on Mayonnaise Machine
Roe
Fish Pond

Squid Ink
Harvest from Lightning Rod | Gift from Pam

Tea Leaves
Grows except Winter

Ginger
Ginger Island Forage

Taro Root
Ginger Island

Pineapple
Ginger Island

Mango
Ginger Island

Cinder Shard
Volcano Dungeon
Full Shipment - Page 3

Magma Cap
Volcano Dungeon

Bone Fragment
Dropped by Skeletons

Radioactive Ore
Enable hardmode in the mines and they appear as regular nodes

Radioactive Bar
Craft at furnace with 5x Radioactive Ore and 1x Coal

Smoked Fish
Craft at Fish Smoker with 5x of one fish

Moss
Gross on tree trunks over time and harvested with an axe

Mystic Syrup
Obtain the Foraging Mastery and craft a Mystic Tree Seed and grow a Mystic Tree and add a Tapper

Raisins
Place grapes into a dehydrator

Dried Fruit
Place fruits into a dehydrator

Dried Mushrooms
Place mushrooms into a dehydrator

Carrot
Spring crop introduced in 1.6 - Can be traded with the Raccoon Wife

Summer Squash
Summer crop introduced in 1.6 - Can be traded with the Raccoon Wife

Broccoli
Fallcrop introduced in 1.6 - Can be traded with the Raccoon Wife

Powdermelon
Winter crop introduced in 1.6 - Can be traded with the Raccoon Wife
Joja Co. Member Of The Year - Town Development
 Joja Co. Member Of The Year
Become a Joja Co. member and purchase all the community development perks.
To become a Joja Co. Member, head to the Joja Mart and talk to Morris on the right. You can buy a membership for 5,000g. After that, talking to him again will let you view the Joja Development Form shown below.
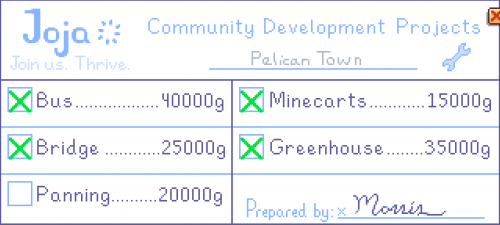
Each entry mirrors a complete task in the Community Center, so in order to buy a development, you cannot finish any of them inside of the Community Center before doing this.
Simply buy each of them for 135,000g total and go to town after they're all built and you'll find a cutscene and the achievement.
Legend - Money Making
 Greenhorn
Earn 15,000g
 Cowpoke
Earn 50,000g
 Homesteader
Earn 250,000g
 Millionaire
Earn 1,000,000g
 Legend
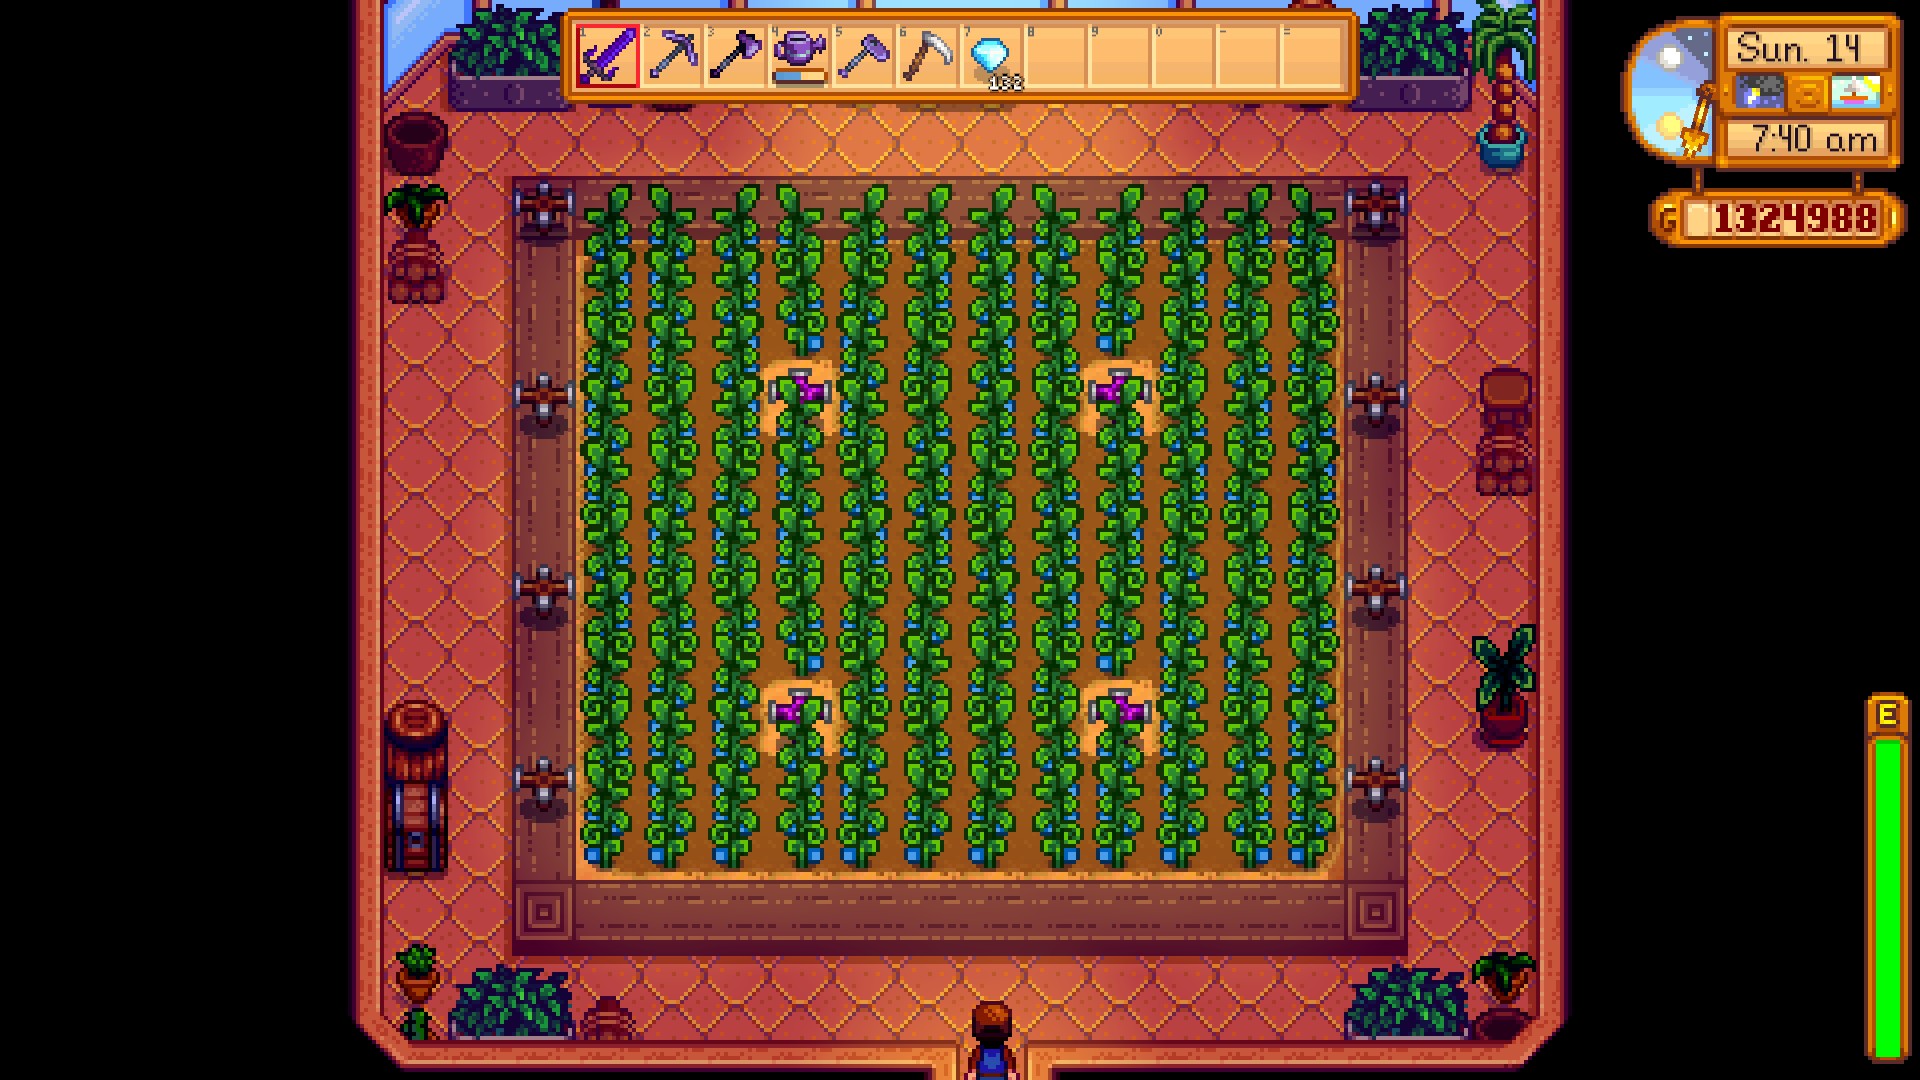
Earn 10,000,000g
The fastest method I went with was setting up the greenhouse for 116 ancient fruits, and make sure they all produce on the same day no matter what. That way you save a BUNCH of time. Also, probably save this for the last thing to do, because you're about to ruin quite a few things if you're rushing this. Note: Relationship has been updated so anyone with max relationship will no longer lose hearts.
If you cannot find an additional Ancient Seed relic, you may try to use the seed maker and produce one that way.
Money
Next, make sure to have the Artisan perk where artisan goods are worth 50% more. Finally, you'll also need 116 kegs so you can simultaneously transfer the fruit into wine.
Ancient Fruit is the highest valued fruit at 750 gold. Cranberries and blueberries would have to output roughly 5-7 fruits per tile in order to match this base price which won't happen. You could argue, less days, but you'll see why in a bit.
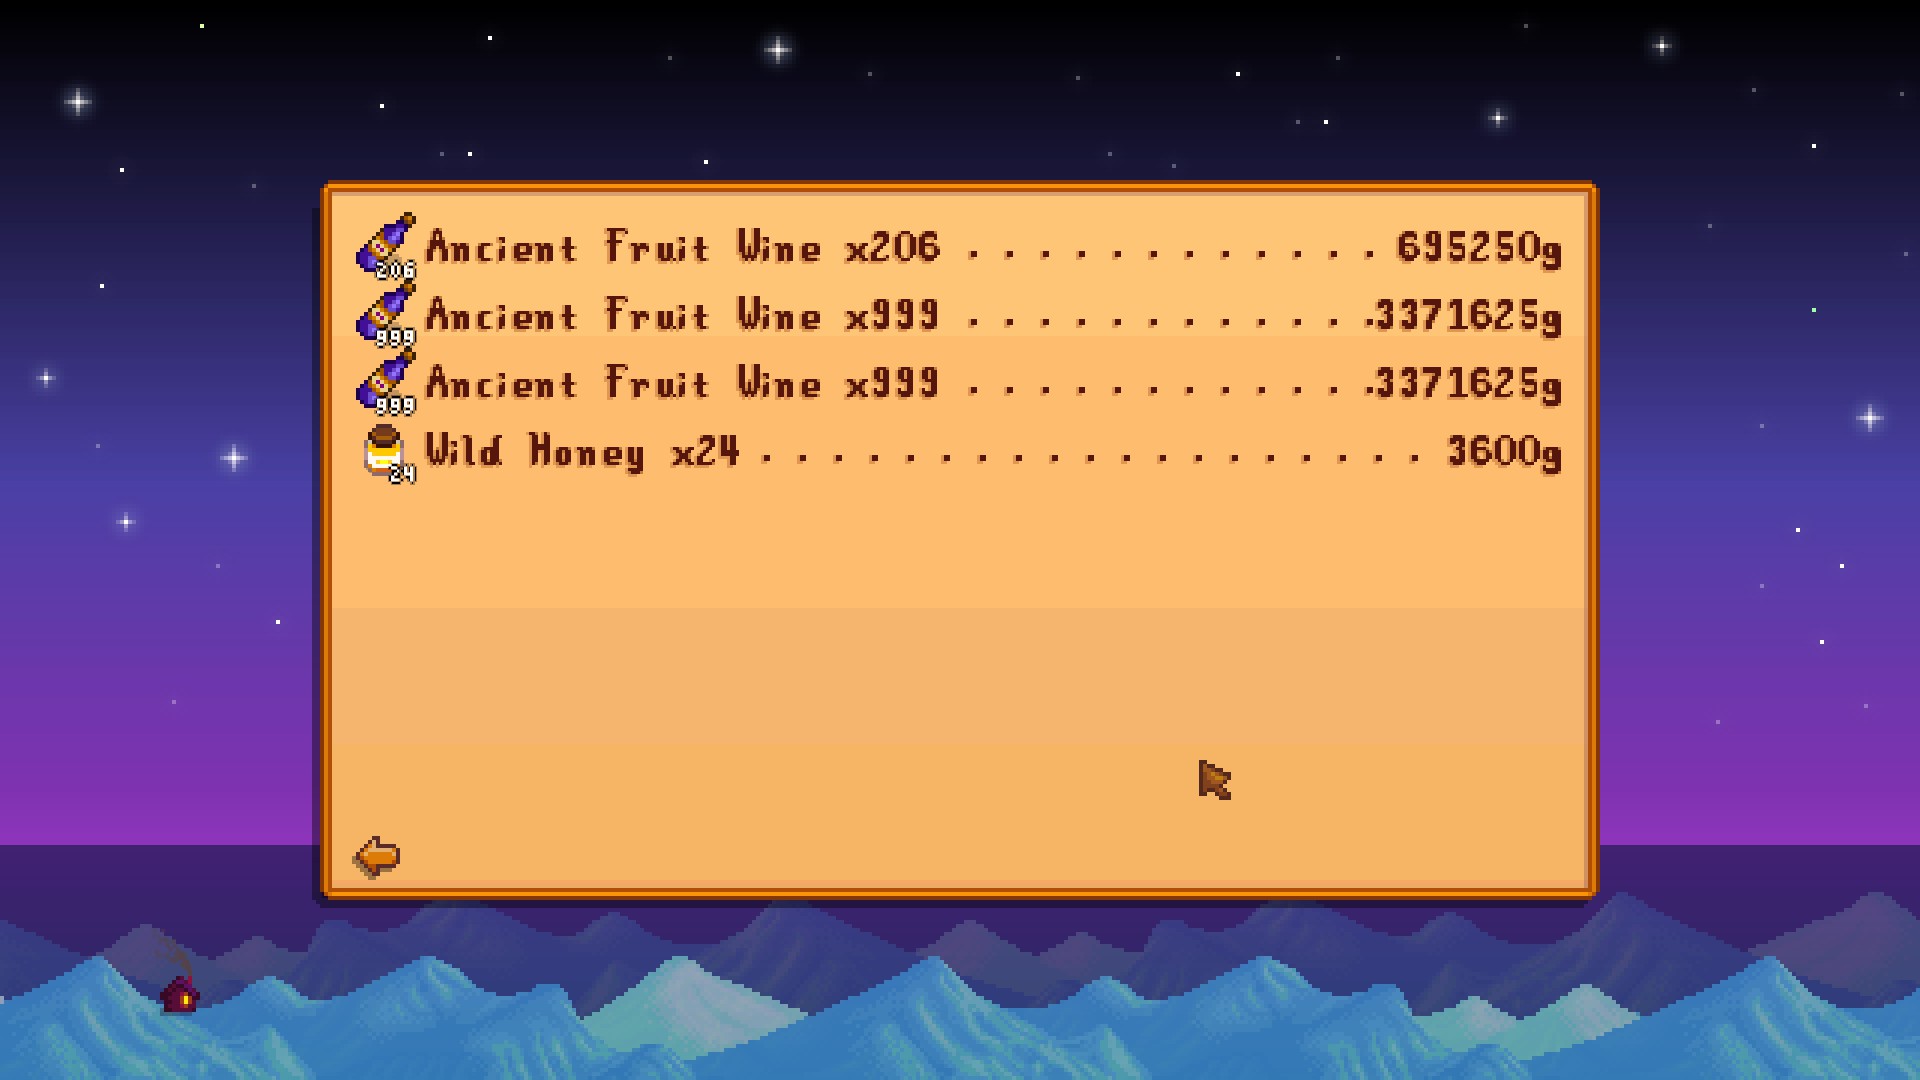
Wine
The base value of wine takes the base value of the fruit, then multiplies it by 3. So at 750 gold, an Ancient Fruit Wine is worth 2,250g each. With the Artisan specialization, that increases from 3x to 4.5x which is 3,375g per wine. Then with 116 wine, you end up with 391,500g per batch. The quality of the fruit is ignored when it comes to wine.
Time
Now for the time saving portion: Ancient fruit initially takes 28 days to grow, then reproduces within 7 days after the first fruit. Then wine takes 6 days to produce. This means every 7th day, you pick up all the fruit in the greenhouse, then pick up all the wine while placing new ancient fruit into the kegs. There's no reason to pick-up the wine when it finishes as you have nothing new to put in.
You can simply sleep for 7 days in a row, then get the new batch, rinse and repeat.
Risks
You will skip a MASSIVE amount of days if you do this which means there will be some issues:
- Relationships no longer decay once they reach 10-hearts.
- Weeds on your farm will grow out of control and may break (R.I.P. Crystalarium)
- Fences will break down
So you can manage those if you want, or not. Completely up to you. There is another thing that works well with this time skip; however. You can watch the TV for Cooking Recipes every Wednesday and Sunday.
Living Large - House Upgrades
 Moving Up
Upgrade your house.
All house upgrades are done by Robin whose upgrades are available at her shop. You MUST bring the materials required to upgrade with you to her shop.
Costs: 10,000g
Material: 450 Wood
Additions: Upgrade creates a bedroom, adds a kitchen to allow you to cook, and a refrigerator that doubles as a chest. Cooking items will use items from the refrigerator automatically.
 Living Large
Upgrade your house to the maximum size.
Costs: 50,000g
Material: 150 Hardwood
Additions: Adds two new rooms: an empty room, and a baby room for any potential future kids. Kitchen is also longer.
Local Legend - Community Center Bundles
 Local Legend
Restore the Pelican Town Community Center.
A quick rundown on how to interpret the following tables. For each bundle, there are a certain number of 'Slots' that you can use. For most of the bundles, the number of items it requests is the same, meaning you need ALL of them. However for others, there are more items available than slots, meaning you can pick the ones you want.
Crafts Room
Collection Reward: Bridge Repair - Quarry [Mountain]Bundle
Slots
Items
Reward
Spring Foraging
4
Wild Horseradish, Daffodil, Leek, Dandelion
30x Spring Seeds
Summer Foraging
3
Spice Berry, Grape, Sweet Pea
30x Summer Seeds
Fall Foraging
4
Common Mushroom, Wild Plum, Hazelnut, Blackberry
30x Fall Seeds
Winter Foraging
4
Winter Root, Crystal Fruit, Snow Yam, Crocus
30x Winter Seeds
Exotic Foraging
5
Coconut, Cactus Fruit, Cave Carrot, Red Mushroom, Purple Mushroom, Maple Syrup, Oak Resin, Pine Tar, Morel
5x Autumn's Bounty
Construction
4
99x Wood, 99x Wood, 99x Stone, 10x Hardwood
1x Charcoal Kiln
Pantry
Collection Reward: Greenhouse - FarmBundle
Slots
Items
Reward
Spring Crops
4
Parsnip, Green Bean, Cauliflower, Potato
20x Speed-Gro
Summer Crops
4
Tomato, Hot Pepper, Blueberry, Melon
1x Quality Sprinkler
Fall Crops
4
Corn, Eggplant, Pumpkin, Yam
1x Bee House
Quality Crops
3
5x [Gold] Parsnip, 5x [Gold] Melon, 5x [Gold] Pumpkin, 5x [Gold] Corn
1x Preserves Jar
Animal
5
Large Milk, Large Brown Egg, Large White Egg, Large Goat Milk, Wool, Duck Egg
1x Cheese Press
Artisan
6
Truffle Oil, Cloth, Goat Cheese, Cheese, Honey, Jelly, Apple, Apricot, Orange, Peach, Pomegranate, Cherry
1x Keg
Fish Tank
Collection Reward: Glittering Boulder - PanningBundle
Slots
Items
Reward
River Fish
4
Sunfish, Catfish, Shad, Tiger Trout
30x Bait
Lake Fish
4
Largemouth Bass, Carp, Bullhead, Sturgeon
1x Dressed Spinner
Ocean Fish
4
Sardine, Tuna, Red Snapper, Tilapia
5x Warp Totem: Beach
Night Fishing
3
Walleye, Bream, Eel
1x Small Glow Ring
Crab Pot
5
Lobster, Crayfish, Crab, Cockle, Mussel, Shrimp, Snail, Periwinkle, Oyster, Clam
3x Crab Pot
Specialty Fish
4
Pufferfish, Ghostfish, Sandfish, Woodskip
5x Dish 'O The Sea
Boiler Room
Collection Reward: Mine Cart - Bus Stop/Town/Mines/QuarryBundle
Slots
Items
Reward
Blacksmith
3
Copper Bar, Iron Bar, Gold Bar
1x Furnace
Geologist's
4
Quartz, Earth Crystal, Frozen Tear, Fire Quartz
5x Omni Geode
Adventurer's
2
99x Slime, 10x Bat Wing, Solar Essence, Void Essence
1x Small Magnet Ring
Vault
Collection Reward: Bus RepairBundle
Slots
Items
Reward
2,500
1
2,500g
3x Chocolate Cake
5,000
1
5,000g
30x Quality Fertilizer
10,000
1
10,000g
1x Lightning Rod
25,000
1
25,000g
1x Crystalarium
Bulletin
Collection Reward: Friendship - Boost Relationship with TownspeopleBundle
Slots
Items
Reward
Chef's
6
Maple Syrup, Fiddlehead Fern, Truffle, Poppy, Maki Roll, Fried Egg
3x Pink Cake
Dye
6
Red Mushroom, Sea Urchin, Sunflower, Duck Feather, Aquamarine, Red Cabbage
1x Seed Maker
Field Research
4
Purple Mushroom, Nautilus Shell, Chub, Frozen Geode
1x Recycling Machine
Fodder
3
10x Wheat, 10x Hay, 3x Apple
1x Heater
Enchanter's
4
Oak Resin, Wine [Any], Rabbit's Foot, Pomegranate
5x Gold Bar
There is a STRONG chance that you will miss this achievement due to conflicting cutscenes attempting to occur on the SAME day. This chance is strong BECAUSE completing the community center will boost the relationships of nearly everyone in town thus making you hit relationship checkpoints that may or may not trigger upon entering town and overwriting the community center cutscene.
Hot Fix: If your game was bugged by having the event appear during a festival, or another cutscene and not having the cutscene appear for the achievement do below. This bug shouldn't happen anymore with a recent update.
Navigate to your save files at: %appdata%/Roaming/StardewValley/Saves/<your_save> then open both files in here. One has the same name as your folder, the other is named SaveGameInfo. Open these using a text editor, notepad works. Now search for 'eventsSeen' using CTRL+F and then go to the right until you find '<int>191393</int>'. Delete this in both saves, save and reboot the game.
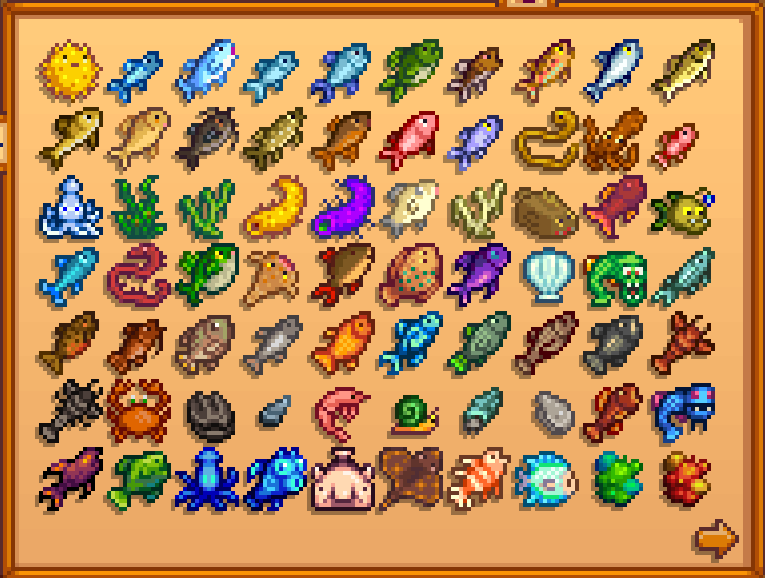
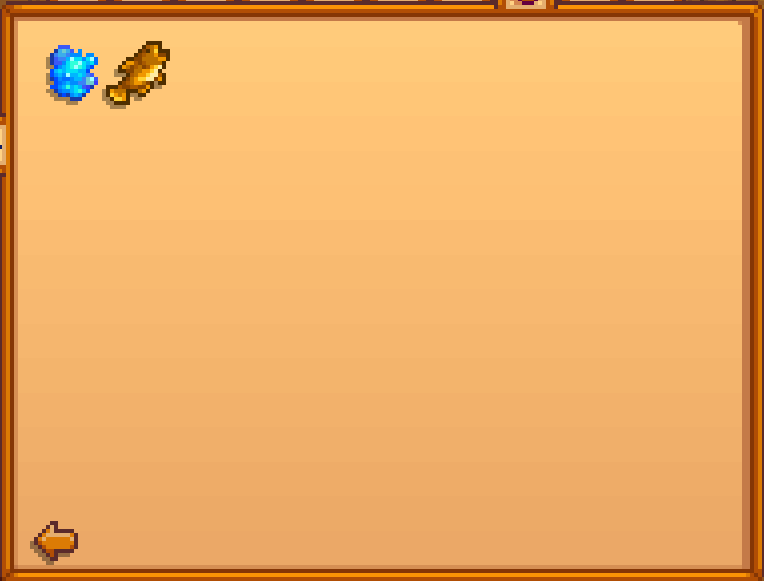
Master Angler - Fishing - Part 1
 Fisherman
Catch 10 different fish.
 Mother Catch
Catch 100 fish.
 Ol' Mariner
Catch 24 different fish.
 Master Angler
Catch every fish.
Morning: 6AM-11AM
Afternoon: 12PM-4PM
Morning/Afternoon: 6AM-7PM
Noon/Night: 12PM-2AM
Afternoon/Night: 4PM-2AM
Night: 6PM-2AM
Fish
Season
Location
Weather
Time
Type

Pufferfish
Summer
Ocean
Sunny
Afternoon
Fishing

Anchovy
Spring/Fall
Ocean
Any
Any
Fishing

Tuna
Summer/Winter
Ocean
Any
Morning/Afternoon
Fishing

Sardine
Spring/Fall/Winter
Ocean
Any
Any
Fishing

Bream
Any
River
Any
Night
Fishing

Largemouth Bass
Any
Lake
Any
Any
Fishing

Smallmouth Bass
Spring/Fall
Lake, Forest
Any
Any
Fishing

Rainbow Trout
Summer
River, Lake
Sunny
Morning/Day
Fishing

Salmon
Fall
River
Any
Any
Fishing

Walleye
Fall
River, Lake, Forest
Rain
Any
Fishing

Perch
Winter
Lake, River
Any
Any
Fishing

Carp
Any
Freshwater, Sewers
Any
Any
Fishing

Catfish
Spring/Fall
River, Forest, Secret Woods (Summer)
Rain
Any
Fishing

Pike
Summer/Winter
Lake, River
Any
Any
Fishing

Sunfish
Spring/Summer
River
Sunny
Morning/Day
Fishing

Red Mullet
Summer/Winter
Ocean
Any
Morning/Day
Fishing

Herring
Spring/Winter
Ocean
Any
Any
Fishing

Eel
Spring/Fall
Ocean
Rain
Night
Fishing

Octopus
Summer
Ocean
Any
Morning/Noon
Fishing

Red Snapper
Summer/Fall
Ocean
Rain
Morning/Day
Fishing

Squid
Winter
Ocean
Any
Night
Fishing

Seaweed
Any
Ocean
Any
Any
Fishing

Green Algae
Any
Mines/River
Any
Any
Fishing

Sea Cucumber
Fall/Winter
Ocean
Any
Morning/Day
Fishing

Super Cucumber
Summer/Fall/Winter
Ocean
Any
Night
Fishing

Ghostfish
Any
Mines: 20F, 60F, 100F
Any
Any
Fishing

White Algae
Any
Mines/Sewer
Any
Any
Fishing

Stonefish
Any
Mines 20F
Any
Any
Fishing

Crimsonfish
Summer
Ocean (See below)
Any
Any
Fishing

Angler
Fall
River (See below)
Any
Any
Fishing
Master Angler - Fishing - Part 2
Fish
Season
Location
Weather
Time
Type

Ice Pip
Any
Mines 60F
Any
Any
Fishing

Lava Eel
Any
Mines 100F
Any
Any
Fishing

Legend
Any
Lake (See below)
Rain
Morning/Day
Fishing

Sandfish
Any
Desert
Any
Morning/Day/Night
Fishing

Scorpion Carp
Any
Desert
Any
Morning/Day/Night
Fishing

Flounder
Spring/Summer
Ocean
Any
All Day
Fishing

Midnight Carp
Fall/Winter
Lake
Any
Night
Fishing

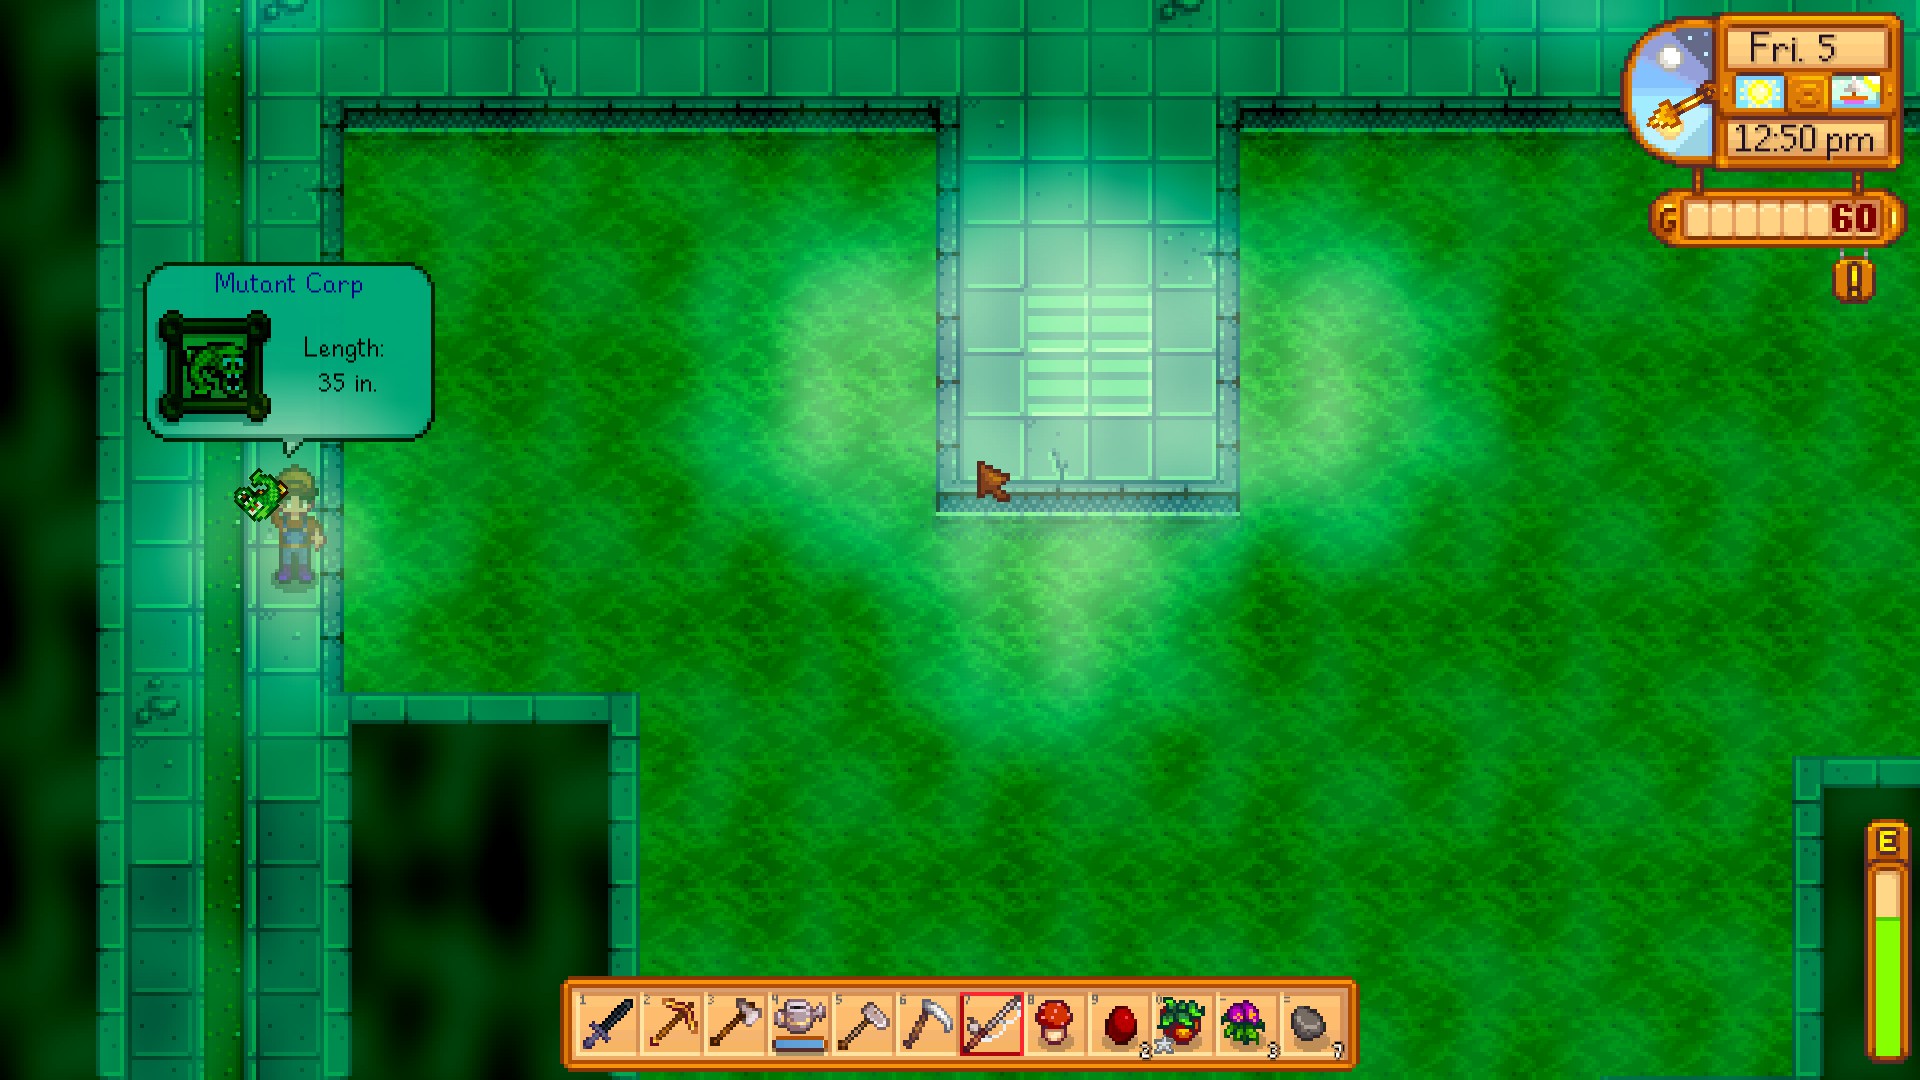
Mutant Carp
Any
Sewers
Any
Any
Fishing

Sturgeon
Summer/Winter
Lake
Any
Morning/Day
Fishing

Tiger Trout
Fall/Winter
River
Any
Morning/Day
Fishing

Bullhead
Any
Lake
Any
Any
Fishing

Tilapia
Summer/Fall
Ocean
Any
Morning/Noon
Fishing

Chub
Any
Lake, River
Any
Any
Fishing

Dorado
Summer
River
Any
Morning/Day
Fishing

Albacore
Fall/Winter
Ocean
Any
Morning/Night
Fishing

Shad
Spring/Summer/Fall
River
Rain
Morning/Day/Night
Fishing

Lingcod
Winter
River, Lake
Any
Any
Fishing

Halibut
Spring/Summer/Winter
Ocean
Any
Morning/Night
Fishing

Lobster
N/A
Ocean
N/A
N/A
Trapping

Crayfish
N/A
River/Lake
N/A
N/A
Trapping

Crab
N/A
Ocean
N/A
N/A
Trapping

Cockle
N/A
Ocean
N/A
N/A
Trapping

Mussel
N/A
Ocean
N/A
N/A
Trapping

Shrimp
N/A
Ocean
N/A
N/A
Trapping

Snail
N/A
River/Lake
N/A
N/A
Trapping

Periwinkle
N/A
River/Lake
N/A
N/A
Trapping

Oyster
N/A
Ocean
N/A
N/A
Trapping

Woodskip
Any
Secret Woods (See below)
Any
Any
Fishing

Glacierfish*
Winter
Cindersap Forest (See below)
Any
Morning/Day
Fishing

Void Salmon*
N/A
Witch's Swamp
Any
Morning/Day
Fishing

Slimejack*
N/A
Mutant Bug Lair
Any
Morning/Day
Fishing

Midnight Squid
Winter 15-17
Night Market
N/A
N/A
Fishing

Spook Fish
Winter 15-17
Night Market
N/A
N/A
Fishing

Blobfish
Winter 15-17
Night Market
N/A
N/A
Fishing

Stingray
All Seasons
Ginger Island - Pirate Cove
Any
Any
Fishing

Lion Fish
All Seasons
Ginger Island - Ocean
Any
Any
Fishing

Blue Discus
All Seasons
Ginger Island - Pond/River
Any
Any
Fishing

River Jelly
All Seasons
All freshwater locations (rivers, lakes) with the exception of Standard/Beach farms
Any
Any
Fishing

Cave Jelly
All Seasons
Caves/Mines
Any
Any
Fishing

Sea Jelly
All Seasons
Ocean
Any
Any
Fishing

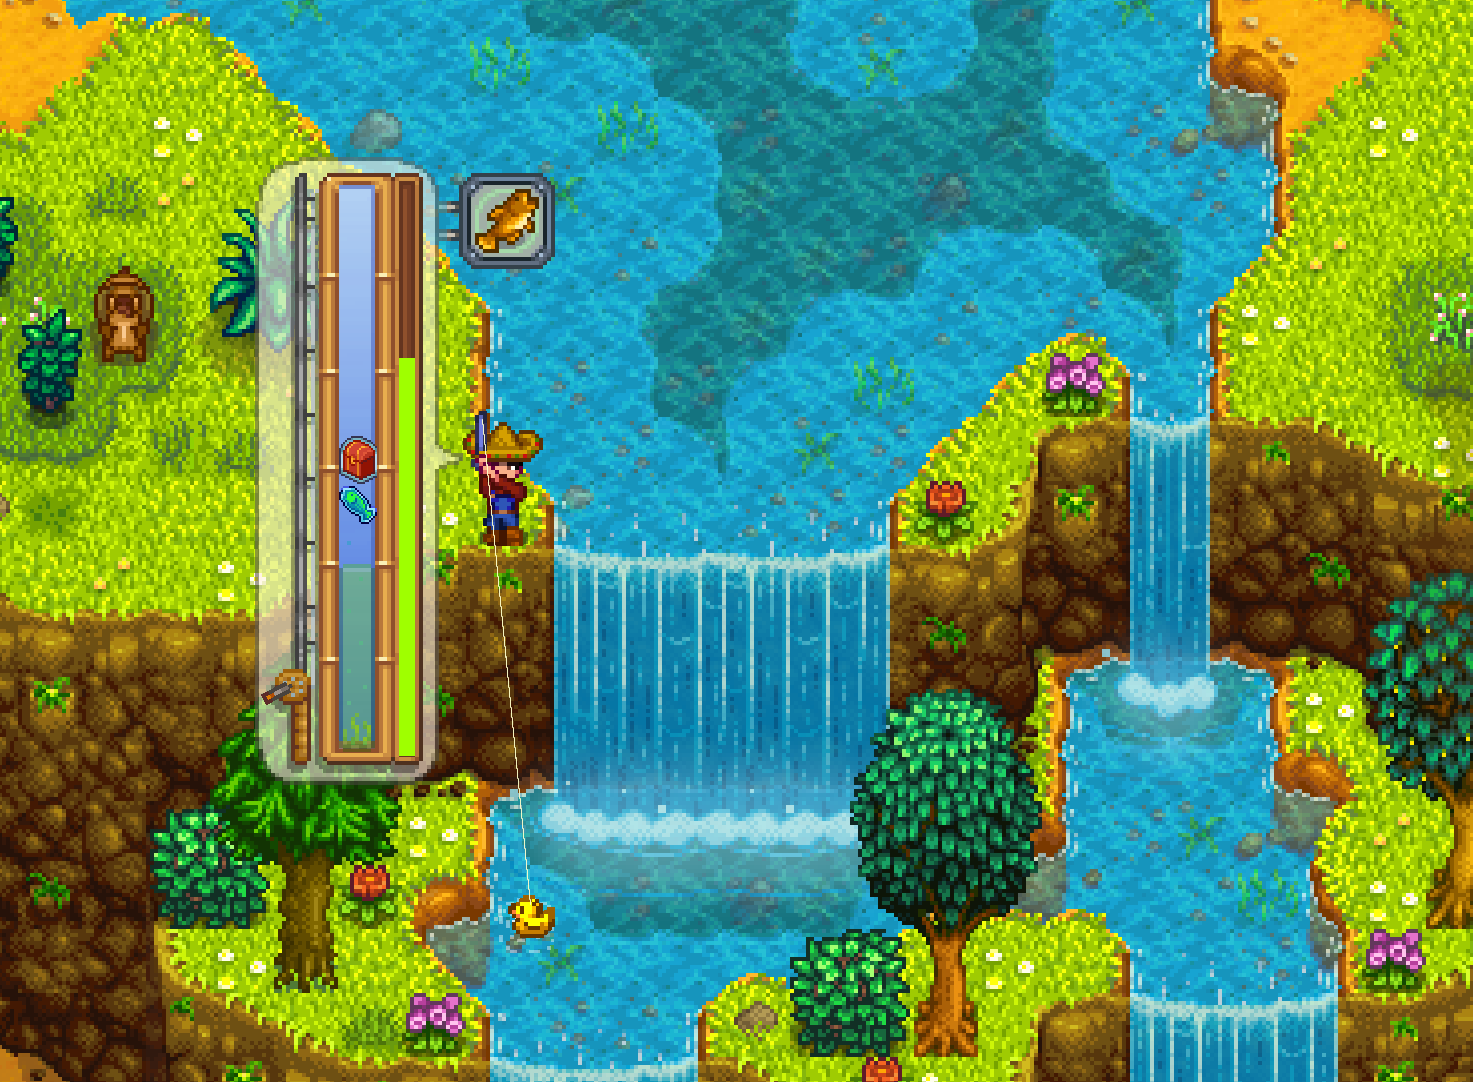
Goby
Any
Waterfalls
Any
Any
Fishing
Goby Location
Master Angler - Fishing - Part 3
Mutant Fish - Just fish about anywhere in the Sewer and you'll be set.
Angler - Using the spot I'm standing on, fish towards the north using max power on an Iridium Rod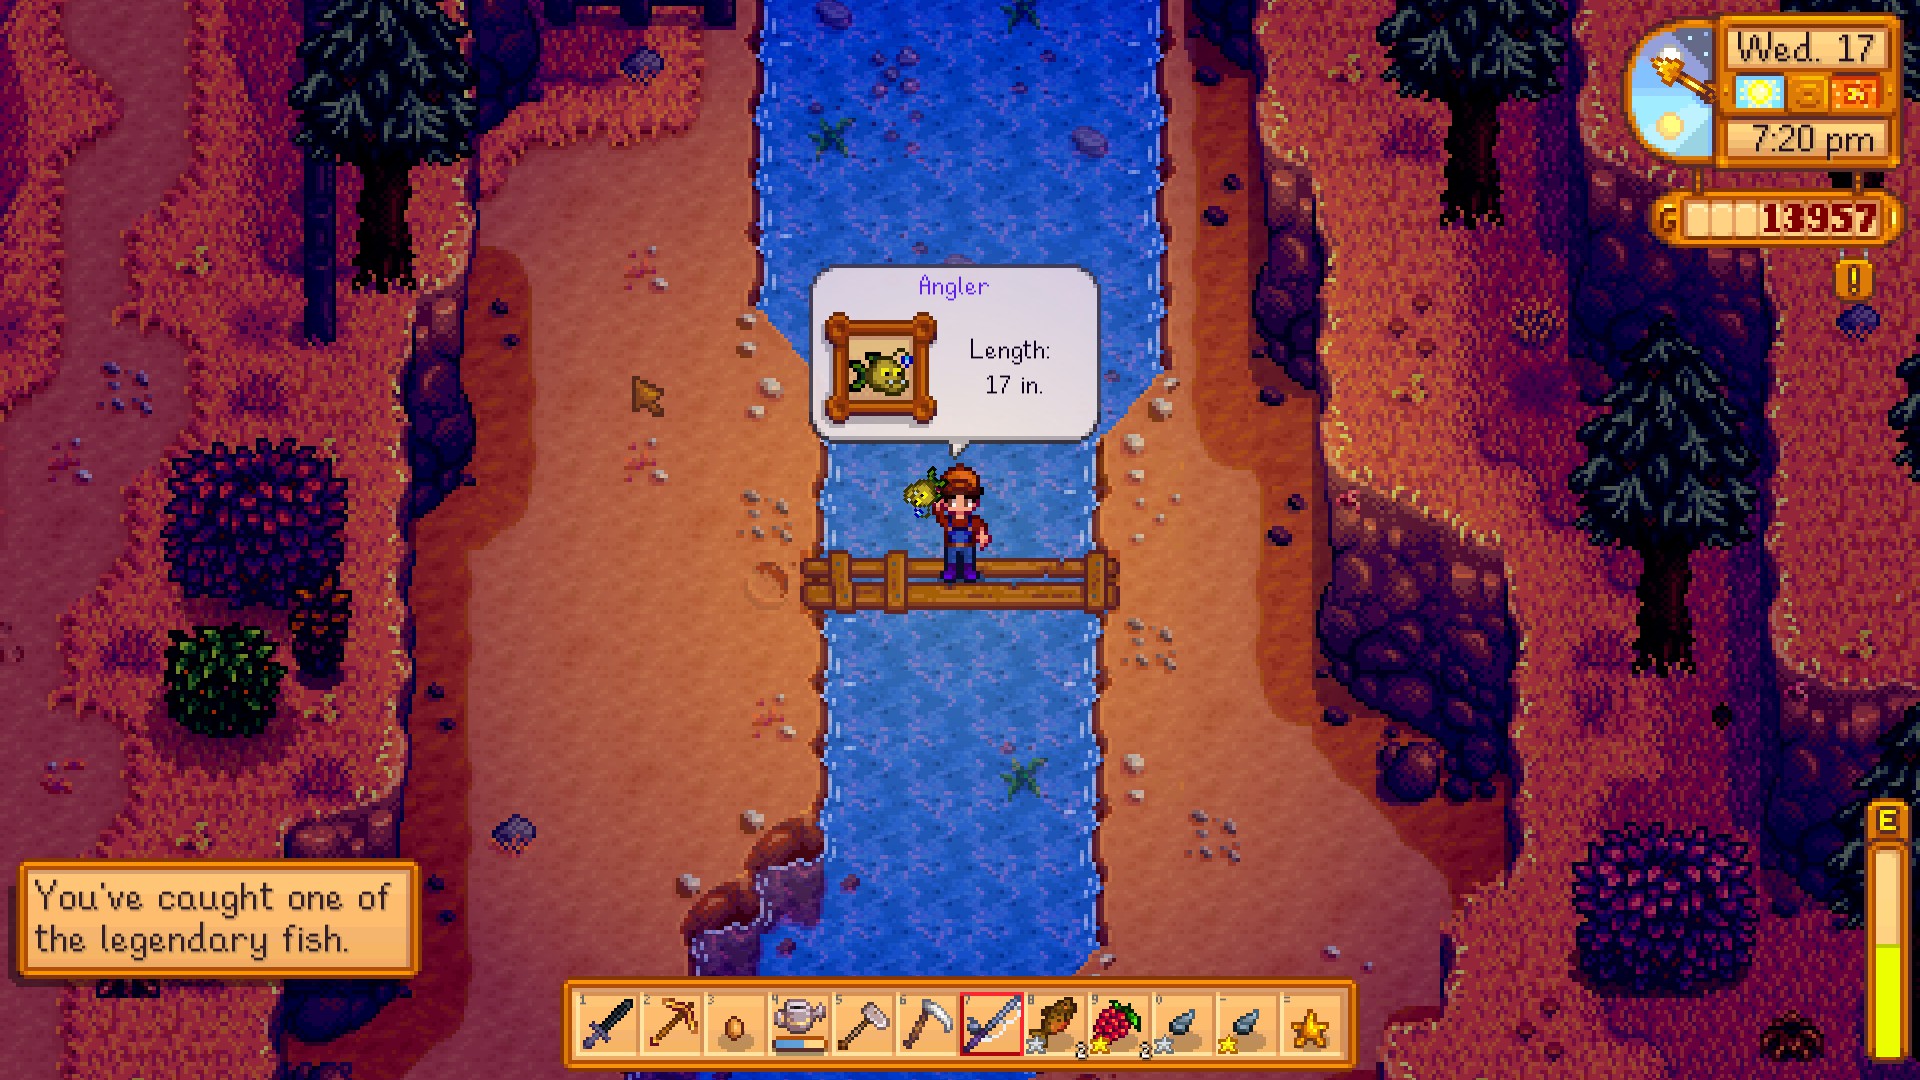
Glacierfish - In Cindersap Forest, go towards the south end and onto the island tip. Cast as far south as possible
Legend - Cast as far right as possible. This is the spot where Sebastian smokes at the Lake near the mines.
Crimsonfish - Technically anywhere on the eastern pier at the beach works.
Slimejack and Void Salmon - See Magical Construction Questline Section
Result
Master Of The Five Ways - Skills
 Singular Talent
Reach level 10 in a skill.
 Master Of The Five Ways
Reach level 10 in every skill.
Experience is gained upon performing an action related to the skill you're leveling up. Level ups only occur when you go to sleep. It's even possible to earn multiple level-ups for the same skill, especially in farming.
- Farming: Harvesting crops (per crop)
- Foraging: Chopping trees, foraging fruits and wild vegatables
- Fishing: Fishing and Trapping
- Mining: Mining rocks, ores, and gems
- Combat: Eliminating enemies
Professions are permanent skill choices available at Level 5 and Level 10. Your level 5 profession WILL affect what skills show up at Level 10. So plan ahead.

Skill
Profession (Lvl 5)
Specialization (Lvl 10)
Farming
Rancher: Animal Products sell for 20% More
Coopmaster: Befriend Coop animals quicker, Incubation time cut in half
Shepherd: Befriend barn animals quicker, Sheep produce wool faster
Tiller: Crops sell for 10% more
Artisan: Artisan Goods sell for 40% more
Agriculturist: Crops grow 10% faster
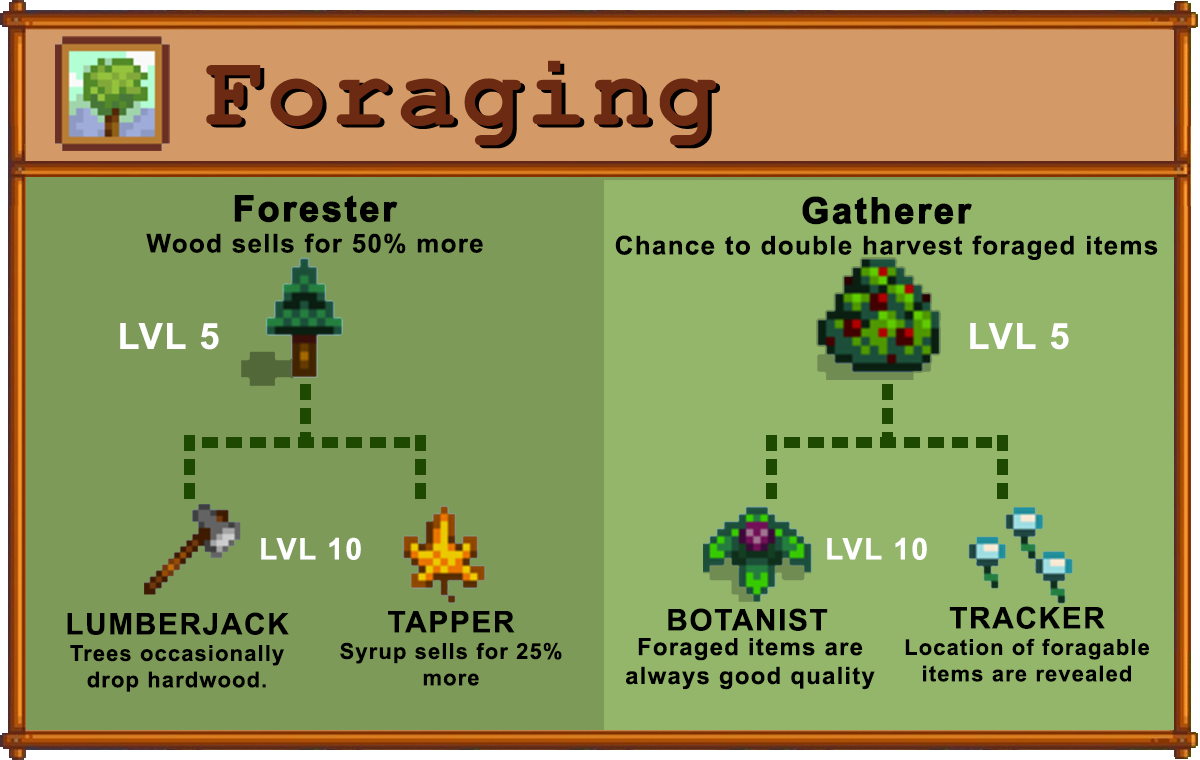
Foraging
Forester: Wood sells for 50% more
Lumberjack: Trees occasionally drop hardwood.
Tapper: Syrup sells for 25% more
Gatherer: Chance to double harvest foraged items
Botanist: Foraged items are always gold quality
Tracker: Location of foragable items are revealed
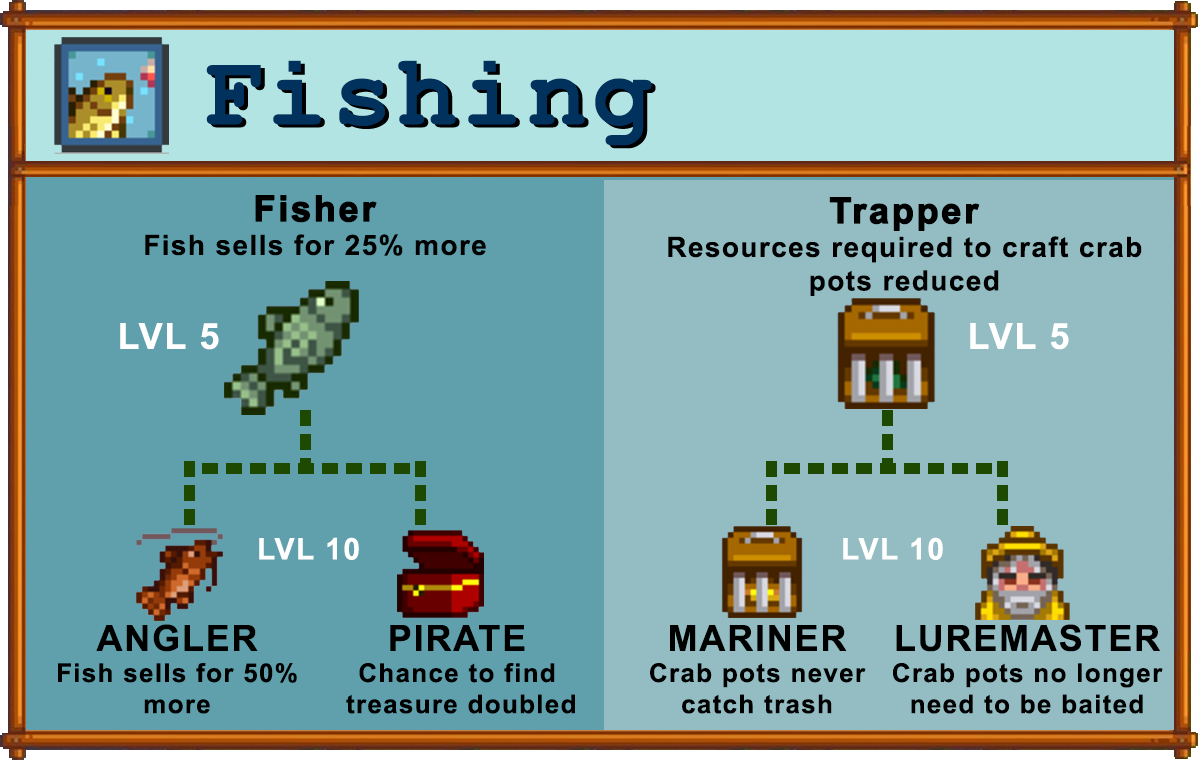
Fishing
Fisher: Fish sell for 25% more
Angler: Fisher sell for 50% more
Pirate: Chance to find treasure doubled
Trapper: Resources required to craft crab pots reduced
Mariner: Crab pots never catch trash
Luremaster: Crab pots no longer need to be baited
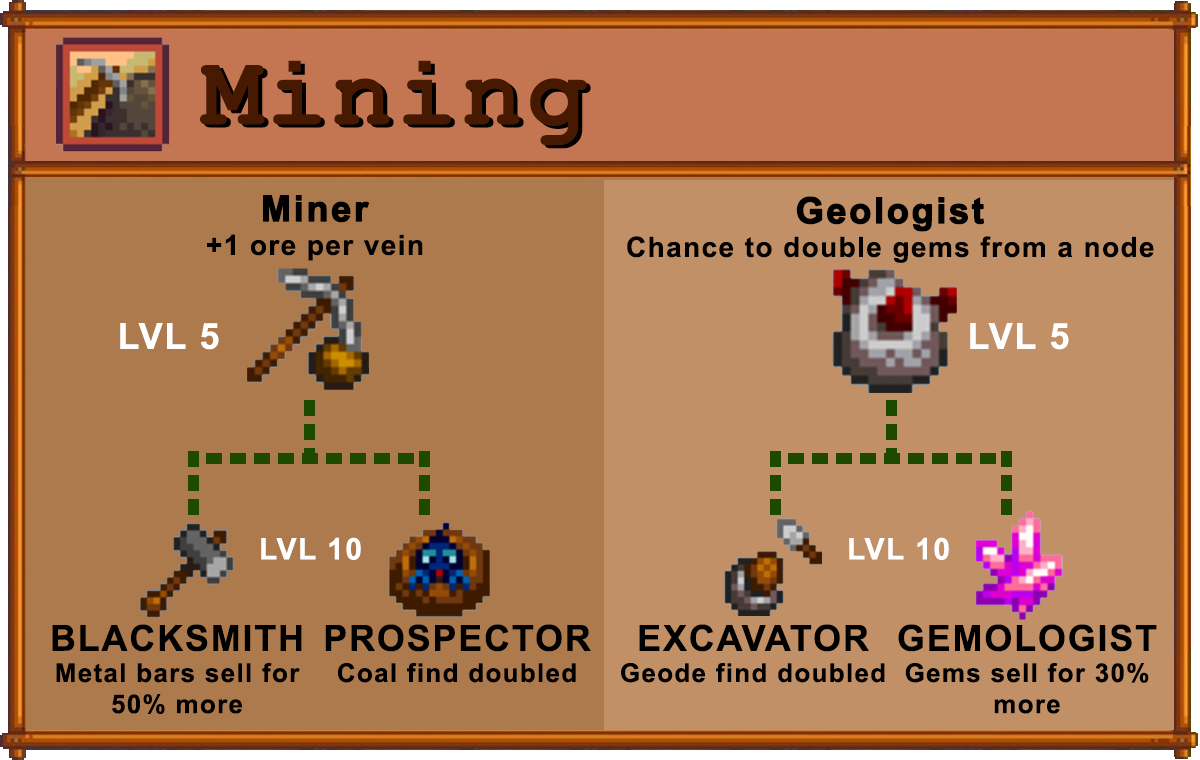
Mining
Miner: +1 ore per vein
Blacksmith: Metal bars sell for 50% more
Prospector: Coal find doubled
Geologist: Chance for double gems from a node
Excavator: Geode find doubled
Gemologist: Gems sell for 30% more
Combat
Fighter: +10% damage, +15 HP
Brute: +15 damage
Defender: +25 HP
Scout: Crit Chance +50% (2% to 3%)
Acrobat: Special attack cooldown reduced to half
Desperado: Critical hits are deadly (I assume OHKO)
Experience Table
While you can't really check what your experience is at, with this you can at least estimate where you are in your level.Level
Experience
1
99
2
379
3
769
4
1299
5
2149
6
3299
7
4799
8
6899
9
9999
10
14999
Monoculture
 Monoculture
Ship 300 of one crop.
If you're going for this achievement early on in the game, I'd recommend doing this with Blueberries in the Summer, or Cranberries in the Fall as you do not have to replant seeds (like Potatoes) and they yield multiple counts per harvest.
You can do this with any crop, to see which qualify, simply check Polyculture.
Mystery of the Stardrops
 Mystery Of The Stardrops
Find every stardrop.
Num
How-To
1
Reach Floor 100 of the Mines - Stored in a chest
2
Give Mr. Cannoli Statue in the Secret Woods a Sweet Gem Berry - Rare Seed via Traveling Cart
3
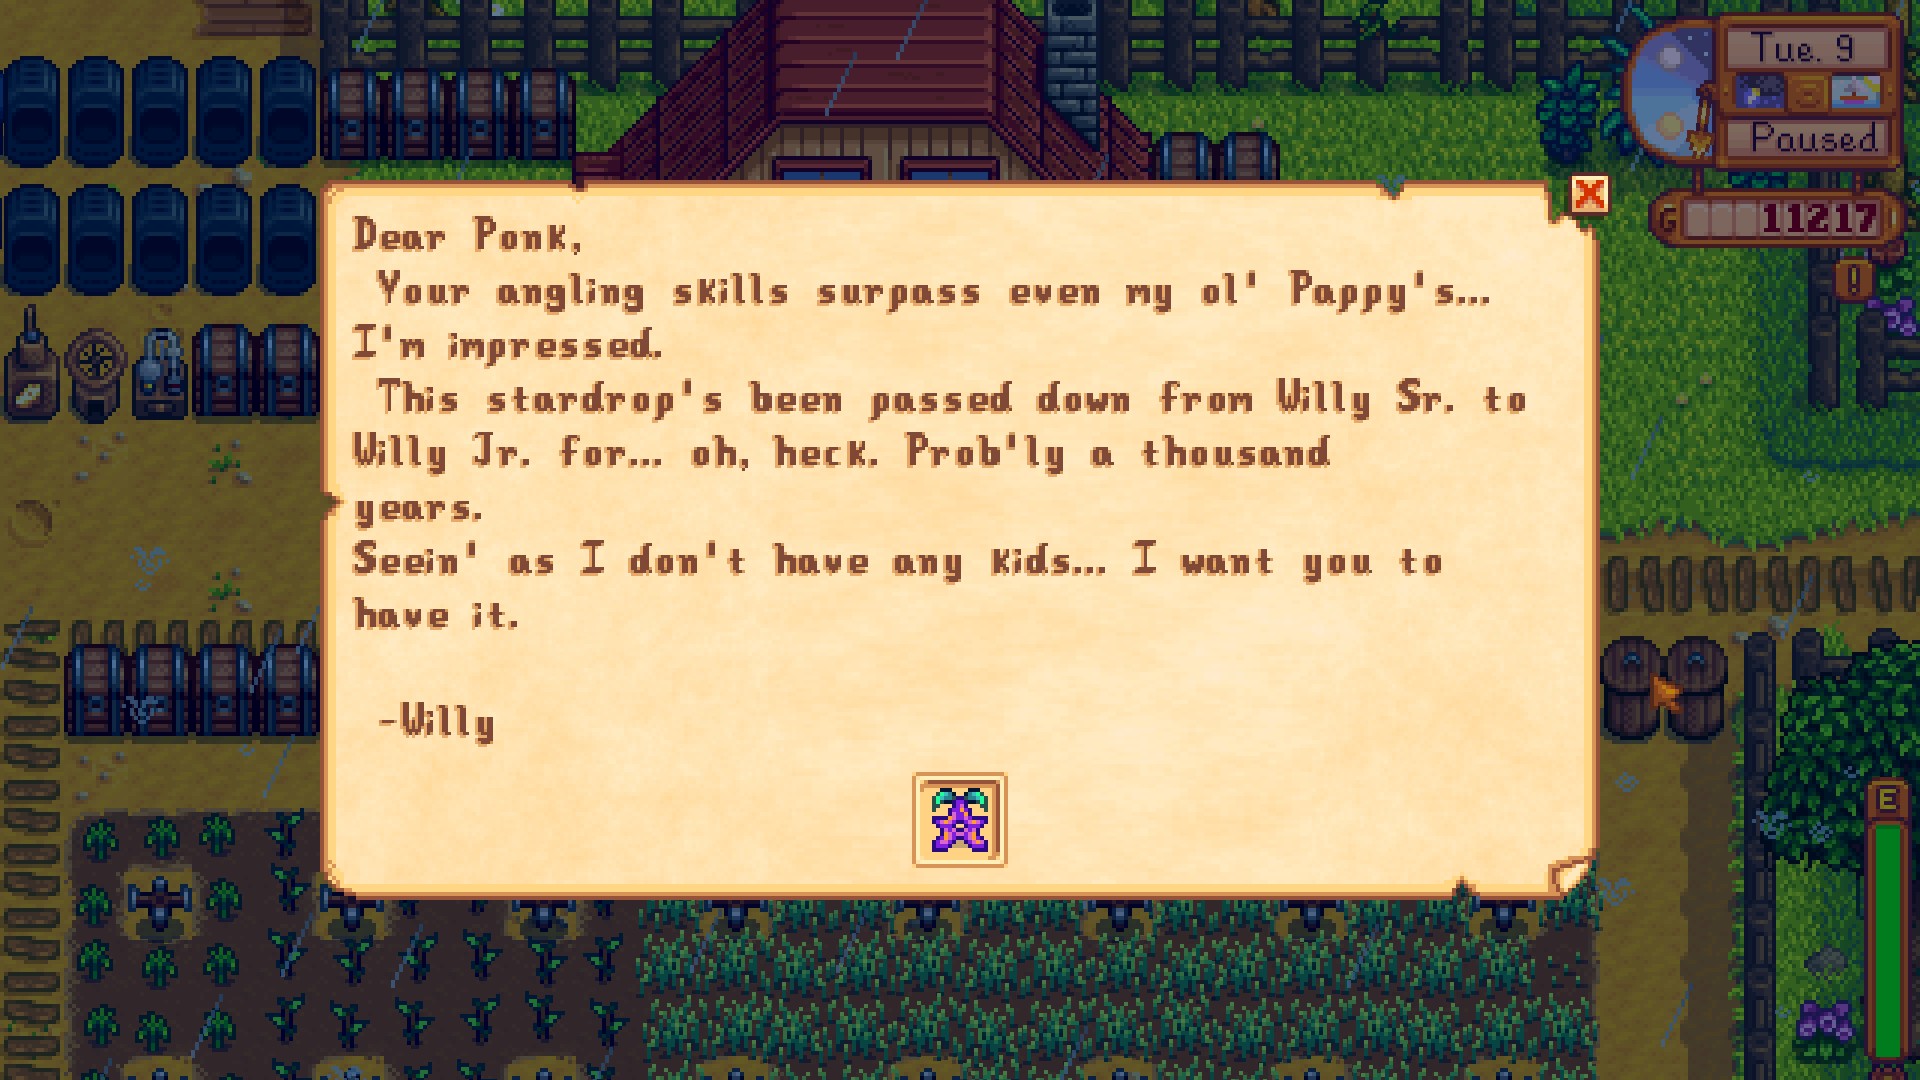
Buy one from Krobus in the Sewers for 20,000g. Access to the sewers via Gunther by donating 60 items
4
Given by your spouse when you reach 13/12 heart relationship (This value is only shown when talking to them from time to time)
5
Sent in the mail via Willy after completing Master Angler Achievement
6
Bought for 2000 Tokens at the Stardew Valley Fair - The only tip I can give is that winning 1st place in the Grange Display gives you 1000 tokens.
7
Complete the Museum Collection - See Museum Collection
Polyculture
 Polyculture
Ship 15 of each crop.
Spring
Crop
Notes
Parsnip
-
Potato
-
Kale
-
Green Bean
-
Cauliflower
-
Strawberry
Seeds sold at Egg Hunt Festival | Spring 13
Rhubarb
Seeds sold at the Oasis in the Desert
Garlic
Available in stores starting on Year 2
Coffee Bean
Update 1.1: Traveling Cart (2500g)
Summer
Crop
Notes
Wheat
-
Hot Pepper
-
Radish
-
Hops
-
Tomato
-
Melon
-
Blueberry
-
Corn
Also grows in Fall
Starfruit
Seeds available from the Oasis in the Desert
Red Cabbage
Available in stores starting on Year 2.
Fall
Crop
Notes
Corn
Also grows in Summer
Bok Choy
-
Eggplant
-
Cranberry
-
Amaranth
-
Yam
-
Artichoke
Available in stores starting on Year 2.
Grape
-
Pumpkin
-
Beet
Seeds available from the Oasis in the Desert
Protector Of The Valley - Adventurer's Guild
 Protector Of The Valley
Complete all of the Adventure Guild Monster Slayer goals.
After joining the Adventurer's guild, if you examine the bulletin board one til to the left of the fireplace, you'll find all the goals you need to complete for this achievement. For each goal you complete, Gil to the right will reward you with something.
All enemies can be found inside the mines are various levels.
Monster
Count
Location

Slime
1000
All mine floors | Secret Woods


Void Spirits
150
Floor 81+

Bats
200
All mine floors; for any old players, lava bats count now

Skeletons
50
Floor 71-79

Cave Insects
150
Floor 1-29 | Bug and Cave Flies count

Duggies
30
Floor 1-29

Dust Sprites
500
Floor 41-79


Crab
60
Rock Crab: 1-29
Lava Crab: Floor 80-119
Iridium Crab: Skull Cavern 26+
Lava Crab: Floor 80-119
Iridium Crab: Skull Cavern 26+

Mummy
100
Skull Cavern

Pepper Rex
50
Skull Cavern: Prehistoric Levels

Serpents
250
Skull Cavern
The Beloved Farmer - Relationships
 A New Friend
Reach a 5-heart friend level with someone.
 Best Friends
Reach a 10-heart friend level with someone.
 Cliques
Reach a 5-heart friend level with 4 people.
 Networking
Reach a 5-heart friend level with 10 people.
 Popular
Reach a 5-heart friend level with 20 people.
 The Beloved Farmer
Reach a 10-heart friend level with 8 people.
Relationships are associated with hearts. Each person has an event at every multiple of 2 hearts for a total of 5 events.
2 Hearts | 4 Hearts | 6 Hearts | 8 Hearts | 10 Hearts
Now, gifting is the most reliable method of improving your relationship with someone. So, you need to gift items that they either love or like.
1) Gifting them on their birthday gives them a big boost.
2) Gifting the right items during the Festival of Winter Star gives a big boost.
3) Completing help requests and mail quests is a big boost.
Things you should know about relationships:
1) Choices you make during these 'events' may have an effect on your relationship
2) Single friends cannot pass 8 hearts unless you give them a Bouquet
3) For Marriage, see Marriage section.
4) Completing the Community Center is a big boost.
Relationship Listing[docs.google.com] - Credit for creating this list goes to Vechh from /r/StardewValley
The Bottom - Mines
 The Bottom
Reach the lowest level of the mines.
There are a total of 120 floors to the mines. This achievement unlocks upon reaching Floor 120.
I won't mention much about enemies, that'll be located in 'Protector of the Valley'. This is more about going through the entire mines.
In the mines, there is a checkpoint every 5th floor of the mines due to access to the elevator. Every 10th level, you get a safe zone, and on all 10th floor except for 30, a chest with an item.
If you die in the mines, then you'll also lose some progress with the elevator.
Floor
Chest
10
Leather Boots
20
Steel Smallsword
30
40
Slingshot
50
Tundra Boots
60
Crystal Dagger
70
Master Slingshot
80
Firewalker Boots
90
Obsidian Edge
100
Stardrop
110
Space Boots
120
Skull Key
The objective of each floor is to simply find the ladder. The can be pre-spawned (rarely, but floor 58 generally has the same ladder over to the far right), hidden under a rock, or appear after killing an enemy.
There is also a chance for an infested cave encounter where you will only see enemies, and no rocks, ores, or nodes. A ladder will spawn under the ladder you came from once you defeat all enemies in the cave (one can still spawn from killing an enemy).
Three Tips
- You can craft a staircase using 99 stones that lets you place down a staircase. Stone is purchaseable from Robin at 20g each, or simply mine the giant rocks in the mines for 10 stones each. Good to speed run through the mines, or used sparingly if you're running low on time and you want to reach the next checkpoint.
- Using bombs to clear out large amounts of rocks to quickly find the staircase.
- If you're low on energy and have no energy replenishing items, you should aim towards killing enemies first because the sword does not consume energy.
Update 1.1
Depending on when you played Stardew Valley and due to the amount of content that this game has, I found it best to not only update the guide at each section to accommodate for the updates, but as create a section for each update of new things added. Note: These are only things that are related to the achievements.
Crop: Coffee Beans
- Season: Spring
- Acquisition: Traveling Cart (2500g) or Dust Sprite Drop
Fishing: Slimejack
- Season: All
- Acquisition: Mutant Bug Lair (See Magical Construction Questline)
Fishing: Void Salmon
- Season: All
- Acquisition: Witch's Swamp (See Magical Construction Questline)
Craft: Cask
- Acquisition: Build Cellar through House Upgrade (via Robin)
Item: Void Mayonnaise
- Acquisition: Use Void Egg on Mayonnaise Machine
Item: Mead
- Acquisition: Use Honey on Keg
Update 1.3
Master Angler
The 1.3.27 update introduces a new winter event that occurs on Winter 15-17 known as the Night Market which also adds 3 new fishing entries to the Master Angler achievement.Fish
Season
Location
Weather
Time
Type
Midnight Squid
Winter 15-17
Night Market
N/A
N/A
Fishing
Spook Fish
Winter 15-17
Night Market
N/A
N/A
Fishing
Blobfish
Winter 15-17
Night Market
N/A
N/A
Fishing
Craft Master
Note: The Wedding Ring is only available in a Multiplayer game and is not required in a Singleplayer game.Item
Ingredients
Recipe
Wood Sign
25x Wood
None
Stone Sign
25x Stone
None
Garden Pot
1x Clay, 10x Stone, 1x Refined Quartz
Evelyn cutscene after building Greenhouse
Wedding Ring
5x Iridium Bar, 1x Prismatic Shard
Traveling Cart - 500g
Update 1.4
Highlights
- Fish Pond can be purchased at the Carpenter's Shop
Craft Master
Item
Ingredients
Recipe
Grass Starter
10x Fiber
Pierre's Shop (1,000g)
Deluxe Scarecrow*
50x Wood, 40x Fiber, 1x Iridium Ore
Collect all 8 Rare Scarecrows - Letter
Mini-Jukebox
2x Iron Bar, 1x Battery Pack
Gus [5]
Tree Fertilizer
5x Fiber, 5x Stone
Lv 7 Foraging
Tea Sapling
2x WIld Seeds, 5x Fiber, 5x Wood
Caroline [2]
Warp Totem: Desert
2x Hardwood, 1x Coconut, 4x Iridium Ore
Buy from Oasis (10x Iridium Bar)
Brick Floor
2x Clay, 5x Stone
None
Deluxe Scarecrow
- Turnip Head Scarecrow: Purchase from Stardew Valley Fair for 800 Silver Stars
- Witch Scarecrow: Purchase from Spirit's Eve for 5,000g
- Alien Scarecrow: Purchase from Casino for 10,000 Qi Coins
- Snowman Scarecrow: Purchase from Traveling Cart during Fall/Winter for 4,000g
- Lady Scarecrow: Purchase from Flower Dance for 2,500g
- Dwarf Scarecrow: Purchase from the Dwarf for 2,500g
- Raccoon Scarecrow: Donate 20 Artifacts to the Museum
- Mask Scarecrow: Donate 40 Artifacts to the Museum
Full Shipment
Item
Where to get
Unmilled Rice
Grow in Spring [Year 2]
Caviar
Farm Sturgeon in Fish Pond for Sturgeon Roe | Use Sturgeon Roe on Preserves Jar
Aged Roe
Build Fish Pond for Roe | Use Roe on Preserves Jar
Green Tea
Use Tea Leaves on a Keg
Dinosaur Mayonnaise
Use Dinosaur Egg on Mayonnaise Machine
Roe
Fish Pond
Squid Ink
Harvest from Lightning Rod | Gift from Pam
Tea Leaves
Grows except Winter
Gourmet Chef
Name
Image
Ingredients
Recipe Source
Triple Shot Espresso
3x Coffee
Stardrop Saloon - 5,000g
Seafoam Pudding
1x Flounder, 1x Midnight Carp, 1x Squid Ink
Level 9 Fishing
Shrimp Cocktail
1x Tomato, 1x Shrimp, 1x Wild Horseradish
The Queen of Sauces [Even Year: Winter 28]
Master Angler
Fish
Season
Location
Weather
Time
Type
Flounder
Spring/Summer
Ocean
Any
All Day
Fishing
Midnight Carp
Fall/Winter
Lake
Any
Night
Fishing
Update 1.5 - Part 1
Highlights
- New Areas: Ginger Island, Volcano Dungeon
- Added Special Orders board
Full Shipment
Banana
Ginger Island - Island Trader for Sapling
Ginger
Ginger Island Forage
Taro Root
Ginger Island
Pineapple
Ginger Island
Mango
Ginger Island - Island Trader for Sapling
Cinder Shard
Volcano Dungeon
Magma Cap
Volcano Dungeon
Bone Fragment
Dropped by Skeletons
Radioactive Ore
Radioactive Bar
Craft at furnace with 5x Radioactive Ore and 1x Coal
Master Angler
Fish
Season
Location
Weather
Time
Type
Stingray
All Seasons
Ginger Island - Pirate Cove
Any
Any
Fishing
Lion Fish
All Seasons
Ginger Island - Ocean
Any
Any
Fishing
Blue Discus
All Seasons
Ginger Island - Pond/River
Any
Any
Fishing
Gourmet Chef
Name
Ingredients
Recipe Source
Ginger Ale
3x Ginger, 1x Sugar
Dwarf Shop - Volcano Dungeon [5000g]
Banana Pudding
1x Banana, 1x Milk, 1x Sugar
Ginger Island Trader - 30x Bone Fragment
Mango Sticky Rice
1x Mango, 1x Coconut, 1x Rice
Leo [7]
Poi
4x Taro Root
Leo [3]
Tropical Curry
1x Coconut, 1x Pineapple, 1x Hot Pepper
Ginger Island Resort [2000g]
Squid Ink Ravioli
1x Squid Ink, 1x Wheat Flour, 1x Tomato
Combat Level 9
Update 1.5 - Part 2
Craft Master
Item
Ingredients
Recipe
Hyper Speed-Gro
1x Radioactive Ore, 3x Bone Fragment, 1x Solar Essence
Qi's Walnut Room - 30 Qi Gems
Deluxe Fertilizer
1x Iridium Bar, 40x Sap
Qi's Walnut Room - 30 Qi Gems
Deluxe Retaining Soil
5x Stone, 3x Fiber, 1x Clay
Ginger Island Trader - 50x Cinder Shard
Fiber Seeds
1x Mixed Seeds, 5x Sap, 1x Clay
Special Request Board
- "Community Cleanup" for Linus
- "Community Cleanup" for Linus
Warp Totem: Island
3x Hardwood, 1x Dragon Tooth, 1x Ginger
Volcano Dwarf [10000g]
Cookout Kit
15x Wood, 10x Fiber, 3x Coal
Foraging Level 9
Rustic Plank Floor
1x Wood
Carpenter's Shop - 200g
Stone Walkway Floor
1x Stone
Carpenter's Shop - 200g
Fairy Dust
1x Diamond, 1x Fairy Rose
Ginger Island - The Pirate's Wife quest
Bug Steak
10x Bug Meat
Combat Level 1
Dark Sign
5x Bat Wing, 5x Bone Fragment
Krobus Mail after 3+ Heart
Quality Bobber
1x Copper Bar, 20x Sap, 5x Solar Essence
Special Request Board - "Juicy Bugs Wanted" for Willy
Stone Chest
50x Stone
Special Order Board - "Robin's Resource Rush"
Monster Musk
30x Slime, 30x Bat Wing
Special Order Board - "Prismatic Jelly" for Wizard
Mini-Obelisk
30x Hardwood, 20x Solar Essence, 3x Gold Bar
Special Order Board - "A Curious Substance" for Wizard
Bone Mill
10x Bone Fragment, 3x Clay, 20x Stone
Special Order Board - "Fragments of the past" for Gunther
Thorns Ring
50x Bone Fragment, 50x Stone, 1x Gold Bar
Combat Level 7
Glowstone Ring
5x Solar Essence, 5x Iron Bar
Mining Level 4
Farm Computer
1x Dwarf Gadget, 1x Battery Pack, 10x Refined Quartz
Special Order Board - "Biome Balance" for Demetrius
Ostrich Incubator
50x Bone Fragment, 50x Hardwood, 20x Cinder Shard
Complete all collections and surveys at Island Field Office
Heavy Tapper
30x Hardwood, 1x Radioactive Bar
Qi's Walnut Room - 20 Qi Gems
Geode Crusher
2x Gold Bar, 50x Stone, 1x Diamond
Special Order Board - "Cave Patrol" for Clint
Hopper
10x Hardwood, 1x Iridium Bar, 1x Radioactive Bar
Qi's Walnut Room - 50 Qi Gems
Solar Panel
10x Refined Quartz, 5x Iron Bar, 5x Gold Bar
Special Order Board - "Island Ingredients" for Caroline
Magic Bait
1x Radioactive Ore, 3x Bug Meat
Qi's Walnut Room - 20 Qi Gems
Update 1.6 - New Achievements
New Achievements
 Well-Read
Read every book.
The bookseller visits just above where Joja Mart is/was twice a season.
Overall, you only need to read 19 books, not all of them.
Required
Book Name
Acquire
Animal Catalogue
Sold by Marnie
Book of Mysteries
Mystery Boxes
Dwarvish Safety Manual
Sold by Dwarf
Friendship 101
Sold by Bookseller | Prize Ticket reward in Lewis' House
Horse: The Book
Sold by Bookseller
Jack Be Nimble, Jack Be Thick
Sold by Bookseller | Artifact Spots
Jewels Of The Sea
Sold by Bookseller | Fishing Chests
Mapping Cave Systems
Box in the Back of Adventurer's Guild after slaying 1000 monsters | Bookseller starting Year 3
Monster Compendium
Dropped by all monsters | Bookseller starting Year 3
Ol' Slitherlegs
Sold by Bookseller
Price Catalogue
Sold by Bookseller | Fishing Chests | Mystery Boxes | Artifact Spots
Raccoon Journal
Given by Good Neighbor Questline - Quest 2 | Sold by Raccoon Wife
The Alleyway Buffet
Between the Blacksmith and Joja-Mart, there's a part of the fence line that's covered by a tree that you can actually cross over. After breaking the large log and rock, there is a trash can behind a tree with the book.
The Art O' Crabbing
Catch 8 Squid during SquidFest
The Diamond Hunter
Sold by Dwarf in Volcano
Treasure Appraisal Guide
Sold by Bookseller | Mystery Boxes | Artifact Troves
Way of the Wind pt.1
Sold by Bookseller
Way of the Wind pt.2
Sold by Bookseller (after pt 1)
Woody's Secret
Chopping Trees
Not Required
Book Name
Acquire
Bait and Bobber
Sold by Bookseller | Fishing Chests | Mystery Boxes | Artifact Spots
Book of Stars
Sold by Bookseller | Given by Good Neighbor Questline - Quest 4
Combat Quarterly
Sold by Bookseller | Fishing Chests | Golden Mystery Boxes | Chopping Trees
Mining Monthly
Sold by Bookseller | Golden Mystery Boxes
Queen of Sauce Cookbook
Sold by Bookseller | Fishing Chests | Mystery Boxes | Artifact Spots
Stardew Valley Almanac
Sold by Bookseller | Fishing Chests | Mystery Boxes | Artifact Spots
Woodcutter's Weekly
Sold by Bookseller | Traveling Cart | Desert Festival | Cutting Trees
 Two Thumbs Up
See a movie.
After completing the Community Center in the bundle route and not the Joja route, there will be an thunderstorm event when you sleep. If you visit the Joja Mart that's run down, you will find the Missing Bundle. Complete the Missing Bundle, and the next day the juminos will work on Joja Mart and turning it into a Movie Theatre overnight. Pay 1000g at the entrance for a ticket, and enter for the achievement.
 Blue Ribbon
Get 1st place in the Stardew Valley Fair competition.
The Stardew Valley Fair occurs on the 16th of Fall every year. I won't go far into the best ways to do these, but you'll want to get 1st in the Grange for the achievement.
General strategy is to include items of different categories (at least 6 different categories) as well as higher quality for more points. The categories are: animal products, artisan goods, cooking, fishing, foraging, fruits, minerals, and vegetables.
 An Unforgettable Soup
Delight the Governor.
The Luau occurs on the 11th of Summer every year. As part of the event, you can place one item into the potluck soup. For this achievement, you'll want the best possible soup which can be obtained by placing specific items. Some of the easier ones to provide are gold tier goat milk, large milk, melon, or yams.
 Good Neighbors
Help your forest neighbors grow their family.
You'll need an overnight event for heavy winds causing a large tree to fall just south of your farm. Leftover is a stump and you can restore this stump to build a house here that will be inhabited by some critters.
This questline will alternate between fulfilling the requests and waiting until the next quest and will take several days in between requests. After the 8th quest, you'll finish this achievement.
 A Distant Shore
Reach Ginger Island.
In order to access Ginger Island, you will need to either restore the Community Center through bundles or fill out the Joja Community Form. Once there, you'll get a letter to go visit Willy in the Fish Shop.
After repairing the boat, you can take a ride to Ginger Island.
 Infinite Power
Obtain the most powerful weapon.
You'll need a Galaxy weapon which can be unlocked by obtaining the Galaxy Sword by offering a Prismatic Shard to the Three Pillars int he desert. You can either use that Galaxy Sword or buy Galaxy weapons from the Adventurer's Guild.
Next, you'll need to obtain 100 golden walnuts on Ginger Island to access Qi's Walnut Room and obtain Qi Gems to buy 3 Galaxy Souls. Then head to the top of the Volcano with 60 Cinder Shards to the Forge. Upgrade the Galaxy weapon 3 times to create an Infinity Weapon.
 Danger In The Deep
Reach the bottom of the 'dangerous' mines.
This will require you to obtain 100 golden walnuts on Ginger Island and then access Qi's Walnut Room on the west side of the island (the purple door). inside is Qi with a quest board on the left. Every Monday, the quests will rotate and you're specifically looking for the Danger in the Deep quest.
Once you have this quest, then the mines will be converted to the dangerous mines with the elevator reset. From there, make your way down to the 120th floor again within the quest duration time.
Update 1.6 - Collections
Full Shipment
Clam was removed from Page 1Name
How to Obtain
Smoked Fish
Add fish to Fish Smoker
Moss
Harvested from trees covered in green
Mystic Syrup
Obtain Mystic Tree Seed from Foraging Mastery and plant and apply Tapper
Raisins
Add grapes to Dehydrator
Dried Fruit
Add fruit (not grapes) to Dehydrator
Dried Mushrooms
Add mushrooms to Dehydrator
Carrots
Progress Good Neighbor Quest to buy seeds | Spring
Summer Squash
Progress Good Neighbor Quest to buy seeds | Summer
Broccoli
Progress Good Neighbor Quest to buy seeds | Fall
Powdermelon
Progress Good Neighbor Quest to buy seeds | Winter
Craft Master
Name
How to Obtain
Big Chest
Sold by Robin (5k)
Big Stone Chest
Sold by Dwarf (5k)
Dehydrator
Sold by Pierre (10k)
Fish Smoker
Sold by Willy (10k)
Mushroom Log
Foraging 4
Bait Maker
Fishing 6
Heavy Furnace
Mining Mastery
Text Sign
N/A
Anvil
Combat Mastery
Mini-Forge
Combat Mastery
Statue of Blessings
Farming Mastery
Statue Of the Dwarf King
Mining Mastery
Tent Kit
Foraging 8
Treasure Totem
Foraging Mastery
Mystic Tree Seed
Foraging Mastery
Deluxe Bait
Fishing 4
Challenge Bait
Fishing Mastery
Deluxe Worm Bin
Fishing 8
Sonar Bobble
Fishing 6
Blue Grass Starter
40 Qi Gems from Qi's Walnut Room
Gourmet Chef
Name
How to Obtain
Moss Soup
Foraging 3
Master Angler
Name
How to Obtain
Goby
Any season, fish the waterfall
River Jelly
Any season | Rare Item | Freshwater
Cave Jelly
Any season | Rare Item | Caves
Sea Jelly
Any season | Rare Item | Seawater
For the jellies, you can increase your luck for better drop rate. Jelly is not a fish, it catches like items such as driftwood, newspaper and glasses.
Goby Location:
Update 1.6 - Perfection
 Perfection
Reach the summit.
Once you unlock Qi's Walnut Room, the board on the right is a perfection tracker, so you'll want to hit 100% on that list.
Overall, would recommend this tool to see how your save is doing and what you're missing. You don't need to do everything in the checklist, just the perfection listed ones and this corresponds to the perfection list given by Qi's Board: https://mouseypounds.github.io/stardew-checkup/#sec_Skills
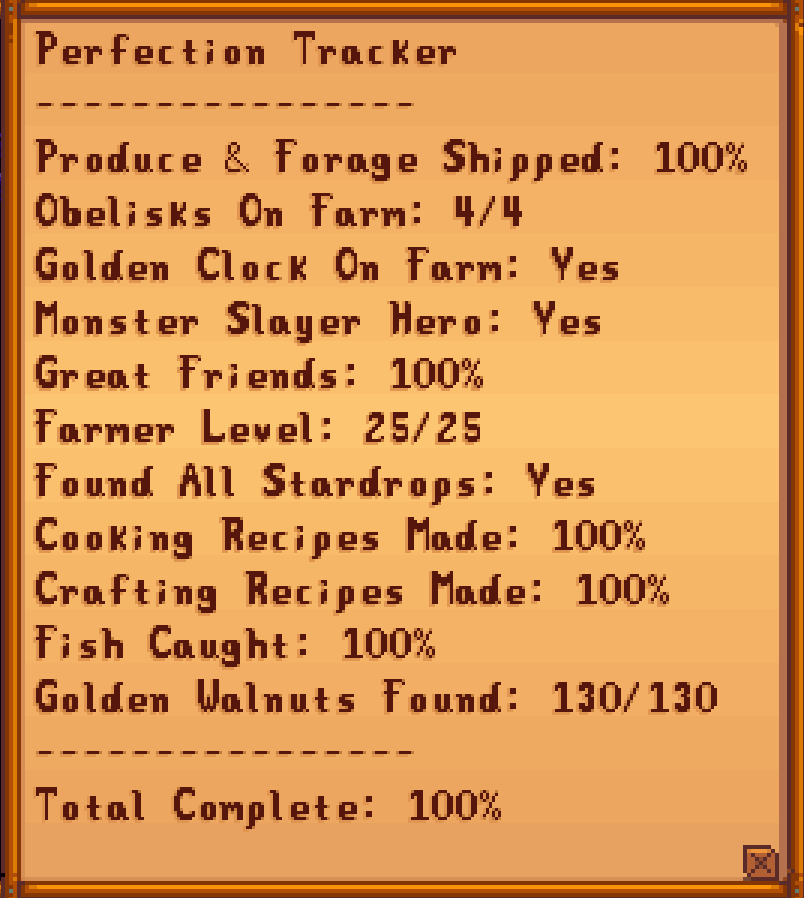
Requirements
Requirement
Notes
Ship all 145 items in the Shipment Collection
See Full Shipment
Build an Earth Obelisk, Water Obelisk, Desert Obelisk, and Island Obelisk.
Complete the Goblin Problem quest and then the Wizard will let you build these
Build a Golden Clock on the Farm
See obelisk note.
Monster Slayer
Complete every monster eradication goal at the Adventurer's Guild
Great Friends
You'll need 8 hearts for all datable folks, and 10 hearts for all non-datable folks
Farmer Level 25
Hit Level 10 in all 5 Skills
Found all Stardrops
See Mystery of the Stardrops
Cook every recipe
See Gourmet Chef
Craft all items
See Craft Master
Catch all fish
See Master Angler
Find all Golden Walnuts
There's 130 in total: would just check here combined with the checklist: https://stardewvalleywiki.com/Golden_Walnut
You can confirm your state in game or through the checklist provided. Once you're done, you'll be able to access the Summit just north of the Train Station after sleeping.
FAQ
Q: Where is Robin's Lost Axe?
A: Forest, directly south of Leah's House across the river. Follow the cliff on the right.
Q: Where are the Mayor's Shorts?
A: Marnie's Bedroom; will need 2 hearts to enter her room.
Q: Where is Linus' berry basket?
A: Go to the Bus Stop, head to the left using the road to find his berry basket on the next map. (Lower level of the Backwoods)
Q: Why did my crops die?
A: Crops are a season thing, so when a season dies, all crops that cannot survive in the new season will wither away. Realistic or not, that is the mechanics of the game.
Q: An earthquake happened. What is it?
A: First off, the earthquake did not kill your crops. Secondly, it unlocks a new area. Check the area just north of the Carpenter's Shop (Robin/Demetrius/Maru/Sebastian).
Q: What does the train do?
A: From time to time, a train may drop resources while it passes through Pelican Town.
Q: What is the Witch Event?
A: This requires a Chicken Coop, not sure what size, but it always occurred on my Deluxe Coop. A witch will visit overnight while you sleep giving you a cutscene. This will GUARANTEE a Void Egg in your coop that you can hatch and harvest more void eggs. Other than the Full Shipment achievement, no real advantages here.
Q: I was sleeping and an explosion happened overnight. What is it?
A: This is a meteorite hitting your farm. Search around for a round purple meteorite that yields Iridium Ore. Requires a Gold Pickaxe to mine. Does not disappear if you don't mine it. It also has specific spawning points, so if a building is occupying a meteor spot, the meteor will not fall there.
Changelog
April 2024
- Full Shipment - Fully Updated + Fixed Broken Steam Images
- Master Angler - Fully Updated
- Craft Master - Fully Updated + Fixed Broken Steam Images
- Gourmet Chef - Fully Updated
March 2024
- Updating for 1.6
- Updated 1.6 section for new changes
March 2023
- Making changes for 1.5
- Removed ingredient list section, too much to keep up with and serves little purpose
- Created distinction sections for 1.3 and 1.4 as well
- Updated Master Angler achievement
- Updated Gourmet Chef achievement
- Updated Full Shipment achievement
- Updated Craft Master achievement
December 20, 2016
- This update is primarily for: Update 1.1
- Skill: Rancher 10% to 20%
- Skill: Artisan 50% to 40%
- Skill: Blacksmith 25% to 50%
- Added Slimejack and Void Salmon to Fishing
- Added Spring Section
- Added Summer Section
- Added Fall Section
- Added Winter Section
- Updated Full Shipment: Void Mayonnaise, Coffee Bean, Mead
- Updated Craft Master: Cask