Ultimate Nightreign Guide: Solo Climbing Random Trios to Depth 5 – 9999 (Boss Mechanics, Pathing, Relics, New/Casual/Hardcore)
 Cider
Cider(105 ratings)
Nov 15, 2025 @ 1:03pm6,466198
AchievementsCharactersClassesCo-opGame ModesGameplay BasicsLootMaps or LevelsMultiplayerSecretsWalkthroughsWeaponsEnglish
Lecture/Accompanying Guide Video
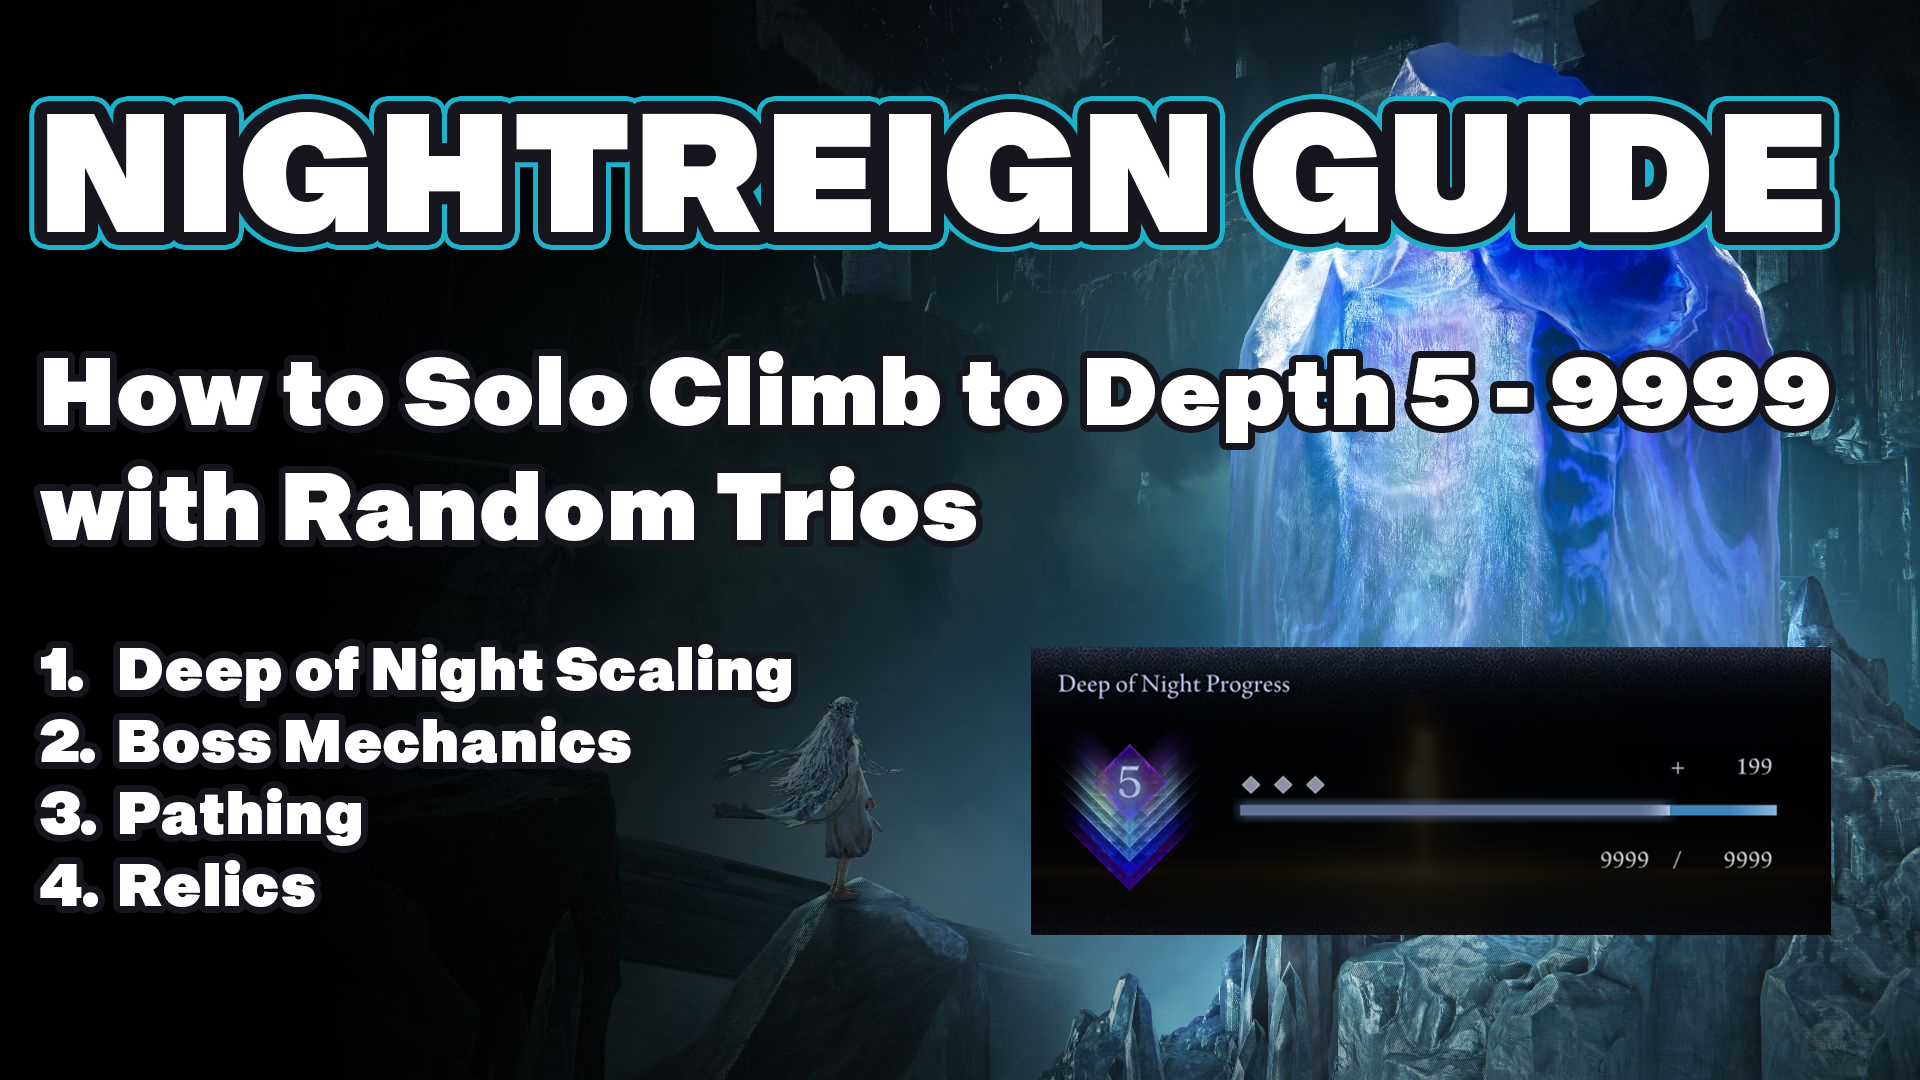
1. Deep of Night Scaling
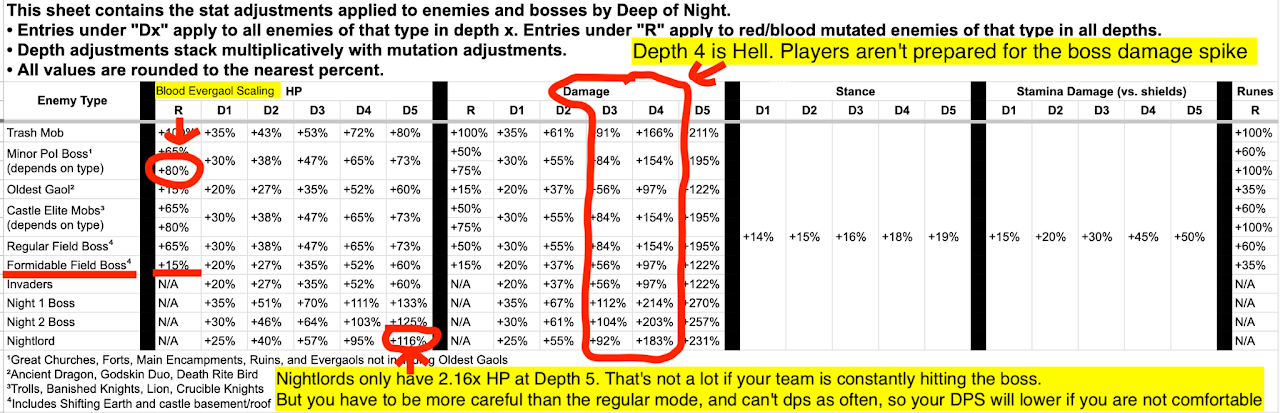
If you look at the scaling in Deep Of Night, it can help you make better decisions. For example, notice on the left that regular Evergaols and field bosses get a 65-80% HP increase for being blood/red. Formidable ones only get a +15% HP increase.
The return on investment for your time doing the Red Formidable bosses can be much higher, if done at the right time. At the same time, they attack more frequently, and could cost you more time than just +15% HP alone, like the other Red bosses/mobs. Red Trash mobs give double runes and guarantee a drop. To get a drop in the base game you had to open interactables, chests, or kill special monsters. Your item pool potential has now increased if you kill red mobs.
Credit for table: https://docs.google.com/spreadsheets/d/1Yu1QWcDTBSIwx3NA9SuyrxqY7pCeE9jzzb9wcRInVJg/edit?gid=721645342#gid=72164534
2. Boss Mechanics (don't skip this section, it's the most important)
What if I told you can do 2x more damage to Animus in Everdark Gnoster, or that Melees can do more than Casters, by just learning 1 mechanic? Many Depth 5 players still aren’t aware of that mechanic as of this guide. This guide does not cover all the mechanics and skips over many basic ones, but these are the ones most important ones I found off random Reddit posts and use, that might not be obvious to dodge by playing the game.
The most important thing in this game is to know as many boss mechanics as possible. It can save your runs, a team wipe, increase DPS, and save you from so much suffering/time. This is the boring part of the guide, but it is the most important part of the guide everyone skips because they think they know them all already. I included aura farming clips with them for entertainment, so that you too, might be able to aura farm as well.
The most important thing in this game is to know as many boss mechanics as possible. It can save your runs, a team wipe, increase DPS, and save you from so much suffering/time. This is the boring part of the guide, but it is the most important part of the guide everyone skips because they think they know them all already. I included aura farming clips with them for entertainment, so that you too, might be able to aura farm as well.
General Skills to learn for Trios (Aggro Switching, Clutch Reviving, Aura Farming)
https://www.youtube.com/watch?v=3aQficUvHYo
- Aggro switching
- You need to be prepared for the boss to switch aggro. This can happen immediately when someone gets downed or when you do many hits/high dps to the boss. Even with Less Likely to be Targeted +12, Fulghor would do a 180-snipe 1-shot the 3-Bar Ironeye.
- Some players build muscle memory, prepare for the worst, by dodging even when they don’t have aggro. It helps prevent getting cross-fired by your teammate dodging into you, or large aoes. Doing this will lower your DPS, but for some attacks, it may be worth it.
- You need to be prepared for the boss to switch aggro. This can happen immediately when someone gets downed or when you do many hits/high dps to the boss. Even with Less Likely to be Targeted +12, Fulghor would do a 180-snipe 1-shot the 3-Bar Ironeye.
- Reviving the one downed player
- When ⅓ of the players get downed, the person holding aggro should try and keep aggro and focus on staying alive, drawing the boss away. The other person without aggro on the boss, should start reviving the other player. When you are reviving your teammates, there is a very high chance the boss will switch aggro and start chasing you down. Your other teammate who lost aggro, needs to pick up the slack on the revive, or if you’re good enough, you can revive while dodging.
- If someone is really throwing, it might not be worth reviving them at all, and you might want to finish the boss instead. But if you can, try to revive them a few times first.
- When ⅓ of the players get downed, the person holding aggro should try and keep aggro and focus on staying alive, drawing the boss away. The other person without aggro on the boss, should start reviving the other player. When you are reviving your teammates, there is a very high chance the boss will switch aggro and start chasing you down. Your other teammate who lost aggro, needs to pick up the slack on the revive, or if you’re good enough, you can revive while dodging.
- Reviving teammates while dodging the boss at the same time
- This is a skill that requires knowing how to dodge boss patterns at a close range, under pressure, and can save entire runs. All characters have a way to revive their 3-bar teammates, but some have it easier than others. The revive bars do not scale linearly.
- TLDR: Only 40 revive damage for the first bar is needed. A total of 240 revive damage is needed for depleting all 3 bars. Credit: https://docs.google.com/spreadsheets/d/1w1qkrqrbp3uQ7d4MyYv4CYAWhKfanQnhI2hLf1Fkn6k/edit?gid=1667142776#gid=1667142776
- Wylder melee 1 bar, ult 2 bars.
- Duchess must melee 1 bar, invisibility lasts for 2 bars of melee.
- Raider ults for 1 bar, melees on Totem.
- Revenant can use summons and melee, ult both teammates at 3 bars with decent range, or drop the claws for other characters to use for the fastest melee revives in the game, due to her special/limiting moveset.
- Guardian has a shockwave relic and his ult.
- Recluse ult is weak, only does 1 weak bar, but has extreme range. Melee for the rest. The i-frame for your ult doesn’t last long and you can die while in animation. Cannon of Haima helps, but is RNG. If the boss is low enough, it may be better to solo the boss since she has high DPS.
- Ironeye can ult for 2 bars at range, usually ranged or melee the rest.
- All ranged characters should try and learn how to dodge bosses at close range, so that they can revive their teammates while being under attack if needed. You get less room for error in Deep of Night over the base game, so this is why supplemental guides can help you with that if you don't want to do regular runs. But simply knowing them won't be enough to master them and the variables in trios.
- This is a skill that requires knowing how to dodge boss patterns at a close range, under pressure, and can save entire runs. All characters have a way to revive their 3-bar teammates, but some have it easier than others. The revive bars do not scale linearly.
- Consider turning off lock-on entirely, off of the boss, off of your teamates when reviving them. Keep an eye on the boss while reviving
- You'll probably notice that I do this often in the below aura farming clips. It pays off to watch the boss while reviving, as the aggro can switch to you.
- Play the character you are most comfortable with instead of trying to “balance” the team comp.
- The most broken team composition right now is Ironeye, Duchess, and Recluse. Wylder can be considered to be a part of the best team comps. It works in Depth 5, because you can’t afford to get hit much anyway with enough damage negation. You don't need a x y z comp with x y z characters. Everyone can do damage, even Guardian. People get hit all the time in Depth 5 though. You can climb by playing only one character to 9999, even as a Guardian, so long as you know the limits, needs of your class, your team, and the bosses. If you don’t main Ironeye, Duchess, or Recluse, there’s a pretty good chance you’ll get some okay damage comp (Wylder, Executor, Revenant). Still perfectly fine.
- The only “exception” to where a specific team comp makes a fight that much easier, would be Everdark Caligo at Depth 5. Cancelling her Ultimate Frostbite as Wylder/Ironeye (Raider, Guardian, Executor, kinda) can make the fight way more easier. The more Frostbite you take from ED Caligo’s ult, the less resistant to Frost you become, and you lose HP. This attack is “avoidable” through i-frames from your ult, but otherwise it can really burn through your HP, and you have to tank it and dps race.
- There's nothing wrong with being a flex/balanced player, either, just don't feel the need to. You can see how powerful character mastery can be in the flex/aura farm clips I posted below.
- The most broken team composition right now is Ironeye, Duchess, and Recluse. Wylder can be considered to be a part of the best team comps. It works in Depth 5, because you can’t afford to get hit much anyway with enough damage negation. You don't need a x y z comp with x y z characters. Everyone can do damage, even Guardian. People get hit all the time in Depth 5 though. You can climb by playing only one character to 9999, even as a Guardian, so long as you know the limits, needs of your class, your team, and the bosses. If you don’t main Ironeye, Duchess, or Recluse, there’s a pretty good chance you’ll get some okay damage comp (Wylder, Executor, Revenant). Still perfectly fine.
- Know what items and passives your teammates are looking for, and share them. Take a look at their items and relics every so often.
- If you don’t help your teammates get what they need, they may become useless in fights, and drop your DPS significantly more than any other relic or item would give you.
- Melees want Damage Negation on Successive Attacks, so that they can DPS at close range without worrying about getting 1 shot. A melee with enough vigor is usually fine with one Damage Negation at Full HP.
- A squishy character could need 2 Full Damage Negation at Full HP to survive in Depth 5. Usually one is sufficient at Depth 4, or could use some other passive help elsewhere.
- Revenant/Duchess needs shards from Rises. A Recluse could use a Rise. Recluse/Duchess might not get a Shattering Crystal from the rise due to RNG, but you could get it for them. Revenants may struggle to get the right incantations due to RNG.
- An Ironeye/Executor/Guardian might want a smithing stone to upgrade his base bow, ailment katana, shield from blue to purple for +20% damage.
- A weapon drop that is not your classes’ dormant power, could still be worth taking, giving to your teammates. It could be a big power spike for your team, especially if the Nightlord is weak to it.
- If you don’t help your teammates get what they need, they may become useless in fights, and drop your DPS significantly more than any other relic or item would give you.
- "My randoms are griefing/quitting/disconnecting". Common issue at lower Depths, but you probably didn't want them as a teammate anyway.
- Although you are getting griefed, duoing can be a blessing sometimes as the scaling is easier, poise breaking trash mobs though harder to revive teammates,. That's why there's 3 bullet points on reviving teammates. There were some games I hoped my random wouldn't come back because the Nightlord fight became that much easier.
[*[b]]A lot of boss attacks have lingering aoes, effects, elements from their attacks, that will damage you if you don't avoid those [/b]. Examples are Everdark Gladius's fire, Adel's Lightning chomps, Adel's diving ground shockwave, Heolstor's darkness goo, Fulghor's goo, etc. These effects can be even more dangerous when playing in trios, even though you might not have aggro, you could get hit by them. I try dodge them often in the Everdark Gladius videos I included. Some of them can be difficult to spot too.
Everdark Gnoster / Normal Gnoster
Everdark Gnoster
This boss can be a nightmare if two people don’t know the fight. But it can become really easy knowing a few mechanics. Any character, including melees can do massive damage learning one mechanic. That mechanic?
Depth 5 Everdark Gnoster Animus's 15 second Damage Window
https://www.youtube.com/watch?v=PybLZ5dxmdM
Animus lands floats on the ground after casting her orbital laser attack. All characters no matter what spell or weapon they have, can do massive damage to Animus in this 15 second window. When dodging the orbital laser attack, you want to target your strafe to return back to where Animus was casting the spell. Don't do it if you have the giant laser. Be careful of aggro from Faurtis/Gnoster of course.
There are other ways to damage Animus
There are also two main strategies for this fight.
Depth 5 Everdark Gnoster Dodging Enhanced Rain with Regular Sprint
https://www.youtube.com/watch?v=lcNeB3vtaEU
Other Must-know Mechanics include
Normal Gnoster
This boss can be a nightmare if two people don’t know the fight. But it can become really easy knowing a few mechanics. Any character, including melees can do massive damage learning one mechanic. That mechanic?
Depth 5 Everdark Gnoster Animus's 15 second Damage Window
https://www.youtube.com/watch?v=PybLZ5dxmdM
Animus lands floats on the ground after casting her orbital laser attack. All characters no matter what spell or weapon they have, can do massive damage to Animus in this 15 second window. When dodging the orbital laser attack, you want to target your strafe to return back to where Animus was casting the spell. Don't do it if you have the giant laser. Be careful of aggro from Faurtis/Gnoster of course.
There are other ways to damage Animus
- Hitting the model directly as it is possessing Faurtis/Gnoster (requires aerial projectile spells, certain items to be effective, short window)
- Hitting enhanced Faurtis/Gnoster (there will be damage reduction on Animus).
There are also two main strategies for this fight.
- Heavy DPS Animus, Faurtis, and Gnoster. Most players will use this strategy, but you have to know how to dodge every attack. Someone needs to know how to deal with aggro with Enhanced Gnoster. This is probably the more common method of fighting (or losing to) this boss, so don’t expect to always be able to do Strategy 2 which I find much easier, unless you’re the lurer and your teammates don’t attack Gnoster.
- Have anyone lure Gnoster (probably not Recluse/Duchess, so they can attack Animus), and never kill Gnoster. By never killing Gnoster, the lurer does not have to dodge Gnoster’s Enhanced regular homing missiles, which is a delayed attck, and your team doesn’t have to dodge the falling missiles/ultimate. The catch is your teammates have to be comfortable fighting Faurtius only. They should attack Animus’s model during the possession window and/or after it lands on the ground after the orbital laser attack. I prefer this strategy as I find it more stable, has less chaos, and you have to dodge less mechanics, but not everyone will want to do this strategy.
Depth 5 Everdark Gnoster Dodging Enhanced Rain with Regular Sprint
https://www.youtube.com/watch?v=lcNeB3vtaEU
Other Must-know Mechanics include
- You can dodge the Animus’s orbital laser attack by regular sprinting (hold down dodge button). You may need to conserve stamina for a few seconds if you have the aggro for the giant final beam.
- You can dodge Enhanced Gnoster’s falling rain attack, simply by regular sprinting away or to the side.
- To survive against Faurtis, if you stay positioned by his tail, he can’t really harm you. To dodge the exploding red vines from enhanced hcned Faurtis, you must wait for the particles/vines to travel to you, and then dodge, not right away when the ground gets highlighted. Move far away when he shouts.
Normal Gnoster
- Just have anyone lure regular Gnoster away from Faurtius in Phase 1.
- If combined Gnoster/Faurtius starts shouting, and charges at you, sprint to the side, dodge 2-3 times while sprinting to avoid the missiles from Gnoster.
Everdark Libra / Normal Libra
Everdark Libra
There are two ways to deal with ED Libra. The first is the easiest, but RNG dependent. This fight becomes trivial, solo carry-able, if at least one person has a passive of at least “Less Likely to be Targeted +9”.
Depth 5 Everdark Libra - Revenant Hard Carry Example
It's not easy, but it's easier than it looks with enough practice and patience. Libra does less moves than his enhanced version.
https://youtu.be/G9eH1ADAxCo
https://www.youtube.com/watch?v=yfRmftiNlRc
Other Mechanics that are important to know
Normal Libra
https://www.youtube.com/watch?v=jyhgFHAH5mg
There are two ways to deal with ED Libra. The first is the easiest, but RNG dependent. This fight becomes trivial, solo carry-able, if at least one person has a passive of at least “Less Likely to be Targeted +9”.
Depth 5 Everdark Libra - Revenant Hard Carry Example
It's not easy, but it's easier than it looks with enough practice and patience. Libra does less moves than his enhanced version.
https://youtu.be/G9eH1ADAxCo
https://www.youtube.com/watch?v=yfRmftiNlRc
- Everyone should get at least +9. This makes the fight much easier. Don’t throw away the +6 you may find, as it would be worth combining with another +6. The condemned give up chasing you at +9 (they may aggro if you’re reviving someone). People with that passive can DPS Libra without worrying about the condemned. He uses a smaller moveset of his regular version. If you don’t have it, run, stay alive. You should run in case you need to revive your teammates later who are fighting Libra.
- At last resort, due to bad RNG, if you don't get Less Likely To be Targeted passives, you can still win. If your casters have good aoe spells (Mohg’s Spear), confident melees with stance break, damage negation, ultimates like Duchess’s, and Defeating enemies fills more of the Art gauge +0/+1, you can kill all the condemned until the Riot phase.The spawns may get out of control, because you’re focused on dodging. You’ll be attacking ED Libra a lot when the condemned are gone, so you can try to end the fight before it gets out of control or while it gets out of control. I’ve completed a few runs like this. Usually they include Mohg’s Spear/Duchess Ultimate, but those are not mandatory. Skilled players that know how to kill the condemned and survive is enough, but it's a tall order.
Other Mechanics that are important to know
- During the Day, your team needs to do everything in their power, opening chests, killing red mobs, focusing on Night Invaders, camps, checking shops, instead of doing Evergaols or low-priority drop POIs. You can also get Less Likely to be Targeted by clearing any Field/Formidable bosses too. Unfortunately, your best chance at winning with the DoN scaling of the condemned, is getting at least one “Less likely to be targeted +9”. If you want to trio with a squad for more damage to burst the condemned, than you can do Evergaols on Day 2, but it's not mandatory.
- Take your time, it’s okay if your DPS is slow until the Riot phase. Libra himself doesn’t have that many attacks. After the first Riot, the fight will go faster and become easier. It took several runs to slow down entirely and break my base game habits.
After attacking Libra enough times, he will go mad, and attack the condemned nearby. The condemned will also attack Libra. A Condemned Revenant can do 600-800 damage to Libra per lightning spear. - You cancel Libra's quadrant holy walls with certain ultimates like Ironeye. If you have Less Likely to be Targeted, it might be worth saving your Ultimate for emergencies/revives instead. A great time to cancel Libra's walls is when you are trying to DPS the condemned as a team.
- Try luring Libra away from the condemned.
Normal Libra
- Your team comps might not have the ultimates/attacks/poise break to break Libra’s sigil/meditation at later stages. It’s fine, but focus on dodging while he’s enhanced.
- If your teammates get downed, you can revive them when Libra starts meditating again.
- If you really want to min-max the fight, you can save your frenzy spells, for when your team is unable to break his meditation bubbles/sigils After he gets enhanced, you can start applying frenzy, to make him simmer down a bit.
https://www.youtube.com/watch?v=jyhgFHAH5mg
Everdark Maris / Normal Maris
Everdark Maris
ED Maris is much easier when all 3 players know the mechanics. It can be extremely difficult to solo carry. I'm not skilled enough at the fight to solo carry at Depth 5 even though I'm aware of all of the mechanics. There is a path to solo carry, and I have an idea of as to how, so I'll go practice after finishing writing this guide.
Normal Maris
https://www.youtube.com/watch?v=f-v3wPGn6RU
ED Maris is much easier when all 3 players know the mechanics. It can be extremely difficult to solo carry. I'm not skilled enough at the fight to solo carry at Depth 5 even though I'm aware of all of the mechanics. There is a path to solo carry, and I have an idea of as to how, so I'll go practice after finishing writing this guide.
- Charge Storm Ruler to damage Maris, the skill from the weapon that drops from killing Augur/Phase
- When Maris starts sending exploding water bomb balls at you, keep your lock-on on Maris, and spam the light attack version of the Storm ruler skill. Your light attack Storm ruler projectile will get rid of the bomb balls, and you barely have to move or dodge, if all 3 players are sending light attack projectiles out. Light attacks will drain your FP, so you need to charge your FP again by holding the heavy attack. It’s best to stay somewhat nearby to your teammates due to this mechanic.
- For his Ground Exploding Laser Beam, it is one of the hardest mechanics to learn due to how long this fight can become at Depth 5. There are barely any visual or sound anchors to time your dodge correctly. Unfortunately my best tip is just building muscle memory to dodge when actual explosion aoe approaches to your character, abuse i-frames, or surge sprint dodge away.
- Avoid reviving your teammates when Maris is sending out Tsunami Waves. You might not want to be the last to die, but trying to revive your teammates can end entire runs, as you get surrounded by the waves. while reviving your teammates. Once your teammates are revived, they could get stuck in the wave and die again right away.
- Maris’s Dark Balls. In this phase, getting downed can ruin the run, and can make solo carrying much more difficult, as Maris does other attacks with balls active.
- Use lock-onto the balls with and spam the light Storm Ruler skill attack.
- Stay near Maris so that your projectiles can lock onto the Dark Balls.
- If you can’t clear the Dark Balls in time, Maris might trigger his sleep skill. This can be cancelled with enough stance damage from charged Storm Ruler in solo mode, but he will have more stance in trios. Ideally clear his balls to stop this from happening, but it is technically possible to break his stance using charged Storm rulers while he has the balls active.
- When your Storm Ruler is fully charged, the lasers from the Dark balls won’t damage you. Pretty niche, I prefer to just strafe to the side.
- Use lock-onto the balls with and spam the light Storm Ruler skill attack.
Normal Maris
- Everyone should have at least one lightning weapon to break Maris’s stance when he triggers Sleep skill. Sprint towards him as soon as he starts running away to cast his Sleep skill.
Killing the suicide Jellyfish bombs will do damage to Maris. It’s worth it for your trio to focus on killing them, so you don't get bombarded with explosions as well. Aoe spells help, and they still have low HP at Depth 5. - Clear one or two tentacles around you so you don’t get killed off-screen.
- If desperate, have a melee comp with no bows/range, you can run away from the exploding teardrop nuke. But if you have range, then you should probably kill at least one and help your teammates out.
https://www.youtube.com/watch?v=f-v3wPGn6RU
Everdark Gladius / Normal Gladius
Everdark Gladius
There are some confusing or crucial mechanics to learn aside from his base attacks.
Depth 5 Everdark Gladius with many examples. I had less likely to be targeted +12 to help me revive teammates easier, while the others drew aggro. Also black flame is a flame spell, so don't use it on Gladius like me if you can avoid it. Both the other Revenant and I weren't able to get solid holy spells/weapons due to RNG. I was afraid to use Radagon's Ring of Light after the first phase due to the cast animation time.
https://www.youtube.com/watch?v=8Tvaj1t_hUU
https://www.youtube.com/watch?v=LXDknJe3P2U
Normal Gladius
I don't have any advice for Normal Gladius, since most of dangerous attacks are a lighter version of Everdark Gladius, and it's the first boss. But I would recommend watching a moveset video on Youtube if you struggle to clear him. He and his clones are super weak to holy and will get staggered very quickly with holy damage.
There are some confusing or crucial mechanics to learn aside from his base attacks.
Depth 5 Everdark Gladius with many examples. I had less likely to be targeted +12 to help me revive teammates easier, while the others drew aggro. Also black flame is a flame spell, so don't use it on Gladius like me if you can avoid it. Both the other Revenant and I weren't able to get solid holy spells/weapons due to RNG. I was afraid to use Radagon's Ring of Light after the first phase due to the cast animation time.
- 00:00 Radagon's Ring of Light
- 01:24 Ground Aoe Dodge
- 03:44 Gladius Aura Farm Buffs Himself if you attack him. I'm not sure why the other Revenant attacked Gladius during the aura farm, whether they knew the mechanic, or believed that Gladius would one shot everyone regardless of the damage buff. I would still not recommend attacking him at Depth 5, because I had enough damage negation to survive his attacks, and hitting him could've put the damage over to one-shot me.
- 05:28 Dodging Phase Transition Torpedo Attack (w/ Aggro) in Trios
- 07:55 Dodging Phase Transition Torpedo Attack (w/o Aggro) in Trios.
https://www.youtube.com/watch?v=8Tvaj1t_hUU
- To consistently survive ED Gladius’s second phase transition with torpedo clones in trios, it’s best to spread as far away as possible from your teammate, around the edge of the arena, to avoid getting cross-fired, or aggro switching after your teammate dies to a torpedo. Regular sprint to dodge the first two torpedoes, surge sprint to dodge the last two. You can dodge i-frame them, but it’s way too risky.
In a video clip below, there are two perspectives. The first split, I had aggro for one dog. The second split Wylder on my team dodged all of the aggro, while I was far away and safe. As you can see, all three of us split off from each other, and there is much less risk of getting hit if you are prepared for aggro switching, and you get a wide view of where dogs are. - To dodge Gladius’s map aoe attack, you must adjust the timing of when you dodge, based on how far away you are from him. There are safe spots at certain angles from this attack, but you need to learn how to dodge the ground aoe itself. You’re not dodging the initial slam if you’re far away, you’re dodging the ground aoe, which has a hitbox itself.
- For dodging Gladius’s triple fire wave slash attack, you must also delay your dodge slightly after he swings, so that you dodge the fire wave itself. Dodging too early will get you killed. During this attack, he will switch aggro to other teammates.
- Don't attack Gladius when he is slowly walking/aura farming. He will buff himself up to 3 times when he gets hit while aura farming. He will aura farm after doing a 2-hit attack which you can find in the video below. The dog with the sword in the split face, can aura farm as well. Even with Depth 5 damage being high already, try to avoid doing it.
- Some of his attacks have residual Flames which you need to consider when dodging. The triple bite with flames is pretty much undodgeable at close range, so run away if he starts doing that.
When Gladius is in the clone phase, keep an eye on the dog holding the sword, ideally all of them. He can do a large aoe fire wave slash on anyone from far away.
https://www.youtube.com/watch?v=LXDknJe3P2U
Normal Gladius
I don't have any advice for Normal Gladius, since most of dangerous attacks are a lighter version of Everdark Gladius, and it's the first boss. But I would recommend watching a moveset video on Youtube if you struggle to clear him. He and his clones are super weak to holy and will get staggered very quickly with holy damage.
Everdark Caligo / Normal Caligo
Everdark Caligo
Unfortunately with Deep of Night 4-5 scaling, specific team comps/characters can make this fight much easier to deal with. It’s still possible to go without these characters, but it’s definitely a lot smoother with them. At lower Depths 1-3, it would probably be better to play your main character.
Depth 3 Everdark Caligo Revive Aura Farm. I only have a low bit-rate video for this fight at Depth 3, sorry. Maybe it's better this way so you can get a feel for the Depth 3 scaling versus the other Depths. Items and relics are at the end of the clip. I like this video because I felt like I made the right decisions on the revives, and I knew how to dodge some key mechanics. I also knew that Sebastian can revive 2 bars on his own. Since Caligo was diving, I had to position away from the Wylder, just enough, so that Sebastian wouldn't get hit or de-summoned. It also is another example of the damage you lose when your teammates gets downed, and what it looks like with all teammates up. ED Caligo feels tanky, but the armor breaks contribute a lot to the fight. This is a pretty old video.
https://www.youtube.com/watch?v=3U1vP_-Ydas
https://www.youtube.com/watch?v=b93BXj4tWys
Normal Caligo
Unfortunately with Deep of Night 4-5 scaling, specific team comps/characters can make this fight much easier to deal with. It’s still possible to go without these characters, but it’s definitely a lot smoother with them. At lower Depths 1-3, it would probably be better to play your main character.
Depth 3 Everdark Caligo Revive Aura Farm. I only have a low bit-rate video for this fight at Depth 3, sorry. Maybe it's better this way so you can get a feel for the Depth 3 scaling versus the other Depths. Items and relics are at the end of the clip. I like this video because I felt like I made the right decisions on the revives, and I knew how to dodge some key mechanics. I also knew that Sebastian can revive 2 bars on his own. Since Caligo was diving, I had to position away from the Wylder, just enough, so that Sebastian wouldn't get hit or de-summoned. It also is another example of the damage you lose when your teammates gets downed, and what it looks like with all teammates up. ED Caligo feels tanky, but the armor breaks contribute a lot to the fight. This is a pretty old video.
https://www.youtube.com/watch?v=3U1vP_-Ydas
- Cancelling Caligo’s exploding Frost Shard will make this fight much more manageable. You cancel it with Wylder, Ironeye, Raider, Guardian (and probably Undertaker) by pre-positioning yourself to where Caligo will land after casting her Ice armor. Wylder and Ironeye would have the easiest time cancelling the attack.
- The main reason why you want to cancel this attack is because getting frostbitten by the attack will continually reduce your Frost Resistance, so take more Frost buildup the next time they trigger.
- You can “dodge” the attack Icicle Explosion/Whirlwind by i-framing the whirlwind with an ultimate, when it reaches your character, but you probably won’t have your ultimate charged for every whirlwind, save for a few fire aoe spells like Grafted Dragon.
- The main reason why you want to cancel this attack is because getting frostbitten by the attack will continually reduce your Frost Resistance, so take more Frost buildup the next time they trigger.
- There is a major punish/DPS window when Caligo lays down and builds her armor. You can continually hit her head while she charges up the attack. But you need to dodge when she slams her head to the ground to activate the attack. You can find a video somewhere explaining the timing. Usually as a caster, I prefer to run away from the giant whirlwind attack, because I’ve missed the dodge before, but eventually I want to get good at that punish window, and some people are pretty good at it.
- Stay under her legs always except for when she stands up cast an ice breath downwards. Even if you’re a caster, the best place in general for dragon fights is to be at their legs. An alternate place you can stand is by the side of her wings, but you could draw her aggro, or she can turn around and catch you in her front spell attacks.
https://www.youtube.com/watch?v=b93BXj4tWys
Normal Caligo
- Stay under her legs always except for when she stands up cast an ice breath downwards.
- When Caligo flies away and disappears, she can cast a map aoe ice breath, follow the sound cue to find the pillar to block the attack.
- When Caligo flies away and disappears, and you hear ice cracking, sprint towards the noise as fast as possible, and you can damage it while it is casting the spell. The ice ceiling has a hole above Caligo, so you won't get damaged if you make it to the boss.
Heolstor
Free win? Not really.
Many hardcore players at Depth 5 are actually really happy to see Heolstor. That’s because many of us have learned to solo Heolstor and know how to dodge the quirks of his moveset, all damage windows. I had nothing to do in the base game, so I did Colossal Sword Revenant solo and a Revenant Parry solo in the base game. I now know all my heal window opportunities for this fight as well. But not everyone will be comfortable with the fight, because not everyone wants to do solo runbacks, and casters might not be familiar with holding aggro, dodging attacks at close range. You don't need to do solo runs to learn the fight, I haven't done it for all of the bosses, but it can help.
Depth 3 Heolstor Carry Example. Prime example of Ironeye/Recluse dying to Aggro Switches. Two arrows was all it took for Heolstor to do a 180 and one-shot the Ironeye. Melee example for clutching as Revenant/knowing the boss moveset. Aggro switch example is at the end.
https://www.youtube.com/watch?v=n_yRutMmzw0
- The best thing you can do to learn Heolstor is to solo him in the base game, but that also requires learning how to clear Day 1 and Day 2 solo first.
- The next best thing you can do is watch a moveset analysis video like the other bosses.
- For his map aoe, there is an angle from him that is safe from the ground aoe damage. You need to adjust your dodge timing based on your distance from Heolstor. Relying on the safe spot angle only is risky, as he can change positioning or catch you out of position.
- If you are far away, you want to delay your dodge to when the ground aoe is about to reach you, similarly to Everdark Gladius.
- If you are up close, you want to dodge early when he accelerates into his slam. You’ll see some players walk right under him and attack him while he is charging up the aoe. This method is slightly riskier, but there are a lot of players who are confident dodging him up close.
- If you are far away, you want to delay your dodge to when the ground aoe is about to reach you, similarly to Everdark Gladius.
- For his charged darkness sword slams, the goo aoe might hurt you after you dodge his initial slam.
- To dodge both the sword slam and goo at the same time, you need to dodge right in front of him/up close as he accelerates his sword into you, or be very far away from the ground/goo.
- To dodge the affinity after effects from swings, it’s best to dodge diagonally into him/the right of him after every swing he does.
Everdark Fulghor / Normal Fulghor
Everdark Fulghor
Free win? Not really.
Depth 4 - Everdark Fulghor. Caster Melee Revive aura farm Example
https://youtu.be/-5fegvMkah4
The reason I wouldn’t consider Everdark Fulghor a free win, even though he has a simple moveset because:
Actual Boss Mechanic Tips
https://www.youtube.com/watch?v=FicxjH0Ncf8
Normal Fulghor
Free win? Not really.
Free win? Not really.
Depth 4 - Everdark Fulghor. Caster Melee Revive aura farm Example
https://youtu.be/-5fegvMkah4
The reason I wouldn’t consider Everdark Fulghor a free win, even though he has a simple moveset because:
- If your ranged characters aren’t used to dodging him at close range, or his aggro switches, it could make the fight much harder for the team. Many people start getting lazy in this fight since Fulghor is considered one of the easiest Everdarks to learn for valid reasons, which can also quickly kill runs.
- For whatever reason, Less Likely to be Targeted seems to work the least on Fulghor. Two arrows from the Ironeye, and Fulghor will 180 snipe and kill the glass cannon Ironeye/Recluse with an arrow who didn’t want to pick up damage negation (I remember this vividly and it has happened more than I’d like to have seen in Depth 5). I wish I kept the receipts.
- Laziness. If you’ve soloed him as melee or fought him frequently with melee, you can confidently dodge his attacks. I’ve also soloed him with Colossal Sword Revenant, so I can solo carry and build my ult to revive. Other characters have to put in more work to revive teammates. People start getting lazy as you can massively DPS him with bleed or spells/lightning, so a run can spiral out of control if people start getting downed.
Actual Boss Mechanic Tips
- For Fulghor’s ultimate / ground aoe exploding arrow, you have many options. The simplest option is to run far away, or past him. However, sometimes I struggle to run past him as Revenant, due to the character’s limited stamina. It can still be good to learn how to dodge the arrow explosion with a dodge roll. If you master that, you can Revive teammates while he is charging the arrow. He will track one player with a glowing light and aim the arrow. The arrow itself can hit you, so you might want to strafe to the side a bit, as he’ll lock onto one location eventually. Lots of aura farming potential.
- His fast/sudden arrow snipe is mostly dodged by muscle memory. Seems scary, but play him enough and you’ll get used to it. He can do two of them in a row when his HP gets low
- For Fulghor’s triple attack with two swings and a slam, this is surprisingly easy to learn. Before every attack he charges his sword while on his heels, dodge the initial swing, and simply spam dodge again to dodge the second swing (might need to wait a bit if Duchess, but I don’t remember), and wait a bit to dodge the third swing/slam.
- Dodging Fulghor’s 10 hit combo can be easier than you think. Get close to him, spam dodge 2 or 3 times behind him, starting from the initial swing, and surge sprint away for the rest of his attacks. Don’t attempt try to dodging his finals swings while not looking like I do in the clip. Also vigor helped me out here.
https://www.youtube.com/watch?v=FicxjH0Ncf8
Normal Fulghor
Free win? Not really.
- Fulghor’s goo arm attacks are not really dodgeable at medium range due to the aoe of the goo being flung along with the swing. You can jump over the goo. The best way to survive the goo is to dodge close range to Fulghor. Casters are very susceptible to dying to the goo attacks since they are usually mid range or in casting range, where they can get hit by Fulghor speedy movement + goo aoe. You can avoid the goo attacks by being far away in the first place and surge sprinting, but if you’re in mid range, you want to dodge into him.
- Fulghor will also frequently charge his holy spear attack that shoots a spear underneath everyone, which you need to cancel using lightning/charge attacks/poise damage. However, lightning on its own may not cancel his charged attack. If he has the visual lightning debuff on his armor, you may need to melee him as well to cancel the attack. For example, two light attack Lightning Spears seals, sometimes doesn’t cancel the attack/break his poise due to that existing debuff. Prepare yourself mentally for him to slam the ground and shoot a spear from underneath you, if his attack doesn't get cancelled.
Everdark Adel / Normal Adel
Everdark Adel
Free win? Not really.
This boss is also labeled as one of the easiest Everdarks, but he can still be tough in Deep of Night, and there are still min-max things you can do to help your runs. He does look more scary than he actually is with his ground explosions and lightning.
https://www.youtube.com/watch?v=Q_8SLGIoXFE
Normal Adel
Free win? Maybe a little bit.
Free win? Not really.
This boss is also labeled as one of the easiest Everdarks, but he can still be tough in Deep of Night, and there are still min-max things you can do to help your runs. He does look more scary than he actually is with his ground explosions and lightning.
https://www.youtube.com/watch?v=Q_8SLGIoXFE
- Everdark Adel is tough, because if your Melee is not comfortable weaving in attacks while dodging, your team DPS will drop significantly. It is even tougher when you don’t have Ironeye, or a Recluse on your team, or multiple range. The caster will likely take aggro if the melee aren’t hitting often, and have way less time to DPS if they are trying to stay alive. I’ve had plenty of Guardians/Executors who were pretty much cosmetic to the fight, because they played full survival, and were not comfortable with weaving in attacks.
- Super min-maxy, but I recommend drawing aggro and fighting Adel, away from the hill where he casts the tornado/whirlwind. By pre-positioning far away from the whirlwind, where he casts at the same spot every time, you can easily reach the Spirit Streams and won’t get killed by the tornado expansion. It’s not worth ulting and staying inside either, as Adel also dives into the middle of the tornado.
- You can jump or dodge to avoid the ground explosions.
- The melee characters and Ironeye can cancel the tornado summon, but it’s only practical for Ironeye and maybe Wylder, as you have to run away from the lightning storm first, and then get to him before the tornado spawns to cancel it. Ironeye has range.
- In this fight, you can charge your ult by dodging his grabs that have a sound queue. If you dodge into boss grabs in Nightreign, it will charge your ult a decent amount. As Revenant, if I dodge all of Adel’s attacks, I can solo carry by quickly charging my ult and revive my teammates, rinse and repeat.
- Adel has a lot of lightning aoe with his chomps, I recommend watching moveset analysis videos for this, and his ground explosion can be jumped or dodged easily with patience.
Normal Adel
Free win? Maybe a little bit.
- Certain characters can free your teammates from a grab with poison/charge attacks.
You learn the grab to charge your ult, dodge/jump ground waves, delayed chomp, etc. - Not much many hidden tricks to unveil for this boss, I would recommend watching using a moveset analysis video if you struggle with Adel. He's scary to learn the first time.
Night 1 Bosses - Common Wipe Mechanics
I’m only including 3, as this guide is very lengthy, and the other bosses aren’t as difficult, easier to learn, or won’t destroy your team as easily as these three can from my personal experience.
- Night’s Calvary
- Don’t get killed from off-screen and try to dodge the swings.
After knocking a rider off by poise or killing the horse, try to continually backstab the calvary. - Continual backstabs will help prevent the Knights from spawning in another horse, gives you an iframe, stops them from attacking.
- Don’t get killed from off-screen and try to dodge the swings.
- Smelter Demon
- The Smelter Demon has a pretty basic moveset, but if you don’t break his stance often, he can charge up to a blue flame phase. If he gets to that phase, everyone will take burn damage, as well as the Smelter demon himself. If you don’t have flasks because you spent so much time fighting in the rain, this can end a run. It hasn’t happened to me yet, but I’ve gotten close and have a heal seal. If you have enough Flasks, the demon can kill himself.
- Sometimes I help break the Smelter Demon’s stance as a Revenant with a melee/strength relic to prevent the fight from going out of control
- The Smelter Demon has a pretty basic moveset, but if you don’t break his stance often, he can charge up to a blue flame phase. If he gets to that phase, everyone will take burn damage, as well as the Smelter demon himself. If you don’t have flasks because you spent so much time fighting in the rain, this can end a run. It hasn’t happened to me yet, but I’ve gotten close and have a heal seal. If you have enough Flasks, the demon can kill himself.
- Battlefield Commander (Commander O’Neil Scarlet Rot)
- There’s one move that can wipe a whole team, and that is the multi-hit Scarlet Rot Whirlwind. It’s even more dangerous at Night 1 because your melee might not have damage negation items or vigor yet. It's probably not very tankable at Depth 5, even Wylder might not be able to survive with his passive, but don't quote me on that. If you’re a caster, try to stay away, if melee, get away when he charges up that attack.
Night 2 Bosses - Common Wipe Mechanics
Another curlated list of the bosses, since I personally think the others are easy to learn by simply playing.
- Nameless King
- If you have a parry shield there is huge aura farm potential, but you probably don’t want to parry if you’re 2 bars, or low on flasks when trying.
- The charged attack lightning/homing lightning strike attack from the Nameless king can wipe a whole team or make the fight worse. It’s essential to know the timing of this attack. The only thing you need to know, is the lightning takes about 1 second after he finishes his cast, to actually strike everyone on the team. So you want to delay your dodge about a second after he casts it. It’s in contrast to the Draconic Tree Sentinel, who strikes 1 person instantly after its cast with no delay.
- Another deadly attack is the rock/wind wave swing. It has a wide hitbox, and you need to dodge into it to avoid it. Knowing how to dodge this will help with Ancient Dragon’s Lightning spears.
- If you have a parry shield there is huge aura farm potential, but you probably don’t want to parry if you’re 2 bars, or low on flasks when trying.
- Ancient Dragon
- This boss is a pain because it has high HP, high ailment resistance, extremely high poise to where it’s rare to break his poise even once during the fight.
- Keep to his legs like every dragon fight.
- Run away from fire breaths.
- When the dragon stands up and charges his lightning spear/slam attack, wait for the initial slam, look for the projectile lightning wave to reach you, then dodge into the wave. He will do another slam, so dodge that wave that comes towards you as well. This can end runs or kill people frequently. Otherwise, the fight can be easier than you think.
- This boss is a pain because it has high HP, high ailment resistance, extremely high poise to where it’s rare to break his poise even once during the fight.
- Dancer of the Boreal Valley
- At around half hp, she can cast the dreaded spin-to-win multi attack. It is actually dodgeable, but if you’re ranged, stay the hell away and surge sprint away. To dodge this attack at close range, dodge forward once into the dancer for the first swing, dodge to the left for the second swing, and surge sprint away as the dancer turns around.
- It’s actually weak to holy in Nightreign, with -26 resistance. Not really lightning and the other elements.
- At around half hp, she can cast the dreaded spin-to-win multi attack. It is actually dodgeable, but if you’re ranged, stay the hell away and surge sprint away. To dodge this attack at close range, dodge forward once into the dancer for the first swing, dodge to the left for the second swing, and surge sprint away as the dancer turns around.
- Outland Commander (Commander Niall)
- The summons can end runs. There are multiple strategies to dealing with summons.
- Have everyone focus dps on the summons, ults, spells, while dodging Niall.
- Have one person take aggro from Niall, the other two fight the someones.
- Ranged can cast spells and kite the summons to kill them, while someone holds aggro with Niall.
- You can actually use a Bewitching Branch on the summons during the Night 2 fight and trivialize the fight.
- The summons can end runs. There are multiple strategies to dealing with summons.
- Death Rite Bird
- He’s aggressive, and does a lot of swings. It takes a bit to get used to him. Pay attention to all of the ghostflame trails he leaves behind from attacks, don’t step into them.
To dodge the falling spears attack, you need to be next to the faraway/initial spears that will land first. - Dodge into them, right after they land. This will let you avoid the spears that land at a staggered pace towards the deathbird.
- He’s aggressive, and does a lot of swings. It takes a bit to get used to him. Pay attention to all of the ghostflame trails he leaves behind from attacks, don’t step into them.
3. Pathing (Understanding Opportunity Cost. Good/bad pathing can make your run much easier or harder)
Everything you do in this game takes time, no matter how easy the POI is. There is an opportunity cost, not just with time, but with drops/passives. Traveling takes time. The 30 seconds or minute you take greeding for a 3rd flask could’ve been used for another POI or two instead. Depending on your team composition, spells, skill level, and relics, you will do more or less damage and have to adjust/avoid certain fights. If we’re Guardian, Wylder, Revenant, I’m probably not gonna try to fight the blood magma at castle wyrm unless we all had bleed weapons or crater.
- There are set seeds/maps/poi placements in the game, but you don’t need to look at the seeds to master pathing. https://www.nightreignmap.com/en.
- You can get to level 15 every single game in any seed without the map, following a general formula. It’s still possible to kill ED Gladius at level 11, but reaching level 15 without the Crucible Knights runes, is a good indicator of efficient pathing. It’s also a sign that your team had opportunities for getting good items/passives.
- If you’re not ending at lvl 15 almost every game, then you can improve your pathing, and you are likely missing opportunities for good items. Think about the time you spend at each POI, and whether the rewards were worth your time. Focus on clearing hotspots POIs like Night Invader Camps and Castles with very high chances or drop opportunities to get Damage Negation first, then stack damage or pick up damage passives after. Also think about how much time you’ve spent already before the circle starts closing. It might be better to clear nearby POIs instead of backtracking. Take advantage of the Bird/Eagle Gliders. I use the same formula every time, with slight variations. POI priorities change based on where the Night Invader camps spawn. Maybe there will be a new meta, balance change in the DLC, or something I don’t know about that will pop up on Reddit in the future. I’m still improving my pathing even after all these hours of playing.
General Formula for the Base Castle Map
- Base Camp -> Level 2.
- If you have Revenant, Recluse, or Duchess, you need to go to a nearby Cathedral/Fort/Sorcerer Rise and get spells for them. Clear some extra mobs, red mobs as well for good passives. Pick up a stonesword key -> Level 3
- Evergaol? No, Consider doing them later, and skip them for now, avoid doing them at level 2-3. I recommend to avoid doing one at this point, as they can waste time. You have 4 minutes and 30 seconds for the first circle to start closing. The reason why I prefer to skip Evergaols entirely Day 1, is to account for the seeds where the first circle cuts off the castle. Everything you do takes time, traveling, the Evergaol fight itself. When you have 4 minutes and 30 seconds, it matters. You are also gambling on the Evergaol being an easy one. Ideally save Evergaols for late Day 2, when you can clear them extremely quickly, no matter which boss you get, for much less time spent than in Day 1.
- Clearing other pois/finishing castle on Day 1 gives you a lot more for your buck, and your casters needs items. You may not be able to use the blue items yet, if you didn't kill trash mobs to get to lvl 3. One camp can give you 10-20x drop opportunities which is more important early game, and finding damage negation. Doing difficult Evergaols can cost you a ton of time, it's not worth it. Just because you have a key, and it's on the way, doesn't mean you have to open it and check. You might lose a key. You might not be able to path back to the ones you open, nor is it worth pathing back to. They're still good at the right times. Not always the end of the world if you do an Evergaol at lvl 2-3. People will commonly do an Evergaol at these levels. Certain characters are extremely good at early-game Evergaols a Frost/Bleed Executor.
- The ones worth doing this early would be Grave Warden Duelist, Bloodhound Knight, and Omen (including blood versions). If it’s anything besides those 3, try pinging away, and potentially, abandoning your teammates, and start clearing towards the castle. Hopefully they’ll realize it isn’t worth doing at lvl 2-3. It would be better for you to solo an easy POI for your team, join them later, than to stay and fight the Red Banished Knights.
- If you take the lead on pinging, you might not have to do that lvl 2-3 Evergaol fight. Watch out for other pings from your teammates, they could have a better or a worse idea.
- Clearing other pois/finishing castle on Day 1 gives you a lot more for your buck, and your casters needs items. You may not be able to use the blue items yet, if you didn't kill trash mobs to get to lvl 3. One camp can give you 10-20x drop opportunities which is more important early game, and finding damage negation. Doing difficult Evergaols can cost you a ton of time, it's not worth it. Just because you have a key, and it's on the way, doesn't mean you have to open it and check. You might lose a key. You might not be able to path back to the ones you open, nor is it worth pathing back to. They're still good at the right times. Not always the end of the world if you do an Evergaol at lvl 2-3. People will commonly do an Evergaol at these levels. Certain characters are extremely good at early-game Evergaols a Frost/Bleed Executor.
- Actual Step 3. Clear an easy camp/ruins/field boss or two while on the way. If there is a Night Invader camp in your half of the map, lure them out and kill them. It’s worth it, most of the time you don’t even have to clear the camp. They take at most 1-2 minutes, for so many runes, chances at really good passives, and buff people with the relic line. You can even do this at lvl 2 or at the first POI you do. If you’re scared, then learn how to deal with them because they become easy to kill. This is where Defeating enemies fills more of the Art gauge +0/+1 comes very handy. You can kill some trash mobs to charge up your ult before killing the invaders Pick up 1 Church/Flask on the way before going to Castle if it’s worth it. Certain characters like Ironeye or Recluse/Duchess may want to go to the mine for a purple smithing stone. It’s a 20% increase in damage from blue to purple, assuming they don’t get better weapons later on. That can also be done later -> Level 5-6.
- Castle. The castle is very good for Rune/Reward/Chest Density. You want to hit it on Day 1, 90% of the time, be near it , or start it before the first circle starts closing to avoid being cut off from it. If you are running late, and the circle completely cuts off the castle, it’s okay to do it on Day 2 instead, just speedrun easy POIs and Evergaols in the circle.
It’s a valid strategy to not even do the Castle sometimes, but keep in mind you could give yourself less opportunities for big chests, items, and are susceptible to backtracking back to places you’ve already cleared, based on where the circles end.
If the basement is a difficult boss like a Blood/Red Wolf, Bell Bearing Hunter, go kill the Trolls/Banished Knights/Crucible Knights first, focusing on the ones that give dormant drops first. They are much easier to kill and can give you an early game power spike Those castle mobs are very valuable runes and drops for time. Clearing the ones that don’t drop anything usually aren’t worth your time with the circle/time limit. Open the 9+ chests around the castle -> Level 8-12. - On your way to the Night 1 Circle, you may be able to clear an easy POI before the rain gets to you. You may be able to greed in the rain, but if you all die outside of the circle, as the circle reaches the final perimeter, you may just lose the run outright and won’t be respawned. If you are in the rain for too long, you won’t have the flasks to help you easily clear the first boss. Sometimes one POI is enough, you don't need to squeeze a second in the rain. You can suicide outside the circle for a flask refresh, but you need someone alive when it is almost done closing, or the run will end -> Level 8-12.
- Night 1 Boss. Learn the boss's mechanics, no more face tanking allowed. Learn aggro switching. Learn to revive people while dodging. Boss Mechanics guide is down below -> Level 8-12.
- Because you cleared the mobs with dormant drops at the castle on Day 1 for a ton of runes, you now have lots more flexibility of where you can go on Day 2. You don’t even need to go back to the castle. In terms of general priority, not accounting for proximity:
- Night Invader Camps. You want to path for this in mind first, in case the circle cuts it off. It shouldn’t take much time. Skip fighting the camp’s boss if it’s time wasteful. Though it does give more runes and can also drop red items from time to time.
- Blood Formidable Bosses -> Regular Formidable/Blood Mini Bosses -> Regular Mini bosses. You want to prioritize pathing around Blood Great Bosses first. Yes they are slightly more difficult, but the runes/rewards are better. Some are not even that more difficult.
Remember that scaling chart earlier? A Formidable Boss only gets a +15% HP buff when it is the Blood variant. Meanwhile, Evergaols and Field Bosses get a +65-80% HP Buff for being a Blood variant. Both of them are generally easy for a chance of red items, but the Formidable bosses are not that much harder for better reward qualities. - Evergaols (they are with doing now as you have a lot more items to deal with the hard ones, and can get +5% damage for each one with the relic).
- One more flask/church.
- Regular Camps (for Red Mobs and chests). These have a ton of opportunities for drops and are underrated in Deep of Night, still worth doing on Day 2. If you don’t have “Less likely to be targeted” for ED Libra or Damage Negation at Full HP/Successive attacks, you want to be killing as many red mobs and opening chests as much as possible. This becomes the main priority for ED Libra over Evergaols.
- Doing those POIs in that order will get you around -> Level 14-15. You might be able to squeeze 1-2 more POI as the circle is closing, calculate the risk. Preferably don’t do it in the rain because you need flasks for Day 2 boss -> Level 14-15
- Night Invader Camps. You want to path for this in mind first, in case the circle cuts it off. It shouldn’t take much time. Skip fighting the camp’s boss if it’s time wasteful. Though it does give more runes and can also drop red items from time to time.
- Learn the movesets for Night 2 bosses, as they can be run-enders -> Level 14-15
Formula for Shifting Earths (Crater, Mountaintop, Noklateo, Rotted Woods)
The only thing different about shifting earths is Day 2 pathing. It’s common to head for the POI when the First circle on Day 2 starts closing, but I often find it better to go slightly earlier. This is where finishing Castle Day 1 for the dormant drops is important, as it makes pathing more flexible. Shifting earth images were taken from the Fextralife Nightreign wiki: https://eldenringnightreign.wiki.fextralife.com/Shifting+Earth. These are general guides for pathing on an average run, you don't have to follow them exactly.
Crater
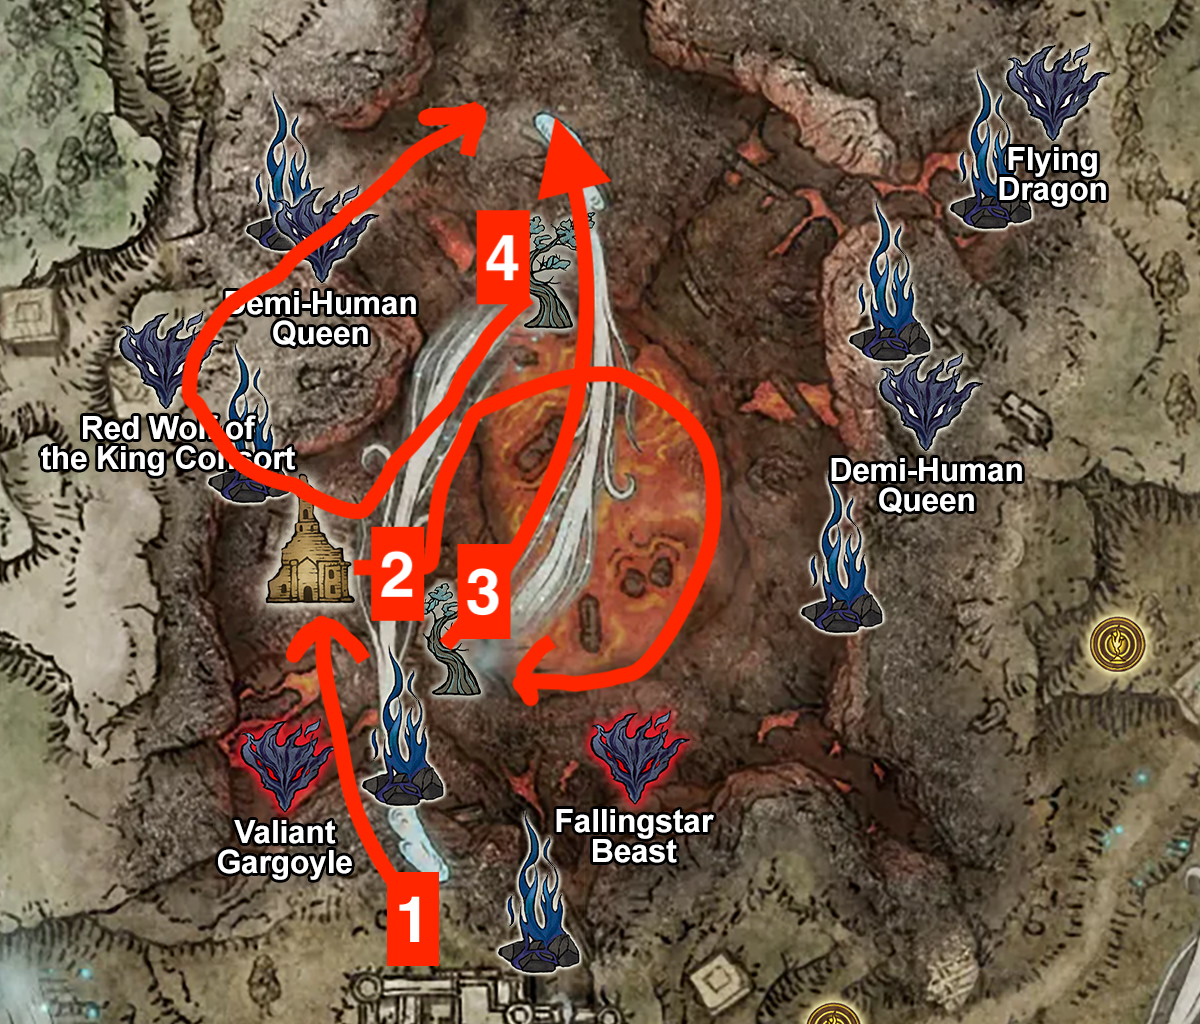
After the Night 1 Boss, finish up any remaining POIs needed. Try to head to the crater before the First circle of Day 2 starts closing. This is a general path. In order to fully complete this path and Step 4, you need a decent DPS party. If you cleared the entirety of the dormant drops in the castle on Day 1, you can try killing the Fallingstar Beast or Valiant Gargoyle. Likewise if you didn’t finish castle Day 1, and aren’t at least level 10 after Night 1, you can quickly kill the mobs at the castle for more runes before heading to the crater. Skip certain checkpoints if running low on time.
If you see items on corpses, they may be worth checking as they have chances to drop legendary weapons, a 5% base chance. There are specific ones that are capable of doing so, but I'm not including those in this guide.
Mountaintops
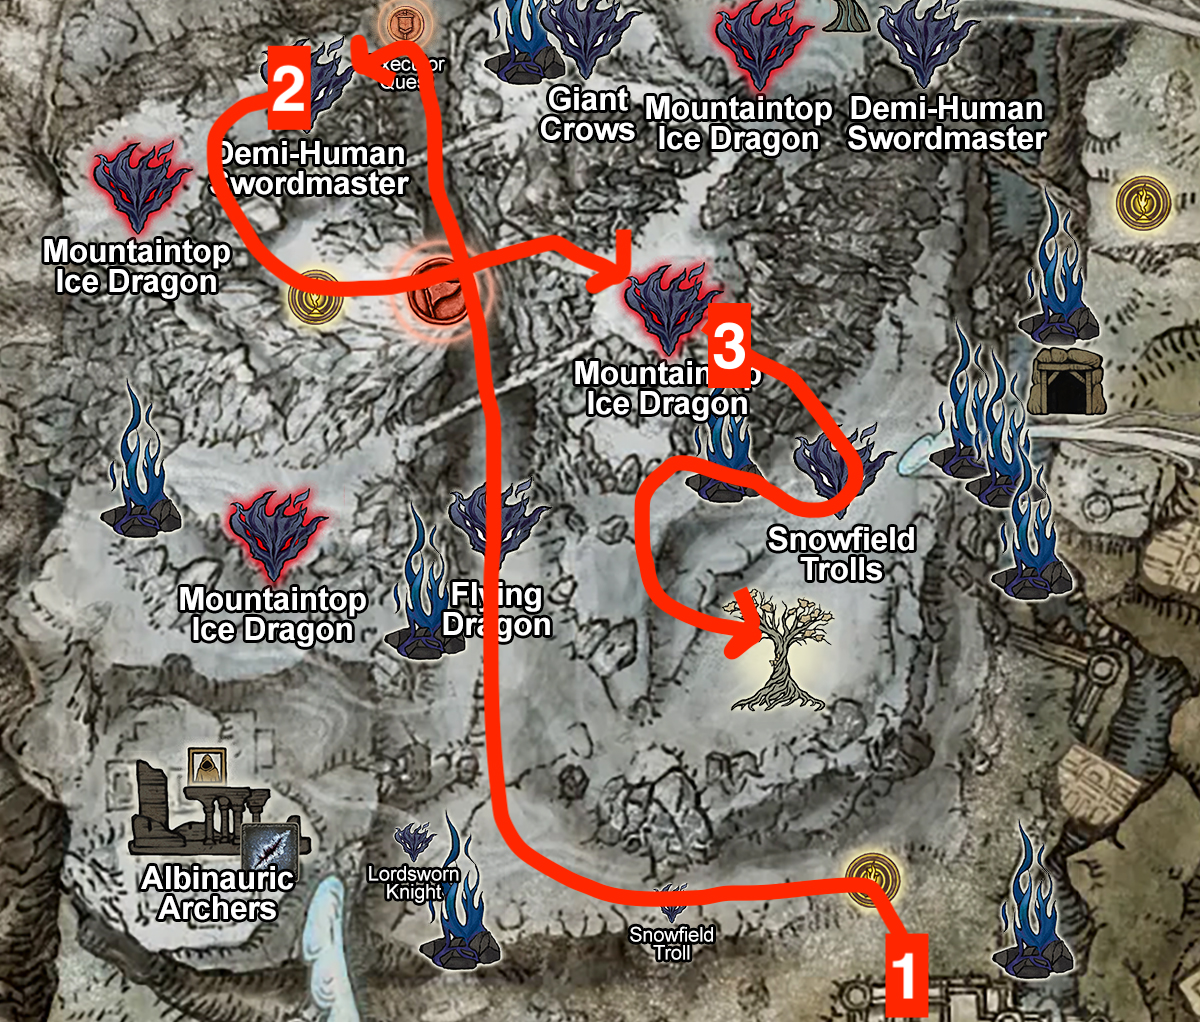
After the Night 1 Boss, finish up any remaining POIs needed, and try to head to the Mountaintop before the First circle of Day 2 starts closing. Although the mobs are easy, and the circle is in your favor for the Mountaintop, it’s better to go slightly early, so you can get through the Ice Dragon for a guaranteed yellow item. Same strategy as crater, wipe out most of the Castle Day 1, shoot for 10-11. Wrap up POIs and kill castle at the start of Day 2 quickly for dormant powers and leave before the first circle.
The pathing after the trolls near the final circle, is for killing extra trash mobs for supplemental runes if you have extra time.
If you see items on corpses, they loot them on the way as they have chances to drop legendary weapons, a 5% base chance. There are specific ones that are capable of doing so, but I'm not including those in this guide.
Noklateo
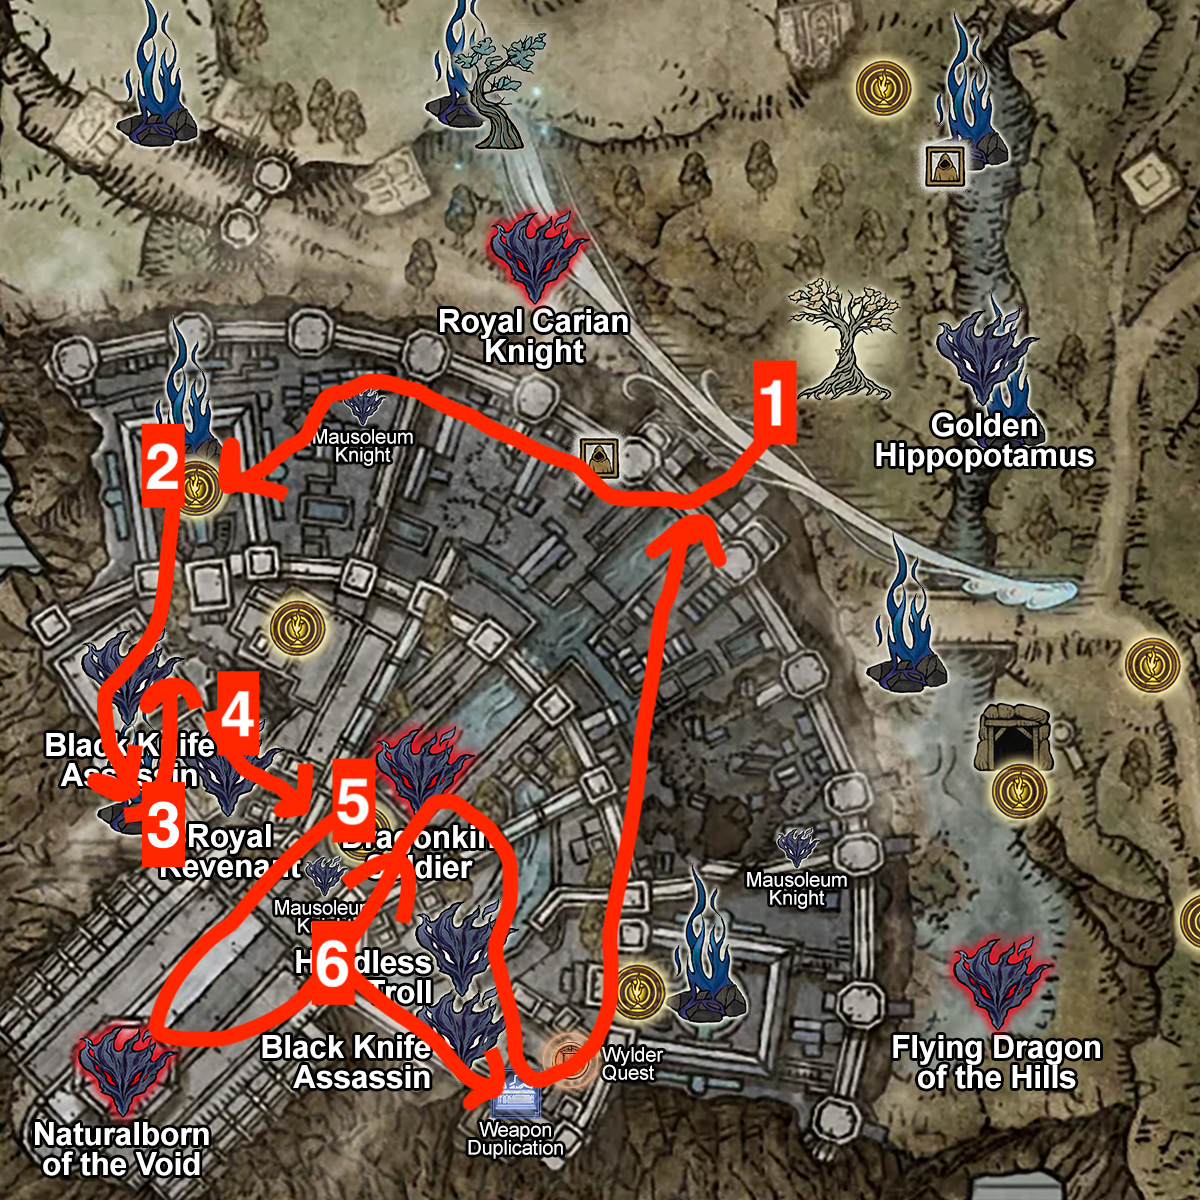
Head for Noklateo immediately after killing the Night 1 boss. That extra field boss or POI probably isn’t worth it. You should be around level 9-10, if pathed efficiently on Day 1 with Night Invaders. If tight on time, make sure to prioritize Astel for the revive/guaranteed legendary. Path 6 is a bit wonky.
Adjust if you already have good items and are tight on time/are a low dps team. You want to duplicate Damage Negation at Full HP, Less Likely to be Targeted (for ED Libra), as soon as possible. At Depth 5, having two Damage Negation at Full HP, is much better than killing the remaining ~2-3 bosses after killing Astel. If your team is already kitted out, have high DPS, or need items, you can kill the Dragonkin Soldier first in Path 6, but that consumes time for duplication. The circle might be closing in as you kill those bosses.
*Note that there is a Mausoleum Knight with a dormant drop, and purple+ tier chest at path/arrow 3->4, which is not shown in this map
Rotted Woods
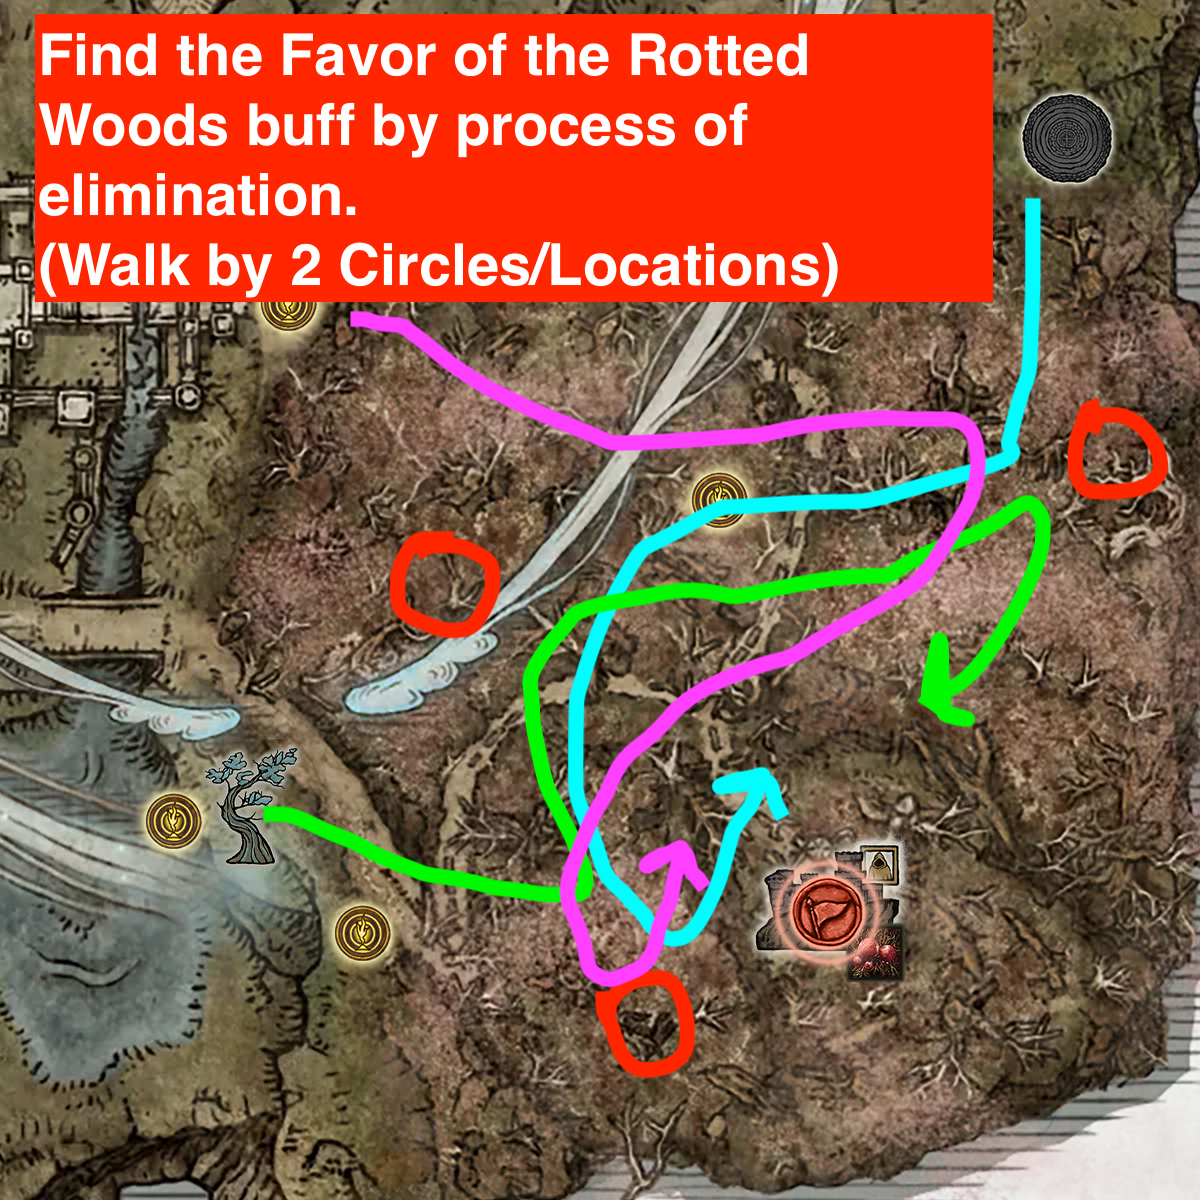
Like the Mountaintops and Crater, you want to ideally leave Castle before the First circle of Day 2 starts closing. If you already cleared Castle for the dormant powers, pick up any remaining POIs, and head straight towards the woods. Level 10 is enough. The Rotted woods are pretty flexible on pathing, and there are many extra runes you can get from clearing the trash mobs.
The reason you want to find the Favor of the Rotted Woods buff by process of elimination, is because you want to save time from having to go to the Fort/Location Reveal. The second circle generally closes in towards the middle of the Woods, slightly toward the south. While killing the bosses, you’ll be near ⅔ of the buff locations, so you’ll know exactly which location has the buff, and you can see it from a far distance. If you happen to walk near one of the locations earlier, before attacking the bosses right away, you can grab it immediately and save time.
"Is clearing the Fort worth it for the chance at a Scarlet Rot weapon?"
Maybe, if you brought a purple smithing stone with you, and it's Adel. You likely have good items from killing the bosses, and scarlet rot gets tougher and tougher to apply to the Nightlords anyway. Not worth the time where you can kill another boss instead.
4. Relics (they're not that important, as people make them out to be)
Everyone wants to know what relics they should run, especially if you’re new to the mode. It doesn’t matter that much for Depth 1-3. The scaling is not that crazy compared to later Depths and the base game. Take this time to get good at handling boss aggro. You could just run full vigor or whatever, or even run no relics, but try not to grief your random trios by having nothing. If you skipped the Deep of Night Scaling chart/image at the very beginning of this guide, go take a look, as Nightlords in Depth 5 only have 2.16x (+116%) their base HP.
Damage ups mean little if you can’t dodge the boss mechanics and weave attacks. The players not hitting the bosses often or getting downed too quickly, is usually the main reason for low DPS. Bad relics are fine. One person at 3 bars will destroy your DPS. Having 3 people consistently hitting the boss is a ton of damage. Past the core lines, they don’t matter that much. You still want to have the best effects you have to work with. to make your climb easier. Almost all damage ups are multiplicative, so they can go wild 100 * 1.07 * 1.07 * 1.07. You don’t need massive luck, insane relics like cheaters do to win consistently, or to maintain Depth 5 9999. Knowing boss mechanics are the most important part of mastering Nightreign, but less exciting.
Essentials for Almost Everyone and Every Character
After the DLC, this is indisputably the best individual relic line. Very underrated line. People may skip this line because they think it's not useful for the Nightlord fight (except it’s amazing for Everdark Libra, Raids, Dreglord, Bosses), but that's not the way it should be looked at. This line will make everything you do during the day way easier. Most importantly, it helps you get tons of items faster which is the most important in Deep of Night, as well as deal with many difficult special situations. Killing bosses, red mobs, clearing camps, night invaders, everything faster. The more stuff you kill, the more/better gear/passives you can get that will make the Nightlord fight easier. It helps you clear POIs/red mobs for good passives like Damage negation at Full HP or Less likely to be targeted for ED Libra and runes.
Extremely broken on Ironeye and Scholar, great for Duchess, Wylder, Revenant, Undertaker, Guardian. For Recluse, Executor, Raider it’s pretty good and worth, but again, opportunity cost/substitute-able for lines/needs of those characters. Even though Recluses may opt out, it's still a great way to sustain yourself and your teammates HP/FP. You can win without this line, but the difference when one person doesn't have it is night and day.
- Defeating enemies fills more of the Art gauge +0/+1
- Attack power increased for each Night Invader defeated +7%
Almost a must-have to dedicate a whole relic for one line at Depths 4-5 due to very high chances of having two camps (3-4 invaders). The passive from items/runes/damage buff you get from them are so the 30 seconds it takes to lure and kill them. This line is good for Depth 1-3, but less so than Evergaol since there’s a lower chance for two camps at that depth. You might not even have this relic if you’re new/casual, so it’s not a big deal if you don’t have it while going through Depths 1-3. - Attack power increased for each evergaol prisoner defeated +5%
Great for Depths 1-3, but it can always be substituted for like any line. View this line as a +10% damage up on average run in Depth 4-5 It’s just another damage line. Evergaols are best done on Day 2, where you can deal with any type that spawns. They can be a trap if done at bad times, and frequently done at bad times. You’ve probably seen clip-farming or Reddit posts of people melting bosses, but that’s much harder to do with randoms with varying skill levels, and the best way to melt is to learn how to get the most hits in with your class without falling down. Focus on hotspots for damage negation passive first such as castles and Night Invaders.
Everyone spams Evergaols, it has a high potential damage boost, all the guides recommend them, why do some players like me save them for Day 2 or sometimes go without doing them at all? Opportunity cost. Naturally, people play video games to just hit stuff and have fun, and don’t want to think about anything else. If you watch the selected clips I have solo carrying runs, more damage wouldn’t have made a major difference in any of those fights because I spent so much time reviving my teammates, and they would get one shot at Depth 5 without enough negation/vigor. You can’t do massive DPS if you play more passively or fear for your life.
If you skipped to this section, I cover how you can use Evergaols effectively in random queue, under the General Formula for Base Castle Map. section.
Napkin Math for Evergaols + Invader
There’s affinity damage to take into account, resistances, etc. You can observe your own damage in game. I personally don’t run an Evergaol at the moment Revenant until I find a better relic or get certain buffs. Classes with i-frames like Ironeye, Duchess, and Recluse. I may weight it more, but even then can benefit, so I prefer the lazy route with a hybrid build.
Charged Lightning Spear
600 damage.
Evergaol (3) + Night Invader (3)
600 * 1.05^3 * 1.07^3 = 850
Night Invader (3) Only
600 * 1.07^3 = 726 damage.
Losing the Evergaol line for something else or smaller, wouldn’t be a big sacrifice/alternative for me as a Revenant. I know from experience how much DPS I need on Depth 5 Fulghor to make the run go smoothly or solo carry. - Night of Fathom - Marais Relic (Vigor + 5/+100 HP) / Vigor +3 / Increased Maximum HP
Vigor is still useful even at Depth 5. More at lower depths. Getting a +3 with other good stuff can be considered a perfect roll. Having only vigor is probably not a good choice past Depth 4, besides maybe Raider. Using a Deep Night of the Fathom, or having +3 lines is nice. If you stack full vigor at Depth 3 as Revenant, you potentially wouldn’t even need a Damage negation at Full HP with some dormant boosts found during the day like +10% HP, affinity/physical damage negation. Some boss attacks also do “chip” damage which your vigor can help with.
At higher Depths, aim to include damage lines to help the fights/days go faster. If you’re 3-barring at boss fights though, consider finding ways to make vigor work. A hybrid would be the best bet for most people, especially for Depths 1-4. I’m also lazy and equip vigor for the best chances as Revenant to be able to survive 1 hit in Depth 5, even though it’s not guaranteed. - Max FP increased for each Sorcerer's Rise unlocked +18%
This line is all you need for Duchess and Revenant’s FP issues. You’ll want to unlock at least 1 Rise every game for the shards. - General damage buffs that apply to many weapons like Incantations, Sorceries, Affinity Damage, Physical Attack Up, are all nice to have, consistent, and perfectly fine for comfortably at Depth 5 scaling.
If you think that you are not clearing Depth 5 runs without specialized builds, then it's likely you or your teammates have not learned how to weave in attacks while dodging at a good pace. You alone having high uptime is what you can control. Pay close attention to when your melees are not meleeing, and when your casters are having trouble surviving aggro or reviving you. Those will tank your dps. You can see it in the videos I included. Once you are good at weaving attacks, then you can consistently melt runs with your trios.
For example, Revenant, full Dragon Cult can be risky, requiring dragon cult/not dragon communion, when she already has difficulty getting what she wants. - Class-Specific Relics that boosts skills, passives, ultimates. Ran out of character space for this guide, look for another guide for your class.
5. Can I trust this guide made from a random Nameless guy? Player Stats / My Relics Included
Hopefully I've provided enough analysis for you to make your own decisions at this point on whether this guide is worth your time. I'll go fix critical issues for this guide, if there are holes. If the aura farm clips haven't convinced you, then that's fine. Simply reading this guide won't make you win more instantly, but it can help you with consistency and that knowing that one mechanic or knowledge check, can save you future runs. I'm no 1200 hour John Nightreign that carried me at Depth 5 Night 1 on the Ulcerated Tree Spirit and had a better pathing than me in that one run, but I've thought a lot about the game, and I love it. Don't forget to have fun, and enjoy the chaos, process, and laugh at the suffering and losses you may experience.
Background
I have 500 hours in Nightreign. I was reluctant to make this guide, but I know that knowledge spreads fast in this community. Hopefully it helps others improve and I can play with better randoms, you get better randoms, or you become a better random.
This is my experience after playing 1.5 months of Depth 5 daily. I didn’t reach 9999 right away. It took me a month of playing after work to get to 9999, and other players got there way faster. I was bad at ED Libra, lost to him 3 times in a row at Depth 5, but now I can solo carry the fight at Depth 5 (video above). To me, mastery means being able to solo carry every boss. I currently can’t carry Depth 5 ED Maris. I observe the decision-making of my teammates and wonder how they even got to Depth 5 (no-offense), about 10-20% of the time. In some games during my climb, I’ve been carried as well. But I haven’t found a good guide that hits the important marks, so I made this. It’s not feasible to expect every player to find and look for every trick in the book posted on Reddit.
I’m pretty confident in what I’ve learned so far, and a lot of players who have finished their grind, have similar strategies. I’m just some random guy who loves the aura farming part of the game
Before reaching 9999, I’ve deranked from Depth 5 to Depth 3, 2 times. I’ve been through Depth 4 hell and my skill level belonged there at some point.
All of this information came from thinking about every single game, whether a POI was worth my time, reading Reddit every day for a new trick, or watching Youtube videos. This guide is also subjective on certain parts. It’s based on heavily analyzing my own matches, playing as Revenant primarily, thinking about what I could’ve done better after every decision.
That being said, the goal of this guide is to supposed to be an all-in-one place for what you need to know to master Nightreign to the point of carrying your friends or randoms. Switching to Wylder and soloing regular ED Gladius randomly is no problem for me because I understand the boss mechanics, and generally what he needs to succeed.
Main Go-to/lazy Revenant relic setup (not important, only 10/18 useful lines)
As I analyzed in the relic section, I chose to have roll vigor to give me the base chances of surviving one hit, though I still need to find around +50% damage negation in total during a run. I don't want to lock in every run to run full glass cannon, or need more damage negation because I didn't run vigor. I can't wait to get better relics, but you don't really get a choice.
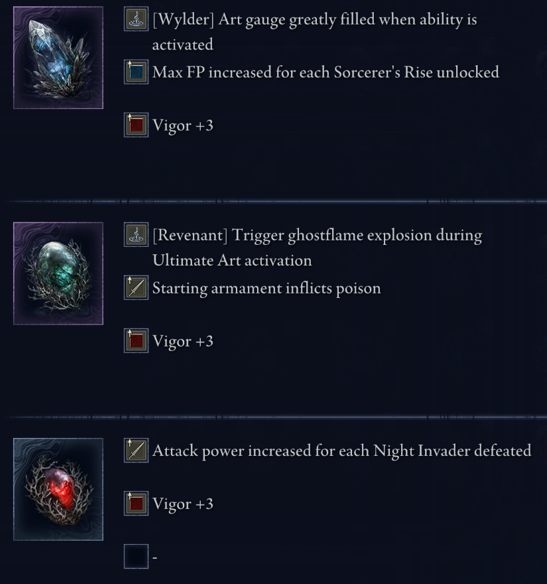
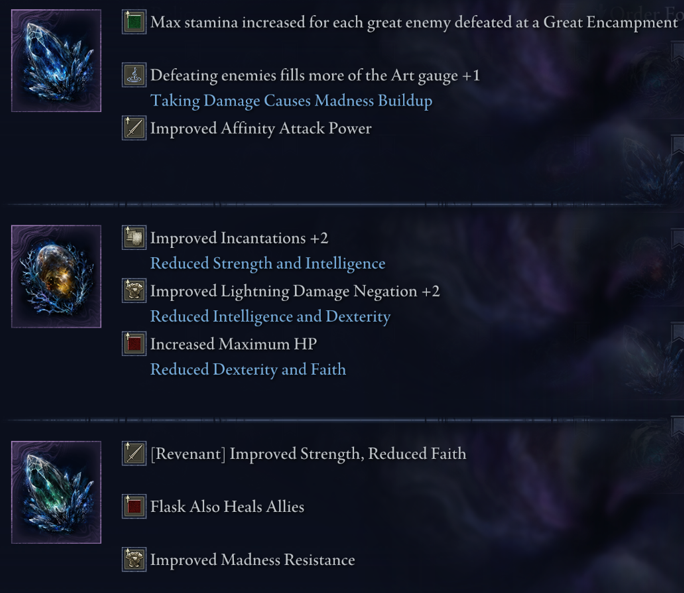
Glass Cannon that I rarely run
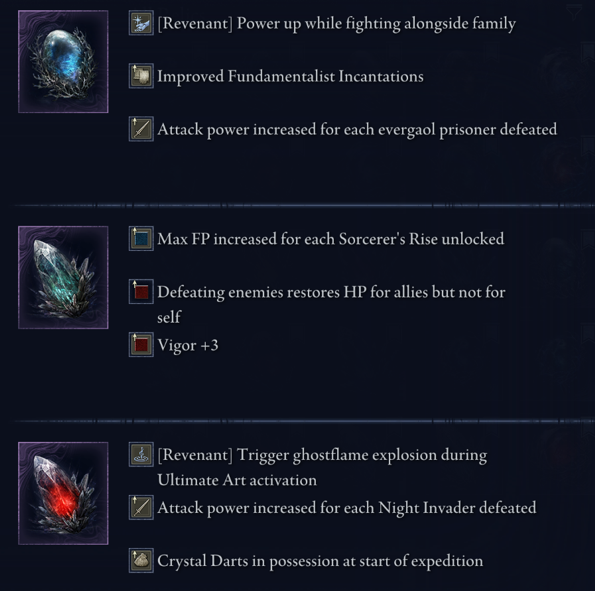

The first relic looks great, until it isn’t. I don’t want lines to become useless if I don’t get a specific incantation and troll randoms. Fundamentalist Incantations pretty much requires me to have Discus of Light or Triple Rings of Light to get value out of it. I don’t get those every game, due to the bad incant pool and incant combos. Power up while fighting alongside family is not that great at Depth 5 for me. I can get 10% damage for 10 seconds, the time Frederick stays alive on the field. Maybe Revenant summons will get buffed in the future. It sure is lucky and insane, but I quickly swapped out of it.
Battle Record - Summary as of 11/12/2025
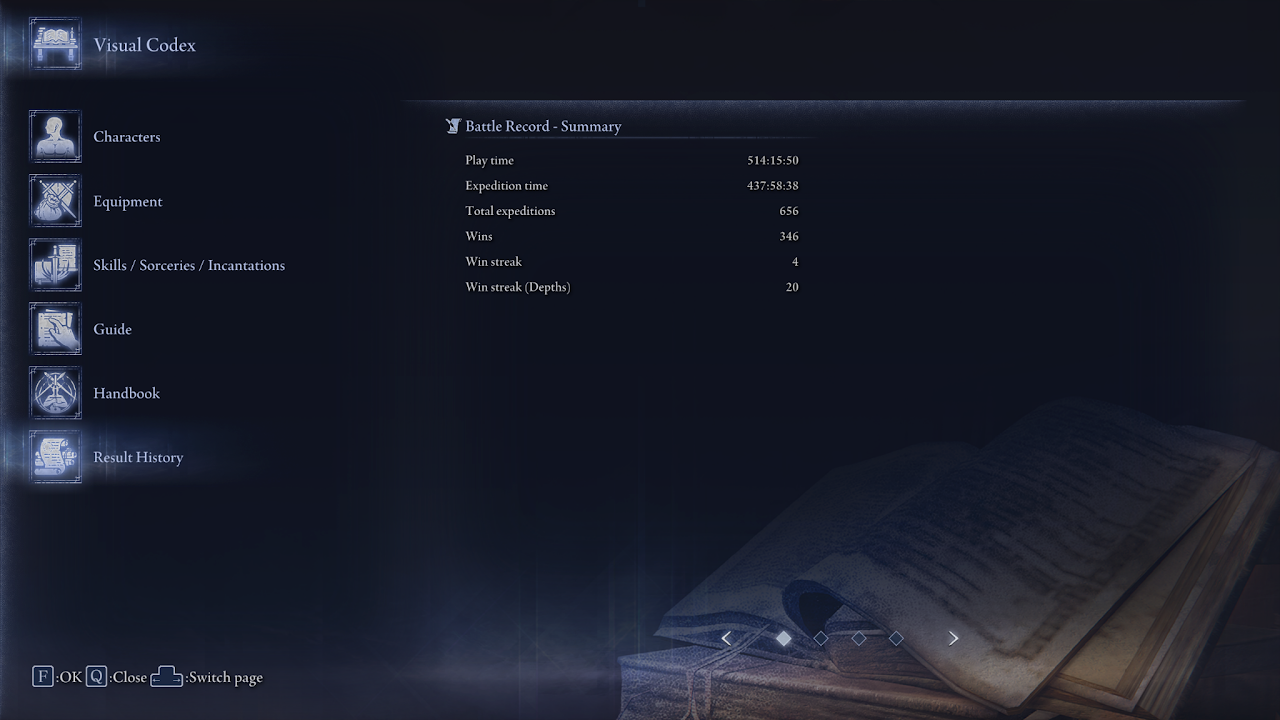
First Depth 5 Game - 9/27/2025
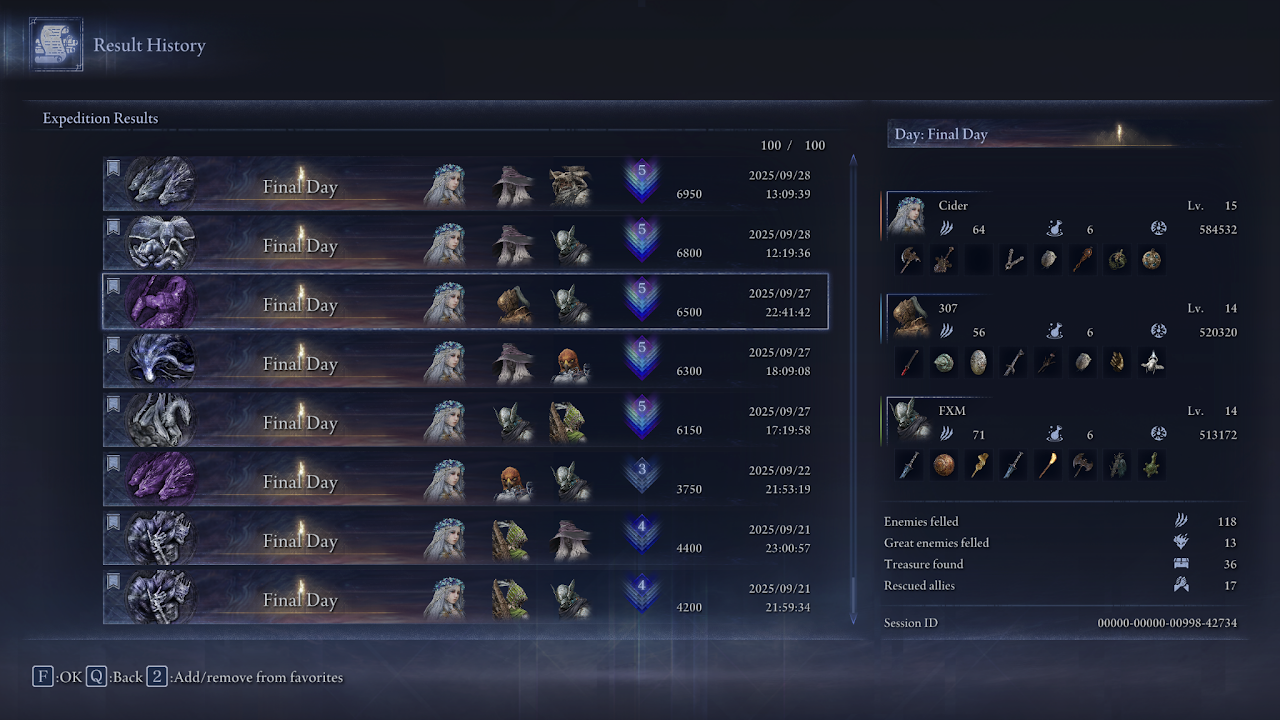
Reaching 9999 - 10/30/2025
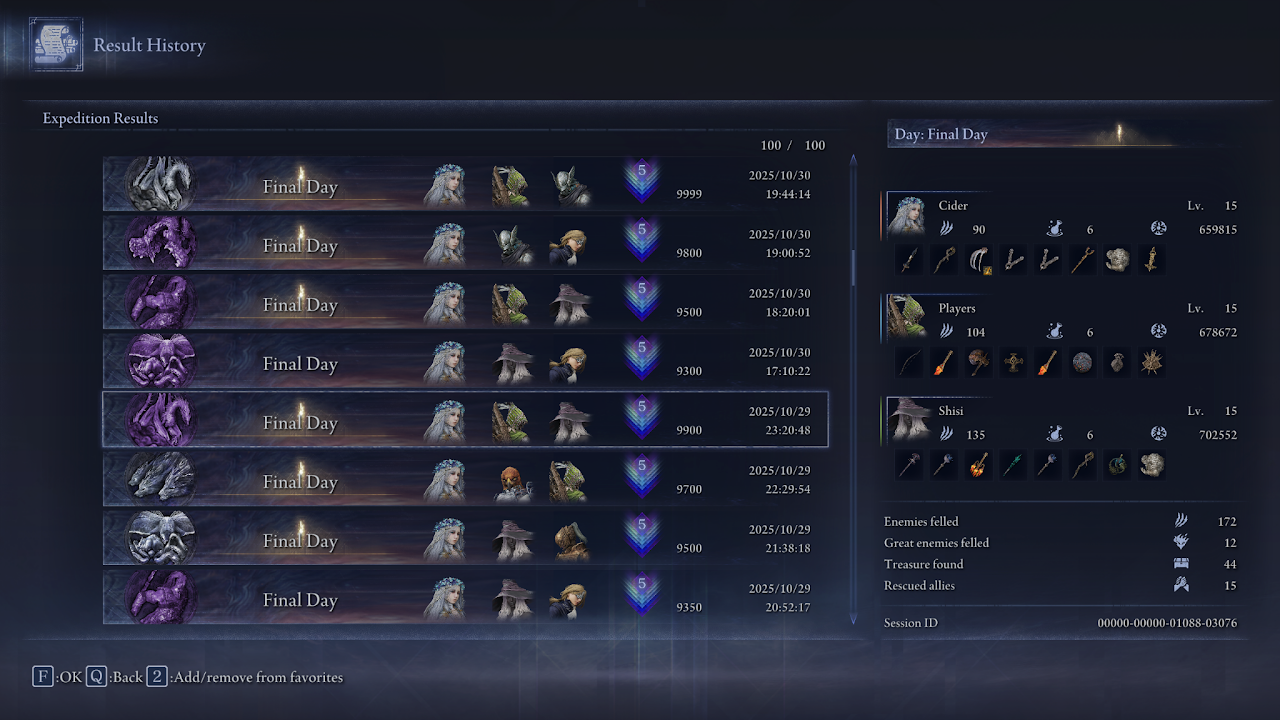
Closing Thoughts/More Game Profile / Unimportant Information / If you're curious and made it this far
I thought I had the ability to reach 9999 way earlier after reaching Depth 5. It took me a whole month of playing after work, getting better at the game. Eventually I learned to solo carry randoms to save runs because I wanted to try and master the game. Sometimes you’ll get Depth 4 games, which can be harder with inexperienced randoms. Luck can play a huge factor in your climb with bosses, but you should be prepared to fight any boss and not play the hope game. As players get better and better, the climb can become easier.
On average, from checking Steam profiles of my teammates, it takes a player about 400 hours to reach Depth 5. If I had all of this knowledge beforehand, it would’ve saved me many runs, and I could’ve climbed in less time. You also need to play the game and have fun naturally, for all of the stuff to sink in and perform under pressure. It took me 12 hours on Nightreign’s launch to kill regular Gladius, solo-queuing with randoms as Duchess. With better pathing and knowledge shared from the community, it feels almost impossible to lose regular runs for many players.
Plenty solo climb to 9999 with bad relics, non min-max strategies, and found different things worked for them. What’s the same in every climb, and not RNG dependent, is that the players knew how to deal with most of the boss mechanics. Analyze your own games, playstyle, your trios/friends (this guide is for people who don’t have many), have fun, instead of blindly following this guide or other strategies.
I don’t know exactly why I had the itch to make this guide like this, and I like the game, but maybe it was because I got mad at some random people making questionable decisions even at Depth 5. Everyone makes mistakes, the game is hard. This guide took about 19 hours to make.
Background
I have 500 hours in Nightreign. I was reluctant to make this guide, but I know that knowledge spreads fast in this community. Hopefully it helps others improve and I can play with better randoms, you get better randoms, or you become a better random.
This is my experience after playing 1.5 months of Depth 5 daily. I didn’t reach 9999 right away. It took me a month of playing after work to get to 9999, and other players got there way faster. I was bad at ED Libra, lost to him 3 times in a row at Depth 5, but now I can solo carry the fight at Depth 5 (video above). To me, mastery means being able to solo carry every boss. I currently can’t carry Depth 5 ED Maris. I observe the decision-making of my teammates and wonder how they even got to Depth 5 (no-offense), about 10-20% of the time. In some games during my climb, I’ve been carried as well. But I haven’t found a good guide that hits the important marks, so I made this. It’s not feasible to expect every player to find and look for every trick in the book posted on Reddit.
I’m pretty confident in what I’ve learned so far, and a lot of players who have finished their grind, have similar strategies. I’m just some random guy who loves the aura farming part of the game
Before reaching 9999, I’ve deranked from Depth 5 to Depth 3, 2 times. I’ve been through Depth 4 hell and my skill level belonged there at some point.
All of this information came from thinking about every single game, whether a POI was worth my time, reading Reddit every day for a new trick, or watching Youtube videos. This guide is also subjective on certain parts. It’s based on heavily analyzing my own matches, playing as Revenant primarily, thinking about what I could’ve done better after every decision.
That being said, the goal of this guide is to supposed to be an all-in-one place for what you need to know to master Nightreign to the point of carrying your friends or randoms. Switching to Wylder and soloing regular ED Gladius randomly is no problem for me because I understand the boss mechanics, and generally what he needs to succeed.
Main Go-to/lazy Revenant relic setup (not important, only 10/18 useful lines)
As I analyzed in the relic section, I chose to have roll vigor to give me the base chances of surviving one hit, though I still need to find around +50% damage negation in total during a run. I don't want to lock in every run to run full glass cannon, or need more damage negation because I didn't run vigor. I can't wait to get better relics, but you don't really get a choice.
Glass Cannon that I rarely run
The first relic looks great, until it isn’t. I don’t want lines to become useless if I don’t get a specific incantation and troll randoms. Fundamentalist Incantations pretty much requires me to have Discus of Light or Triple Rings of Light to get value out of it. I don’t get those every game, due to the bad incant pool and incant combos. Power up while fighting alongside family is not that great at Depth 5 for me. I can get 10% damage for 10 seconds, the time Frederick stays alive on the field. Maybe Revenant summons will get buffed in the future. It sure is lucky and insane, but I quickly swapped out of it.
Battle Record - Summary as of 11/12/2025
First Depth 5 Game - 9/27/2025
Reaching 9999 - 10/30/2025
Closing Thoughts/More Game Profile / Unimportant Information / If you're curious and made it this far
I thought I had the ability to reach 9999 way earlier after reaching Depth 5. It took me a whole month of playing after work, getting better at the game. Eventually I learned to solo carry randoms to save runs because I wanted to try and master the game. Sometimes you’ll get Depth 4 games, which can be harder with inexperienced randoms. Luck can play a huge factor in your climb with bosses, but you should be prepared to fight any boss and not play the hope game. As players get better and better, the climb can become easier.
On average, from checking Steam profiles of my teammates, it takes a player about 400 hours to reach Depth 5. If I had all of this knowledge beforehand, it would’ve saved me many runs, and I could’ve climbed in less time. You also need to play the game and have fun naturally, for all of the stuff to sink in and perform under pressure. It took me 12 hours on Nightreign’s launch to kill regular Gladius, solo-queuing with randoms as Duchess. With better pathing and knowledge shared from the community, it feels almost impossible to lose regular runs for many players.
Plenty solo climb to 9999 with bad relics, non min-max strategies, and found different things worked for them. What’s the same in every climb, and not RNG dependent, is that the players knew how to deal with most of the boss mechanics. Analyze your own games, playstyle, your trios/friends (this guide is for people who don’t have many), have fun, instead of blindly following this guide or other strategies.
I don’t know exactly why I had the itch to make this guide like this, and I like the game, but maybe it was because I got mad at some random people making questionable decisions even at Depth 5. Everyone makes mistakes, the game is hard. This guide took about 19 hours to make.