Necrobinder's True Potential
 Kaine HBG-Hands
(59 ratings)
Mar 20 @ 1:06pm10,85862
CharactersGameplay BasicsEnglish
Introduction
WHY YOU SHOULD BE CAREFUL WITH THIS GUIDE
As a warning: I am not a very good player and am still in the process of learning StS2. My winrate climbing up to Asc 4 is 18.92% on Necromancer and in rotating Ascensions across characters as I have been playing my win rate across everyone is currently 16.47%. I am currently playing Ascension 4 on Necrobinder. However, I fully believe I could continue to climb higher and higher even with the beta patch nerfs because I did not rely on Infinite combinations anyway. I find this character to be very relaxing, actually. Unfortunately if I only focused on this character I believe I would become a better StS2 player slower than if I rotated after every win, so it is not a priority for me to play.
For anyone curious about what Ascensions I have unlocked rotating across characters, here it is: 4/4/5/4/3.
I may get some things wrong in this guide. Things may not work as well in Ascension 7+ where upgraded and rare cards become less available. Regardless of this I am convinced that the cards I am going to discuss are fundamental to the playing of a good Necrobinder across all ascensions. So many possibilities are open by these few cards I will discuss that it would even be unreasonable to expect me to list every possible card combination.
NOTICE
I will be talking about card combinations very often and using pictures to visualize. With the exception of the main three (Dredge, Transfigure, Graveblast), assume the combinations do not require upgraded cards. The combinations can still work with default versions of Dredge, Transfigure, and Graveblast, but not always.
Common, Humble Recycler
 One of my favorite cards in the entire game when upgraded. I even look for it in shops. I especially like having two copies upgraded but only one upgraded Graveblast can still add tremendous value to any deck.
 Graveblast enables so many different and highly effective recycles with 1 or 0 cost cards it is worth upgrading as soon as possible. If nothing else, it can fetch a card from the Discard Pile we were not able to play in a different turn which already makes it worth considering for that reason alone. It is also a common rarity card!
Here's a few of my favorite Graveblast loops with 3 energy. If we have 4 Energy and 2 Graveblasts in hand we can play many of these loops starting from the Discard pile. These loops still work without Graveblast+, only Graveblast, but are much less accessible under those circumstances.
- Melancholy (Assume there is a 1 or 0 cost) -> Graveblast -> Melancholy.
This loop is massive block protection for one turn which in the best case scenario only costs 1 energy. Bone Shards helps kill Osty faster to reduce the cost of this card more consistently in any given encounter.
[Note: Graveblast -> Melancholy -> Graveblast -> Melancholy is another way to play Melancholy twice if there are two Graveblast effects in the hand and there is enough energy to play all the cards. Death's Door looped using Graveblast is even better block for decks that can apply Doom consistently but this is consistently more energy expensive as well.]Loop #2: - Negative Pulse -> Graveblast -> Negative Pulse.
Decent block, great doom stacking early on and very good for encounters with lots of enemies.Loop #3: - Capture Spirit -> Graveblast -> Capture Spirit.
Instant card draw engine; Parse (Draw 3 Cards) is a more direct substitute to Capture Spirit for the purpose of drawing cards. I have always preferred Capture Spirit over Dirge because Dirge is sometimes hard to play for its maximum value in terms of Souls. Now that Dirge is an Exhaust card in the beta branch, this loop is far more practical.Loop #4: - No Escape -> Graveblast -> No Escape.
Early into an encounter this loop is good for stacking Doom on a single target. Because of how No Escape stacks Doom it is even a winning combination once the enemy has a high amount of Doom. Great for boss fights.Loop #5: - Hang -> Graveblast -> Hang
This combination helps scale Hang faster and it also does decent damage.Loop #6: - Transfigure+ -> Graveblast -> Transfigure+.
Extremely powerful, extremely rare, and extremely situational loop. I will discuss Transfigure in more detail later in the guide.
Loops worth mentioning:Loop #7: - Invoke -> Graveblast -> Invoke
Generic high energy loop for the next turn. I haven't used this enough. It is very good for decks running lots of high cost cards and capable of using many Soul cards to draw.Loop #8&9: - Fear OR Defy -> Graveblast -> Fear OR Defy
Stacking Vulnerability debuffs or Stacking Weak debuffs.Loop #10&11: - Reave OR Grave Warden -> Graveblast -> Reave OR Grave Warden
I would not play this often but it is good early into the game. Easy soul generation.
Loop #1:


Please take notice that I did not include every possible combination for using Graveblast. There are other viable loops with the card and Graveblast is not limited only to use upon Necrobinder cards. Colorless cards and cards of other classes are sometimes very good targets for a Graveblast loop.
Uncommon, Emergency Recycler
If you've read the guide up to this section you may be thinking, "Ok. Cool. Graveblast. Loops. Whatever. What if I can't find a Graveblast / can't upgrade it / can't find extra copies?". Don't worry, the next card serves a very similar purpose and can help maintain access to a "Graveblast" type of loop while opening up even more possibilities for our use.
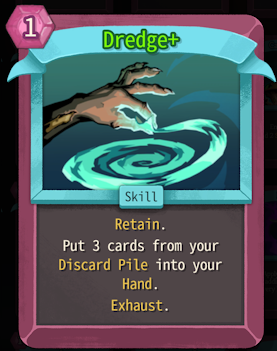
Typically I use this card as a substitute for Graveblast. I don't always upgrade it but it is absolutely worth a consideration. Dredge is perfect for the times when Graveblast is not available, especially when it is upgraded. Retain (only available on Dredge+) is a very good feature that Graveblast does not have, meaning we can use it when it would make the most difference to us in any encounter. We can also use it to enhance Graveblast loops but it gets complicated.
Discovering loops for this particular card takes more thought since it pulls three cards from the Discard Pile instead of one; it is also much more situational since it depends very heavily upon the contents of the Discard Pile and Energy available to the player. Consider starting Dredge loops with Wisp or Borrowed Time (to refund the Energy spent on Dredge), but always remember this card pulls three cards out of the Discard Pile instead of one. There are many strange loops possible using Dredge with high energy. There are also many generic and simple combinations enabled by the use of Dredge that require little thought. It is very important to keep our minds open to new possibilities when we have this card, so we should always check our Discard Pile before using it. I will list an interesting combination now only to inspire players to think of more.
 (Assume that Transfigure is in Discard Pile, 3 energy to start. Borrowed Time can be substituted for other 0 cost energy cards like Production, but Borrowed Time is not exhaustible so it is simpler): Borrowed Time / Production -> Hang -> Dredge -> [Hang, Borrowed Time, Transfigure] -> Transfigure (Hang) -> Borrowed Time -> Hang.
This Dredge loop achieves many different things. It allows us to play Hang once, doubling its attack value against the individual target for the rest of the encounter. We then Dredge so we can Transfigure Hang to cost 2 Energy and we play the Transfigured Hang for a total of 3 Hang plays in one turn. The loop outputs 77 damage (11,22,44) assuming we did not play Hang on the target before. Finally, we both scaled the damage that Hang could output in any one turn since it now always plays twice and it scales itself twice per turn without any other loops. If we drew the same Hang card we used in the loop again and played it, it would deal 264 damage (88+176) in one turn. This loop can also be used to scale Hang to end a boss encounter immediately if played later on when we have a few Hang debuffs in place already.
Of course, Dredge can only be used once per encounter and duplicates of this uncommon card may be difficult to justify when we are statistically more likely to find Graveblast (Uncommon vs. Common rarities). Therefore this combination is not a perfect solution to all single target encounters since Hang necessarily applies a debuff to double its damage against any one target and this debuff can disappear (for example, when Test Subject or Doormaker transform). Regardless, this loop is very powerful for single targets.
Note that the beta branch increased the Doom cost of Borrowed Time. It is quite substantial if it is not upgraded in a low HP situation. So, consider this loop more practical if Borrowed Time is upgraded or substitute Borrowed Time for another energy card like Production, which is now unfortunately an Exhaust card.
Typically I use this card as a substitute for Graveblast. I don't always upgrade it but it is absolutely worth a consideration. Dredge is perfect for the times when Graveblast is not available, especially when it is upgraded. Retain (only available on Dredge+) is a very good feature that Graveblast does not have, meaning we can use it when it would make the most difference to us in any encounter. We can also use it to enhance Graveblast loops but it gets complicated.
Discovering loops for this particular card takes more thought since it pulls three cards from the Discard Pile instead of one; it is also much more situational since it depends very heavily upon the contents of the Discard Pile and Energy available to the player. Consider starting Dredge loops with Wisp or Borrowed Time (to refund the Energy spent on Dredge), but always remember this card pulls three cards out of the Discard Pile instead of one. There are many strange loops possible using Dredge with high energy. There are also many generic and simple combinations enabled by the use of Dredge that require little thought. It is very important to keep our minds open to new possibilities when we have this card, so we should always check our Discard Pile before using it. I will list an interesting combination now only to inspire players to think of more.
Loop Example:
(Assume that Transfigure is in Discard Pile, 3 energy to start. Borrowed Time can be substituted for other 0 cost energy cards like Production, but Borrowed Time is not exhaustible so it is simpler): Borrowed Time / Production -> Hang -> Dredge -> [Hang, Borrowed Time, Transfigure] -> Transfigure (Hang) -> Borrowed Time -> Hang.This Dredge loop achieves many different things. It allows us to play Hang once, doubling its attack value against the individual target for the rest of the encounter. We then Dredge so we can Transfigure Hang to cost 2 Energy and we play the Transfigured Hang for a total of 3 Hang plays in one turn. The loop outputs 77 damage (11,22,44) assuming we did not play Hang on the target before. Finally, we both scaled the damage that Hang could output in any one turn since it now always plays twice and it scales itself twice per turn without any other loops. If we drew the same Hang card we used in the loop again and played it, it would deal 264 damage (88+176) in one turn. This loop can also be used to scale Hang to end a boss encounter immediately if played later on when we have a few Hang debuffs in place already.
Of course, Dredge can only be used once per encounter and duplicates of this uncommon card may be difficult to justify when we are statistically more likely to find Graveblast (Uncommon vs. Common rarities). Therefore this combination is not a perfect solution to all single target encounters since Hang necessarily applies a debuff to double its damage against any one target and this debuff can disappear (for example, when Test Subject or Doormaker transform). Regardless, this loop is very powerful for single targets.
Note that the beta branch increased the Doom cost of Borrowed Time. It is quite substantial if it is not upgraded in a low HP situation. So, consider this loop more practical if Borrowed Time is upgraded or substitute Borrowed Time for another energy card like Production, which is now unfortunately an Exhaust card.
Rare, Magical Multiplication

One of my favorite cards in the entire game. It is a shame I rarely am able to find it or play it.
The reader may already have figured out its value from the previous sections or the title but I will spell it out for anyone who hasn't been able to succeed with it so far. Transfigure can multiply value of important cards directly. What makes this so valuable is that we can multiply again using the loops I have mentioned in the guide so far. Transfigure can even be used more than once on the same card. And again, for emphasis, whatever cards we Transfigure become perfect candidates for Graveblast or Dredge loops.
What makes this card beautiful is that it lets us create our own scaling out of any Power cards, Skill Cards, and Attack cards in the deck: Double Lethality, Double Demesne, Double Squeeze, etc, etc. If we already had duplicates of these cards, we scale even harder. We have to think very carefully to get the most power out of this card but it is one of the most rewarding cards we can play as the Necrobinder.
I mentioned this combination earlier in the guide:
 Transfigure+ -> Graveblast -> Transfigure+.
This is simply a preparation loop for when we have multiple cards in our hand that are worth doubling in value. With high energy we can even play those cards on the same turn; if not, we save them for another draw. We can even skip Graveblast and simply Transfigure+ with a copy of itself, though for the sake of cost and turns spent it would arguably be easier to play Transfigure+ twice on the most valuable card we have in the hand at the time.
- Here is a combination I used to win in Ascension 3 vs. the Queen boss recently. I had already played a few turns and Banshee's Cry was at or close to 0 energy cost.
- Turn 1 of combination: Transfigure+ (Banshee's Cry+) -> Graveblast -> Transfigure+ (Banshee's Cry+) (Preparation turn).
- Turn 2 of combination: Banshee's Cry+(*3) -> Graveblast -> Banshee's Cry+(*3).
This combination is possible because Banshee's Cry has infinite negative mana scaling and I could have scaled it for as long as necessary if I continued to survive and play ethereal cards.
A combination I have wanted to play but have not had an opportunity for: - Transfigure (Veilpiercer) -> Veilpiercer = Veilpiercer -> Graveblast -> Veilpiercer.
[Notice that there are many combinations Graveblast has to play that are equivalent to combinations that exist with Transfigure played by itself.]
We do not have to Transfigure on the same turn to benefit from this combination or any other Transfigure-only combinations. Free ethereal cards is a very nice bonus in this particular scenario.


Ending
In conclusion, Necrobinder's true power is of multiplying card values in an easily accessible way; no other class gets such simple and cheap cards in order to increase the value of the best cards of their deck. It is a class capable of turning good cards into amazing cards and of creating win conditions where there might not be any.
Thanks for reading my guide and do let me know if it helped.
Thanks for reading my guide and do let me know if it helped.
Notice for Players of Other Languages
You have my full permission to translate and redistribute this guide as long as you give credit to me and my original guide. I don't care in any way if you make a video. Do let me know how it goes, how it's received; it fascinates me that people can have such different opinions on StS2 in my own language, let alone in others. I considered translating the guide to Chinese using enterprise level LLMs since the Necrobinder is supposedly very controversial in that community of players but I felt it would be better if the community judged my guide as worthy of translating or not translating as the translation would still be of higher quality from a person than an AI with such a complex language.