Complete Guide - Easy Raiding
 Youshisu
(134 ratings)
Oct 31, 2025 @ 4:07pm9,093211
CraftingGame ModesGameplay BasicsLootMaps or LevelsMultiplayerSecretsWalkthroughsWeaponsEnglish
Hello
Guide is separated into chapters.
Read it through or check chapters on the right side if you are interested into specific one.
Read it through or check chapters on the right side if you are interested into specific one.
- Quick tips
- Looting
- Crafting
- Weapons
- Enemies
- Moving
- Combat
- Skill tree
First game
Free gear is your friend
Your stash (items inventory) has few weapons upgraded to Tier 3 at start of the game. You can use them for your first raid, but most likely will lose it or worse, die without using it :D It can really happen quite often. You lose everything on death, except item in safe pocket, which usually is 1 slot.
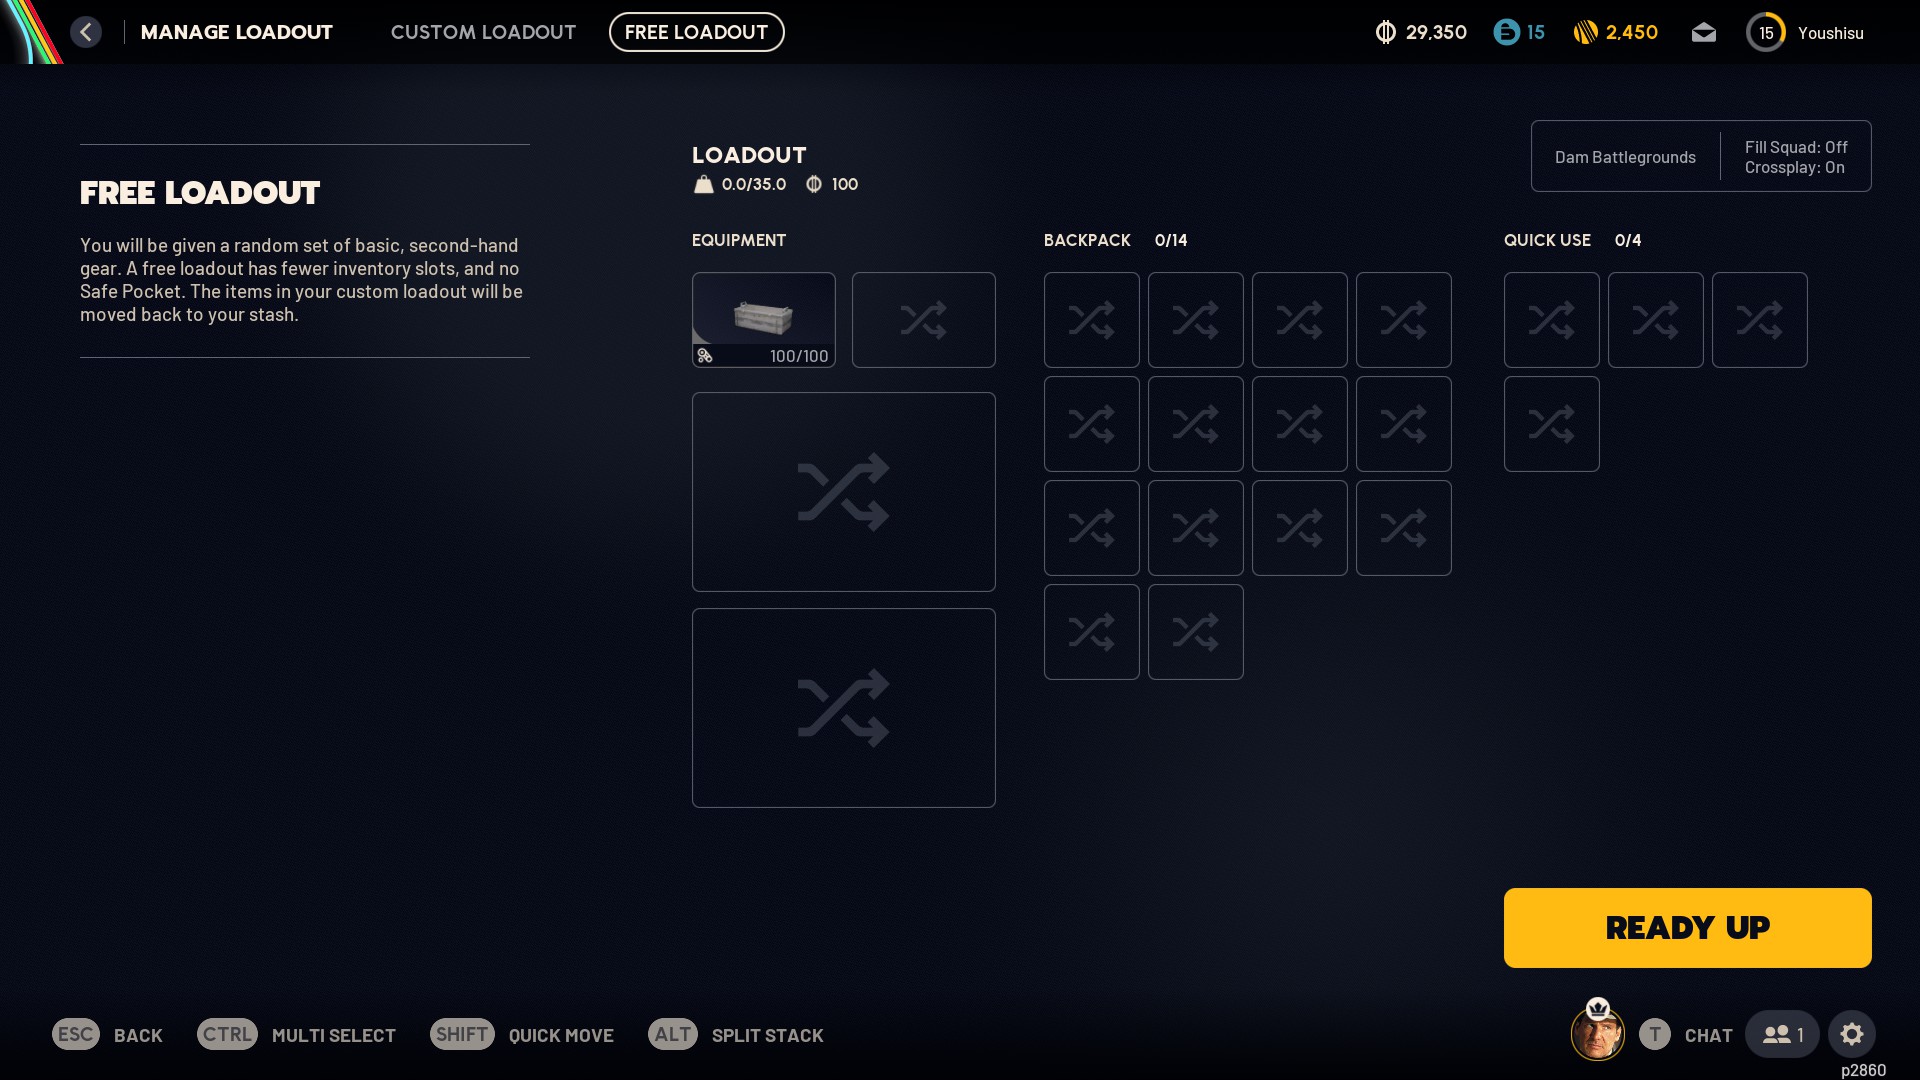
Since you don't know anything about this game I suggest using free Loadout.
Once u extract, this gear can be upgraded basically for free. This very easy way to learn game.
Use it as much as you want.
Pros:
- You get random basic weapon with ammo
- Shield is always equipped
- Sometimes start with fancy explosives
- No stress over gear
- You can freely experiment and take time to learn
- Dying won't hurt you that much
- Free gear has less weight capacity
- No safe pocket
- Limited healing items
How to use free loadout:
Select map u want to play. During loadout change tab above to "Free Loadout".
Hit big yellow button to start adventure
Quick tips
More will be in "Tactics" chapter
- Nevery fully trust anybody, this is a SURVIVAL game
- Health is more important than shield
healing is slower as you must wait to use next bandage - Damage stops shield recharge
- Shields pass % of damage to body
- Combat is optional, stealth is advised
- High ground is strong advantage
- ARCs are attracted to noise, so are players.
- Listen to sounds and noises! It will give you clues about players and arc.
- Avoid big robots
- Every weapon is different, give it a try to test each one.
- Perks will not replace your decisions, think what u can do on the surface
- Keep track of game time and elevator timers. They will close.
- Even when downed you can still use extracts and ARC will not shoot at you.
- Dying is part of learning process, your character still gets experiance and you get knowledge.
- Fully charged shields can be kept in inventory, but will slowly charge from 0 to 100 when equipped.
- Solo players are spread more on map then groups. In solo mode you are more likely to meet other players
- Match making tries to match solo with solo players, but thats not always the case.
Firing Range
Game has firing range, but for some reason it unlocks after 4 games.
Constrols - IMPORTANT keys!
I suggest rebinding default keys, but here is defaults:
Shift: Sprint
H: holster weapon for faster running
Q: usable items. Click to select. Hold to open selection.
C: crouch (sneak)
C+V: slower crouching
C during sprint: slide
B: proximity voice chat
G: emotes and communication
F: flashlight
Mouse3 (Wheel): Ping
Very important:
X: toggle camera shoulder.Shift: Sprint
H: holster weapon for faster running
Q: usable items. Click to select. Hold to open selection.
In backpack:
- Shift + Left mouse
Quick move items between EQ and container
Quick move item from backpack to quick slot or safe pocket. - Alt + Shift + Left click: Quick move half of stack
- Alt + Drag: Move half of stack (for dropping)
- Hold Ctrl: Select multiple items
Rest:
V: walk C: crouch (sneak)
C+V: slower crouching
C during sprint: slide
B: proximity voice chat
G: emotes and communication
F: flashlight
Mouse3 (Wheel): Ping
Movement
Crouching
Lowers your profile.You can hide behind smaller covers.
Moving while crouched generate less noise.
Sprinting
Sprinting generates a lot noise.Sprinting with hidden weapon is much faster than with weapon.
Sliding
During sprint press crouch button to slide.Slides are furher if done downhill.
Can not heal during slide, but shoots is possible.
Effect can be boosted with skill tree
Jumping
Requires stamina to jump.Vaulting
Action that help you jump over obstacles quite quickly.When stamina is exhausted this action is slower
Climbing
Any form of climbing edge above player. During falling you can grab edges to climb up.
When stamina is exhausted this action is slower
Wall jumping
During any climbing you can press jump button again to jump of climbed wall into specific direction.Effect can be boosted with skill tree
Rolling
Can be combined with walk or sprint.Sprint rolls are longer, but also consume more stamina.
When stamina is exhausted this action is slower
Effect can be boosted with skill tree
Falling
Falling does damage.Non fatal damage can be reduced with perk or roll.
When close to ground press crouch button do do roll.
When falling you can grab edges to start climbing with 0 damage taken.
First simple loop
Free gear
I assume u stared with free gear. Free starting gear has basic gray "augment" but I like to call them "backpacks" (I may sometimes use this word in guide for an augment).Loop:
- Play with free gear
- Loot and survive
- Upgrade gear
- Change weapon if u want
- Get more ammo / healing items
- Raid again.
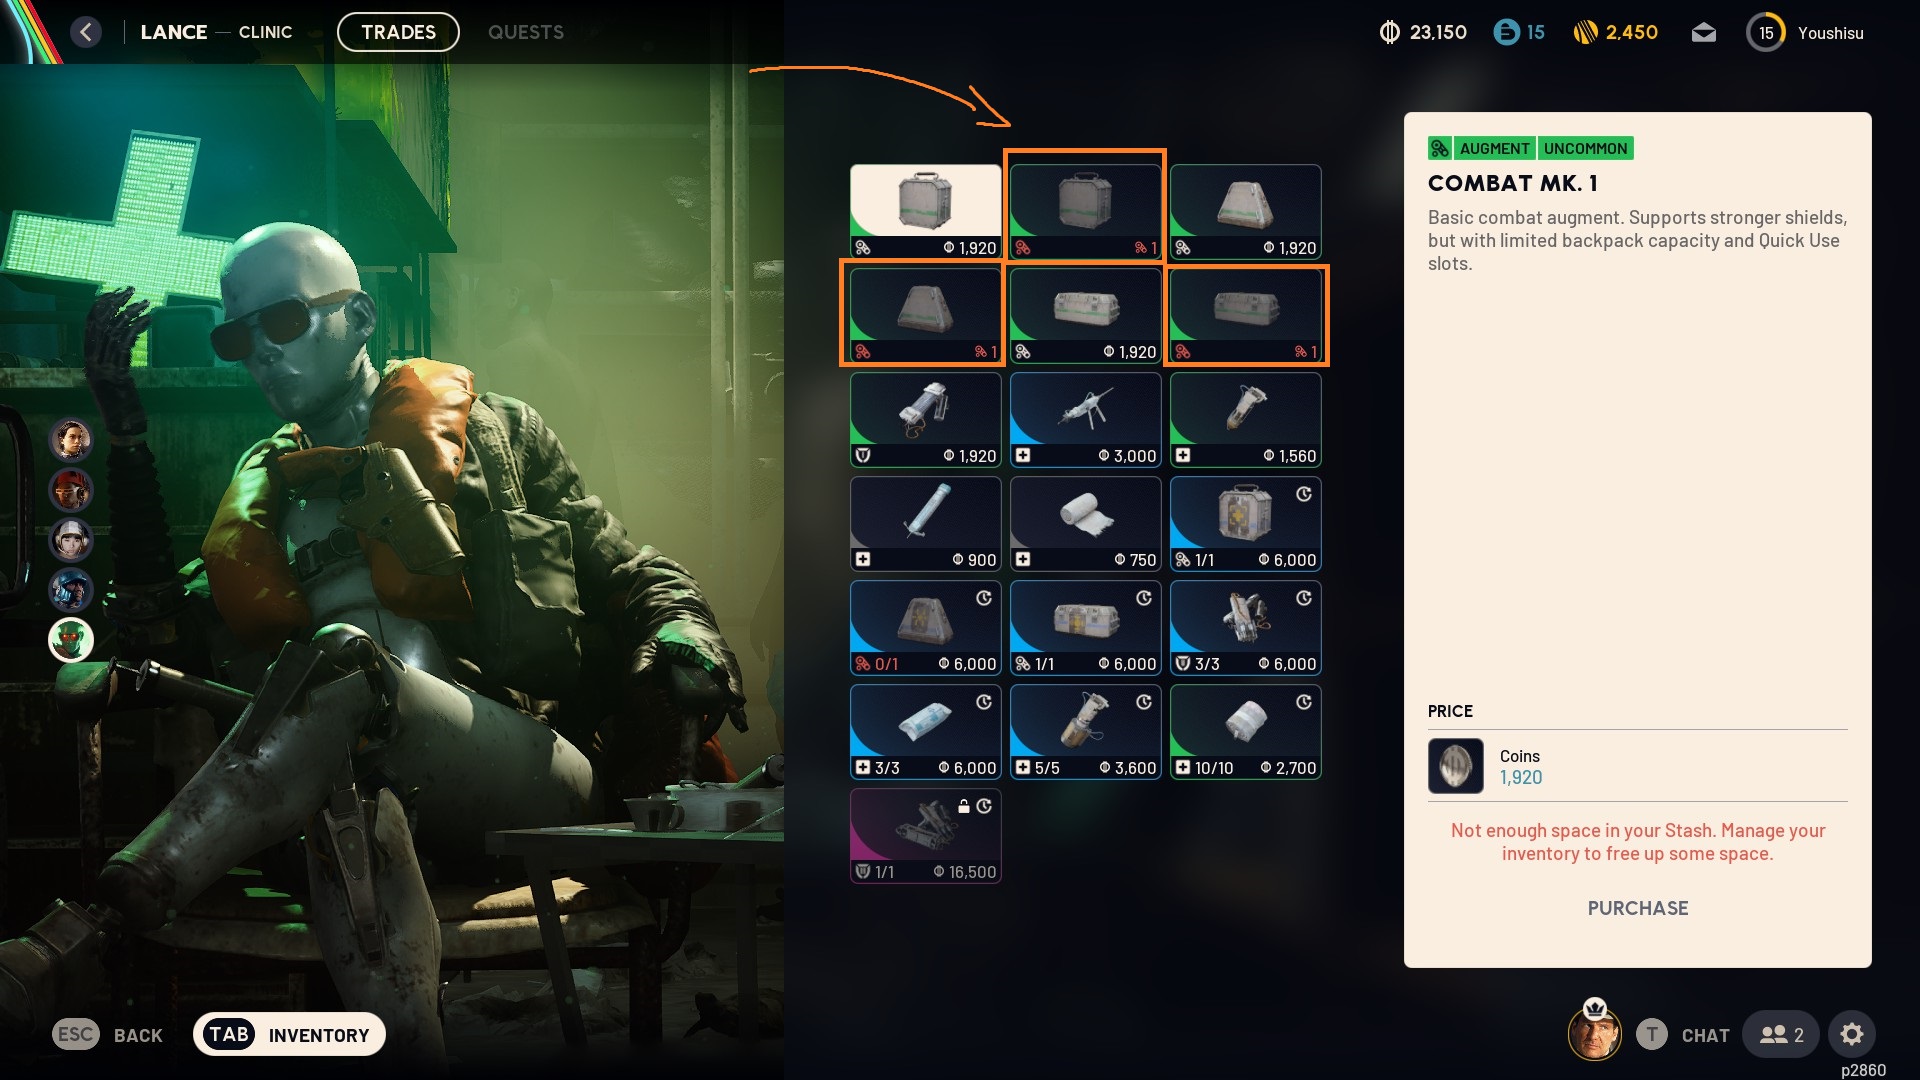
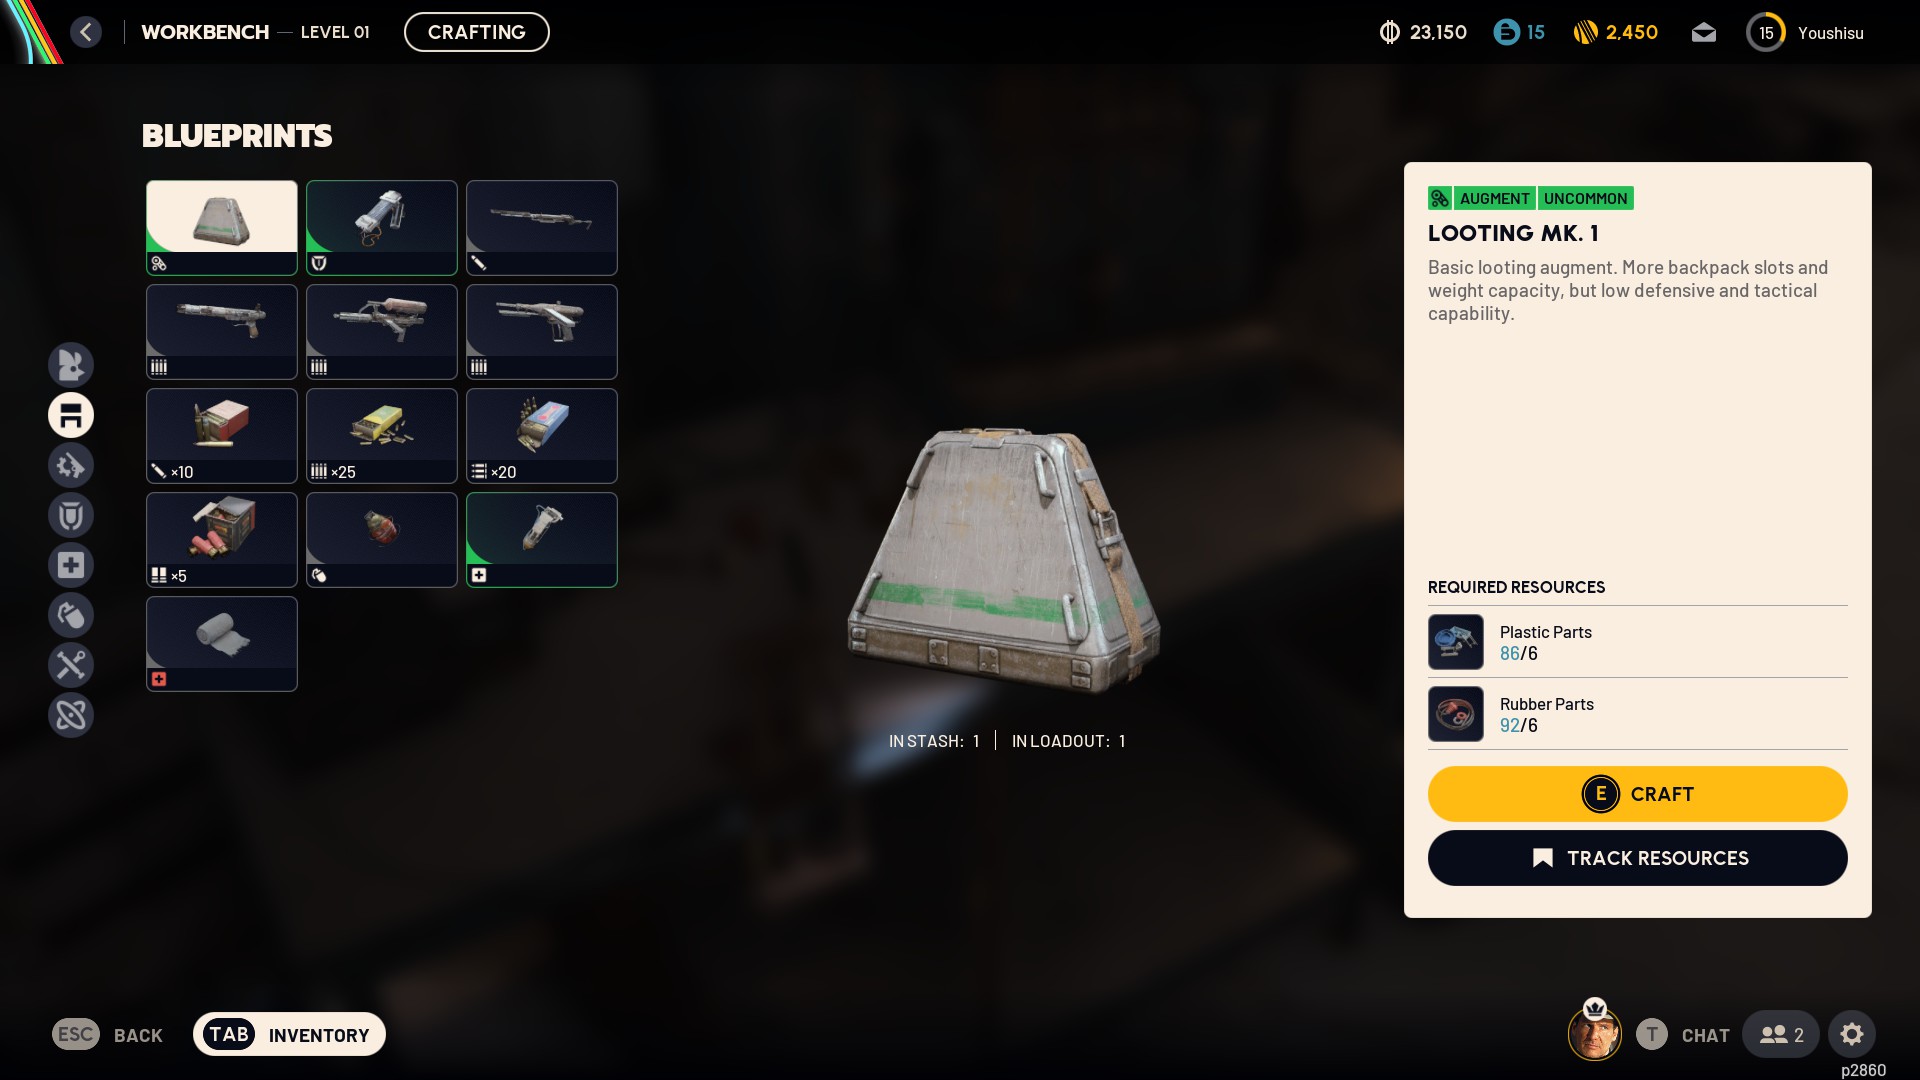
Augment upgrade
Do not sell free augment "backpack"!It can be traded for any green augment u desire 1:1 for FREE.
After extraction, unequip it and go to medic trader.
You will have more capacity, more slots and 1 safe pocket. You saved cash and materials this way.
Items and crafting are explained in detail in next chapters
Extracted!
You extracted! How awesome!This will help you stand on your feet when lacking weapons or materials. Now you got new resources. You can craft something now, change weapon and start new game with better "backpack".
More about items and weapons in equipment chapter
Next round
If you lack materials, or items then go with "free gear" again, its ok. At some point you will shift towards using custom gear most of the time. I hope you will. Playing with your gear is very cool if you can sustain it.
Most of my games are with custom gear, but i come back to play with "free gear" for fun :D, it gives a lot of fun between rounds and quests.
Stash
Stash holds your items between games.Stash can be ugraded. First few levels are relatively very cheap. It only costs cash.
When your stash is full, it is good indicator to either recycle materials, do crafting or take good guns and go out with your loadout.
Rooster
Game along giving you free gear option, also provides you with a helping rooster pet.
This chicken is very smart, it brings you free resources, collect them as they stack up only up to 50! Visit him every few raids to grab some materials.
He does not gather resources when you are not playing
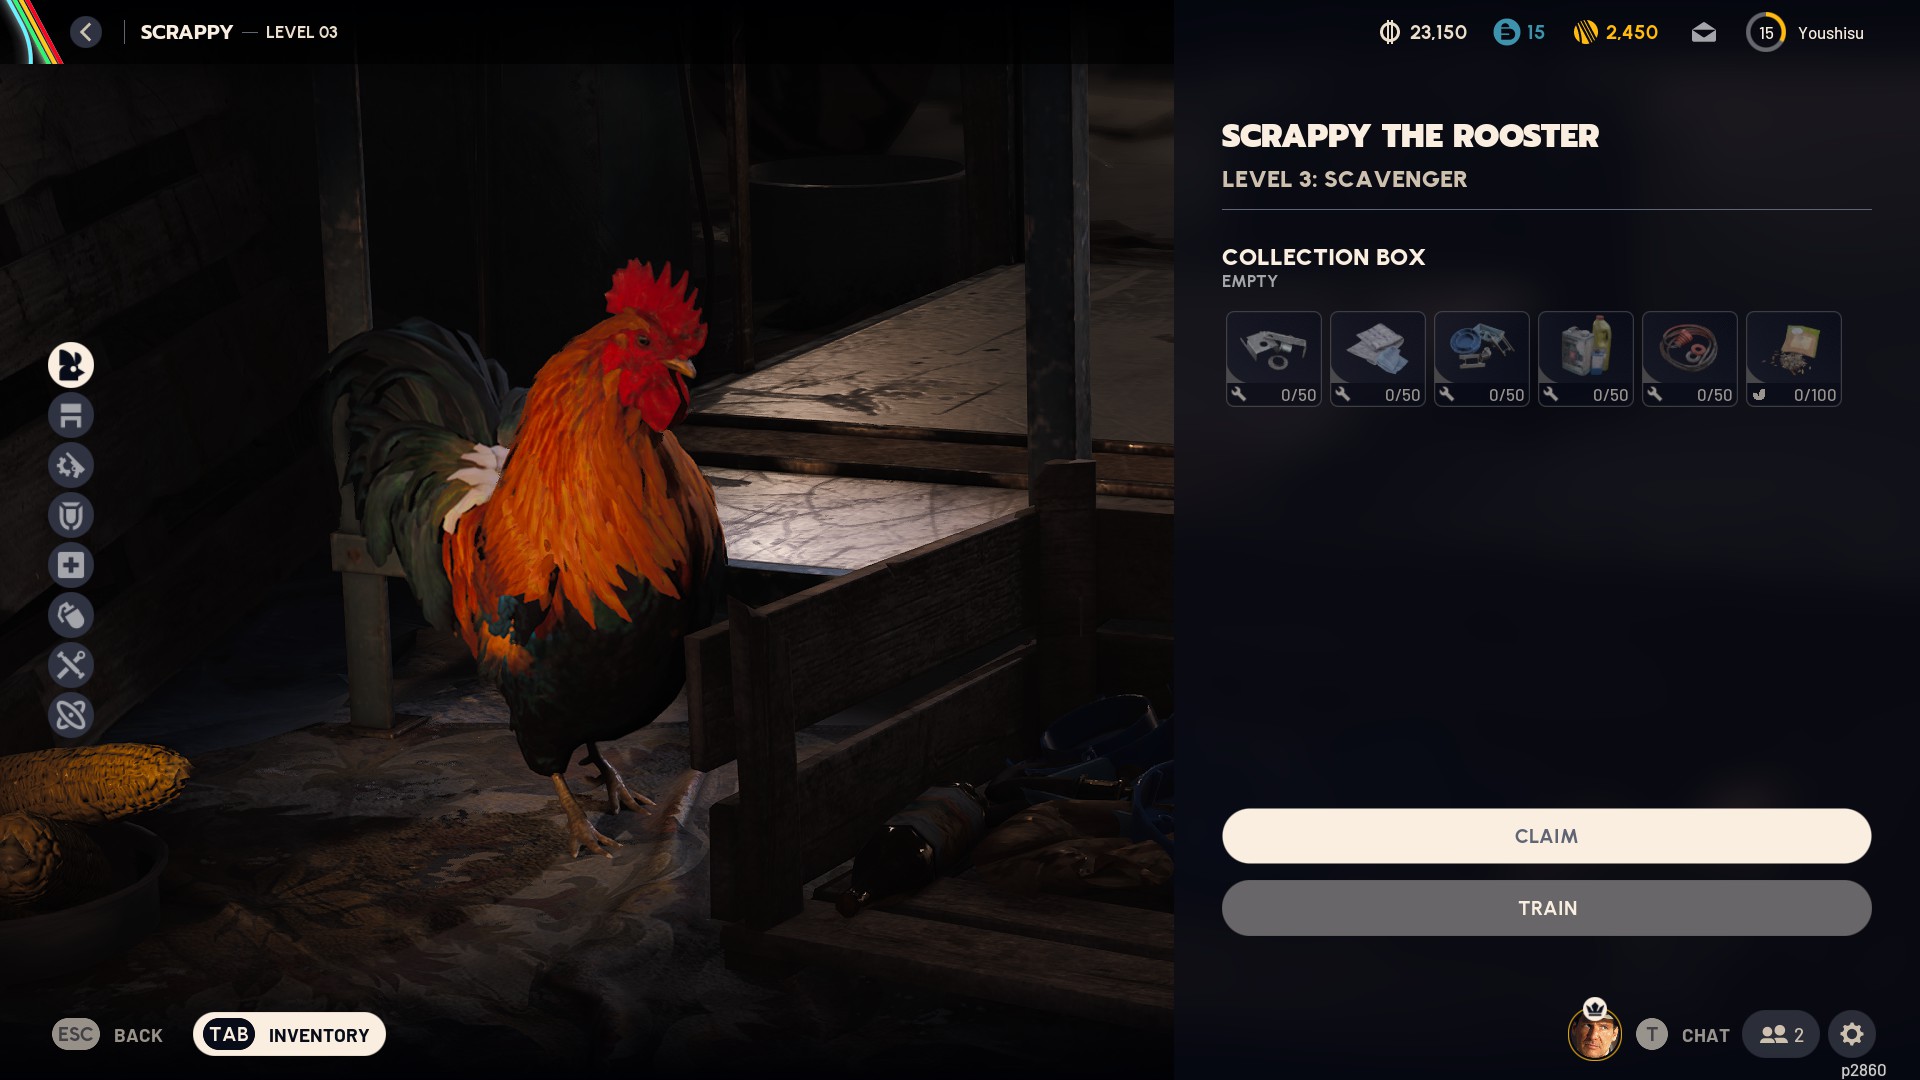
First item to collect is Dog collar. Next upgrades are beyond first map.
This chicken is very smart, it brings you free resources, collect them as they stack up only up to 50! Visit him every few raids to grab some materials.
He does not gather resources when you are not playing
How to collect items:
- Got to workshop
- Visit chicken
- Click yellow button "Claim".
Upgrade
Chicken can be upgraded, if you provide him with specific items. Upgrade means he will collect resources quicker.First item to collect is Dog collar. Next upgrades are beyond first map.
Looting - What to loot
What to loot
This is though question, as everyone will need different resources. But I will explain you some core mechanics so you can decide faster during your playtime.We can split loot into few categories:
- Crafting resources
- Weapons and attachments
- Consumable items
- Valuables (trinkets)
- Blueprints
- Acces keys
- Currency
General idea of value for loot rarity in order is:
- Legendary (Yellow)
- Epic (pink)
- Rare (blue)
- Uncommon (green)
- Common (White/gray)
General looting rules
- Focus on item color.- Don't loot ammo, its cheap to craft. Collect it only when u are in need during raid and type you are currently using.
- Heavier items usually are less worth per weight, so its better to collect more lighter items.
- Heavier items usually give more resources when recycled than lighter.
- Recycling in base is 2x better than salvaging in raid
- Salvaging items for smaller parts is weight ineffective, but usefull when too much variety of items.
Early items focus
- arc cells (for shield chargers)
- any gun parts (preferably green)
- any mechanical components (preferably green)
- any electrical components (if you want to use heavier shields)
- arc alloy (workbenches upgrades)
Blue equipment often require blue materials.
Looting - Loot types
Basic materials
There is 5 categories of basic materials (rooster brings all of them).There is a lot of recipes, so I would not focus on collecting this loot unless you need some specific type for crafting.
Focus more on collecting green or blue items.
Dismantling items during game to stack basic materials is ineffective. Items yield more materials in sperenza, sometimes are dismantled into few material types.
Components and items
Most items can be used for crafting or recycled. Usually it means item is green or blue.It can be both "component" or "toaster" or any other item. It takes some time to learn which item give which type of material.
Some items are required for better craft, while other can be only recycled and are more valuabe.
Usually blue items are dismantled into green items, but there can be exceptions.
Better weapons and equipment will require better items to craft and repair.
Weapons
You want to collect any weapon with higher "Tier" or "Rarity" (they are not the same)Every weapon can be upgraded to higher tier 2-4. Higher tier weapons got bonuses like better recoil or reload speed. So pay attention if weapon has roman number I or IV (Tier)
If you see blue weapon or pink, just take it, it powerfull, blue snipers also got scope, while pink can oblitere anything!
Attachments are always looted! Got some weapon, put them on your gun, you don't need backpack slot for it. It will improve your gun handling by a lot.
Consumable items
There many items that can be used.First type you will use is some form of healing or shield recharge.
Guns use ammo to operate.
Whole variation of grenades. Mines. Decoy flares. Booby traps.
Valuables
Valuables or trinkets are items with "diamond" icon. Good for cash, always take them, except "Old Photo" its cheap.Cash
If you need cash, best way is to collect blue or better items. Always prioritize pink and valuables they are worth 1k or more, then loot items by rarity.Seeds are also very valuable and weight almost nothing.
Blueprints
You always want to collect them. If not for use, then for sale. They are worth good coin.If you bring it to base, u can learn them and craft that weapon after filling requirements.
Access keys
Occasionally you can find some sort of keycards or keys.Depending on the item, it will open something. Keys can open special extraction points, while keycards can open locked areas for better loot.
Currency
There is only one type of ingame currency you can loot, it's seeds.Collect them, you can exchange them for crafting materials.
Quest items
Quest items are normal items, but they will have marker above their icon, meaning you need to extract with them.Quest items have rectangle marker.
Items marked for crafting have circle.
Looting - Where to loot
The answer is anywhere.
Every area has specific loot types.
Hover mouse over item you need or want to loot. It will have some tags like "Industrial" or "Medicine".
Open map and check which zone has this tags, you will have great chance of finding this item there!.
Gun parts, arc alloys and arc powercells are always found in ARC bots, try hunting few bots.
For pacifists friends, there is old battlefield area, you can salvage arc parts there.
Map - Points of Interests
Map is filled with different locations. If you see name on the map, there is place to explore and loot.
Some locationz are marked with yellow or red line, there is higher value loot. But expect more players to be there.
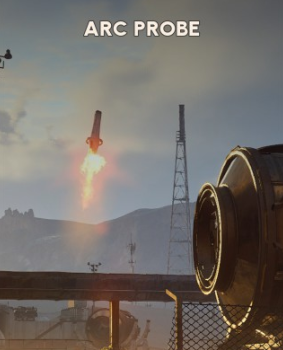 Very good loot. Risky.
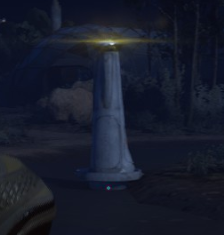
To open probe you must breach its hull. It will emit very loud noise when breaching. This can attract nearby ARCs, sometimes can call reinforcements.
Idle probe will beep sound and blink purple.
Standing probe has 3 panels to loot. Collapsed has only 1.
Not looted probe will change light to yellow and red shortly before leaving.
It will not departure if you start breaching.
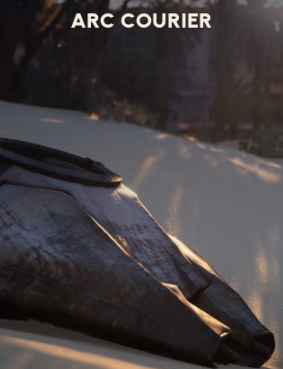 Crashed couries are free ARC loot. It only has to be breached and does not emit any sounds.
 Very good loot. Very risky.
In order to find it, you must find radio tower and iteract with it. You will shoot yellow flare into sky. Everybody will see this flare, it is loud and explodes high above.
Supply will arrive around 30-60 seconds on baloon.
Pay attention where it lands, it lands closer to flare than tower.
 Box is hidden in ground. You can hear it as it does ticking sound (like clock).
Usually worth looting, often has consumables.
You can open it only inside depot, so bring it inside as it has good loot.
Usually contains ammo and consumables.

Some locationz are marked with yellow or red line, there is higher value loot. But expect more players to be there.
Exploration
On the surface you can find random events and items, so look around for them.Probes
Very good loot. Risky.To open probe you must breach its hull. It will emit very loud noise when breaching. This can attract nearby ARCs, sometimes can call reinforcements.
Idle probe will beep sound and blink purple.
Standing probe has 3 panels to loot. Collapsed has only 1.
Not looted probe will change light to yellow and red shortly before leaving.
It will not departure if you start breaching.
Couriers
Crashed couries are free ARC loot. It only has to be breached and does not emit any sounds.Supply drop
Very good loot. Very risky.In order to find it, you must find radio tower and iteract with it. You will shoot yellow flare into sky. Everybody will see this flare, it is loud and explodes high above.
Supply will arrive around 30-60 seconds on baloon.
Pay attention where it lands, it lands closer to flare than tower.
Raider's stash
Box is hidden in ground. You can hear it as it does ticking sound (like clock).Usually worth looting, often has consumables.
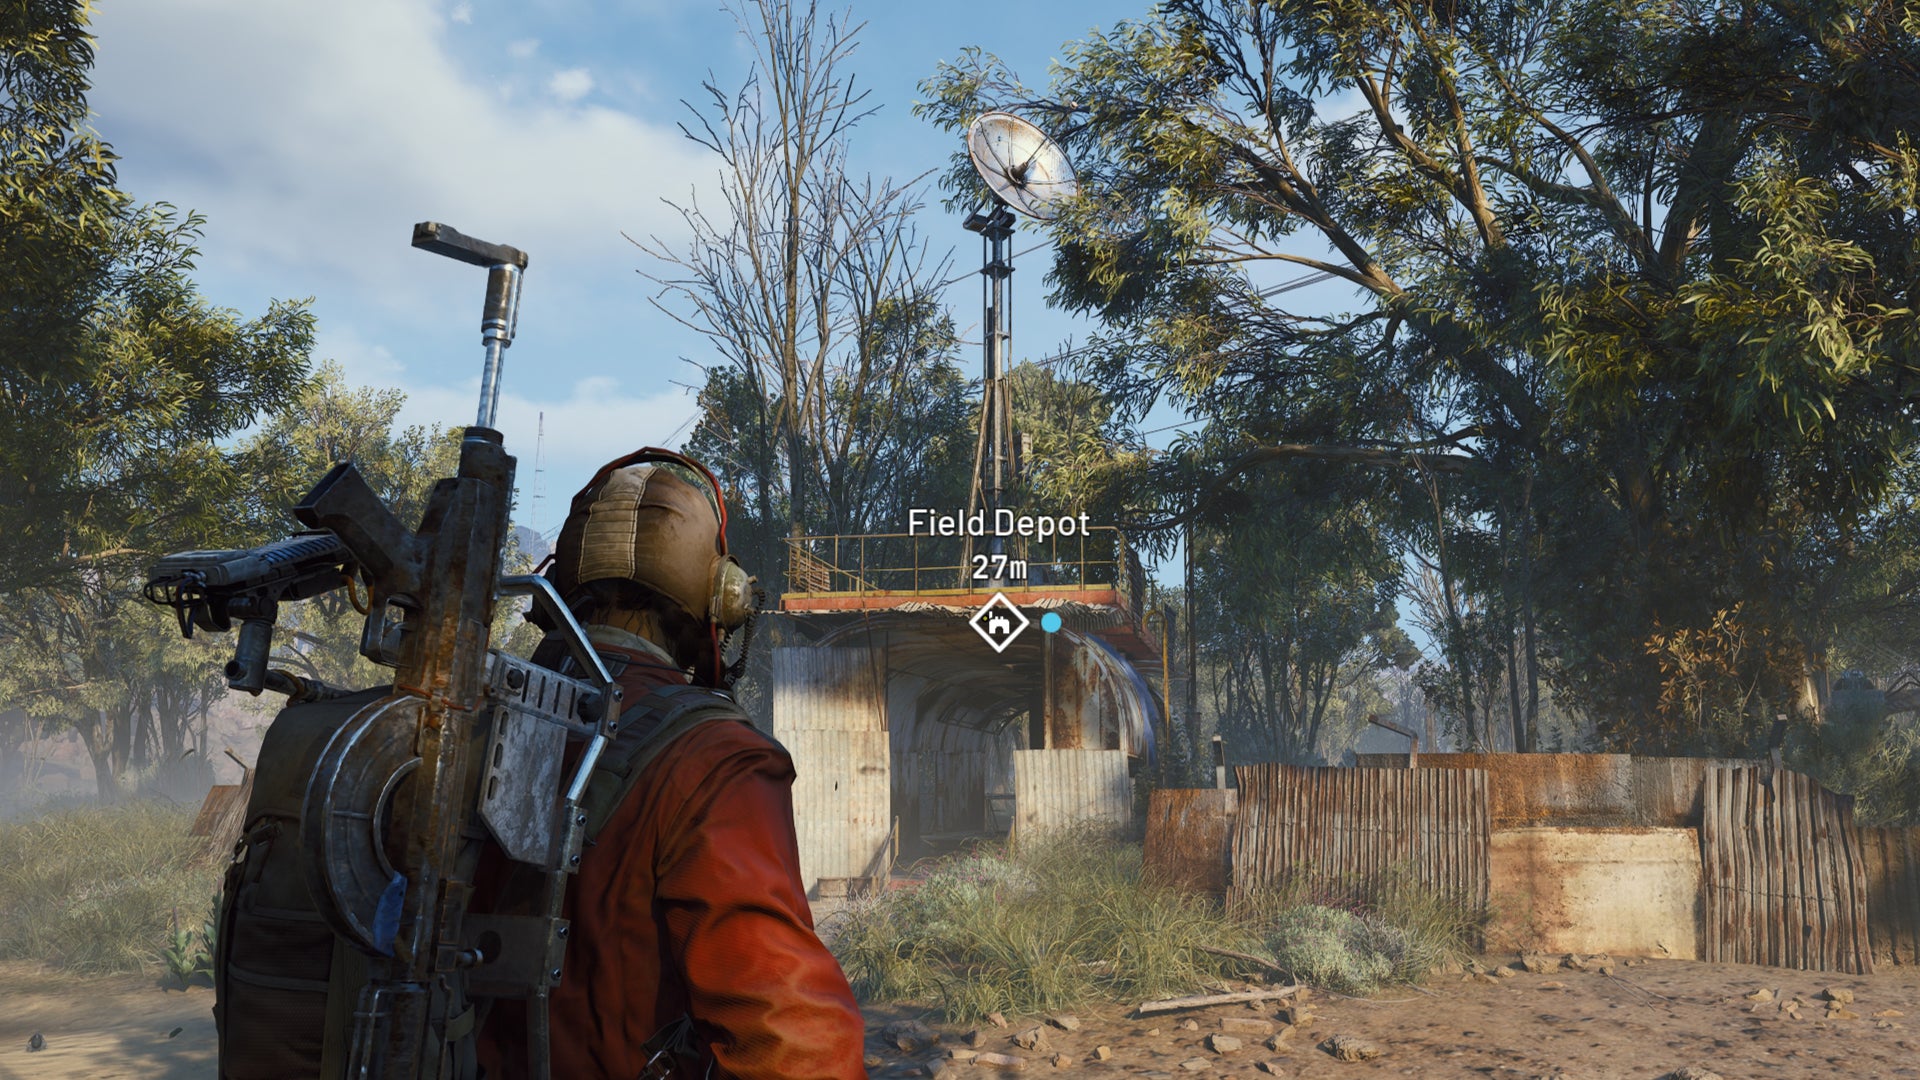
Field crates
You can find at least one crate near Field Depot, sometime more. You can open it only inside depot, so bring it inside as it has good loot.
Usually contains ammo and consumables.
Crafting
This is one of biggest and most important subject of this game.
If you want check how items recycle or prices, check wiki page: Arc Riders Fandom[arc-raiders.fandom.com]
Any crafting item can be recycled down to 1 of 5 basic materials.
To create every station of level 1 you only need:
- basic materials
- arc alloy
- arc powercells
Basic recepies of common items:
You can craft attachments.
You can upgrade weapons here to, check tab above.
To upgrade basic gun u only need basic materials. For tier 3 you need green gun parts.
Exception is smoke grenade, its in Utility station
If you want check how items recycle or prices, check wiki page: Arc Riders Fandom[arc-raiders.fandom.com]
Recycling
Recycling items means converting them to lower rarity. Some items will give more parts then other.Any crafting item can be recycled down to 1 of 5 basic materials.
Salvaging
During raid u may want to collect more items with salvaging. Recycling during raid yields around 2 times less resources. But its about personal choice and playstyle.Crafting stations
Currently in game there are 7 types of crafting stations:To create every station of level 1 you only need:
- basic materials
- arc alloy
- arc powercells
Workbench
First basic crafting station. U will start crafting ammo, meds and weapons here.Basic recepies of common items:
Item
Recipe
Bandage
5x fabric
Shield recharger
5x Rubber parts, 1x ARC Powercell
Any ammo
3x Metal parts, 2x Chemicals
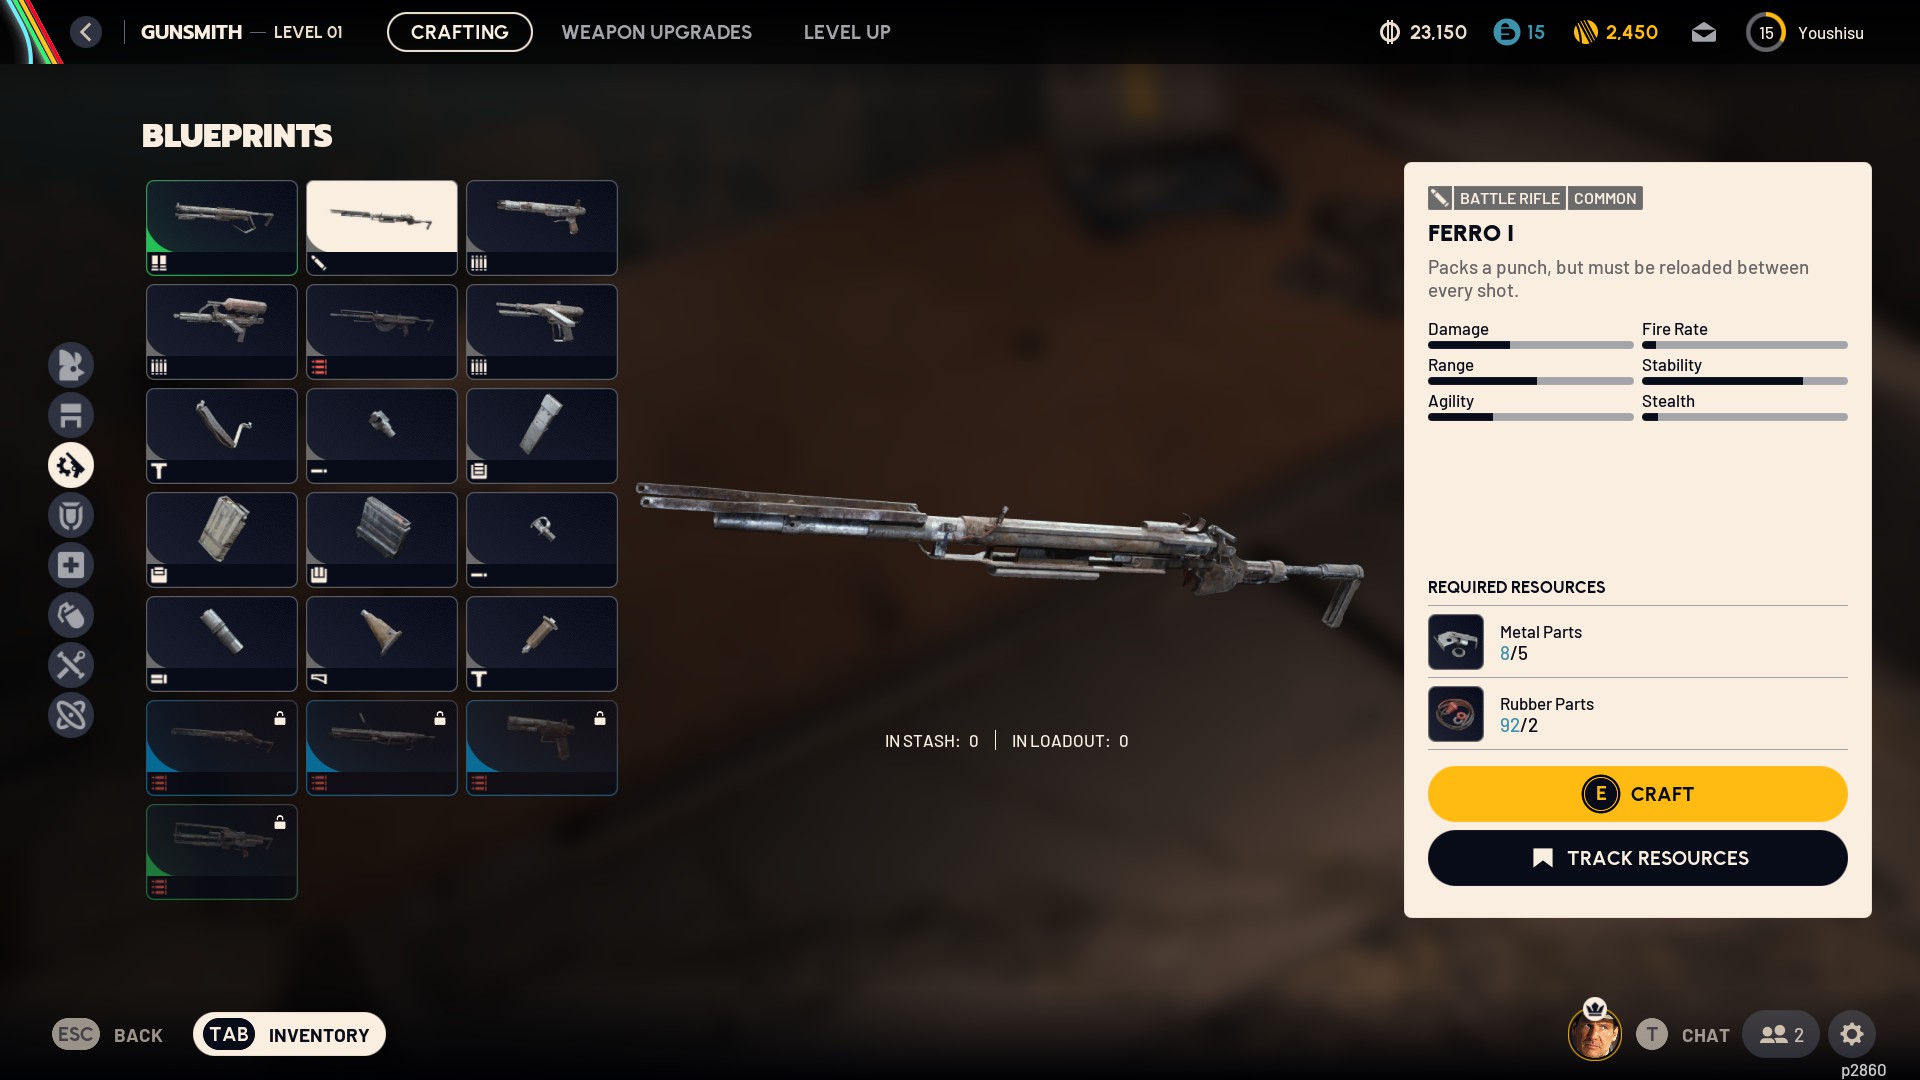
Ferro
5x Metal parts, 2x Rubber parts
Kettle
6x Metal parts, 8x Rubber parts
Sticher
8x Metal parts, 4x Rubber parts
Hairpin
2x Metal parts, 5x Rubber parts
Gunsmith
This station lets you craft more weapons and any weapons discovered with blueprint.You can craft attachments.
You can upgrade weapons here to, check tab above.
To upgrade basic gun u only need basic materials. For tier 3 you need green gun parts.
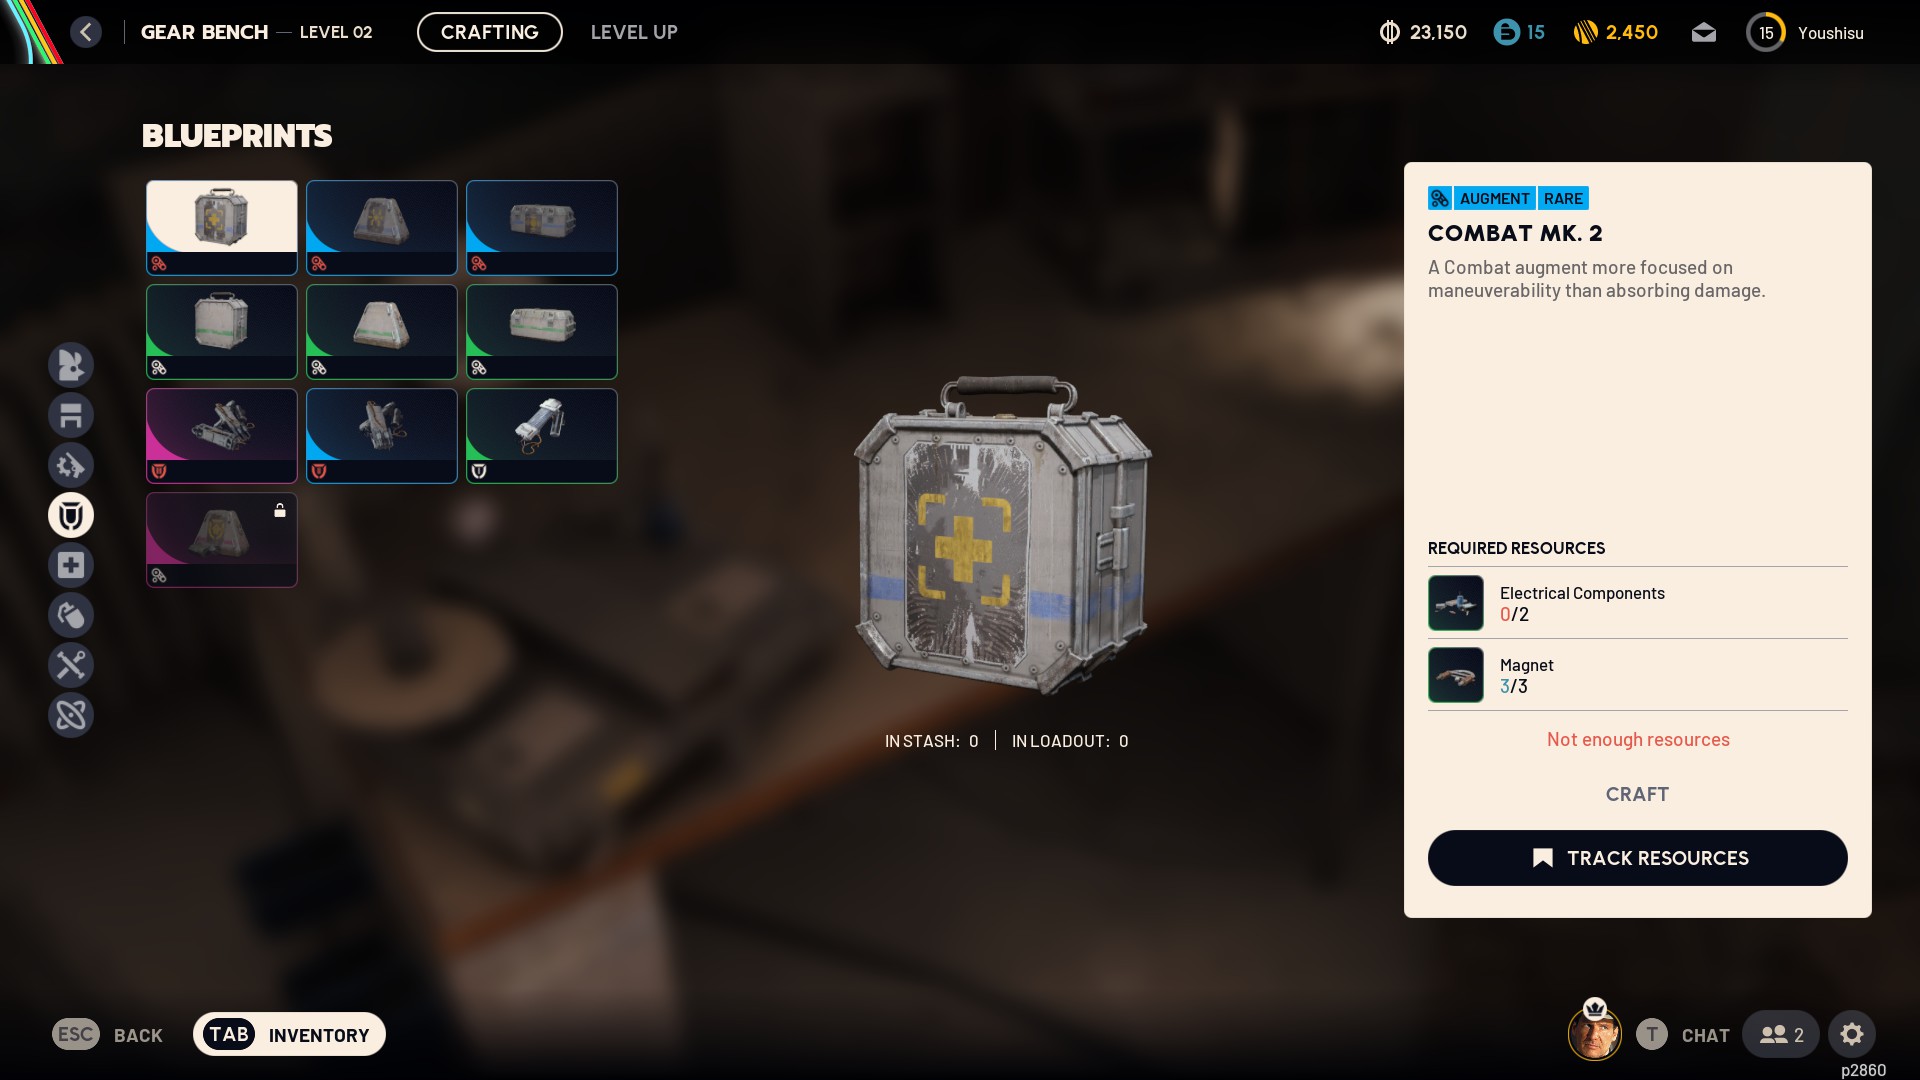
Gear station
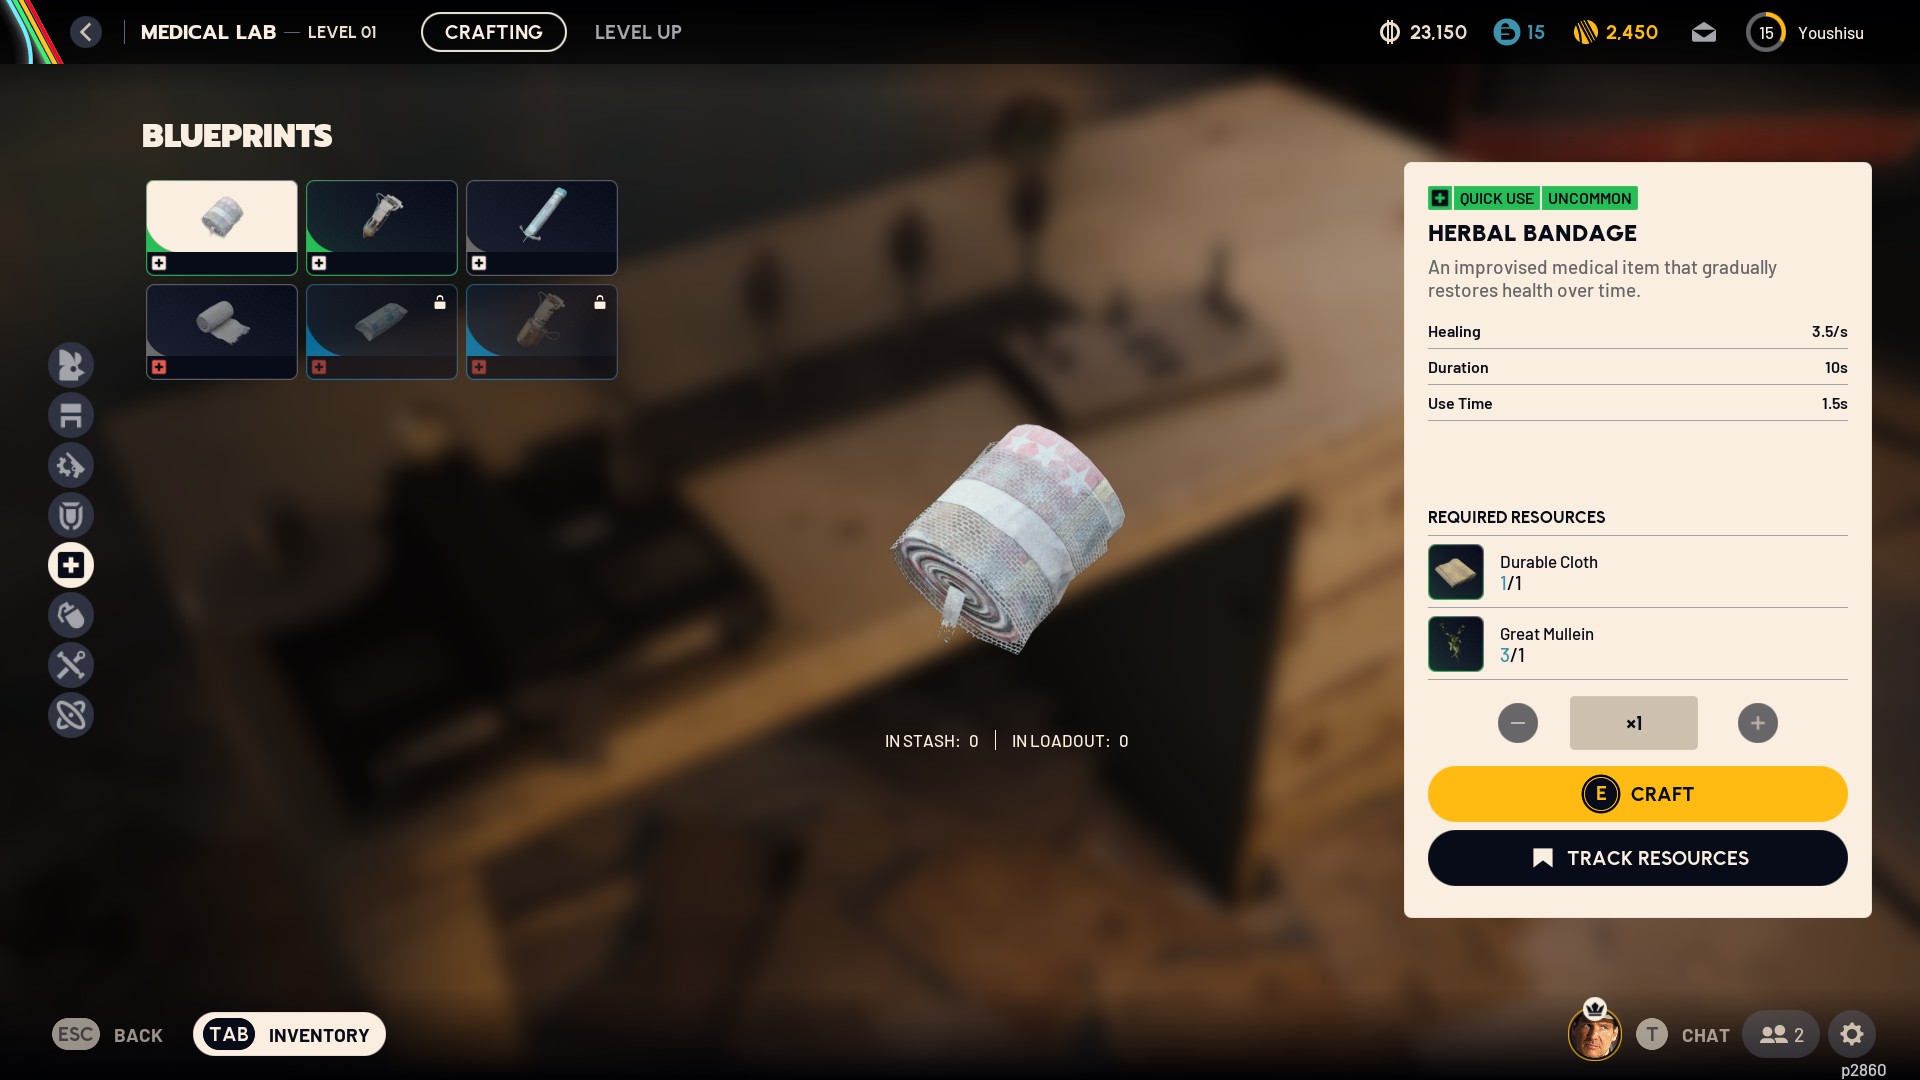
I rarely visit this station, but u can craft better shields here and more variety of augments.Medical station
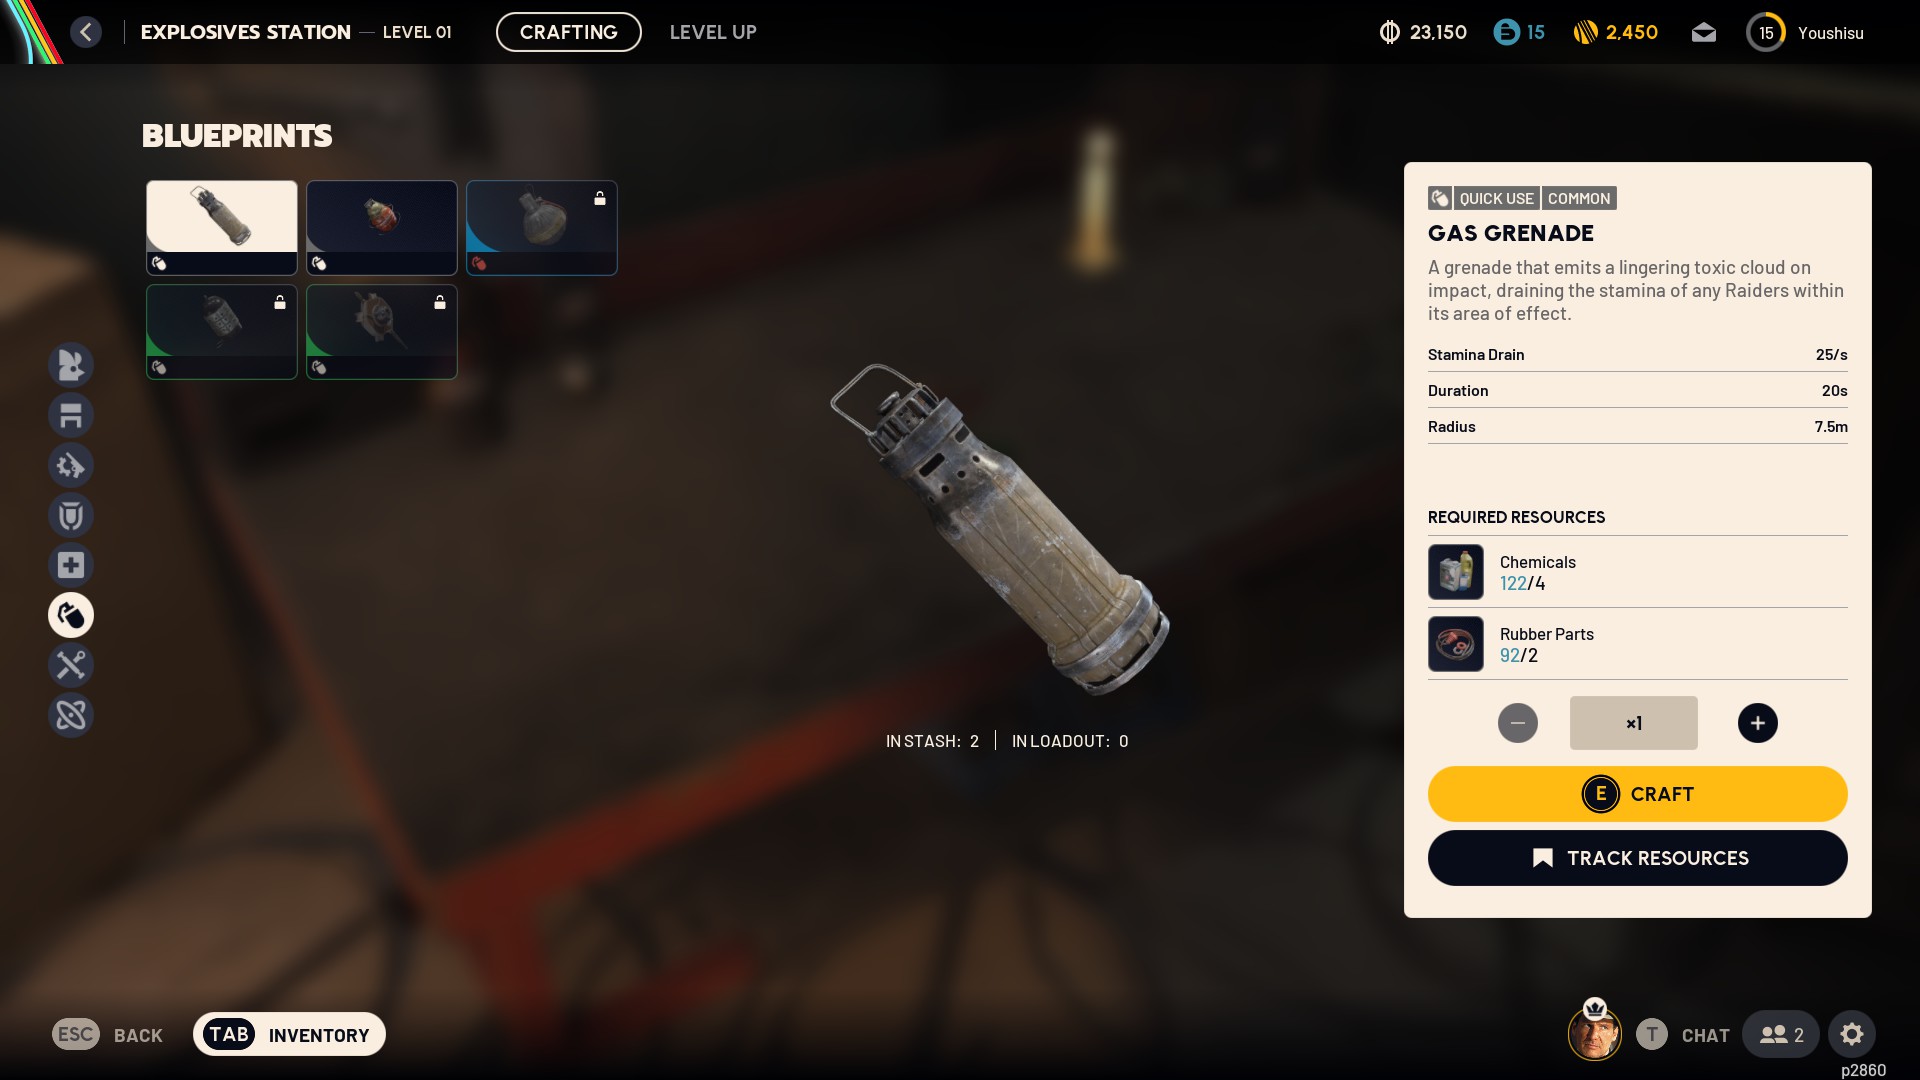
This station let you craft better medical items.Explosive station
Any sort of grenades or explosives will be crafted here.Exception is smoke grenade, its in Utility station
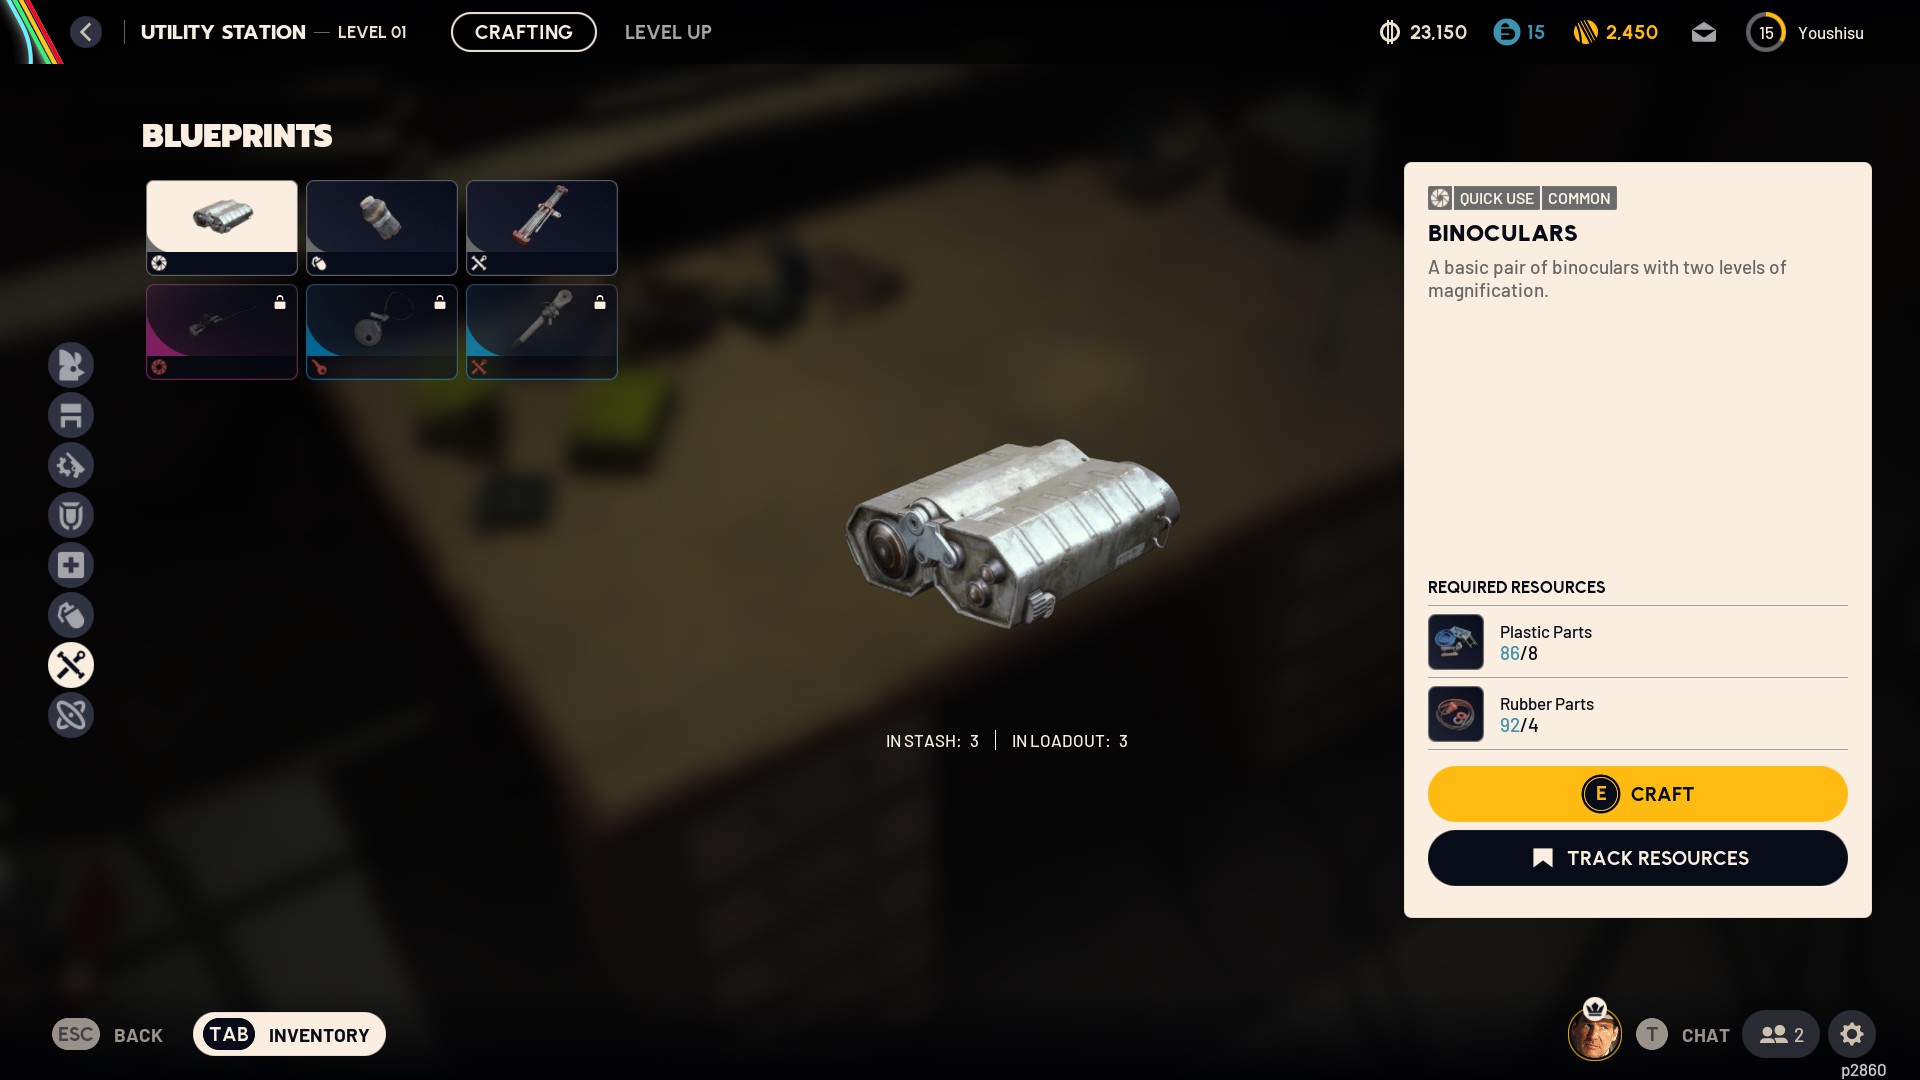
Utility station
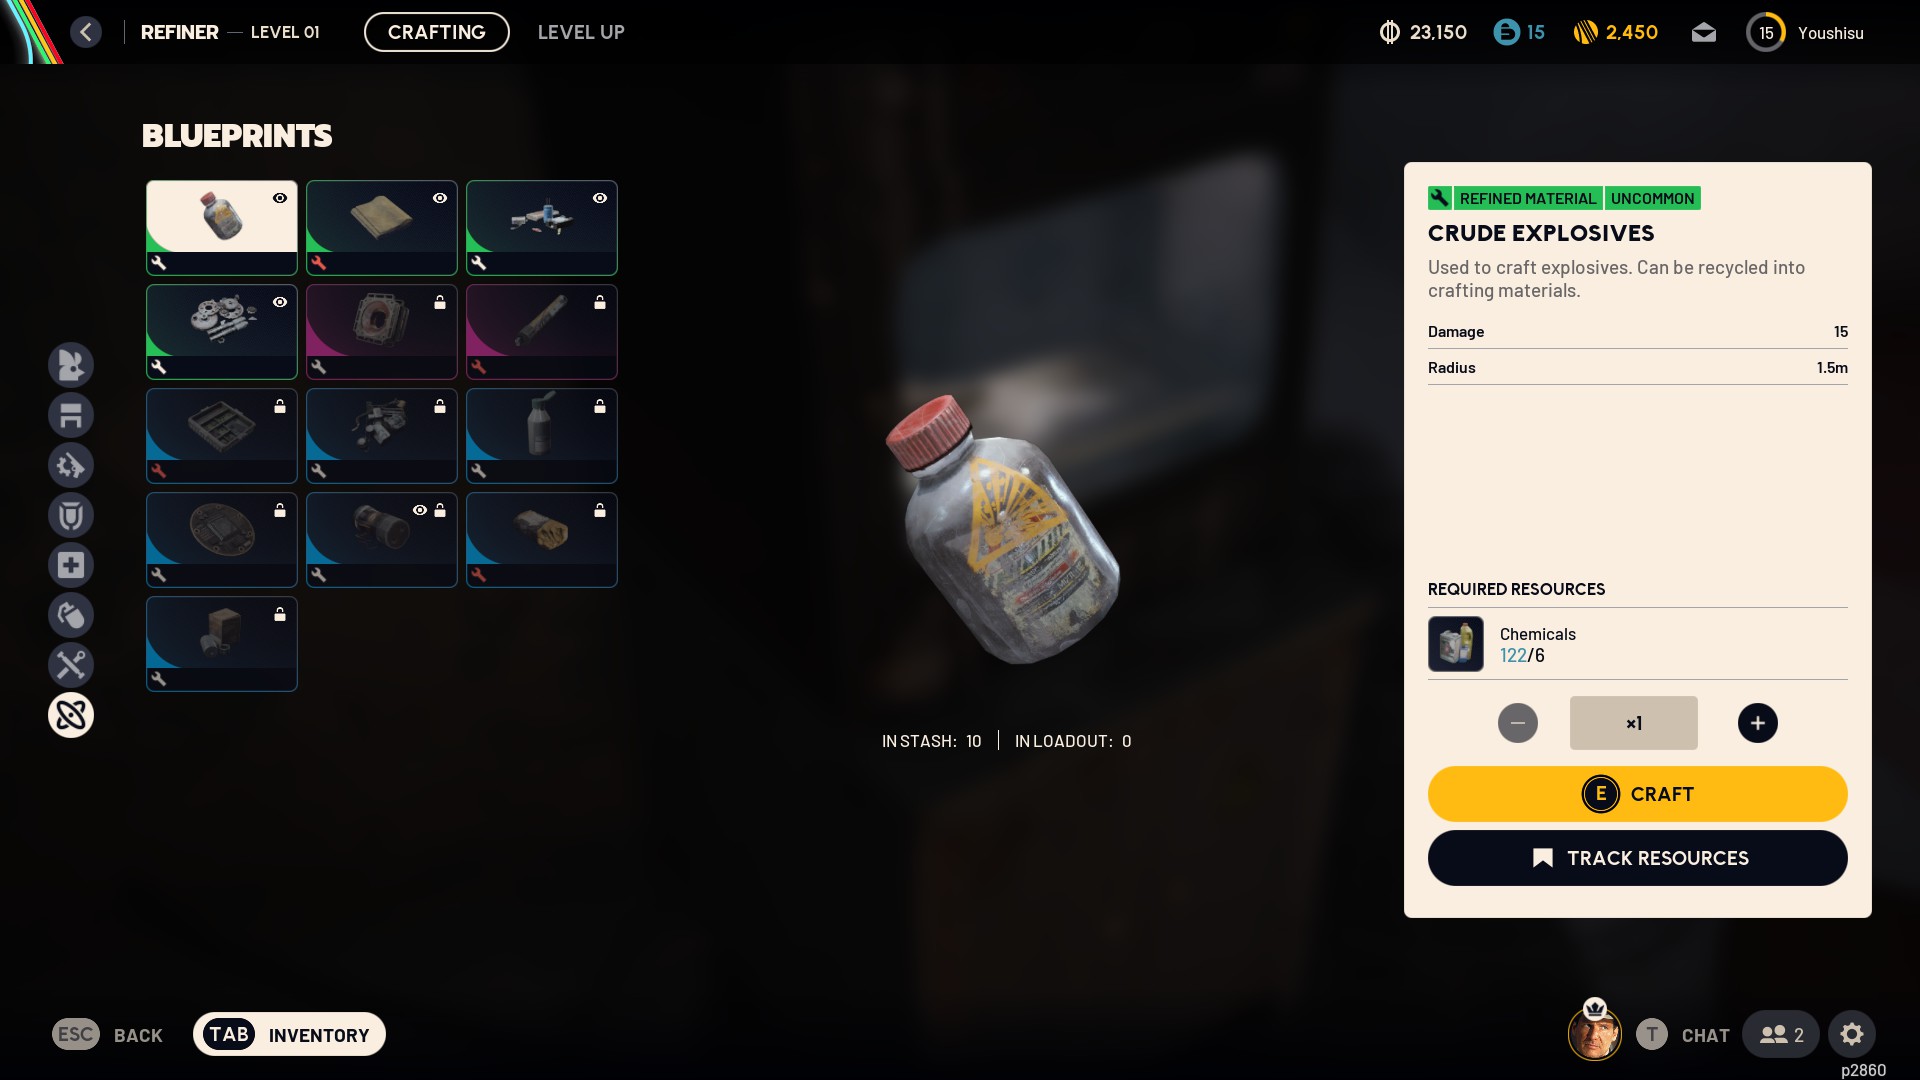
Station that lets you craft other consumables.Refinery station
Later in the game u will be able to craft some green and blue crafting materials.
Equipment - Weapons
In early game you will have access to only 4 ammo, depending on ammo it can penetrate armor of ARC better or worse, which means more or less damage to armored targets.
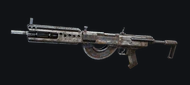 Medium ammo, automatic rifle.
Good firerate, low recoil. Very good at medium range.
At close distance small magazine is big disadvantage.
No magazines, you load 2 bullets per tick.
Fully upgraded version has 2x magazine size.
You can not craft this weapon at start of the game, but it is accessible through "free loadout".
Crafting is unlocked with gunsmith station 1
 Light ammo, smg.
Very deadly at close distance.
High firerate, normal reload speed. Very hungry for ammo.
Can be used at medium distance to deal with ARC's if done properly to conserve ammo.
Upgrade redcues recoil and increases magazine size.
 Heavy ammo, rifle.
Huge damage, slow reload. Single bullet per magazine.
Very strong vs. ARC, recommened for learning but requires aim to deal with flyers. Difficult to operate in buildings and at close range.
Very strong when upgraded, upgrades reduce reload times by huge margin.
This weapon is perfect for ambushes as it deal heavy dmg, which can give you headstart in fight if you got 2 weapons.
Good shot will completly deplete basic shield and half health.
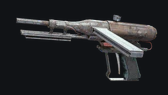
 Light ammo, silenced pistol
This pistol has a bit better reload speed than ferro, but damage is way smaller.
Useful for stealth, not advised for combat or killing medium size arcs.
 Ligth ammo, semi automatic rifle
Damage is Good, fire rate is good.
Disadvantage is that its semi automatic, which means 1 shot per click.
Good for close if you click fast.
High recoil at medium range.
 Shotgun ammo, pump-action shotgun
This weapon deals huge damage in close distance. Good raider can knock down enemy with medium shield in 2 shots.
Weak against armored ARC.
Destroyer of players.
You can not craft it, but if you find it, you better take it! Can be unlocked with blueprint, or bought from trader.
- Light ammo (bad penetration)
- Medium ammo (average penetration)
- Heavy ammo (good penetration)
- Shotgun (no penetration)
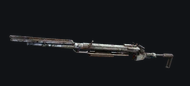
Rattler
Medium ammo, automatic rifle.Good firerate, low recoil. Very good at medium range.
At close distance small magazine is big disadvantage.
No magazines, you load 2 bullets per tick.
Fully upgraded version has 2x magazine size.
You can not craft this weapon at start of the game, but it is accessible through "free loadout".
Crafting is unlocked with gunsmith station 1
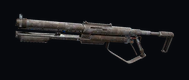
Stitcher
Light ammo, smg.Very deadly at close distance.
High firerate, normal reload speed. Very hungry for ammo.
Can be used at medium distance to deal with ARC's if done properly to conserve ammo.
Upgrade redcues recoil and increases magazine size.
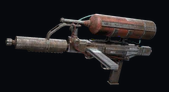
Ferro
Heavy ammo, rifle.Huge damage, slow reload. Single bullet per magazine.
Very strong vs. ARC, recommened for learning but requires aim to deal with flyers. Difficult to operate in buildings and at close range.
Very strong when upgraded, upgrades reduce reload times by huge margin.
This weapon is perfect for ambushes as it deal heavy dmg, which can give you headstart in fight if you got 2 weapons.
Good shot will completly deplete basic shield and half health.
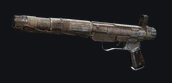
Hairpin
Light ammo, silenced pistolThis pistol has a bit better reload speed than ferro, but damage is way smaller.
Useful for stealth, not advised for combat or killing medium size arcs.
Kettle
Ligth ammo, semi automatic rifleDamage is Good, fire rate is good.
Disadvantage is that its semi automatic, which means 1 shot per click.
Good for close if you click fast.
High recoil at medium range.
Il Toro
Shotgun ammo, pump-action shotgunThis weapon deals huge damage in close distance. Good raider can knock down enemy with medium shield in 2 shots.
Weak against armored ARC.
Destroyer of players.
You can not craft it, but if you find it, you better take it! Can be unlocked with blueprint, or bought from trader.
Equipment - Attachments
Most weapons can have up to 4 attachments. Unlocking gunsmith station 1 lets you craft most tier 1 attachments.
Attachment types:
Attachment types:
- Muzzle
- Grip
- Magazine
- Stock
Muzzle
Reduce recoil or gun sound.Grip
Improves handling or recoil depending on grip.Magazine
Increases ammo capacity.Stock
Increases stability or reduces recoil
Equipment - Shield
Shields do not protect from damage!
Shields do not protect from damage!
Shields do not protect from damage!
Shields do not protect from damage!
!!!!111one11e=mc^2111
They absorb fraction of damage, while you body also gets damage.
Use bandages to heal!
Damage example:
If you take damage of 10.
Shield hp will be reduced by 10 points.
Hp will be reduced by 6 points.
Runing with 1 hp is very risky.
Shield recharger refils 50 shield hp.
Bigger shields require more rechargers to operate.
Shields do not protect from damage!
Shields do not protect from damage!
Shields do not protect from damage!
!!!!111one11e=mc^2111
They absorb fraction of damage, while you body also gets damage.
Use bandages to heal!
Damage example:
If you take damage of 10.
Shield hp will be reduced by 10 points.
Hp will be reduced by 6 points.
Runing with 1 hp is very risky.
Item
HP
Damage absorbtion %
Move speed penalty %
Light shield
40
40
0
Medium shield
70
42.5
5
Heavy shield
80
52.5
15
Shield recharger refils 50 shield hp.
Bigger shields require more rechargers to operate.
Equipment - Items
Healing
Bandages
Heals player.Herbal bandages
More HP with same Hp/s Stamina
Adrenaline
Refill full stamina and increase stamina regeneration temporary. Great for overweight runs. Shield
Recharger
Refills 50 hp of any shield to its max capacity.Arc cell
Can be used to refill 25 shield hp. Its better to find 5 rubber and craft recharger
Throwables
Grenades
Lil smoke grenade
Explodes on impact. Creates small cloud of smoke.
6s duration
Smoke grenade
Better smoke grenade, bigger area.20s duration
Gas grenade
Creates poison gas cloud, which drains stamina.Light impact grenade
Very small radius30 damage.
Heavy fuze grenade
Big area. Very good end game grenade.80 damage
Snap blast grenade
Sticky grenades, they glue to surface or object.Medium explosion.
70 damage
Explosives material
Crafting material, that can be used to throw.15 damage
Drivers
Drivers are obtained from ARC.They can be thrown for various effects.
Some can shock ARC, others must be shot to explode.
Various Mines
Can be placed to ambush enemies. If exploded can harm person who placed them.Can not harm teammates, but can still apply effects on them.
Can be defused for pickup. To defuse enemy mines you need red perk.
Mines detonate when ARC is nearby
Utility
Zip line
Lets you quickly move from one point to another.
Enemies - ARC
Threat
Both players and ARC can hurt you, but don't worry.Depending on ARC bot, they are more or less harmful. Some of them can't even do damage.
Most arc will chase you, even if you enter building, they also can get inside.
Behaviour
Most ARCs do have light indicators, so you can tell what they do.White: patrolling bigger area
Yellow: alerted, they search for player
Red: Following players
Blue: scanning places
Sometimes ARC can lure other ARCc in area if found player.
ARC Bots you can try to kill
Tick
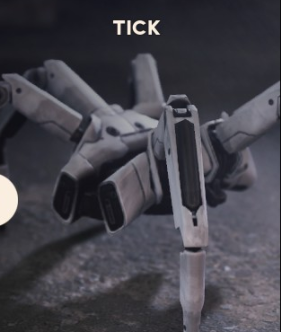 Crawling bot. Hides on walls and ceiling in buildings. Not armored and small.
They can jumpscare you. Does very small damage. You can treat them with hammer.
Pop
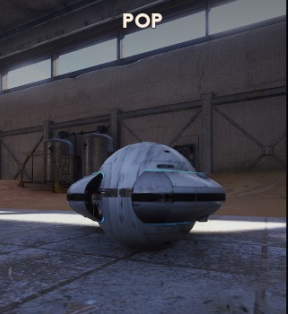 Exploding bot. Not armored. Very easy too kill.
If you find it to close to you, it will start beeping and explode soon after, best way is just to dodge roll to gain distance.
Usually spotted in buildings.
Fireball
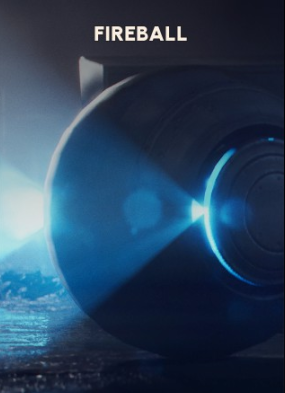 Rolling bot. Armored.
To kill it you must wait for it to open shield. Be quick or it will treat you with flamethrower.
Usually spotted in buildings.
When killed, explodes into small ring of fire.
Wasp
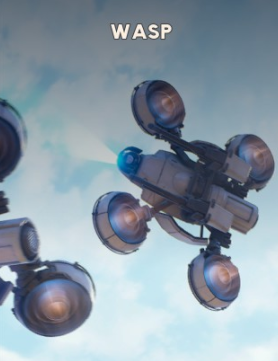 Lightest of flying ARCs, shoots with machine gun. Very mobile. Aim at propellers. Wasp will be grounded if you destroy 2 engines, usually will also explode but not always.
Can be overwhelming with amount
Snitch
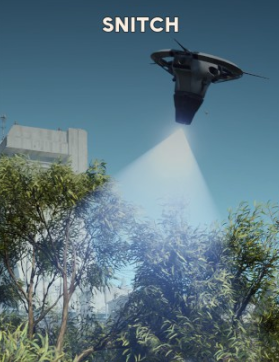 Harmless bot, calls for reinforcments when spots player.
If you got ferro, you might want to try to kill it, you need 2 good shots to kill it.
It has 3 rotors in his ring panel, a bit harder to destroy than wasp.
Reinforcment drops can be easily avoided, once u know it will happen, holster your weapon and just run away, damaged snitch may not follow you, so when bots finally drop, they won't know where you are.
Hornet
 Armored flying drone.
 Front engines are armored, while rear engines are easily damaged. Tricky to kill as it always rotates front to you.
Shots zapping bolt, which does huge damage to shield and medium damage to health.
Bolts can be dodged
Turret
 Ceiling hanging gun, does not move. Usually placed in buildings.
Hit him in mounting arm.
Shoots player at sight and has cone of light.
Sentry
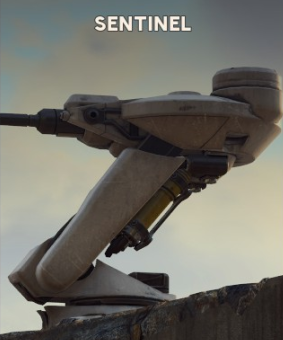 Stationary turret, shoots player at sight. Higher range than turret and shoots with sniper bullets.
Sentry targets you with laser.
Tactics - General
Trust
Don't trust anybody, never give full trust!Someone says "friendly", ok but watch what he does with his gun.
Telling "friendly" does not mean a lot. He can back stab you anytime.
Does this guy tells jokes or he is silent? Maybe he wants to distract you, pay attention.
Does guy runs with some purpose and ignores you, then its kinda safe.
Does he says "I want to extract" and then do not press button... That is very fishy ;)
Does he run back and forth or follows you, I would not trust him that much.
Never holster gun first unless guy is very chill.
You feel threat? Just shoot him first, protect yourself.
Keep your distance.
ARC Aggro
ARCs give each other information. Cameras can lure nearby ARCs.Breaching is safe around 100m.
They lose aggro easily if they can't see player for about minute.
Stealth
Stealth is more advised against players, they are smarter.Breaching makes noise, breaching probe makes even more noise. It will alert players and make you exposed to their fire.
Looting is risky, you can't see around. Always scan open area around you.
Watch your back!
You won't spot anybody most of the time, but this keeps your back safer.Decisions
You are not forced to fight, you can run away, but be careful, you can run onto ARC or other player.There is nothing worse then fighting more than 1 enemy.
If you are low on health, u probably do not want to take more damage.
If you got low healing items, u can not do long lasting fights.
Tactics - Movement
In buildings
Always hold weapon when exploring builings.Ambush can come from any corner.
Stamin managment in open areas
Alway keep small reserve of stamina in the open, in case of shooting to make roll or sprint in panic.Regen stamina near covers or run slowely with some buffer.
Always run in zig-zag patterns in the open.
Under fire make tighter zig-zags and change direction more often and less predictable.
Use cover and walls
Use walls and covers when traversing.Walls will protect you from 1 side, they will also hide you from this one direction, harder to spot you.
You got less angles to watch out for.
Standing
Standing still without cover is risky. Even with cover is risky from your side.If you can or make noise, make little steps left right or small circles. This way someone can not ambush-snipe you.
Tactics - Combat
Cover
This is most important tip. Always use cover to hide from bullets.
Use it for your advantage.
Peek closely to edge and avoid bullet spread.
Hiding in building is very good against ARC.
Items and gadgets
There is variaty of items that can be used in weapon. Players can have explosives and throw grenades. Its harder to avoid them when you are enclosed with walls.
If you attack, throw grenades behid cover or inside. They must leave or will take huge damage.
Its easier to win fights when enemy has low life.

High ground
Always try to be higher than your enemy.You see more. You can easily throw grenades.
Hiding is easier.
Cracked shield
When enemy shield is broken, you will hear electric sound.Fleeing
When low on health or not enough healing items, you better run or improvise some traps.
Skill Tree - Guide
If you are solo player, putting all points in single tree is stupid.
If you play with team, its still not best idea.
I will explain most interesting perks early, and compare some of the lategame perks
So you can see pros and cons of them.
Projects should grant additional skill points, but this happens only once each 2 months and we had none yet.
You got perks that increase you breaching speed and also make them quiet.
Few perks can help you surive ambush, you can get stamina or hp back in critical moments.
Can also reduce weight of used weapons.
Greately improves mobility but this tree has nothing else to offer beyond stamina and speed.
Improves looting speed, provides you with better sneaking speed and field crafting!
Can increase overall weight limit and decrease overweight penalty.
It also has few minor perks useful in combat.
Match it your playstyle.
Current max level is 75.
To unlock end perk u need 36 points in tree. Plus additional point for skill itself. This can cost total 37 or 38 points.
You can take 1 end perk from 2 colors, but this leaves 1 free skill point on third branch (kinda silly).
Its better to use balanced build with 1 tree using end perks.
Perks order: Skill tree[arcraiders.build]

Disclaimer
Perks do not show us exact modifiers, it is all empiric how good certain perks are.
If you play with team, its still not best idea.
I will explain most interesting perks early, and compare some of the lategame perks
So you can see pros and cons of them.
Skills can not be reset easily
Only way to reset skills is project. It takes time to build and resets more than just skill points.Projects should grant additional skill points, but this happens only once each 2 months and we had none yet.
Skill tree is divided into 3 categories
Conditioning
This tree is kinda like thoughness or combat survival.You got perks that increase you breaching speed and also make them quiet.
Few perks can help you surive ambush, you can get stamina or hp back in critical moments.
Can also reduce weight of used weapons.
Mobility
Increases stamina and improves stamina consumption for all actions. But can not replace stamina perks from other branchs.Greately improves mobility but this tree has nothing else to offer beyond stamina and speed.
Survival
General tree that improves solo surivability on the surface.Improves looting speed, provides you with better sneaking speed and field crafting!
Can increase overall weight limit and decrease overweight penalty.
It also has few minor perks useful in combat.
Plan - Which perks to choose
This is very personal preference. If you commit to something better know pros and cons. Match it your playstyle.
Current max level is 75.
To unlock end perk u need 36 points in tree. Plus additional point for skill itself. This can cost total 37 or 38 points.
You can take 1 end perk from 2 colors, but this leaves 1 free skill point on third branch (kinda silly).
Its better to use balanced build with 1 tree using end perks.
I suggest taking all light blue perks
Take all perks and then fill rest points to match your playstyle, they are universal and very strong.Perks order: Skill tree[arcraiders.build]
Disclaimer
Perks do not show us exact modifiers, it is all empiric how good certain perks are.
Skill Tree - Before level 10
Fight or flight
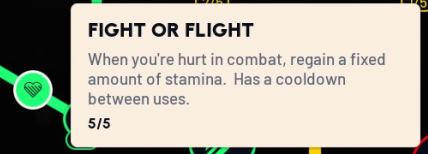 You get stamina with any damage, since all damage penetrates shield.
You will always get some stamina if you had none when being attacked.
Proficient prayer
 Breaching is very loud, better do it quickly. It also increases looting speed cause you open every container faster.
 Gentle pressure
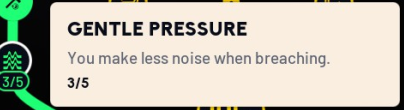 Reduces noise when breaching, but if someone is roaming nearby he can still hear it.
Better value for solo players than teams.
Nible climber
 You will climb very often. Worth dropping few points into that perk.
 Marathon runner
 Very good perk as it reduces stamina consumption for most importat action "sprint".
Very strong synergy with multiple other green and red perks.
This one node should be maxed for everyone at some point.
Youthful lungs
 Good perk that increases max stamina, but treat it as buffer, it is worthles in long lasting combat or running.
 It is only good if you wait to regain stamina to run across open area.
In-round Crafting
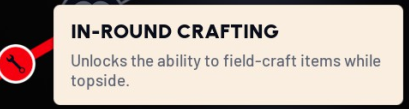 Very good perk for solo player. Let you craft basic bandages and shield chargers in raid, with few other items. Works also when playing with free gear.
I would suggest to get that perk early, but its not required.
Looters Instinct
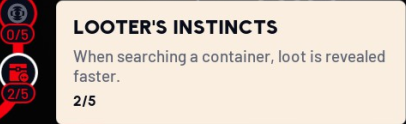 Loot quicker. (Not sure if bodies count as containers)
Skill tree - Middle perks
Survivors Stamina
 Increases stamina regen when on low life. Works well with "Marathon runner"
 Unburdend Roll
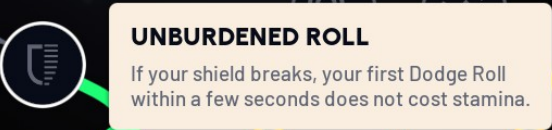 Strong perk for abushes. Dodge rolls with sprint take a lot of stamina.
 Calming stroll
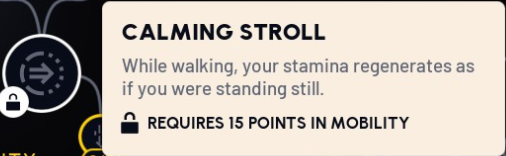 This perk is tricky. Runing is not walking. Arc raiders has walk action, you should use toggle key to walk and use this perk, which can be quite useless as it slows you down.
 Carry the momentum
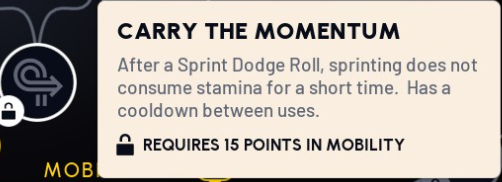 Good perk for dodging bullets, extends run time.
 Suffer in silenced
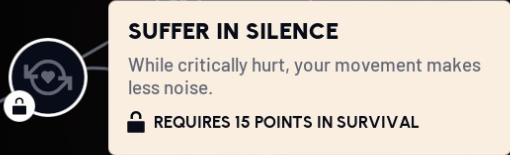 This perks reduces noise of footsteps (I think)
 Good as new
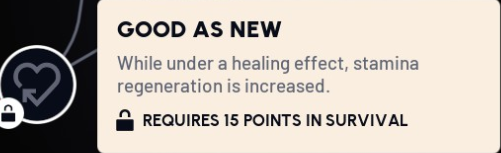 All basic bandages heal over time, this perk has good synergy for healing and running.
But you don't always got time to heal or slow down.
Skill tree - End perks
Remember, currently you can have only 2 perks of same tree.
 Heals you up to 31 hp, after short (about 20-30s) delay.
 Rare use for this perk. Turrets still explode when killed, so not good for stealth.
Reaching wasp with hammer is not trivial either.
 Probably best end perk, lets you preserve stamina while traversing obstacles.
(no idea if it works for climbing)
 Jump off obstacle at end of vault.
 Let you disarm mines placed by enemies.
 This perk let you open unique containters. They got very good loot, often purple.
Every map has few containers, some are locked behind keycard doors.
Green
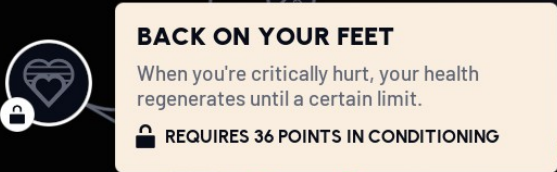
Back on your feet
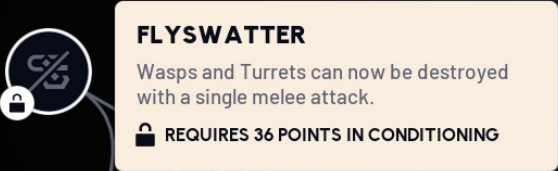
Heals you up to 31 hp, after short (about 20-30s) delay. Flyswatter
Rare use for this perk. Turrets still explode when killed, so not good for stealth.Reaching wasp with hammer is not trivial either.
Yellow
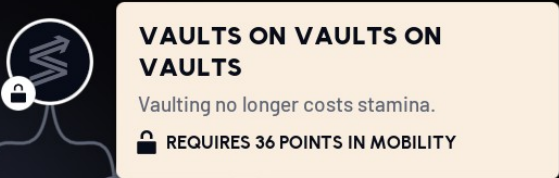
Vaults on vaults on vaults
Probably best end perk, lets you preserve stamina while traversing obstacles.(no idea if it works for climbing)
Vault spring
Jump off obstacle at end of vault. Red
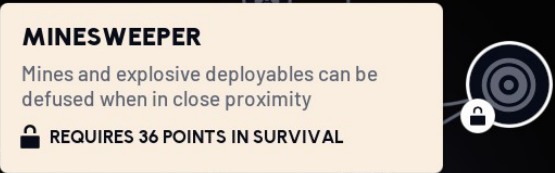
Minesweeper
Let you disarm mines placed by enemies. Security breach
This perk let you open unique containters. They got very good loot, often purple.Every map has few containers, some are locked behind keycard doors.
Skill tree - Interesting small perks
Green
Blast-born
Better hearing during explosions. Downed but determined
Slower health decay when downed A little extra
Generate resources when breaching Loaded arms
Equipped weapon has less weight Yellow
Slip and slide
Slides are longer and faster Sturdy ankless
Less damage when falling from non lethal height Heroic leap
Sprint dodge rolls are longer. Crawl before walk
When downed, you crawl faster Vigorous vaulter
Vaulting is not slowed when stamina is exhausted Red
Traveling tinkerer
You can craft hatch key and combine grenades with laser to make traps (but requires better items). One raider's scraps
Raider containers can have more items Broad shoulders
Increases maximum weight capacity Looter's Luck
Chance to reveal 2 items at once
Skill tree - Rest
Used to weight
Less slowdown penalty from shields Turtle crawl
Damage resistance when downed Effortless swing
Less stamina drained when doing melee Sky clearing swing
More damage to drones with melee Effortless roll
Dodge rolls cost less stamina (not sprint rolls) Off the wall
You can wall jump further Ready to roll
Easier to do recovery roll when falling Agile croucher
Moving faster while crouched Revitalizing squat
Better stamina regen while crouched Stubborn mule
Lesser penalty from overweight to stamina regen Three deep breaths
When ability exhaust your stamina, stamina will regen quicker
Merchants
Each merchant can sell you items, but stocks are limited.
Merchants are refreshed daily.
 Celeste is the only barter merchant.
She trades various crafting materials and items for seeds.
Merchants are refreshed daily.
Celeste
Celeste is the only barter merchant.She trades various crafting materials and items for seeds.
Rest of traders sell:
- Medical items
- Guns and attachments
- Explosives
- Other utilities
Thanks!
If you like it, please leave a like
Its motivating.Got question? Feel free to ask.
Something is wrong. Let me know Ill fix it :D
If you want to thank me more
Buy me a coffee link[buymeacoffee.com]