NPLH full guide
 Mr. Moyer
(116 ratings)
Mar 23, 2022 @ 2:28pm6,705150
AchievementsCraftingGame ModesGameplay BasicsLootMaps or LevelsSecretsWalkthroughsEnglish
VERSION information
GAME VERSION: 1.2.K_223 12 July 2022
This guide was built and the information verified by playing through the game at "full retail release" version 1.0.K_188, after playing for more than a year on Early Access. If your game version is anything lower than that, (check in the bottom left corner of the main title screen) you need to UPDATE YOUR GAME or a lot of things will be broken. If your game version is significantly HIGHER than that (it's still 100% good as of version 1.1.K_214), well then some of the information in this guide could be outdated but most of it should still be good.
The developers have been actively fixing bugs and glitches now that they're done making the base content and game mechanics. The game is still a little bit glitchy sometimes, but they are still ironing out the wrinkles.
EDIT 8/10/2022
NEW VERSION 1.3.K_232 was just released, containing CHALLENGE MODE and the UNDERGROUND LABYRINTH. I'm currently playing through the new update to see what changes I may need to make for this guide. So this guide might be a bit outdated now but most of it should still be helpful information for you.EDIT 12/11/2022
Awakened Realms - the developers of this game - have done something shady and unethical. Basically they abandoned this game after promising more content; then built a "NEW" game that has identical gameplay, just the maps are moved around... and they implemented the new content into that game... and put it in early access. Essentially they used this game as "practice" for the new one which is why the ending of this game is super lame, and why they rushed into final release. They just waned to make money off of this one for six months before announcing the early access of the "new" one - which isn't really new it's more like "NPLH Plus" or something. It is called "Fresh Start Cleaning Simulator" and really it is A MUCH BETTER GAME than this even though it was just released into early access a month ago. However, they are rushing that game into final release too early, just like they did with this one. Essentially they are getting paid for the same game twice. And that doesn't sit right with me. I feel cheated and insulted by this behavior. So I'm UNINSTALLING this game and I will NOT be supporting the new one. This guide is "finished" as is. It is roughly 95% up to date anyway so I am sure it will get you through the whole game, but just some of the blueprint and shop costs might be a bit different. I had some fun with this game but I don't like devs who make me feel like a fool. So I'm cutting ties and moving on to other projects. Hope this information is still useful to those of you who are still playing NPLH. Have fun. Bye.
So... what is this game anyway?
The story opens with Ellen (that's YOU) living on a space station, waiting for her turn to relocate to Mars permanently. But she decides to come visit her grandfather's farm on Earth one last time... only to find Grandpa gone and the farm is a TOTAL MESS. So you have to clean up the mess, help the neighbors to uncover clues, and go find your Grandpa. And it all starts with a... talking... chicken.
It's an adventure/exploration game mostly. You run around the world, cleaning up all the trash that civilization left behind when everyone packed up and moved to Mars. As you go, you will help out the neighbors with some odd jobs. And you might find some "treasures" buried in the trash, or left in the luggage that people forgot to grab on their way out the door to the spaceport. But not treasure in the "so shiny, bling bling" sense...
The game is also a farming/ranching simulator. The economy of the game runs on "preserved foods" which you make by growing crops and raising livestock on your farm and then cooking them in your kitchen. Bring enough jars to your neighbors and they'll trade for blueprints of items that let you improve your farm, or unlock upgrades that let you access new areas of the world. Then you have to go to your workbench and actually build those items if you want to use them, and that requires some recycled materials that you earn by throwing all the trash you found into a recycling machine. There are also blueprints for decorative items that you'll find during your travels - these will let you decorate your farm, and inside your home, however you like.
There are also a lot of enemies that will try to stop you from cleaning up the world. These are evil robots with rotten programming. Use your drill tool as well as your water gun and vacuum pack to take them apart - literally - then use their parts to further your quest to rebuild the old farm and find Grandpa.
It's not as epic as it sounds though. It's really a casual style gaming experience. There are no time limits on anything in this game. If the robots kill you, you just wake up in your bed the next morning, losing out on whatever time was left for that day. It's very chill, very low-key. So don't be in a hurry with this one. Just enjoy the ride.
DANGEROUS GRAPHICS MODE!!
This game has quite a few glitches and bugs, some of which are directly related to your graphics settings. So before you start a game, get into the settings and make sure you have them set properly. Some advice about that:
The difference between "Performance" graphics and "High" graphics is INVISIBLE in terms of how the game looks. However, on HIGH mode it will use up roughly 5 GB of RAM as well as 60% CPU power (running on an Intel i7 4.2 GHz system with NVidia GeForce 1080 graphics). The drain on your PC will drop to about HALF of that much if you use PERFORMANCE settings. None of it makes a visible difference in the game either, it's all just math done behind the scenes. If you are running on a low-spec computer, there is a good chance this game will overheat your CPU and your GPU, potentially causing PERMANENT PHYSICAL DAMAGE TO YOUR COMPUTER SYSTEM. So always run the game with graphics set to "PERFORMANCE" mode, and un-check all the special effect boxes on the right side of the graphics settings screen.
In addition to avoiding catastrophic CPU failure, you can also adjust volume levels and change some of the controls before you start a game. All of these settings can also be changed after you're in the game, but it's more efficient to set them before you start. The other settings can be set however you like, so feel free to experiment. But remember: ALWAYS USE PERFORMANCE GRAPHICS SETTINGS to avoid damaging your computer hardware.
"HIGH" graphics mode will cause permanent damage to your computer hardware. Run on "PERFORMANCE" mode only, at all times.
The difference between "Performance" graphics and "High" graphics is INVISIBLE in terms of how the game looks. However, on HIGH mode it will use up roughly 5 GB of RAM as well as 60% CPU power (running on an Intel i7 4.2 GHz system with NVidia GeForce 1080 graphics). The drain on your PC will drop to about HALF of that much if you use PERFORMANCE settings. None of it makes a visible difference in the game either, it's all just math done behind the scenes. If you are running on a low-spec computer, there is a good chance this game will overheat your CPU and your GPU, potentially causing PERMANENT PHYSICAL DAMAGE TO YOUR COMPUTER SYSTEM. So always run the game with graphics set to "PERFORMANCE" mode, and un-check all the special effect boxes on the right side of the graphics settings screen.
In addition to avoiding catastrophic CPU failure, you can also adjust volume levels and change some of the controls before you start a game. All of these settings can also be changed after you're in the game, but it's more efficient to set them before you start. The other settings can be set however you like, so feel free to experiment. But remember: ALWAYS USE PERFORMANCE GRAPHICS SETTINGS to avoid damaging your computer hardware.
ADDITIONAL NOTE ABOUT GRAPHICS AND FPS LAG:
Having "too many" crops growing and/or animal pets in any one area (i.e. your farm) will overload the graphics processing and the framerate will lag down to maybe 6 fps, even on "performance" graphics mode. Workaround: never have pets and veggies in the same area, and never have more than 100 crops growing in the same area at the same time, and never have more than 5 level-3 pet houses in the same area. In short, spread your buildings around some. Don't just try to put EVERYTHING on your main farm. Unless you're weird and you just LOVE low-fps lag and overheating your GPU.
EVIL SAVE SYSTEM - and how to work around it
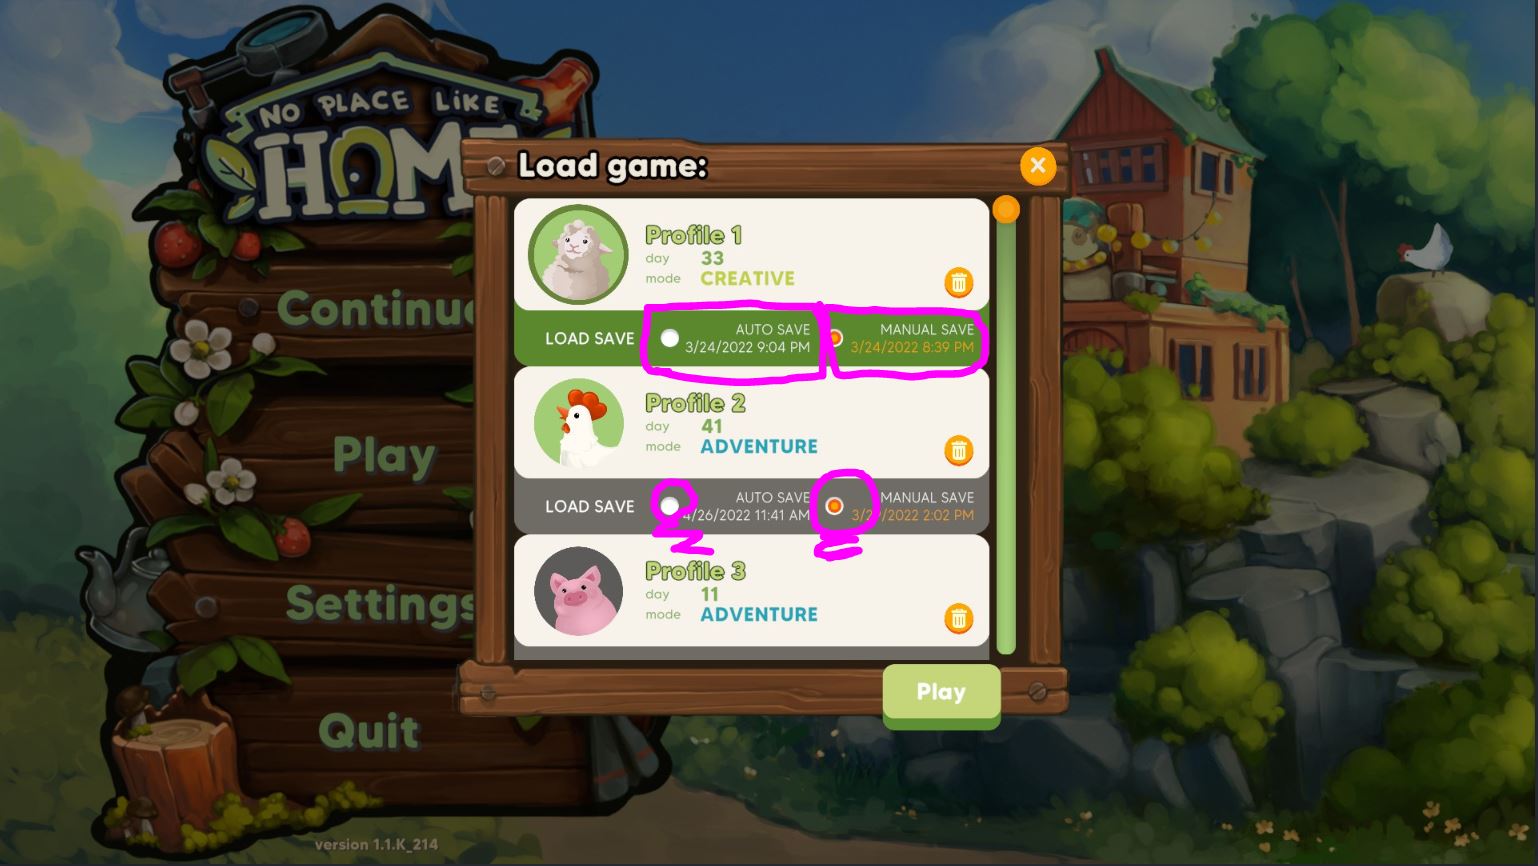
This game has the stupidest save-game system I've ever seen. It has two DIFFERENT kinds of save files per save slot: auto-save and manual save. Auto save happens whenever you go through a door, and also I think some other points during your game. Manual save is when you sleep in bed or save your game from the ESC menu. So the two saves can be made at DIFFERENT TIMES, with different progress done in the game.
When you try to load your game using the "CONTINUE" button at the main menu, it will ALWAYS load the same type of game (auto-save I think but not really sure about that) REGARDLESS OF WHICH ONE IS NEWER. So if you use CONTINUE it has a 50/50 chance of loading the OLDER save file and it will look like you lost progress.
So NEVER USE THE "CONTINUE" BUTTON TO LOAD YOUR GAME!!
Instead, use the "PLAY" button. Then select which save slot you want. Then each slot has two options with tiny round buttons to choose: the auto-save, or the manual save. It shows you the timestamp for both save files. Check the bubble for the NEWER file, then load your game. Ta-da! Presto, no more loss of progress.
What I like to do to avoid this mess entirely, is to go home and sleep in bed, wake up, walk out the door, use the map to fast travel somewhere (i.e. the village in front of Mark's store), then hit ESC and drop a save there. That way my auto-save and manual save files will both be the same, at least within a few seconds of each other.
I know, this is a stupidly messy system. Now you know it, too. But neither of us is in charge of the hotfix patches for the game so we're just kind of stuck with what we got.
For broken quests or disappearing items
There are two glitches that a lot of people claim they have problems with. I cannot verify these because IT NEVER HAPPENED TO ME in 22 play-throughs all through early access stages of development or 3 play-throughs since full release. But in case you run into them, here is some info about that.
The developers posted this message in the discussion board regarding a nasty bug where items on your farm will just "vanish" for no apparent reason. (Or the Panta Rei quest fails to complete properly)
If your save game broke down or your game crashes but used to work earlier, or your farm items have vanished (Or you can't use the boat even after finishing all the Desert quests) then please prepare copy of your:
1. Save Games
2. Player Files
3. System specification
and send them to us to: contact.nplh@awakenrealms.com
Where to find them: Open up any folder on your computer. Paste this in a direction field: %USERPROFILE%\AppData\LocalLow\Awaken Realms\NPLH\
Here is a picture instruction:
https://cdn.cloudflare.steamstatic.com/steamcommunity/public/images/clans/39143148/d79c89a47215ab1b4d892cb140884a2b356639ca.png
Now, I think what is happening is because of the NEW SAVE GAME SYSTEM, they added "autosave" function whenever you go through a door to a new area it will save your game. But then you can also save manually from the ESC menu. And then you can also save your game by sleeping in a bed or by getting killed and waking up the next morning. FOUR ways to save your game. And it keeps TWO save files per game: one for the most recent auto-save, and one for the most recent manual save. When you go to load your game, PAY ATTENTION to which option is checked on your save slot. By default it will load the most recent MANUAL SAVE ONLY. If the autosave is more recent, and you use the "Continue" button to load the manual save or if you hit "Play" and just select the default file, then you will lose some progress because the manual save is older than the autosave. You'll have to click "Play" (NOT CONTINUE) and change the check-box on your file to the MOST RECENT save before you load your game.
Or, to make it simple, just always make a manual save from the ESC menu before you quit the game for the day. Then the manual save will always be the most recent one, and it will be the one that loads by default whether you hit "Play" or "Continue" on the main menu screen.
If you still have problems with vanishing stuff, send your files to the developers.
...
AHA I've remembered what the second one was. Again, I never had this happen to me. But a lot of people are complaining about the final quests in the Desert not completing properly so they can never access the Sunken City and the final boss fight. So...
First, make sure you ACTUALLY COMPLETED every other quest in the desert. You can help the goats, llamas, and fennecs as well as finish Frank's final quest at ANY TIME before unlocking the boat, but the rest of these will need to be completed in the correct order because Janet only gives you one quest at a time.
If any of those quests ends up broken, follow the same instructions as above, to email your save files to the developers so they can take a look and see why these quests keep breaking (but only for certain people).
The developers posted this message in the discussion board regarding a nasty bug where items on your farm will just "vanish" for no apparent reason. (Or the Panta Rei quest fails to complete properly)
If your save game broke down or your game crashes but used to work earlier, or your farm items have vanished (Or you can't use the boat even after finishing all the Desert quests) then please prepare copy of your:
1. Save Games
2. Player Files
3. System specification
and send them to us to: contact.nplh@awakenrealms.com
Where to find them: Open up any folder on your computer. Paste this in a direction field: %USERPROFILE%\AppData\LocalLow\Awaken Realms\NPLH\
Here is a picture instruction:
https://cdn.cloudflare.steamstatic.com/steamcommunity/public/images/clans/39143148/d79c89a47215ab1b4d892cb140884a2b356639ca.png
Now, I think what is happening is because of the NEW SAVE GAME SYSTEM, they added "autosave" function whenever you go through a door to a new area it will save your game. But then you can also save manually from the ESC menu. And then you can also save your game by sleeping in a bed or by getting killed and waking up the next morning. FOUR ways to save your game. And it keeps TWO save files per game: one for the most recent auto-save, and one for the most recent manual save. When you go to load your game, PAY ATTENTION to which option is checked on your save slot. By default it will load the most recent MANUAL SAVE ONLY. If the autosave is more recent, and you use the "Continue" button to load the manual save or if you hit "Play" and just select the default file, then you will lose some progress because the manual save is older than the autosave. You'll have to click "Play" (NOT CONTINUE) and change the check-box on your file to the MOST RECENT save before you load your game.
Or, to make it simple, just always make a manual save from the ESC menu before you quit the game for the day. Then the manual save will always be the most recent one, and it will be the one that loads by default whether you hit "Play" or "Continue" on the main menu screen.
If you still have problems with vanishing stuff, send your files to the developers.
...
AHA I've remembered what the second one was. Again, I never had this happen to me. But a lot of people are complaining about the final quests in the Desert not completing properly so they can never access the Sunken City and the final boss fight. So...
First, make sure you ACTUALLY COMPLETED every other quest in the desert. You can help the goats, llamas, and fennecs as well as finish Frank's final quest at ANY TIME before unlocking the boat, but the rest of these will need to be completed in the correct order because Janet only gives you one quest at a time.
- find four spare parts for pipe valves
- fix all four broken pipes to fill up the four shallow lakes
- buy the desert pot blueprint from Janet
- build a set of 16 desert pots at your workbench
- setup 16 desert plant pots (four around each shallow lake)
- plant 16 desert shrubs in those pots
- fix the llama garage and feed batteries to three llamas
- go tell Janet you're all done with the pipes and shrubs, then talk to her again.
- shoot your water hose into the three deep holes to make small (but deep) lakes
- un-cover the fennec den which is buried in trash just past Janet's shop
- feed all five fennecs so they go home, then wait until the next day
- feed at least five goats so they go live at your cow shed, then wait until the next day
- go back to Frank, bring a Watermelon Salad and five Old Wood, to unlock the final room in Grandpa's house for decorating.
- go tell Janet you're all done with the deep lakes. Then talk to her again.
- find three dam console parts
- put the parts into the dam console
- push the red button on the console
- Tell Janet you're finished with the goats & fennecs. Then talk to her again and tell her you finished with the dam controls. Then talk to her again and ask for her help.
- the boat should be available now - right next to the desert's llama garage
- the fast-travel door to the Sunken City should be active on the map, too
If any of those quests ends up broken, follow the same instructions as above, to email your save files to the developers so they can take a look and see why these quests keep breaking (but only for certain people).
By popular request - Rubber Drill "glitch"
THIS IS NOT A GLITCH OR BUG. THE RUBBER DRILL UPGRADE ACTUALLY WORKS THE WAY IT IS SUPPOSED TO... BUT ONLY IF YOU USE IT AGAINST THE RIGHT KIND OF TARGET.
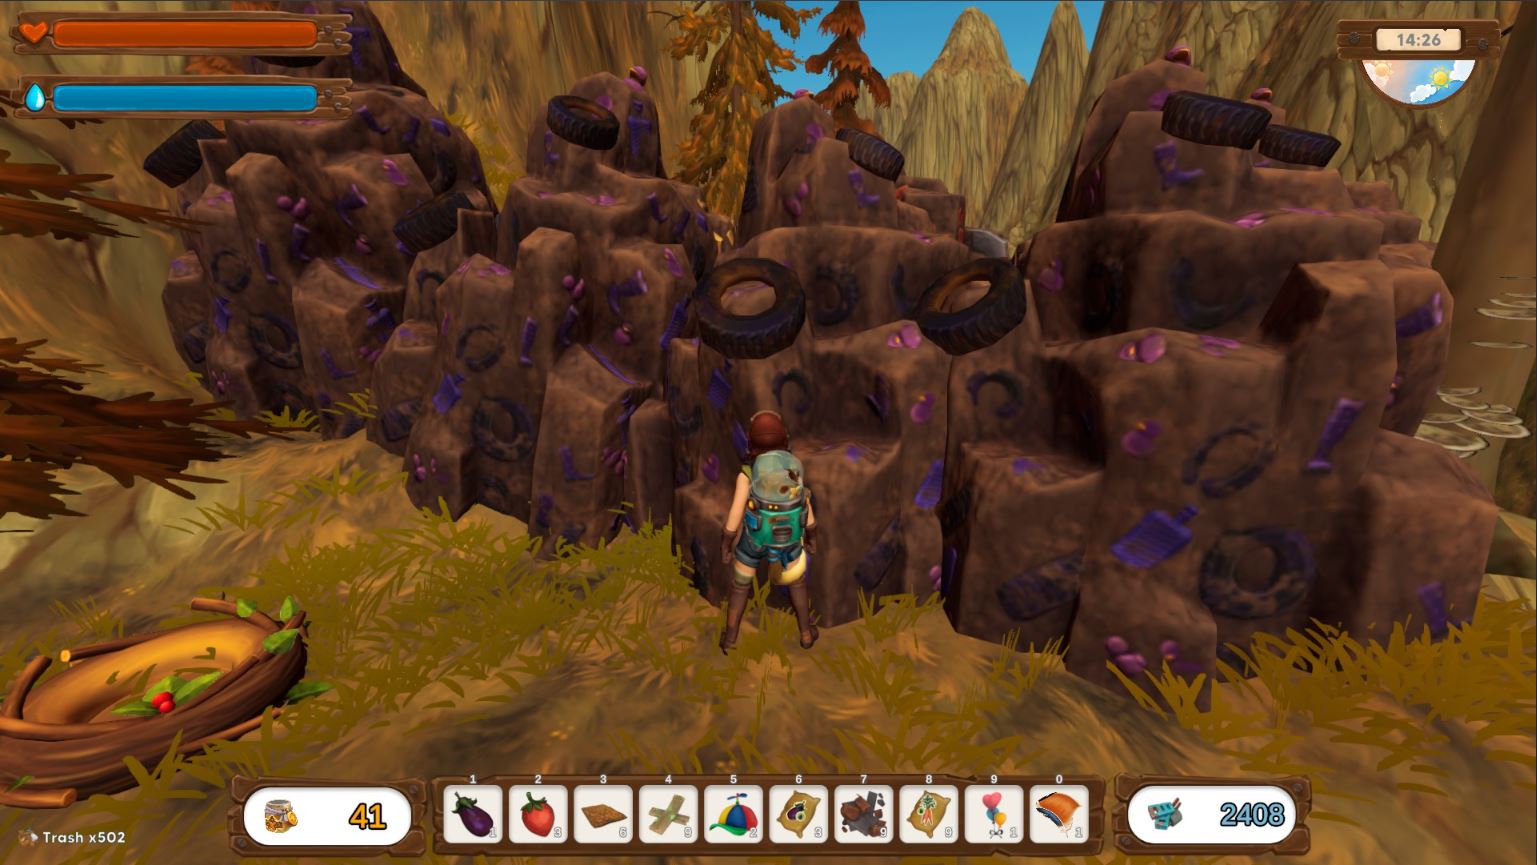
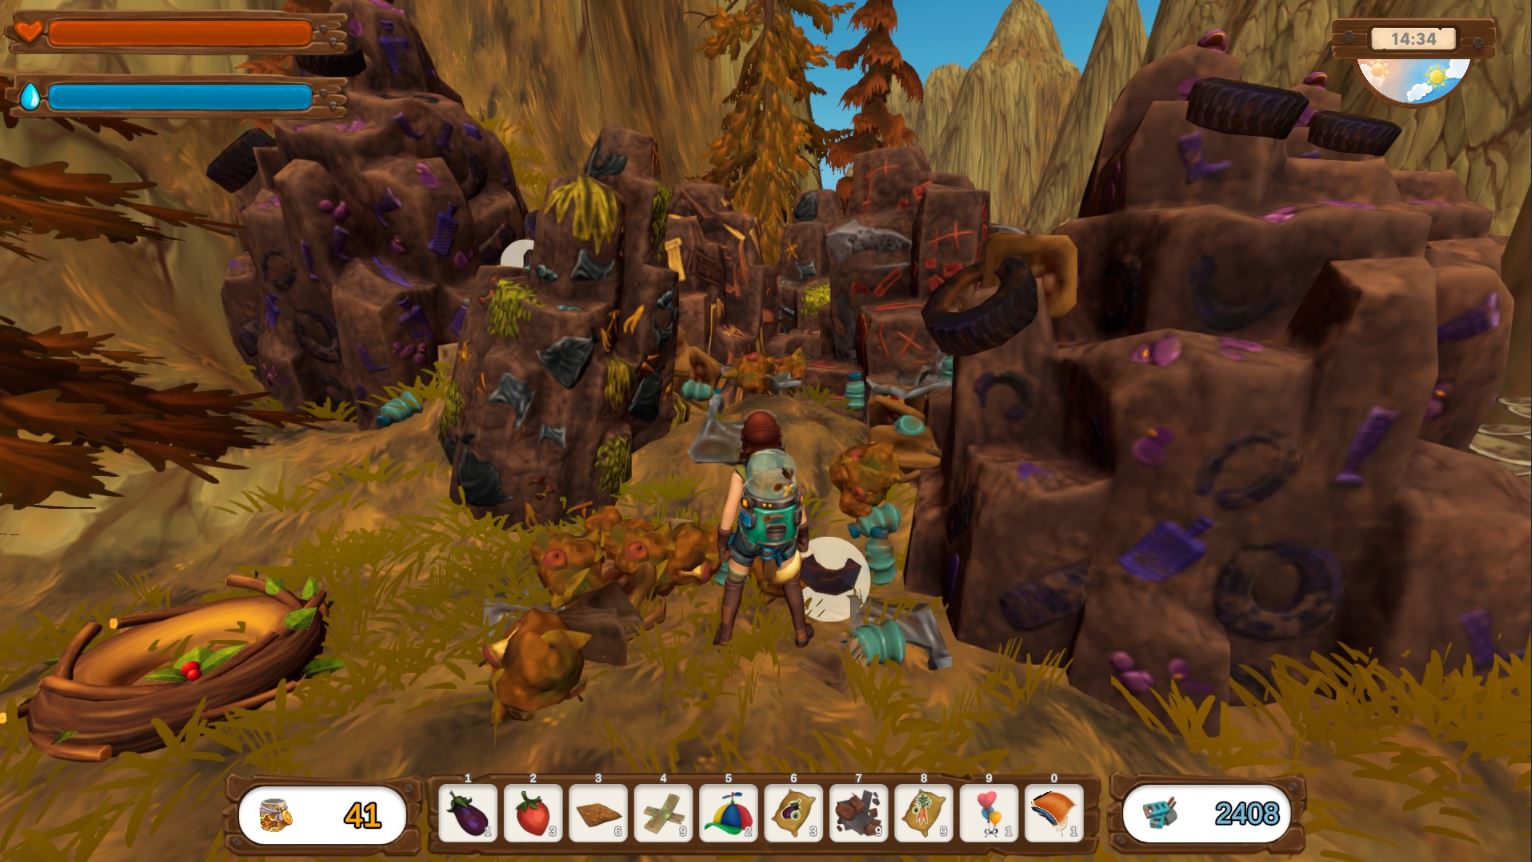
TOO MANY fools are claiming on the forums that the rubber drill upgrade "doesn't break the rubber trash." Well, that's because you're not actually using it on the rubber trash. Rubber trash looks like a standard trash brick, except it has purple pieces of rubber and a few old tires sticking out of it... like this:
...
...
...
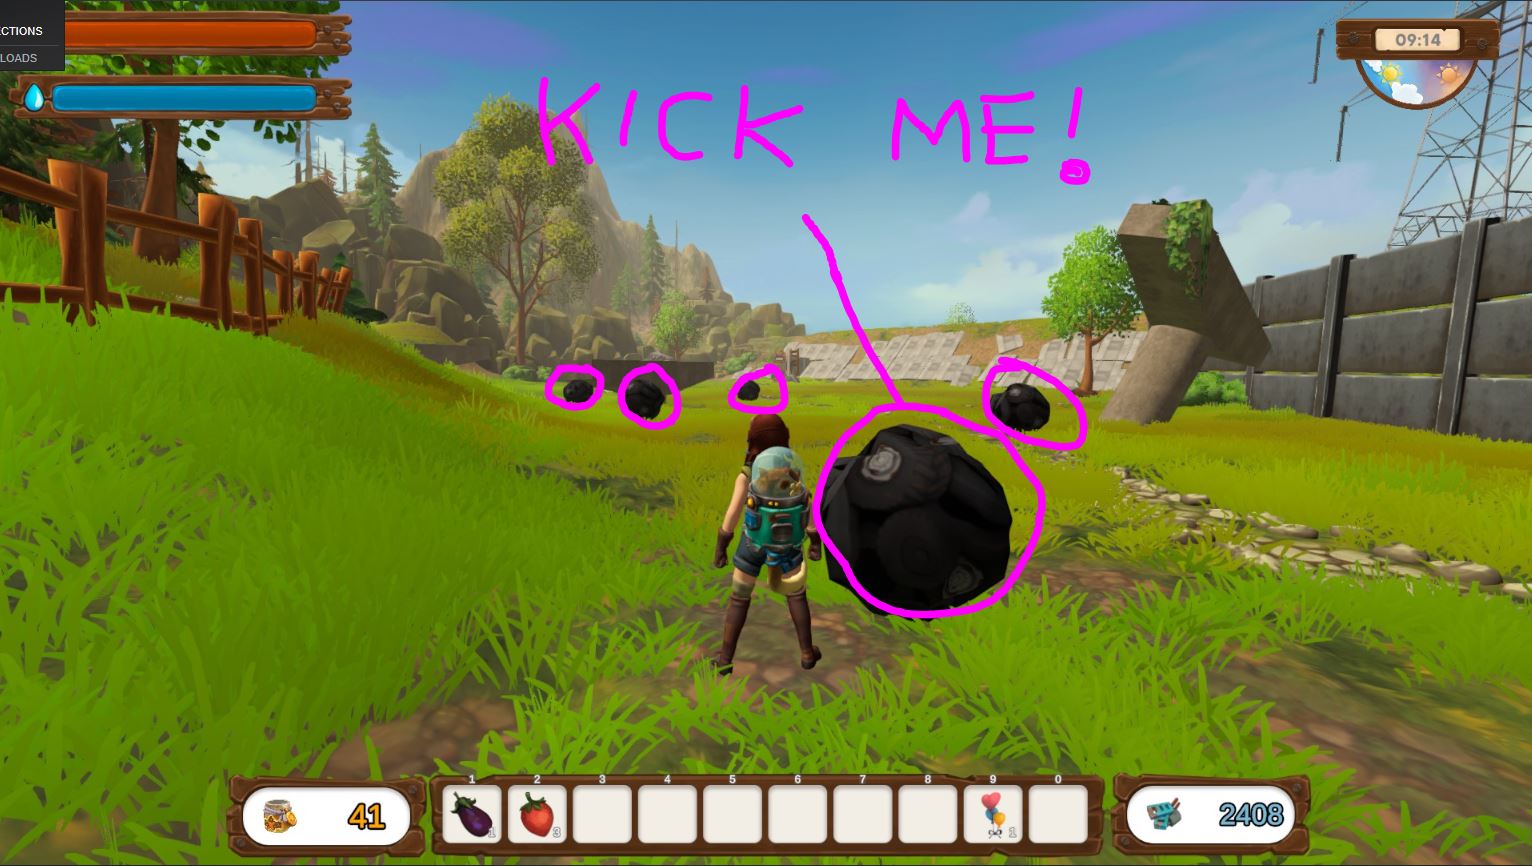
What you're trying to do is break a "tire ball" which is INDESTRUCTIBLE. It is meant to be knocked around like a soccer ball. It will damage enemies or trash bricks on contact, even if the ball isn't moving and the enemy tries to walk/jump through it. LOL. These balls are first encountered in the back side of the Village, just down the hill from the entrance to Lonely Hills. The ACTUAL rubber trash that the drill WILL break is first encountered down in a manhole right next to your farm... but the next time you find it is just up the hill from these tire balls, at the door to Lonely Hills. So yeah they are in the same place, and technically both made of rubber. But the trash bricks can be destroyed - while the tire balls are INVINCIBLE BOUNCY BALLS OF DEATH.
TOO MANY fools are claiming on the forums that the rubber drill upgrade "doesn't break the rubber trash." Well, that's because you're not actually using it on the rubber trash. Rubber trash looks like a standard trash brick, except it has purple pieces of rubber and a few old tires sticking out of it... like this:
...
...
...
What you're trying to do is break a "tire ball" which is INDESTRUCTIBLE. It is meant to be knocked around like a soccer ball. It will damage enemies or trash bricks on contact, even if the ball isn't moving and the enemy tries to walk/jump through it. LOL. These balls are first encountered in the back side of the Village, just down the hill from the entrance to Lonely Hills. The ACTUAL rubber trash that the drill WILL break is first encountered down in a manhole right next to your farm... but the next time you find it is just up the hill from these tire balls, at the door to Lonely Hills. So yeah they are in the same place, and technically both made of rubber. But the trash bricks can be destroyed - while the tire balls are INVINCIBLE BOUNCY BALLS OF DEATH.
Graphical Resolution Glitch
If you start playing the game and it looks like you're missing entire pages in the workbench screen or in the NPC shops, or if your item hotbar doesn't seem to be there (or if it's halfway cut off) then you probably have a non-standard monitor size. This happened to me with my 49-inch Ultra-4K HD monitor.
Luckily THERE IS A FIX FOR THIS.
Get into the options menu, and manually change the resolution and/or check the box for WINDOWED MODE. For some display sizes, one side and part of the bottom of the screen will be cut off if you're using the default resolution selected by the game. Changing it to the actual size of your monitor will allow the ENTIRE SCREEN to be shown properly. Then you can see those arrows for changing pages in the NPC shops and in your crafting menu. And you can see (and properly use) your item hotbar at the bottom of the screen, too.
I totally forgot about this glitch, thanks to the folks on the discussion forums for reminding me about it!
Other Bugs and Glitches
- For all of the quests that require special items, you will find EXTRA items all over the place. Nearly twice as many as you actually need. Most of them CANNOT be thrown away but after you turn in the quest the extras can then be recycled.
- Feathers are scattered all over the world. You can pick them up from the beginning, but the quest to turn them in is about 2/3 of the way through the game. So build a chest to hold all the feathers that you find. Or don't touch them until you get the quest to pick them up from Jay in the Frozen Peaks zone.
- On the "Achievements" menu, the description for each achievement is written in VERY LIGHT GREEN TEXT on top of a light tan background, it is very hard to read.
- Ranch buildings (chicken coop, pig sty, cow shed, robot lodge) need you to leave about "three feet" of space around all edges when you place it on the ground. This INCLUDES the area inside the little fence, not just the main building. If you put it too close to other objects, fences, or walls then sometimes animals will disappear or get stuck in unreachable places.
- CHEAT for when you run out of Pet Food: If you have a bunch of animals who want pet food, but you don't have enough ingredients to make it... just REMOVE their house. Put it somewhere else (or have a second empty house waiting already). re-tame the animals so they walk back home. Next day, they'll give you an item as if they were never hungry. Repeat each day if they ask for more Pet Food.
- There will be several places where you get stuck on the terrain, or possibly fall through the floor. On the ESC menu is a "save and go home" option. Be sure to SAVE AGAIN when you get home because this option will save your game BEFORE sending you home.
- Canned dog food can be preserved... but it's a quest item so DO NOT preserve it - give it to Harold to make a tasty treat for the doggy
- In the Village, by the lake, there are 5 foxes. After you feed them, they have a stupid tendency to walk THROUGH the mountain wall behind their den, or to get stuck UNDER their den. Sometimes they will teleport back home after a day or two though.
- NOT A BUG but a lot of people have trouble with this: Harold's quest to rebuild his house asks you to bring him the materials to fix it. He WILL NOT take the materials though. Just stand in front of his house and press the "interact" key (E by default) when you see the tag pop up asking for old wood and rubble. You'll fix the house yourself. Then talk to Harold about it.
- NOT A BUG but everyone seems to think it is: In Lonely Hills, Frank asks for wood and parts for TWO quests. The first quest takes parts that look like CINDER BLOCKS (all found in the first area near Frank and down the hill by the river) as well as OLD WOOD. Unlike Harold's house, you actually have to give these parts to Frank. Then he gives you a Repair Kit, which you bring to his house in the village and fix it like Harold's house. The second quest takes parts that look like WEATHER VANES (all found in the next area, through that big door by the river bank) as well as OLD WOOD. After that he will ask for more OLD WOOD and some food to unlock more rooms in your house. At no point does he ask for Quality Wood, that stuff is for rebuilding the deer habitat. For the second quest onward, once you give him the parts he will just open up some doors in the back of your house so you can go decorate them.
- NOT A BUG but a lot of people have trouble with this: In Lonely Hills, there is a quest from Rudy to fix the broken bridge by finding a bunch of bridge planks. He doesn't want the parts, just take them to the bridge and fix it yourself.
- In Lonely Hills, there are a few piles of trash that the final little bit of it is sunk too far into the ground, Ellen can't reach it to vacuum it up. Not a big deal, you'll only miss out on about a dozen pieces of regular trash. Just ignore them and move on. Or eat some super-chicken food and fire a chicken launcher at it. Might get fixed in a future update.
- In Lonely Hills the quests to help the ducks and deer will tell you to return to Frank; this is wrong - return to Harold instead. Specifically, return to his shop in the back end of Lonely Hills.
- In Lonely Hills, when Rudy sends you to find Harold he asks you to get his "Farmer's Chain" - nobody knows what that is... throughout the quest it is just referred to as "the part" and then when you finish Harold's quests with ducks and deer he gives you a bottle of "Neutralizer" instead. Just bring it back to Rudy and it's fine.
- In Lonely Hills, the deer have a bad habit of magically walking through the mountain walls and falling off the map, never to be seen again. This can happen before or after you befriend them.
- Lonely Hills, the two pigs who want oats will still get highlighted after the quest finishes, as if they have something else to say or give you, but you can't actually do anything with them after that.
- Frozen Peaks for Jay's feathers quest you need to turn in five feathers first to clear Jay's initial quest. Once that quest is done you can turn in all the rest to complete the collection. But if you try to turn them ALL in for the first part of the quest then it won't complete the collection quest so you never get the reward at the end; it takes ALL your feathers but only recognizes the first five.
- In Frozen Peaks, Lilly's quest to collect crops WILL NOT accept Tea or Sunflowers, but it does require cranberry, watermelon, and olive which you can't find until you reach the Desert. It used to require oats, but the devs removed that requirement and it broke the quest when they did.
- In the Desert, the Designer NPC introduces herself as "Yvonne Sin Laurent" but all other text in the game refers to her as "Janet." Same person, just two different names for some weird reason.
- In the Desert, the "dam console" that needs the three parts WILL NOT SPAWN into the game until you get the quest from the designer to go fix it. But you can pick up the parts well before that.
- Desert fennecs do not get highlighted when you approach, need to just "guess" when you are in range to touch them. That said, they seem to have the "best" detection range and hit box of all the animals.
- Sunflowers cannot go in a bird feeder,
- The following items have NO USE in the game: glue, wool, and wool ball. Goat cheese and olive oil are almost useless too because each of them is only used in one recipe that you'll probably never bother to cook.
- When you reach Sunken City, the only exit is to use the map for fast travel.
- There are still a bunch of typo errors in the dialogues.
- Sunflowers make ZERO PET FOOD in the kitchen - you get no reward from cooking them. So don't cook them.
- Japanese bed decorations can't be slept in. They're just for decoration.
- The "dancing cow" from the Power Plant: does not increase heart from petting her, and if you put a hat on her... WOW. Seriously, put the Rabbit Ear hat on this particular cow. Not for the faint of heart.
- Having "too many" crops growing and/or animal pets in any one area (i.e. your farm) will overload the graphics processing and the framerate will lag down to maybe 6 fps, even on "performance" graphics mode.
- Coffee makes 25 jars in the preserver and can get seeds from bird feeder, but gives ZERO pet food in the kitchen.
- Cacao cannot go in the preserver or bird feeder, and gives ZERO PET FOOD in the kitchen.
- Creative Mode only: enemies in range of the "doctor" robots DIE INSTANTLY instead of being healed. Including the final boss.
- Coffee, Cacao, Cherry, and Pear are only available in Creative Mode, and seeds are only found by purchasing them from Lily or from your decoration workbench.
- Some people say upgrading a building causes it to rotate 90 degrees, but this didn't happen to me.
FIXES for certain glitches and bugs
Sometimes, things sort of "freeze up" or just go kind of goofy with glitches while you're playing the game. Memory-leak is a real problem with this game. Sometimes it just needs a chance to clear the cache, which it can't do as long as the game is still running. This might happen after a couple hours of playing, depending how big your computer's RAM allocation is. So go sleep/save, exit the game, reboot and load the save and try again. That's usually going to be your FIRST thing to try anytime anything goes wrong.
If the game hangs on a loading screen...
1. The FIRST TIME you boot/load the game it will take A LONG TIME to boot. You'll have to tell Windows to "wait for NPLH to respond" on a popup window. Just give it maybe 20 minutes to finish booting up. Go make a sandwich, or go for a jog, or go get some work done and come back later. Don't worry, this only happens the first time (and if they release a MAJOR update patch ti might happen the first time after that, too). But then next time you run the game it will only take maybe 30 seconds to boot.
2. Try the "Verify Integrity of Game Files" tool from Steam library (there are many tutorials on how to do that if you've never done it before). The Steam download utility will misplace or break about 1% of the files it tries to download on a wireless internet connection. On a hard-wired connection it happens less often but still happens once in a while. It only takes a couple of minutes to run the check, and if it finds a problem it only downloads the files that it needs to replace - not the entire game. So it's quick and efficient, and usually will fix the problem of your game freezing on a loading screen.
If you're having problems on a save file that WAS working on an OLDER version of the game but somehow goes horribly wrong on a NEW version after the game updates, well unfortunately you might have to just delete that save file and start a new game. At this point in development you're usually okay playing a save game from version 1.0.K_150 or later as long as there have only been minor hotfix patches since you started your game file. If there was a BIG update patch that changed too many things (game mechanics, quest items, etc.) then you will still have to start a new game.
There is a glitch with storage chests, sometimes when you first open the chest it gets "stuck" with the item in your first inventory slot selected. So if you click on ANYTHING it will move that item into the chest, possibly exchanging it for whatever you were trying to click on. Because of this glitch, just make it a habit of ALWAYS moving the cursor over the first item in your inventory BEFORE clicking on anything else; this will get the selection cursor un-stuck so you can use the chest as intended after that. Simple fix for an annoying bug, but you have to make it a real habit or it will surprise you sometimes and make you yell "D'oh! Not again!!"
Try not to put "too many" crops and/or animals in any one area. Having that many moving objects on the screen will create a ton of lag, overheat your GPU and CPU, and your framerate will drop to single digits. Trust me, my computer is pretty high end and it's happened to me. So if your game gets "choppy" when you walk through your farm, move a few things to another location in the world until you trim it back enough to bring your frame rate back to normal. Running an intel i7 with a GeForce 1080 my limit seems to be: keep it fewer than 90 animals, and fewer than 150 growing crops. Plain old farm soil with nothing planted on it doesn't have as big of an impact. It gets EVEN WORSE if those crops are ready for harvest because the game also has to display the "speech bubbles" that tell what items are ready for harvest. Basically, try not to make your farm too crowded on any one screen.
Having trouble reaching a piece of trash that is placed too high or too low for Ellen to reach? Try upgrading your vacuum range at Rudy's shop, or cook some food that gives you SUPER CHICKEN powers and throw a super chicken at it.
If you fall through a hole in the map and end up under the floor, hit ESC and use "Save & Go Home" option. It sends you home, but it saves the game BEFORE it teleports you so if you load the game again you'll be back in the hole. So save again immediately after you get home.
Broken Achievements
Some of the in-game achievements are BROKEN. Since they are broken, the Steam achievements associated with them are also broken. Here is a list
- GOOD LUCK trying not to go blind from reading the achievement descriptions. That choice of text color (VERY LIGHT GREEN writing against a LIGHT TAN BACKGROUND) is just stupid.
- There are only 11 llamas you can tame (out of 15 total in the game). The achievement will complete when you find 10 of them, but the text description on the stamp card thing asks you to "befriend 15 llamas." I think 15 is a typo.
- The stations achievement DOES NOT DEFINE WHAT A "STATION" IS - very confusing. Some buildings seem to give you NEGATIVE points towards the achievement, some count for 1 point, and some give zero points. And sometimes it seems like the number will just change at random depending which map zone you are standing in and which direction Ellen is facing. It's just super confusing. BUT... I think I figured out how to make it work, see the next chapter of this guide.
- It asks you to make 20,000 jars of preserved food, but that's ridiculous since it only takes about 8500 jars to beat the whole game. I mean, sure you could spend three times more time on cooking and preserving than you "need to" ... but that just seems excessive to me.
- It asks you to "perform a cooking experiment" which ONLY registers as complete if you make an OFFICIAL recipe without already owning the recipe. If you already have all the official recipes unlocked, you cannot complete this one. Pet food made by not following any recipe does not count as an "experiment" apparently.
- There is an achievement for cleaning all the trash off of the Fennec den in the Desert, but it does not register it as complete.
- The Feathers achievements WILL NOT COUNT any feathers obtained before they added this achievement to the game. But any feathers collected after April 22, 2022 will count normally. (NOTE: for the feathers to count, you must give them to Jay in Frozen Peaks. Just picking the feather up is not enough.)
- Similar to the feathers bug, the achievement to plant and grow 10 Olive Trees does not count any trees planted before May 13, 2022. Just planting the seed is not good enough either - you need to wait a full week until it is fully grown to the point where you can start collecting olives.
- The achievement to collect 100 Glue is a bit broken... in one game I got over 120 glue so no problem, but in my next play-through I only got 54 glue so the quest will never be able to complete (the only place to find Glue is in the final zone - Sunken City, and it seems that resources collected from Llama boxes do not count - only the ones found in the trash piles count).
The "Hell's Kitchen" Achievement
There is an achievement that requires you to make a "cooking experiment." What this means is you have to cook an OFFICIAL RECIPE using the correct ingredients, BEFORE you find the recipe in the game. Pet food does not count for this. If you have already found all the cooking recipes, you will not be able to get this achievement unless you start a new game.
The easiest way to pop this is to play the tutorial. Get to the point where you setup the chicken coop and feed potatoes to the chickens. They give you a bunch of eggs. Run back to the kitchen, insert TWO EGGS (not one, not three, but TWO) and you will make sunny side up fried eggs. This should pop the achievement since you definitely don't find any recipes in the tutorial.
The easiest way to pop this is to play the tutorial. Get to the point where you setup the chicken coop and feed potatoes to the chickens. They give you a bunch of eggs. Run back to the kitchen, insert TWO EGGS (not one, not three, but TWO) and you will make sunny side up fried eggs. This should pop the achievement since you definitely don't find any recipes in the tutorial.
The Other Cooking Achievement That Causes Confusion
Another one asks you to "cook 200 dishes" but what it actually means is "use the kitchen 200 times." When they originally made the achievements it was only possible to cook ONE food at a time; later they added the ability to cook multiple servings of the same food at the same time by using the "+" button when you load your kitchen. So back then, one use of the kitchen was equal to cooking one dish. Now you can use the kitchen once and cook five dishes if you have enough ingredients. So you just have to use the kitchen 200 times instead of counting the total number of cooked food that you made.
The "Stations" Achievement
If you open your inventory and then go to the "Achievements" page, under the "Resources" tab you'll see an entry for "Stations." There are two achievements there: build 5 stations, and build 25 stations. Because there is SO MUCH UNCERTAINTY about how this thing works, what even is a station, sometimes the counter goes backwards for no reason... I've figured out how to do it and I'm going to pass that information along to you now.
First off, do not attempt this achievement until you clear the Frozen Peaks missions. Yeah, all of them. And all of Lonely Hills. And all of the Village. You can do it before you enter the desert, or after you reach the desert. Technically you can do it earlier, but that would feel like cheating.
Second tip: do them all in a single play session. Do not log out of the game. You can rest and save, but DO NOT LOG OUT OR CLOSE THE GAME. For some unknown reason, logging out or re-loading a save tends to have strange effects on the number of stations that are counted for this achievement. You could even end up with a negative number of stations showing as completed. How??? I don't know. It just does stuff like that.
Third tip: you can upgrade your stations as you go. But DO NOT remove them since doing so will totally break the achievement. Also, after you upgrade things and the upgrade time cycle (the repair tent thing) finishes, you'll have to put down ONE MORE basic station in order to refresh the achievement's count.
Fourth tip: you have a few machines already built on your farm at the beginning of the game. These DO NOT COUNT towards the achievement. Neither do any machines that you earn as quest rewards. ONLY MACHINES THAT YOU BUILD YOURSELF AT YOUR WORKBENCH WILL COUNT. And after you make it at your workbench, you actually need to place it on the ground to see the effect on the achievement progress. Just having it in your backpack is not good enough.
The Cheaty Way (for lazy cheaters)
Several machines can all be unlocked before you leave the village. Spam build a bunch of those until the achievement pops. Just build 25 solar power stations (for the low price of 15 Recycled Materials + 5 Old Wood each and 25 Preserved Meal jars for the blueprint).The Honorable (and more satisfying) Way
The solar power station isn't the only machine that counts as a "station." Try building five of each of these machines, which each should count as one station. NOTHING ELSE IN THE GAME WILL COUNT AS A "STATION" FOR THE ACHIEVEMENT.- Basic Kitchen
- Basic Preserver
- Basic Mayo Maker
- Basic Jam House
- Basic Bee Hive
- Basic Cheese House
- Oil Press
- Solar Power
Default Controls
Gamepad support is still not the best even if it recognizes your controller at all, use a controller at your own risk. Keyboard and mouse is much better. For this guide I'll assume you're using keyboard and mouse only.
In the settings menu, you can adjust mouse sensitivity on both axes. I find that setting it to around 1.7 on both X and Y works pretty well, but it will depend on what kind of mouse you have, the size of your monitor, and what version of the game you're running (sometimes they update the control settings). So you might have to experiment with this a bit if you notice the mouse cursor moving too slowly or too fast in your game.
Farming, Combat, and Exploration
INVENTORY controls
Adventure Mode lets you turn QUEST TRACKING on or off when you select a specific quest in your quest journal. Challenge Mode does not allow Quest Tracking.
In the settings menu, you can adjust mouse sensitivity on both axes. I find that setting it to around 1.7 on both X and Y works pretty well, but it will depend on what kind of mouse you have, the size of your monitor, and what version of the game you're running (sometimes they update the control settings). So you might have to experiment with this a bit if you notice the mouse cursor moving too slowly or too fast in your game.
Farming, Combat, and Exploration
- WASD - have Ellen walk around.
- middle mouse button - auto-walk in the direction you're facing
- Hold SHIFT-WASD - run faster, running depletes stamina which recharges pretty quickly on its own
- Mouse - look around, move the selection cursor, aim your water hose or vacuum
- SPACE - use the vacuum
- L-Click - swing your vaccum/drill to smack whatever is in front of you
- HOLD L-mouse-button - use your drill to bore a hole through whatever is in front of you
- (drilling works well for trash bricks, vacuuming works well for trash piles, and hammer-smack works well for evil robot enemies)
- R-Click - fire a blast of water (or fire a super-chicken if you have one loaded)
- HOLD R-mouse-button - fire a steady stream of water like a garden hose
- (blast is good for watering your garden, hose is good for defeating evil robot enemies)
- Tap SHIFT while moving with WASD - dodge-roll in the chosen direction
- E - "interact" with whatever you're looking at (open a chest, feed an animal, activate a button, open a door, talk to a person, use a machine, etc)
- E - (while building something or planting a seed) - confirm placement of a building in build mode, or plant a seed in planting mode
- R - (when looking at an OBJECT or BUILDING) "remove" a building or object, return it to your backpack, so you can put it somewhere else
- R - (when looking at a FRIENDLY ANIMAL) open a friendly animal's status screen, where you can give it a hat or rename it or check its "heart" affection level.
- R - (while building something) rotate the building BEFORE you confirm its placement
- I (or TAB) - open your backpack. From there you can select other menu tabs or manage your inventory.
- M - open the map. On the GLOBAL map you can use "fast travel" by clicking on any unlocked door (yellow highlight). Locked doors have a red highlight around the edge.
- Number keys 1 to 0 - Use whatever item is in your hotbar slots
- ESC - open the main menu
- THERE IS NO "JUMP" IN THIS GAME
INVENTORY controls
- L-click - pick up a stack of items to move it manually
- R-click - automatically move a stack of items between inventory screens (your backpack, kitchen contents, chest contents, etc.)
- Shift-Click - pick up a SINGLE item from a stack
- CTRL-Click - open a popup menu to select how many items you want to pick up from the stack, use the "+ or -" buttons on the screen to select the amount
- (Shift and CTRL work on both left and right clicking)
Adventure Mode lets you turn QUEST TRACKING on or off when you select a specific quest in your quest journal. Challenge Mode does not allow Quest Tracking.
Game Modes
There are currently TWO game modes, and a third is planned to be released soon. Here are some basic descriptions so you can choose the right one for your play style.
You can build any farm equipment FOR FREE. All decorations can be built FOR FREE. You can buy all the seeds as well as animal hats from your decoration workbench. But you will still need to wait for the plants to grow, and for the buildings to upgrade, like normal. You can also still follow along with the main quest - and anything out in the world that normally would require items (such as needing a few old wood and rubble to repair the fox den) will still require those items. But for the most part, this mode is for when you just want to focus on farming and not worry about anything else. You don't need to cook anything unless you just want to cook. You don't need to recycle trash because everything is FREE. Just chill out and build your farm.
A weird bug: in Creative Mode, any enemies that stand near one of the evil "doctor" robots that usually repairs his friends... will be KILLED instead of repaired.
CREATIVE mode:
Enemies can't hurt you. You can destroy them in just ONE HIT even with your vacuum. ALL the recipes are unlocked so you never have to go shopping again. You still should buy some upgrades from Rudy's shop, but they are all FREE. You have special machines that spawn in animals, if you want a ranch with 300 sheep - now you can! There is a device to move time forward so you don't have to sleep in bed to skip a day. They added four new crops: cherry and pear trees, coffee plants, and cocoa plants - but no recipes use them. You can build any farm equipment FOR FREE. All decorations can be built FOR FREE. You can buy all the seeds as well as animal hats from your decoration workbench. But you will still need to wait for the plants to grow, and for the buildings to upgrade, like normal. You can also still follow along with the main quest - and anything out in the world that normally would require items (such as needing a few old wood and rubble to repair the fox den) will still require those items. But for the most part, this mode is for when you just want to focus on farming and not worry about anything else. You don't need to cook anything unless you just want to cook. You don't need to recycle trash because everything is FREE. Just chill out and build your farm.
A weird bug: in Creative Mode, any enemies that stand near one of the evil "doctor" robots that usually repairs his friends... will be KILLED instead of repaired.
ADVENTURE mode:
This is the main "arcade" style game mode. Enemies can kill you, and they take more than one hit to defeat them. You will unlock more crops and blueprints as you progress farther into the game. Most of the story quests have to be finished in order to make any progress. You will have to grow crops and cook food in order to earn enough "money" (in the form of jars of preserved food) to buy all the blueprints, as well as collect Old Wood, Rubble, Rubber, and other resources to build all the equipment for your farm. And you will need to recycle all the trash in order to get enough recycled material to build equipment for your farm. The number of animals is limited so you can't have that farm with 100 foxes and 300 sheep here. This mode is for people who want to explore and follow the story WHILE setting up a farm and ranch.CHALLENGE mode:
Higher costs for blueprints and crafting recipes. Stronger enemies, more of them, varied attack patterns. NO map access if you're in the underground labyrinth. Same basic game, but more of a challenge and it will take you longer to complete the story quests. I'm currently trying to play through this mode to verify what it is and any NEW bugs it might have.
Farming 101
You'll find a bunch of different seeds in this game. There are basically THREE kinds of seeds.
If you want more seeds, you can buy them from Lily or put some of the produce into a bird feeder. Basic bird feeder gives 3 seeds per item. Advanced gives 4 seeds per item. Ultra gives 6 seeds per item. Take note of the fact that you have two bird feeders on your farm at the beginning of the game. The red one is a regular basic bird feeder: put in fruit or veggies to get seeds later. The green one is "grandpa's bird feeder" which automatically generates seeds every so often (usually potatoes but sometimes tomatoes).
NOTE: The sunflower and cacao cannot go in a bird feeder. The oats can only go in a basic bird feeder, the upgraded versions won't accept it until they fix this with an update to the game.
SOIL PLOTS
You can use regular soil farm plots, or "flower pots", or the greenhouse to grow any of these crops. Blueprints for each type of soil are available to purchase from Mark (farm soil plots only), Frank (farm soil plots and flower pots), and Yvonne/Janet (all three). Then you have to build the item at your workbench... but you will find PLENTY of regular farm soil plots in the trash so you probably don't ever need to build those yourself. These are your basic fruit and vegetables. Each seed takes three days to grow, and will usually produce only ONE crop. (You can boost your chance to find extra crops at harvest time by purchasing "Berry Picker's Glove" upgrades from Rudy). Remember, you need to water these crops EVERY DAY or they will not grow. You can water them automatically using sprinklers. Regular sprinklers cover a 4 x 4 square area. Turbo sprinklers cover a square 6 x 6 area. If you want more seeds, you can buy them from Lily or put some of the produce into a bird feeder. Basic bird feeder gives 3 seeds per item. Advanced gives 4 seeds per item. Ultra gives 6 seeds per item. Take note of the fact that you have two bird feeders on your farm at the beginning of the game. The red one is a regular basic bird feeder: put in fruit or veggies to get seeds later. The green one is "grandpa's bird feeder" which automatically generates seeds every so often (usually potatoes but sometimes tomatoes).
NOTE: The sunflower and cacao cannot go in a bird feeder. The oats can only go in a basic bird feeder, the upgraded versions won't accept it until they fix this with an update to the game.
- Potato
- Tomato
- Pumpkin
- Lettuce
- Eggplant
- Oats
- Strawberry
- Pepper
- Corn
- Blueberry
- Carrot
- Wheat
- Beetroot
- Onion
- Garlic
- Cranberry
- Watermelon
- Tea
- Sunflower
- Cacao (creative mode ONLY)
- Coffee (creative & challenge modes ONLY)
TREES
You don't need any special soil to grow trees. Just plant them ANYWHERE - even underground. These take about a week to grow (except acorn/oaks which take twice as long). You never need to water them. They will store up to SIX fruits once they start producing, and each tree grows ONE fruit per day. So if you miss a couple days of harvesting, just keep clicking on the tree to get additional stored fruits until the green highlight goes away. NOTE: these fruits cannot go in a bird feeder. Luckily you should find plenty of seeds in the trash as you go. Or buy them from Lily if you need more.- Apple
- Peach
- Orange
- Olive
- Acorn - Oak
- Cherry (creative mode ONLY)
- Pear (creative mode ONLY)
FLOWERS
Purely decorative, produce NOTHING, cannot go into the Bird Feeder, Kitchen, or Preserving Machine. Plant it, look at it, admire it. That is all. If you press R to "remove" the plant, you will get the seed back. The only way to get additional flower seeds is to purchase them from Lily in the Frozen Peaks power plant. Anything that is not classified as "fruit or vegetable" is considered a flower, there are too many varieties to bother listing here. They all grow on soil farm plots, flower pots, or greenhouses.
Ranching for Dummies
There are several kinds of animals in this game, and you can befriend or tame ALL of them. Here I'll give you a quick summary of how to do that. There are three types of animals: wild animals, farm animals, and delivery llamas.
ALL of these animals will eat PET FOOD after you "befriend" them and bring them home. They only want their "favorite food" the first time you meet them.
There is only ONE each of the dog, cat, and raccoon. You'll find several of each of the other animals (at least 10) but you don't need to feed ALL of them, you're only "required" to feed maybe 5 of each for a few quests. The dog is also part of a quest, but not the cat or raccoon.
Wild animals and your pets/livestock will all have a "heart" that fills up every time you feed them, take their gift, spray them with water, pet them, or activate the party button on their level 3 house. With each heart level, you get a bigger chance to get MORE ITEMS from those animals every day.
In Frozen Peaks near the swamp and radio tower, there is another llama garage. There are five llamas in the area, but you can only get three of them to work at the garage. They only bring glass, but will bring it every morning rain or shine.
In the Desert there is another llama garage. Like the one in the swamp, it can only have three llamas even though there are five of them in the desert. This one will only bring you e-waste, you cannot choose another item from the garage here.
Delivery llamas have no "heart" level. They just bring 2 boxes of items each day.
WILD ANIMALS
First you need to repair their natural habitat. Then feed them ONE piece of their favorite food, and they will go live there. Once you befriend enough of them, they will give you seeds FOR FREE every morning. You'll need to feed five of each type of animal to complete various quests. There are also in-game achievements for collecting a certain number of seeds from them.- Foxes (5) - in the Village by the lake, they live at the den near Harold's house and they eat Strawberries, give you Strawberry seeds. NOTE: after you feed them, foxes have a habit of walking into the den or the rock wall nearby, where you can't reach them. They usually correct themselves after a day or so.
- Deer (10) - in the Lonely Hills past the Old Trading Post, they live at the woodlet past Harold's shop there. They will eat acorns and then give you blueberry and pepper seeds every morning. NOTE: Deer have a bad habit of walking THROUGH the mountain walls, then falling through the floor and disappearing forever, even after you befriend them they will walk through the walls near the woodlet.
- Boar (5) - In the Frozen Peaks behind Jay's shop is their den. Feed them a beetroot, then they are SUPPOSED give you beetroot seeds each morning. But currently they DO NOTHING after you feed them. And they tend to get stuck INSIDE the trees and the den, where you can't reach them anyway.
- Fennecs (5) - their den is in the Desert just past Yvonne/Janet's shop. Feed them a watermelon, then they give you watermelon seeds every morning.
FARM ANIMALS
First you need to buy blueprints for their house, then build their house at your workbench, then construct it ANYWHERE in the world. Upgrades to their house must be placed on top of the previous version. You can't skip an upgrade level either, level 2 goes on top of level 1, then level 3 goes on top of level 2. Level 3 CANNOT be placed on top of level 1. Once you have the home constructed, you have to feed the animal one of their favorite foods. After that, they live at the house and will give you ONE item each morning - as long as you took care of them the previous day. By "took care of" I mean each time you take an item from them, they will ask you for something. You will have to either PET THEM (press E key), FEED THEM (Pet Food, press E key), or BATHE THEM (R-click to spray them with water). If you don't take care of this, they will keep asking for it and never give you another item until you handle it. ALL the farm animals will eat pet food after you befriend them, you only need their favorite food if you find them in the wilderness and want to bring them home for the first time. NOTE: there is only ONE each of the dog, cat, and raccoon in the game. The other animals you can find several of them, and adding an upgrade to their house will allow five more animals to live there.ALL of these animals will eat PET FOOD after you "befriend" them and bring them home. They only want their "favorite food" the first time you meet them.
- Chickens - live at chicken coop, eat a potato, give eggs
- Cubots - live at cubot lodge, eats batteries INSTEAD OF PET FOOD, gives recycled materials
- Dog - live at dog kennel, eats dog bone, gives random items and recycled materials
- Pigs - live at pig sty, eat honey, give truffles
- Cat - live at cat house, eats honey, gives random items and preserved jars
- Ducks - live at chicken coop, eat a carrot, give duck eggs
- Raccoon - lives at raccoon house, eats garlic, gives glass and random items
- Cows - live at cow barn, eats Wheat, gives Milk
- Sheep - live at cow barn, eats herbal medicine, gives wool
- Goats - live at cow barn, eats cranberry, gives goat milk
There is only ONE each of the dog, cat, and raccoon. You'll find several of each of the other animals (at least 10) but you don't need to feed ALL of them, you're only "required" to feed maybe 5 of each for a few quests. The dog is also part of a quest, but not the cat or raccoon.
Wild animals and your pets/livestock will all have a "heart" that fills up every time you feed them, take their gift, spray them with water, pet them, or activate the party button on their level 3 house. With each heart level, you get a bigger chance to get MORE ITEMS from those animals every day.
DELIVERY LLAMAS
Near your first farm you'll find a llama garage. If you fix it, then you will be able to feed FIVE LLAMAS (all found on your farm) a Battery and then they go live at the garage. You can place an item (old wood, rubble, rubber, glass, e-waste, or glue) into the garage and hit the "Collect" button and the llamas will go find more of that item, leaving them in boxes beside the garage each morning. You must FILL THE ENTIRE GARAGE before they will handle any deliveries though. This first garage you can CHOOSE which item you want them to find, and it requires five llamas.In Frozen Peaks near the swamp and radio tower, there is another llama garage. There are five llamas in the area, but you can only get three of them to work at the garage. They only bring glass, but will bring it every morning rain or shine.
In the Desert there is another llama garage. Like the one in the swamp, it can only have three llamas even though there are five of them in the desert. This one will only bring you e-waste, you cannot choose another item from the garage here.
Delivery llamas have no "heart" level. They just bring 2 boxes of items each day.
Blueprints and Crafting
The NPC shops will sell you BLUEPRINTS for various items you can use on your farm. These include machines to prepare your food, flower pots and greenhouses to plant crops in, and homes for your animal friends. Once you purchase the blueprints (usually at a cost of preserved jars and some food items) you need to go back to the workbench on your farm to actually build the item itself (usually at a cost of recycled materials and some construction items as well). Except Rudy - Rudy sells you upgrades to your tools directly, they will apply immediately without needing to build them at your workbench later.
When I say "construction materials" I mean these: Old Wood, Rubble, Rubber, Glass, E-Waste, and Glue which are all found by smashing special trash bricks (the ones that require drill upgrades) or in suitcase loot. You can get more of a particular one by placing a single piece in the llama garage on your farm and then hitting the "COLLECT" button.
Recycled materials are found by taking care of your dog and cubot pets, opening suitcase loot, or putting construction materials and trash into a recycler machine. Different materials will produce different amounts of recycled material when put into the machine:
You can also recycle quest items for quests that are ALREADY FINISHED. For example, Harold asks you to help the dog by finding FIVE cans of dog food, but there are a few extra cans scattered around. After you help the dog, extra cans can go into the recycler.
Once you buy a blueprint and build the item, put it in your "hotbar" (boxes labeled with numbers 1-0 at the bottom of the inventory screen) and hit the number for that item's slot to place it on the ground. MAKE SURE to leave a little space around the edges of everything; if you put it too close to a wall, fence, or other obstacle then animals or items produced could potentially get STUCK in unreachable places or else glitch through the wall and fall off the map entirely. Or you might put things too close together so you won't be able to walk around/between them. So just leave plenty of space. Also make sure you're building on FLAT ground, too, or else you'll get some bad glitches.
If you are building an UPGRADED item, you have to place it directly on top of the previous item. At each upgrade stage, there will be a tent on top of the item indicating that it is being renovated. This process will take a little bit of time (usually about half a day) and you cannot use the item until it finishes. For example, to get a fully upgraded cheese house:
When I say "construction materials" I mean these: Old Wood, Rubble, Rubber, Glass, E-Waste, and Glue which are all found by smashing special trash bricks (the ones that require drill upgrades) or in suitcase loot. You can get more of a particular one by placing a single piece in the llama garage on your farm and then hitting the "COLLECT" button.
Recycled materials are found by taking care of your dog and cubot pets, opening suitcase loot, or putting construction materials and trash into a recycler machine. Different materials will produce different amounts of recycled material when put into the machine:
Material
# of Recycles per 100
# Needed to make 1 Recycled Material
Trash
6
16.6667
Old Wood
34
3.3333
Rubble
50
2
Rubber
100
1
Glass
100
1
E-Waste
100
1
Glue
100
1
You can also recycle quest items for quests that are ALREADY FINISHED. For example, Harold asks you to help the dog by finding FIVE cans of dog food, but there are a few extra cans scattered around. After you help the dog, extra cans can go into the recycler.
Once you buy a blueprint and build the item, put it in your "hotbar" (boxes labeled with numbers 1-0 at the bottom of the inventory screen) and hit the number for that item's slot to place it on the ground. MAKE SURE to leave a little space around the edges of everything; if you put it too close to a wall, fence, or other obstacle then animals or items produced could potentially get STUCK in unreachable places or else glitch through the wall and fall off the map entirely. Or you might put things too close together so you won't be able to walk around/between them. So just leave plenty of space. Also make sure you're building on FLAT ground, too, or else you'll get some bad glitches.
If you are building an UPGRADED item, you have to place it directly on top of the previous item. At each upgrade stage, there will be a tent on top of the item indicating that it is being renovated. This process will take a little bit of time (usually about half a day) and you cannot use the item until it finishes. For example, to get a fully upgraded cheese house:
- Place the basic cheese house wherever you want it.
- Place the advanced cheese house on top of the basic one.
- Place the ultra one on top of the advanced one.
Furniture and Decorations
You might notice there are TWO workbenches at your farm. One is for building animal homes, farming equipment, kitchens, and other USEFUL items. The other one is for building DECORATIVE items like furniture and cute little items you can place around your house and farm to make it look pretty. The decoration workshop also has access to ALL seeds, animal hats, sheep medicine, disco ball, and a few other things - but only in CREATIVE MODE.
Whether it's a couch or a chicken coop, building anything in the game is always the same. Open your backpack and put the item into the hotbar at the bottom of the screen. Then close the backpack. Move near the spot where you want to build it. Hit the button for the hotbar item you want to build. Use the mouse to move it around - RED hologram means you cannot build it there, GREEN means you can. If it's red, there is either a wall, another building, or an animal in the way. Before you put the item down, you can press "E" to rotate it 90-degrees until it faces the direction you want. Then L-click to put the item in place. IF you put it in the wrong place, walk up to it and press R to pick it back up and put it back into your backpack to try again later.
Blueprints for decorations are not sold in any shops. You'll find them in suitcases scattered around the world (and a few in the back rooms of grandpa's house). You won't be able to build an item until you unlock the blueprint. (In Creative Mode, all blueprints are unlocked from the start of the game.) Decorations only cost 1 or 2 recycled materials to build, so they're pretty cheap.
Feel free to design your decorations and furniture however you like. There is no bonus for putting them in certain places or anything like that. It's totally up to you. You cannot interact with or use decoration items either, for example the beds in the decoration workbench CANNOT be slept in - they just look nice.
I haven't used very many decorations yet, just a few. SOME people say they are having problems putting the decorations in the house, they keep going invisible or falling through the floor... but I have never experienced that. If you experience that issue, please email your save game files to the developers as per the note at the beginning of this guide about save/load glitches.
The point is, decorative items (like garden fountains and couches) have NO PRACTICAL PURPOSE. They're purely for your own visual enjoyment, to add a personal touch to your farm and home.
Recipes and Cooking
As you progress further into the game, you'll find new seeds and new animals. This will expand the types of food that you can produce on your farm. Once you have some ingredients (by farming it or by ranching some animals), there are several options you can do with them.
Notice that cooked dishes come with special effects if you eat it. Some will restore your health. Some will make you walk faster (temporary boost). Some will make your attacks slightly stronger (temporary boost). And some will let you fire "super chickens" by using R-Click - this will replace your normal water gun. Super Chickens fly straight ahead, but may bounce off of walls, trash, or enemies. They basically attack everything within a pretty big range as they travel.
Recipes can be FOUND in suitcases hidden around the world. Or you can "experiment" in the kitchen and you will unlock the recipe if you use the correct ingredients. If you feel like experimenting to unlock recipes, feel free. ANY time you use "wrong" ingredients, you just make Pet Food so nothing is ever really wasted in the kitchen.
The basic kitchen can take two types of ingredients, so it can make a few different dishes.
The advanced kitchen can take three types of ingredients, expanding the recipes you can cook.
The ultra kitchen can take four types of ingredients so it can cook any recipe in the game.
Press E to use the kitchen. Move ingredients from your backpack to the kitchen one at a time... or you could just click on the recipe from the recipe list at the bottom right to automatically add the correct ingredients. Any recipe that is greyed out means you don't have enough ingredients in your backpack to make that dish. If the greyed out recipe has a number on top, that means your kitchen isn't big enough to handle that recipe and you need to upgrade your kitchen first. Once your ingredients are in, just hit the "COOK" button. Cooking only takes a few seconds to finish. Dishes can't be turned into Pet Food since you can only cook a food once. You don't put toast back in the toaster at breakfast time, right?
At the Preserving Machine, press E to use it. Then select what foods you want to preserve. Then hit the "PRESERVE" button to start the process. It will take a little while to finish. Different foods/dishes make different numbers of jars. For ingredients, the number of jars is equal to the number of pet food it will make in the kitchen.
You only need a few of each ingredient for shopping purposes. The rest can be turned into pet food, or else turned into cooked dishes and then made into preserved jars. Good luck.
Duck eggs are not (currently) used in any recipes, and they can't be used to make mayo either.
Eggs are used in a few kitchen recipes, or they can go into a mayo maker to get mayo out.
Milk is used in a few kitchen recipes, or it goes into a cheese house to make cheese.
Goat milk is NOT used in the kitchen recipes currently, but it can go into a cheese house to get goat cheese out.
Goat cheese and cow cheese both are used as ingredients in the kitchen.
Olives are not part of any official kitchen recipe but can be made into oil in an oil press, and the oil is an official kitchen ingredient. Plain olives can still be used to make pet food though.
The jam house lets you choose which fruit to use, but only peaches, strawberries, and blueberries can be turned into jam.
Jam can be used as an ingredient in the kitchen.
Truffles can be used in the kitchen.
Wool cannot be cooked or preserved, but it can go into the loom to make "wool ball". Neither wool or the ball has any practical purpose in the game though.
Tea is not part of any official recipe, but it can be cooked to make pet food or it can be preserved to make jars.
Sunflowers make ZERO PET FOOD in the kitchen - you get no reward from cooking them. So don't cook them. They also cannot go into a bird feeder.
Oats are not part of any official kitchen recipe, but can be cooked into pet food or preserved to make jars.
Creative Mode adds four new foods (cherry, pear, coffee, cacao) but none of them are used for any official recipes in the kitchen. Cherries and pears grow on trees and give a lot of pet food in the kitchen or jars in the preserver. Coffee will give you a lot of jars in the preserver, and can be used in the bird feeder to get more seeds, but it gives ZERO pet food in the kitchen - so don't cook it. Cacao can make 25 pet food if you cook it (which is weird because most animals are deadly allergic to chocolate) but it cannot be placed into the preserver or bird feeder, so don't even try it.
- Use the ingredients as part of the cost to buy blueprints and upgrades from NPC shops
- Put the ingredients into the bird feeder to get more seeds
- Put the ingredients into a machine (jam house, cheese house, mayo maker) to produce a new ingredient (jam, cheese or goat cheese, mayo)
- Put the ingredients into a kitchen and follow a recipe to cook a "dish"
- Put the ingredients into a kitchen but DO NOT follow a recipe, to cook "Pet Food"
- Put the ingredients directly into the Preserving Machine to make preserved jars... but this method is inefficient and won't give you very many jars.
- Put the COOKED DISHES into the Preserving Machine to make preserved jars, which are used as money to buy blueprints and upgrades at NPC shops. Using cooked dishes for this is more efficient than trying to preserve the raw ingredients.
- Put a cooked dish into your hotbar (1 - 0 keys) and press the button for that slot. This will activate the dish's special effects, and consume the dish.
Notice that cooked dishes come with special effects if you eat it. Some will restore your health. Some will make you walk faster (temporary boost). Some will make your attacks slightly stronger (temporary boost). And some will let you fire "super chickens" by using R-Click - this will replace your normal water gun. Super Chickens fly straight ahead, but may bounce off of walls, trash, or enemies. They basically attack everything within a pretty big range as they travel.
Recipes can be FOUND in suitcases hidden around the world. Or you can "experiment" in the kitchen and you will unlock the recipe if you use the correct ingredients. If you feel like experimenting to unlock recipes, feel free. ANY time you use "wrong" ingredients, you just make Pet Food so nothing is ever really wasted in the kitchen.
The basic kitchen can take two types of ingredients, so it can make a few different dishes.
The advanced kitchen can take three types of ingredients, expanding the recipes you can cook.
The ultra kitchen can take four types of ingredients so it can cook any recipe in the game.
Press E to use the kitchen. Move ingredients from your backpack to the kitchen one at a time... or you could just click on the recipe from the recipe list at the bottom right to automatically add the correct ingredients. Any recipe that is greyed out means you don't have enough ingredients in your backpack to make that dish. If the greyed out recipe has a number on top, that means your kitchen isn't big enough to handle that recipe and you need to upgrade your kitchen first. Once your ingredients are in, just hit the "COOK" button. Cooking only takes a few seconds to finish. Dishes can't be turned into Pet Food since you can only cook a food once. You don't put toast back in the toaster at breakfast time, right?
At the Preserving Machine, press E to use it. Then select what foods you want to preserve. Then hit the "PRESERVE" button to start the process. It will take a little while to finish. Different foods/dishes make different numbers of jars. For ingredients, the number of jars is equal to the number of pet food it will make in the kitchen.
You only need a few of each ingredient for shopping purposes. The rest can be turned into pet food, or else turned into cooked dishes and then made into preserved jars. Good luck.
Duck eggs are not (currently) used in any recipes, and they can't be used to make mayo either.
Eggs are used in a few kitchen recipes, or they can go into a mayo maker to get mayo out.
Milk is used in a few kitchen recipes, or it goes into a cheese house to make cheese.
Goat milk is NOT used in the kitchen recipes currently, but it can go into a cheese house to get goat cheese out.
Goat cheese and cow cheese both are used as ingredients in the kitchen.
Olives are not part of any official kitchen recipe but can be made into oil in an oil press, and the oil is an official kitchen ingredient. Plain olives can still be used to make pet food though.
The jam house lets you choose which fruit to use, but only peaches, strawberries, and blueberries can be turned into jam.
Jam can be used as an ingredient in the kitchen.
Truffles can be used in the kitchen.
Wool cannot be cooked or preserved, but it can go into the loom to make "wool ball". Neither wool or the ball has any practical purpose in the game though.
Tea is not part of any official recipe, but it can be cooked to make pet food or it can be preserved to make jars.
Sunflowers make ZERO PET FOOD in the kitchen - you get no reward from cooking them. So don't cook them. They also cannot go into a bird feeder.
Oats are not part of any official kitchen recipe, but can be cooked into pet food or preserved to make jars.
Creative Mode adds four new foods (cherry, pear, coffee, cacao) but none of them are used for any official recipes in the kitchen. Cherries and pears grow on trees and give a lot of pet food in the kitchen or jars in the preserver. Coffee will give you a lot of jars in the preserver, and can be used in the bird feeder to get more seeds, but it gives ZERO pet food in the kitchen - so don't cook it. Cacao can make 25 pet food if you cook it (which is weird because most animals are deadly allergic to chocolate) but it cannot be placed into the preserver or bird feeder, so don't even try it.
Eating Cooked Food
When you cook food in the kitchen, the result comes with a "special effect" if you eat it. Eat it by putting it in your hotbar and pressing the number for that slot, just like planting a seed or building a chicken coop. There are four different effects possible. Here are my thoughts on them, since today I just went ahead and ate food for the first time ever. No wonder Ellen is so skinny, right!? LOL
"Better" foods (worth more points towards jars or pet food) will produce bigger special effects. For super chicken better foods give more ammo. For health, better foods restore more HP. For sprint and damage I have not yet tried the better foods, only the very cheap beginner ones.
Super Chicken: (gives you a few ammo for the Super Chicken Cannon, replacing your regular water gun attack)... It's fun, useful in practically any situation, and limiting each food to just a few ammo seems pretty well balanced. I like this one. Well done.
Health: (restores a TINY amount of HP instantly)... I have Herbal Vitamins 1 upgrade. Let some enemies beat me up on purpose until I had almost no HP left. Ate a baked apple. It restored VERY LITTLE BIT of health, I died in ONE HIT even after eating it. I will need to eat probably 8 of them to fill my health bar completely. The health restoration food is useless, it's actually better to just go home and sleep until the next day. The HP recovery effect needs a big power boost, I feel like it should be restoring double or triple the amount that it currently heals. Otherwise I'm just going to throw all of the "health" foods into the preserver for more jars.
Sprint: (30 second duration, supposed to make you faster but doesn't actually seem to do that)... I have Runner Shoes 1 upgrade. I ate some Sprint food, saw the sprint timer at the top of the screen. Tried "walking" and "sprinting" before and after eating the food. The difference was not even noticeable, to me it felt like the same speed. This is useless unless you're going to SERIOUSLY BOOST the speed power. Otherwise it's better to just throw it all into the preserver for more jars.
Damage: (30 second duration, increases your DRILL damage while you hold down the L-mouse button)... I have Hardened Drill 1 upgrade. Ate a poached peach to compare the damage with and without the damage boost. For attacking enemies, the boost was TOO SMALL TO DO ANY GOOD, it still took the same number of hits (3) to kill enemies. But it was VERY EFFECTIVE using the "hold L-mouse to drill" attack when breaking trash bricks. So I guess its use is specific to TRASH BRICKS only since it really doesn't help against enemies at all. Against a red jumping spider my regular attack took 3 swings to kill it. With the damage boost on it took 2 + 3/4 hits to kill it. It seems to only affect the "constant drilling" attacks, has no effect on "hammer swing" or "water gun" attacks.
Caffeine: (90 second duration, prevents you from taking "exhaustion" damage at night in Challenge Mode, has no effect against damage caused by enemy or traps)... If you're going to stay up past midnight, you will take damage every second and you will be dead in roughly 1 minute if you start with full health. Drink coffee to stay awake so you don't take this kind of damage. But remember it will RUN OUT so you either need to drink a cup every in-game hour (real-life minute) or quickly get home before you pass out.
TL,DR SUMMARY
Super chicken - great, love it, it's perfect.
Sprint - doesn't seem to have any effect other than a timer counting down on screen
Health - HP healing effect is not big enough to be useful.
Damage - only useful against trash bricks. Doesn't help enough against enemies. But hey, there are a LOT MORE trash bricks than enemies in this game.
Caffeine - prevent from taking damage from being too tired (you can still be hurt by enemy attacks) at night in Challenge Mode; only lasts about 90 seconds.
Regarding quests and items
I want to address some of the problems that certain people are reporting regarding broken quests and quest items that are missing from the game...
ALL quest items are verified to be in the game (including all the feathers) and ALL quests are verified to progress and complete even if you get the required items before you start the quest officially. I personally had NO PROBLEM finding any of the house parts or dam parts etc.
If you are having problems with quest items or quests starting/completing incorrectly, try closing the game, rebooting and loading your save again. Sometimes this causes "invisible" things to spawn back in. The next step if it keeps happening is to use the "Verify Integrity of Game Files" tool from the Steam library, there are plenty of tutorials available for that. It's actually very easy to use, usually takes less than five minutes to run, and most of the time it will find and repair the problem. It just looks for damaged or missing files, since the Steam download utility has a bad habit of losing or breaking about 1% of the files that it downloads... especially if you're using a wireless internet connection. It's less of an issue if you're on a hard-wired connection plugged into your modem with a physical cable. IF that doesn't work, try updating your game to the most current version, then RUN THE VERIFY INTEGRITY TOOL AGAIN, and then START A NEW GAME.
There are no feathers in the Desert or Sunken City. However, the three new crops from the Desert (watermelon, cranberry, and olive) are needed for Lily's crop collection quest..
The rest of this contains some spoilers, so quit now if you're worried about that.
There are TWO KINDS of house parts for Frank. First you need parts for HIS house, which look like concrete cinder blocks - you'll find five of them before you cross the river at the bottom of the hill where Frank is... but there are extra parts across the river, too. Then parts for Ellen's house are found in the next section of Lonely Hills, through that first door and before the next door.
The two sections of Lonely Hills after that are where you will find all the Bulbulator Parts that Rudy will ask for. You can find all five before you leave the area where you find Rudy's shop.
The area through the door by Rudy's shop, where you find a broken bridge, has all of the wooden planks that you need to repair the bridge.
After you give the spare parts to the robot in Frozen Peaks, you're NOT DONE with the robot. He tells you to go shut down the satellite signal. That requires you to go up to the top of the mountain at the edge of the swamp, where you will collect three satellite parts - all of them are located on the top of the mountain around the tower. Then put the parts into the satellite controller, and hit the button to shut the signal down. Then go back to the robot and he should tell you he's planting trees instead of telephone poles now. Only then can you go back and tell Jay that you fixed the robot.
You can't start Lilly's quests (at the Frozen Peaks power plant) until you finish Jay's quests to plant giant oak trees, help the boars, and fix the robot. After that, talk to Jay and she'll suggest that you should go find Lilly to continue.
Water filters in the swamp - you only need three, there will be extras lying around. But you can finish the quest now! (During early access for a little while the quest was broken. But it is fixed now.)
Mine cart parts for Lilly's quest are scattered around the power plant area (where Lilly is), there will be three of them and possibly one extra, they are called "Railway Scrap."
Algae for the bulbulator WILL NOT APPEAR until you get the quest from Lilly to go get it. It appears all around the lake in the Village, it looks like seaweed and the items should be glowing. You only need five, there will be extras. If you don't see it behind Harold's house, try using the railway scrap parts to fix the mine cart first, then talk to Rudy AT HIS HOUSE IN THE VILLAGE - if he doesn't live there yet then you need to finish Lonely Hills quests first - and get the new bulbulator (the item is DIFFERENT from the one you used in Lonely Hills, you can have BOTH in your inventory at the same time). If Rudy doesn't live in the Village yet because you haven't finished the Lonely Hills quests yet, then you won't find any algae yet.
Fenugreek herbs in the swamp WILL NOT APPEAR until you get the quest from Lilly to go get them. (During early access for a little while the quest was broken. But it is fixed now.)
Lilly's crop quest requires one of each crop (fruits, veggies, and tree products) EXCEPT for acorn, sunflower, and tea. That means you need to bring her these items:
potato, tomato, pumpkin, lettuce, eggplant, strawberry, oats, apple, peach, orange, corn, pepper, carrot, blueberry, wheat, beetroot, garlic, onion, watermelon, cranberry, olive.
If you are playing in creative mode, you can also grow cherry, pear, cocoa, and coffee but Lily won't take them because they're not supposed to be in the game. Last I checked, this quest is BROKEN because Lily forgets to collect your oats!!
The dam controller console in the Desert WILL NOT APPEAR until you get the quest from the designer to go fix it. However, the three parts for it will appear as soon as you enter the fourth area of the desert. The parts are all located on the left side of the fourth desert area, go past the three timed yellow buttons. There is only one controller, it will be in that fourth area on the right side as you enter the area, all the way in the back where the fence wall meets the big dam wall. It will take all three parts, then a red button will appear on the front of it, the quest will complete only after you hit the button. Then go see the designer again.
The boat that takes you to Sunken City is in the next area of the desert, you'll see a hole in the gray wall of the canal with a little rowboat there. The only way to exit Sunken City is to use fast travel doors from the map (or Save & Go Home from the ESC menu)..
Good advice for NEWBs
Is this your first time playing this game? Or maybe you've played it 20 times already but just want some generic tips? Alright then...
[/list]
- There are two types of money in this game: "jars" are universal currency used to pay NPCs for upgrades and blueprints. "Recycled materials" are your primary construction resource, which is used at your workbench to build EVERYTHING you need for your farm. Then there are other materials you'll need for specific construction projects, too: old wood, rubble, rubber, glass, e-waste, and glue. These all come out of special trash bricks and each one requires a special drill upgrade to destroy.
- Other construction materials (quality wood, house parts, etc.) are considered QUEST ITEMS and cannot be thrown in the trash. So build a chest to keep the extras in. These are found either lying out in the open, given to you by the NPC, or else in suitcase loot. AFTER you finish the quest, you can put any extra quest items into the recycler.
- Farm soil, flower pots, and animal pens should ALWAYS be placed on FLAT, LEVEL ground. Putting these on hills or bumpy terrain will cause problems - you might not be able to reach the soil to plant crops, or your animals might fall through the floor or get stuck in odd places where you can't reach them.
- Other structures like the Greenhouse, mayo maker, chest, etc. can go on bumpy ground and hills, but make sure you can WALK right up to that location and interact with the structure before you confirm the construction location!! If you can't reach it, then you can't use it (also can't remove it).
- Your main farm is the biggest piece of flat, level ground in the game. It consists of three main areas: the main farm right in front of grandpa's house; the side farm behind the wooden fence, you'll find Rudy standing in there; and the back farm which is across the river from Rudy and then through a door.
- At some point you'll have too many crops and animals on your farm, and the game will start to get choppy or laggy. At this point it's a good idea to find a new spot to move some of your stuff to, to reduce the load on your graphics card. I find the next best place to build a farm is the Old Quarry pit in Lonely Hills. It's big and flat, it's near a fast-travel door, and your deer woodlet is not too far up the path from there. Another decent spot is in Frozen Peaks, the cow pasture where all the frozen hay blocks are. It's a decent size, and flat enough, but not big enough to serve as your main farm.
- Another good place to grow crops (especially TREES) is underground through the manhole right beside your main farm, on the way to Mark's shop - next to a bird nest with a feather and a chicken in a cage. Yep, soil and crops and trees can all be placed underground. The ground there is very flat and level, and it's a great spot for OAK TREES if you feel the need to collect extra acorns. Sadly it seems the recent update BROKE the underground so now if you try to plant trees there it will steal your seed without planting a tree. Farm plot and veggie seeds still work though.
- Oak trees... planted via acorns of course... when you harvest them they literally throw acorns all over the map. They will usually end up in the river or up on a mountain so you can't usually reach them. BUT if you plant them underground, the tree branches get stuck in the roof so all the acorns will drop right beside the tree trunk. Nice! Oak trees cannot be planted underground anymore.
- You really don't ever need extra acorns; only 15 for a quest to replant trees in the Village, and another 10 to feed to some deer in Lonely Hills. So you don't really need to plant any more oak trees.
- Trees take a whole week to grow. After that they make fruit every single day, so you only need to plant a few (maybe 10) of each type of tree.
- Because trees take so long to grow, you'll probably spend a few days "stuck" waiting for them to give you enough fruit to buy the next upgrades or finish the next quest. As such, plant some trees as soon as you find the seeds for it!! If you know where to find tree seeds, skip past everything else to get to them FIRST. Then once your trees are planted, go back and clear the rest of the area while you wait for the trees to grow.
- Apple tree seeds are found around the lake in the Village.
- Peach tree seeds are found near the sea shore in the Village.
- Orange tree seeds are found in the back side of Lonely Hills, past the old quarry and the old trading post where Harold has his vacation home.
- Olive tree seeds are found in the final area of the Desert.
- Acorns (oak tree seeds) are found randomly EVERYWHERE.
- Whenever you build ANYTHING, leave about three feet of space (a little more than the width of Ellen's body) around ALL FOUR SIDES. Otherwise you can't walk around it and neither can your pets; pets will get stuck in weird places or else walk through a wall and fall off the map; products of the machine will get stuck in weird places; and it will just be a very bad day for you.
- You need a total of around 8500 jars and maybe 10,000 recycled materials to completely clear the game. You might find about 2000 or so of each in suitcase loot. So you don't need to go too crazy cooking and recycling everything you see.
- Several complete sets of decorations and wallpapers are behind locked doors in your house; these are accessed by completing Frank's quests in Lonely Hills.
- Anytime you have a choice of which upgrade to buy next: always go for the next drill upgrade FIRST, then the next "big backpack", then the next "bigger water tank." After that, the rest can be bought at any time and are totally optional but they do make the game a little easier.
- You can eat food to get special buffs. Put a cooked dish (not a raw ingredient) in your hotbar.
- You WILL get stuck on some bumpy terrain, or fall through the floor, at some point. When it happens, hit ESC and use the "Save & Go Home" button. Then IMMEDIATELY DROP A MANUAL SAVE AGAIN. It will save BEFORE it sends you home, so if you load that save file you'll still be in whatever hole you were stuck in before.
- You only need a few of each type of crop (raw ingredients) to trade with NPC's to buy all the upgrades and blueprints. After that, you can cook whatever you want. Eat it, throw it in the preserver to get more jars, or turn the raw ingredients into pet food.
- You don't need to rescue every animal in the world!! Ten of each is more than enough.
- You don't need to clean up every piece of trash in the world!! But you can try if you want to.
- After defeating the final boss you are given a choice to stay on earth or move to mars. Staying lets you continue the game, plain and simple. But all the quests should already be done... so really it's just you, your farm, and decorating grandpa's house... forever. If you choose to move to mars then you just see the end credits and the game is over. Your choice.
[/list]
Adventure Mode Walkthrough - with maps
WARNING: The rest of this guide contains some MAJOR spoilers because I'll tell you where to go and what to do for every single quest. Read at your own risk.
And this begins the reason why most of you are here. The walkthrough. I'm making my own maps (in Microsoft Paint - sorry I'm not an artist) that will indicate the locations of most of the important things. But for most of the quest items they're scattered around in pretty obvious locations so if you just take your time and explore each area, you should find them on your own without my help. So my maps will just list most of the major points of interest, and i leave the little stuff up to you to locate on your own, but for particularly hard ones I'll give some hints.
You can freely jump around between the different zones, now that they've implemented "fast travel" from the global map in your backpack menu. You can also run quests from all the zones simultaneously. However, certain quests cannot be completed until you've finished the quests in the previous zone. You are expected to play the game in the following way:
Notice there are a few "locks" in place to keep you from skipping sections, but aside from that you can jump around a little bit. Everything else (how you build your farm, which crops you want to grow, how many animals you want to keep, which upgrades you buy from Rudy) is all OPTIONAL. Also, you can technically SKIP most of the Lonely Hills and Frozen Peaks... if you have all of the drill upgrades you can run to the back end of Frozen Peaks, from there open the door to the desert, and as long as you finish ALL the quests in the desert (including feed five fennecs and five goats, fix four pipes, plant four shrubs, spray water into three deep holes, and fix the dam console) then you can ride the boat to Sunken City from there and beat the game. Without playing roughly HALF of the quests outside of the desert.
And now I'll get into a full walkthrough guide for you, under the assumption that you actually want to play the FULL game, the way it was meant to be played. Also assuming you play in ADVENTURE MODE; there will be a brief "getting started" guide for Challenge Mode afterwards.
Good luck. First up: the tutorial level!
And this begins the reason why most of you are here. The walkthrough. I'm making my own maps (in Microsoft Paint - sorry I'm not an artist) that will indicate the locations of most of the important things. But for most of the quest items they're scattered around in pretty obvious locations so if you just take your time and explore each area, you should find them on your own without my help. So my maps will just list most of the major points of interest, and i leave the little stuff up to you to locate on your own, but for particularly hard ones I'll give some hints.
You can freely jump around between the different zones, now that they've implemented "fast travel" from the global map in your backpack menu. You can also run quests from all the zones simultaneously. However, certain quests cannot be completed until you've finished the quests in the previous zone. You are expected to play the game in the following way:
- Start building your little farm. But remember you can build ANYWHERE IN THE WORLD if you don't want everything right outside your house.
- Meet Mark just down the hill, help some chickens, upgrade your drill to Rubble version, then go further down the hill into the Village and meet Harold.
- Do a few quests for Mark and Harold while working towards upgrading your drill to Rubber version. Help a dog. Help some foxes. Rebuild Harold's house. Find a lost pig. Install a water filter. Replant a bunch of sick trees. Help a few more pigs.
- With your new rubber drill, break the rubber trash blocking the door to Lonely Peaks and meet Frank the architect on top of the first hill you find there.
- Help Frank rebuild his house, then have him start working on your grandpa's house until he asks you to go find Rudy farther into Lonely Hills.
- YOU CANNOT START RUDY'S QUESTS UNTIL FRANK FIXES THE FIRST ROOM IN YOUR HOUSE.
- Do a few jobs for Rudy: get bulbulator parts, spray water on some toxic waste dumps, fix a broken bridge, and find some special fungus.
- YOU CANNOT START HAROLD'S NEW QUESTS UNTIL YOU BRING THE FUNGUS TO RUDY.
- Harold has a "vacation home" at the old trading post in Lonely Hills. Go help some ducks for him. Then help some deer for him. Then bring the Neutralizer to Rudy.
- Go put the completed bulbulator down in the basement in the big hole with green gas coming from it, behind Rudy's shop. Then go tell Rudy it's done.
- YOU CANNOT GET ALGAE FOR LILY IN FROZEN PEAKS UNTIL RUDY MOVES INTO HIS HOUSE IN THE VILLAGE, down the hill from Mark's shop. This happens only after you put the bulbulator in the hole in Lonely Hills.
- Upgrade your drill go Glass. The door to Frozen Peaks is blocked off by glass trash.
- Meet Jay the ornithologist (bird scientist) and help her replant some giant oak trees.
- Bring five feathers to Jay.
- Use some dry firewood to thaw out the boar den nearby, then repair the den, then plant acorns around it.
- Meet a robot, fix it with some spare parts found nearby.
- Head to the "back side" of the Frozen Peaks, just before the swamp there is a mountain path leading up to a radio tower... find some parts there to fix the satellite console and then push the button to turn it OFF.
- While you're in the area, there are two boars in the swamp - feed them beets.
- Also find three water filters in the swamp and use them to fix some leaky pipes nearby.
- Go back to the robot and make sure he's fully fixed now.
- There are three more boars around Frozen Peaks, go feed them all now.
- Also feed all eight cows after you build TWO cow sheds.
- Now you can return to Jay and tell her the robot is fixed and the boars are happy.
- YOU CANNOT START LILY'S QUESTS UNTIL YOU FINISH JAY'S QUESTS (not including finding all the feathers).
- Now you can bring any additional feathers that you might find to Jay at any time. NOTE: there are no feathers in the Desert, but there are some in Frozen Peaks, Lonely Hills, the Village, and your farm.
- Go find Lily at the power plant. While you're there, the last cow is in the back corner of the power plant. Also grab 3 railway scrap parts from the area.
- Go find the mine cart and fix it with the railway scrap.
- ALGAE WILL NOT APPEAR IN THE VILLAGE UNTIL YOU HAVE FINISHED RUDY'S QUESTS IN LONELY HILLS
- Go get the bulbulator from Rudy, then get five algae from the lake near Harold's house in the Village.
- Install the bulbulator and algae on the mine cart in Frozen Peaks, hit the button on it.
- Talk to Lily. Go behind the ice block to find a bunch of pink mushrooms, bring them to Lily.
- THE FENUGREEK HERBS DO NOT APPEAR IN THE SWAMP UNTIL YOU BRING LILY THE MUSHROOMS AND SHE ASKS FOR THE HERBS.
- Go to the swamp, bring Lily the herbs that appear there.
- Take the medicine to five sheep: one behind Lily, four more behind the sludge ice block. NOTE: they will live at a COW SHED.
- Tell Lily the sheep are happy.
- Go upgrade your drill to the E-Waste version.
- Go to the Desert and meet the designer (named Janet or Yvonne depending who you ask). Buy her blueprints for the Desert Pot. Build the Desert Pot (you get 16 but only have to build it once).
- Go through the desert, plant 16 shrubs in 16 pots and fix 4 broken pipes to fill up some shallow lakes.
- Feed watermelons to the Fennecs.
- Go back to the designer and tell her the lakes are done and the shrubs are planted.
- YOU CAN'T FILL THE DEEP HOLES UNTIL SHE ASKS YOU TO DO SO.
- Go fill three deep holes with your water hose to make some nice lakes.
- Spray five goats with water, then feed them cranberries. NOTE: They will live at a COW SHED.
- Go tell the designer you're done.
- THE DAM CONSOLE WILL NOT APPEAR UNTIL SHE ASKS YOU TO FIX IT
- Find dam console parts (in the final area of the desert) and then fix the console.
- Tell the designer you're all finished.
- SHE WON'T LET YOU ON THE BOAT UNTIL ALL DESERT QUESTS ARE DONE
- Use the boat to enter Sunken City
- Run through the area, firing the chicken cannon at everything you see.
- Final boss fight.
- Rescue grandpa.
- Decide if you want to stay or go to Mars. HINT: going to Mars just ends the game and you see the credits screen. Staying here just lets you continue building your farm or decorating your house, or working on those in-game achievements.
Notice there are a few "locks" in place to keep you from skipping sections, but aside from that you can jump around a little bit. Everything else (how you build your farm, which crops you want to grow, how many animals you want to keep, which upgrades you buy from Rudy) is all OPTIONAL. Also, you can technically SKIP most of the Lonely Hills and Frozen Peaks... if you have all of the drill upgrades you can run to the back end of Frozen Peaks, from there open the door to the desert, and as long as you finish ALL the quests in the desert (including feed five fennecs and five goats, fix four pipes, plant four shrubs, spray water into three deep holes, and fix the dam console) then you can ride the boat to Sunken City from there and beat the game. Without playing roughly HALF of the quests outside of the desert.
And now I'll get into a full walkthrough guide for you, under the assumption that you actually want to play the FULL game, the way it was meant to be played. Also assuming you play in ADVENTURE MODE; there will be a brief "getting started" guide for Challenge Mode afterwards.
Good luck. First up: the tutorial level!
Tutorial
When you first start a new game, you have the option to run through a little tutorial area. There is a ladder to your left that will skip the whole thing, but if this is your FIRST TIME playing the game then I recommend you run through the tutorial. The path here is very linear, just follow along the route between the two fence lines.
Since the area is VERY LINEAR and ONLY FOR PRACTICE, and the default controls for each station are listed on SIGNS along the road, I won't bore you with a long description of it. Just hit TAB (or the "I" key) first to open your inventory, look around the menu tabs there. Then close that screen and hit ESC to open the main menu. Under "Settings" you can view the controls that you have setup for the game, and you can change them if you want to.
After viewing the inventory menus and the settings menus, you can choose to go straight into the main game using the ladder next to you, or run through the path and practice playing for about five minutes; there is another exit at the far end of the path. EVERYTHING will be removed from your inventory once you leave the tutorial area.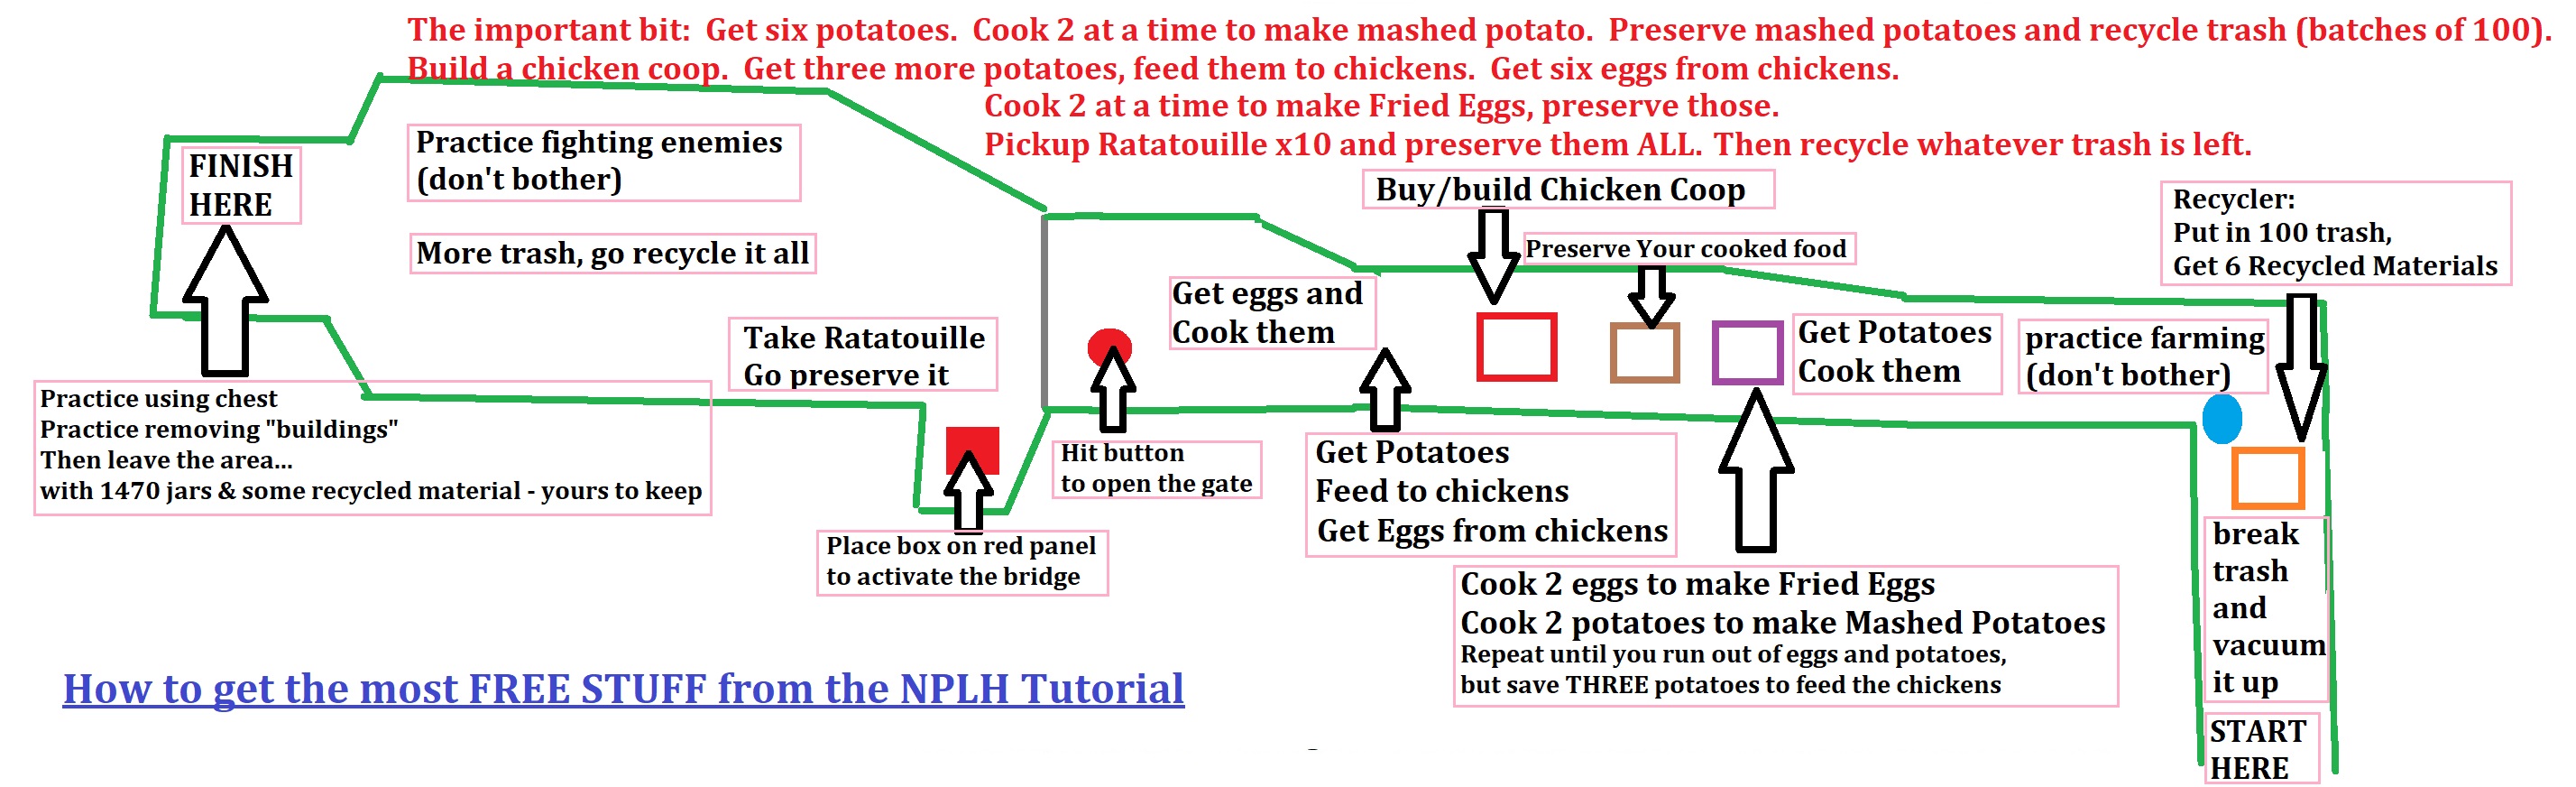
DIFFERENCES for Challenge Mode
Challenge Mode is the same as Adventure Mode until the end of the tutorial. After that a few things are different.
- Quest requirements, and quest item locations, are the SAME for all game modes.
- Shop prices for blueprints and Rudy's upgrades are quite a bit more expensive.
- Crafting recipes for furniture and tools are quite a bit more expensive.
- Cooking recipes in the kitchen are THE SAME for all game modes.
- Construction costs to repair houses, fix the llama garages, fix the fox den, etc. are considerably more expensive than in Adventure Mode.
- Enemies move faster, and there are more of them.
- The basic spider and crab enemies take SIX hits to die from your basic starter drill attacks (Adventure Mode it's four hits).
- Enemy attacks hit HARD, you'll lose a lot of health, and they like to gang up on you.
- If you are awake after midnight, you take damage over time, from full health you will die in about a minute and a half (about an hour and a half on the in-game clock).
- You can plant COFFEE SEEDS to grow COFFEE BEANS and then cook them to make a COFFEE drink. Drink it to prevent loss of health at night. ... But you don't find any coffee until pretty late in the game.
- If you die, there is a tax to respawn the next day. Your pets will eat MOST of your jars of preserved foods and you'll lose some other materials, too. SO TRY NOT TO DIE, it's very expensive!! Yeah, death actually hurts in this mode.
- You will start with "Grandpa's bird feeder" which gives you potato seeds every morning and SOMETIMES a tomato seed... but there will be no regular bird feeder on your farm (you'll have to buy the blueprint and build your own regular bird feeders but first you will need to grow some APPLES to pay for the blueprint).
- Because you don't start with a birdhouse, you should NEVER use, cook, eat, or spend the last THREE of any of your vegetables. Save the last three until after you build a birdhouse; then you put the last three veggies into the birdhouse to get more seeds the next morning. Remember the basic birdhouse takes three veggies and gives nine seeds (3 seeds per veggie) but the more advanced ones are more efficient, returning more seeds per vegetable.
First 4 Days on Your Farm
- Clear the trash around the farm until you find the book that Cornelius wants. Bring it to him.
- Keep clearing trash around the farm. Pick up any fabric or clean glass items, save them for a quest later.
- Remember to put full stacks of 500 trash into your recycler to keep it from taking up space in your backpack.
- Place any soil farm plots onto your farm (I prefer doing farm sizes of 6 x 6 plots because later a single turbo sprinkler can water that whole area).
- Plant vegetable seeds onto the soil farm plots.
- Those veggies will grow after three days as long as you water them each day.
- Build a Chicken Coop at your workbench.
- Place the Chicken Coop somewhere on your farm - leave plenty of space between it and any walls or rocks, and make sure it's kind of out of the way so the chickens won't block your path or prevent you from expanding your veggie fields later.
- You might also want to build and place several Chests around the farm, perhaps even one or two inside the house, to keep your stuff organized.
- Find a couple of chickens, now that you have a Chicken Coop you can feed them a potato to befriend them. They'll go live at the chicken coop from now on, and if you take care of them they'll give you eggs every morning.
- On the right side of the farm, on the other side of the wooden fence, find Rudy. He sells upgrades for your weapons and such. The FIRST THING YOU MUST MUST MUST BUY is the Rubble drill upgrade. After that, you should also get the Big Backpack 1 upgrade.
- Continue clearing the farm, then go through the metal fence and across the river. Clear the trash from the area back there. One of the trees has a ladder on it that leads up to some free stuff. When you drop down, also check behind the little waterfall.
- Go through the door in the grey wall and clear the trash out of there, too. From now on, I'll be calling that place "the back side of the farm."
- Get three of the wooden boxes. Put two of them in front of the ramp at the back corner of this area, Cornelius is over there with another quest for you. He wants you to find him in every location he visits. This is his "farm" location.
- Back across the river, turn left and there's another ramp where you use a box to cross, bit of free stuff there.
- Go up the ladder onto the top of the cliff, there is some free stuff up there as well as on two platforms when you drop down the cliff.
- Make a chest and place it near Rudy, put any feathers you find into it since you won't need them for quite a while.
- Now go out the other side of the farm, clear a little patch of trash there. Go underground by using the manhole there. Your rubble drill can destroy the red bricks here, but the purple ones will need a rubber drill that you'll get a little later.
- Back up the manhole, go through the door nearby. Clear trash out of the area until you reach Mark. He won't actually give you any quests or tell you about your grandfather until you bring him proof of the chicken's love. But you can use his shop here. As soon as you can afford it, buy the Preserving Machine and the Simple Kitchen. After you grow some pumpkins, also buy the first upgrade for the kitchen. You'll find PLENTY of soil farm plots just by breaking trash piles, but you can buy the blueprint of you really want to - it's cheap.
- Back on your farm, you should have tamed five chickens by now. Talk to Cornelius near your house. He wants fabrics to make an outfit for the chickens. You should already have enough fabric, so talk to him again and give it to him.
- Go up to one of your pet chickens and press R. You can rename it, but the quest only asks you to give it a hat. So do that now.
- Go back to Cornelius and he'll give you a disco ball in trade for some clean glass. Go place it in front of your pet chickens and watch them dance. Go talk to Cornelius again. He gives you proof of chicken friendship and then he leaves.
- Go back to Mark in front of his store, give him the chicken statue thing. He'll tell you about your grandfather if you help him with a few things first.
Days 4 - 8 Around the Lake
- Go downhill from Mark's store. There is a ton of trash down here, as well as a lot of dangerous enemy robots, so be careful.
- To the left is a feather. Pick it up and go put it in a chest for later.
- You can't get the pigs yet, you need to do a few quests first.
- The dog on the hill can become your pet, bu you need to do some quests first.
- Straight back to the river, in the right side you can spray water across the river into a bucket to activate a switch. Turn around and go through a small gate that opened right behind you for some free stuff.
- You need to go through the wooden fence nearby and clear more trash until you find a wooden box.
- Put the box on the red panel behind the ruined house by the river to open the gate at the back of the house. You'll find some free stuff in there, as well as a switch that removes the floor from the house next door.
- The house that used to have a floor now gives you access to its basement. Go through the door there. Spray water up at the enemies on the platforms to kill them both, then take everything you can from the room.
- Back upstairs, go clear out the area between the wood fence and the big wall on the other side of the little field.
- While you're here, you should go left and up the ramp, spray water into another bucket to activate another switch. When you jump down you should notice a chain-link fence has been opened straight ahead. Go through there, around to the back near the wall, and up a ramp for another feather and some free stuff. When you jump down, go through the door. More trash, a few enemies, and some free stuff awaits in there.
- Once this area is cleared out, back track a little bit. There are two big trees that look toxic and sick. Use your drill to knock them down, then press "E" to plant an acorn there. This will slowly grow into a mighty oak tree... later you'll be able to shake the tree to get more acorns from it. There are two of those trees in this area, and 13 more waiting to be dealt with later.
- Go through the door in the wall to reach the Lake. To the right you'll find a giant green spider robot that has more HP and hits harder than the little red ones. Past that, there is a toxic waste spill that's making the lake water poisonous. You need to find five hydraulic parts to fix it. You should also see a fox over there. There are three foxes around the lake, you need to feed each one a strawberry to befriend it (after rebuilding the fox den).
- To the left is a little bridge. Harold lives over there, he runs a shop that sells some interesting equipment you can use on your farm. He also will give you a few quests so you can progress the story more.
- Find five dog food cans, give them to Harold to get a doggie treat. Then build a dog kennel. Then give the treat to the dog and it will go live with you.
- Rebuild the fox den. Also rebuild Harold's house (costs a bunch of old wood and rubble) by pressing E on the building when you have the required items in your backpack.
- Find five bear traps and destroy them with your drill.
- Meanwhile, start growing a bunch of strawberries.
- Feed strawberries to the foxes and then they give you strawberry seeds every day.
- Tell Harold that's all done. Then he mentions he lost Napoleon (his favorite pig).
- Buy blueprints for the mayo house, upgraded recycler, bird feeder, and upgrades to your kitchen. Go ahead and build some of those as needed to make mayo and expedite recycling your trash. Now you can also make better foods in your kitchen, which makes it easier to get more jars of preserved foods (or more pet food).
- Build some beehives and collect some honey. Build a pig sty and feed honey to five pigs. Go tell Harold you helped the pigs.
- Around this time, you should start finding Peach seeds. Go plant some apple and peach trees, they take a whole week to start growing fruit. You should only ever need about half a dozen of each kind of tree.
- Napoleon is in the underground basement closest to the entrance to Lonely Hills and the seashore, on the other side of the lake. When you find him, say "Liberte" and he'll go back to Harold's house. Then you can build a pig sty and feed him a honey and he will go live with you.
- Back on your farm, you can use old wood and rubble to rebuild the llama garage now. Then find all five llamas (on your farm) and feed them batteries to befriend them. Click on the garage and select which item you want the llamas to bring you each morning, then hit "Collect" and wait a day. They'll drop it off as little boxes outside the garage.
- Now go tell Mark that you helped Harold.
- If you go through the door to the seashore, you can finish the quest to cut down the toxic trees.
- There is also a "Message in a Bottle" quest item on the edge of the beach. Give that to Mark.
- Tell Mark that you healed all the trees. Give him the five hydraulic parts, too.
- Take his water filter to the toxic spill behind Harold's house and use it to fix the spill. Tada - very pretty scenery now.
- See if you can afford any more upgrades from Rudy - especially the Rubber Drill should be your next purchase.
From here you have options. Depending if you can afford the Glass Drill upgrade yet or not, you are "suppsoed to" go to Lonely Hills first. But if you have the glass drill then you can also choose to go to Frozen Peaks now. Technically speaking, you could potentially skip most of the quests in Lonely Hills and Frozen Peaks both, since the objective of the game is simply to reach the Sunken City after completing quests in the Desert. But I will assume you want to follow the full story, so we're going to Lonely Hills next.
Week ???? - The Underground Labyrinth
In the Village there is a large labyrinth underground. All of the tunnel entrances lead into different sections of the labyrinth. (NOT the fast-travel tunnels, but the regular sewer tunnels and basements.) You can explore the labyrinth at ANY time, since there's nothing directly related to the main story there. It's just a sort of dungeon filled with extra crafting resources, a few furniture blueprints and pieces of furniture, a bit of food and seeds, and some enemy robots. I recommend clearing the first four entrances AFTER you clear the section of village down the hill from Mark's shop and meet Rudy but before you go around to the other side of the lake, then come back and do the rest of the underground after meeting Rudy in Lonely Hills zone. But you can do it sooner, later, or never if you so choose. For now, I'll navigate you through the first three entrances. I'll pop in another section about the labyrinth after the chapter on Lonely Hills.
As promised, here's a map. It's a work in progress since there's still one area I can't access until I get the glass drill upgrade, but at least it's something.
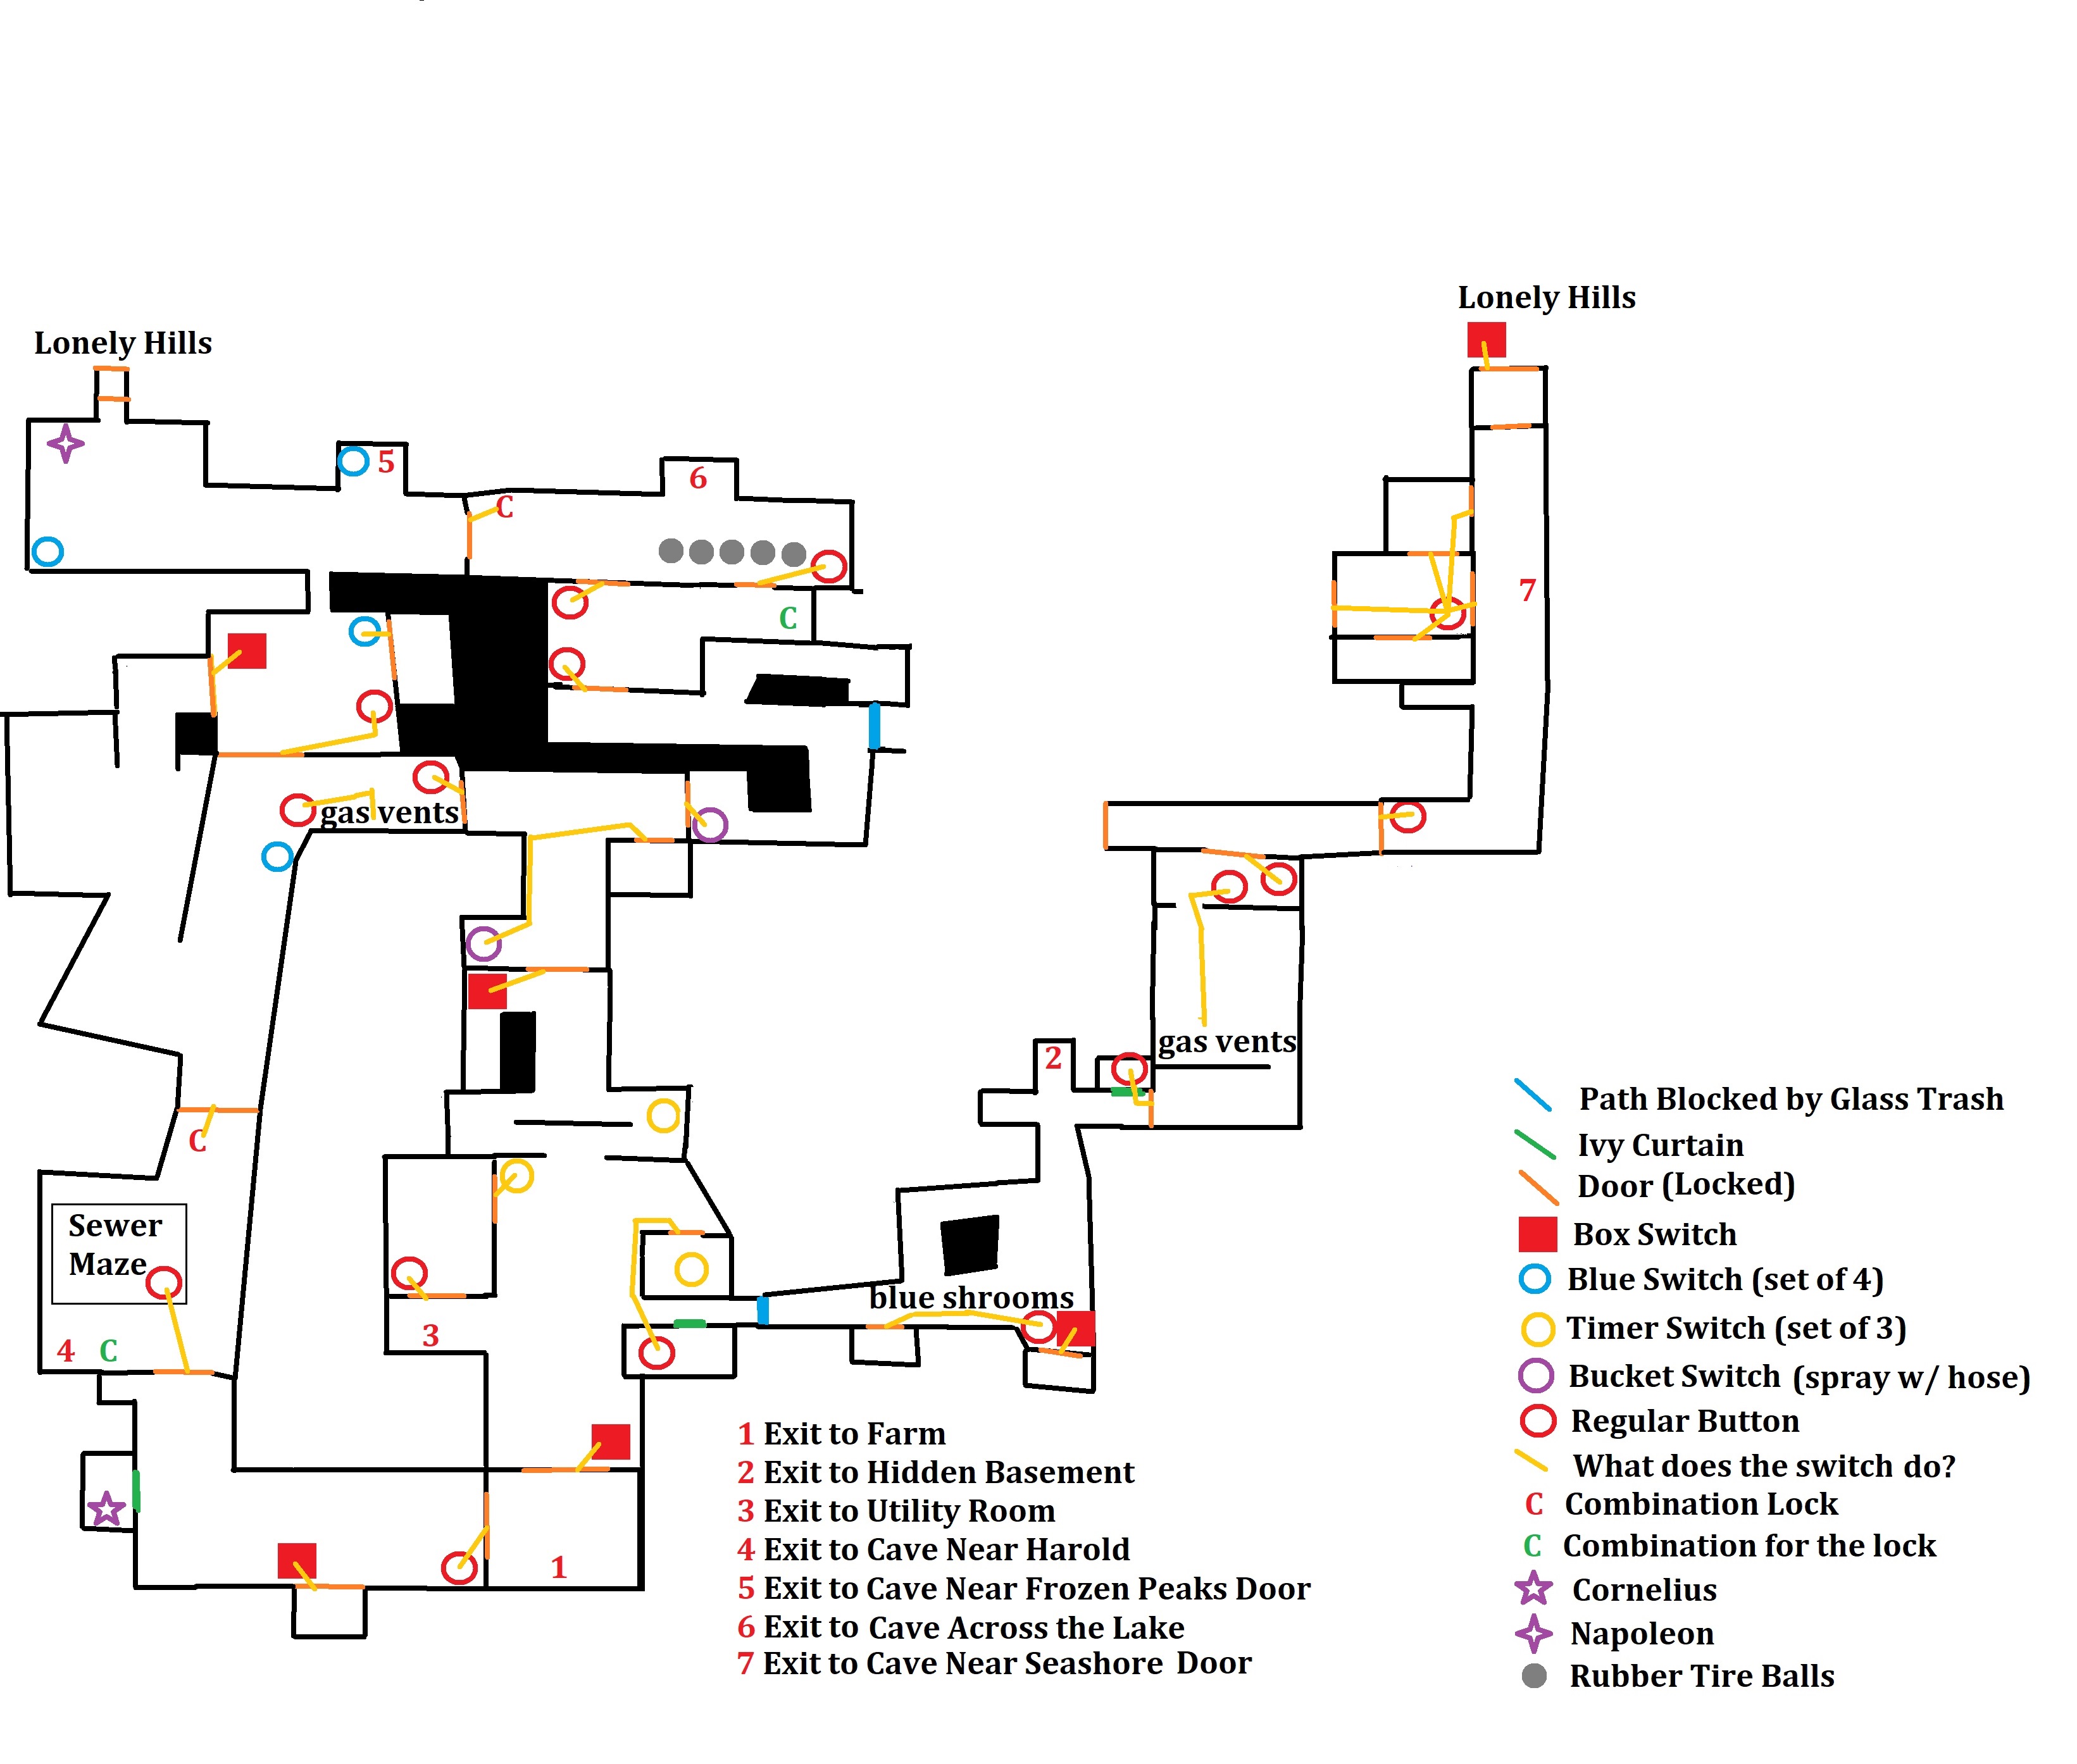
The first entry is a manhole right on your farm, near the door that leads to Mark's shop. When you first reach it, the big yellow doors are locked from the other side, so you can't go anywhere from here... and you'll need Rubble Drill and Rubber Drill to clear all the trash out. Later on, you'll open the yellow doors from the other side and then this room will be a "shortcut" to return to your farm when you're down by the lake in the Village. Well, not really shorter - just different route.
The second entrance is through the basement under a removable section of floor, in a broken house downhill from Mark's shop. Here you have two paths. One way leads through a small room full of gas vents that will hurt you if you get hit by the gas... but you can use the brown boxes to block them. The switch on the other side turns off the gas vents. From there, there are two yellow doors on opposite ends of a hallway. Both are locked from the other side. The other path from the hidden basement door leads past some big blue mushrooms. There's a room that opens by putting a box on a red panel, it has some loot boxes inside. You can steal a box from the previous path, or there will be a new box waiting for you just around the next corner, buried in the trash. There's also a red button there, hit it to open a door on the side of the next hallway. There is a red button inside that door that opens the next big yellow door, which is guarded by a bunch of spitting crabs and a giant green gas-spitting spider. Even if you kill them all, you will need a Glass Drill to continue that way. So you're done in here for now, but you can come back later to break the glass trash piles.
The third entrance is behind a locked fence, it's a door to a small utility room before the big door that leads to the lake area. You open the fence by shooting water into a bucket that's on top of a ramp nearby. There are NEW types of switches here. The yellow ones are a set of three, you need to hit all three QUICKLY before the timer runs out. If you're too slow you need to start over. The door with yellow switches is just trash and loot, nothing special. There is also a door that leads back to the farm, so you can go home to bed if it gets late and then come back here without the trouble of walking halfway across town first. There's a path with glass trash blocking the doorway, that leads back to the second entrance (in the hidden basement). Then if you past the yellow buttons there is another door at the end of that path, too. Immediately to the left, behind some trash, is a low wall with a bucket sitting on a switch. Just like the one outside on the ramp, spray the bucket with your water hose - remember to aim up and arc the water over the wall. This opens a small door around the corner with some loot inside. The other doors here are locked from the other side, so head back up to the surface.
The fourth entry is a cave near Harold, there's a button above the cave with a bucket. Hit it with water to fill the bucket and open the fence in front of the door. I don't want to say too much about this area, I'm going to let you explore it on your own. Eventually you reach some doors that are closed from the other side, we'll be back for those later - you get there from the caves on the other side fo the lake.
As promised, here's a map. It's a work in progress since there's still one area I can't access until I get the glass drill upgrade, but at least it's something.
The first entry is a manhole right on your farm, near the door that leads to Mark's shop. When you first reach it, the big yellow doors are locked from the other side, so you can't go anywhere from here... and you'll need Rubble Drill and Rubber Drill to clear all the trash out. Later on, you'll open the yellow doors from the other side and then this room will be a "shortcut" to return to your farm when you're down by the lake in the Village. Well, not really shorter - just different route.
The second entrance is through the basement under a removable section of floor, in a broken house downhill from Mark's shop. Here you have two paths. One way leads through a small room full of gas vents that will hurt you if you get hit by the gas... but you can use the brown boxes to block them. The switch on the other side turns off the gas vents. From there, there are two yellow doors on opposite ends of a hallway. Both are locked from the other side. The other path from the hidden basement door leads past some big blue mushrooms. There's a room that opens by putting a box on a red panel, it has some loot boxes inside. You can steal a box from the previous path, or there will be a new box waiting for you just around the next corner, buried in the trash. There's also a red button there, hit it to open a door on the side of the next hallway. There is a red button inside that door that opens the next big yellow door, which is guarded by a bunch of spitting crabs and a giant green gas-spitting spider. Even if you kill them all, you will need a Glass Drill to continue that way. So you're done in here for now, but you can come back later to break the glass trash piles.
The third entrance is behind a locked fence, it's a door to a small utility room before the big door that leads to the lake area. You open the fence by shooting water into a bucket that's on top of a ramp nearby. There are NEW types of switches here. The yellow ones are a set of three, you need to hit all three QUICKLY before the timer runs out. If you're too slow you need to start over. The door with yellow switches is just trash and loot, nothing special. There is also a door that leads back to the farm, so you can go home to bed if it gets late and then come back here without the trouble of walking halfway across town first. There's a path with glass trash blocking the doorway, that leads back to the second entrance (in the hidden basement). Then if you past the yellow buttons there is another door at the end of that path, too. Immediately to the left, behind some trash, is a low wall with a bucket sitting on a switch. Just like the one outside on the ramp, spray the bucket with your water hose - remember to aim up and arc the water over the wall. This opens a small door around the corner with some loot inside. The other doors here are locked from the other side, so head back up to the surface.
The fourth entry is a cave near Harold, there's a button above the cave with a bucket. Hit it with water to fill the bucket and open the fence in front of the door. I don't want to say too much about this area, I'm going to let you explore it on your own. Eventually you reach some doors that are closed from the other side, we'll be back for those later - you get there from the caves on the other side fo the lake.
Week Two - Entering Lonely Hills
As I said, you could potentially go straight over to Frozen Peaks if you bought the glass drill upgrade... but you'd have to come back here for some orange seeds and a couple of other things anyway. So we'll start here. But I will end up sending you to Frozen Peaks a bit early to get wheat seeds (and a few other things) after all... but not just yet.
The entrance to Lonely Hills is down hill and across the river from Mark's store... the fastest way to get there from your farm is to go through the seaside area behind Mark's shop (after you open that locked door of course). Once you open the door to Lonely Hills, you unlock fast travel on the global map - just click on any door with a yellow outline to go there immediately. Doors with red outlines are still locked, so can't be fast-traveled yet.
The entrance to Lonely Hills is down hill and across the river from Mark's store... the fastest way to get there from your farm is to go through the seaside area behind Mark's shop (after you open that locked door of course). Once you open the door to Lonely Hills, you unlock fast travel on the global map - just click on any door with a yellow outline to go there immediately. Doors with red outlines are still locked, so can't be fast-traveled yet.
- Up the hill, make a U-turn and go further up back towards the door. There is a feather and some free stuff on a tiny little alcove there.
- Continue up the main path and you should find Frank the architect standing on top of the hill. He sells two things - farm soil plots, and flower pots. His resource shop sells recycled materials and rubber. And he has some quests for you.
- He wants five house parts and five old wood to start with. All five parts are found here, and in the area down the hill BEFORE you go through the next door. They look like concrete cinder blocks and you can't vacuum them up you have to press "E" to pick them up.
- Remember to explore behind Frank - there's a button that opens a gate down by the river. And a manhole that leads up a narrow mountain peak (where you will find another pig).
- Down the hill, explore this side of the river thoroughly. You should have all 5 parts before you even cross the river, but if you missed one there are more on the other side of the river, too.
- Then there is a spot on the left side where you can place five wooden boxes to build a bridge across the river. Explore that side of the river thoroughly, too, including to the right and up the hill.
- Bring the house parts and old wood to Frank, and he'll give you a repair kit.
- Take that to his house by the lake in the village and fix the house yourself. Also take a minute while you're in the village to start growing new veggies from the seeds you found.
- Tell Frank his house is fixed. Now he wants five more house parts (these are different, they look like weather vanes) and five more old wood in order to help Ellen start fixing up Grandpa's house.
- All the house parts are in the area through that next door as you go upriver. So head there now. Explore that region thoroughly, there's another manhole that leads up to another narrow mountain peak. Fun stuff there.
- At the back of the area is a place where a train got stuck in a tunnel. There is a broken wire there, which will require a battery to fix it. Then you can hit the red button nearby to open the gate that leads to the next area.
- Then go see Frank, give him Ellen's house parts. For the next room in the house, he'll need more old wood and some food. You'll need to grow some peppers and tomatoes to make a peperonata for him. And he'll tell you to go see Rudy to continue the main story quest. He means find Rudy DEEPER INTO THE LONELY HILLS, not back at your farm.
- Talk to Frank once again about your house. This time he asks for five old wood and an apple pie (cook two apples + one honey + two wheat to make it)
- In the next area, IGNORE the big piles of stinky garbage that look different from the normal trash piles, those are for a quest in a little while.
- Keep an eye out for Bulbulator Parts (little rings with a single propeller blade in the middle). You'll need five of them before you talk to Rudy in the next area.
- Once you have cleared this area, go through the next door. The rest of the bulbulator parts are scattered around the other side of that door. Get five parts and go see Rudy.
- Rudy will ask you to use your WATER HOSE on a bunch of those toxic waste dumps. Most of them are farther ahead, but there are a few near Rudy and the area you just came from, back across the river. So back track and hit those now.
- Go past Rudy. There is a button near a cave, it opens the gate in front of the cave. Now you can use the underground tunnel to go between here and your farm. Or just use the fast-travel from the map.
- Go through the next door. The rest of the toxic waste dumps you need to spray with water are all in this area. Find them, spray them. While you're at it, collect five planks of wood and then fix the bridge nearby.
- Go back to Rudy. With the toxic piles dealt with and the bridge repaired, he'll ask you to find some special fungus. it looks like a pink mushroom, and it all grows in the "old quarry" pit.
- Go across the bridge that you recently repaired and through the door on the other side. You could clear this area now... but I like to just open up the fast travel here and then skip over to Frozen Peaks for a little while first.
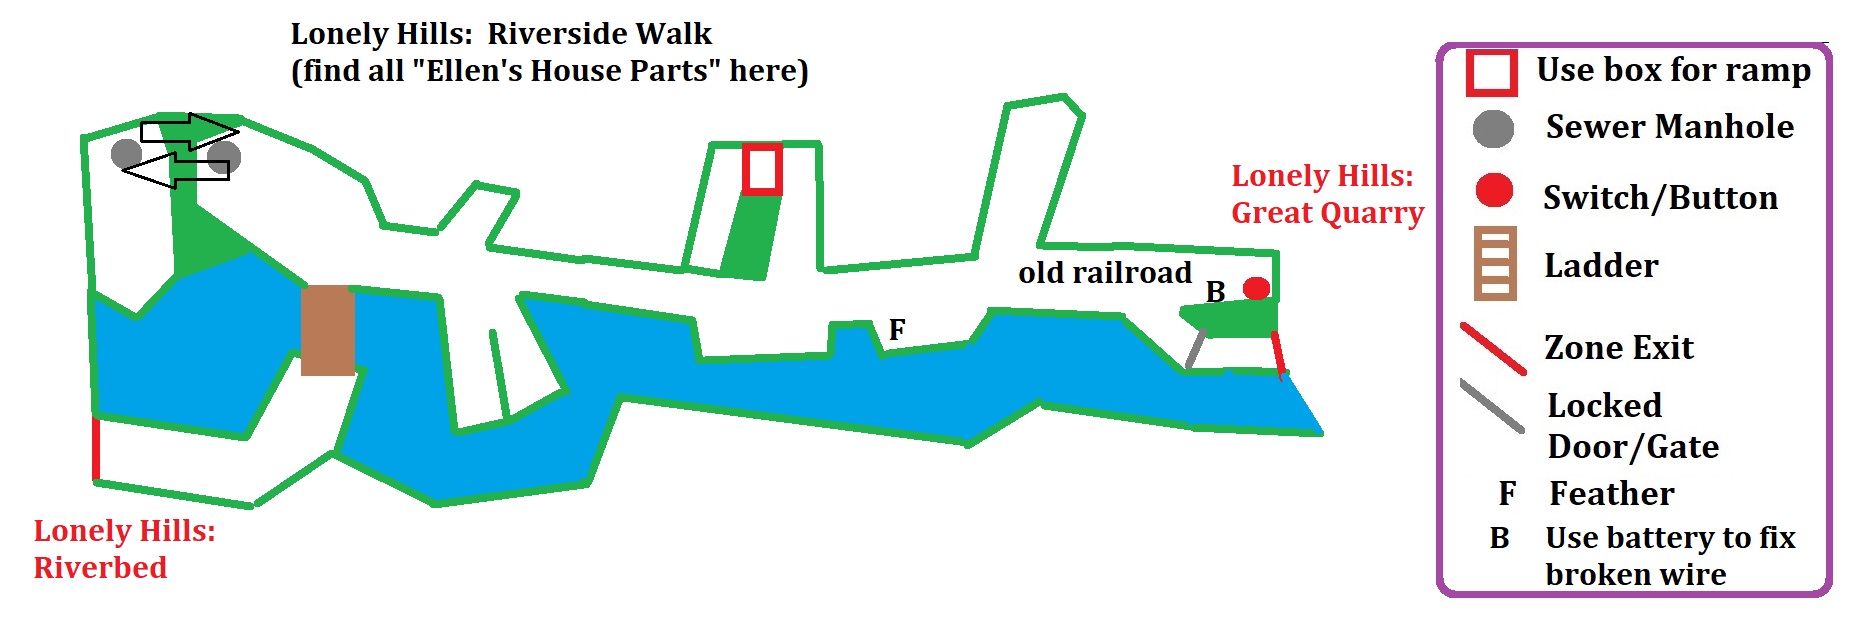
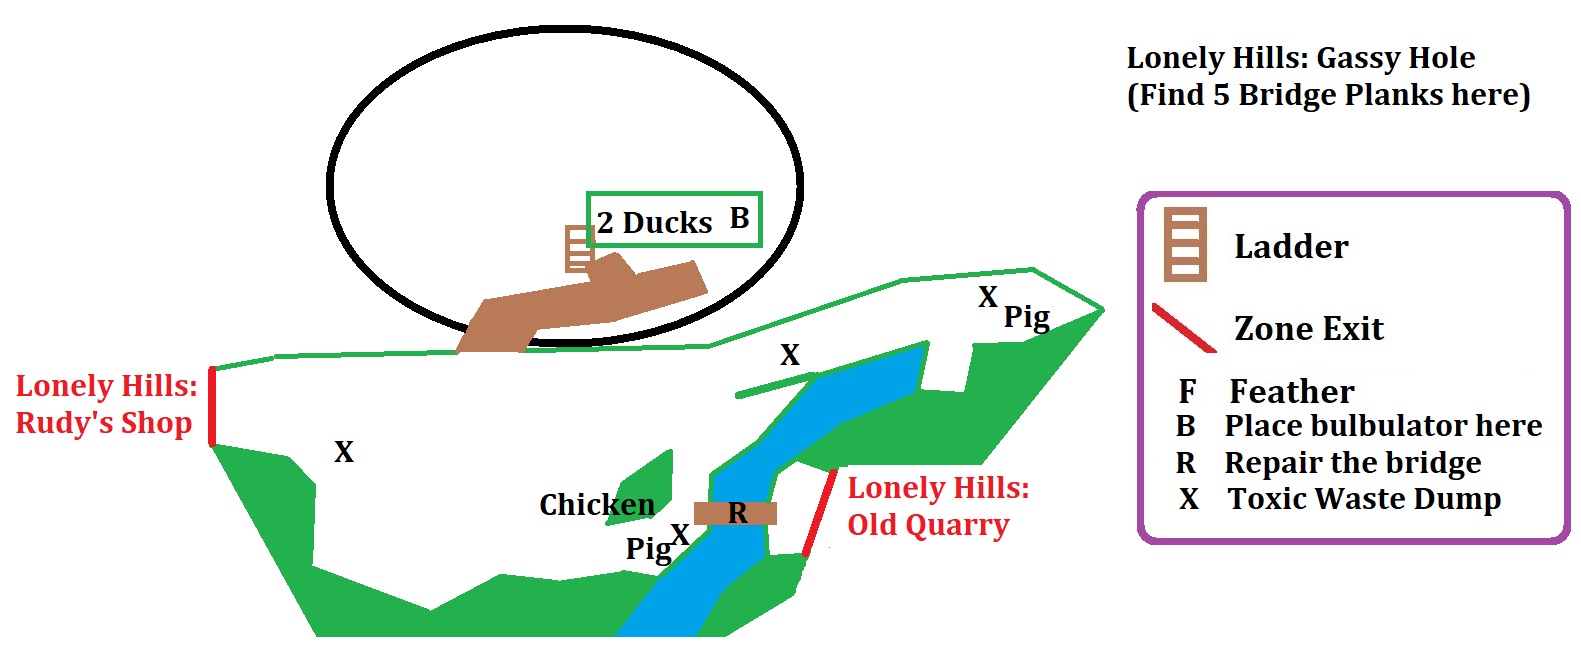
Week Three - beginning Frozen Peaks
Ok, time out. Now that you can fast-travel to the old quarry, we're going to head to Frozen Peaks for a little while instead. Go back to the lake by Harold's house in the Village. Around the back of the lake is a door blocked by some glass trash bricks. Break the bricks and go through the door.
EDIT: As of 25 March 2020 they added 2 more cows (total of 10 now) and five more sheep (total of 10 now). The animals are found in basically the same locations as the ones I already noted in the quest guide below, there are just more of them.
Your goal here is to find some wheat seeds (very easy, should take 2 minutes), some blueberry seeds (will take more like 15 minutes), and some beetroot seeds (maybe 45 minutes). While doing all of this, we'll be working on the first few quests in the area. Why the diversion over this way? Because Frank is going to ask you for some food that requires wheat before he'll open the next room in Grandpa's house. And you normally don't find blueberries until the very end of Lonely Hills but it's good to have them earlier than that. So, here we go...
- Move forward, clearing all the trash you see.
- On the left is a little ramp leading up to a nest with a feather in it. Grab that.
- To the right is a little path leading to a small field with a fence on the left side and another fence on the right side. The left fence has to be opened from the other side so ignore that for now.
- The right fence has a combination lock - you have to hit the buttons in the proper order. The order is shown on a sign that is up the hill in the back of the field. Go check that sign, then come enter the code (X, Triangle, Circle, Square) to open the gate, and go up there to get a recipe for your kitchen.
- Make a mental note that there is a boar here, we'll be back to help him out later.
- Back to the zone entrance, keep going forwards past a long and narrow lake to your left. There's a bucket switch in the middle of the lake, spray that with water to activate the button.
- You'll see an NPC waiting to talk to you at her shop ahead. That's Jay. Go check her store and talk to her. If you have any feathers, bring them here.
- In the area around Jay's shop, there are a bunch of golden acorns - grab those - and a bunch of holes - plant the golden acorns in those. Then go ahead and tell Jay you planted all the trees.
- Next she mentions a malfunctioning robot, and some boars.
- To the right just behind Jay's shop is another little field with a boar in the back corner. There are also THREE feathers in this area, grab them all. On the right side, in the back corner, is a spot where you can walk through a bush and stand on a wooden platform overlooking the area you've already been to. Drop down there and push the button to open the fence, and grab the loot while you're there.
- To the left behind Jay's shop is a small path leading to a feather and a duck.
- Go back to Jay, give her the feathers you just found.
- Behind Jay's shop, at the other end of the field, the path leads to the right - you'll see your first cow there. There's a pit there that has a boar den frozen in ice. Use the "dry firewood" you found to melt the ice.
- With the ice gone, you need to rebuild the den.
- With the den rebuilt, you need to plant acorns around it.
- Now whenever you see a boar you can befriend it by feeding it beetroots. Which is why we want to find beetroot seeds before we leave the area.
- Past the boar den is a robot standing on a hill. The robot wants three spare parts.
- The spare parts are scattered around the ground not too far from the robot.
- His program is still being interfered with, by a satellite radio signal!! The radio tower is pretty far away, so we'll go there later.
- Go past the robot and finish cleaning out this area. Down the hill to the right, you can build a bridge from five wooden boxes. There's a pig over there. There's also a cow down there, by the shack.
- YOU CAN ENTER THE SHACKS HERE. There's trash and usually some free stuff inside.
- Remember to climb the tree behind the shack at the top of the hill.
- Open the next door.
- Clear out just enough trash here to reach the cave with the fence in front of it. Hit the button to open the fence, this opens the shortcut underground tunnel.
- Also feel free to go up to the shack nearby and go inside.
- You can keep clearing trash off the path if you want to, but we're done here for now I think. We'll come back later to finish up.
- Back to the Farm. Start growing some wheat, blueberries, and beetroot. Also some onions if you found any seeds for that.
- See what new buildings and upgrades you can afford while you're here.
- Now head back over to Lonely Hills - Old Quarry.
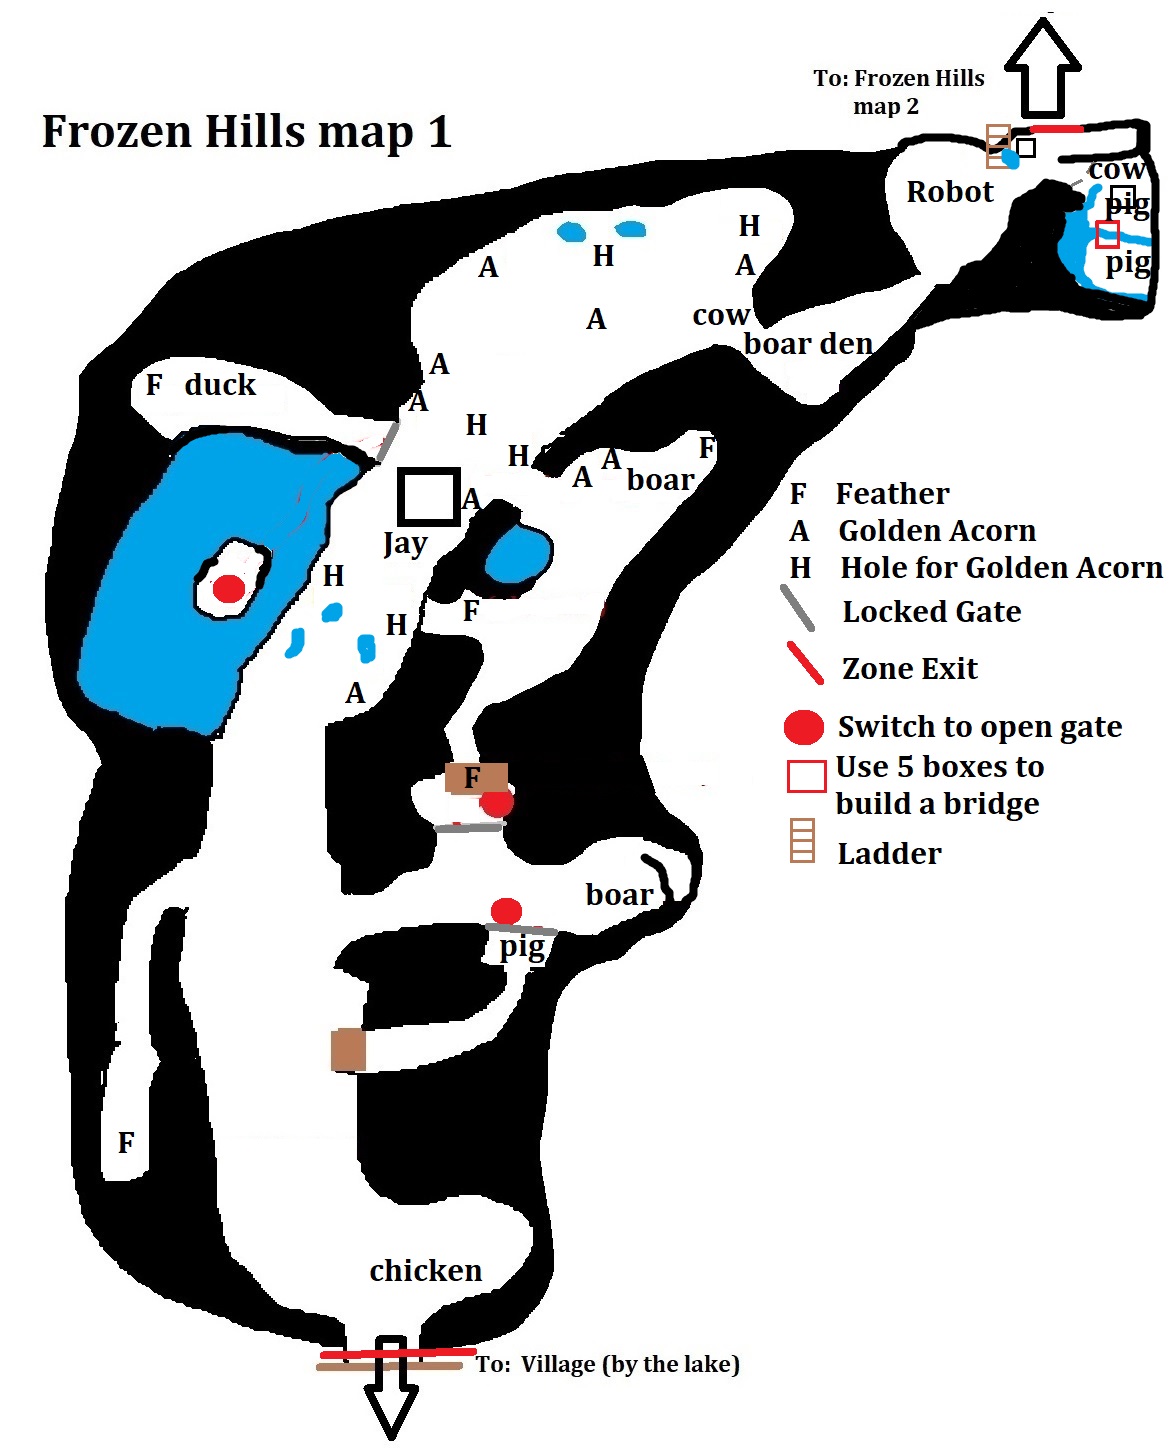
Week Four - The Quarry, Ducks, and Deer
Upon entering the area, keep moving forward and clearing the trash until you reach a broken down old cement truck near a ramp. Welcome to the quarry. Rudy's fungus will be scattered around the pit and the hill behind it, but all seven pieces are BEFORE the door to the next area. On the right side you'll find Cornelius playing hide and seek again. And directly ahead, halfway up the hill by a ramp, you'll find a cat. Build a house for it and feed it some honey and it will live at your farm, giving you a few preserved jars (and maybe other random items) every morning. You'll also find a couple of pigs and chickens up at the top of the hill, and I think maybe a duck, too... I don't remember if there is a duck here or not. There's TONS of trash here so it might take a couple of trips back to the farm to recycle it when your backpack gets full... or you might want to just build a recycler machine here before you start. Also, the ground here is pretty flat, so it's a decent place to build a "second farm" if your main farm gets too crowded.
![]()
Once this area is cleared out and you find all the fungus, go back to Rudy and give him the fungus. He'll ask you for Harold's "Farmer's Chain" - what the frig even is that?? Nobody knows. There's no such thing as a "farmer's chain." I think it was a bad translation maybe. But anyway, you need to find Harold now. NOT at the Village, but here in Lonely Hills. So go through the pit and up the left side and you'll find a door there. Harold has a vacation home over there, by a little train station and a lake. He wants you to help some ducks.
Originally, ducks were not allowed to live at a basic chicken coop, you would need to upgrade it first. They changed that because for a while during early access the upgraded chicken coop was BROKEN so any animals you tried to tame there would VANISH, teleporting off the map instead of to the chicken coop... so they made ducks live at basic chicken coops to work around that bug. The bug has been fixed now, so in the future they might exclude ducks from basic coops again... but for now ducks can live at any chicken coop. Feed them carrots to befriend them, you need five.
Return to Harold, now he wants you to help some deer. Go LEFT first, through the door and down a long staircase. There are a couple of ducks and deer here... but what you really want is the Quality Wood that you find here. You'll need it. Also keep an eye out for orange seeds.
Then clear out the area where Harold is, and follow the tracks past his house and up a narrow path to the next area. There is a woodlet (deer house) there but it's broken. You can fix it in THREE phases. First it needs a few construction materials similar to how you fixed the fox den. Then it needs 10 Oranges and 10 Peppers... so go plant some orange trees and pepper plants. Remember, trees take up to a week to grow so you might want to jump back into Frozen Peaks while you wait for those oranges. (See next chapter for that.) Phase three needs 5 quality wood, which are all found in the four areas here, from the place under the railroad tracks below Harold's shop through the area past the deer woodlet.
In the next area, you'll find more deer and a ladder that goes up to a "secret area." There are a couple of pigs up there who are arguing about oats. Bring them some oats to make them happy. Hooray! Also keep an eye out for more quality wood for the deer woodlet.
Once you fix the woodlet, find a bunch of deer and give them acorns. They'll live at the woodlet, and each morning they will have some seeds for you. It will be a mix of blueberry and pepper seeds. With that done, go talk to Harold. You will not get a "Farmer's Chain" because there is no such thing. You will get a bottle of acid neutralizer though, which is what Rudy REALLY wanted. So return to Rudy now and he'll assemble the bulbulator's final form.
Now take the bulbulator to the big gassy hole behind Rudy's shop, down the ladder into the basement. Kill the giant spiders (and maybe feed the ducks that they drop). Then walk up to the indicated square on the floor and press "E" to install the bulbulator. Return to Rudy one last time, tell him it's done, and he says the road to Frozen Peaks is now open... this is another leftover piece of dialogue from a previous EARLY ACCESS version of the game when the door to Frozen Peaks was actually locked until you finished the bulbulator quest. But it's not locked anymore... so you probably already went there. But whatever, you're done in Lonely Hills now... mostly.
But don't forget about Frank!! Your wheat should be grown by now. So make an apple pie and bring him that plus five old wood and he'll unlock the next room in your house. This would be a good time to go clean up those back rooms, and you'll unlock some decoration blueprints when you do. Feel free to experiment with furniture and decorations, make your place look nice. Then we're moving on to Frozen Peaks, to pick up where we left off.
Week ???? - Underground Labyrinth, part 2
THIS PAGE IS UNDER CONSTRUCTION.
Please bear with me while I work on a new playthrough to test all the new updated content. The latest update patch added an underground labyrinth to the game. I HAVE NOT YET HAD TIME TO PLAY THROUGH IT ALL. But I will come back and fill in this section of the guide as I go.
By now you might have explored some of the labyrinth below the village. This is a good time to go back and finish the rest of it, since you have the Rubber Drill and Glass Drill now. But you can skip it entirely, or visit it earlier or later if you want to. Think of it as an optional "treasure dungeon" sort of place. I've already done a chapter on the first part of the dungeon; now let me guide you through the rest of it. Here is a map, although unfinished since I still need to go back and revisit the section that's blocked off by glass trash.
The next entrance to the labyrinth is a cave around the lake. There are actually TWO caves over there, leading to different parts of the Labyrinth (marked as a red "5" and "6" on the map). Go through both of those caves until you reach a point where you can't continue anymore. The combination to unlock the door down ladder number 6 is located behind the locked fence across the hallway from the ladder. The combination-lock door leads back to ladder 5. If you continue past the combination, you can make a loop back to door 3 as well as a block of glass trash that prohibits you from continuing (unless you have the glass drill upgrade).
The final entrance is beside the door to the seaside, which is downhill from the door leading to Lonely Hills. In the field that had a few of the rubber tire balls that you can toss around like soccer balls. Once inside, there's a garage across from the ladder that has a single red button inside. The button activates all the doors in the garage, and there are enemies behind each one so be careful.
Don't worry, more to come soon!!
Week Five - Getting Cold in Frozen Peaks
Bring a handful of WHEAT with you to save some time (or you'll get enough FREE wheat pretty soon but it will take a half hour or so to find it), this will be for feeding the cows. There are only 8 cows in the game. Also bring a handful of beetroot so we can feed the boars, there are 5 of them. I know this map looks different from the previous ones; it's from my old Early Access guide but they really didn't change this area at all (except the "frozen hay" is now "frozen wheat" and cows eat wheat instead of hay) so I figure it's not worth the effort to make a new map if it's going to be EXACTLY THE SAME just different colors. LOL. Lazy moment, maybe, but the map is still good.
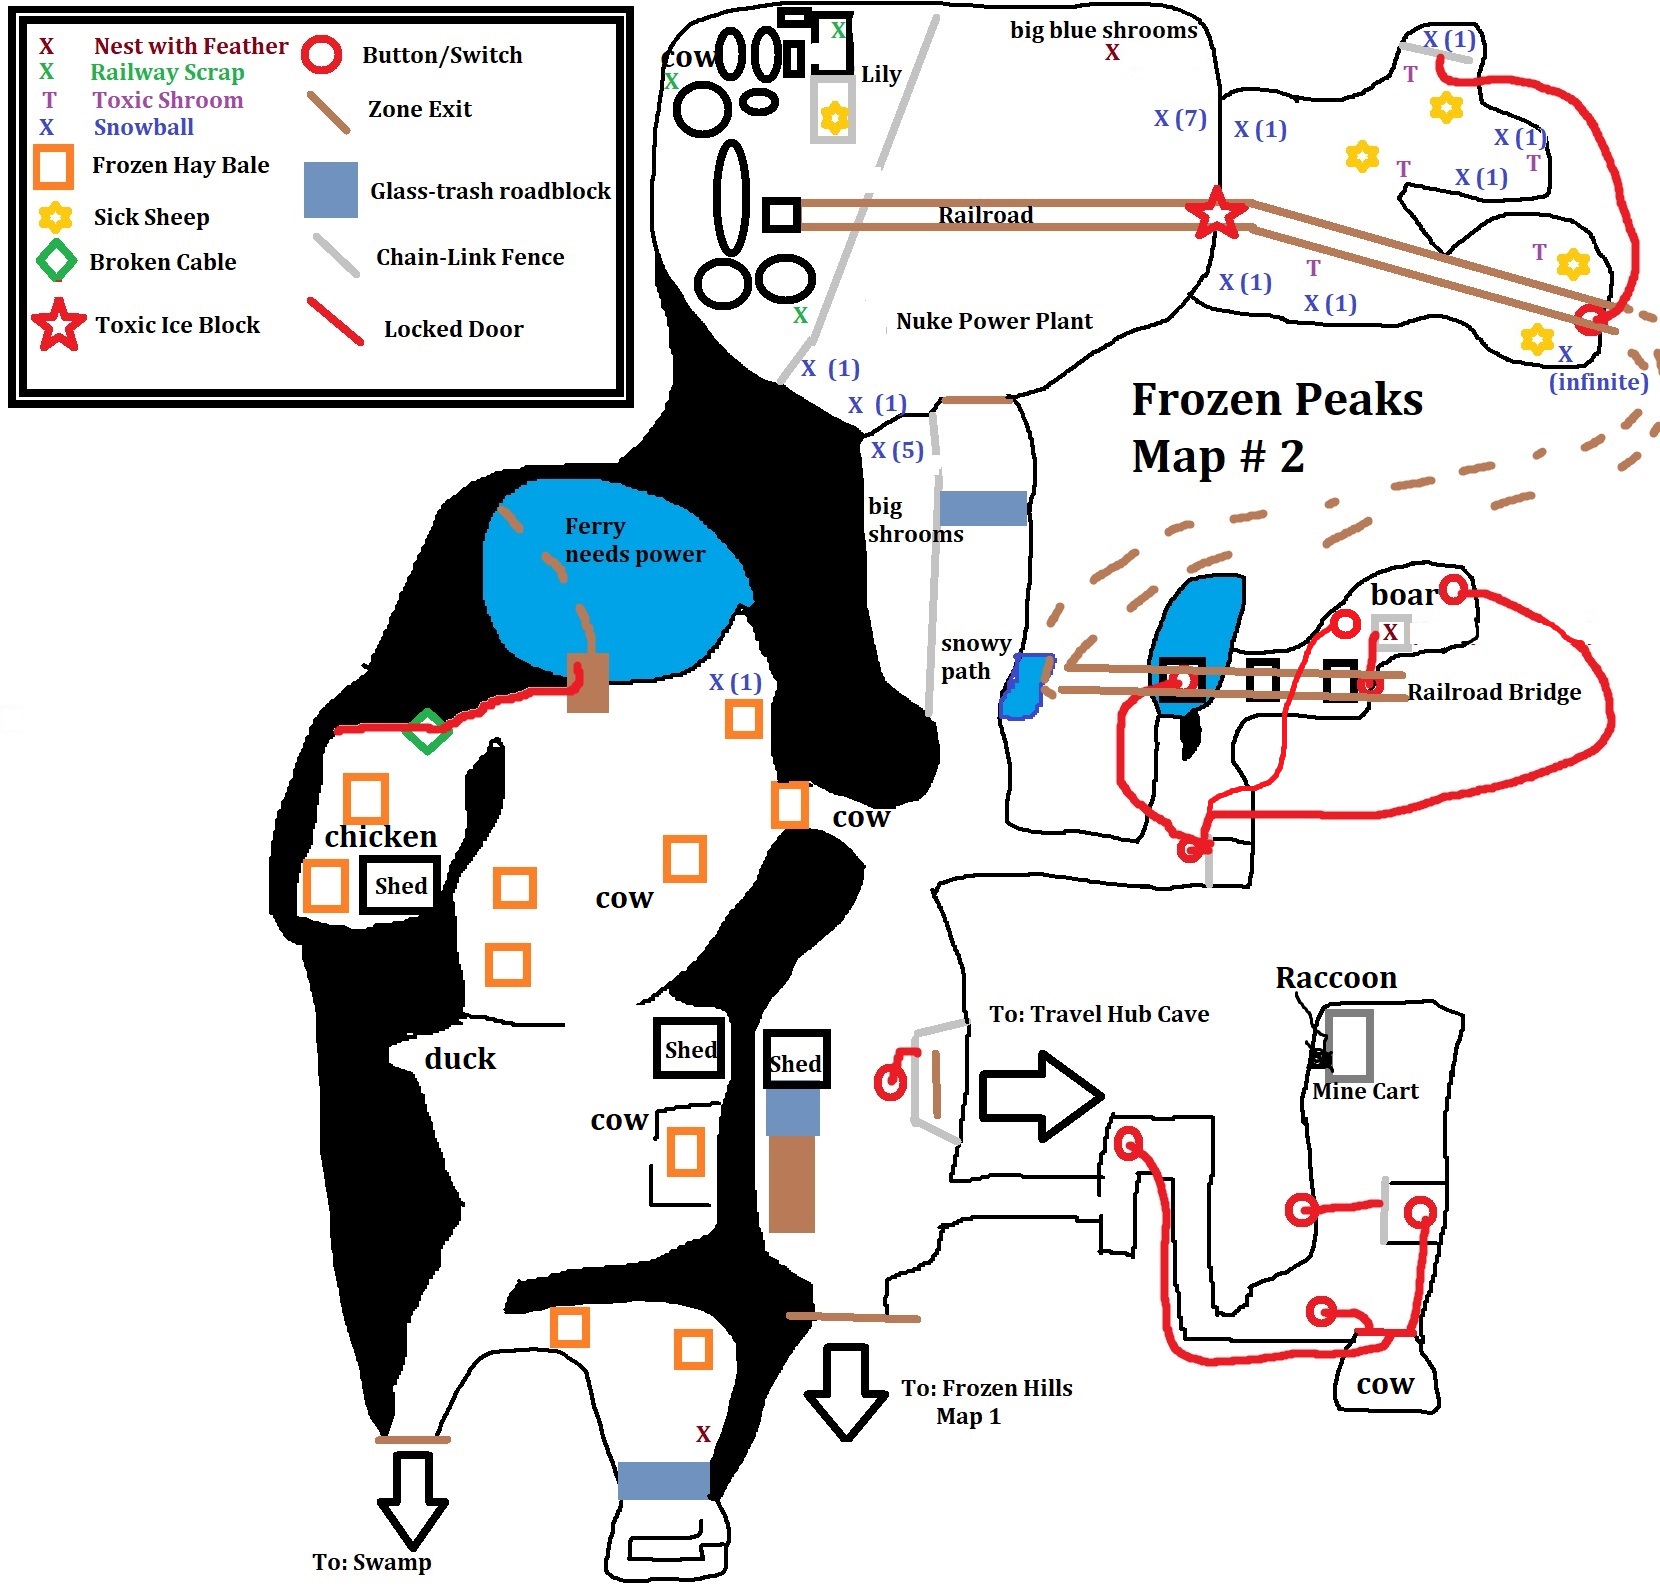
NOTE: You will find Snowballs scattered around here. In an EARLY ACCESS version of the game you could use these to build a snowman decoration (starting with the "snowman head" blueprint that was sold by Jay) but it seems they've removed that blueprint from the game. So snowballs are now USELESS and you CANNOT THROW THEM AWAY because they are marked as quest items. Apparently there was going to be some sort of "frosty the snowman" quest at some point but they never finished implementing it. So you can either IGNORE the snowballs on the ground, or pick them up and stuff them in a chest somewhere, otherwise they'll just take up space in your backpack.
NOTE: You will find Snowballs scattered around here. In an EARLY ACCESS version of the game you could use these to build a snowman decoration (starting with the "snowman head" blueprint that was sold by Jay) but it seems they've removed that blueprint from the game. So snowballs are now USELESS and you CANNOT THROW THEM AWAY because they are marked as quest items. Apparently there was going to be some sort of "frosty the snowman" quest at some point but they never finished implementing it. So you can either IGNORE the snowballs on the ground, or pick them up and stuff them in a chest somewhere, otherwise they'll just take up space in your backpack.
- Bring any of your feathers to Jay first, to add them to your collection in the menu.
- Buy the blueprint for the Cow Shed, and then go build TWO of them.
- If you haven't fed the two boars in the area yet, go do that now - boars like to eat beetroot.
- Just past Jay, before you reach the Robot, feed that cow some wheat so she goes home.
- Past the robot, down a little hill by a shack, is another cow that wants some wheat - go feed it now.
- Go past the robot and through the door, this will put you back where we left off last time: right in front of the "shortcut tunnel" entrance.
- If you haven't done it yet, go left up the wooden ramp into the shack and clear the trash in there.
- Go right up the hill. Halfway up the slope you'll find a yellow button. Don't hit that button yet.
- On top of the hill you'll find a locked "garage door" with another yellow button in front of it (buried under trash piles). Don't hit that button yet either.
- A third yellow button is behind a locked fence. There's a bucket button up on a rock nearby, aim up and spray some water into the bucket to open the fence.
- Hit ALL THREE yellow buttons before the timer runs out, to open the big garage door.
- Inside the door you'll find a cow. Feed it some wheat.
- Farther up the path you'll reach a mine cart and a raccoon. You can't do anything with them YET, but remember they're here because we'll be back for them later. Head back down the hill now.
- Farther up the main path, you'll reach an intersection where you can go left, right, or straight ahead. Straight ahead is the power plant - nothing to do there yet. Left goes to the cow pasture, radio tower, swamp, and desert - we'll go there soon. Go right first.
- You'll see a locked fence, there are FOUR blue switches needed to open it.
- First switch is a bucket switch in the middle of the lake. It's kind of hard to aim at, you can reach it from only two places - down the hill right next to the water (but it's VERY tricky to aim that far away) or else up on top of the hill overlooking the lake. Either way, just fill the bucket to press the button.
- The three other buttons are just regular blue buttons scattered around the top of the hill. Hit them all.
- Feed the boar a beet so he'll go back to the boar den.
- There is another bucket button sitting on the support column nearby, hit it with your hose. Go inside the locked fence here to find another feather.
- Back down the hill, the locked fence is gone, so go in there for some free stuff.
- Back at the intersection, go straight ahead from here (LEFT from where you entered the area) and put some dry firewood on that giant ice block. Also feed the cow some wheat so she'll go home with you.
- In the cow pasture ahead, use dry firewood to melt all the ice. This exposes a bunch of wheat which you can use for cooking or feed it to the cows.
- Go up the hill, there's a chicken there and a shack with some trash inside. Also use a battery to fix a broken wire there, this activates a floating platform on the lake at the bottom of hte hill.
- Ride the platform across the lake, there is one suitcase to open under the waterfall. Be careful - you can fall off the dock or off the platform and end up at the bottom of the lake.
- Walk in the direction leading away from the lake, feed a couple of cows and a duck (after killing a giant purple crab robot), and clean up more trash until you reach a little wall. On the other side you'll find a few more ice blocks to melt, a staircase leading down to a box with two turbo sprinklers inside, and another feather.
- The next door leads to the radio station, the swamp, and the desert. Go there now.
Week Five-and-a-half: Radio Tower Shenanigans
- In this area, to the right you'll find a little shed with a button inside. The button lowers a bridge on the left side of the area. In a previous EARLY ACCESS version of the game, there was some special item on that bridge but it got removed for the full release version so that button is kind of useless now. Just sayin'.
- Near the bridge you just lowered, there is a boar. Go feed him so he'll go home. That makes four boar so far.
- Around the corner from the boar and the bridge, you'll find a Llama garage that needs to be fixed with a few construction parts. Do that now. Be advised: there are FIVE llamas in the area but this llama hut can only take THREE of them, the other two will just always live wild and free.
- Just past the shack with the useless button is a narrow and steep path leading up the mountain. That's our target to finish the robot's quest. Go all the way up that path until you reach the radio tower on top of the mountain.
- WARNING: getting up to the tower platform can be difficult because there are SO MANY robots that spit acid at you, including a giant purple one. Just be careful and kill them all.
- In the area around the tower (and one right on top) you'll find some console parts. You need these to fix the satellite console, then push the red button that magically appears to deactivate the signal.
- While you're up here, there is a feather on top of the tower. Grab that.
- Back down the tower, go behind it and onto the path at the other side. There's a sign there about leaving cookies and milk for a traveler... but we don't have cookies and milk yet because we only JUST GOT OUR FIRST COWS.
- Back down the trail... at one point there is a break in the wall where you can jump down a waterfall onto some wooden platforms. Do that, there is a suitcase with loot that you will want to grab, plus you'll find Cornelius there playing hide and seek again.
- Keep going down the valley until you reach the swamp. The final boar is wandering around here, make sure to feed it.
- There are also a bunch of water filters in the area. You only need three. Use them to fix the leaky pipes here. Just getting a head start on a quest for later.
- Also go through the door, this will take you to the Desert. You'll find the designer nearby, there is some debate about whether her name is Janet or Yvonne, depending if you're reading her dialogue or the blueprint menu LOL. Hopefully they make up their mind what to call her soon.
- Buy the Desert Pot blueprint from her now, you'll need it pretty soon anyway.
- Now use "fast travel" from the map, or just walk, back to the robot in Frozen Peaks. Talk to him to complete his quests. It says he's supposed to find Harold now, and if you talk to Harold in Lonely Hills he will mention the robot, but don't worry it's not another quest or anything like that. You're done with the robot forever.
- Go back to Jay. Give her any feathers you found. Tell her the robot is happy. Tell her the boars are happy (I honestly don't remember if there is an option for this, but if it's there then mention it to her). Then she'll say that you should go see the botanist next.
Week Six - Power Plant and Sheep
- See the map in "Week Five". The power plant is at the top end of that map (the EAST / RIGHT side of the world map in the game).
- Head back to the Frozen Peaks intersection, and this time go straight ahead. It will start snowing once you get halfway up that path, that's how you know you're going the right way. The door at the end leads to the power plant, that's where the botanist is.
- As you clear out the trash here, there are a few points of interest. One is Lily the botanist. She sells seeds (in exchange for preserved jars) for flowers, fruits, and vegetables. If you ever run out of seeds for something, come see her. She also gives you a few quests to continue the story.
- There are three "railroad scrap" parts hidden around the power plant. Make sure you find them all.
- The final cow is hiding in the back corner of the power plant. Feed her some wheat so she goes home.
- Garlic seeds can be found here, you'll need some of those.
- There is a feather in a corner of the area, outside the power plant fence. Grab it.
- There is a gigantic ice brick with toxic sludge on it... we'll break that later to reach the area behind it.
- Lily asks for your help dealing with some sick sheep. She also asks you to bring her some of your crops for scientific study.
- In "Creative" mode, Lily sells every seed in the game. In "Adventure" mode, she only sells decorative flowers and potato, tomato, & pumpkin seeds.to start with; when you beat the final quest in each zone she will unlock more veggie and fruit seeds for sale.
- Once you've cleared the whole area and found all three railroad parts...
- Go home. Check your cows to get some milk. Make Cookies in your kitchen. Plant some garlic.
- Take the cookies and a bottle of milk back up to the top of the radio station hill. Go behind it and put the cookies and milk onto the stump and see what happens. LOL. Yeah. Unfortunately you cannot "befriend" this guy.
- Take the railroad scrap parts back up the hill to the mine cart. Use them to fix the mine cart.
- While you're there, the raccoon wants garlic - which you probably haven't harvested yet but once you have garlic remember to come get the raccoon. It gives you some glass (and occasionally other random items) every morning.
- Go to the Village, down by the lake, and talk to Rudy about the bulbulator. He'll "let you borrow it" but the game actually gives you an entirely new one, it is a DIFFERENT ITEM than the one used in Lonely Hills so if you didn't do that quest yet and you still have that old bulbulator it WILL NOT WORK for this quest and you'll keep it after this quest.
- Go to the lake behind Harold's house and you should see a few plants around the lake that weren't there before. They'll be glowing for easy visibility. They look like seaweed, but they are the "Algae" that you need for the new bulbulator. Grab them all.
- Head back up to the mine cart. Put the bulbulator and algae into the cart. Press the red button that appears on the back side of the cart. Why they put it on the BACK side? I don't know but they did.
- I really wish they made a cut-scene for this... but nope it just says "good job you broke the ice brick." So go back to the power plant and talk to Lily again.
- She wants special mushrooms, like Rudy wanted for his first bulbulator. They grow in the area behind the toxic ice block that you just broke, so go find them all.
- Bring those mushrooms back to Lily. Unfortunately you're not done yet...
- Go back to the swamp (where you used the water filters to fix the broken pipes). You'll find a few plants there that weren't there before. They are glowing for easy visibility. These are the Fenugreek Herbs that Lily wants to make the medicine for the sick sheep.
- Go back to Lily and give her the herbs, also tell her you fixed the pipes. She'll give you some herbal medicine. Find at least five sheep and feed them the medicine - they will go live at a COW SHED so make sure you have enough space for all five of them first.
- There are five sheep in the power plant area right behind Lily. The other five are all behind the toxic ice block, where you found the medicinal mushrooms, but you'll need to WAIT A LITTLE WHILE before Lily will offer to give you more herbal medicine to feed those five.
- After finding five sheep, report back to Lily. She'll tell you that you can "use the bulbulator to break through the other toxic ice on the path to the desert" but we've already BEEN to the desert and there's no toxic ice there so I don't know what she's talking about.
- Sheep will give you wool every morning. You can put the wool into a Loom (blueprints bought from Jay) to make a wool ball. There is NO USE AT ALL for wool or wool balls though, so sheep are kind of pointless - don't waste your pet food on them.
- Lily's final quest requires you to bring her one of EVERY crop you can grow on your farm, including trees and soil farm plots. She will NOT take tea or sunflowers (but they might fix that in a future update) but she does need one of everything else. Here's the list of what she wants:
- potato, tomato, pumpkin, lettuce, oats, eggplant, strawberry, carrot, pepper, corn, blueberry, wheat, beetroot, onion, garlic, cranberry, watermelon, apple, peach, orange, olive.
- Cranberry, watermelon, and olive are only found in the desert. Olives are found WAAAAY in the back of the desert, too, and they grow on TREES which take a week to grow. So it might be a good idea to just run straight through the desert WITHOUT WORRYING ABOUT QUESTS now so you can start growing them while you start your next batch of quests, instead of waiting until there's nothing left to do except the final boss fight.
- Bring Lily what you can for now, to add crops to your collection in the menu.
- Go back to Jay and see what blueprints you can buy. Definitely build some cheese machines. Maybe also upgrade your cow sheds. The loom... since wool has NO PURPOSE WHATSOEVER, well you can buy it and use it as a "decoration" for your farm if you really like it.
- Work on other upgrades for your farm, and also upgrades for Ellen (from Rudy's shop) now that you can afford most of them.
- Also be sure to build the Desert Pots from your workbench now, you'll need them as soon as you go back to the desert. Build it once but get 16 of them. Notice that they only stack up to 10 though, so you get a stack of 10 and a second stack of 6 but they're all there.
- Now go back to Lily and she should have an option at the bottom of her dialogue choices to give you more herbal medicine for the sick sheep. Ask her ONCE and she gives you five of them, there are only five more sheep (all in the area where you found the pink mushrooms) so that's all you should need. Go ahead and feed those sheep now, that should be all 10 of them found and fed.
Final Week - The Desert
This basically is the last area of the game where you can explore freely. Once you finish here, all that's left is the final boss fight. Just so you know.
The desert is composed of FOUR areas. It's pretty linear so I'm not making a map for this. But I'll give you a quick run-down of what's in each area and the quest you have to finish in order to proceed. And I'm including some pics because a lot of people get confused in this area. This is the one and only time when the next zone (Sunken City) really is locked until you finish all of the designer's quests.
The desert is composed of FOUR areas. It's pretty linear so I'm not making a map for this. But I'll give you a quick run-down of what's in each area and the quest you have to finish in order to proceed. And I'm including some pics because a lot of people get confused in this area. This is the one and only time when the next zone (Sunken City) really is locked until you finish all of the designer's quests.
DANGER: STUPID GLITCH
There are several big holes in the fence around the canal at the edge of the Desert. If you walk through a hole, you fall to the bottom of the canal. You cannot get out except by following the canal all the way to the end - into an empty desert that is clearly OFF THE MAP. From there, your only option is to walk off the edge of the world... which forces you to respawn at the nearest doorway. So don't walk through any holes in the walls.- There are no more feathers beyond this point, you should have found them all by now. Turning them all in to Jay in Frozen Peaks will reward you with five ULTRA BIRD FEEDERS. These are not upgrades for smaller ones, these are fully built and ready to go. ... Kind of sad that at this point in the game you really don't need any more seeds.
- Talk to Janet the designer to start the quest line. Be sure to grab your first desert seed right behind her.
- EACH area has FOUR spots where you need to build a desert pot and then plant a desert shrub. The shrubs look like tumbleweeds and they are found all over the desert. There are about 20 seeds but you only need 16, and the seeds look exactly like the full-grown plant rather than like a bag of seeds. You can only use them here, for this quest - you cannot plant them anywhere else and they are not available to buy from Lily (or from your workbench in Creative Mode).
- EACH area has ONE broken pipe that needs to be fixed, then a shallow lake will fill up near where you planted the desert shrubs.
- Once those are all done, go talk to the designer again to start the next quest: fill up the three deep lakes.
- The first three areas each have ONE deep dry pit. Spray your water hose into it until it fills up and plants start growing around it. You won't be able to fill it until you officially start this quest.
- After that, she wants you to fix the dam console and help the animals.
- There are a total of fifteen goats, but only five need to be sprayed with water because they're stuck in sand. The other ten are walking around freely. You only need to feed five for the quest, another five for the in-game achievement. You will have to give them cranberries to befriend them.
- There are a total of five fennecs, you need to vacuum the trash off of their den in the first area just past the shallow lake before you can feed them. You need to feed all five of them some watermelons for the quest.
- The FIRST AREA has three fennecs and three goats.
- The SECOND AREA has one fennec near the tree on a rock by the shallow lake, as well as one or two goats.
- The second area also has a Llama garage that you need to fix before you can feed the llamas batteries. This one will only bring you E-Waste, you cannot set it to bring anything else. It also only has room for three llamas but there are five of them in the desert.
- The THIRD AREA has several goats, but no fennecs.
- The FOURTH AREA has five goats around the shallow lake, two more along the canyon past the three yellow switches, and a fennec across the bridge that appears when you hit the three yellow switches..
- The FOURTH AREA has all the dam console parts. You can find them BEFORE starting the quest, but the console itself will not appear until AFTER you start the quest.
- The dam control console will appear in the back right corner of the FOURTH AREA, where the big dam wall meets the little canal wall. But only AFTER you start the quest to fix it. Once you have the dam control console fixed, hit the RED BUTTON that magically appears on it.
- By now, your olives should be grown. Take one to Lily (as well as a watermelon and a cranberry) to finish your crop collection. As a reward for giving her one of every crop (except for tea, sunflower, decorative flowers, coffee, cocoa, pear, and cherry) she gives you a Jackelope decoration.
- Use 1 Watermelon, 2 Cranberries, and 2 Blueberries to make a Watermelon Salad. Bring it and 5 pieces of old wood to Frank in the Lonely Hills to unlock the final room in grandpa's house. Now you can decorate the entire house to your liking.
- FYI: You can put olives into an oil press to make olive oil. Jay will trade one of her blueprints for some oil.
- FYI part 2: You can put regular cow milk into a cheese machine to make "cheese." Or put goat milk in to make "goat cheese." They are TWO DIFFERENT kinds of milk, so you get TWO DIFFERENT kinds of cheese. You can mix both kinds in one cheese machine though, it will then give you the right amounts of both cheeses when it's done working..
- Fennecs will give you watermelon seeds every morning.
- NOTE: Watermelons cannot go into a bird feeder, so the only ways to get more seeds are buy from Lily or talk to your fennecs.
- Go back to the designer, talk to her a couple of times and then she lets you use her boat. Her boat is located in the SECOND AREA, next to the llama garage. It's the little rowboat in the hole in the gray canal wall. OR, you can just fast-travel from the global map since the door to Sunken City is now unlocked.
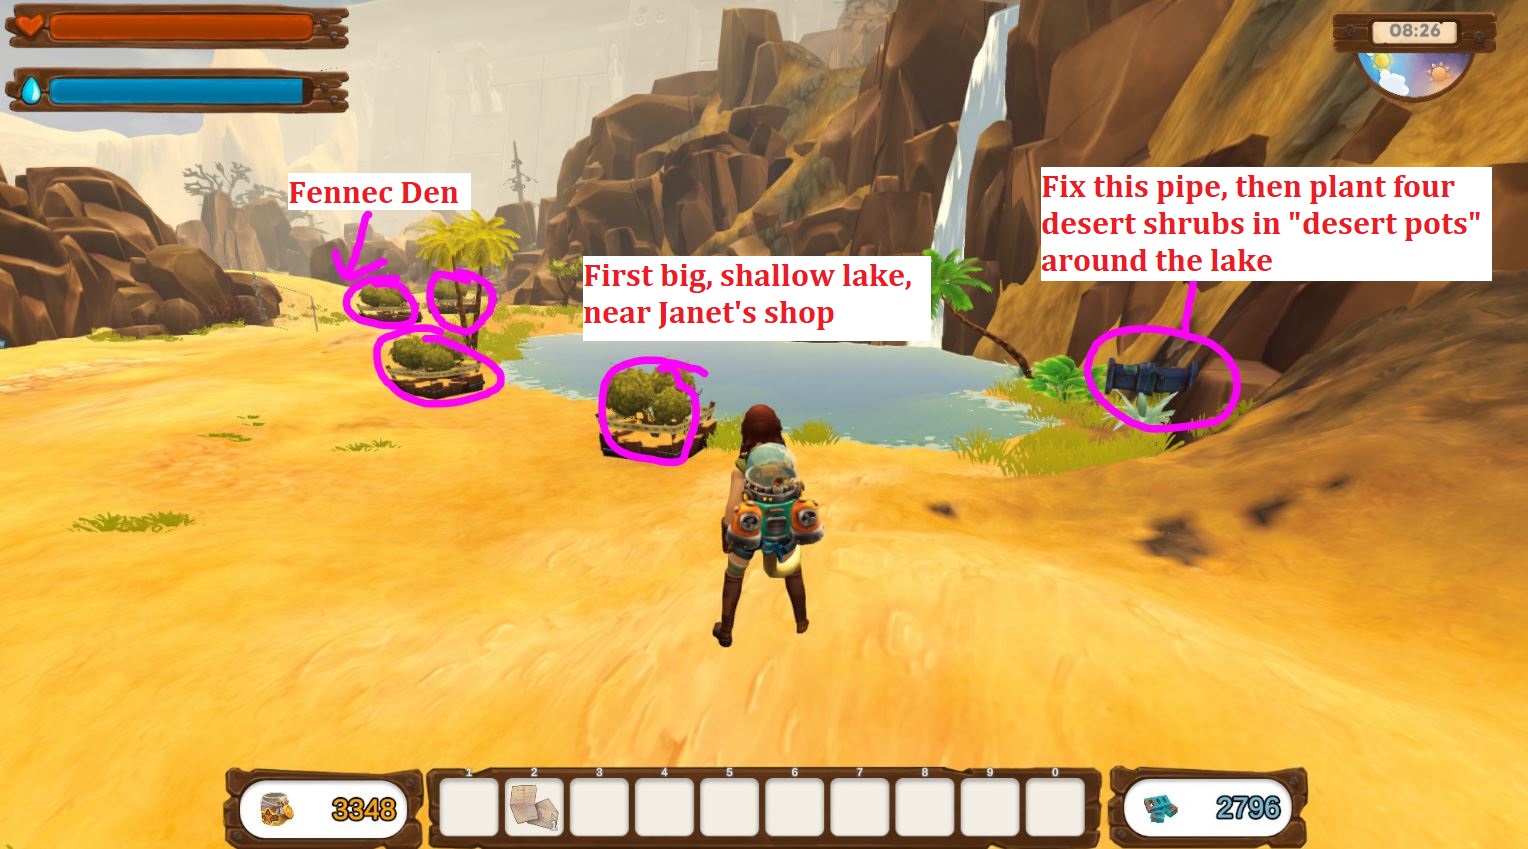
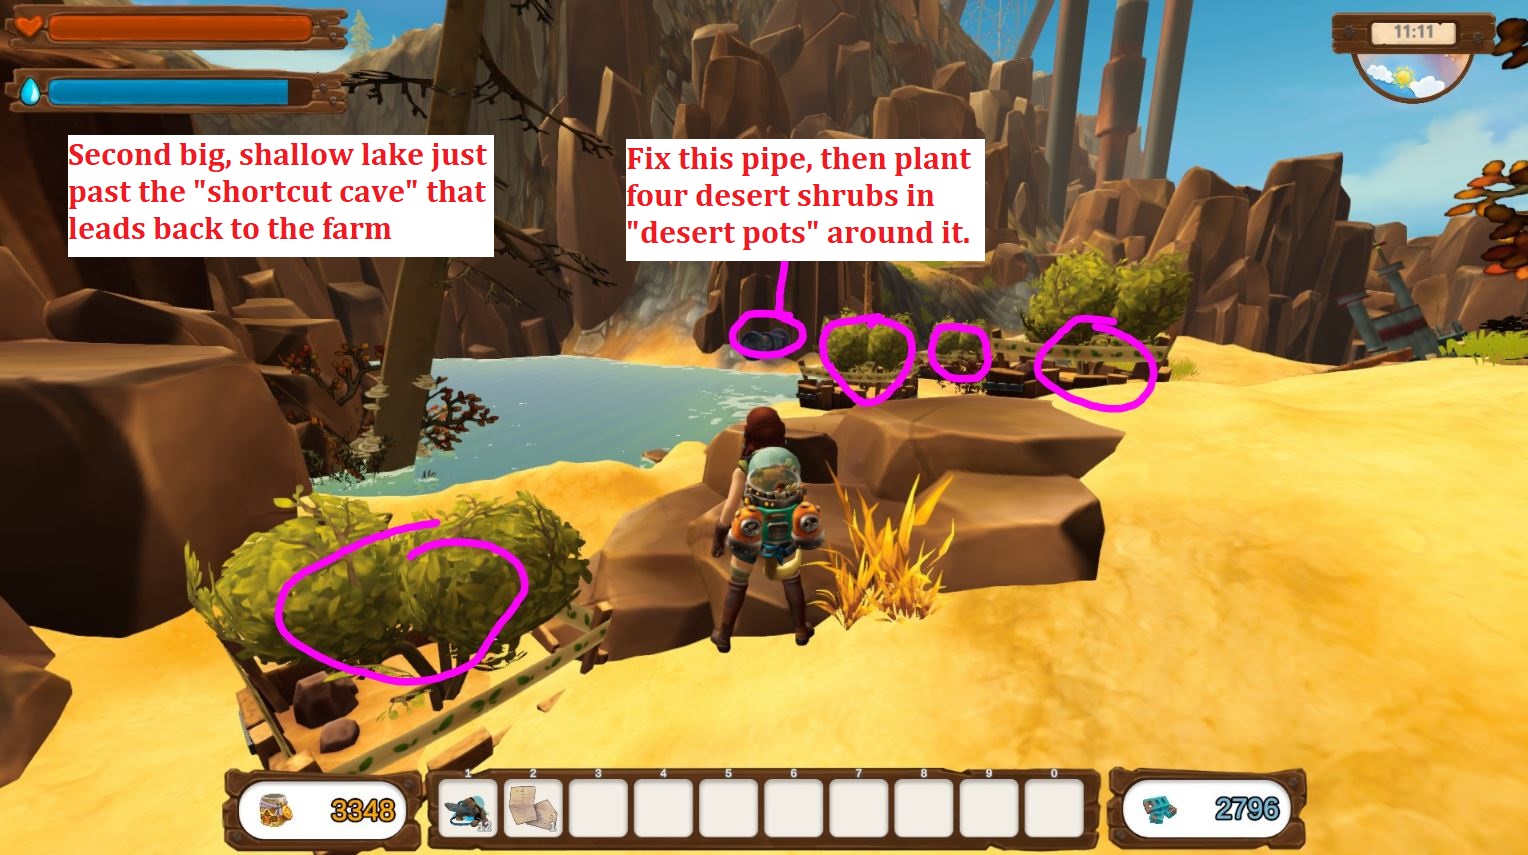
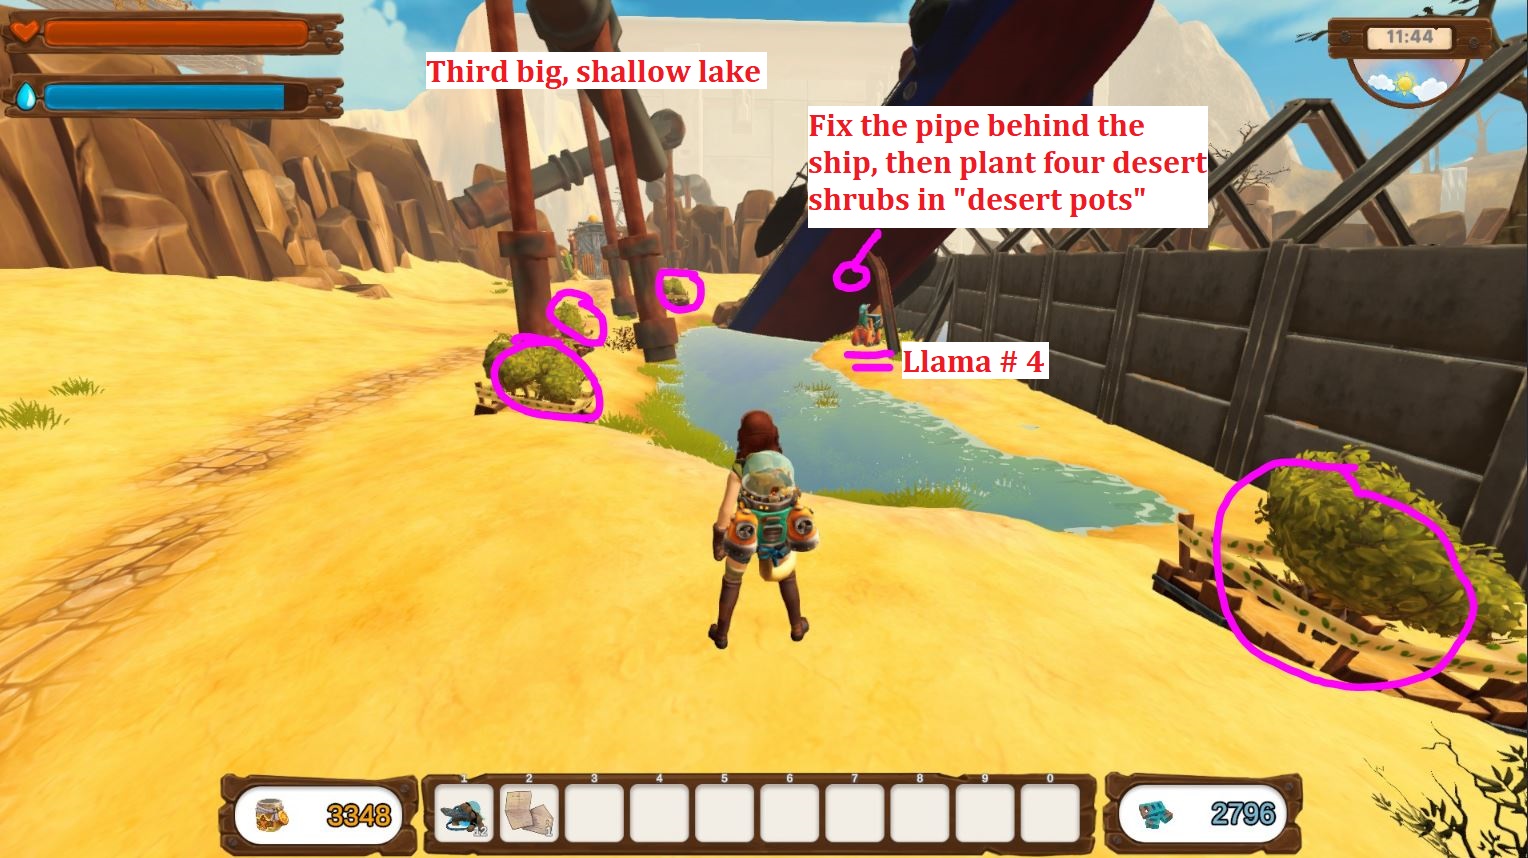
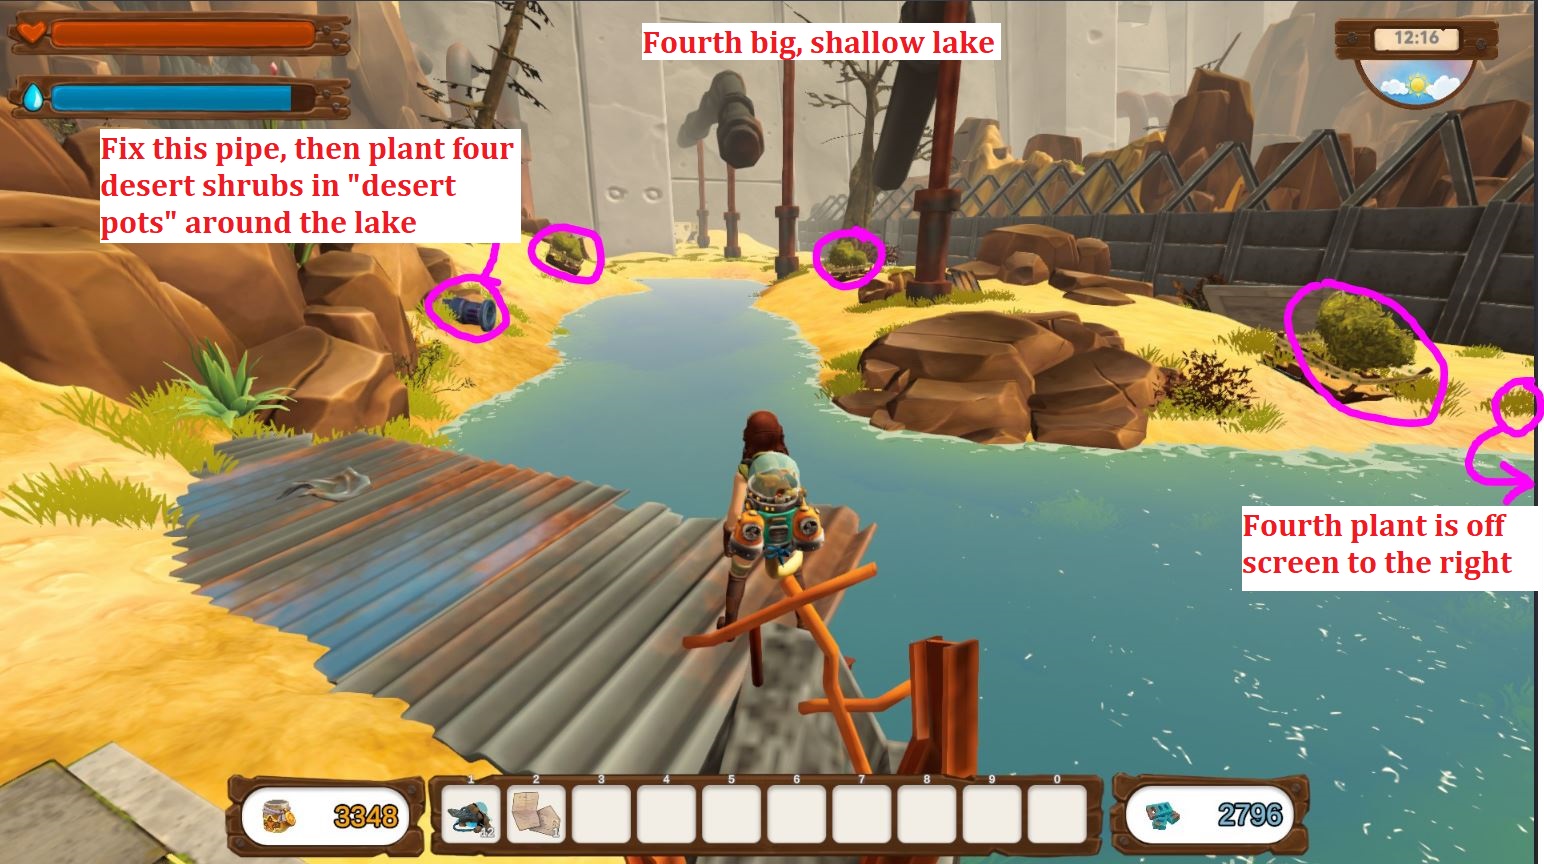
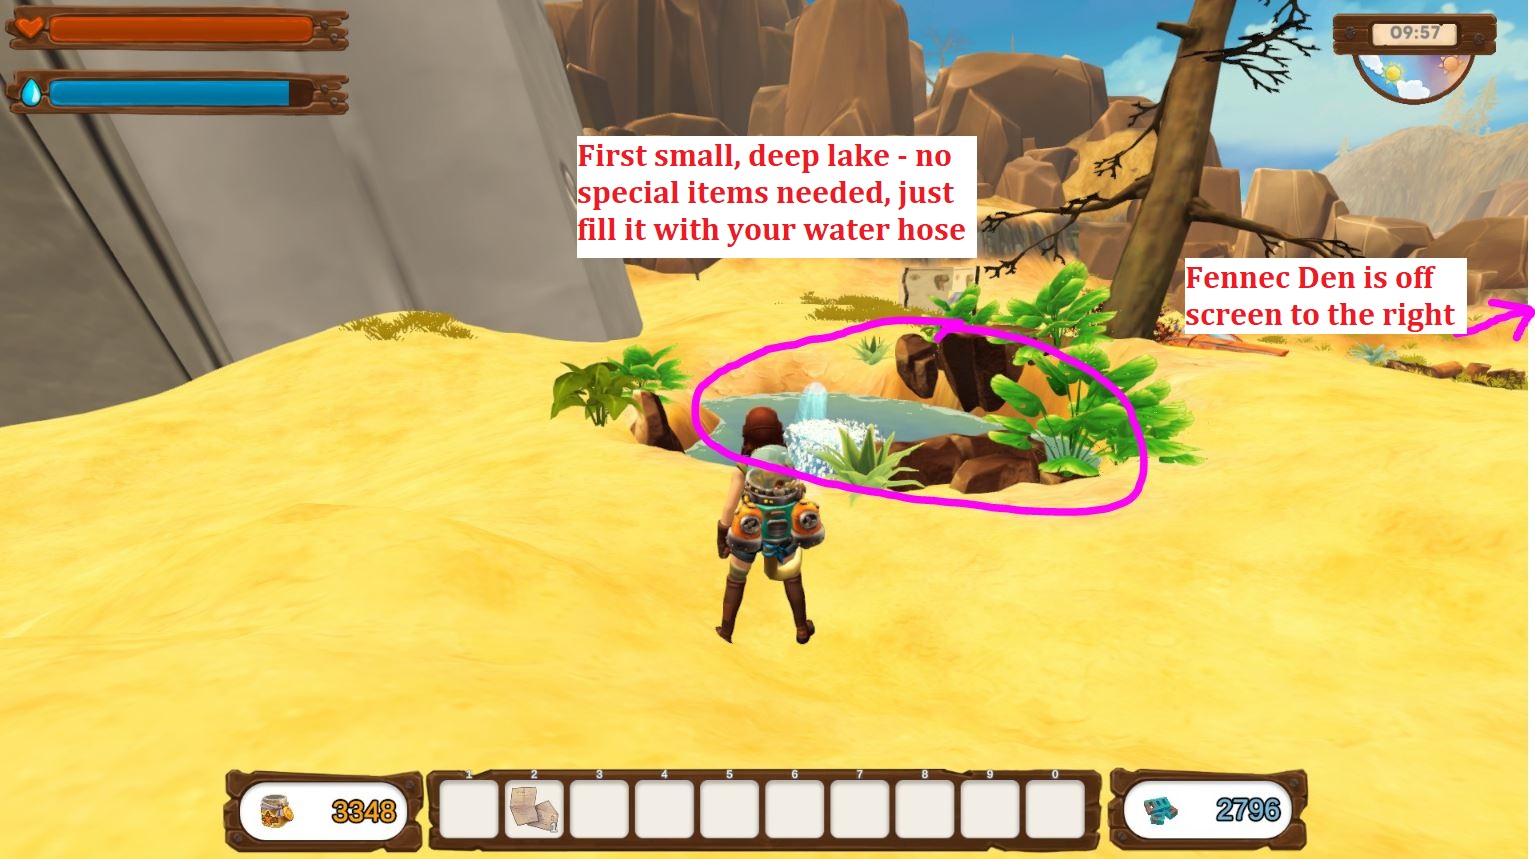
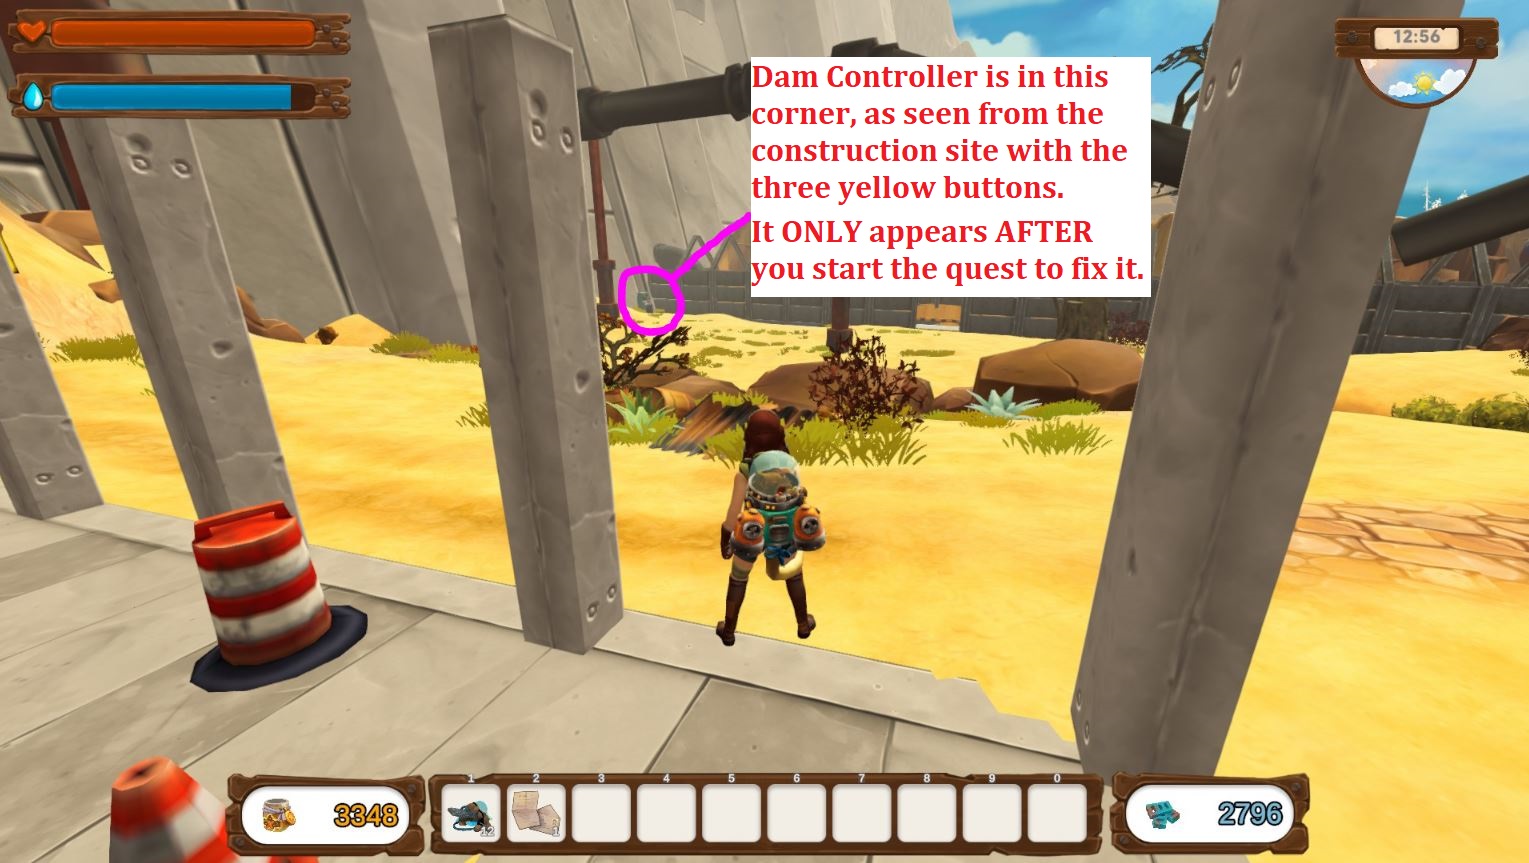
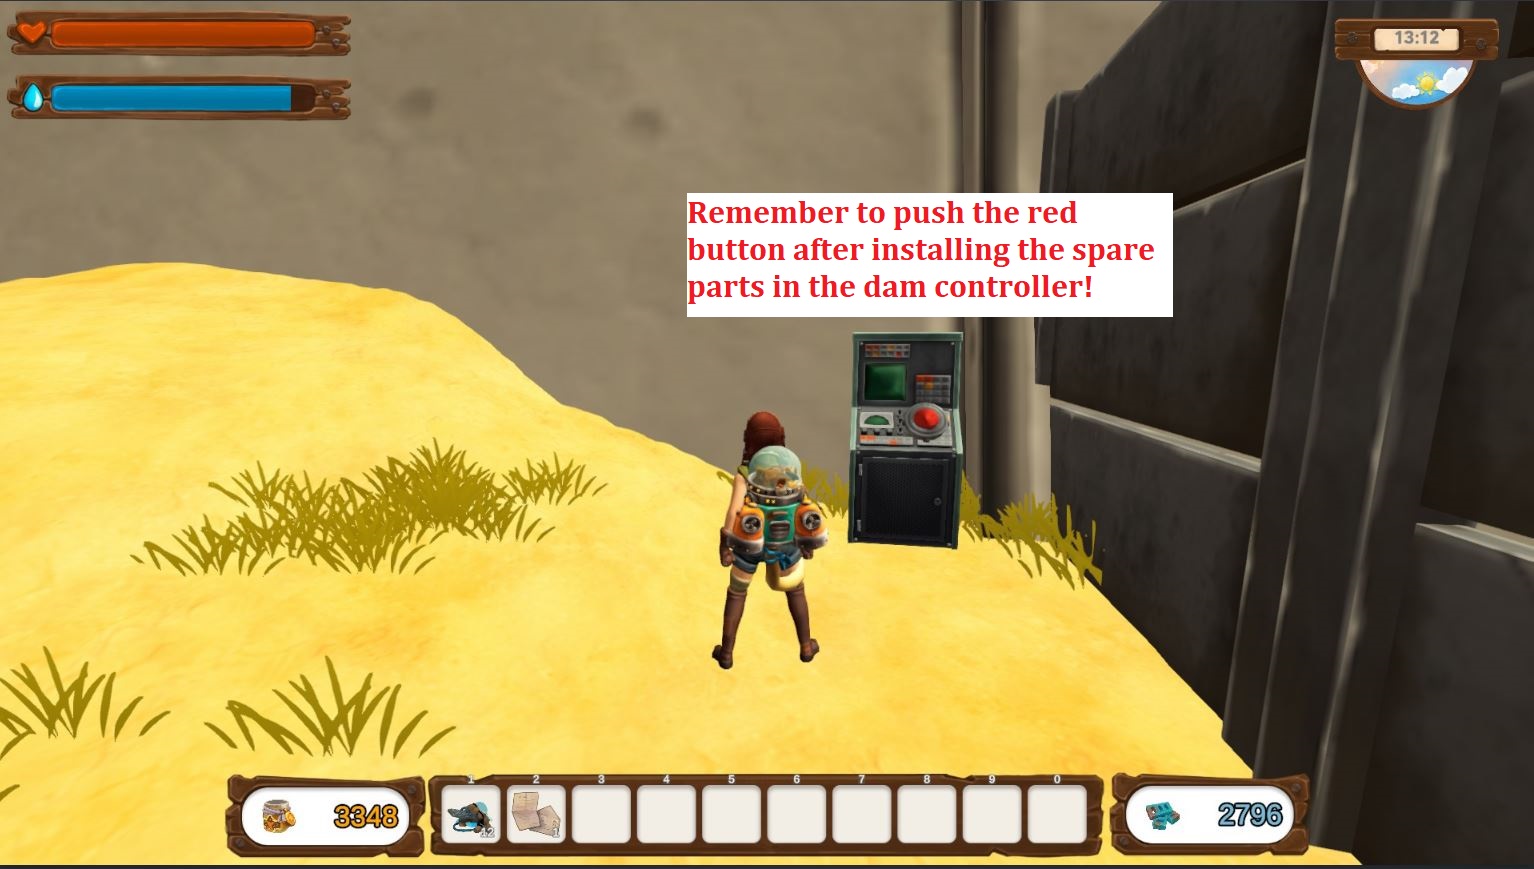
Sunken City - the Final Boss Fight
- The boat sends you to the Sunken City. The only way back is to use fast travel from the map.
- You have "infinite" chicken cannons here. Just R-Click to fire an exploding chicken at whatever is in front of you. The path is completely linear, so just keep moving.
- You will find GLUE here, which has no practical use. However, one of the achievements asks you to make 20,000 recycled material and the best way to get them all is to recycle glue when you run out of trash. Glue gives more recycles than any other "construction item" will. So put a piece of glue into your llama garage FIRST, so they bring more glue every day... otherwise you run out of glue because there's only about 100 pieces in the game.
- There are 3 ducks and 5 chickens around here. You know, in case you feel like you can NEVER have "too many" eggs.
- Eventually you have to fight the final boss... but with the chicken cannon it's ridiculously easy.
- Save Grandpa.
- Now you have a choice. "Go to Mars" just ends the game, you see the credits screen and it's all over. "Stay here" lets you keep playing. You'll be able to keep growing crops, raising animals, and decorating your house. But there are no more quests to do, no new areas to explore, so at that point it's just you and your farm. Kind of zen I guess... but really the game is over.
If you decide to stay here, you can work on some of the achievements (shown in the "TAB" menu) but some of them are BROKEN (see the chapter about broken achievements and bugs at the beginning of this guide for more info). Finishing every achievement in a category will reward you with a poster that you can hang on the wall in your house.
Encyclopedia of Recipes and Resource Shops
RAW CROPS AND INGREDIENTS
If you grow it in your farm or get it from an animal or from any source other than cooking a recipe in the kitchen, it's listed right here! Shows you how many jars of preserves you'll get from the preserving machine, how many pet food you'll get from the kitchen, and how much jam you'll get from the jam house PER ITEM USED..
KITCHEN COOKING RECIPES
EDIT: I found the recipe for Grilled Vegetables on my last play-through. It's down the ladder to the gassy hole basement in Lonely Hills! But I'm too lazy to make a whole new table just for this. LOL.Take those raw ingredients, put them into the kitchen, and this is what you'll get. Any combination of ingredients that does not follow these recipes will result in making Pet Food. You cannot put cooked food back into a kitchen to make more pet food out of it, so don't even try. But it can go into the Preserving Machine to make some jars of preserved food for you. NOTE: I use a column on here called "PPD" which stands for "points per day." SImply put, I take the number of jars the dish will make in the preserver, and divide it by the number of "days" it takes to grow all the ingredients. For this list, any soil crop gets 3 days, any tree or animal crop (truffles, apples, etc.) gets 1 day, and any "station" items (mayo, honey, olive oil, cheese) get 1 day PER ITEM. So if a recipe asks for 2 potatoes and 1 oil, then it counts as 2 soil crops and 1 station crop, so days = 2*3 + 1*1 = 6+1 = 7 days.
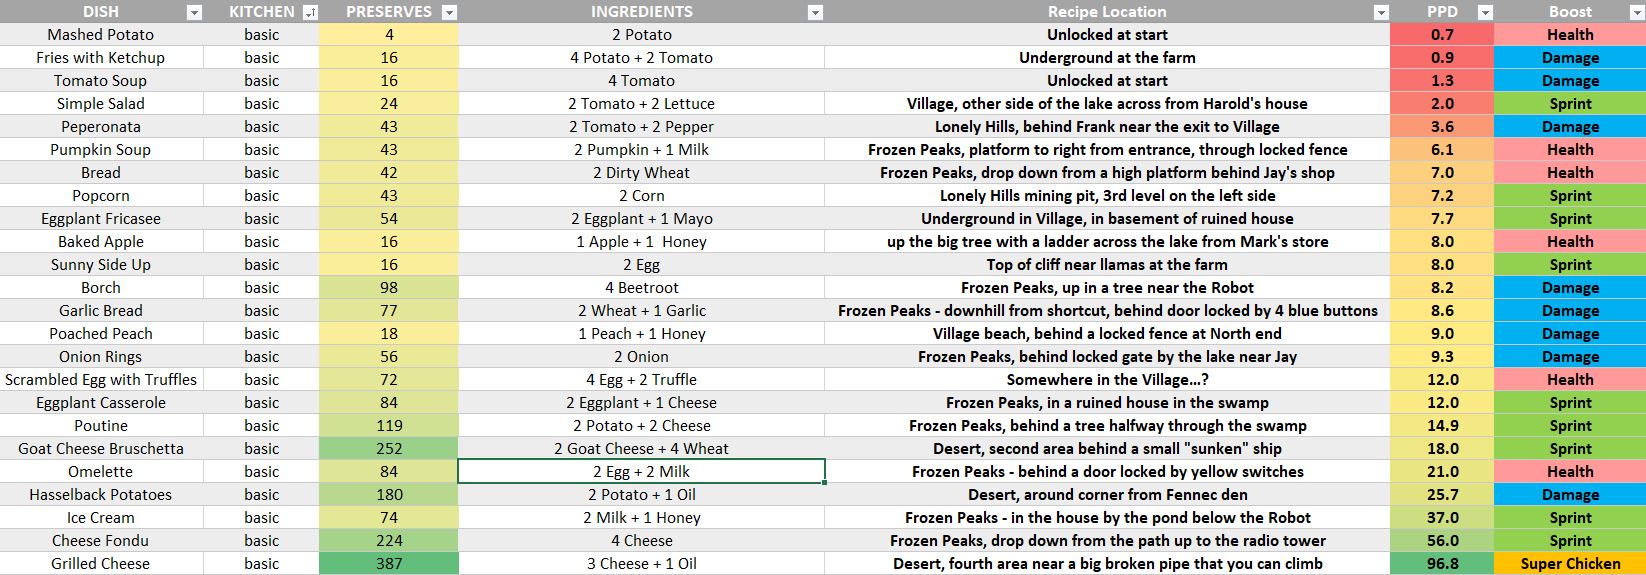
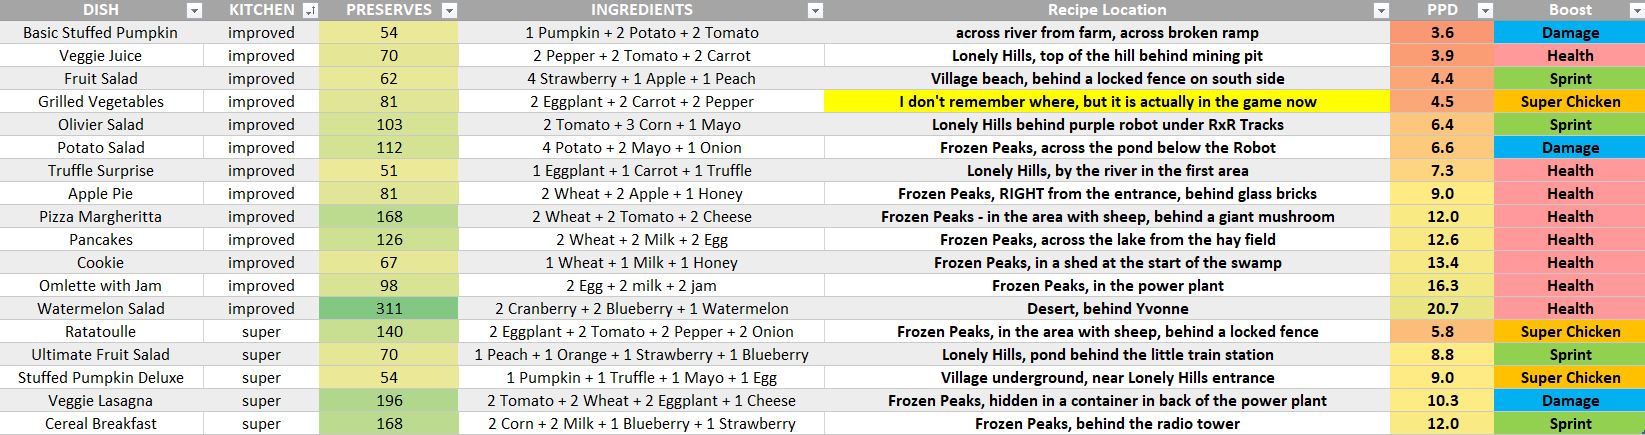
.
.
RUDY'S UPGRADES
You buy these from Rudy's shop, and they will be applied immediately. No need to go back to the workbench to build anything here. The ones you want to focus on FIRST are the drill upgrades to get through different trash bricks (rubble, rubber, glass, and e-waste) and then the big backpack, runner shoes, and vacuum power upgrades. Everything other than the drill upgrades is totally optional but if you buy them then the game will become easier (or at least less annoying).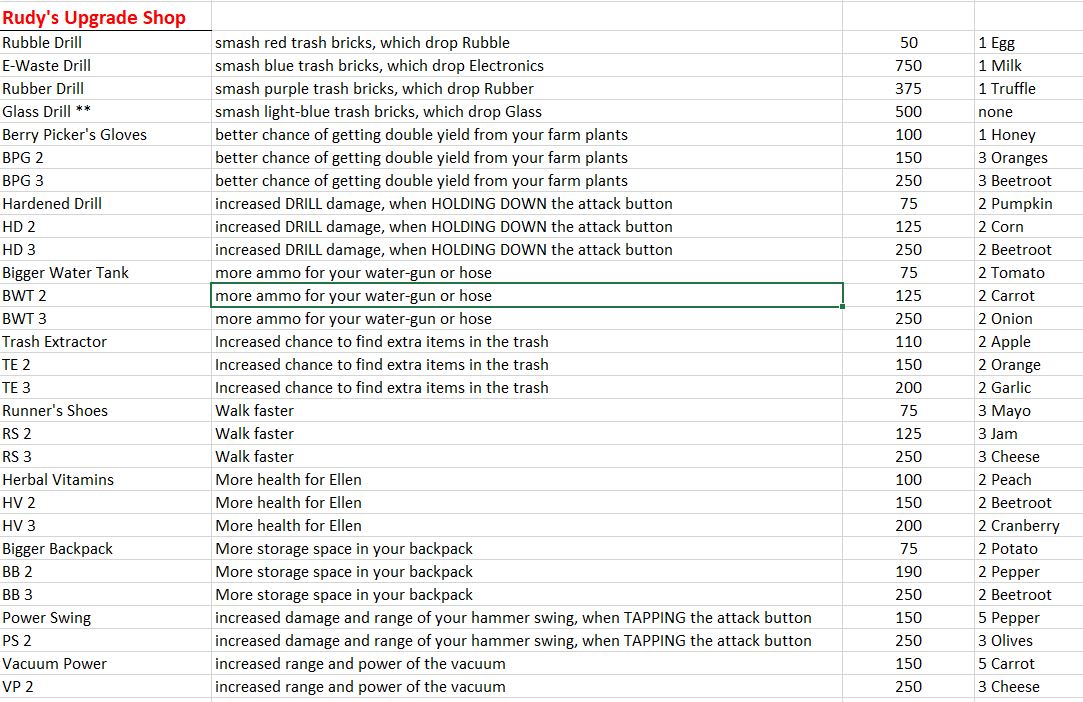
.
.
MATERIAL RESOURCE SHOPS
You buy these at a cost of jars of "prepared food" which you make in your preserving machine. No food is required to trade. Each NPC has a "Resource Shop" which is separate from their main shop, they sell construction materials that you might need to build more equipment for your farm, or you can buy a stack and throw them in the recycler to get more recycled materials..
Lily's resource shop is similar... but different. She has two tabs on her shop - one for decorative flower seeds (5 jars each) that only return the seed if you try to harvest them, their only use is to look pretty on your farm. The other tab sells seeds for fruits and veggies. At first only potato, tomato, and pumpkin are available but as you complete each new region's quests to 100%, you'll unlock the option to buy that region's seeds here, too.
Encyclopedia of Blueprints and Crafting
PURCHASING BLUEPRINTS
Other than Lily and Rudy, each NPC runs a shop where you spend jars of "prepared foods" as well as a few raw ingredients (such as tomatoes or truffles) in trade for some blueprints. These are for animal pens and machines you can build on your farm. After you buy the blueprint, you'll have to return to your farm and use the workbench to actually build the item. This list is just for the price of buying the blueprints. The next section will cover the materials needed to build the equipment at your workbench.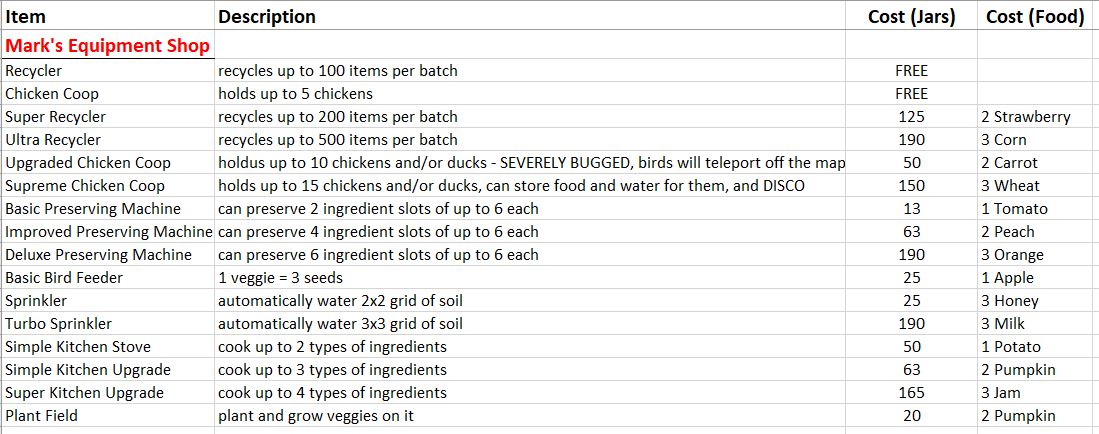
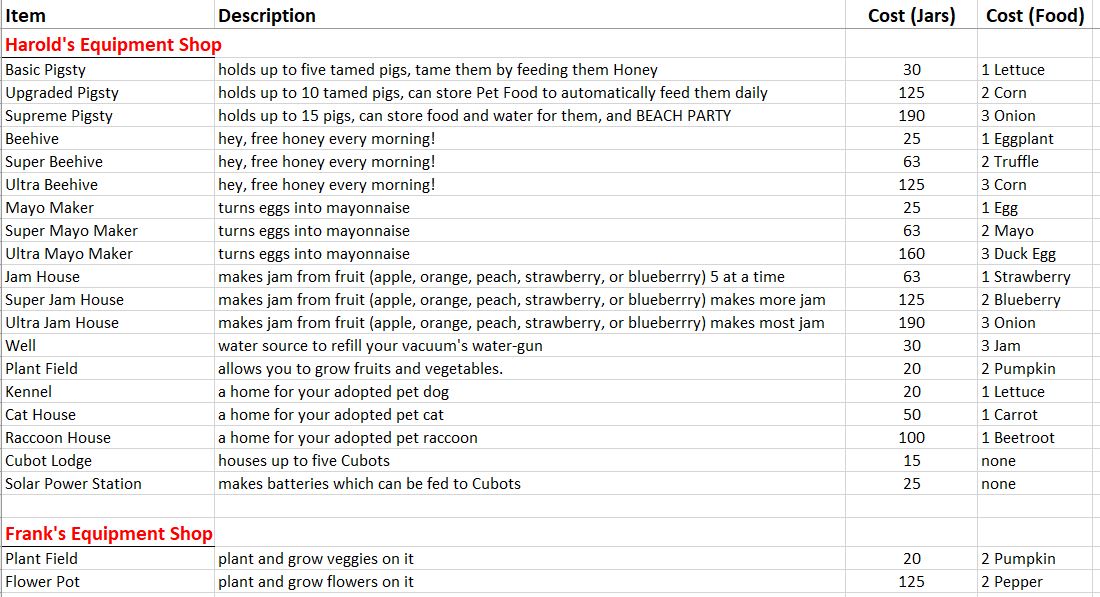
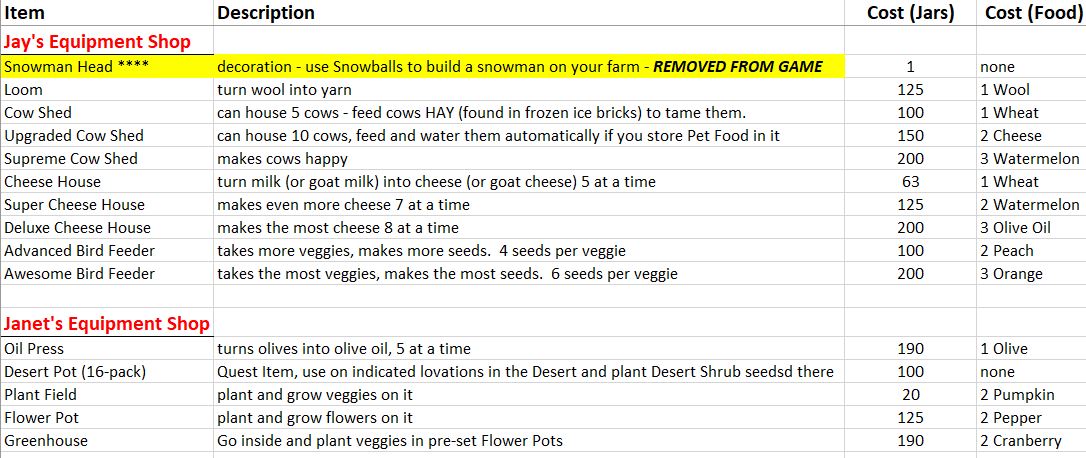
.
.
CRAFTING AT THE WORKBENCH
After you buy blueprints from the NPC shops (except Lily and Rudy) you'll need to build each item at your workbench. Remember you have two workbenches: one for furniture and decorations, and one for useful equipment. This list only covers the main workbench with USEFUL equipment. I don't plan on making a list for the furniture and decorations because they're super cheap and you can check those prices yourself by opening up the furniture workbench.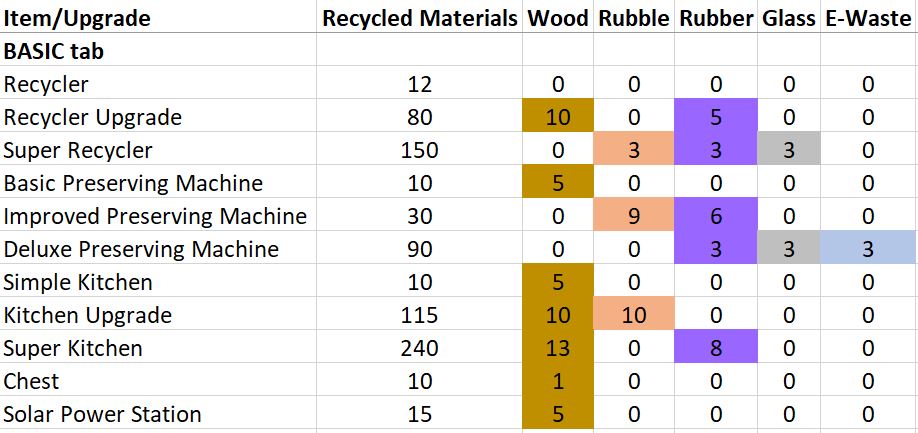
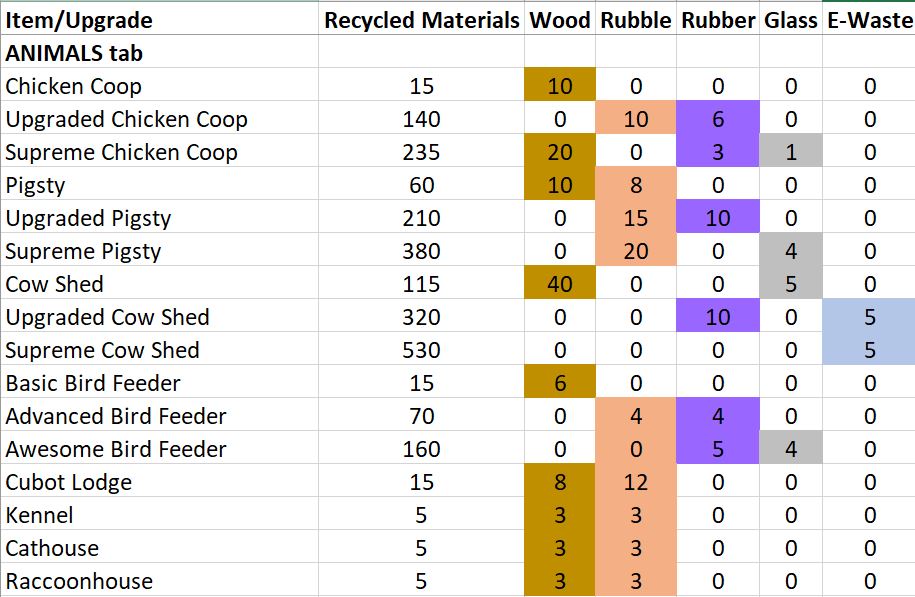
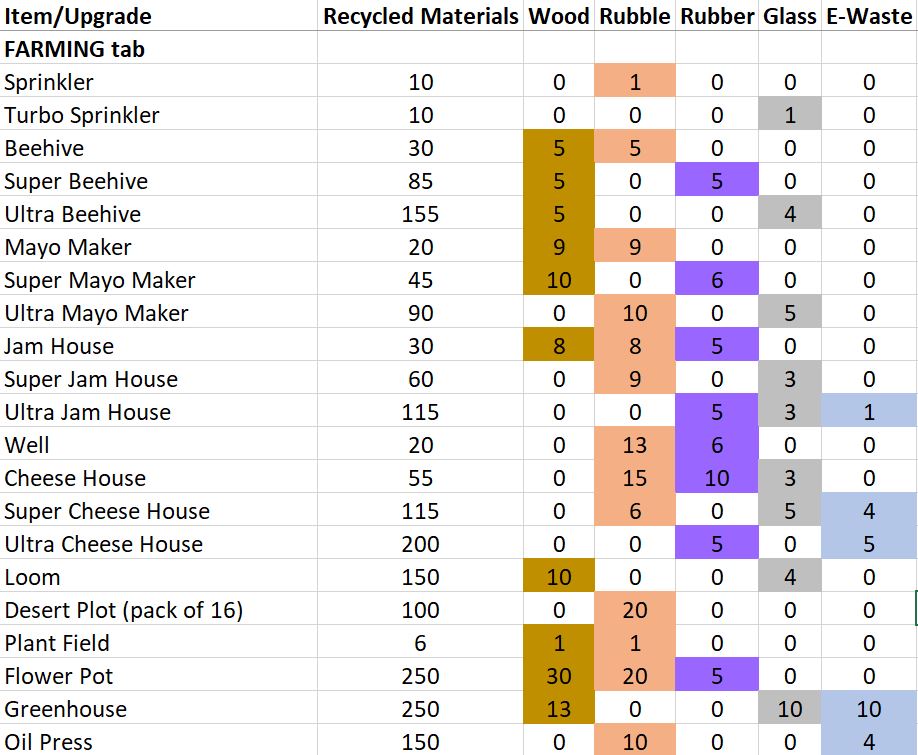
.
And there was one recipe removed from the game that I hope they bring back. It was useless, but it was cute. That would be the SNOWMAN decoration that you build using snowballs, a carrot, and a piece of wool. They'll probably never put it back in the game... but just in case it happens I'll post that recipe here, too. First you would buy the blueprint for the "Snowman Head" from Jay (cost one jar.) Then you would head to the workbench and spend a Snowball to make the head. Place it anywhere, just like building a mayo maker machine. Then click on it to spend another snowball, and again, and finally a piece of wool for the scarf and a carrot for the nose. But as I mentioned, this was removed from the game at the end of "early access" development and they might not want to bring it back.
NOTE: As of may 13 2022, the new version allows you to buy blueprints for the crafting station and the furniture crafting station, so you can then build your workshop ANYWHERE instead of just having the one on your farm.
Frank the architect in Lonely Hills sells both blueprints.
The Crafting Station costs 200 Prepared Meals + 3 Lettuce.
The Furniture Crafting Station costs 200 Prepared Meals + 3 Pumpkins.
When you go to your bench to build them, they both cost the same amount.
200 Recycled Materials + 15 Old Wood + 15 Rubble.
Seed Locations
Lily sells every seed in the game, but only after you 100% complete the quests for each zone. From the beginning she only sells seeds for decorative flowers, potato, tomato, and pumpkin. Once you finish the entire Village (quests from Harold and Mark) she will start selling seeds for Apple, Peach, After completing ALL quests in the Lonely Hills she adds seeds for carrot, pepper, corn, blueberry, and orange to her shop. After completing ALL of Frozen peaks she adds wheat, beetroot, onion, When you COMPLETELY FINISH the Desert she adds watermelon, cranberry, and olive seeds. This should give you a chance to acquire seeds for things if you accidentally use them all up.
Here is a chart of the locations of every type of seed in the game:
Lily requires JUST ONE of each type of crop - EXCEPT tea and sunflowers - to complete her quest and add them all to the collection list in your notebook. ** OATS should also be required by Lily but the developers broke the quest she no longer takes oats so the quest never completes. **
Here is a chart of the locations of every type of seed in the game:
- Potato: mostly in the farm but found randomly everywhere
- Tomato: mostly in the farm but found randomly everywhere
- Pumpkin: mostly in the farm but found randomly everywhere
- Lettuce: mostly in the Village, by the lake
- Eggplant: mostly in the Village, by the lake
- Strawberry: mostly in the village, and as daily gifts from FOXES
- Apple: almost exclusively in the village around the lake
- Peach: almost exclusively in the village, by the sea shore
- Oats: exclusively in the village, by the sea shore
- Carrot: all over Lonely Hills, and randomly in Frozen Peaks
- Pepper: all over Lonely Hills, and randomly in Frozen Peaks, and as daily gifts from DEER
- Corn: back half of Lonely Hills near the Old Quarry
- Blueberries: Old Quarry and Old Trading Post sections of Lonely Hills, and occasionally in Frozen Peaks, and as daily gifts from DEER
- Orange: Old Trading Post sections of Lonely Hills
- Wheat: all over Frozen Peaks
- Beetroot: middle section of Frozen Peaks, and as daily gifts from BOAR
- Onions: swamp section of Frozen Peaks
- Garlic: power plant section of Frozen peaks
- Watermelon: all over the Desert, and as daily gifts from FENNECS
- Cranberry: middle sections of the Desert
- Olives: back section of the Desert
- Tea: only a few seeds are found - and only in the Desert I think
- Sunflower: only a few seeds are found in Lonely Hills and the Desert
Lily requires JUST ONE of each type of crop - EXCEPT tea and sunflowers - to complete her quest and add them all to the collection list in your notebook. ** OATS should also be required by Lily but the developers broke the quest she no longer takes oats so the quest never completes. **
Challenge Mode - Quick Start Guide
Challenge Mode is "mostly the same" except combat is harder and it is MUCH harder to kickstart your economy in the beginning because everything is SO EXPENSIVE. So for the most part, you can just follow along the main walkthrough. However, you WILL NOT have enough Old Wood to build everything you unlock by the time you leave the village and enter the Lonely Hills - even if you clear out the entire underground labyrinth. And if you die, you will LOSE a huge chunk of your jars of food and your recycled materials when you revive the next morning!! So I want to give you some tips on how to start out in the early game in such a way that you won't go broke and thus make it impossible to make any further progress. YES IT IS POSSIBLE TO GET STUCK IN THE BEGINNING IF YOU RUN OUT OF SEEDS, JARS, OR OLD WOOD TOO EARLY. Follow my advice here to avoid that.
- Clean the trash off your farm.
- IMMEDIATELY after clearing the trash off your farm, buy the Rubble Drill upgrade from Rudy.
- Now start planting whatever seeds you found. There is NO NEED to save seeds, plant them all if you have an empty farm plot.
- Remember to water your vegetable farm EVERY MORNING or the crops won't grow.
- Give Cornelius the book you found on your farm.
- Go in the house and clean up the trash in the main room.
- Sleep in the bed. Waking up will auto-save the game. Go out the front door. Hit ESC and save again to drop a manual save file.
- Water your veggie farm since it's a new day now.
- Build ONE (not two or three) Chicken Coop.
- Feed potatoes to FIVE chickens so they will live at the coop.
- Give Cornelius the fabric scraps that you found on your farm.
- Approach a chicken THAT YOU OWN and press "R" key. Give it a name and a hat.
- Give Cornelius the clean glass scraps that you found on your farm.
- Put the Disco Ball right in front of your chicken coop to make the chickens dance.
- Tell Cornelius it's done. He gives you an item that Mark wants.
- At the back part of your farm (across the river and through a door) you'll find a ramp that needs 2 boxes to build a little bridge. Do that, cross the fence to find Cornelius as part of his next "hide and seek" quest - this is the first of several locations where you'll have to talk to him all around the world.
- Build ONE OR TWO chests, for storing seeds and veggies.
- Go talk to Mark about chicken friendship. He asks you to go see Harold next. He also asks you to replant some poisoned trees and fix a water filter.
- IMMEDIATELY buy the KITCHEN and go build ONE on your farm. From now on, no more preserving raw ingredients - only preserve COOKED meals because they give you extra jars.
- Head down the hill past the red Rubble trash. Notice the dog on the hill, we'll be back for him.
- Clear this area of all the trash - DO NOT DIE HERE it's embarrassing.
- Put a box on the switch behind one of the demolished houses. Hit a switch inside to move the floor of the house next door so you can enter the basement. - BUT DO NOT ENTER THE BASEMENT YET.
- On the other side of the wooden fence, climb the ramp alongside the cliff and shoot water into a bucket to activate a button under the bucket. This opens a chain-link fence nearby.
- Go through the area where the fence opened. Climb up the ramp there for some loot. Now you have access to the underground through that utility door as well as the basement door nearby.
- Run home and plant some LETTUCE and APPLES immediately!! You'll need five of each. Remember veggies take 3 days (with watering) to grow. Fruit trees do not need watering but they take a whole week to grow - after that they make one fruit per day.
- Enter the basement door. Clear out the trash. If you're lucky you'll find a few more apple seeds and maybe some peach seeds, too. You should keep 10 of each tree on or near your farm. You can plant any extra seeds anywhere you think that a tree would look nice.
- Buy Kitchen 2 but don't build the upgrade yet.
- Buy Birdfeeder and build TWO of them on your farm. From now on, NEVER eat, cook, or spend the last THREE of any veggie - put them in here to get NINE seeds in return. This is how you avoid GOING BROKE in this game. Feed veggies to birds, get more seeds a little while later, and just keep farming.
- Go through the door to the next area (the lake) and clear some of the trash nearby. Go talk to Harold. He'll ask you to help the dog first. While you're here, buy his Beehive blueprint and his Mayo Maker blueprint. If you can afford it, buy the Pigsty blueprint too - if not, come back for it when you have more lettuce and jars.
- Build THREE beehives and ONE Mayo Maker on your farm. From now on, feed most of your eggs into the mayo maker unless you need them to cook something specific.
- You should have found enough dog food already, give it to Harold and he'll give you a doggy snack.
- Go build your dog kennel (it's FREE) wherever you want to keep your dog.
- Give the snack to the dog that roams down the hill from Mark's shop - NOT the dog at Mark's shop.
- Go talk to Harold and he'll mention foxes need help now.
- There are FIVE foxes all around the lake. There are also FIVE fox traps all around the lake. Break all the traps by attacking them a few times.
- Find the old fox den by a pond. Fix it with materials. Let it finish being rebuilt.
- Meanwhile, turn around and look up by the pond - spray water into the bucket to open the fence nearby. This exposes a cave that leads to another section of the underground labyrinth.
- After the fox den is done, go all the way around the lake. Clear out all the trash. Feed a strawberry to each of the five foxes. From now on, each fox will give you a few strawberry seeds per day. Remember to pet them every day, too, if their heart gets bigger they give you more seeds.
- Place two boxes on red panels to build a little bridge, leading to another entry to Underground Labyrinth. There are TWO entrances on this side of the lake... the final one is at the end of the next area through the door nearby.
- This is a good time to go back and start the underground labyrinth since you're probably out of Old Wood and you can't build anything else without it.
- Go use the door that was under the removable floor. Clear that zone out.
- Same for the entry through the utility door.
- Same for the entry near Harold's shop.
- Talk to Harold about the foxes and now he wants his own house rebuilt. Do that... for 80 Rubble and 80 Old Wood.
- Now Harold says Napoleon (his pig) is missing... we'll find the pig farther into the underground.
- Buy the blueprint for Jam House. Also Pig Sty if you didn't get it already.
- Build ONE pig sty and ONE jam house.
- Toss a few strawberries into the jam house, save the jam since you'll need it soon.
- Grab 5 Honey and go feed 5 Pigs. They'll give you Truffles every day from now on.
- Build that Kitchen 2 upgrade - put the upgrade DIRECTLY ON TOP OF your existing "basic kitchen"
- Buy the Kitchen 3 upgrade from Mark. Once the Kitchen 2 upgrade is done, build upgrade 3 right on top of it. Now you can cook ANY dish in your kitchen (once it's done with construction).
- As you continue the Underground and work your way through the last few sections of the Village, you can work on the following upgrades from Rudy: Berry Picker Gloves 1, Big Backpack 1, Bigger Water Tank 1, Herbal Vitamins 1, Trash Extractor 1, Rubber Drill, Runner's Shoes, and Hardened Drill 1. Once you have ALL of those, you're good to go to Lonely Hills.
- Turn in the final quests for Harold (did you find Napoleon?) and Mark (did you remember to fix the water filter and replant all 15 dead trees?).
Challenge Mode - Summary
Heading into Lonely HIlls you should have on your farm:
1 Grandpa's Bird House1 Recycler
2 Preservers (one was a quest reward)
3 6x6 farm plots for veggies (build one of them underground to save space!!)
10 Apple Trees
10 Peach Trees
1 Chicken Coop with 5 Chickens
2 Bird Feeders
1 Mayo Maker
3 Beehives
1 Jam House
1 Dog Kennel with a Dog
1 Pig Sty with 5 Pigs
1 Kitchen level 3
If you've got all of that, then you should be self sufficient now. So you can just go back and follow the Adventure Mode guide from here on out. It will just take you longer to collect enough Jars and construction materials to build all your new tools and such. Good luck!
A few reminders:
- Water your farm plots EVERY MORNING.
- NEVER spend your final 3 of any type of veggie; put them in the bird feeder instead so you never run out of seeds.
- Try not to run around with more than 300 Jars of food in your pockets; when you die you'll lose a big percentage of those as the cost to revive you.
- DO NOT run around after midnight, your HP will drain until you die.
- DO NOT try to rush it. This game is intended to be casual, not a speed-run. Take your sweet time with things so you don't make a mistake.
- After finishing a quest, if you have EXTRA quest items they can go into the recycler machine so they don't take up inventory space.
- Need more trash, old wood, or rubble? Go back and clear another section of the Underground Labyrinth. Or go further into Lonely Hills - that place is just FULL of garbage.
Challenge Mode Encyclopedia
Challenge Mode prices and blueprint requirements are DIFFERENT from Adventure Mode. Typically everything will be more expensive, except KITCHEN RECIPES ARE THE SAME - so I won't post a new list of cooking recipes here.
NPC Blueprint Shop Prices
UNDER CONSTRUCTION - COMING SOON
Workbench Crafting Requirements
UNDER CONSTRUCTION - COMING SOON
NPC Blueprint Shop Prices
UNDER CONSTRUCTION - COMING SOON
Workbench Crafting Requirements
UNDER CONSTRUCTION - COMING SOON
Future Updates
The developers have said they are planning even more changes yet to come. But it's been nearly a year and they still haven't properly finished the game or provided all the updates that they promised. Interestingly enough - those updates they promised for THIS game are present and functional in their NEXT game which they worked on right before final release of this game and released it almost immediately after this one.
So basically it seems to me that they've abandoned this game in a 2/3 complete state but they're selling it as "full release version" anyway, and now focusing on the new game which is WHAT THIS GAME WAS SUPPOSED TO BE. So don't hold your breath waiting for any new updates or bugfixes because I don't think they're coming.
Hard Mode ... is done, comes with the most recent update.
All the entrances to the underground basements in the Village used to be connected to a bigger labyrinth during early access, but they removed it for final release. However, due to popular demand, they rebuilt the old underground labyrinth so you'll have more areas to explore. Note this might change the locations of some of the cooking recipes, decoration blueprints, and maybe one location of Cornelius playing hide and seek... I just started a new playthrough to see exactly what is down there.
Fishing is coming soon seems to have been abandoned. They say it will not be like other farming/adventure fishing minigames though, it will be sort of like collecting all the different animals in the game. Go fishing at a certain spot with certain bait, catch a certain type of fish, and basically keep them all in an aquarium. Or something like that. I guess maybe sort of like what "Dinkum" does with their fish. So it's still MOSTLY keeping with the game's "vegetarian" and "eco-friendly" themes. But we'll have to wait until they release it to know for sure what it will be like. ... It seems that their new game "Fresh Start Cleaning Simulator" (so named because they wanted a fresh start at making THIS game only BETTER this time) already has the fishing minigame included. It's been a year since final release, even longer since they promised us fishing for NPLH, and it's still not here.
And perhaps someday maybe possibly perhaps... they might throw in a use for the sheep's wool, the decorative flowers, and a few other things that are currently mostly useless.
But it looks like they abandoned the game, basically did a REMAKE which is Fresh Start Cleaning Simulator instead.
The new remake, and abandoning this game with so many promises (and game-breaking bugs) still outstanding... feels like a slap in the face to us players. So I'm out. This guide is "complete" enough, I will not be making any more edits or updates. I am deleting the game from my Steam library and moving on to other projects. Bye.