Battlefield 6: Redsec – All Exploration Locations (Battle Royale)
 SuperBrat12
(70 ratings)
Oct 29, 2025 @ 5:09am5,550118
AchievementsCharactersClassesCo-opCraftingGame ModesGameplay BasicsLootMaps or LevelsModding or ConfigurationMultiplayerSecretsStory or LoreTradingWalkthroughsWeaponsWorkshop
About This Guide
This guide covers all 20 Exploration Challenges and all 20 Secondary Challenges in Battlefield 6: Redsec Battle Royale — every location across the massive Fort Lyndon map, including hidden and easily missed points of interest.
Each entry shows the exact in-game objective and includes short notes to help you find them faster.
Each entry shows the exact in-game objective and includes short notes to help you find them faster.
⚠️ Important:
• You must be Rank 10 before you can start earning Exploration challenge progress.
• These can all be completed solo in Portal Mode with bots — progress still counts!
• You only need to visit each area once; there’s no combat requirement.
Quick Stats
Category
Details
Total Exploration Challenges
20 + 20 ( Secondary) = 40 Total
Map
Fort Lyndon
Mode
Battle Royale – Redsec
Completion Time
1–2 hours (with helicopter or vehicle)
✅ Tip: Use a helicopter or fast transport to chain multiple discoveries in one match. Landing briefly in each zone counts even if you die right after.
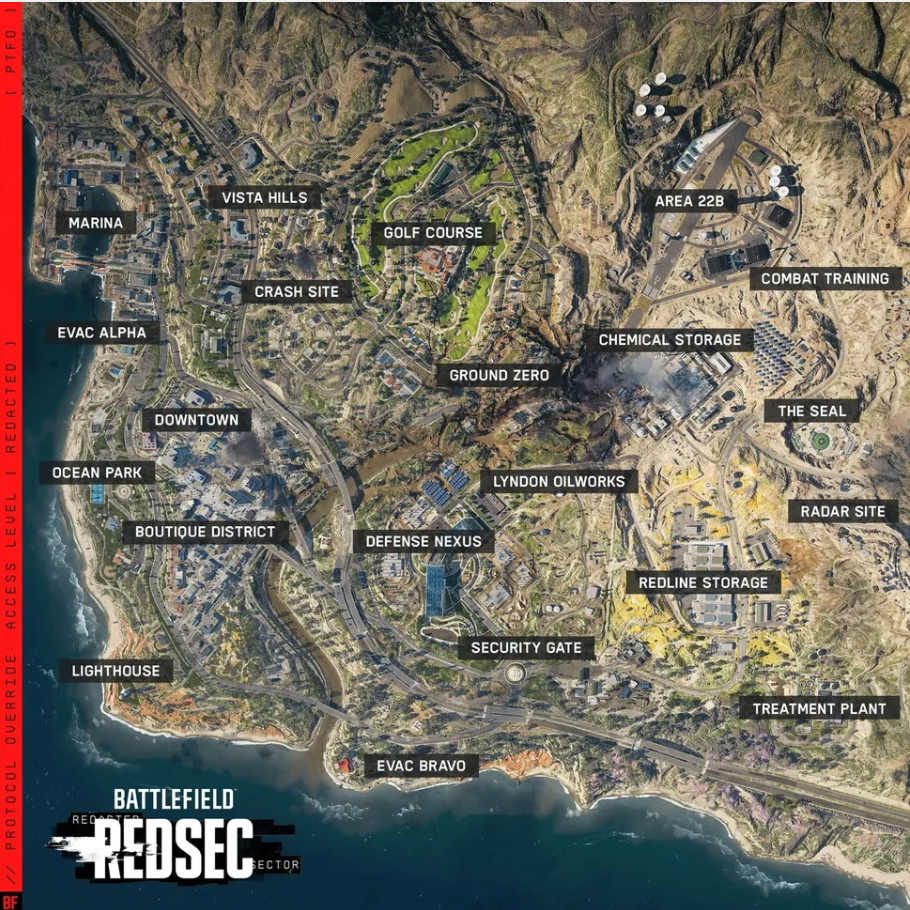
BATTLEFIELD REDSEC MAP
Marina Exploration
Discover the bridge in the Marina District.
0/1
0/1
MAP LOCATION
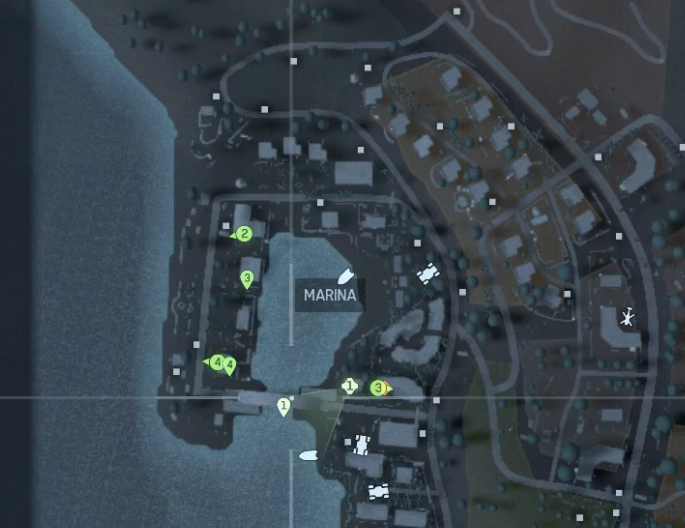
Marina Exploration Second Challenge
Pilot a boat out of the Marina.
0/1
0/1
MAP LOCATION
Fleetview Ridge Exploration
Discover the crashed plane’s attached wing in Fleetview Ridge.
0/1
0/1
MAP LOCATION
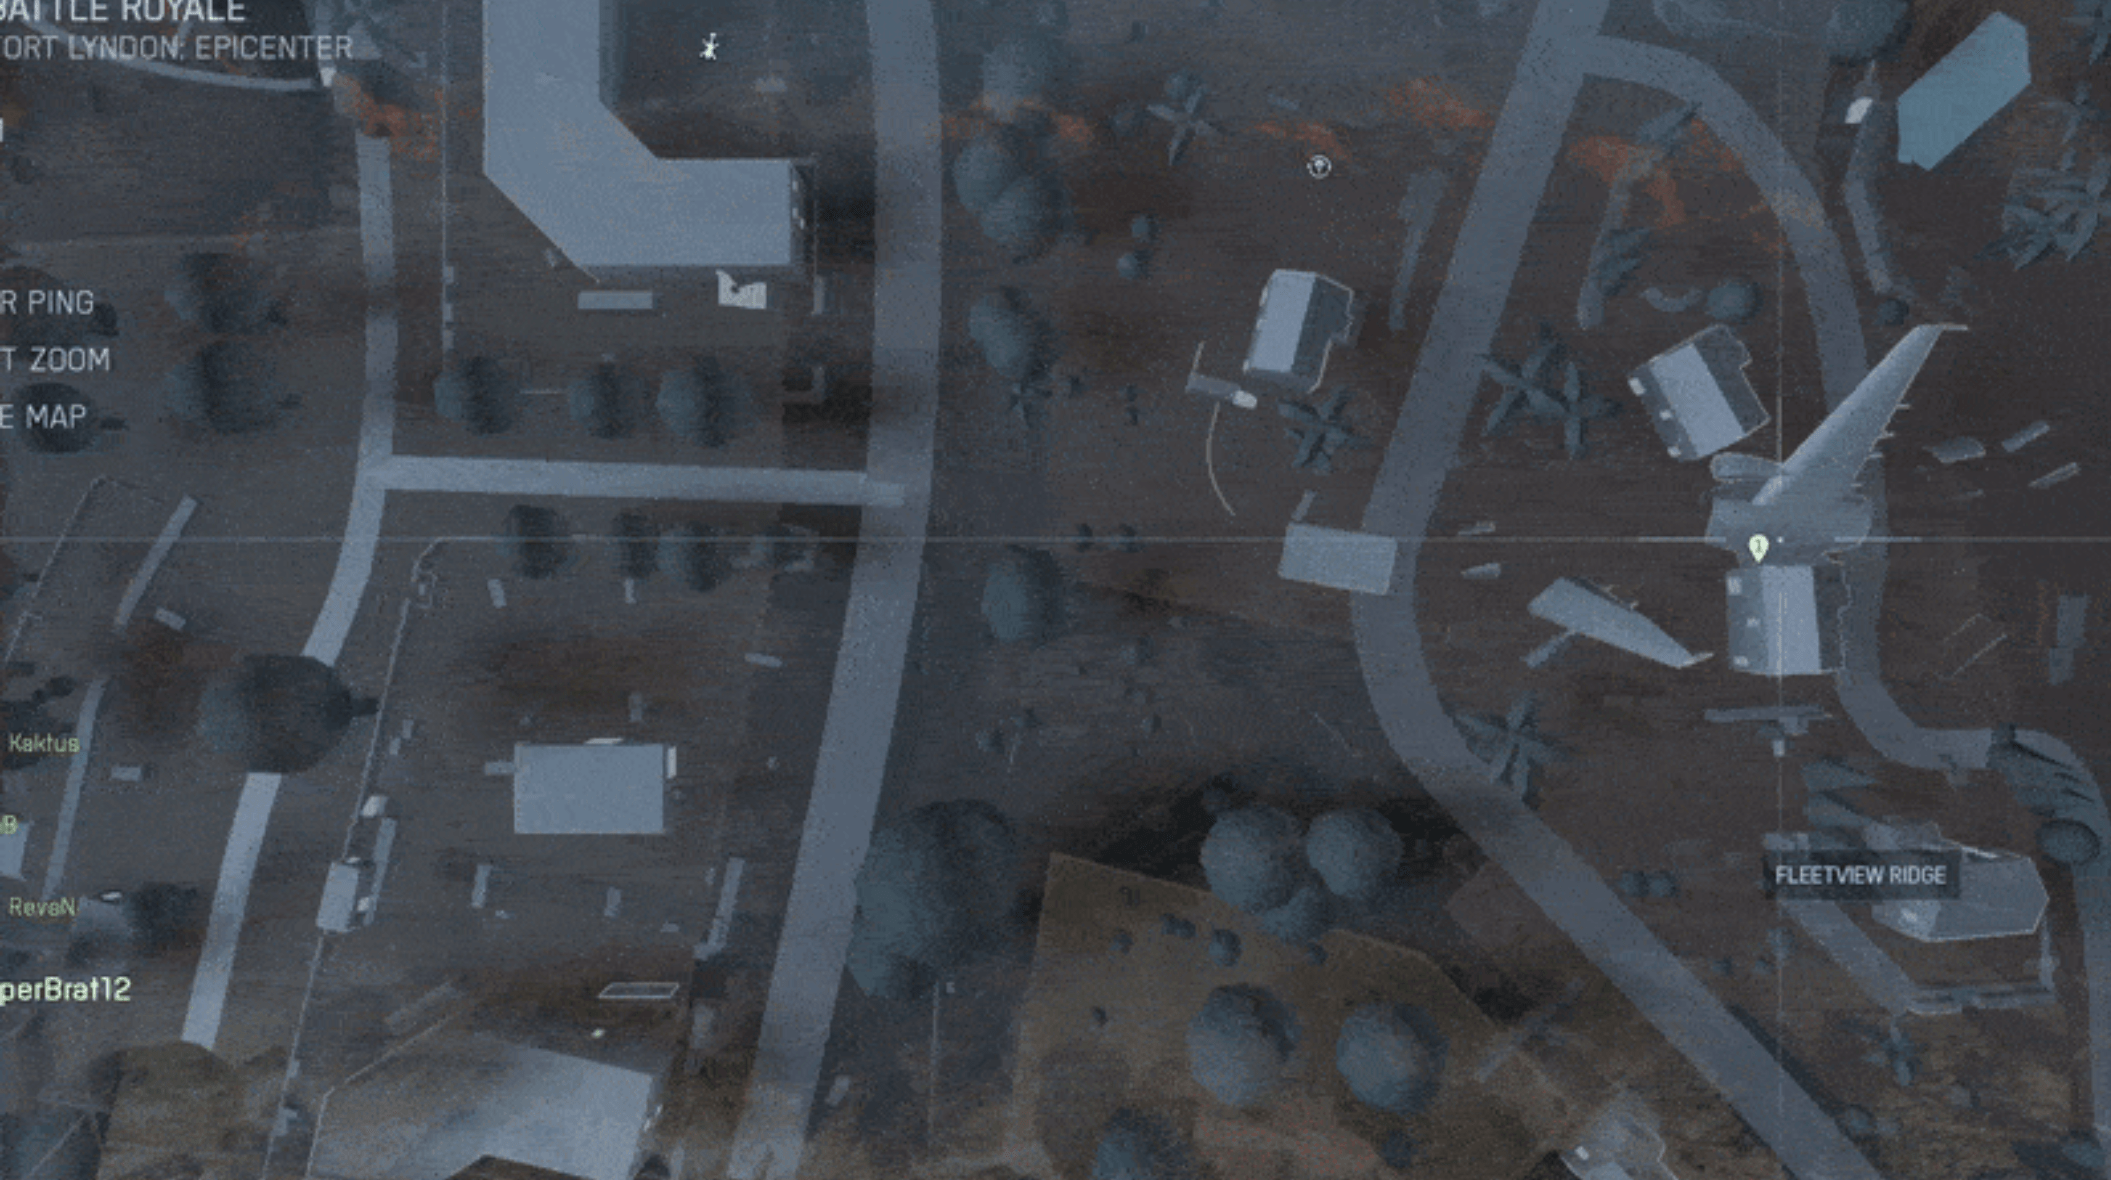
Fleetview Ridge Exploration Second Challenge
Spot an enemy from the crashed plane's connected wing.
0/1
0/1
How to complete the challenge:
- 1 Step: I would recommend to use the Recon class / sniper
- 2 Step: You need to get up on the broken wing.
- 3 Step: Find an enemy and spot him / aim at him
MAP LOCATION
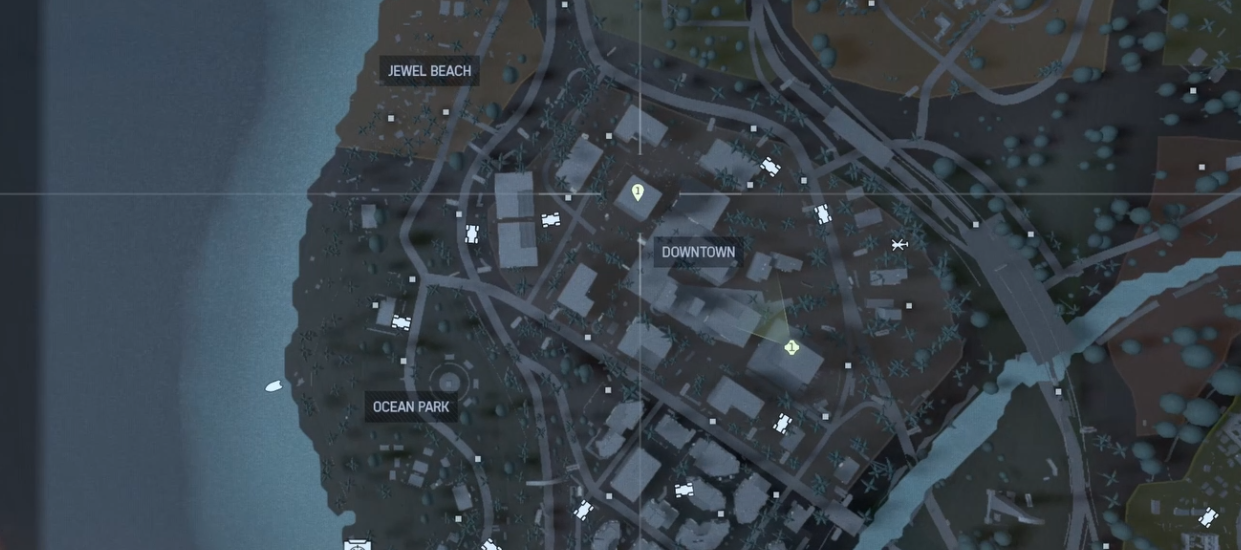
Downtown Exploration
Discover the B2 parking garage tunnel connected to the Crow’s Nest Downtown.
0/1
0/1
MAP LOCATION
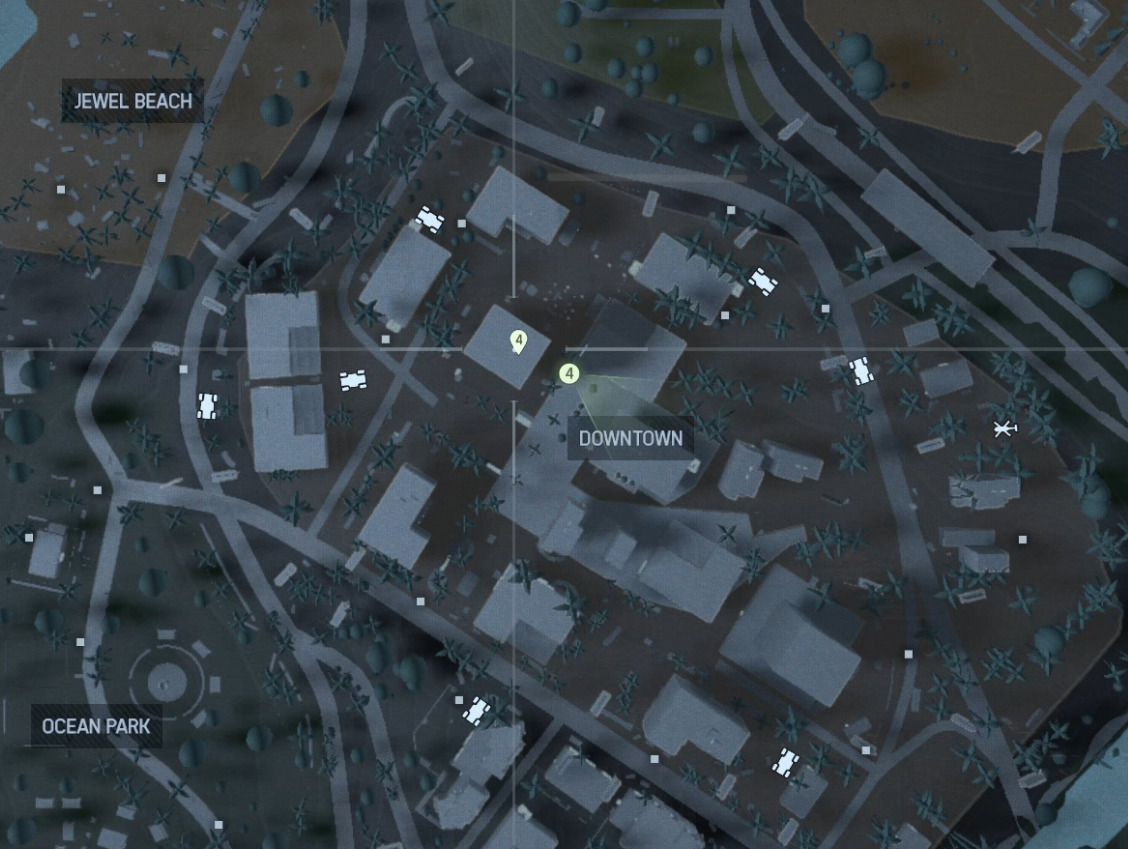
Downtown Exploration Second Challenge
Demolish the skyscraper that has a crow's nest..
0/1
0/1
How To Destroy The Building
- Use Gadget Like Airstrike or Artillery
- Use a Bradly or any Tank
- C4 and rockets
MAP LOCATION
Golf Course Exploration
Discover the bar at the Vista Reyes Country Club.
0/1
0/1
MAP LOCATION
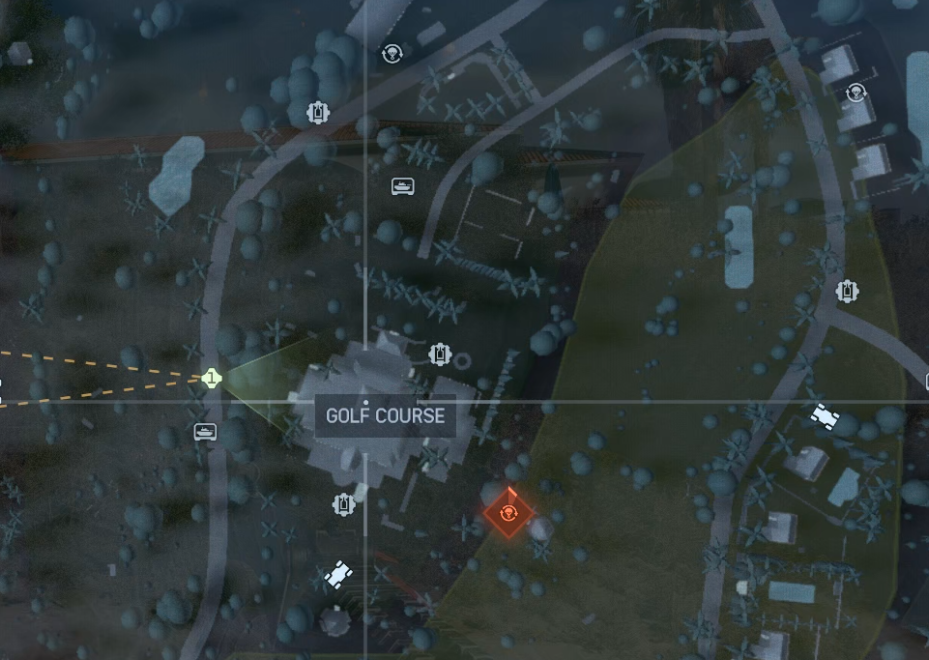
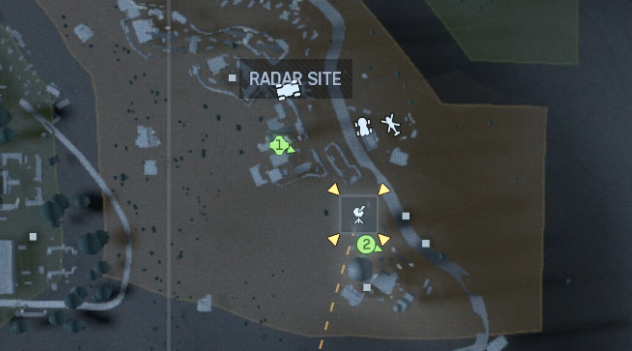
Golf Course Exploration Second Challenge
Turn an enemy into roadkill with a golf cart on any Golf Course green
0/1
0/1
How to do this challenge;
- You can only complete these challenges on the Golf Field – Green Grass Plains.
- Here’s a map with all the locations marked in green and a red pointer arrow:
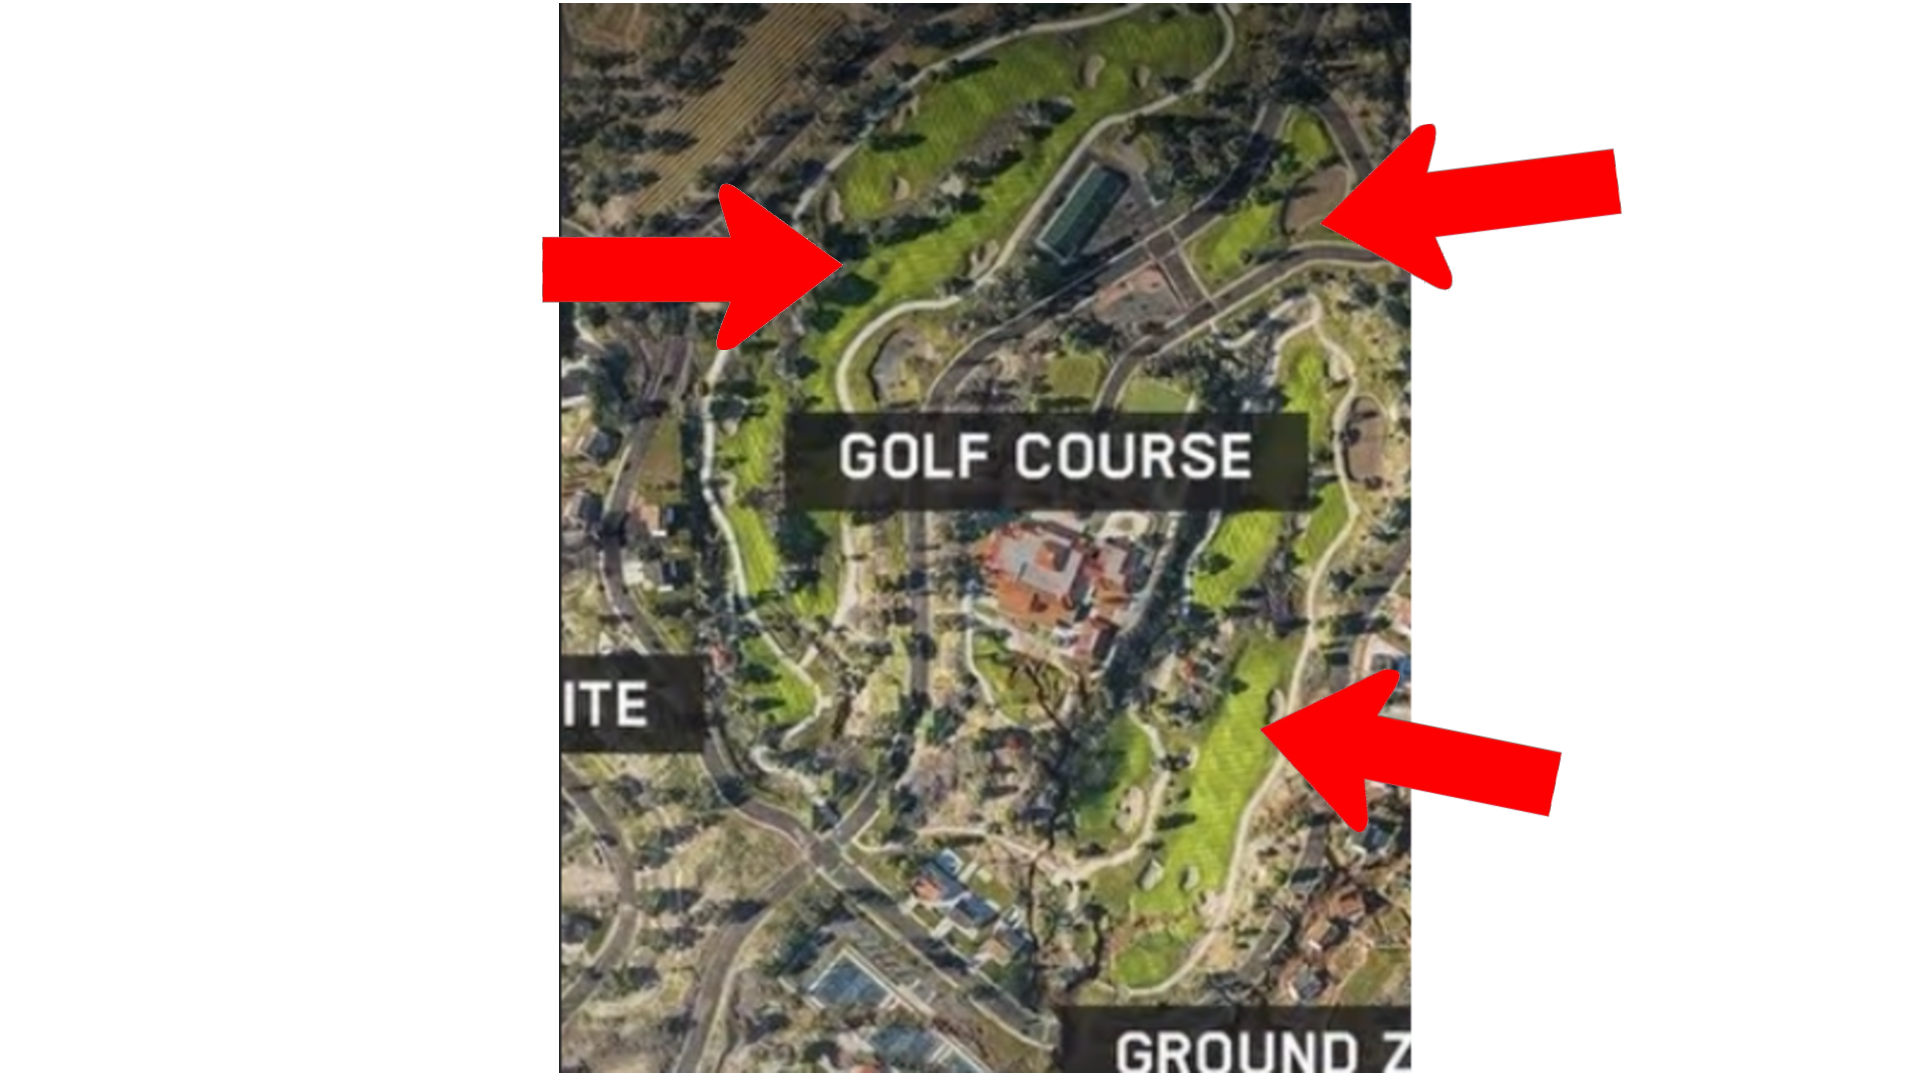
- Just go to one of the green marker to complete the challenges quickly and efficiently.
- Do this in the Traning mode "Initiation" Battle Royal, Doing it with BOT are easier.
MAP LOCATION
Chemical Storage Exploration
Discover the oil refinery near Chemical Storage.
0/1
0/1
MAP LOCATION

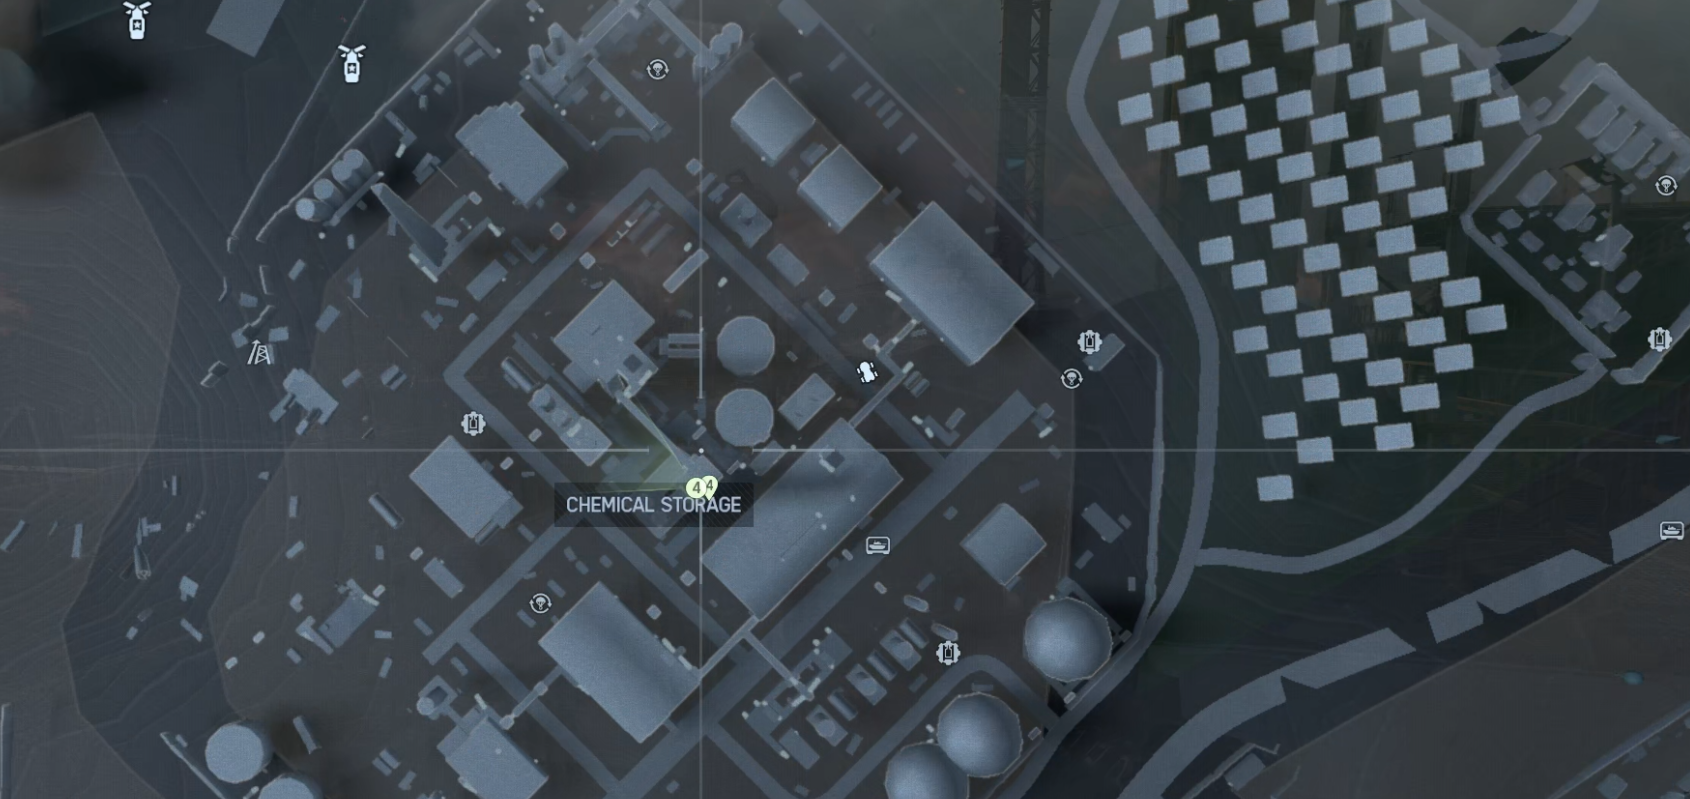
Chemical Storage Exploration Second Challenge
Get a kill with explosive damage near Chemical Storage
How to complete the challenge:
Play in Duos or Quads. I recommend playing Initiation mode, as it includes bots and is much easier.
Steps:
MAP LOCATION
How to complete the challenge:
Play in Duos or Quads. I recommend playing Initiation mode, as it includes bots and is much easier.
Steps:
- I recommend to use the engineer
- Go to Chemical Storage
- Use any explosive launcher, grenades, or C4.
- Kill a player or a bot (you only need one kill).
- If you down a player or bot with a gun and then finish them with a launcher, it also counts toward the challenge.
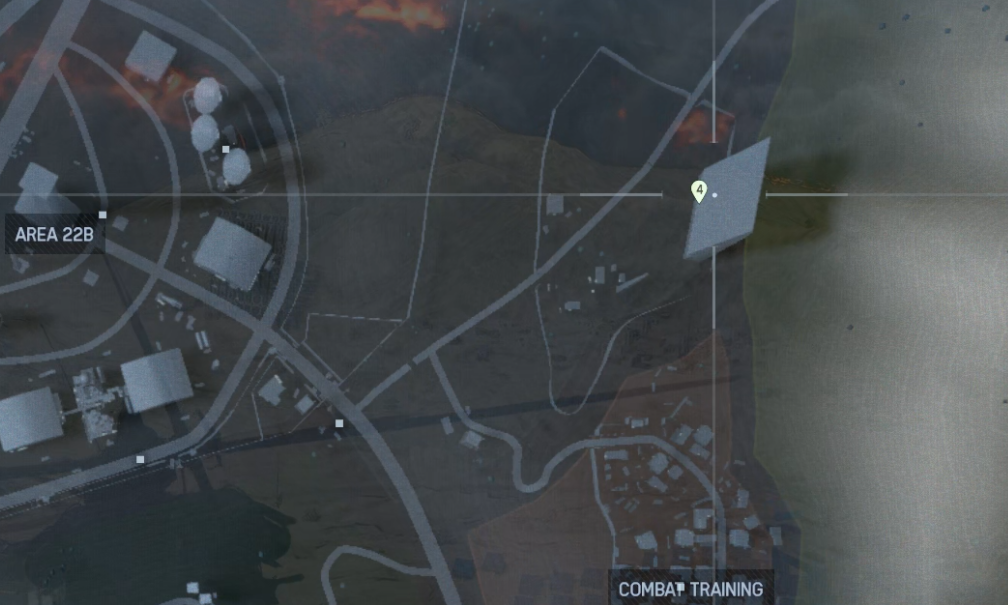
Area 22B Exploration
Discover the air traffic control tower in Area 22B.
0/1
0/1
MAP LOCATION
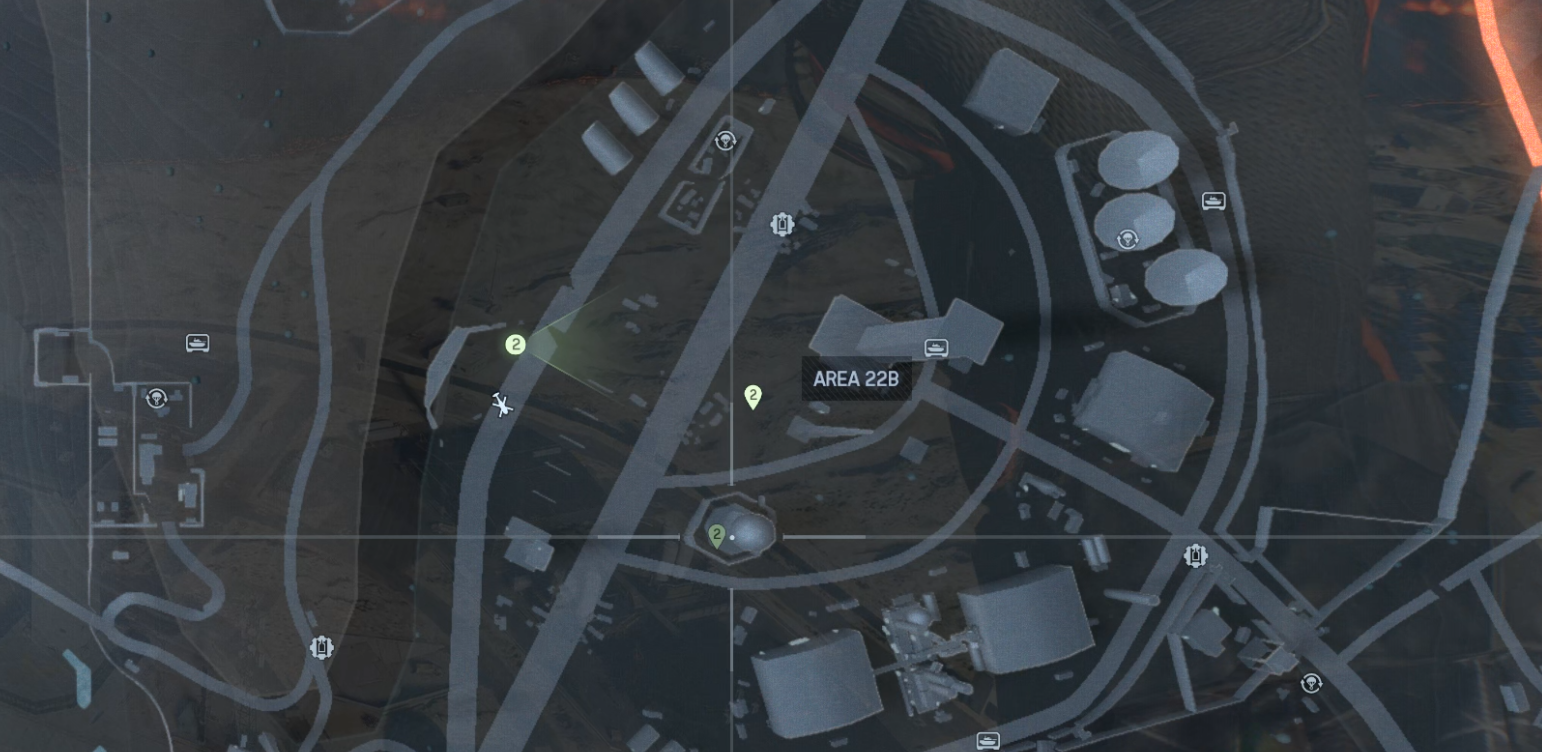
Area 22B Exploration Second Challenge
Destroy a helicopter from the air traffic control tower
How to complete the challenge:
I was only able to complete this in REDSEC QUADS, because it’s the only mode where all map locations are open from the start.
IMPORTANT: You can only complete this challenge if an enemy player has been inside the helicopter. As long as an enemy has used it, the challenge will count—even if they jump out. You will complete the challenge as shown in the GIF.
Steps:
- I recommend to use the engineer
- Go to Area 22B
- Reach the air control tower and go to the top.
- I recommend damaging the Little Bird helicopter nearby with a regular weapon first — remove about half of its health.
- If you find C4 near by throw in on the little bird and wait to someone gets in it if possible.
- Wait until someone enters the helicopter, then shoot it with any rocket or use your C4. I recommend using an AA rocket; if you can’t find one, use the standard Engineer rocket launcher.
(You can destroy any helicopter — it doesn’t have to be a Little Bird. You just need to fire a rocket from the air control tower and destroy it while an enemy is inside or has entered it)
Radar Site Exploration
Discover a radar dome in the Radar and Communications area.
0/1
0/1
MAP LOCATION
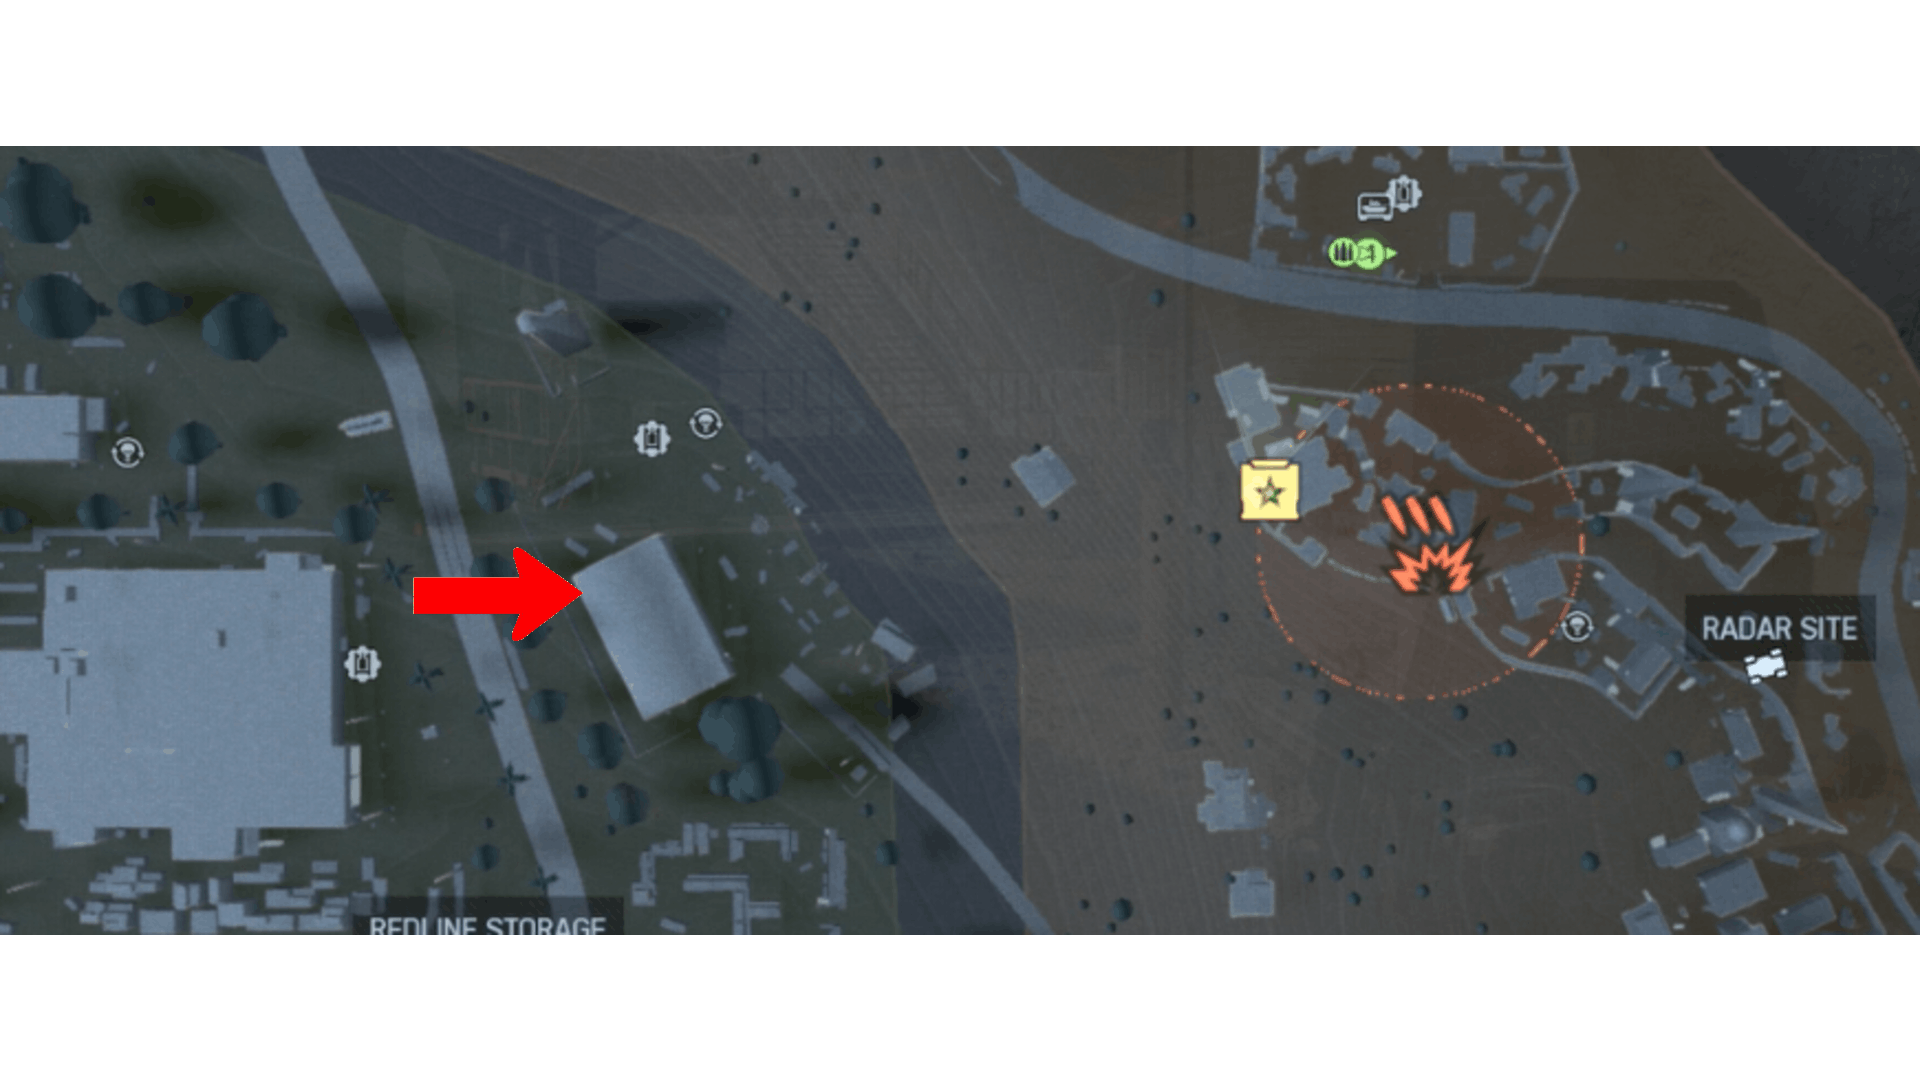
Radar Site Exploration Second Challenge
Zipline to the Radar and Communications area
0/1
0/1
How to complete the challenge:
I was only able to complete this in REDSEC QUADS, because it’s the only mode where all map locations are open from the start.
Steps:
- Go to Redline Storage.
- Get on the roof of this building (see image below).
- Use the zipline to reach the Radar Site at the top.
MAP LOCATION
Redline Storage Exploration
Discover the D-06 vehicle repair bay near Redline Storage.
0/1
0/1
MAP LOCATION
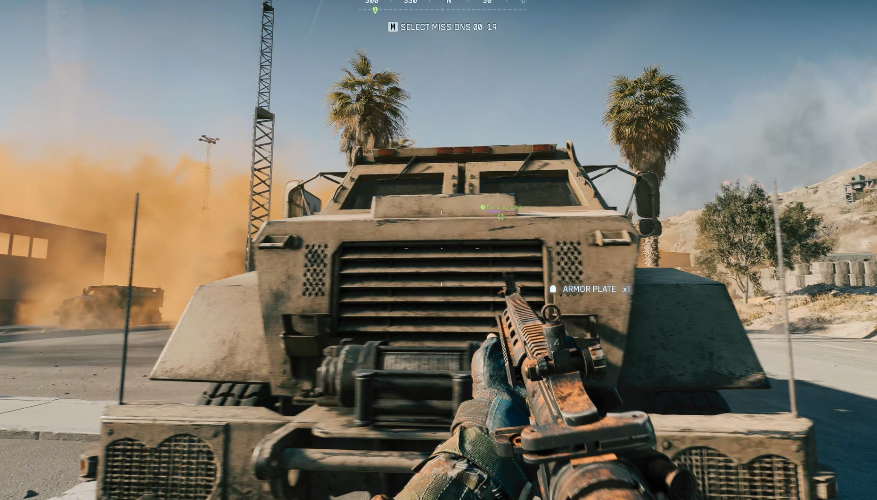
Redline Storage Exploration Second Challenge
Loot an MRAPV near the Redline Storage.
 How To Complete:
MAP LOCATION
 How To Complete:
- Step 1: Go to Redline storage
- Step 2: Find a MRAPV
- Step 3: Loot It
Defense Nexus Exploration
Discover Walker-Senex’s rooftop patio.
0/1
0/1
MAP LOCATION
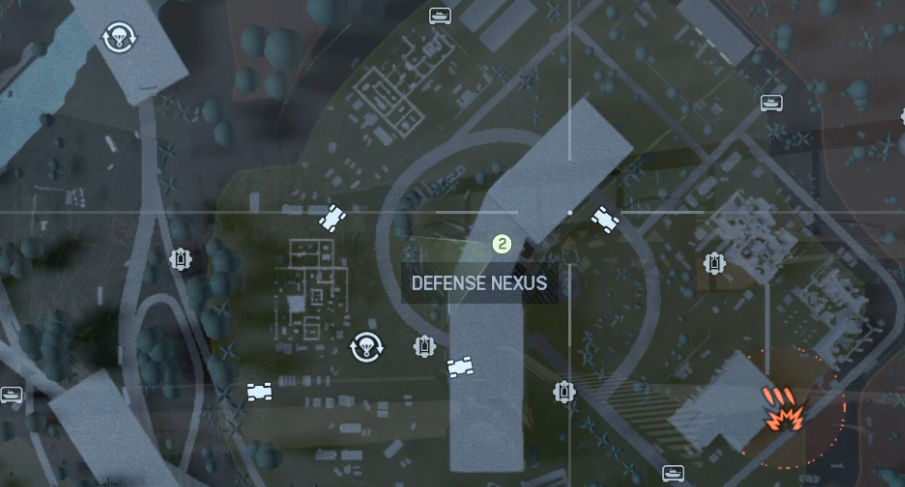
Defense Nexus Exploration Second Challenge
Pet a MASTIFF robot dog inside the Defense NExus
0/1
0/1
Find any of the MASTIFF robot dogs in the compound and melee it.
MAP LOCATION
Lighthouse Exploration
Discover the mounted crab inside the Lyndon Point Lighthouse.
0/1
0/1
MAP LOCATION
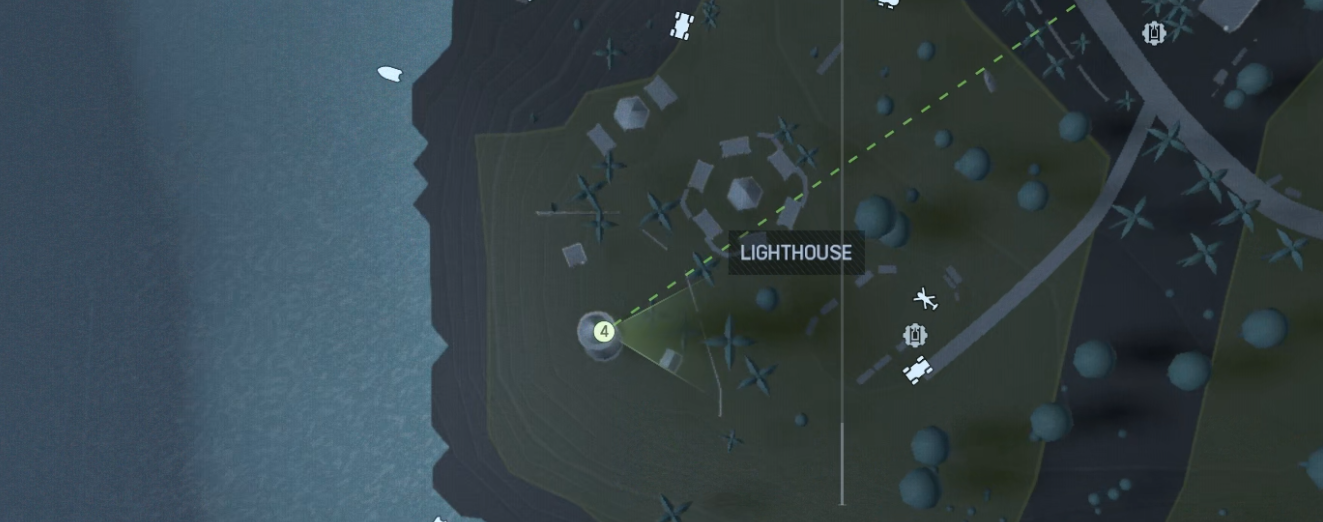
Lighthouse Second Exploration Challenge
Destroy The Lyndon Point Lighthouse's reflector
0/1
0/1
MAP LOCATION
[/previewimg]
Ocean Park Exploration
Discover the tennis courts in Ocean Park.
0/1
0/1
MAP LOCATION

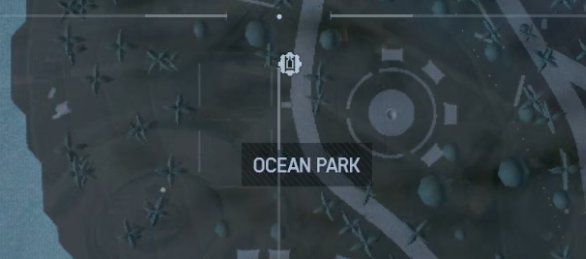
Ocean Park Exploration Second Challenge
Discover the tennis courts in Ocean Park.
0/1
0/1
How To Complete The Challenge:
- Recommended to use C4
- 1 Step: Get explosives gadgets to call in Airstrike or Artillery / Or drive a car up to the mounoment
- 2 Step: Go to the tennis courts
- 3 Step: Blow up the explosives or call in the Airstrike, Artillery or blow up the car
MAP LOCATION
Evac Bravo Exploration
Discover the Golden Anchor restaurant.
0/1
0/1
MAP LOCATION
[/previewimg]
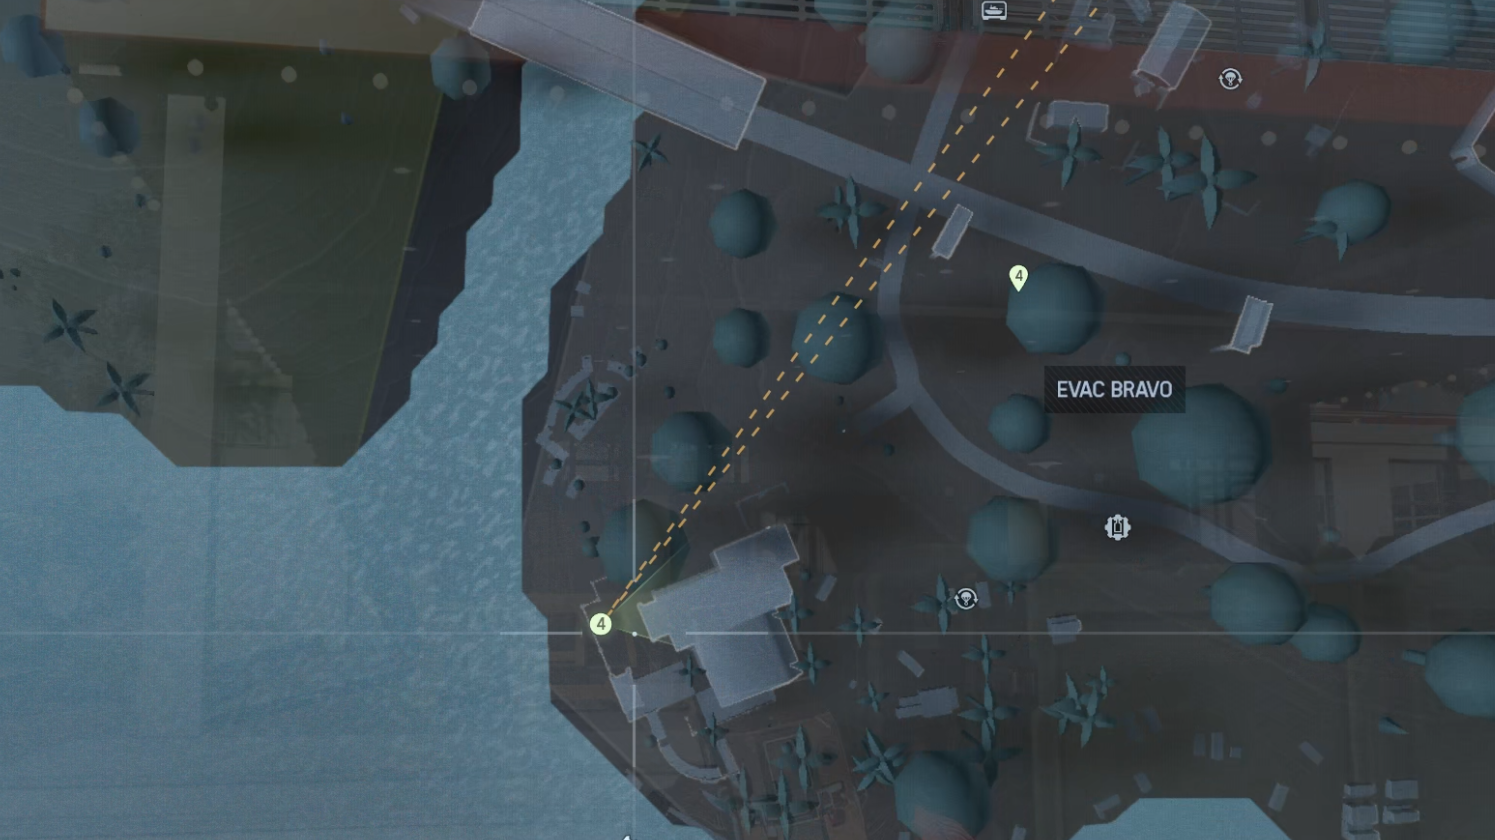
Evac Bravo Exploration Second Challenge
Loot supply crates near Brume Shore
0/5
0/5
How To complete the challenge:
- Get over to the Evac Bravo side.
- Then get down to the beach
- Then go and loot 5 crates near the shore
The shore:
MAP LOCATION
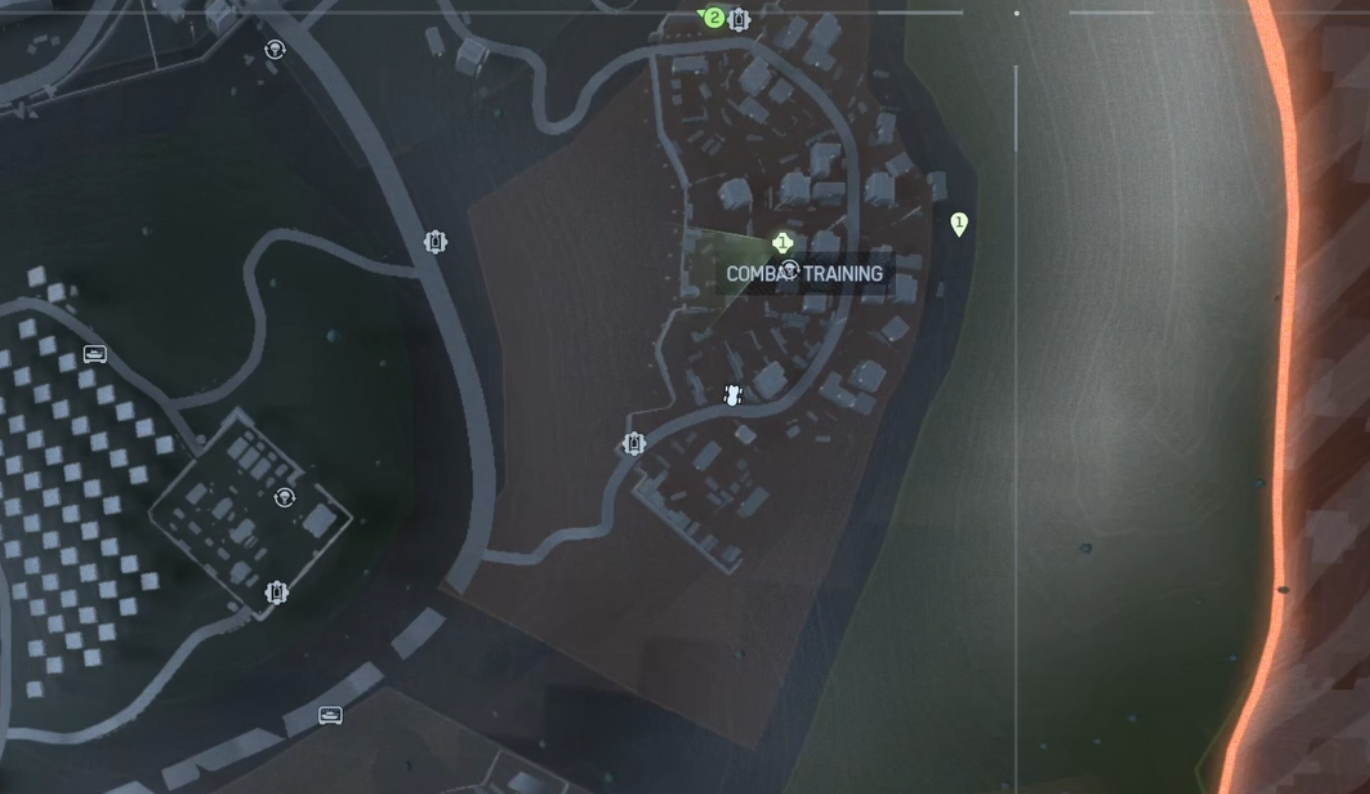
Combat Training Exploration
Discover the radar array near Combat Training.
0/1
0/1
MAP LOCATION
Combat Training Exploration Second Challenge
Discover the radar array near Combat Training.
0/1
0/1
How To Complete the Challenge:
- 1 Step Land at the Combat Training Ground
- 2 Step Walk in to the bulidings
- 3 Step Targets will pop up
- 4 Steps Shoot them to they get destroyed / recommended to use a shotgun
- 5 Shoot10 targets
MAP LOCATION
Ground Zero Exploration
Discover the epicenter of the explosion.
0/1
0/1
MAP LOCATION
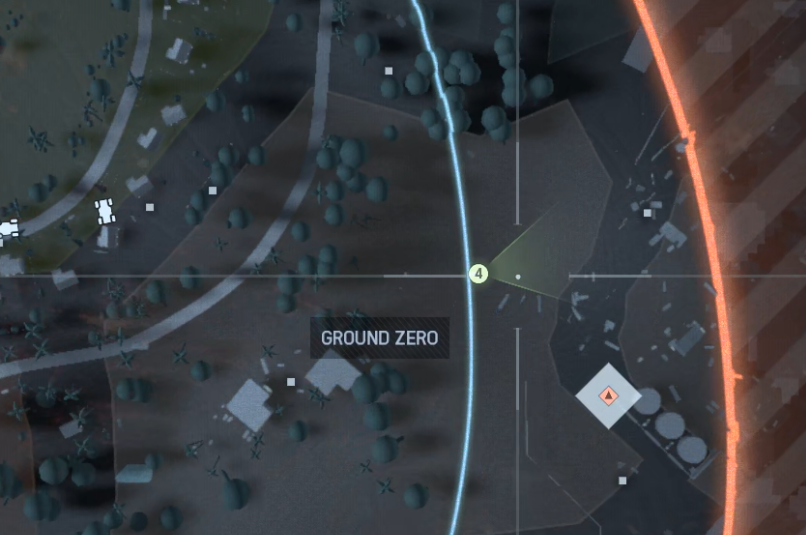
Ground Zero Exploration Second Challenge
Start a mission from the Ground Zero
0/1
0/1
How to do this challenge:
I was only able to do this challenge in normal BR, and not in another mode like initiation.
So when Choose the standard mode for REDSEC and fly over to Ground Zero and start a mission.
How to Start a Mission
On PC, press M (or whatever key you use) to open the map.
After starting the game, it can take about a minute before missions are available.
When missions are ready, you’ll see a prompt on your screen.
Open the map, choose any mission, and the challenge will be completed.
MAP LOCATION
The Seal Exploration
Discover the secret tunnel near The Seal.
0/1
0/1
MAP LOCATION
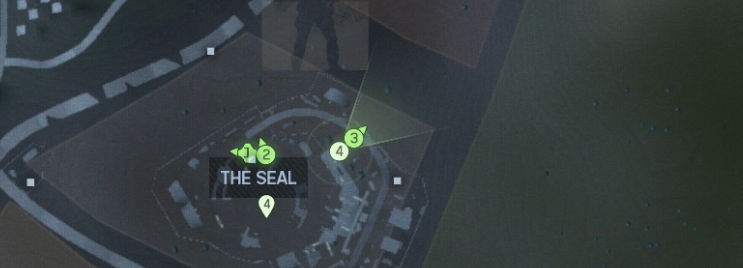
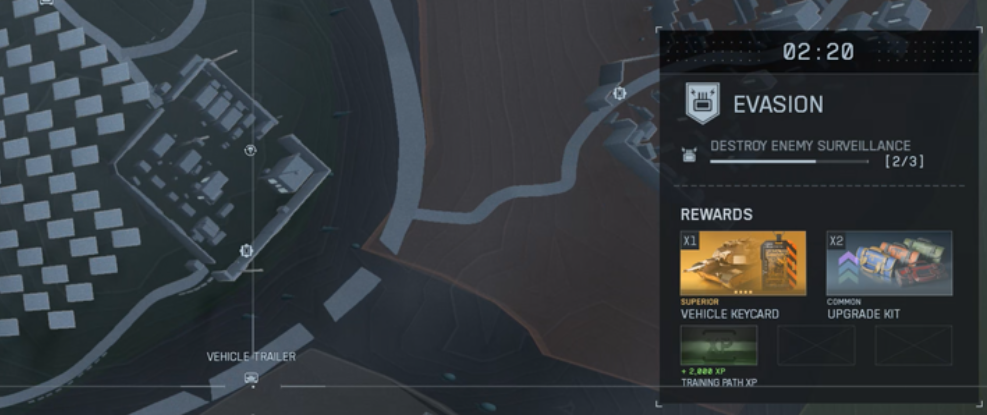
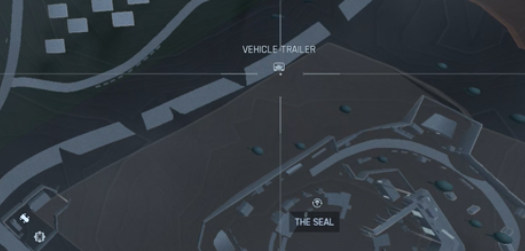
The Seal Exploration Second Challenge
Acquire a combat vehicle near The Seal.
0/1
0/1
How To Complete the Challenge:
I recommend doing this in Quads, because it gives you more time near the Seal location.
Steps:
- First, I recommend landing near The Seal.
- Start doing missions until you get one that rewards a Vehicle Key Card.
- Once you have the key card, go to this location near The Seal.
- Open the door using the key card.
MAP LOCATION
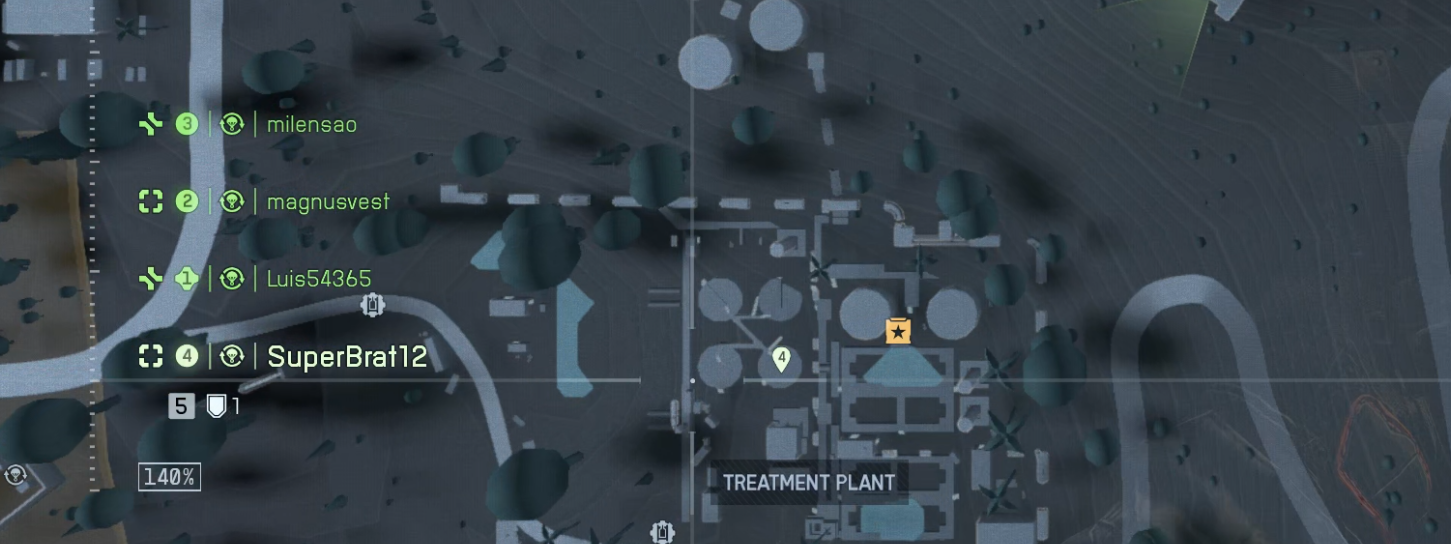
Treatment Plant Exploration
Discover the sediment tanks in the Fort Lyndon Treatment Plant.
0/1
0/1
MAP LOCATION
Treatment Plant Exploration Second Challenge
Redeploy an ally from the Fort Lyndon Treatment Plant
How to complete the challenge:
I recommend to play in Quads.
Steps:
MAP LOCATION
How to complete the challenge:
I recommend to play in Quads.
Steps:
- Go to the Fort Lyndon Treatment Plant.
- Wait for one of your allies to die.
- Redeploy them using the redeploy station at the Fort Lyndon Treatment Plant.
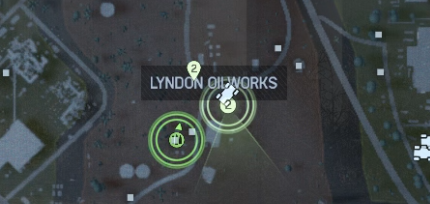
Lyndon Oilworks Exploration
Discover the oil pump jacks at the Lyndon Oilworks.
0/1
0/1
MAP LOCATION
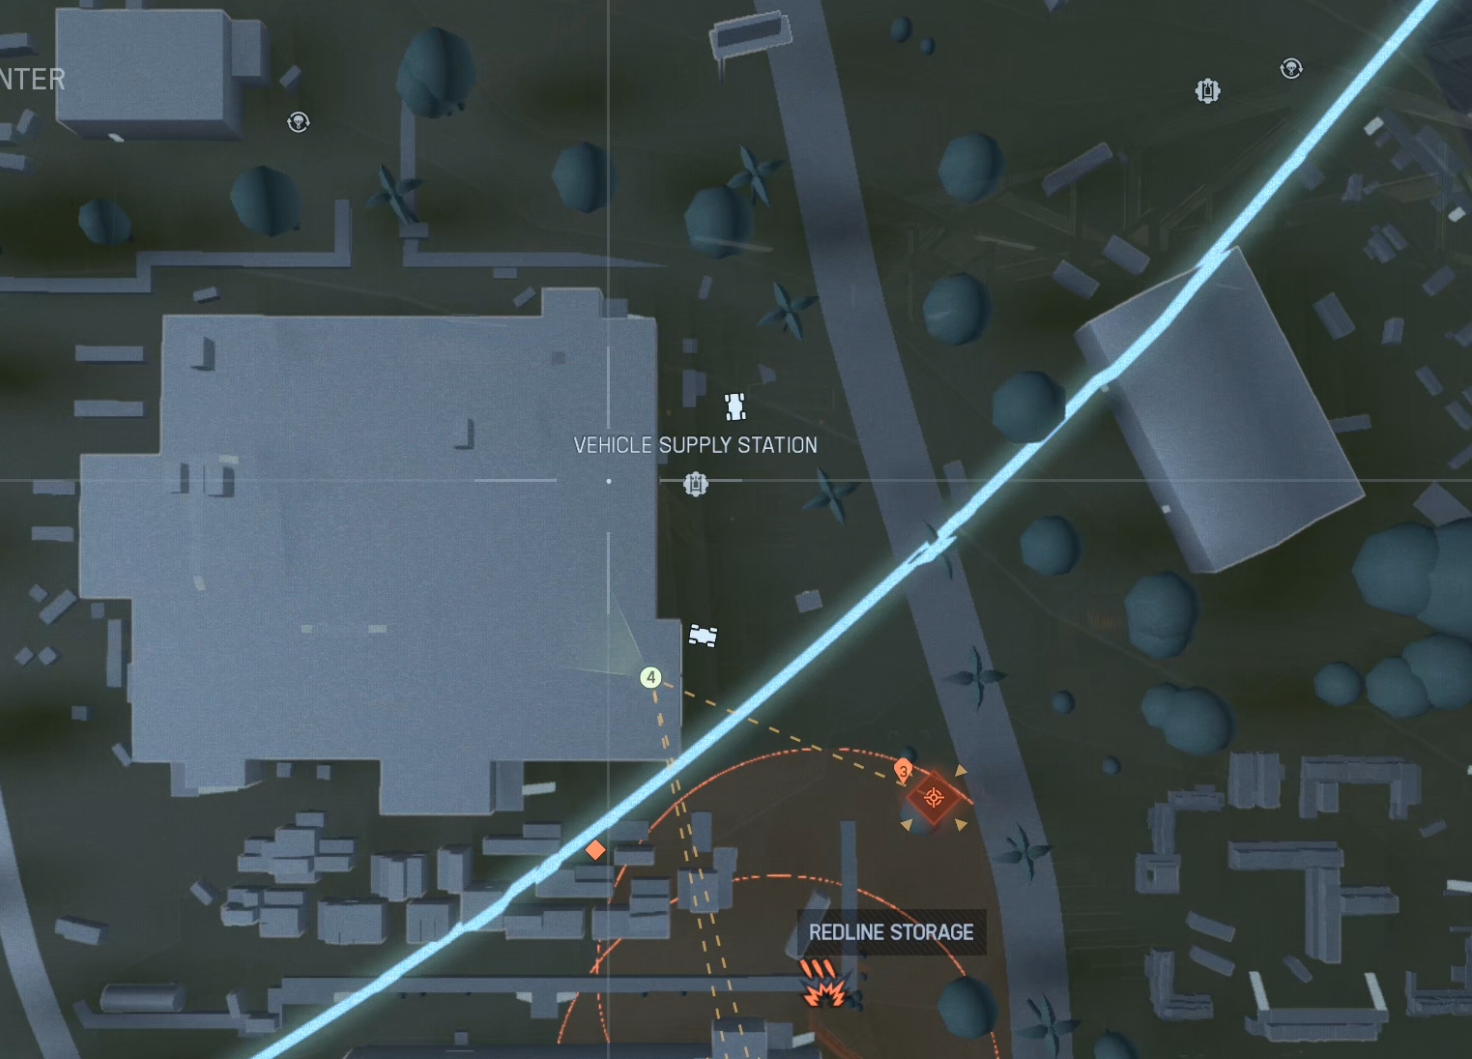
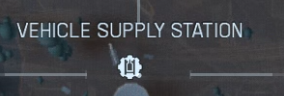
Lyndon Oilworks Exploration Second Challenge
Use a vehicle repair station at the Lyndon Oilworks to restore a combat vehicle
0/1
0/1
How To complete the challenge:
- 1 Step: take any combat vehicle to Lyndon Oilworks
- 2 Step: Find a vehicle supply station
- 3 Step: Repair your car. Damage it or shoot its guns to repair.
MAP LOCATION

Security Gate Exploration
Discover the Fort Lyndon Gate checkpoint.
0/1
0/1
MAP LOCATION
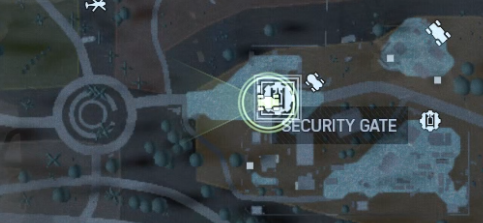
Security Gate Exploration Second Challenge
Drive a vehicle trough the Fort Lyndon Gate
0/1
0/1
MAP LOCATION
Boutique District Exploration
Discover the Chavél Noir shop in the Boutique District.
0/1
0/1
MAP LOCATION
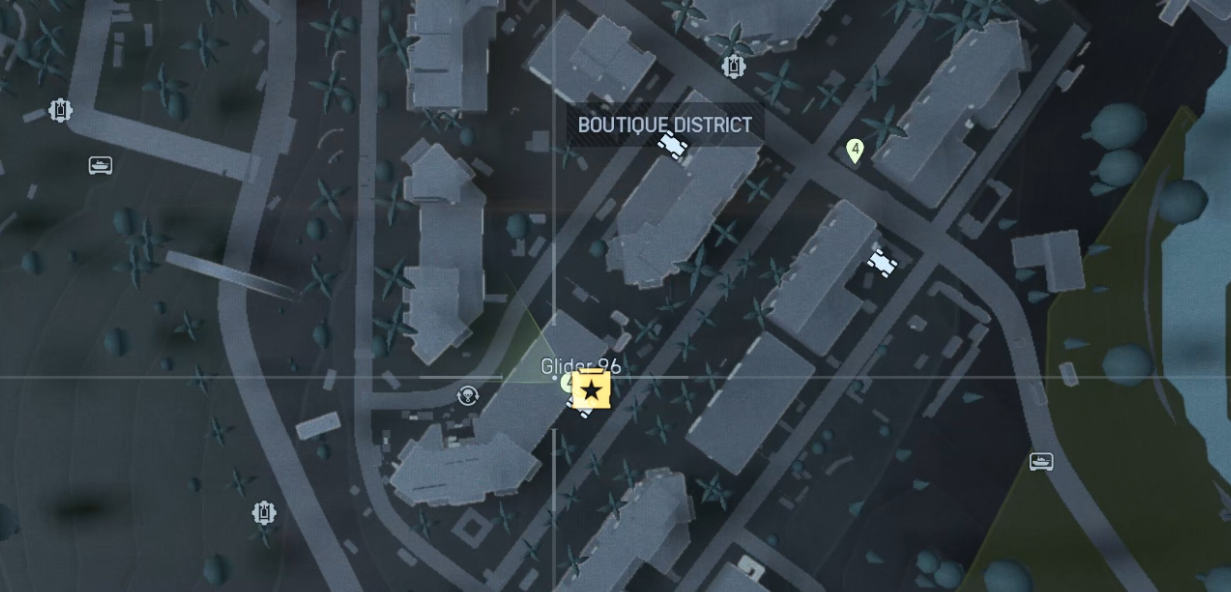
Boutique District Exploration Second Challenge
Loot supply crates in the Boutique District
0/1
0/1
How To Complete the Challenge:
For some reason, I was only able to complete this challenge in this specific building in the Boutique District.
It’s the largest building and the one closest to the “Boutique District” text on the map.
Here’s an image showing the exact building:
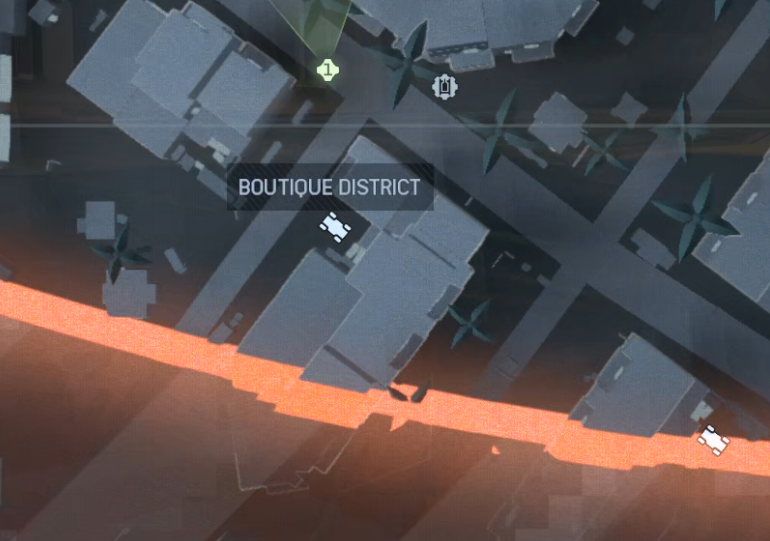 You just need to loot the crates that are in this building it took me 2 games to do
MAP LOCATION
Evac Alpha
Discover the docks at Jewel Beach.
0/1
0/1
MAP LOCATION


Evac Alpha Exploration second Challenge
Drive a light ground transport vehicle over a sand dune on Jewel Beach.
0/1
0/1
How To Complete the Challenge:
- 1 Step: Get a car
- 2 Step: Drive to Jewel Beach
- 3 Step: Drive over any sand dune
MAP LOCATION
ALL BATTLEFIELD 6 ACHIVEMENTS AND CHALLENGES
All Achivements
https://steamcommunity.com/sharedfiles/filedetails/?id=3584275271Battlefield 6 all Assignments & Challenges
https://steamcommunity.com/sharedfiles/filedetails/?id=3592565762