[Super AFK] Klei Points & Spools
 Ná Nà ツ
(140 ratings)
Nov 3, 2025 @ 5:57am7,319179
Game ModesLootWalkthroughsEnglish
NEW LINKS / 新链接

OLD LINKS STILL AVAILABLE / 旧链接仍然有效
- https://accounts.klei.com/link/gimmesomespool (450
)
- https://accounts.klei.com/link/gimmepointsplz (850
)
- https://accounts.klei.com/link/4e19872e-5277-9ed6-6527-63901d70d90b
(1700 - https://accounts.klei.com/link/ForYourRecords (Record Skin
)
ONLY WORKS ON PAGE https://fall2024.dontstarvegame.com
press [TAB] 3 times and click the web CD
仅在页面 https://fall2024.dontstarvegame.com 有效
按 [TAB] 键 3 次,然后点击网页 CD
ALL LINKS IN HISTORY / 历史中的所有链接
LORE INTERACTION 1 & 2 / 剧情互动 1 & 2
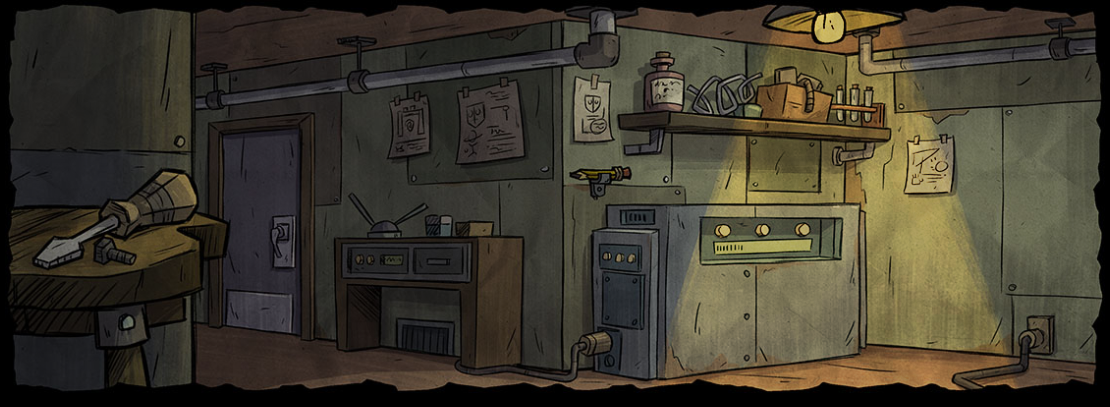
Day Side: (to get to day time, click on the moon)
1. Click Window > Interior with Hourglass
2. Click on the empty hourglass > multiple new panels

3. Each of the multiple panels (26 total) revealed in the previous step correlate to the letters of the alphabet from A to Z.
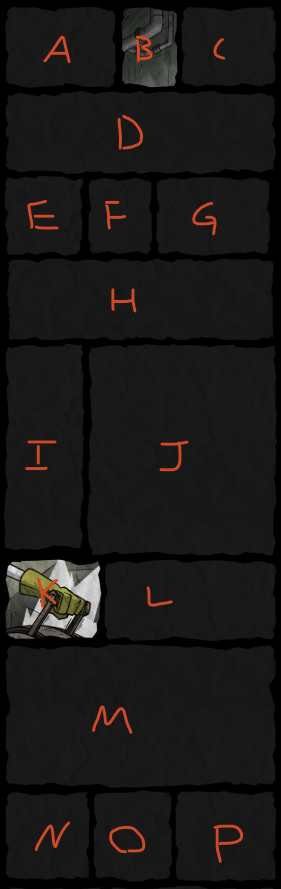
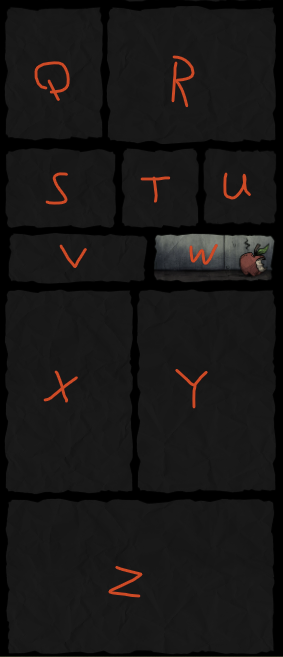
4. Click on the panels corresponding to the letters to spell out "MANIFESTUM" (in order). This will reveal images in some of the blank panels.
5. Now do the same, but this time spell "WAGSTAFF" to reveal even more of the blank panels, plus adding additional panels
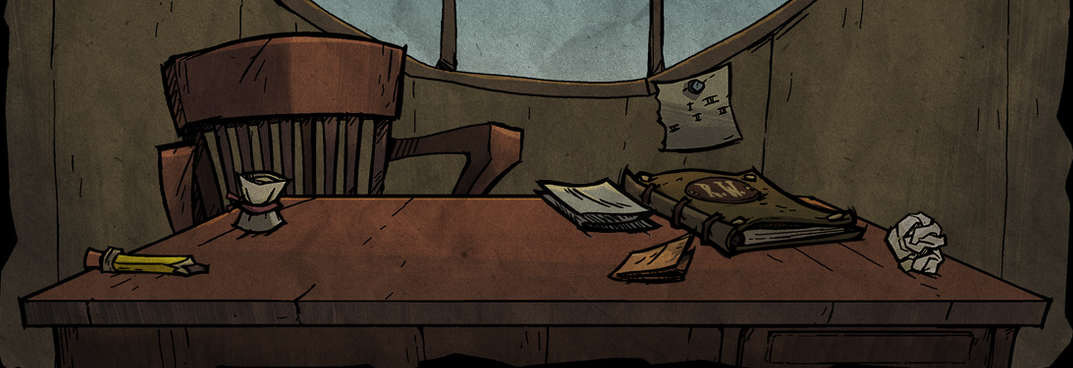
6. Click the paper on the control panel
7. Go back up to the desk and click on the paper to open it
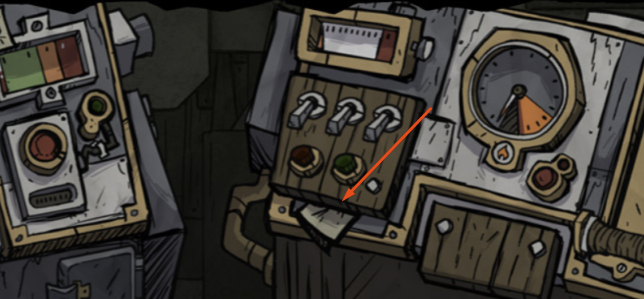
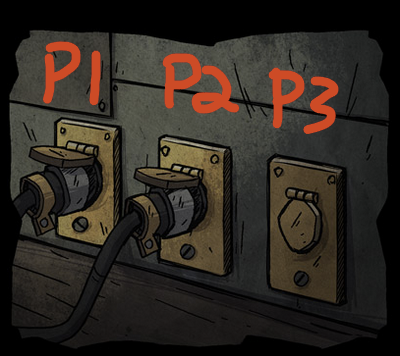
8. Next go to the panel with 3 plugs that're socketed into the wall. We'll label these 1 (Left Plug) - 2 (Center Plug) - 3 (Right Plug). Now click on plugs in the following order: 1, 3, 2 / 2, 3, 1 / 3, 2, 1 / 1, 2
9. Now go back to the panel with the switches, buttons, & dials. The goal here is to power on the machine using the switches & buttons, without the indicator dials overloading (going into the red region)
https://youtu.be/NaQeUxkyM-Q
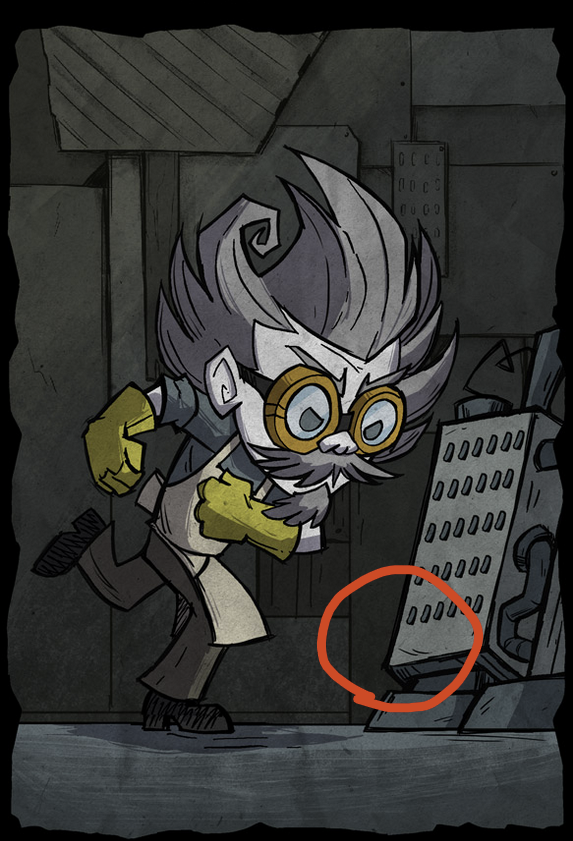
10. On the new panel with Wagstaff winding up to kick the machine. Click on the part of the machine (the grate) where Wagstaff's foot will land 5 times.
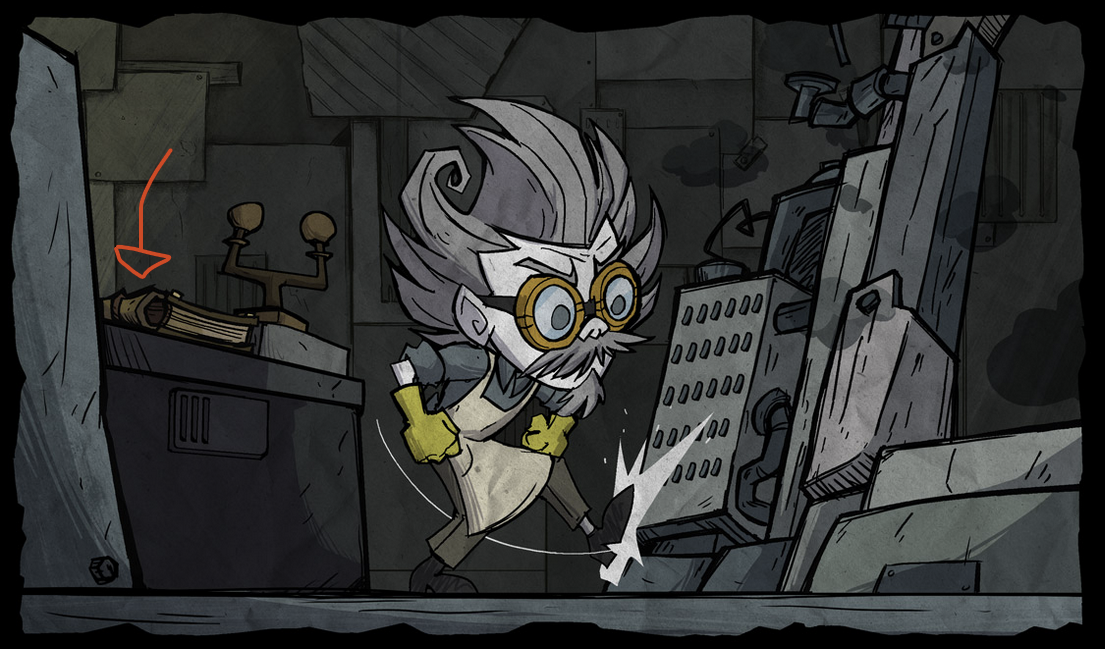
11. In the new panel, click on the book that's on the bench next to Wagstaff.
12. Scroll down the the last panel at the bottom and click the piece of paper that's falling out of Wagstaff's pocket.
13. In the new panel, click on the pencil on Wagstaff's ear.

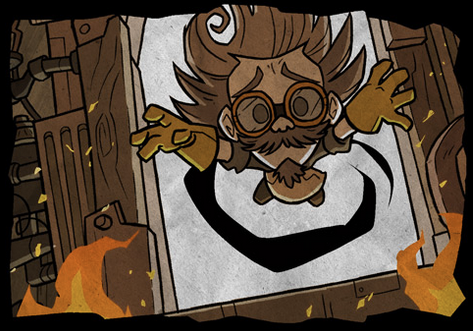
14. In the new panel, click on Wagstaff to reveal one final panel.
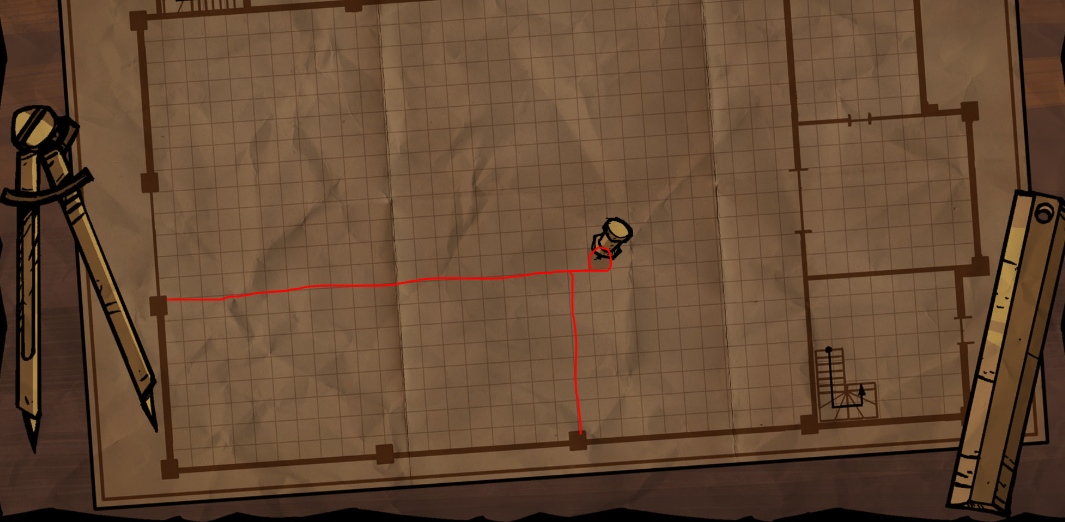
15. Go back up to the desk. Now inspect the new note. This shows a O and X with a path between them.
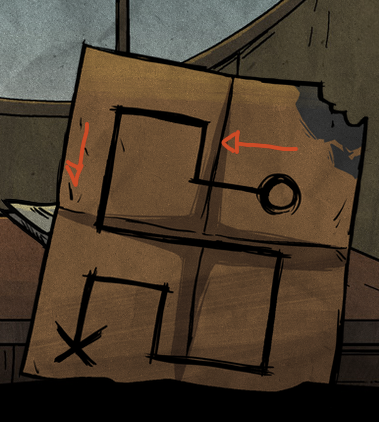
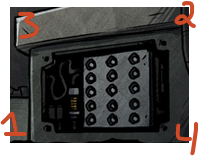
16. In the final panel, there is a metal panel under the "antenna/tuning fork"-like structure. Click on the bolts in this order to unlock the metal panel: lower left bolt, upper right bolt, upper left bolt, and lower right bolt.
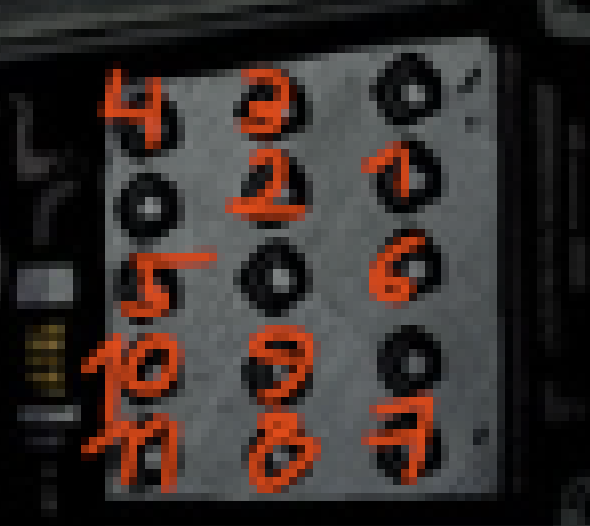
17. Now based on the pattern from step 15, click on the circles in the newly opened metal panel to trace the pattern starting from the O to the X.
18. Now head back up to the desk and click on the Pencil.
Night Side: (to get to night time, click on the sun)
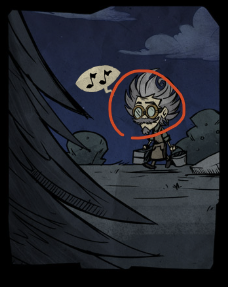
19. Click on the trees on the right side of the burnt factory > new Wagstaff panel
20. Click these spaces
Completing all steps above will grant 3,100 Klei Points. This will show up as Lore Interaction on your Klei Rewards Transactions page[accounts.klei.com]
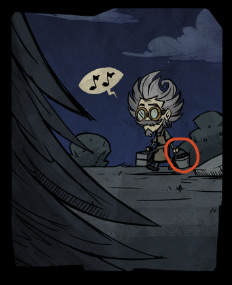
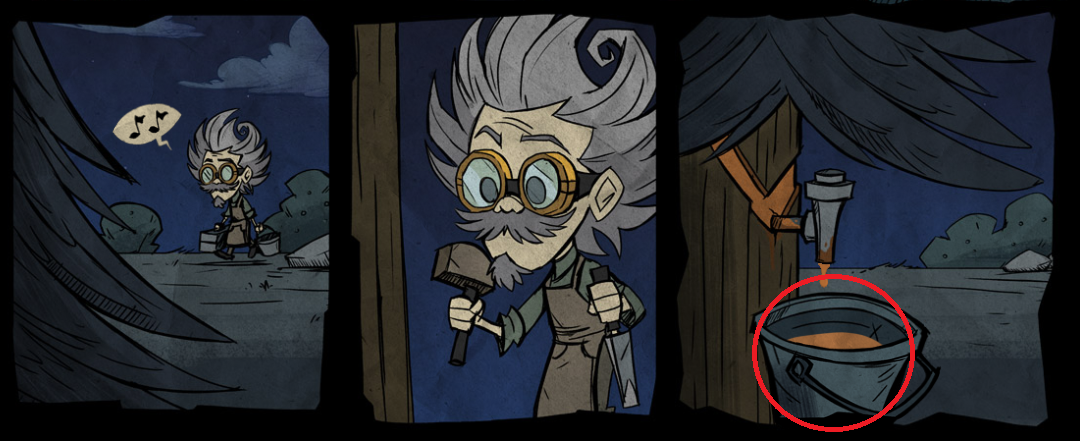
EASTER EGG - Click the sap bucket a ton of times (~40) quickly until a new panel below appears. This panel will disappear if you click it.
Docs: https://docs.google.com/document/d/1kLKXDYVMJ5HE9CMY-qbXXs6JXxBqPq-Z8INWDulwvd8/edit?tab=t.0
Video: https://www.youtube.com/watch?v=z9l1joqvgqs
LORE INTERACTION 3 / 剧情互动 3
Night Side:
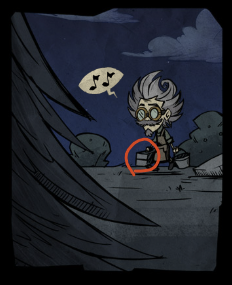
1. Click the sap bucket to reveal 7 panels.
(If you don't see it, scroll down to the OLD LORE INTERACTION section and complete the old mission first. Finish it, then come back here to continue this part.)
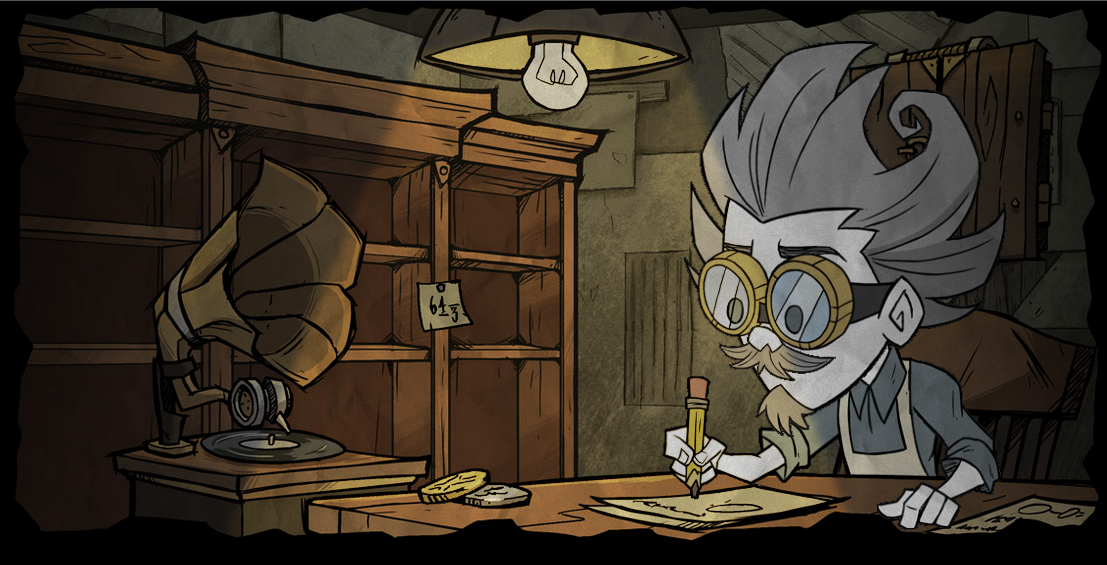
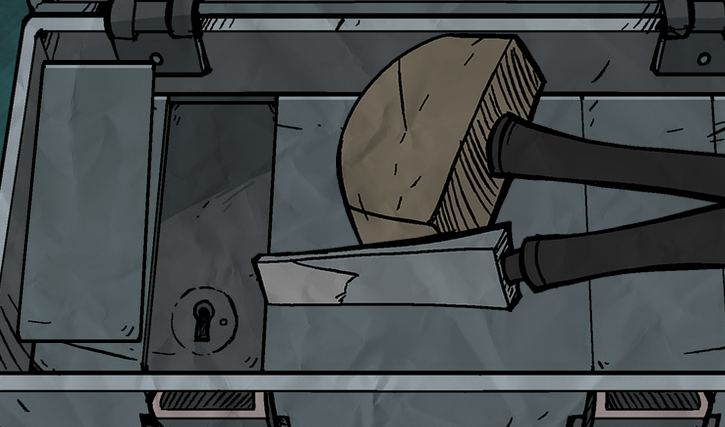
2. In the first new panel below, click on Wagstaff's toolbox, to reveal one additional panel with the contents of the toolbox.
3. Use the chisel on the left panel to reveal a key slot.
Day Side:
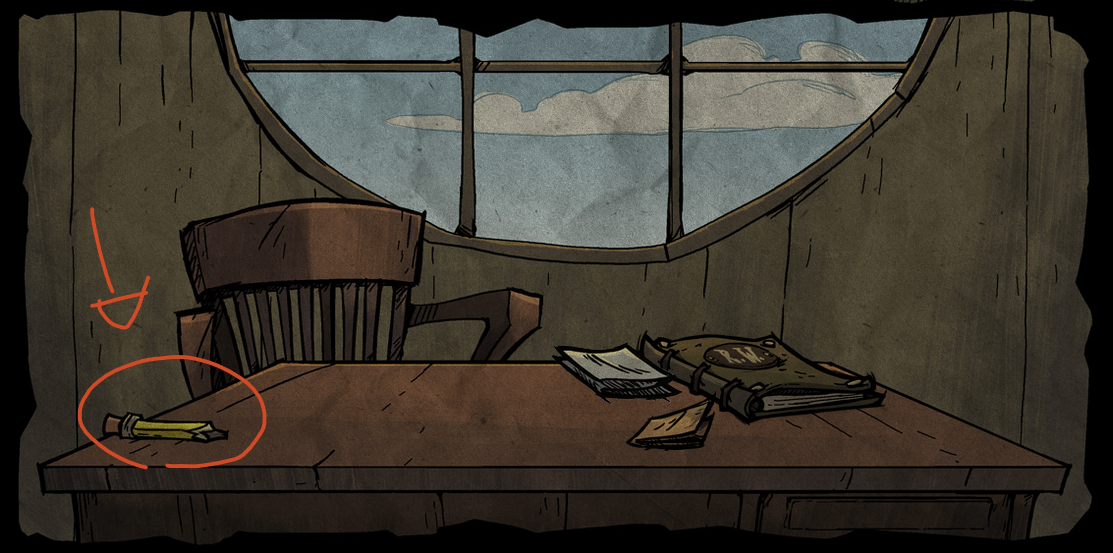
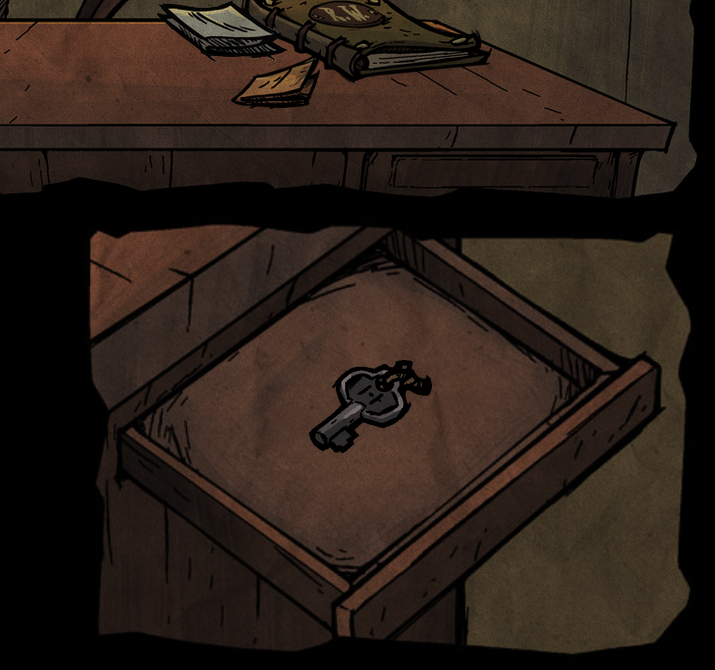
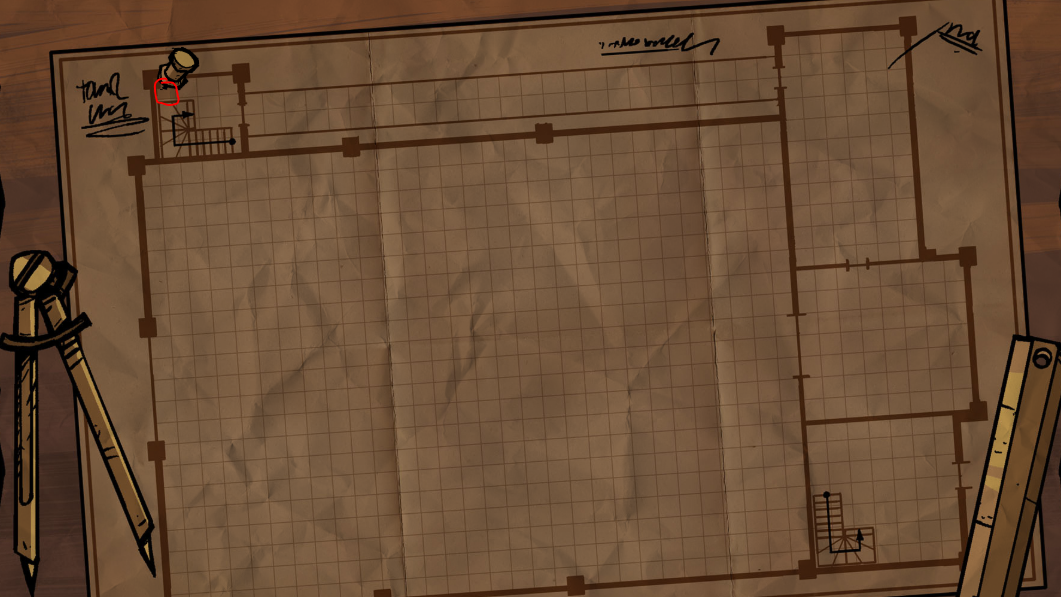
4. Click on the moon to go to the day side. Then click on the drawer on the desk with the journal / notes / pencil to reveal a key.
5. Click on the key.
Night Side:
6. Click on the moon again to go back to Night Side.
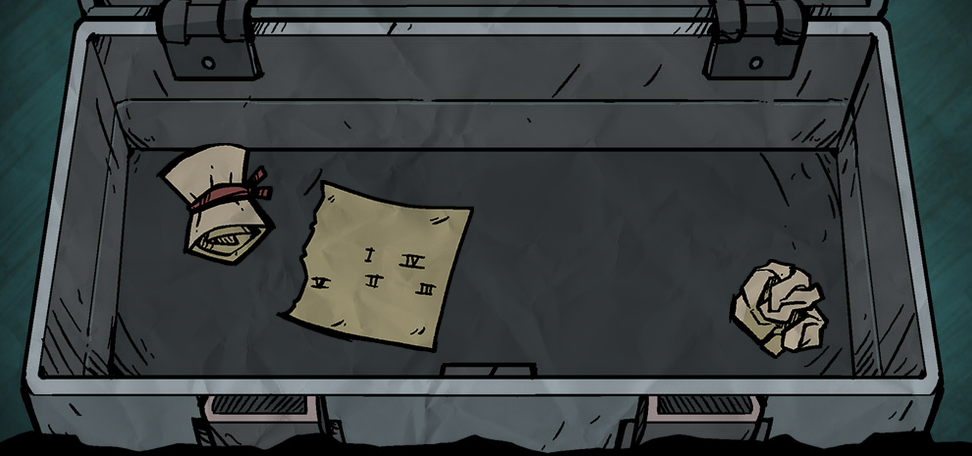
7. In the toolbox panel, use the key in the key slot to reveal 3 clues.
8. Drag each clue outside of the toolbox to add them to the desk on the day side.
Day Side:
9. Go back to the Day Side by clicking on the moon.
10. Inspect the 3 new items on the desk.
Night Side:
11. Go back to the Night Side via the moon.
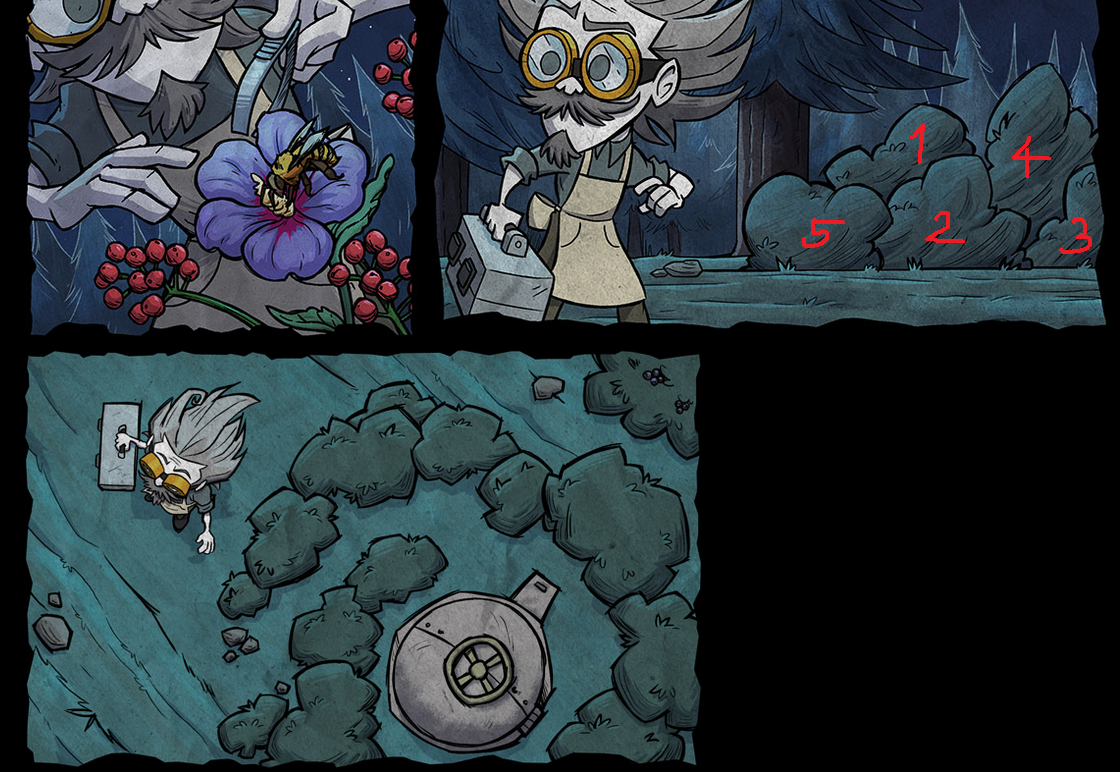
12. In the last panel, click on the bushes in the order based on the note with roman numerals to reveal one new panel below
Solution: Top left bush > Bottom middle bush > Bottom right bush > Top right bush > Bottom left bush
13. In the new hatch panel, click on different parts of the hatch based on the clues from the paper containing yellow / red / clear circle figures. Yellow means clicking on the left hand side portion of the circular handle, red means clicking on the right hand side portion of the circular handle, and clear means clicking on the hatch itself (not the handle).
Solution: Left hand side of handle > Left hand side of handle > Hatch > Left hand side of handle > Right hand side of handle >Hatch > Hatch > Left hand side of handle > Right hand side of handle
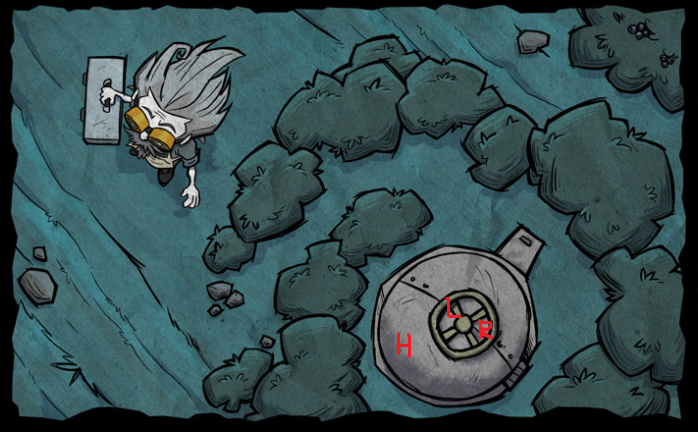
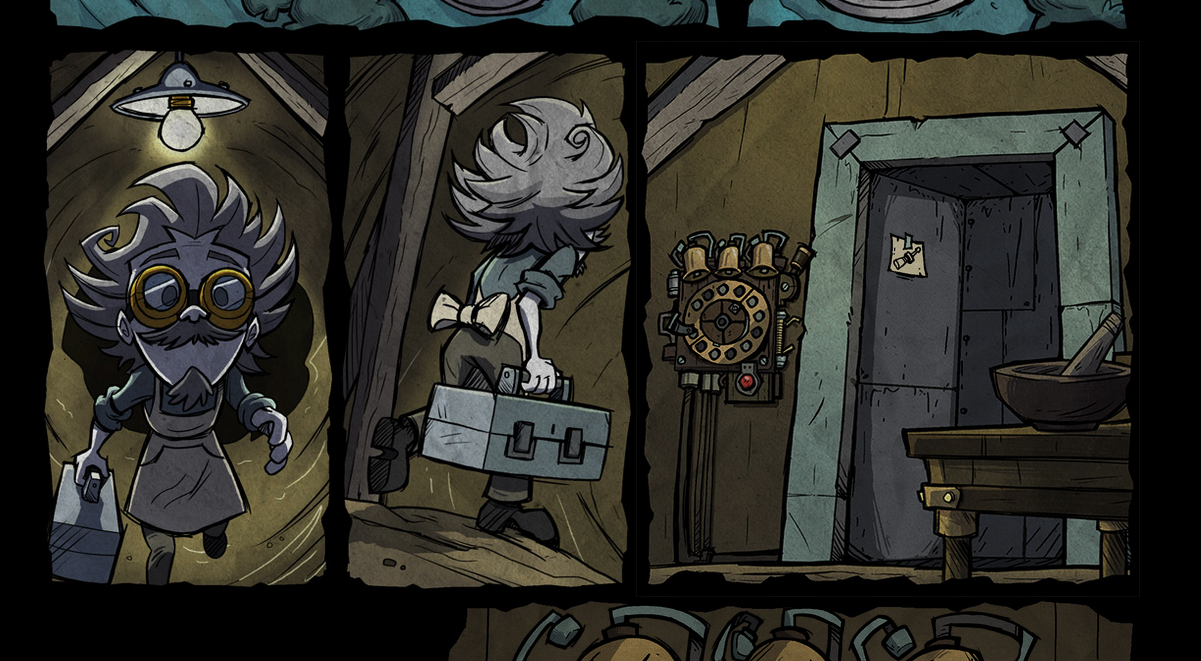
14. After clicking the pattern, it'll reveal a new panel with an open hatch. Click on the open hatch to reveal 3 new panels.
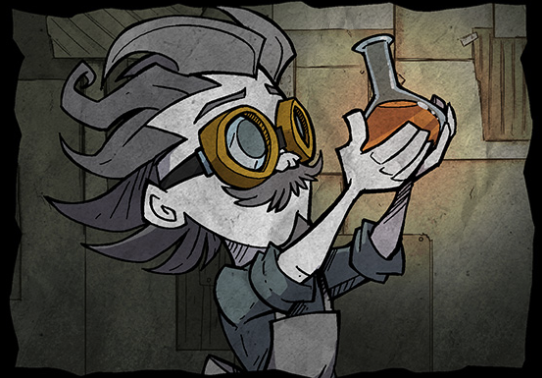
15. In the third new panel, click on the mortar & pestle to reveal a potion mixing panel.
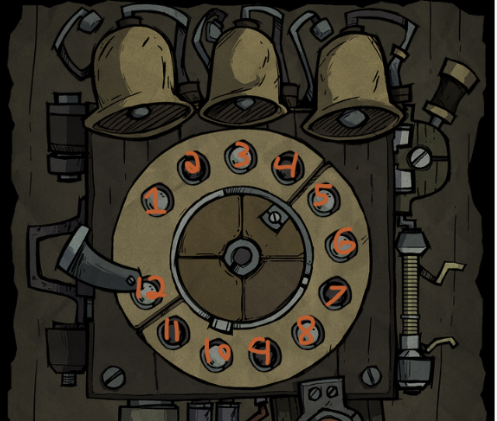
16. In the same third panel, click on the rotary dial contraption to reveal a close up panel of the contraption. (The bells have not been solved at the time of writing)
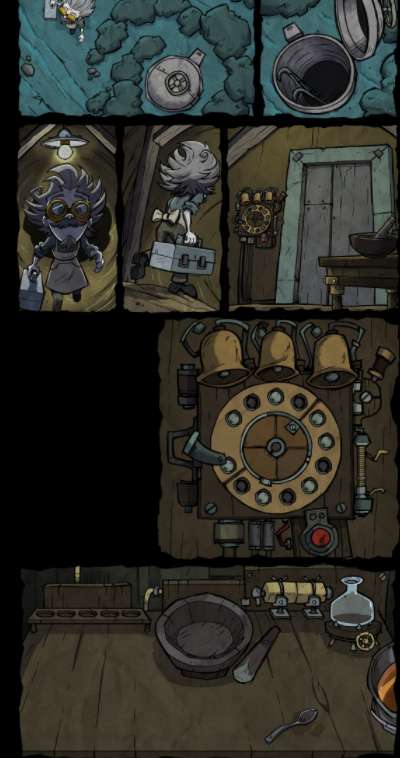
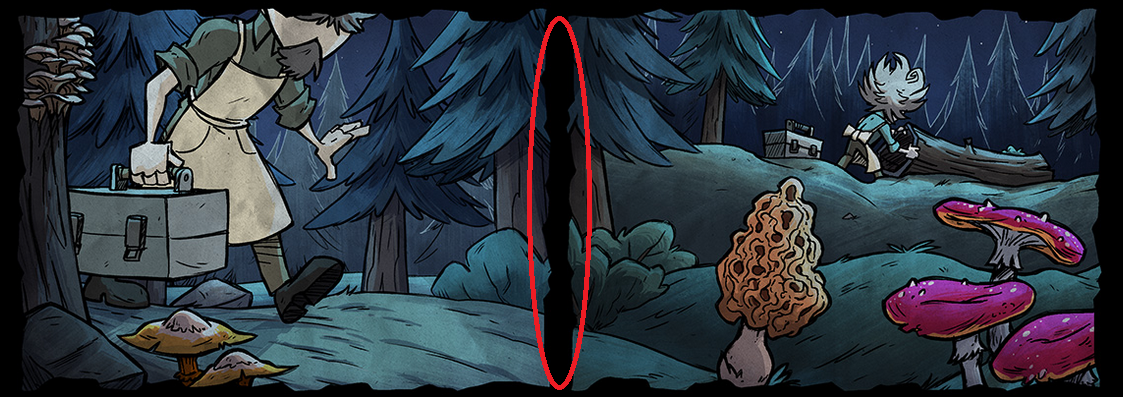
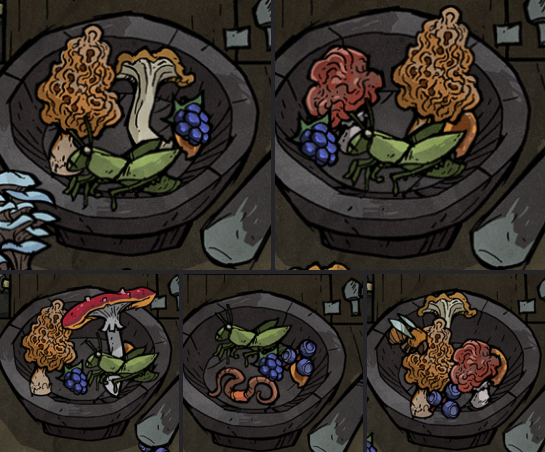
17. To fill the potion mixing panel with ingredients, go back up to the page and click on every mushroom, berry, worm, bee, and flower you see.
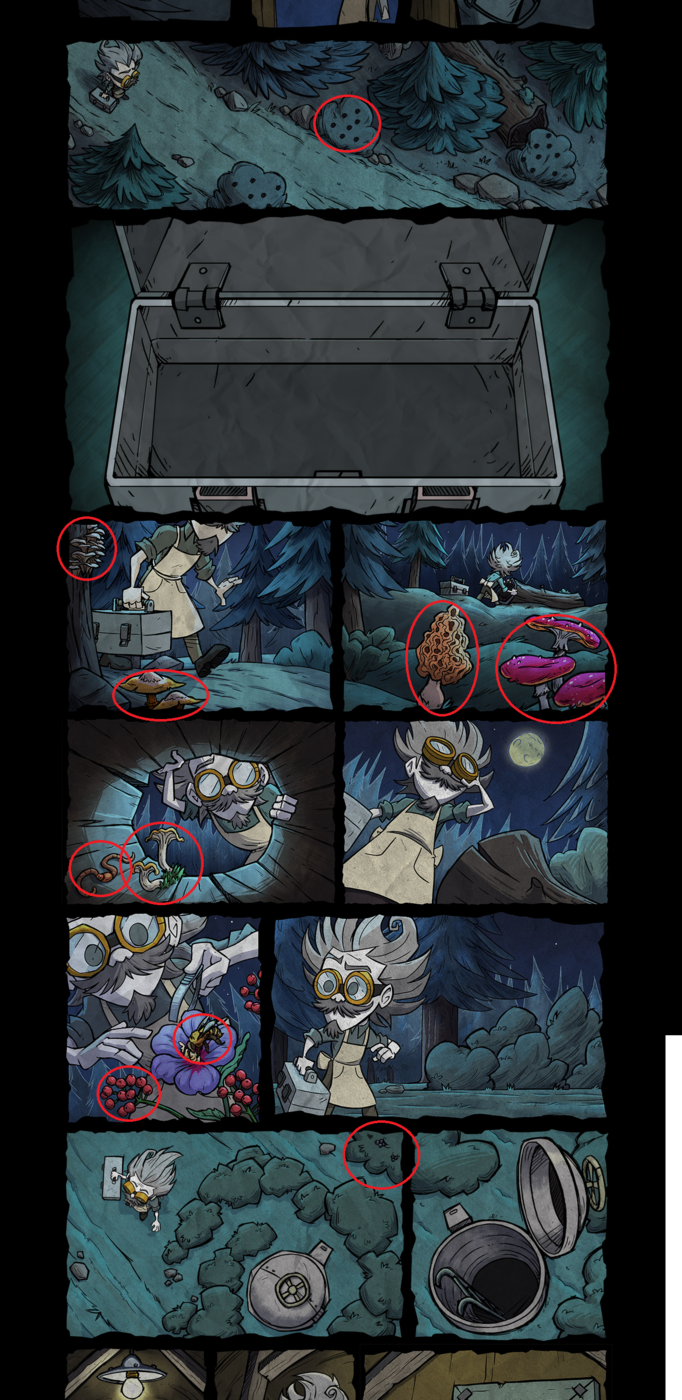
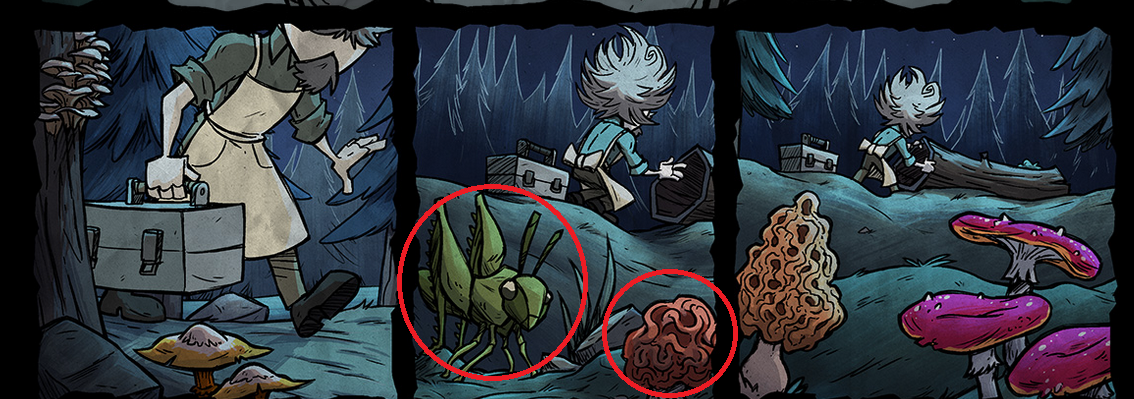
18. To get the last two ingredients, refresh the page. Click once in the circled area. Then place your mouse cursor between these two panels and wait for roughly 2 minutes. This will reveal a panel between these two panels. (Click ONCE in the circled area then wait 2-3 minutes for the cricket to show up. You will hear a noise about 20 seconds in. DO NOT CLICK AGAIN OR DO ANYTHING. Once the cricket appears click it and the mushroom)
19. The new in-between panel will disappear in sometime, but before it does, click on the grasshopper and mushroom for the final two ingredients.
20. Your potion mixing panel will now look like this:
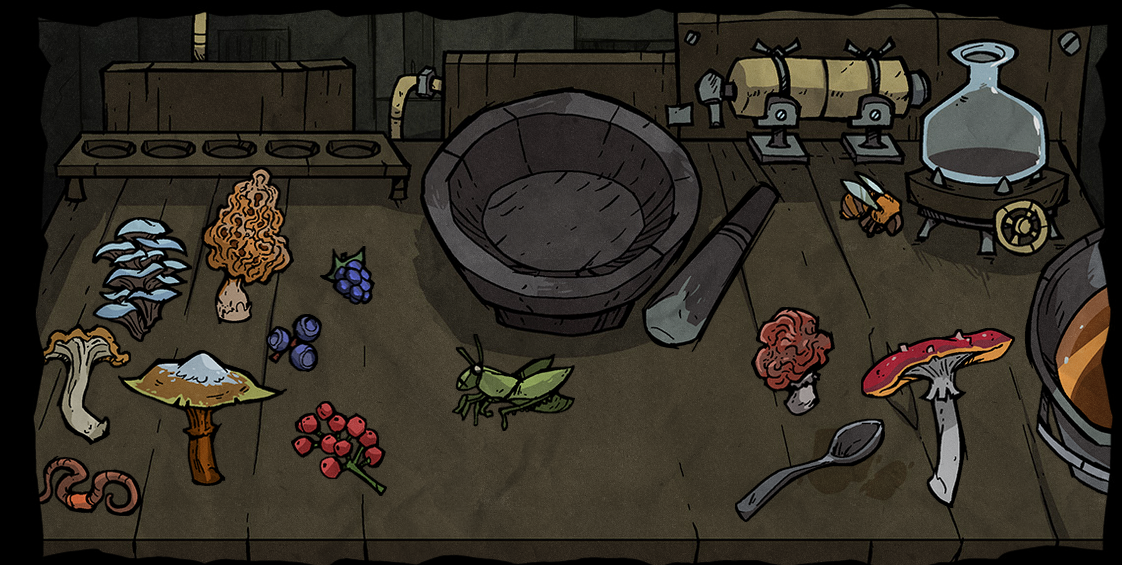
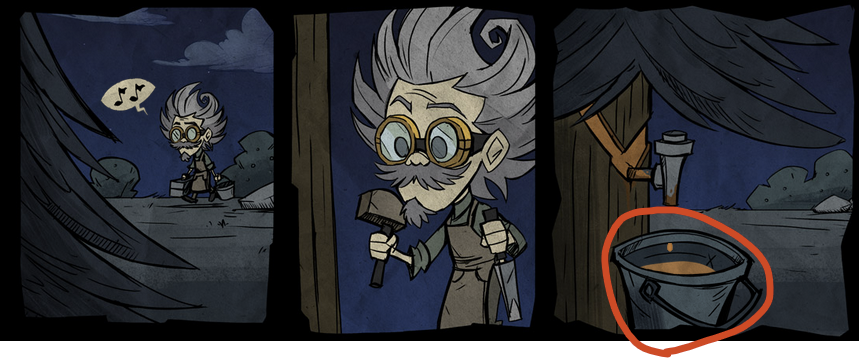
21. Dip the spoon in the sap bucket on the right, then place it in the mortar. This will add sap to the mortar.
22. Now, make each of the following recipes by dragging the respective ingredients into the mortar and using the pestle on the mortar once the ingredients are inside.
23. Each successful recipe will add a test tube to the test tube rack on the left hand side of that panel. Upon completing the 5th potion, one additional panel (of Wagstaff holding the final potion) will be added below the potion mixing panel.
Completing step 23 currently grants you 4,200 Klei Points. It'll show up as "Lore Interaction" on your Klei transactions page[accounts.klei.com].
However, you'll only receive the Klei Points (4,200 points) from the most recent update. Once an update goes live, the old points are no longer attainable.
Video: https://www.youtube.com/watch?v=0S53qbiZuZ0
Source: Instant Noodles
LORE INTERACTION 3.5 / 剧情互动 3.5
- Set notch to 5 beats
- (Handle Down) F# / 7th Button Clockwise
- (Handle Up) G# / 9th Button Clockwise
- Red Button
- (Handle Down) E / 5th Button Clockwise
- (Handle Up) F# / 7th Button Clockwise
- Red Button
- (Handle Down) C# / 2nd Button Clockwise
- (Handle Up) D# / 4th Button Clockwise
- Red Button
- (Handle Down) C# / 2nd Button Clockwise
- (Handle Up) D# / 4th Button Clockwise
- Red Button
- (Handle Up) A / 10th Button Clockwise
- (Handle Up) F# / 7th Button Clockwise
- (Handle Up) D# / 4th Button Clockwise
- Red Button
Video: https://youtu.be/7GDm8Mckiog?si=y-xmHRf21p0HuzPB&t=294
Once completed, the door will open.
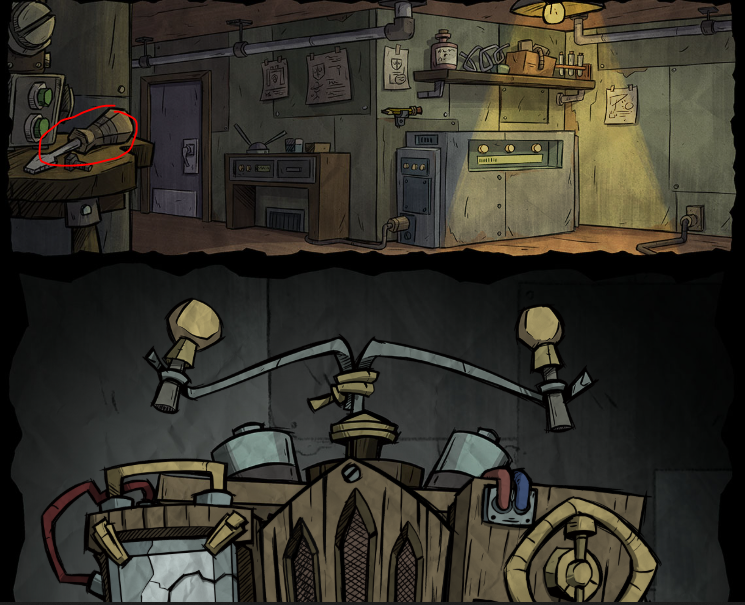
Lab Room:
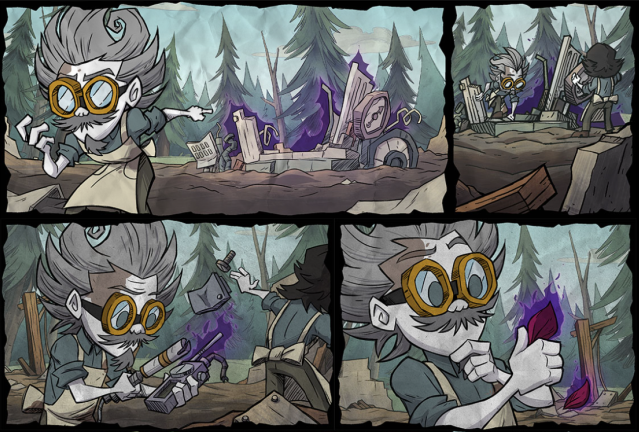
LORE INTERACTION 4 / 剧情互动 4
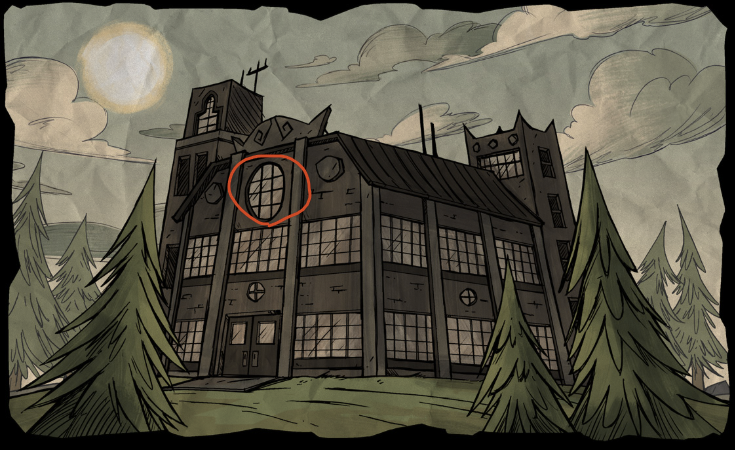
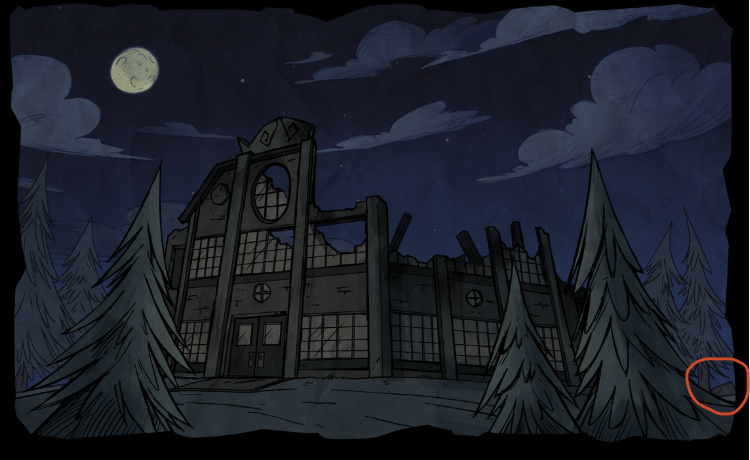
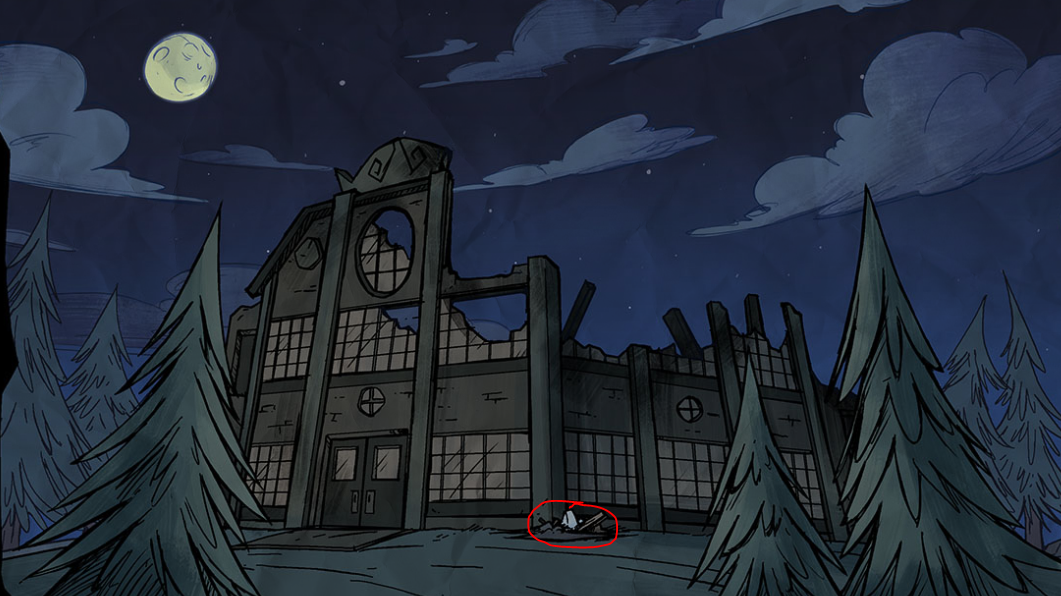
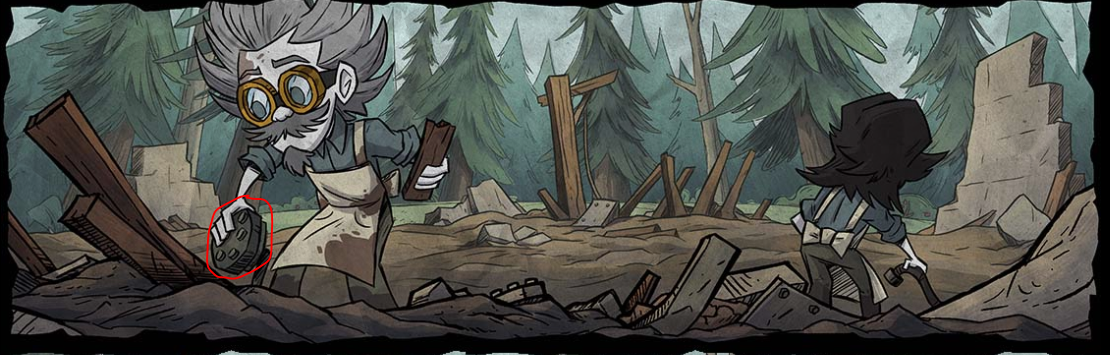
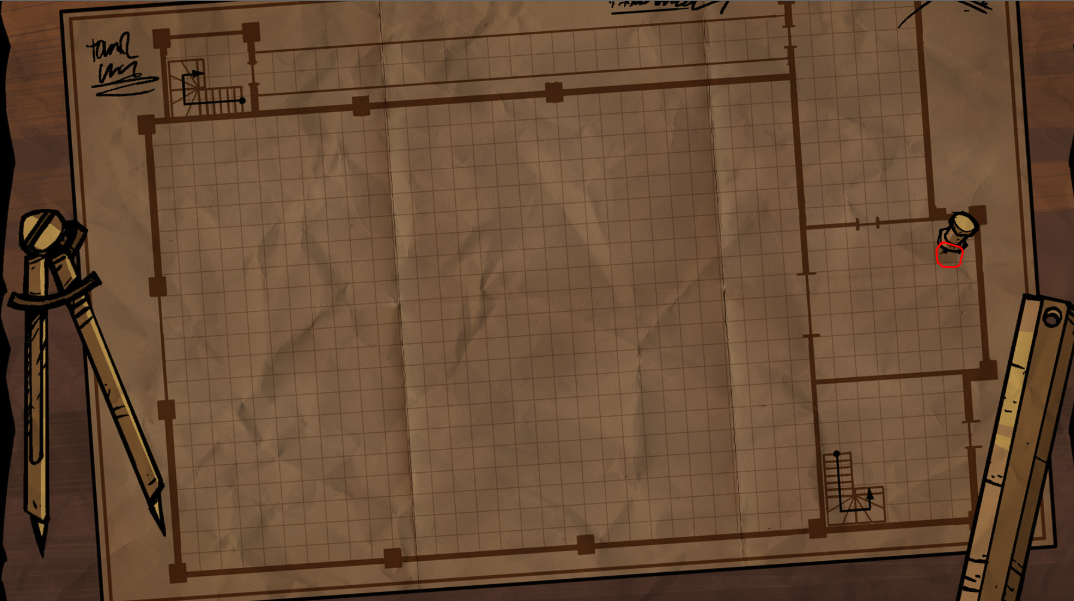
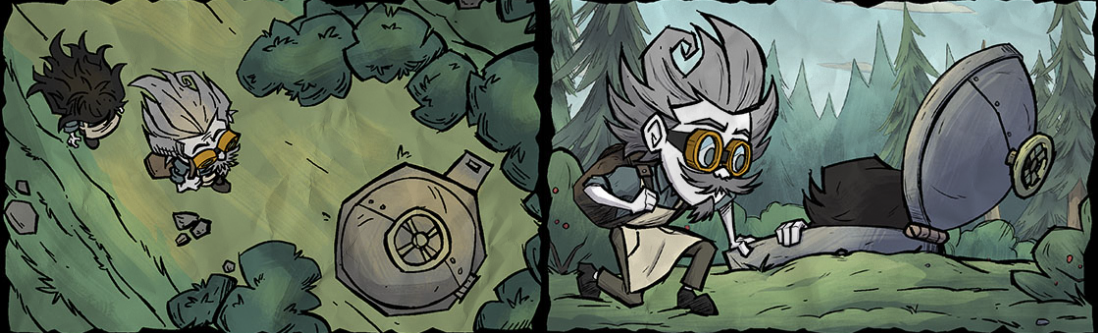
1. Go to the night side of the comic. The destroyed Voxola building has letters hidden in the image.
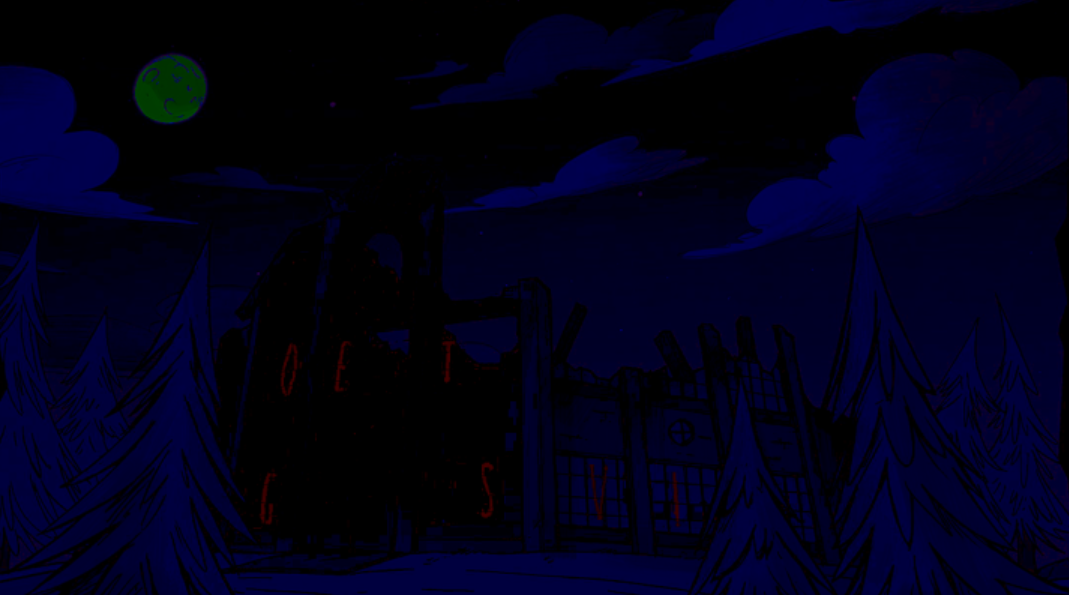
2. Descrambling the letters reveal the word VESTIGO. So click on the windows in the order of the word.

3. This will reveal some excavation tools in front of the building. Clicking on the excavation tools will bring you to a new page.
4. Click on Wagstaff's glasses to reveal they are out of focus.
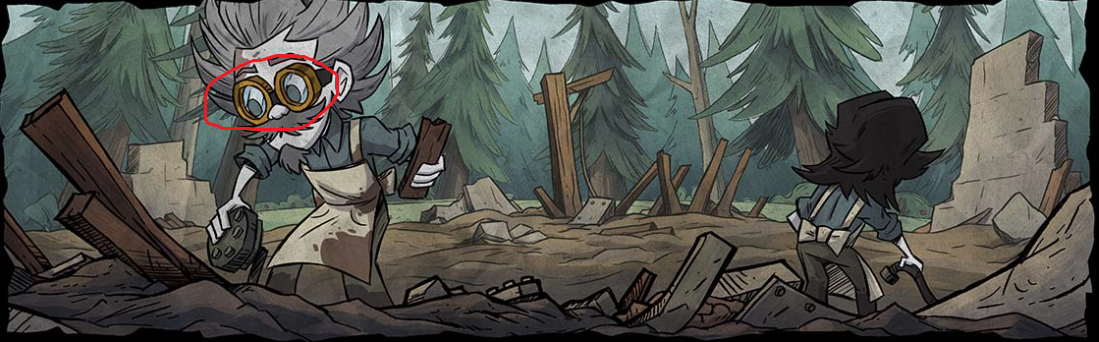
5. Move the knobs to the proper position to get a clear image.
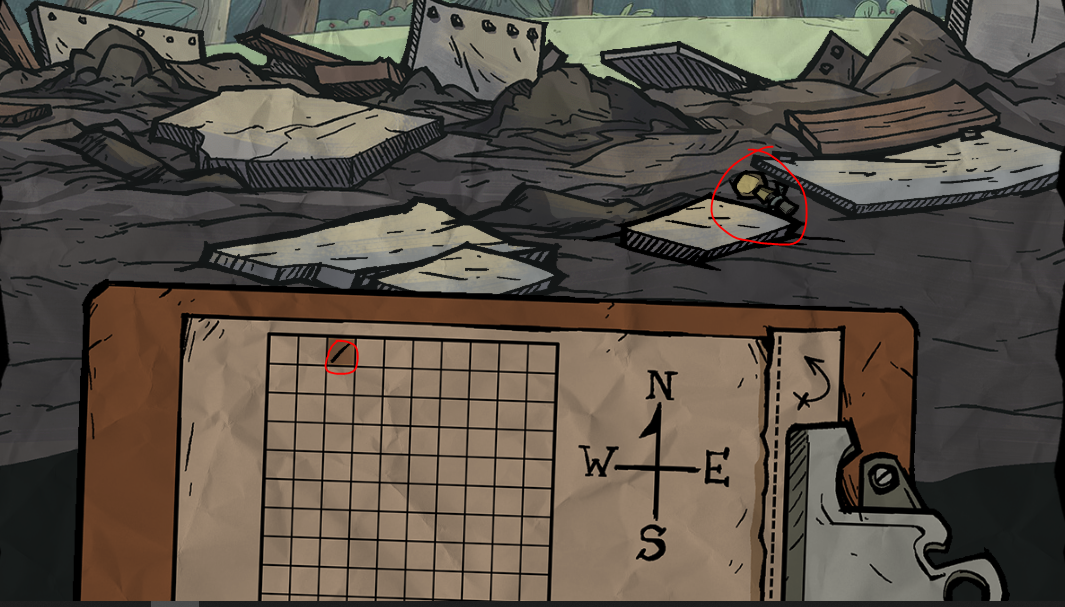
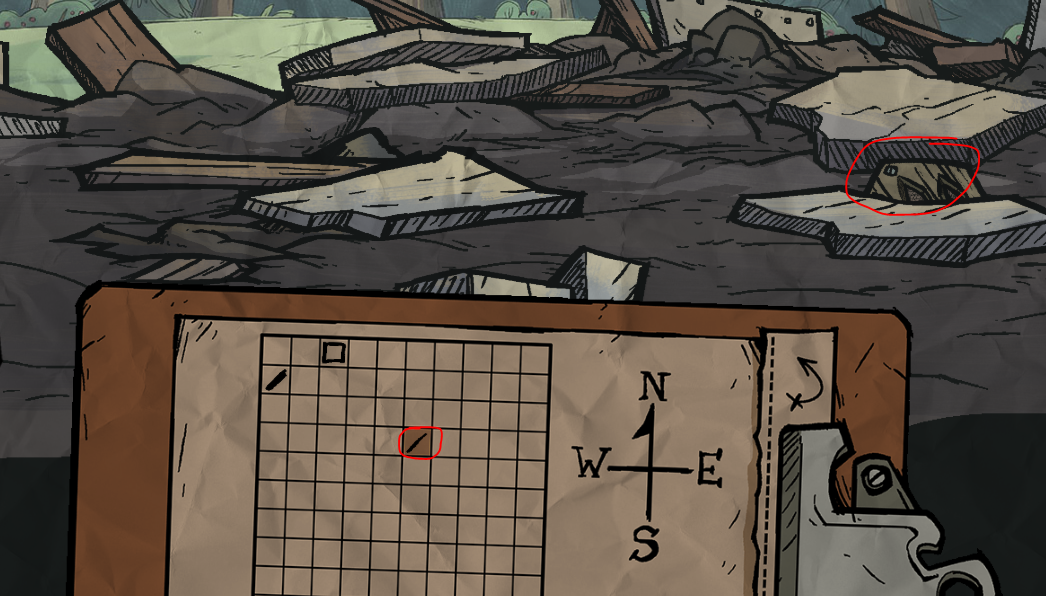
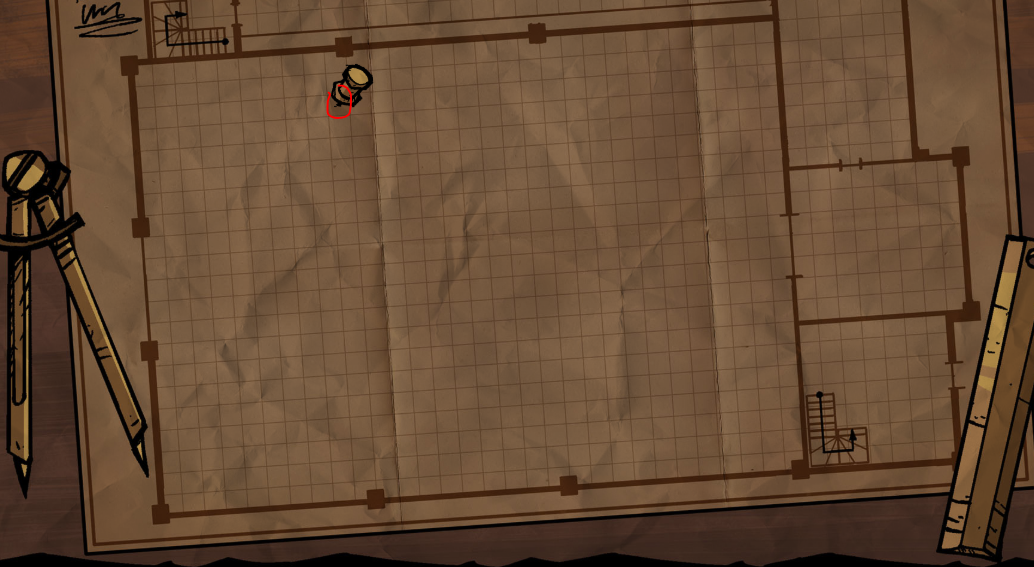
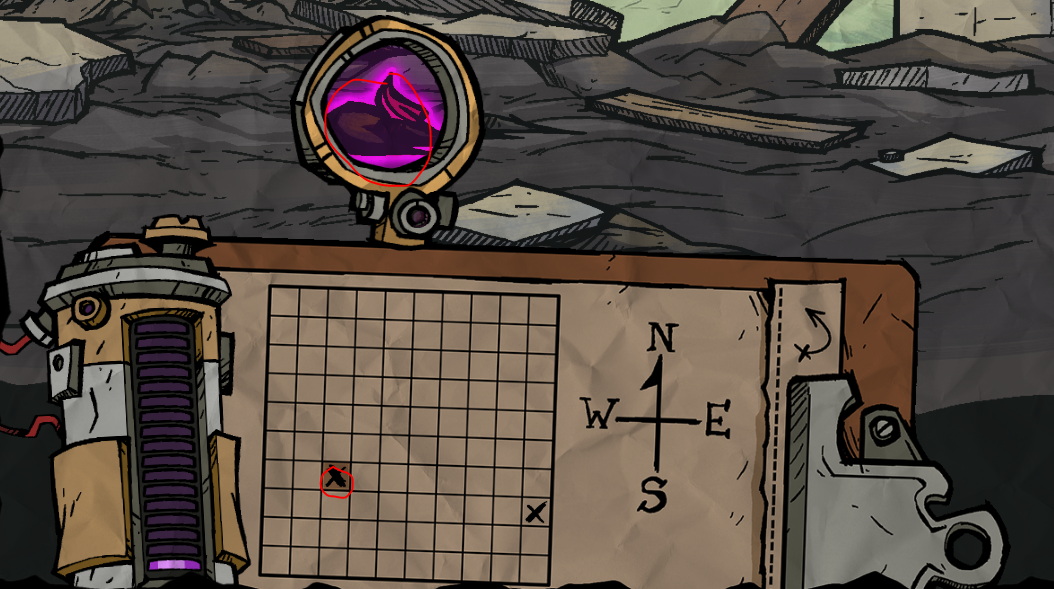
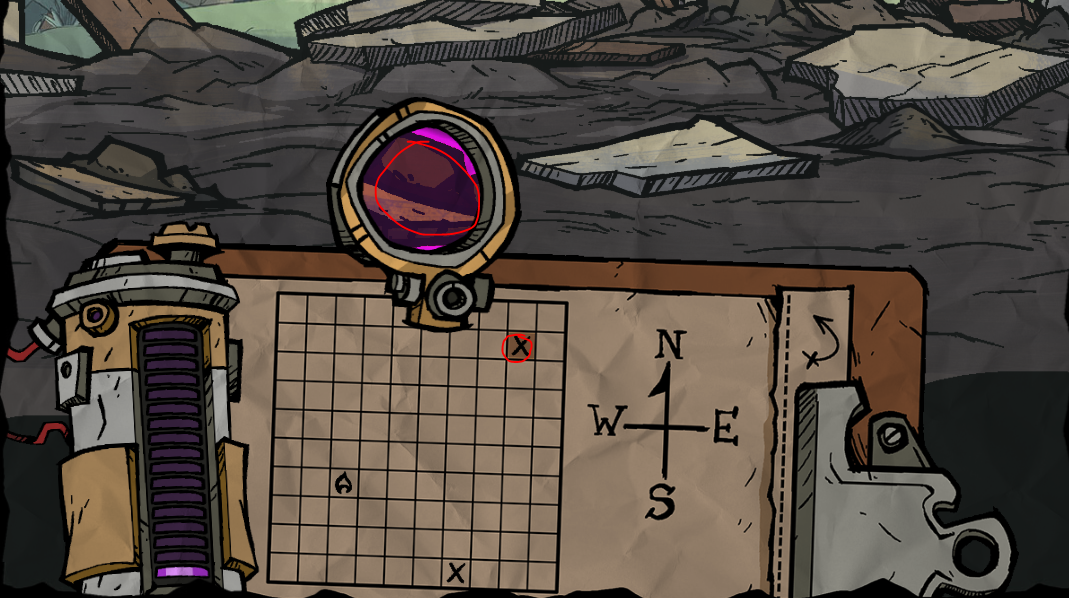
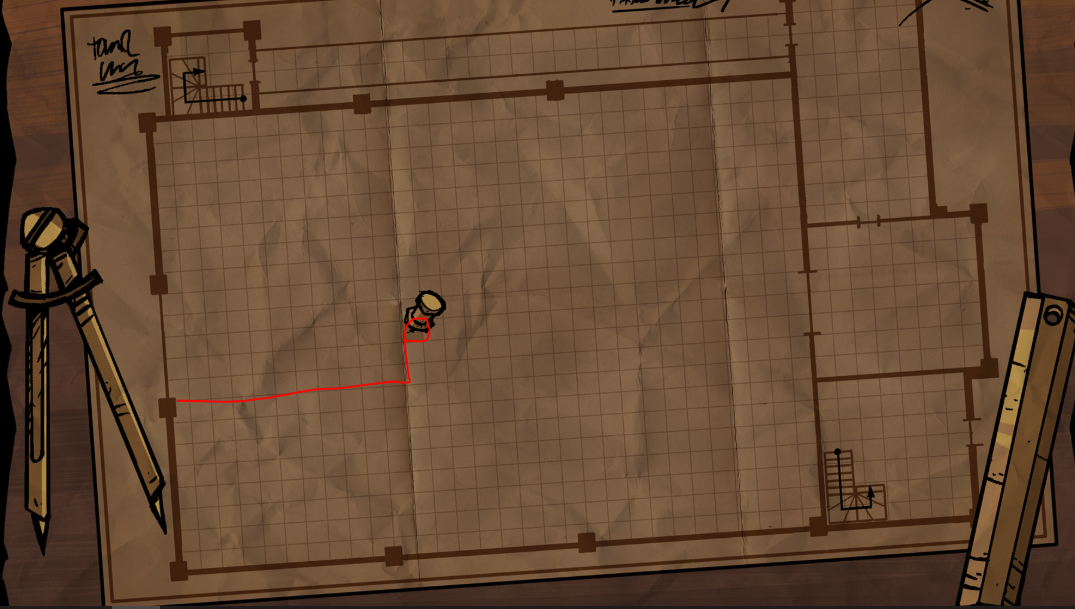
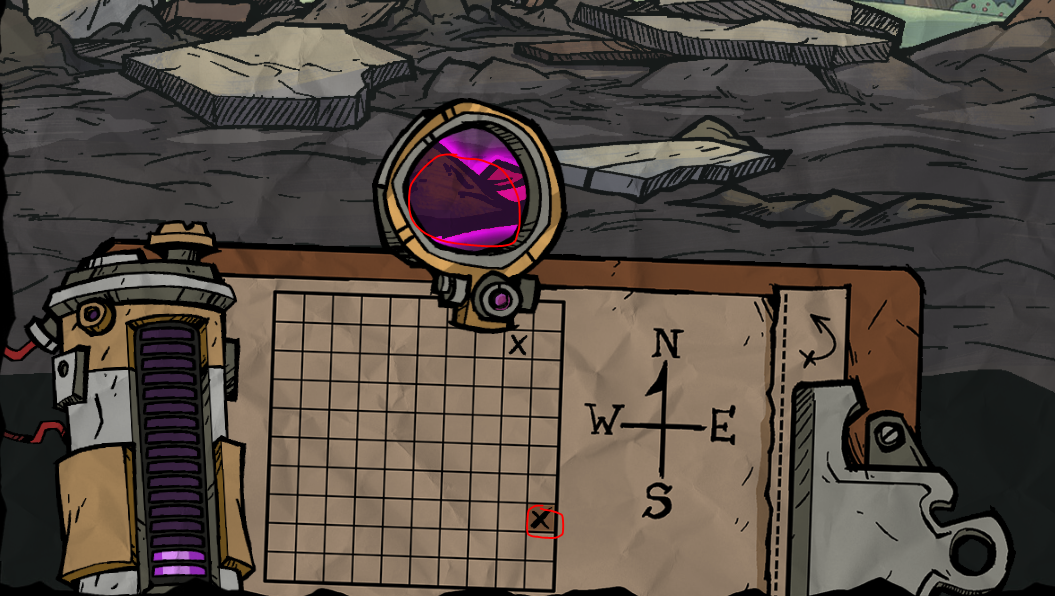
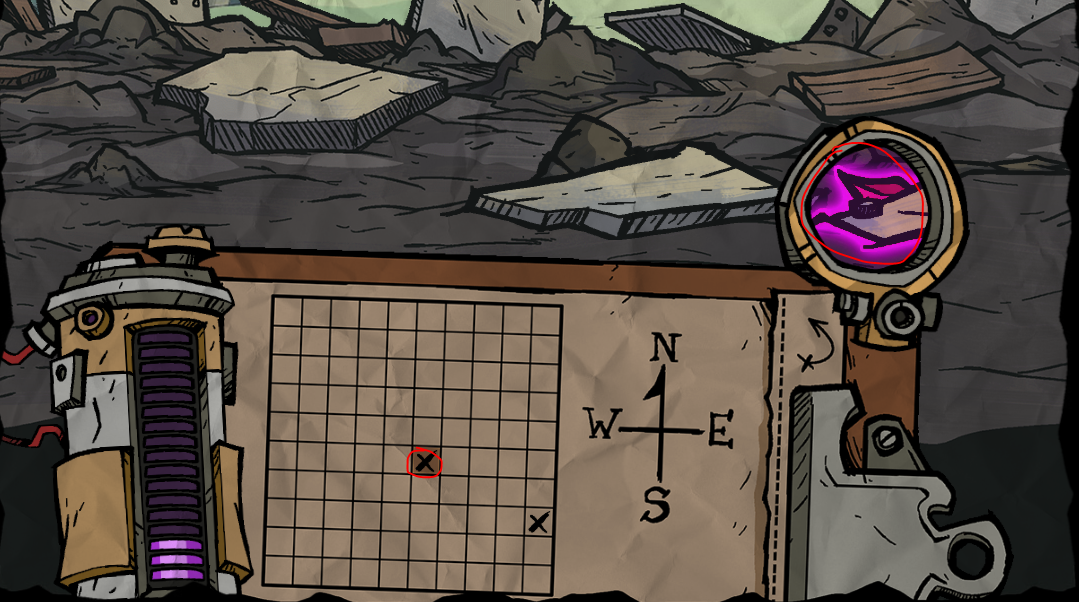
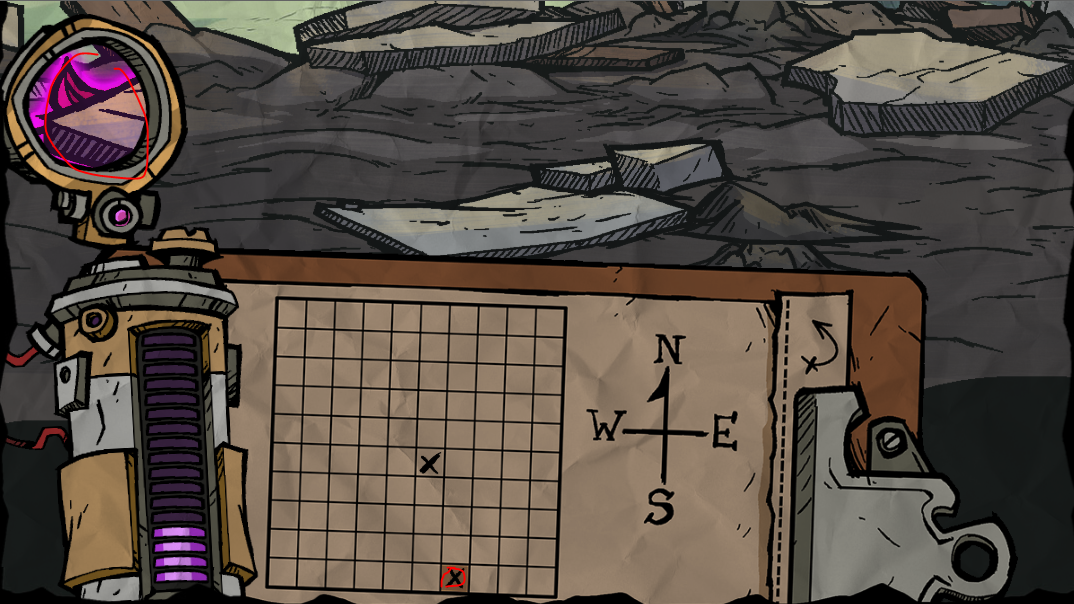
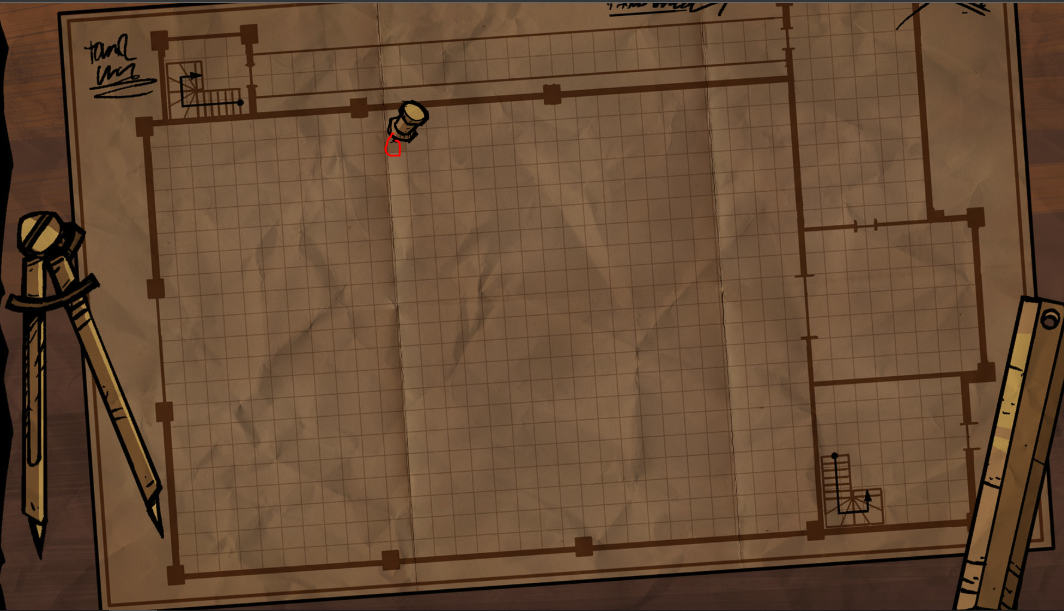
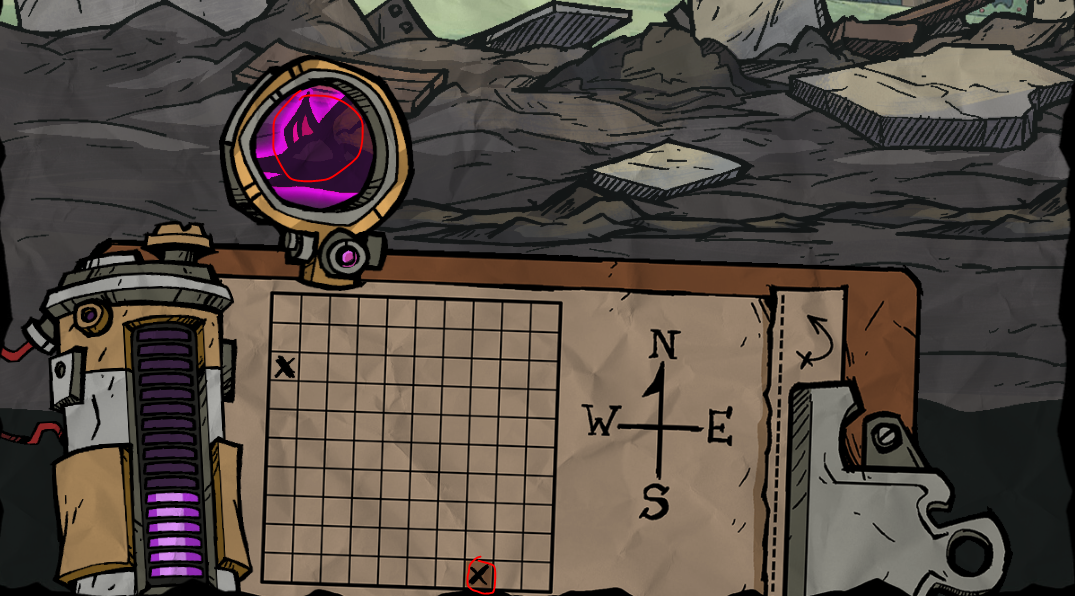
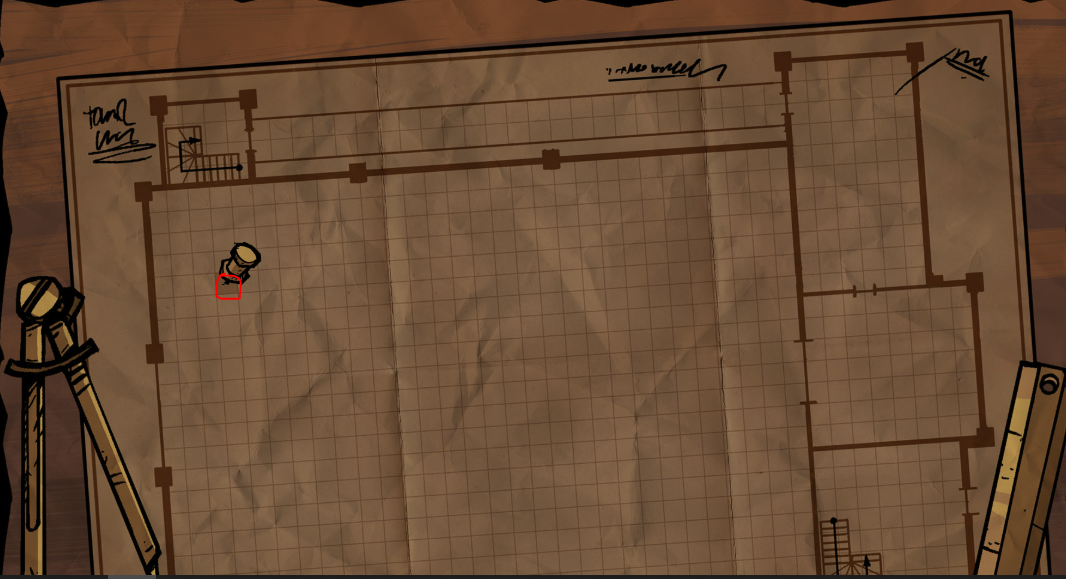
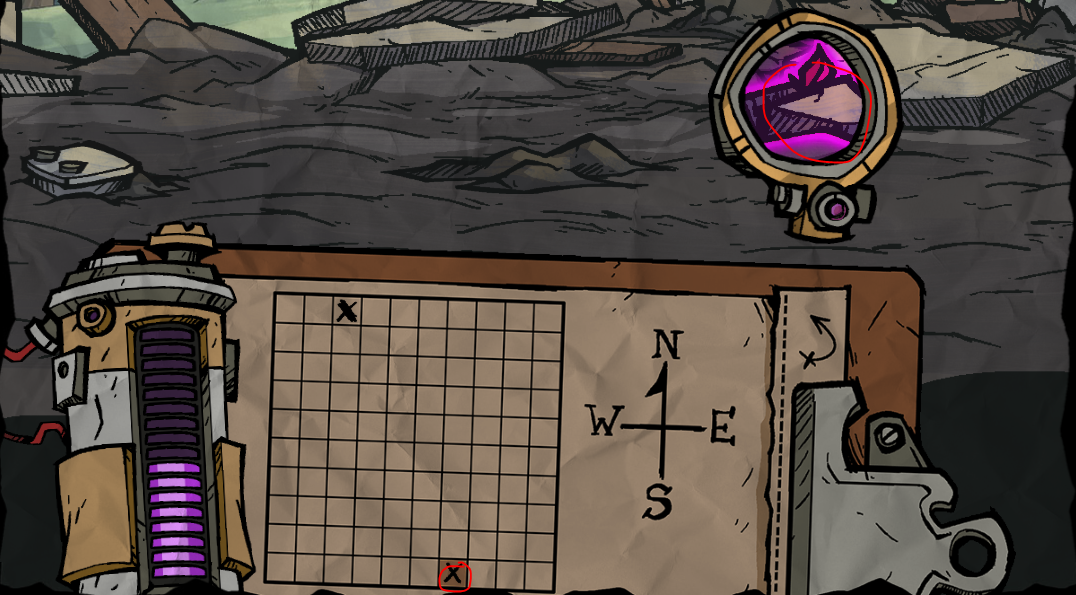
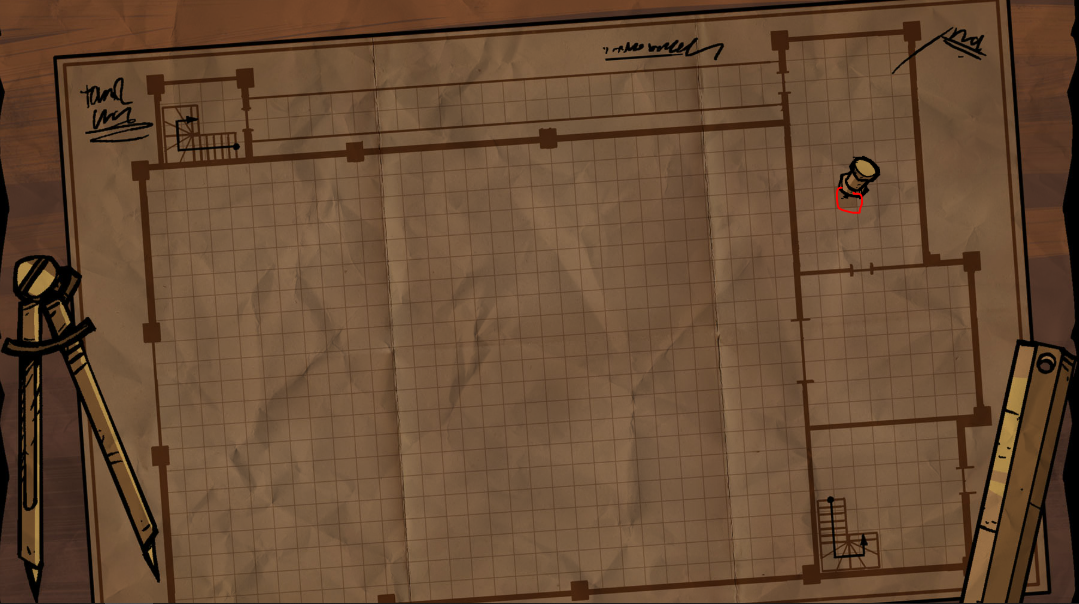
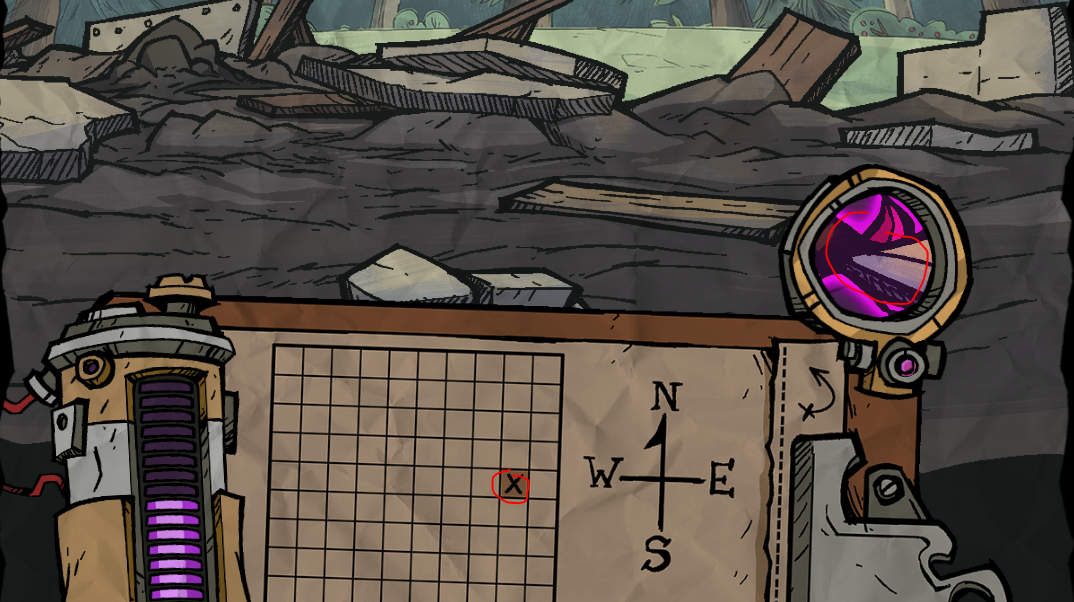
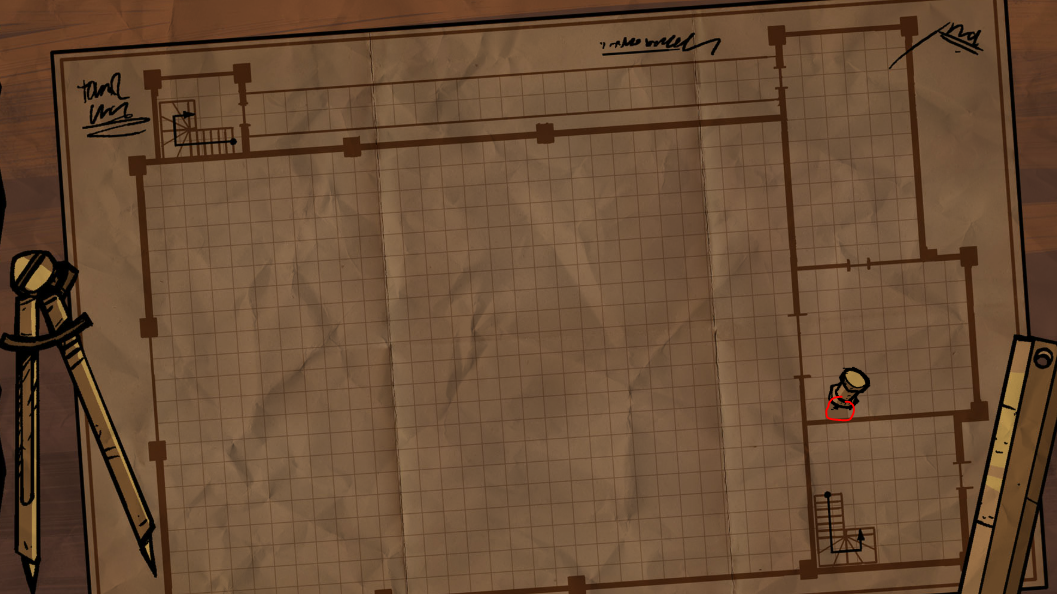
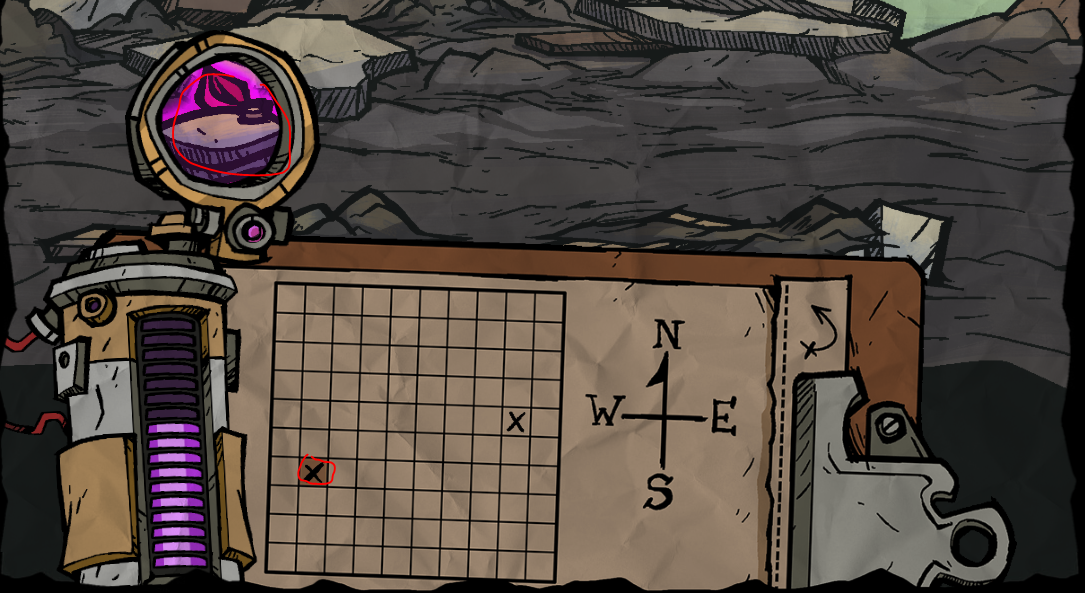
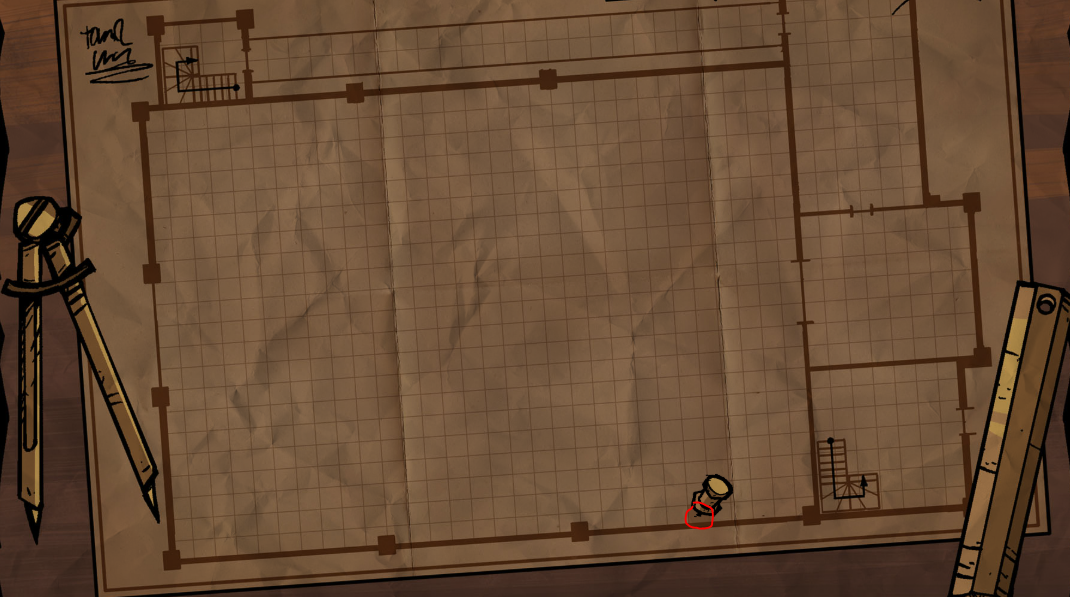
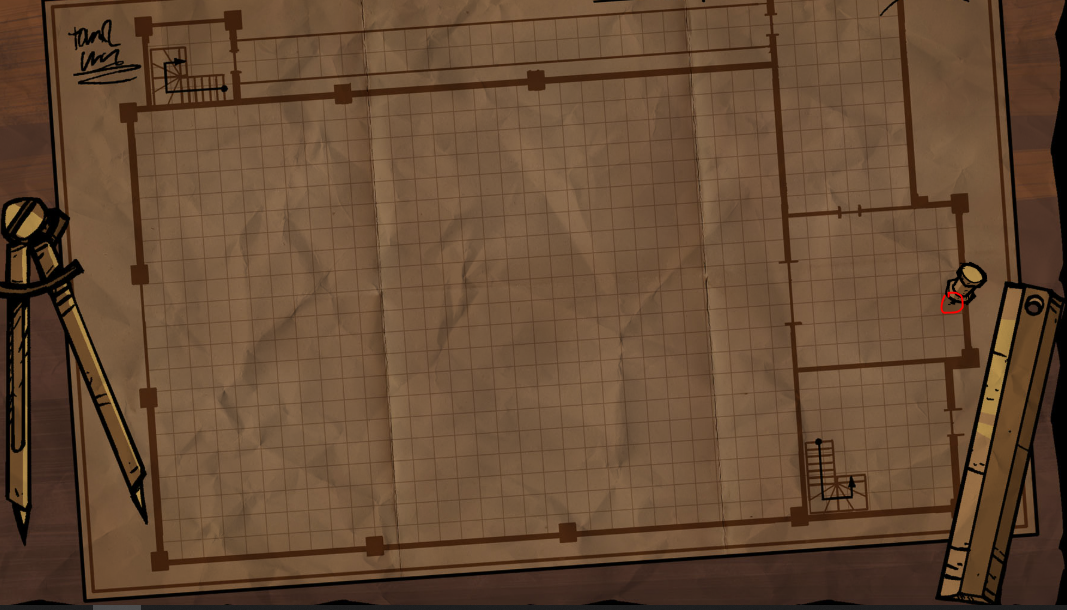
6. This will reveal two additional panels underneath. We now have to go excavating parts from the area. The top panel lets you select a location (from the old Voxola building) to search. The bottom panel, then lets you check each zone in that location.
7. The goal is to find all the parts to B.U.D.D.Y. When you find a zone containing a part, you have to click on that part to retreive it. Solutions follow:
7.1 & 7.2
7.3
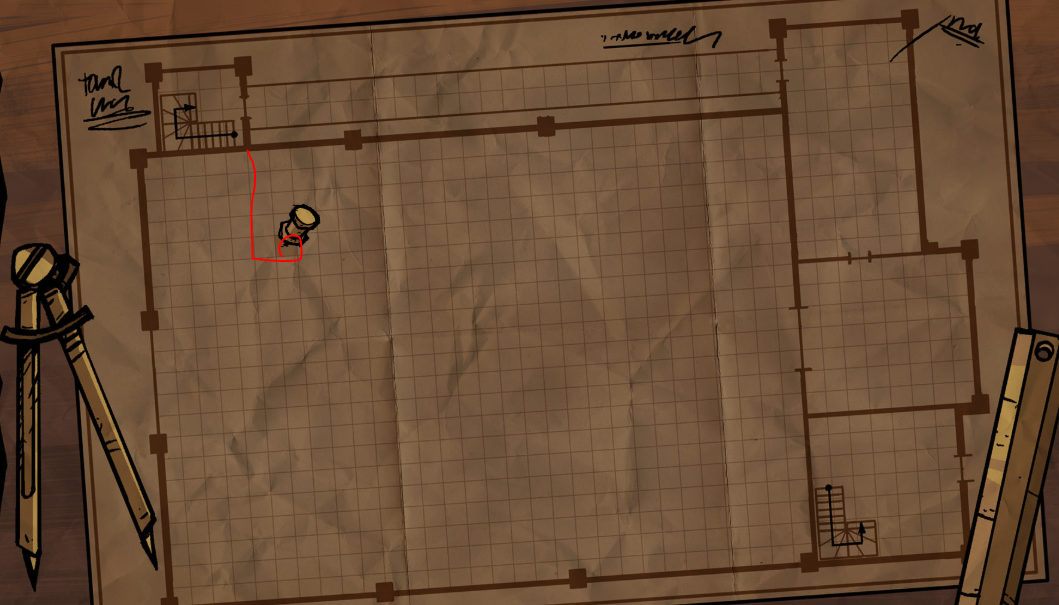

7.4
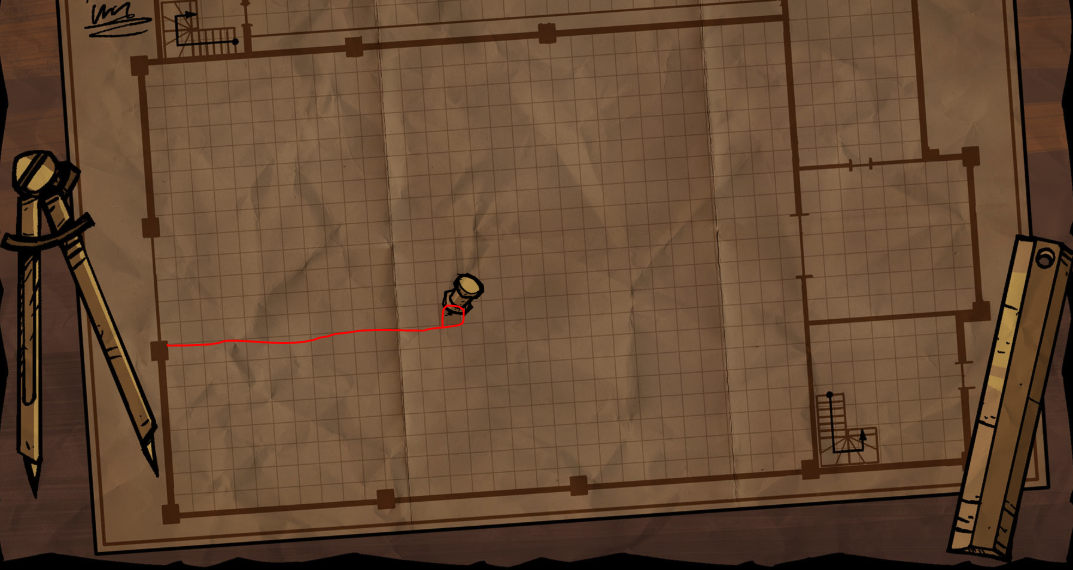
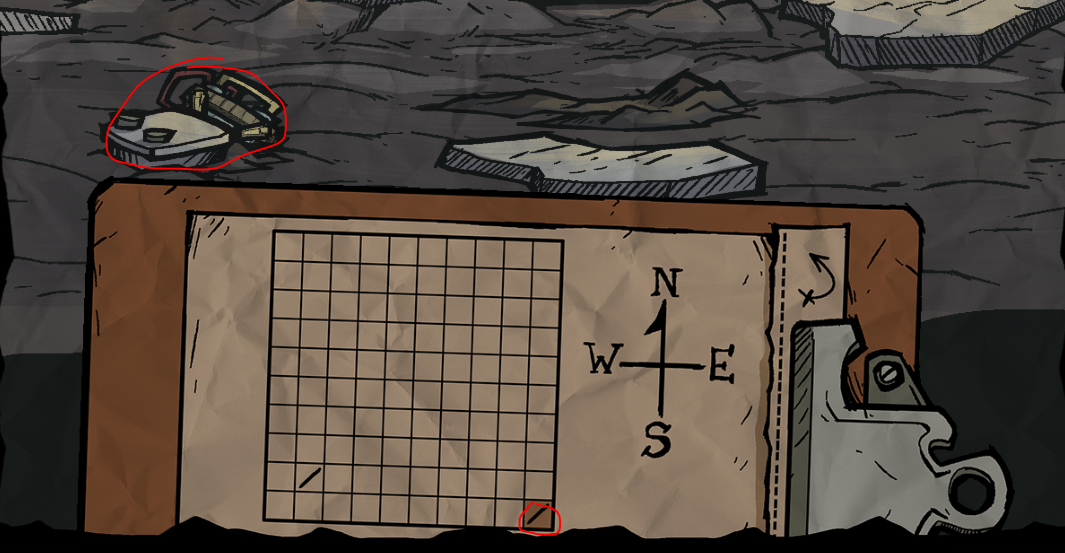
7.5

8. Now that you have the required pieces, click on the part in Wagstaff's hand to return to his workshop.
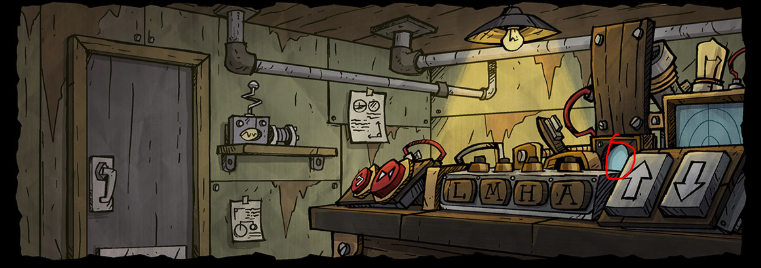
9. Click on the screwdriver on the left hand side to reveal a new panel underneath with the B.U.D.D.Y. parts we found.
10. Flipping the switch will reveal a new panel in the comic below it.
11. Return to the lab. This time click on the door.
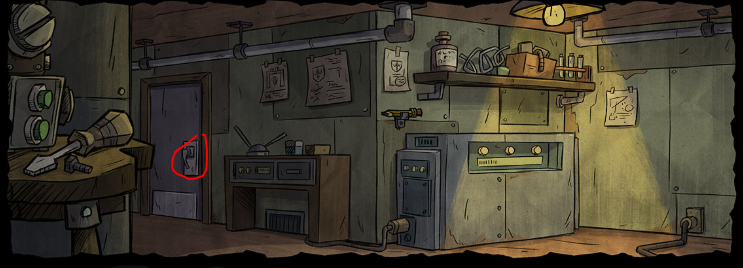
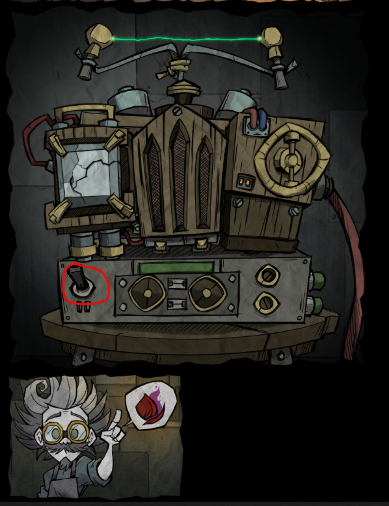
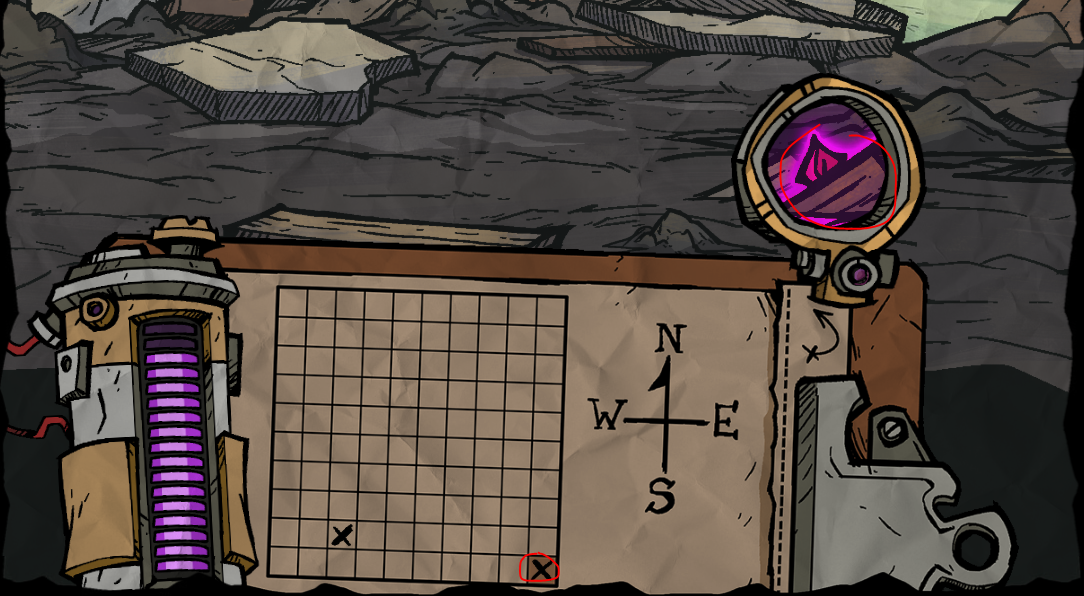
12. This will reveal a new panel. Click on the lens in the background of the panel to reveal a lens contraption panel underneath.
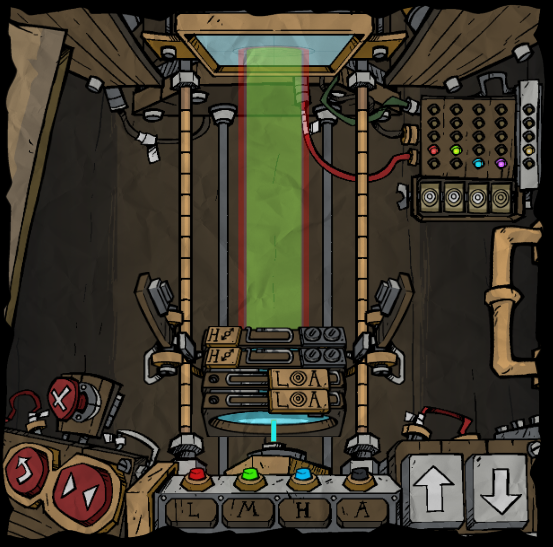
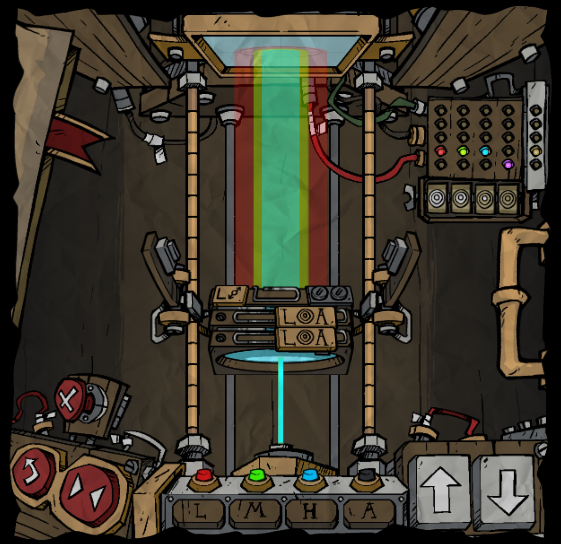
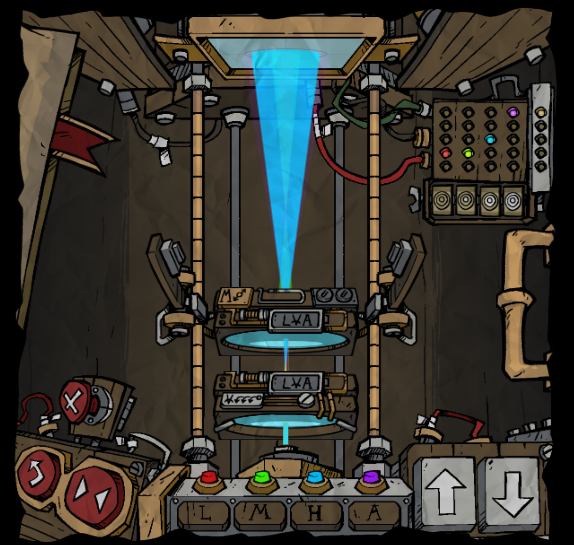
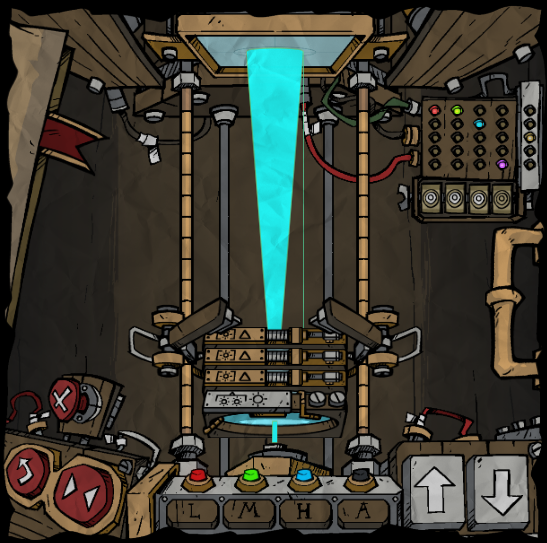
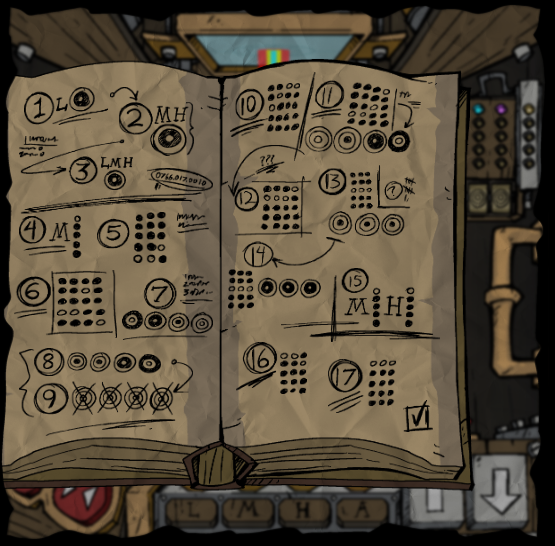
13. Each portion of this lens contraption panel has a different function. The goal is to read the instructions for the next step, add lens to the contraption with the proper lasers toggled so that the laser power and laser width matches the diagrams/hints in the instructions.
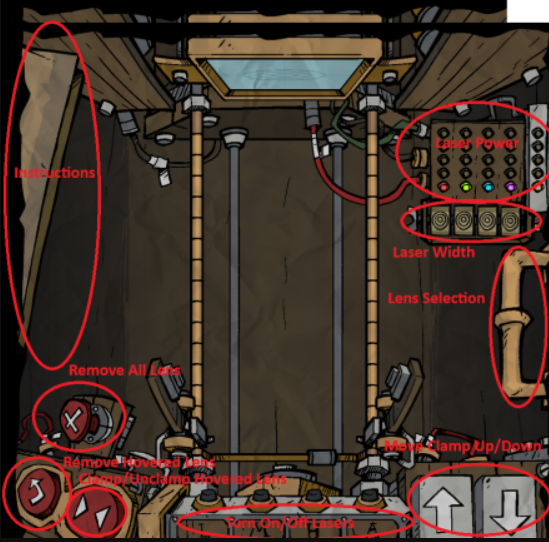
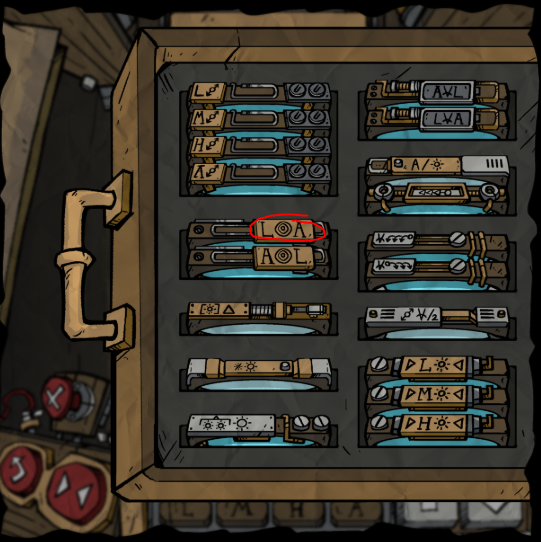
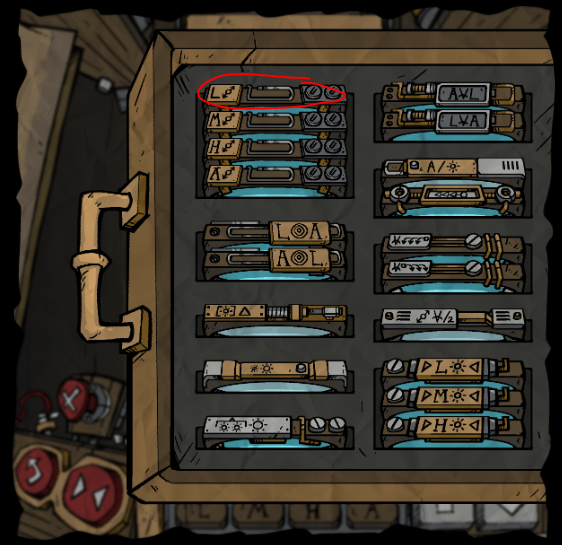
14.1 Open the lens drawer by clicking the handle on the right and choose this lens
14.2 Click this button to release the lense
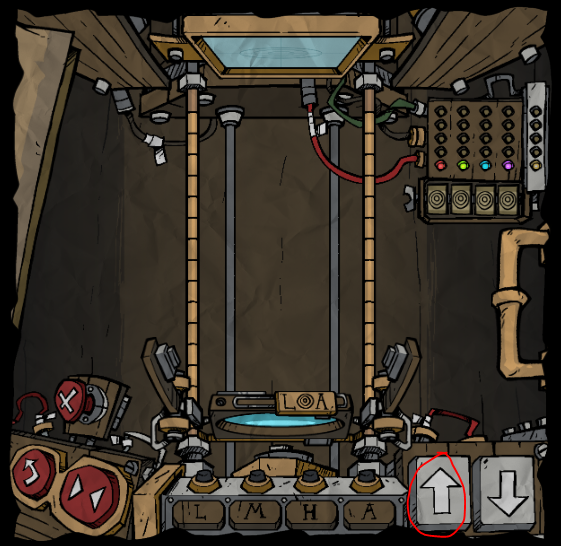
14.3 Move the grabber up 1 space using the arrows
14.4 Open the drawer again and choose this lens
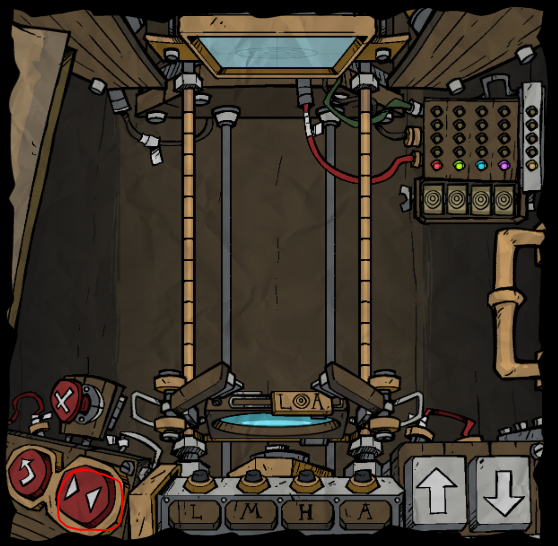
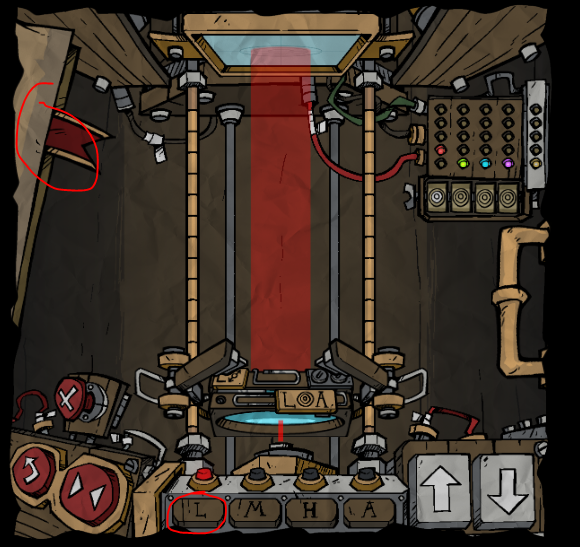
14.5 Click the “L” laser at the bottom. There is now a new goal in the book
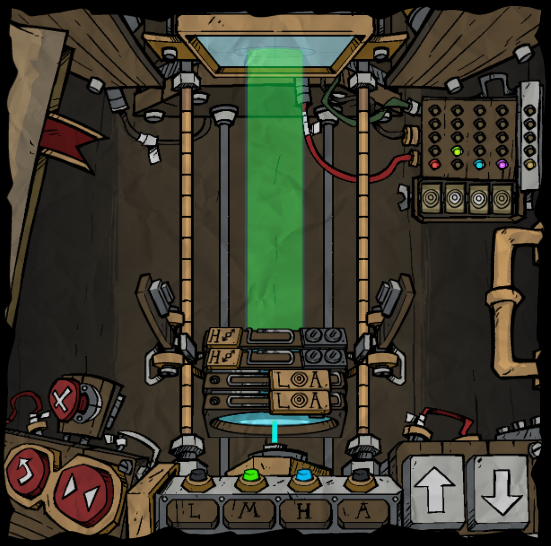
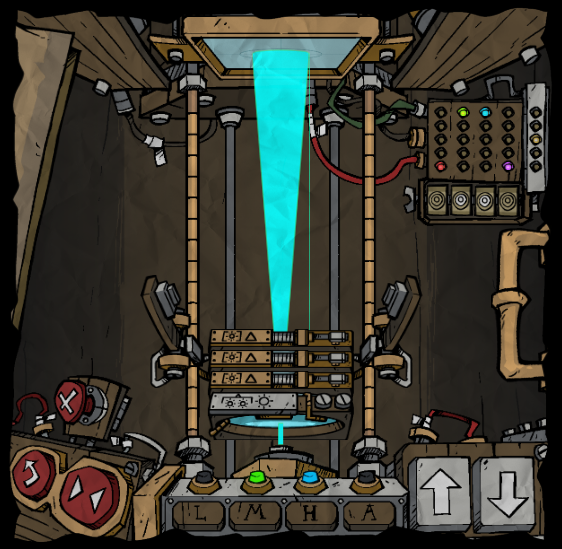
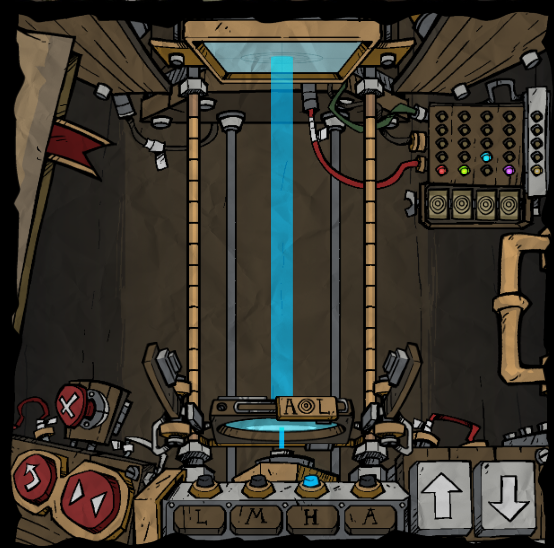
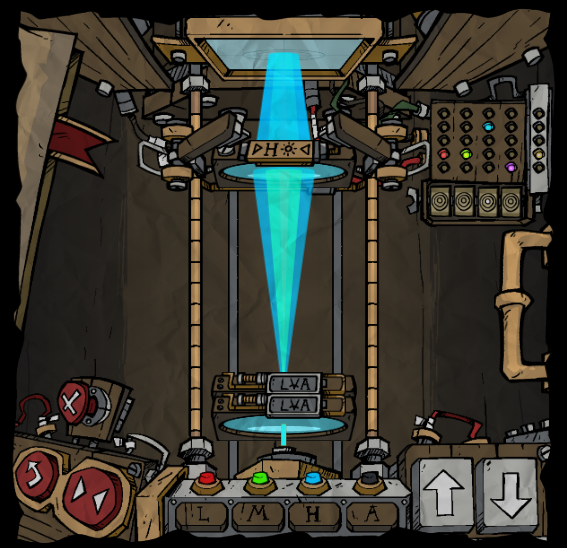
15. Repeat the steps above to complete the following combinations. For each step in the instruction manual, you'll need to open the instructions, then use the clamps and lens selection to create the correct diagram.
15.1
15.2
15.3
15.4
15.5
15.6
15.7
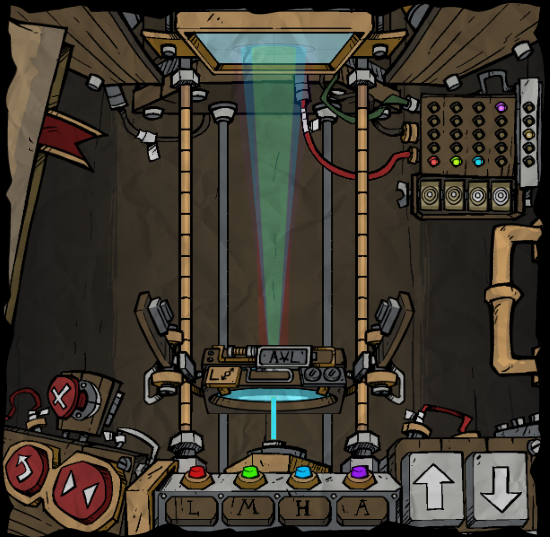
15.8
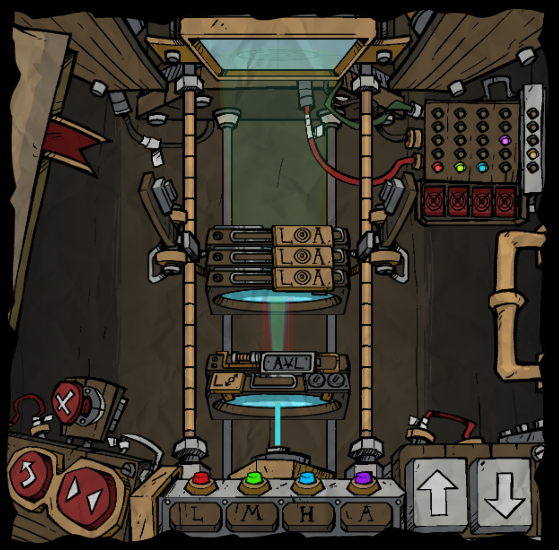
15.9
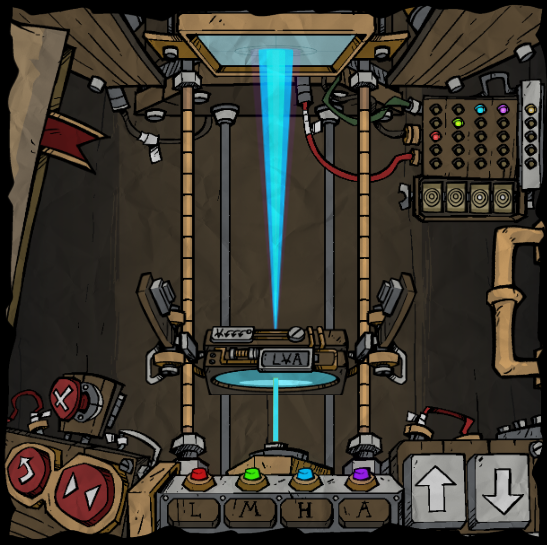
15.10
15.11
15.12
15.13
15.14
15.15
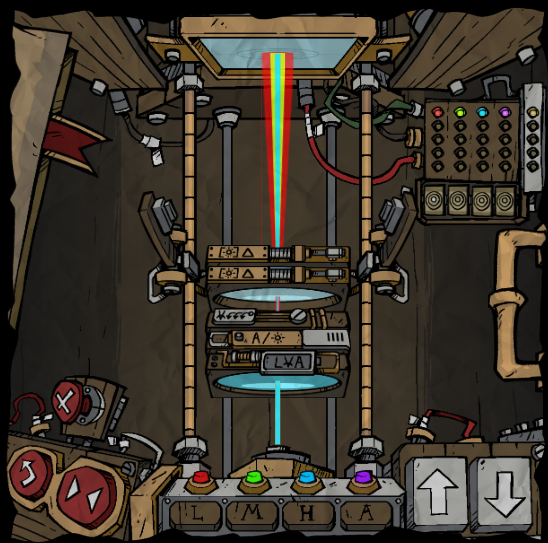
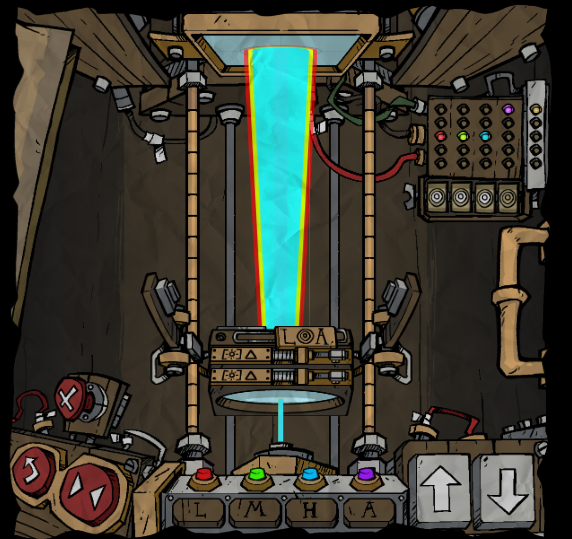
16. Completing those setups will now cause your instruction manual to update one final time with a checkmark in the lower right corner.
LORE INTERACTION 4.5 / 剧情互动 4.5
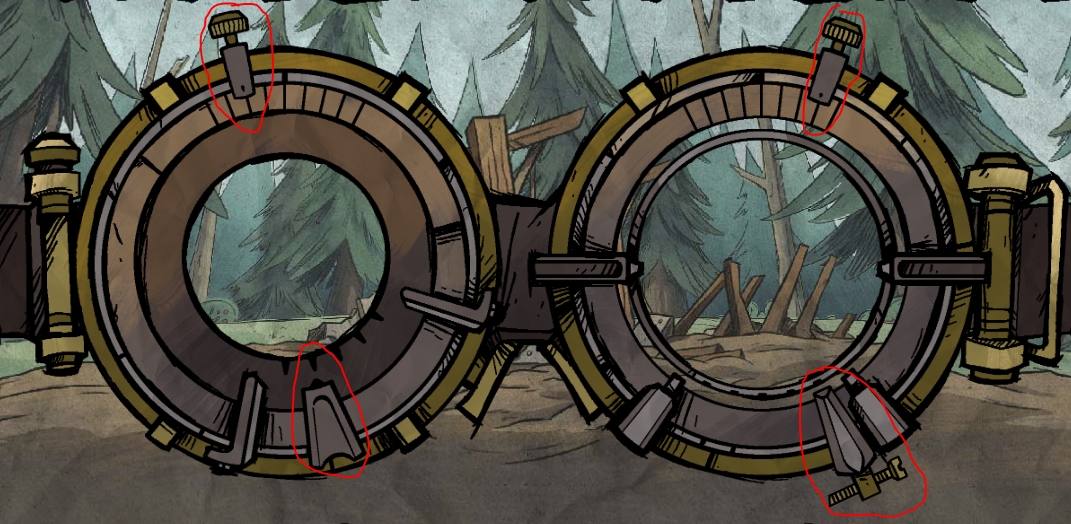
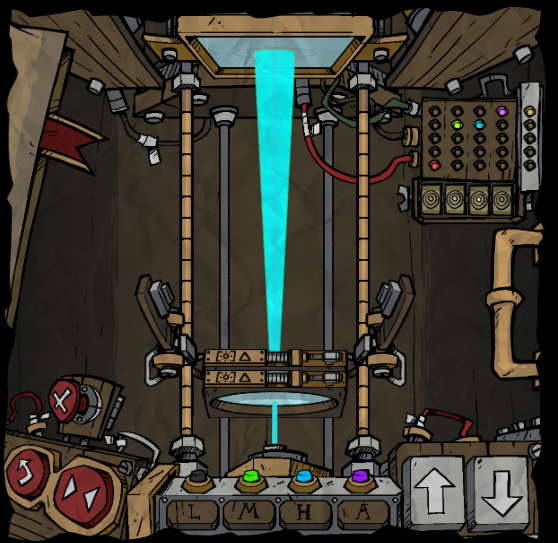
17. Click the door to go back to the lab, click the pencil then the radio to go back to the excavation site, you'll see that Wagstaff's goggles panel has updated. The knobs on the left lens of Wagstaff's googles are now movable again. Move them into this position to have the petal glow. Then click on the petal to add another stamp to your book.
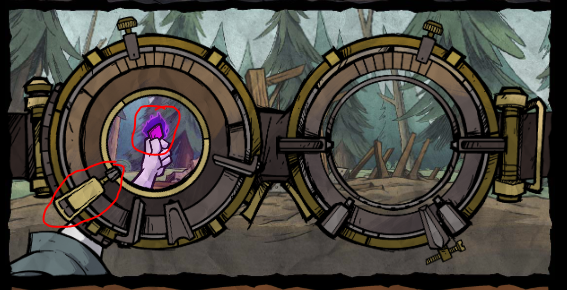
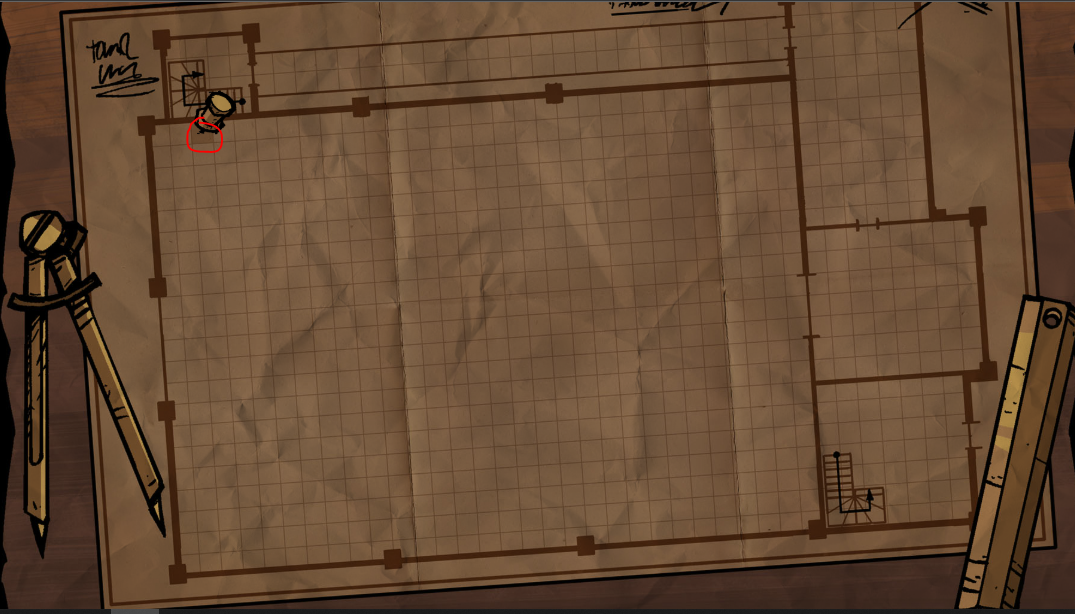
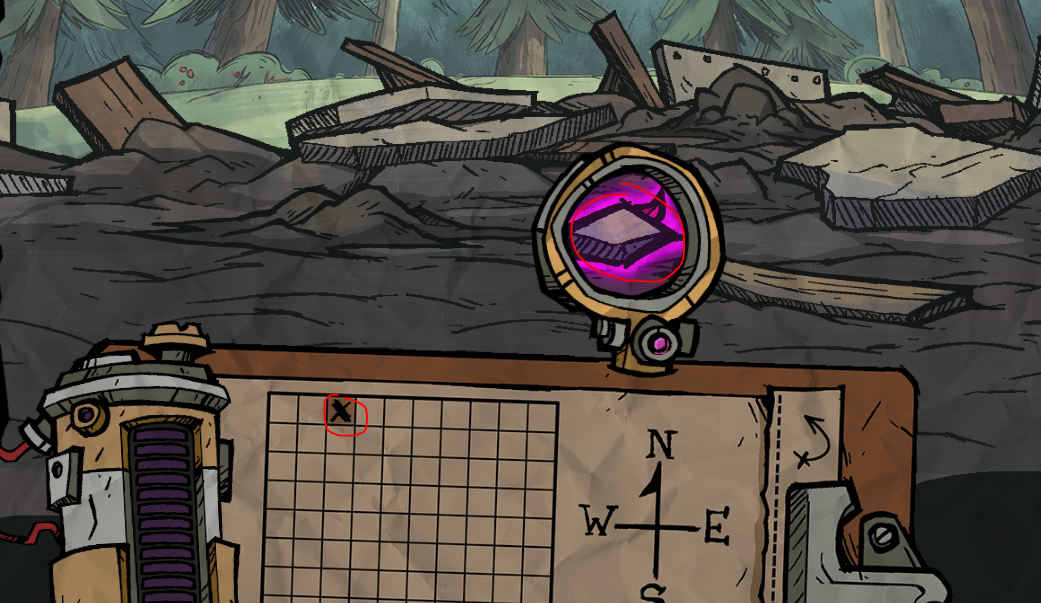
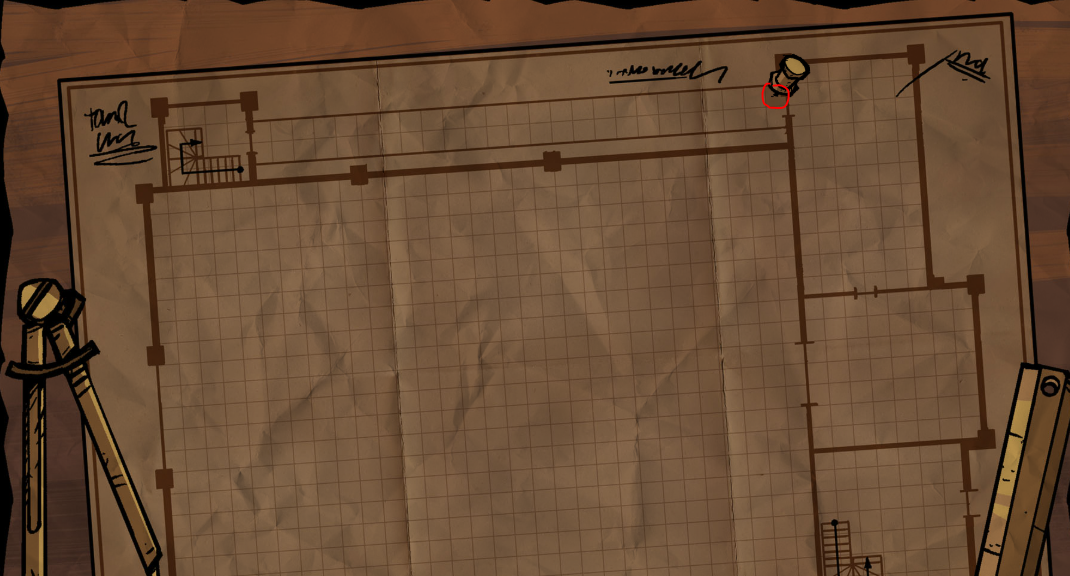
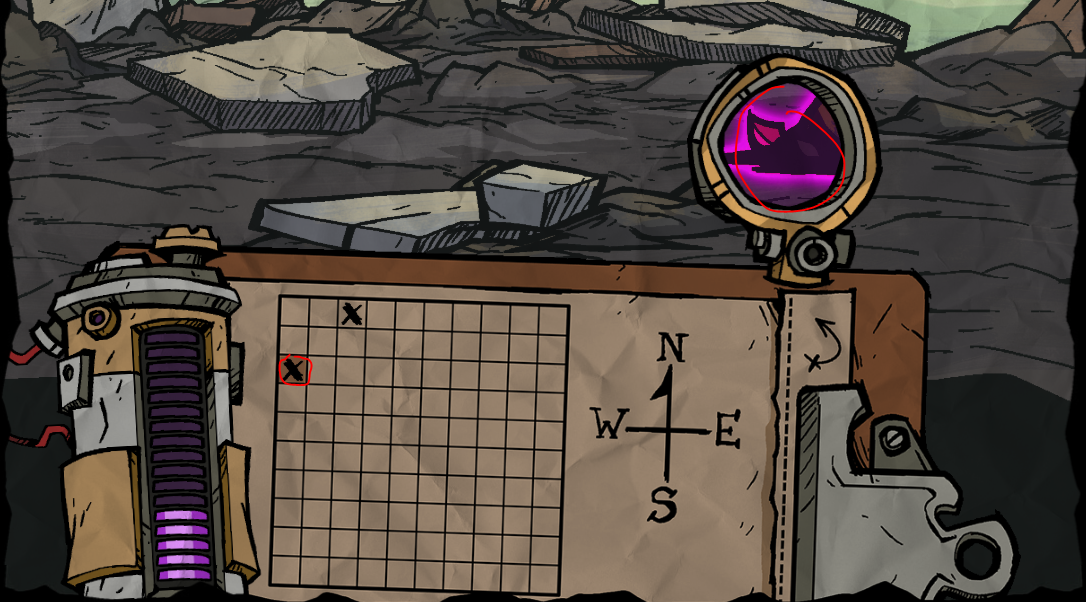
18. There are 17 hidden objects to find in total. A reminder that the lens will blink purple when a zone has a hidden object. You must move the lens to the correct location in the zone to reveal the object. To collect the object, you must click on it. This will then fill one of the 17 bars in the tracker. They are as follows:
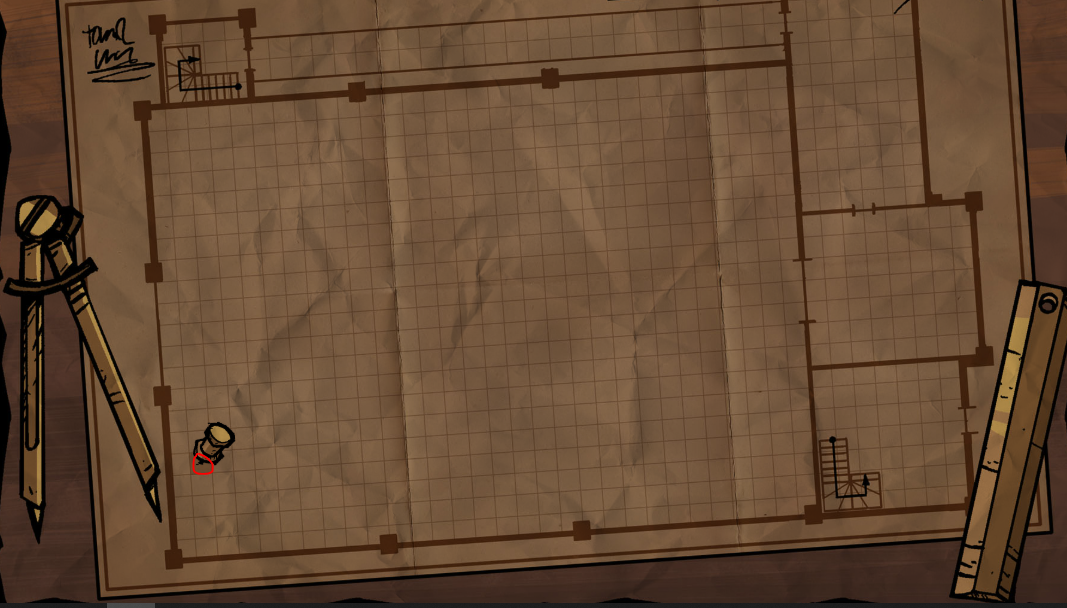
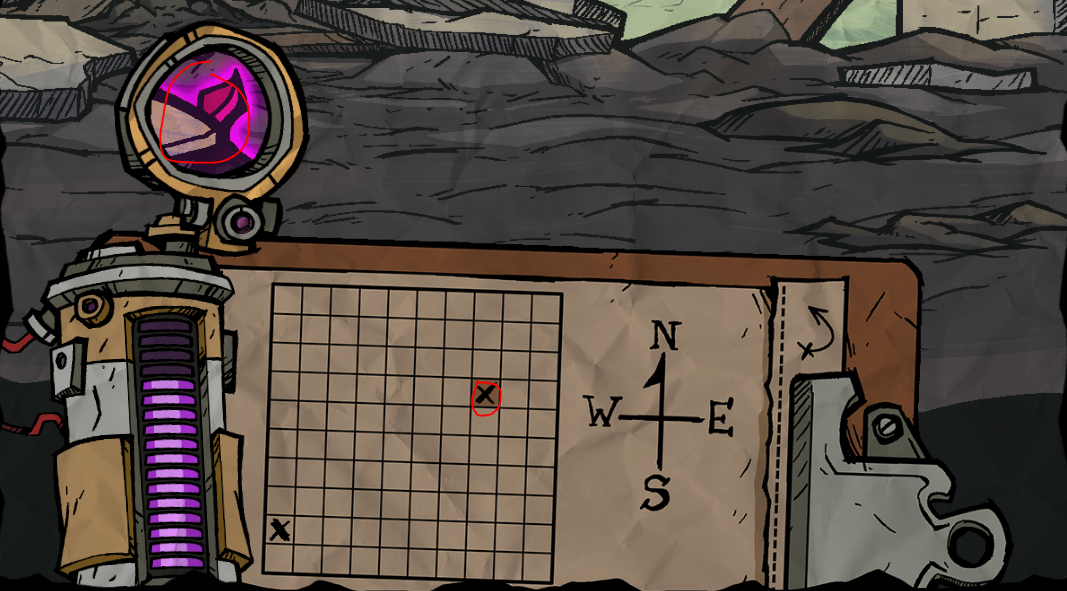
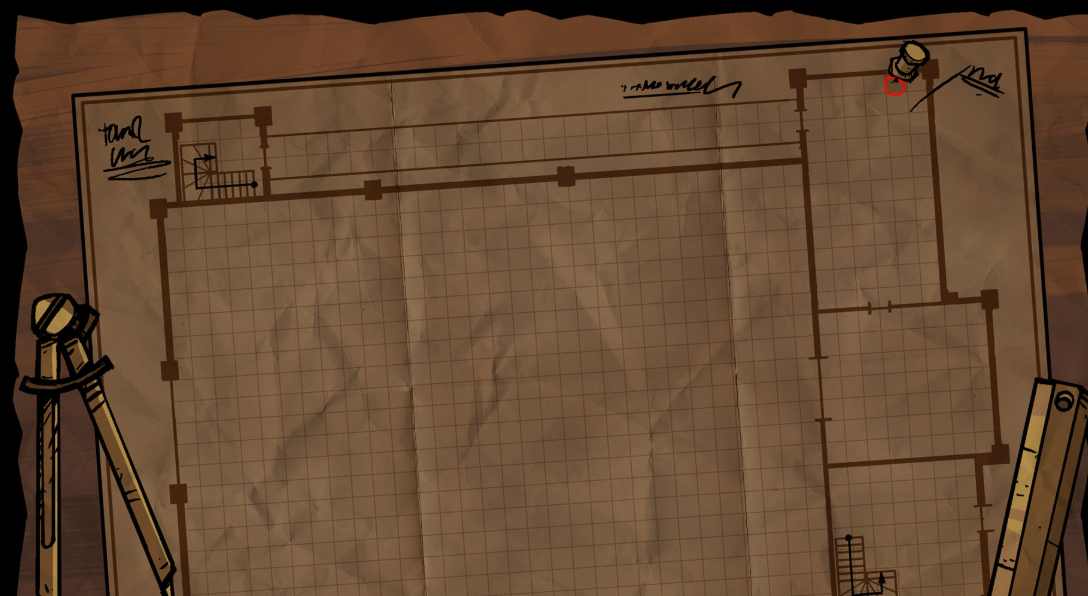
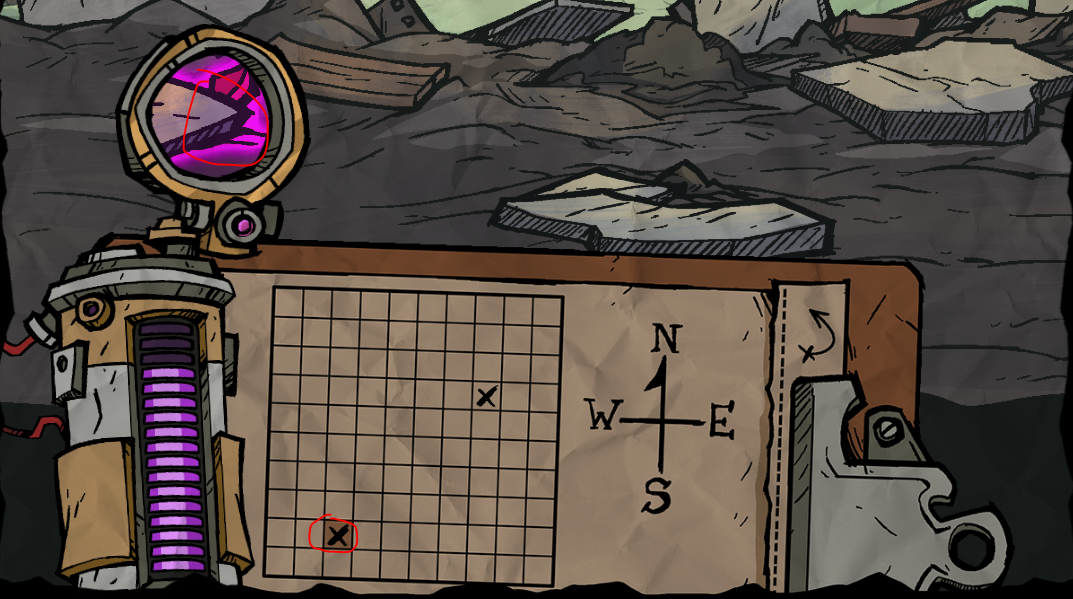
18.1 & 18.2

18.3
18.4
18.5
18.6
18.7
18.8
18.9
18.10
18.11
18.12
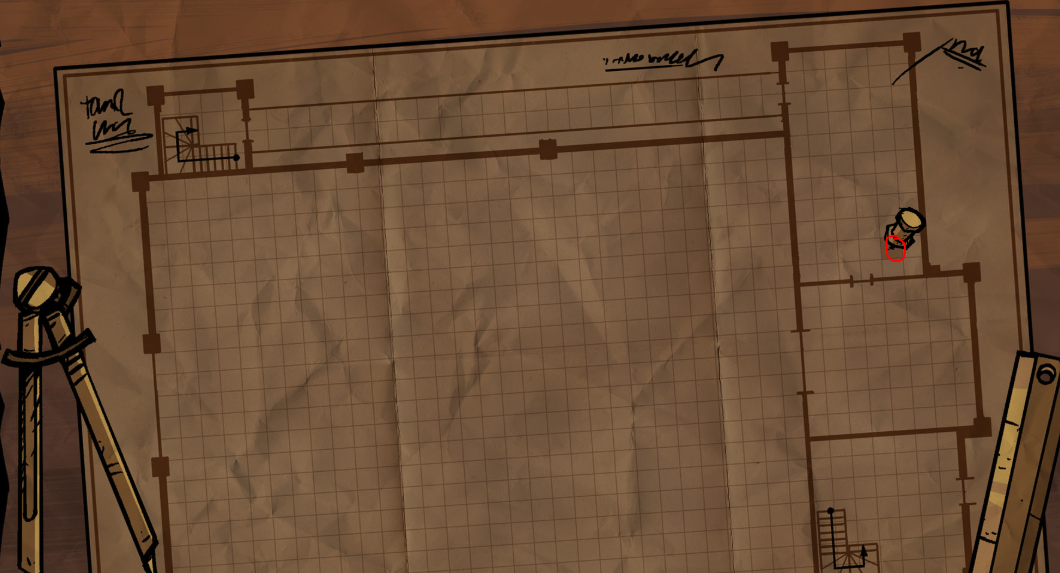
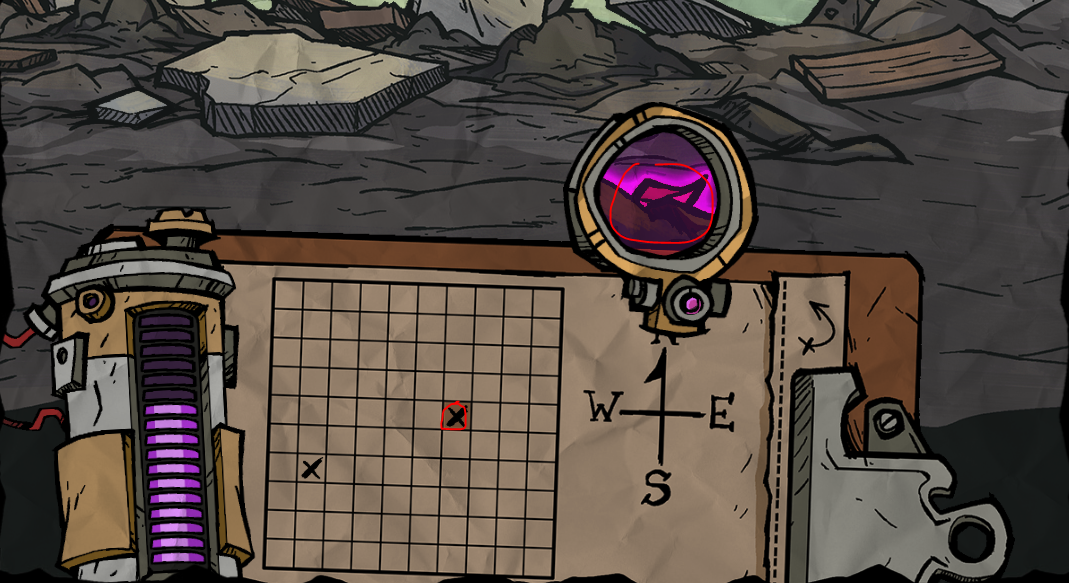
18.13
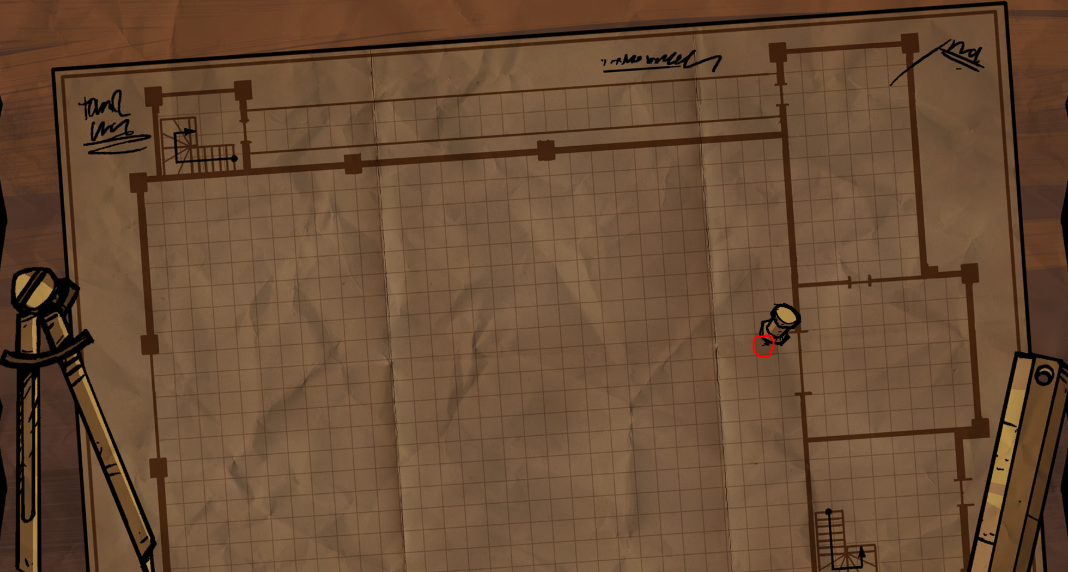
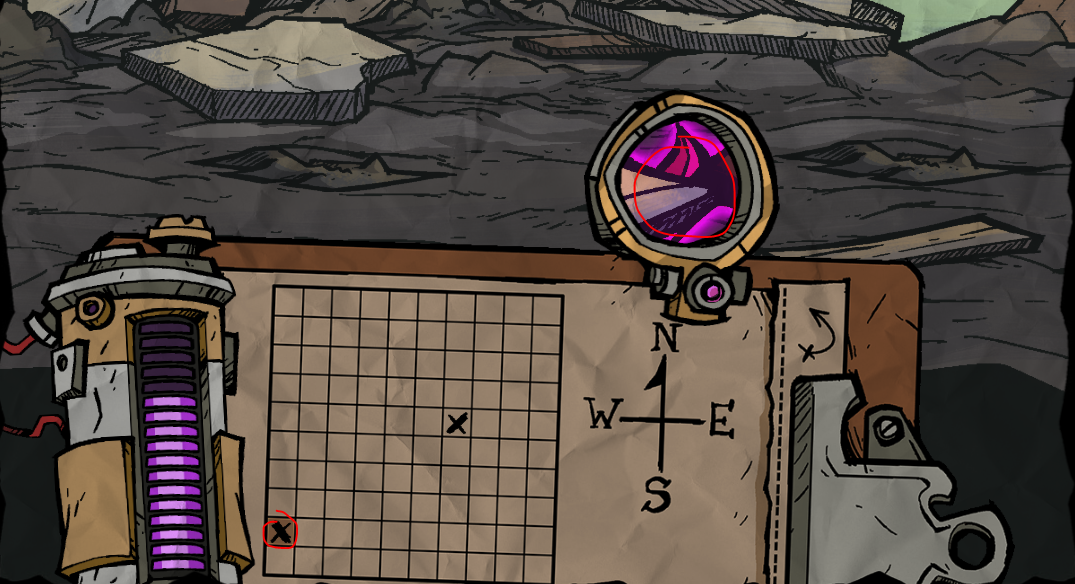
18.14
18.15
18.16
18.17

19. Completing will update the panels below the excavation site.
20. You will also earn 5,000 Klei Points upon completion of step 18. As well as the B.U.D.D.Y. skin for completing step 10. It'll show up on your Klei transactions page[accounts.klei.com].

Video: https://www.youtube.com/watch?v=kmMByS9ESpo
Source: Instant Noodles
18. There are 17 hidden objects to find in total. A reminder that the lens will blink purple when a zone has a hidden object. You must move the lens to the correct location in the zone to reveal the object. To collect the object, you must click on it. This will then fill one of the 17 bars in the tracker. They are as follows:
18.1 & 18.2
18.3
18.4
18.5
18.6
18.7
18.8
18.9
18.10
18.11
18.12
18.13
18.14
18.15
18.16
18.17
19. Completing will update the panels below the excavation site.
20. You will also earn 5,000 Klei Points upon completion of step 18. As well as the B.U.D.D.Y. skin for completing step 10. It'll show up on your Klei transactions page[accounts.klei.com].
Video: https://www.youtube.com/watch?v=kmMByS9ESpo
Source: Instant Noodles
TWITCH DROPS / Bilibili 掉落
After connecting your Klei and Twitch accounts, watch three hours of content to earn a skin.
将您的 Klei 账号与斗鱼/哔哩哔哩账号关联,然后观看 3 小时的内容即可获得一款皮肤。
将您的 Klei 账号与斗鱼/哔哩哔哩账号关联,然后观看 3 小时的内容即可获得一款皮肤。
ASSISTANCE / 协助
https://steamcommunity.com/sharedfiles/filedetails/?id=1981709850

Please don't forget to press the support button if this guide is helpful to you. Thank you. 如果本指南对您有帮助,请别忘了点击支持按钮,谢谢。