A beginner's detailed guide. Up to date for 1.4 (2023).
 sono
sono(926 ratings)
Mar 18, 2022 @ 1:14pm52,0712,634
Gameplay BasicsWalkthroughsEnglish
What is Rimworld, and why should I play it?
Rimworld is a colony management game.
To expand on what that means, you can think of Rimworld as a cross between the Sims and Starcraft, leaning more towards the first. If you're familiar with Dwarf Fortress, it's like that but actually playable by human beings with eyes. Prison Architect is probably the closest comparison.
Like the sims, you manage a group of people, build their homes, give them nice furniture and keep them happy. And like Starcraft, you need to build defenses and fight to keep people and monsters from destroying (or stealing) your stuff.
It's a game more about telling stories than it is about defeating an opponent or reaching a goal. There are endings you can go for, but there are people with hundreds of hours in the game who never bothered going for them, instead enjoying the experience of building nice bases, watching their colonists live their lives and occasionally see them overrun by machine hordes.
In essence, while Rimworld can be played with a strict goal in mind, it's far more similar to games like Crusader Kings in that it's more about having an interesting experience, and having a story to tell your friends at the end of it, whether that end is good or bad. Sometimes you have a story of getting off the planet by the skin of your teeth, sometimes you have a tale of a bickering, infighting colony that didn't prepare properly for winter, got hit by a cold snap causing all their food plants to die off and slowly starved to death.
The world itself is a deadly planet on the outer rim of galactic civilization, filled with ancient trapped ruins, deadly wildlife, friendly and hostile tribes, pirates, lost technology and crashing spaceships.
The game's setting is based on series like Firefly, Dune and a dash of 40k. Expect to see cowboys armed with revolvers one day, primitive tribesmen armed with clubs the next and occasionally have killer robots show up to exterminate all human life.
TL,DR: Come for the challenge, stay for the memories.
What is this guide, and who is it for?
This guide is intended as a how-to for newcomers to the game. It will teach you the basics of getting started, where everything is, and some ideas on what you can do. I'll try to bring things up in an organic order, instead of info-dumping everything up front.
This guide will assume you've only got the vanilla game. The three DLC, Royalty, Ideology and Biotech are generally considered to be pretty great, but I don't expect you to have bought them.
In fact, while Royalty and Biotech are fine, I would heavily recommend turning Ideology off for your first few games. It adds a lot of complexity, which can be overwhelming.
There are other guides out there, but they're either terribly outdated or in a video format, which might not appeal to you. I'll link some of them below. A lot of my information comes from them, as these are people far more experienced at the game than I am.
This guide is not meant to be a bible, held to religiously and followed to the letter. Rimworld isn't a game about absolute optimization, even if you can play it that way. I'm going to suggest some less than ideal ways to do things at times, and my own biases will slip in on occasion. But, by the end of this you should have a stable colony running and have an idea of what's to come.
At the end, I'll recommend some mods that make the game simpler and more enjoyable, as well as some that add content, but this guide will go off the assumption that you're not using any.
A good video guide for beginners: https://www.youtube.com/watch?v=VTG7PpBzHf4
A series of videos going in depth into some specifics: https://www.youtube.com/watch?v=4zBikWY8U74&list=PLS-hAL3jgjOvy3MrdfvKPDH60q_tzOup8
What are colonists?
The core of the game is the people living in your colony. These are a diverse group from various backgrounds, with different skills, passions and traits. Some will be more competent than others, some will have nervous breakdowns over minor discomfort, and some will enjoy seeing your enemies driven before you and hearing the lamentations of their women.
Like a Sim, you generally don't control them directly. You set tasks, like building a wall or planting corn, then your colonists will automatically go and do that for you depending on what general jobs you assign them. You can manually task them onto something, but this is only necessary when you need them to focus on urgent tasks like making a turret when the enemy is approaching instead of working on a widescreen TV.
When they're tired, they'll go to sleep. When they're hungry, they'll eat. When they're bored, they'll go entertain themselves. They'll talk to each other, make friends, get married, form rivalries and get divorced without your input.
You can choose to micromanage this, setting strict schedules, choose what they'll eat and wear, but they generally manage fine on their own using the default settings.
Occasionally, a colonist will get eaten by a panther or die from disease, and you'll take captives from surviving raiders to recruit into your colony. In a 'default' game, you start with 3 of them and slowly build up to around 12.
You'll probably get pretty attached to them, even the guy who heroically defended your colony, lost both legs and now walks around on peg legs. Is he optimal to keep around? No, but he's one of yours dammit.
Colonists are often referred to as Pawns by the community, and I'll likely refer to them that way throughout this guide.
What are storytellers?
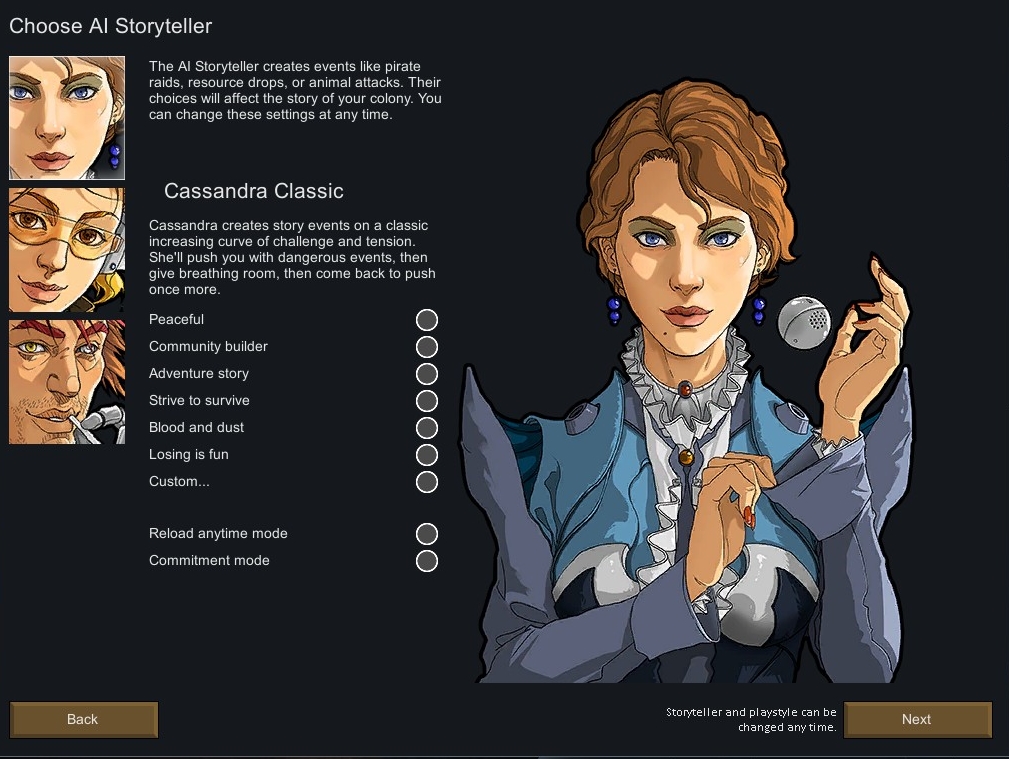 Storytellers are the AI that control what events happen to your colony. They help you have an interesting experience, pushing you when you're doing well, helping when you're doing badly. They're a core part of the experience, but don't worry too much. You can change them and the difficulty at any time. So what are your options?
Cassandra Classic: The default. She's fair, but strict. Challenge ramps up over time and as your colony improves, you can't really go wrong with her.
Phoebe Chillax: She gives more positive events, and longer time spans between large negative events. This gives you more time to build up.

Be warned though, this can actually make the game harder if you're not prepared. The difficulty level is the same, only the time between challenges changes. Where Cassandra sends (as a hypothetical example) 1 raider on month 1, 3 on month 2, 5 on month 3, 7 on month 4 and 10 on month 5, Phoebe will send you 1 on month 1, 5 on month 3, and 10 on month 5. As such, you might not be prepared for the sudden jump in difficulty. On top of that, using your defeated opponent's weapons or selling them is often necessary in the early game, and you'll have less opportunity for that. Finally, she has a reputation for not doing anything for years at a time, only to send a massive wave of enemies at you while giving half your colony malaria. As such, I wouldn't actually recommend her over Cassandra except on low difficulty.
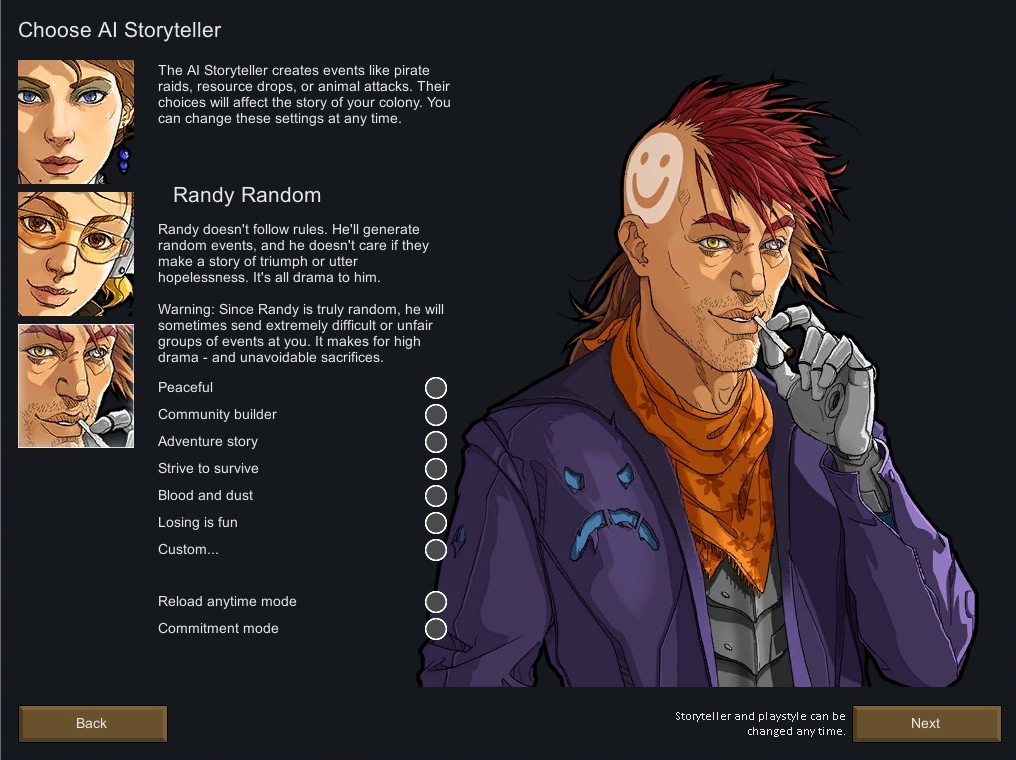 Randy Random: As the name implies, Randy does whatever. He's still going to tailor individual events to the difficulty setting and the prosperity of your colony, but he is perfectly willing to send multiple negative events simultaneously. Some days, you might get attacked by a horde of rampaging barbarians, immediately followed by knock-off T-800 Terminators dropping from the sky into the center of your base, only for a horde of rabid squirrels to come along and finish whoever's left. On the other hand, sometimes no raids happen for months at a time, and instead free items and high-grade weapons rain down from the sky in drop pods. He's also liable to send two raids simultaneously, only for them to attack each other instead of you.
While the early game can be rough with Randy, and sudden destruction is always a possibility, most players actually consider him easier than Cassandra precisely because the consistent scaling difficulty isn't really there.
All storytellers stop sending you free colonists through events as your colonist number increases, with Randy doing so at a higher number. There does not seem to be a fixed limit on pawn numbers, except for what your pc can handle.
While your storyteller matters, you also select the difficulty independent of them. This goes from Peaceful, for a relaxed base-building experience with few to no negative events, to Losing is fun, where the enemy grows quickly, your crops give less food, disease runs rampant and you'll need to squeeze every bit of efficiency out of your pawns. The default is Strive to Survive, but set it to whatever you're comfortable with.
You can also make a custom difficulty to suit your needs. Hate insects crawling out of the ground in the middle of your mountain base? Turn them off. Want to keep the enemy difficulty, but decrease the chance of disease or your pawns instantly dying to a chance bullet to the brain? It's all possible.
I recommend starting on Adventure Story for your first run, and changing it up or down whenever you feel like it. Remember, this can be done at any time, so don't stress too much about the decision.
Starting your game
Let's quickly walk you through what starting your game looks like.
Your first time around, you can play the tutorial. It teaches you some basics, which means I'm going to assume you know everything they've taught you. Unfortunately, some of what they teach you is... not wrong, but pretty suboptimal. I'm going to describe how you start a regular game, although playing the game out starting from the tutorial isn't a bad idea by any means.
When you start a new game, you select your preferred starting scenario. The default selection, crashlanded, is probably the best idea. If you get bored of this, you can start as a more primitive group with more starting colonists, or a rich, technologically advanced single explorer. You can also start naked and alone, but this is like picking Deprived in Dark Souls: done for the sake of challenge.
Next, you pick your storyteller and difficulty. You should know what to do by now. When in doubt, pick Cassandra Classis at Adventure story difficulty. Below that, you pick whether to use saves or not. Saves is heavily recommended. Especially when you start, Pawns are going to die to dumb stuff, and being able to reload a save where you didn't remove a support column and collapse a roof onto someone's head is always nice.
Next, you can change how the world will generate. The default options will do just fine, don't worry about it. Now the world will generate. This might take a second, and if you've got mods installed you might want to go make yourself a tea.
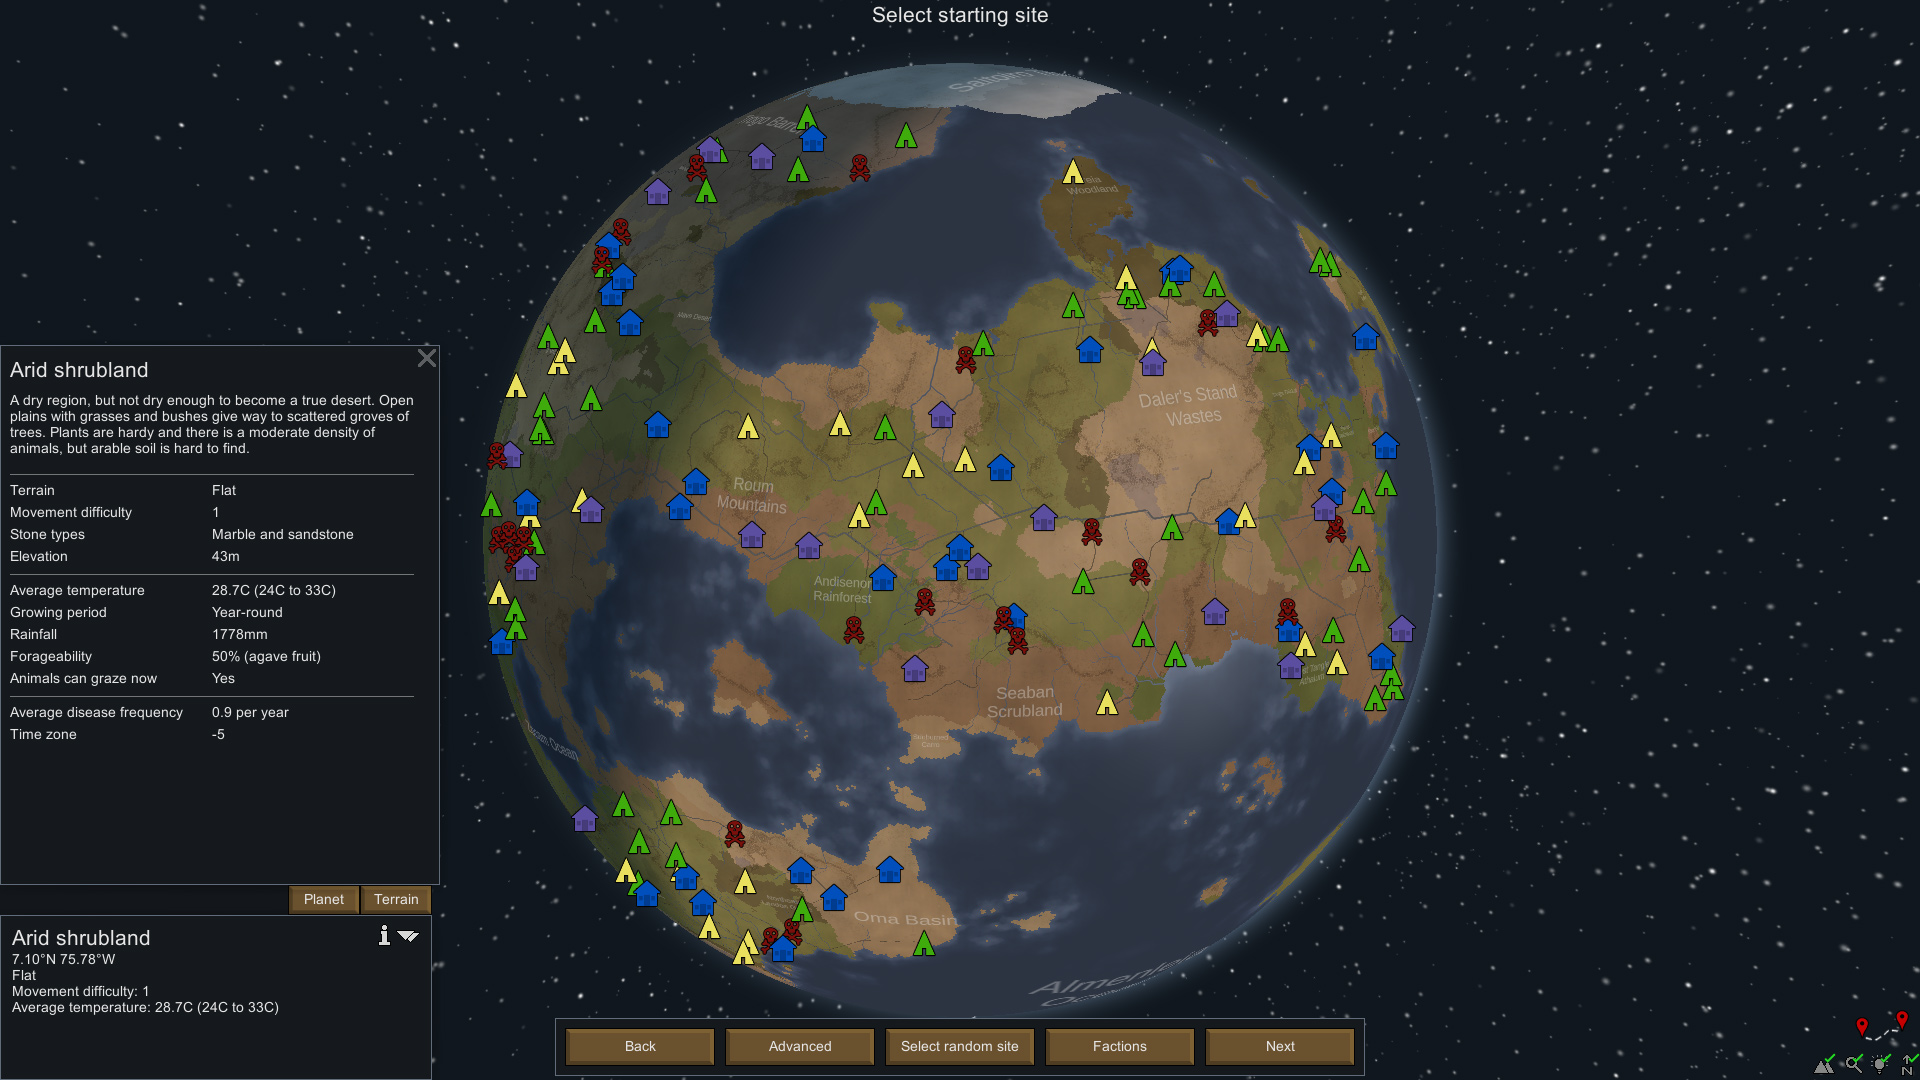 Behold, the planet. It's a dreary place, filled with things trying to kill you. And you're going to be killing a lot of them in order to get off.
Don't pay too much mind to all the camps cluttering the map, they won't be relevant for a while. Raids will happen regardless of where you land, even if it's on an isolated island tribesmen will rowboat over to come steal your fancy chair.
As such, you'll want to land somewhere on the mainland so you can actually travel via caravan to visit your neighbor, go on quests and mine materials.
Your landing spot is effectively part of the difficulty level. You can pick a nice, easy spot, or you can land in an inhospitable hellhole.
For a nice and easy start, you'll want to land in a temperate forest. Hovering over a spot, you can see some details. If you can't see these, click 'terrain'. Most of this isn't important info, but for a smooth experience you'll want the growing period to be 'year-round'. This is achieved around the middle of the planet, although based on the map generation this can appear to be high or low on the map.
Next, you'll want some hills. Large or small, either is fine. These can be seen visually by brown splotches. Mountainous is better for a mountain base, if that's your inclination, but that's a harder start so I wouldn't recommend it for game 1.
Nice to have, but not that important: Marble and Granite as stone types, being close to a road.
Being nearby 'friendly' factions can be useful, but really isn't that important for a regular playthrough. Don't land closer than 4 tiles to another settlement, since it'll make them dislike you. The game will warn you about this if you try.
This might seem like a lot of stuff to take into account, but in practice this is pretty simple. There's hundreds of viable spots just like this.
Remember, this is for the easiest game possible so you can comfortably get to know the game. You might eventually want to branch out to different biomes, growing ranges and temperatures. You can always just have the game select a random tile if you want.
The next thing you'll want to do is click on advanced, and increase the map size. This will be heavier on your pc, but a larger map has a lot more resources and safety. The medium 275*275 is best. More than that and the game AI breaks a bit. Large is pretty much just used for creating a nice megabase in modded games.
When you're done, press next to get into character selection.
Your first time around, you can play the tutorial. It teaches you some basics, which means I'm going to assume you know everything they've taught you. Unfortunately, some of what they teach you is... not wrong, but pretty suboptimal. I'm going to describe how you start a regular game, although playing the game out starting from the tutorial isn't a bad idea by any means.
When you start a new game, you select your preferred starting scenario. The default selection, crashlanded, is probably the best idea. If you get bored of this, you can start as a more primitive group with more starting colonists, or a rich, technologically advanced single explorer. You can also start naked and alone, but this is like picking Deprived in Dark Souls: done for the sake of challenge.
Next, you pick your storyteller and difficulty. You should know what to do by now. When in doubt, pick Cassandra Classis at Adventure story difficulty. Below that, you pick whether to use saves or not. Saves is heavily recommended. Especially when you start, Pawns are going to die to dumb stuff, and being able to reload a save where you didn't remove a support column and collapse a roof onto someone's head is always nice.
Next, you can change how the world will generate. The default options will do just fine, don't worry about it. Now the world will generate. This might take a second, and if you've got mods installed you might want to go make yourself a tea.
Behold, the planet. It's a dreary place, filled with things trying to kill you. And you're going to be killing a lot of them in order to get off.Don't pay too much mind to all the camps cluttering the map, they won't be relevant for a while. Raids will happen regardless of where you land, even if it's on an isolated island tribesmen will rowboat over to come steal your fancy chair.
As such, you'll want to land somewhere on the mainland so you can actually travel via caravan to visit your neighbor, go on quests and mine materials.
Your landing spot is effectively part of the difficulty level. You can pick a nice, easy spot, or you can land in an inhospitable hellhole.
For a nice and easy start, you'll want to land in a temperate forest. Hovering over a spot, you can see some details. If you can't see these, click 'terrain'. Most of this isn't important info, but for a smooth experience you'll want the growing period to be 'year-round'. This is achieved around the middle of the planet, although based on the map generation this can appear to be high or low on the map.
Next, you'll want some hills. Large or small, either is fine. These can be seen visually by brown splotches. Mountainous is better for a mountain base, if that's your inclination, but that's a harder start so I wouldn't recommend it for game 1.
Nice to have, but not that important: Marble and Granite as stone types, being close to a road.
Being nearby 'friendly' factions can be useful, but really isn't that important for a regular playthrough. Don't land closer than 4 tiles to another settlement, since it'll make them dislike you. The game will warn you about this if you try.
This might seem like a lot of stuff to take into account, but in practice this is pretty simple. There's hundreds of viable spots just like this.
Remember, this is for the easiest game possible so you can comfortably get to know the game. You might eventually want to branch out to different biomes, growing ranges and temperatures. You can always just have the game select a random tile if you want.
The next thing you'll want to do is click on advanced, and increase the map size. This will be heavier on your pc, but a larger map has a lot more resources and safety. The medium 275*275 is best. More than that and the game AI breaks a bit. Large is pretty much just used for creating a nice megabase in modded games.
When you're done, press next to get into character selection.
Selecting Colonists
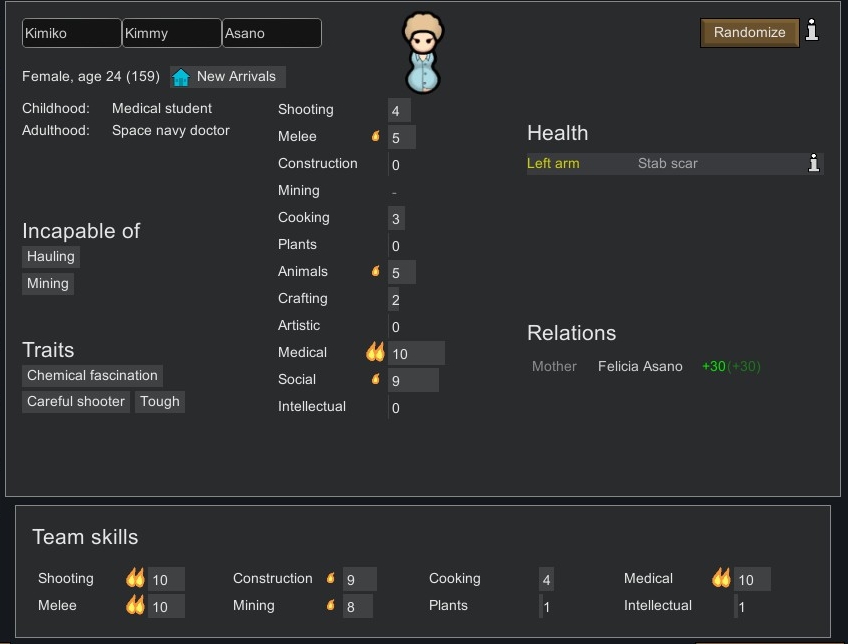
Big screens filled with numbers scare me. If you feel the same, relax, I'll walk you through it. You can hover over most things to get more info.
On the left, you can see your 3 Pawns, as well as 5 other options. Frankly, those other options are just there for if you want to limit yourself to no rerolling. Just ignore them.
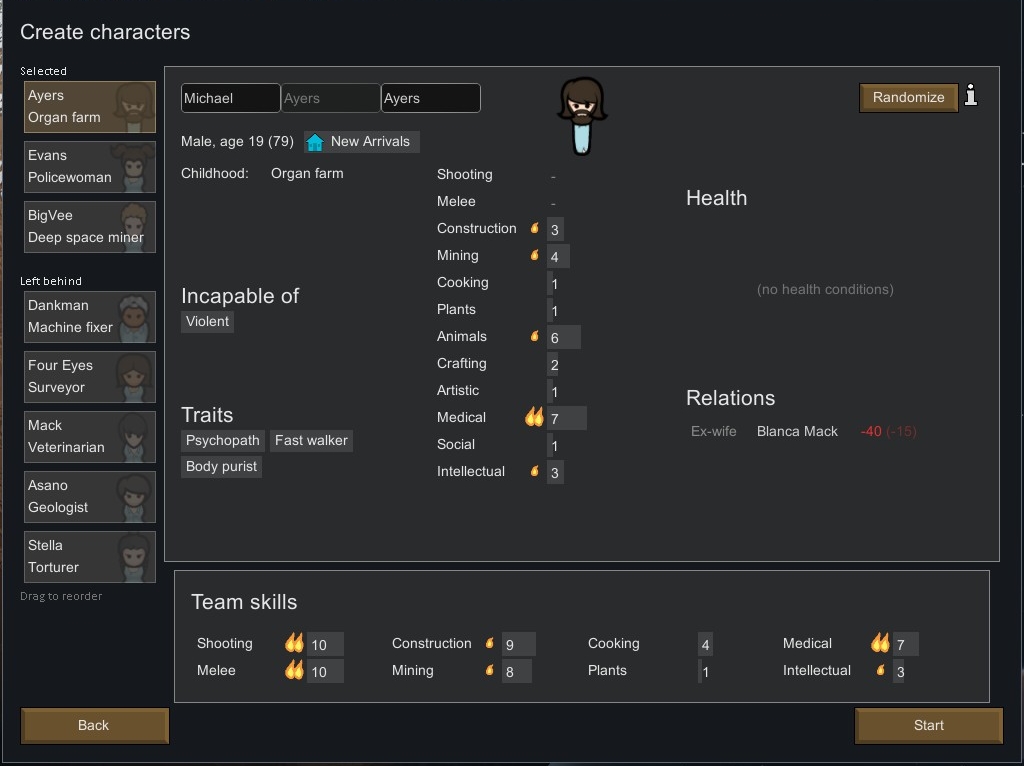 On the top right there's a button to reroll the colonist, giving you a completely random new one.
Let's start with the cosmetic stuff. Each pawn has a distinct name and appearance. The center name will be what they're called 99% of the time. Appearance and name has no impact whatsoever. Age matters somewhat, as Pawns are likely to get ailments as they get older, but you shouldn't worry about it too much. If they're not nearing retirement age, they'll be fine.
Childhood and Adulthood: These are your Pawn's background. Mechanically, they give certain skill buffs and debuffs, as well as potentially making them incapable of something. Don't stress too much about these, everything you need to know is shown elsewhere.
Incapable of: tasks your pawn will refuse to do. Generally, this is a bad thing, but some aren't too terrible. Incapable of art? No biggy, someone else will do it. All you really need to care about are the following: Incapable of Dumb Labor, Incapable of Smart Labor, Incapable of Violent, Incapable of Firefighting, Incapable of Hauling, Incapable of Cleaning. If your starting colonists have any of these, just press the dice in the top right to reroll them. They are no good to your colony. Later recruits can be forgiven these traits, but in the beginning everyone needs to pull their weight.
Traits: Don't worry too much about these. You can make anything work, and they're part of the experience. There's only one trait that should be avoided at all costs: Pyromaniac. If they're a Pyro, get rid of them. They're not worth it. Anything else is survivable. Also keep in mind that traits don't necessarily do what you expect them to. Being a teetotaler is often a bad thing, while being a cannibal has 0 downsides. There's an entire section of this guide dedicated to these, but for your first game it's really not that important.
We're skipping skill for now, to look at Health: If they're an addict, reroll. If they're actively missing a limb, have a prosthetic or have brain damage, get rid of them. Pretty much anything besides scars or old gunshots is bad enough to warrant a reroll.
Relations: Pretty much irrelevant. Pawns will form and break relationships throughout the game. Family only matters when they die, which will make them unhappy for a while. Eventually someone's brother will inevitably invade your base and get shot to death.
Now we get to the good stuff: skills. Skills go from 0-20, are gained through performing a related action and start slowly degrading back down once over level 10. Most important is the little flames(passion) next to the skills. This affects how quickly they gain skill xp, as well as providing a mood boost when doing the job. Without a flame, they'll never be great at the skill. 2 flames is better than 1, but it's not that important for now.
What this comes down to it that a higher skill level makes them immediately useful at it, while passion means that with the same time investment, they'll get a lot better at it than someone without passion.
So what do you want? Well, you don't need everyone to be good at everything. In the beginning people will be doing multiple jobs, but as more colonists join people will start doing a single job full time. This is also pretty much the only way to keep a skill at a high level. As such, these skills should be spread around the group for now. Having someone good at both plants and construction is useless, they'll only have time for 1. Most other skills are combinable.
Do keep in mind that some of your pawns will inevitably die. Even with the best cover and armor, a stray bullet can still get lucky and punch through their brains, and if your only pawn trained as a medic just suffered lethal lead-poisoning while everyone's bleeding out, you might be in trouble. Always try to have at least 1 spare pawn trained for every specialty.
If nothing else, the second-best doctor will be needed to operate on the best doctor.
You can always check your entire team's best skill at the bottom.
 Let's start with what you don't need for now:
Art. You'll only ever need 1 artist in your colony, and only by the midgame. You can just recruit someone then. Passion is more important than skill.
Melee/shooting. Pawns can only use 1 weapon at a time, so if they're using a sword their ranged skill is irrelevant and while ranged pawns can technically fight in melee, if that happens something's gone wrong. While they matter a lot, early game they're not as important as other skills and you'll only need 1 out of 2.
Vital:
Medical. You need at least 1 Pawn capable of treating your other pawns (and themselves in a pinch). Without this, a scratch can become a nasty infection. 8+ recommended, passion useful.
Construction. You'll need to build a lot, and it's often a full time job. Passion is the most important, minimum skill 5.
Plants. Affects planting speed, but higher skills also unlocks different plants. 8+ preferred. Passion recommended. Having 1 pawn with passion and another without passion but with skill 8+ is acceptable.
Cooking. Technically this isn't needed, as there's ways to get around without a cook, but for this guide I'll assume you have someone with some base competency. 7+ preferred. Passion useful. Without decent skill, you'll get occasional food poisoning.
Useful:
Intellectual. Needed for research, which you'll be doing throughout the game. Passion is more important than skill level.
Social. High skill helps with selling and allows you to recruit faster. Prisoners are a drain on your resources and might start a prison break, as such decent skill is desirable.
Situational:
Animal. Lets you tame animals and helps with hunting. Nice for some early food, but this is more a mid-game thing for most players.
Crafting. You'll only ever need 1 crafter to make your equipment, so you can just recruit someone if needed. Passion over skill.
Mining: You'll do a lot of this in hills or mountains, but even low skill does the job and you'll always find recruits with mining. Passion over skill.
Rerolling might take a while. Remember, you're not looking for the perfect team, just barely acceptable ones. Skills will come with time, as long as you've got a good doctor most other things are manageable. You don't want to spend an hour rerolling for the perfect candidates. If you hate this process, look for the mods section.
Once done, press start to land on space Australia.
TL;DR: Don't take cripples, the incapable or the criminally insane into your colony. Get a good constructor and a good planter, and don't have them be the same person. You'll also need someone with a good medical skill, but this can be anyone. Ideally, their other skills will also be alright, and the entire team will have a decent spread.
On the left, you can see your 3 Pawns, as well as 5 other options. Frankly, those other options are just there for if you want to limit yourself to no rerolling. Just ignore them.
On the top right there's a button to reroll the colonist, giving you a completely random new one.Let's start with the cosmetic stuff. Each pawn has a distinct name and appearance. The center name will be what they're called 99% of the time. Appearance and name has no impact whatsoever. Age matters somewhat, as Pawns are likely to get ailments as they get older, but you shouldn't worry about it too much. If they're not nearing retirement age, they'll be fine.
Childhood and Adulthood: These are your Pawn's background. Mechanically, they give certain skill buffs and debuffs, as well as potentially making them incapable of something. Don't stress too much about these, everything you need to know is shown elsewhere.
Incapable of: tasks your pawn will refuse to do. Generally, this is a bad thing, but some aren't too terrible. Incapable of art? No biggy, someone else will do it. All you really need to care about are the following: Incapable of Dumb Labor, Incapable of Smart Labor, Incapable of Violent, Incapable of Firefighting, Incapable of Hauling, Incapable of Cleaning. If your starting colonists have any of these, just press the dice in the top right to reroll them. They are no good to your colony. Later recruits can be forgiven these traits, but in the beginning everyone needs to pull their weight.
Traits: Don't worry too much about these. You can make anything work, and they're part of the experience. There's only one trait that should be avoided at all costs: Pyromaniac. If they're a Pyro, get rid of them. They're not worth it. Anything else is survivable. Also keep in mind that traits don't necessarily do what you expect them to. Being a teetotaler is often a bad thing, while being a cannibal has 0 downsides. There's an entire section of this guide dedicated to these, but for your first game it's really not that important.
We're skipping skill for now, to look at Health: If they're an addict, reroll. If they're actively missing a limb, have a prosthetic or have brain damage, get rid of them. Pretty much anything besides scars or old gunshots is bad enough to warrant a reroll.
Relations: Pretty much irrelevant. Pawns will form and break relationships throughout the game. Family only matters when they die, which will make them unhappy for a while. Eventually someone's brother will inevitably invade your base and get shot to death.
Now we get to the good stuff: skills. Skills go from 0-20, are gained through performing a related action and start slowly degrading back down once over level 10. Most important is the little flames(passion) next to the skills. This affects how quickly they gain skill xp, as well as providing a mood boost when doing the job. Without a flame, they'll never be great at the skill. 2 flames is better than 1, but it's not that important for now.
What this comes down to it that a higher skill level makes them immediately useful at it, while passion means that with the same time investment, they'll get a lot better at it than someone without passion.
So what do you want? Well, you don't need everyone to be good at everything. In the beginning people will be doing multiple jobs, but as more colonists join people will start doing a single job full time. This is also pretty much the only way to keep a skill at a high level. As such, these skills should be spread around the group for now. Having someone good at both plants and construction is useless, they'll only have time for 1. Most other skills are combinable.
Do keep in mind that some of your pawns will inevitably die. Even with the best cover and armor, a stray bullet can still get lucky and punch through their brains, and if your only pawn trained as a medic just suffered lethal lead-poisoning while everyone's bleeding out, you might be in trouble. Always try to have at least 1 spare pawn trained for every specialty.
If nothing else, the second-best doctor will be needed to operate on the best doctor.
You can always check your entire team's best skill at the bottom.
Let's start with what you don't need for now: Art. You'll only ever need 1 artist in your colony, and only by the midgame. You can just recruit someone then. Passion is more important than skill.
Melee/shooting. Pawns can only use 1 weapon at a time, so if they're using a sword their ranged skill is irrelevant and while ranged pawns can technically fight in melee, if that happens something's gone wrong. While they matter a lot, early game they're not as important as other skills and you'll only need 1 out of 2.
Vital:
Medical. You need at least 1 Pawn capable of treating your other pawns (and themselves in a pinch). Without this, a scratch can become a nasty infection. 8+ recommended, passion useful.
Construction. You'll need to build a lot, and it's often a full time job. Passion is the most important, minimum skill 5.
Plants. Affects planting speed, but higher skills also unlocks different plants. 8+ preferred. Passion recommended. Having 1 pawn with passion and another without passion but with skill 8+ is acceptable.
Cooking. Technically this isn't needed, as there's ways to get around without a cook, but for this guide I'll assume you have someone with some base competency. 7+ preferred. Passion useful. Without decent skill, you'll get occasional food poisoning.
Useful:
Intellectual. Needed for research, which you'll be doing throughout the game. Passion is more important than skill level.
Social. High skill helps with selling and allows you to recruit faster. Prisoners are a drain on your resources and might start a prison break, as such decent skill is desirable.
Situational:
Animal. Lets you tame animals and helps with hunting. Nice for some early food, but this is more a mid-game thing for most players.
Crafting. You'll only ever need 1 crafter to make your equipment, so you can just recruit someone if needed. Passion over skill.
Mining: You'll do a lot of this in hills or mountains, but even low skill does the job and you'll always find recruits with mining. Passion over skill.
Rerolling might take a while. Remember, you're not looking for the perfect team, just barely acceptable ones. Skills will come with time, as long as you've got a good doctor most other things are manageable. You don't want to spend an hour rerolling for the perfect candidates. If you hate this process, look for the mods section.
Once done, press start to land on space Australia.
TL;DR: Don't take cripples, the incapable or the criminally insane into your colony. Get a good constructor and a good planter, and don't have them be the same person. You'll also need someone with a good medical skill, but this can be anyone. Ideally, their other skills will also be alright, and the entire team will have a decent spread.
The UI
Once your colonists have landed and left their pods, press spacebar to pause the game. Before getting started, I'm going to explain what you're seeing on screen. Most of it is pretty self explanatory, but if you're lost this will hopefully help.
You've played the tutorial, right? Then you'll have seen the UI (User Interface) before, and have at least a vague idea of what everything is. But I'm going to go over everything here briefly, so you'll know where to look if you want to do something.
Most menus can be closed by pressing outside them or pressing esc.
Let's start with what's on screen before diving into the menu's.
 The bottom bar is where we'll be spending the most time, so that's going to be last.
On the right side of the screen, above the bottom bar, you have a series of small pictures. These are ways to change the UI. You can hover over them to see what they do, but you don't need to change anything here. Frankly, you can play the entire game without ever using any of them. They can help with visualizing things though.
Above them, there's the pause and speed buttons. You should be familiar with these.
Above those is where some valuable info is displayed. The temperature of wherever your mouse is, whether it's inside, the time, the date and the season. Once you get building, the temperature will be useful info, as will knowing the spot is indoors or not. It's a good way to tell whether you forgot to put a door somewhere or you're missing a roof.
Above that is where notifications appear. Urgent notifications will appear in a colored envelope,as you saw in the tutorial. You can click these to open them, or rightclick them to dismiss them.
Non-urgent notifications are displayed as regular text. Hover over them to learn more.
Depending on your colonists, nothing might be displayed here if everything's in order.
The top right is where you'll find the Learning Helper, which will occasionally give you some info to help you learn the game. Messages won't repeat themselves, but you can always open this to look something up. Once you've learned everything and want to get rid of it, use one of the small icons on the bottom right.
The top middle of your screen is where you'll see your 3 colonists. The square behind them indicates their mood, filling up or emptying to represent it. We'll get back to that. Click on their icon to open their menu's, click twice to center on them.
The top left is where your resources are represented. At the moment this is empty, as it only accounts for things placed in your stockpiles. If this gets too full, it becomes scrollable.
The bottom left is where you'll see some more info on wherever your mouse is located. The soil is important for planting and walking speed, Lit represents the light levels, and above those will be anything located there, whether it's a wall, a tree or materials. This window will be hidden by most open menus.
Now, the bottom bar. We're going to go from right to left. This is going to be a lot of info, so I'll try to be brief.
![]() First, there's the menu button. You can also open this by pressing esc. Opening this auto-pauses the game. Here you can save, quit, or change settings.
First, there's the menu button. You can also open this by pressing esc. Opening this auto-pauses the game. Here you can save, quit, or change settings.
Besides that is the factions screen. You won't need this much.
The book gives you graphs, messages and statistics. You never need this, but it can be fun to look at.
World opens the world map. This might take a bit, since the world unloads when you haven't used it in a while.
Quests shows all current quests. When you get one, it'll appear as a notification.
Research shows all available, researched and unavailable research.
Wildlife shows all the animals on the map.
Animals show the animals that you've tamed. Currently, that's whatever animal you started with.
Assign lets you pick what your colonists will wear, eat and what drugs they'll use. The default is good, but you fine-tune things as desired.
Schedule lets you manage when your colonists work, sleep and rest. You only really need to change things if someone's a night-owl. You can also restrict where they can go, useful if you need them to avoid an area or stay inside.
Work is where you tell your Pawns what they should and shouldn't do. See a later chapter for more info.
Architect is where you'll spend most of your time. This has a lot of submenu's, with most of them pretty self-explanatory, but let's go over them briefly just in case.
![]()
Orders is where you find most tasks. If you want someone to do something, you'll likely find it here.
Zone is where you designate areas in one form or another, whether for growing, avoiding or storing supplies.
Structure is where you'll find walls, doors and the like.
Production is where you'll find furniture needed for making things.
Furniture is pretty general. If it's likely to go inside a house and make people comfortable, it's in this menu.
Power is where you find anything that produces electricity, as well as power conduits to get it places.
Security is where you'll find your defenses.
Misc is miscellaneous. Pretty much anything that doesn't fit elsewhere.
Floors allows you to lay floors so people don't have to walk around in dirt all the time. This is low priority.
Recreation is where you find things to fulfill your Pawn's recreation needs.
Ship is empty, but one day you'll use this to make a spaceship.
Temperature is where you'll find your coolers and heaters.
All of these will fill up as you unlock more tech.
I suggest having a look around to see your options, but you'll get used to the UI pretty quickly.
You've played the tutorial, right? Then you'll have seen the UI (User Interface) before, and have at least a vague idea of what everything is. But I'm going to go over everything here briefly, so you'll know where to look if you want to do something.
Most menus can be closed by pressing outside them or pressing esc.
Let's start with what's on screen before diving into the menu's.
The bottom bar is where we'll be spending the most time, so that's going to be last.On the right side of the screen, above the bottom bar, you have a series of small pictures. These are ways to change the UI. You can hover over them to see what they do, but you don't need to change anything here. Frankly, you can play the entire game without ever using any of them. They can help with visualizing things though.
Above them, there's the pause and speed buttons. You should be familiar with these.
Above those is where some valuable info is displayed. The temperature of wherever your mouse is, whether it's inside, the time, the date and the season. Once you get building, the temperature will be useful info, as will knowing the spot is indoors or not. It's a good way to tell whether you forgot to put a door somewhere or you're missing a roof.
Above that is where notifications appear. Urgent notifications will appear in a colored envelope,as you saw in the tutorial. You can click these to open them, or rightclick them to dismiss them.
Non-urgent notifications are displayed as regular text. Hover over them to learn more.
Depending on your colonists, nothing might be displayed here if everything's in order.
The top right is where you'll find the Learning Helper, which will occasionally give you some info to help you learn the game. Messages won't repeat themselves, but you can always open this to look something up. Once you've learned everything and want to get rid of it, use one of the small icons on the bottom right.
The top middle of your screen is where you'll see your 3 colonists. The square behind them indicates their mood, filling up or emptying to represent it. We'll get back to that. Click on their icon to open their menu's, click twice to center on them.
The top left is where your resources are represented. At the moment this is empty, as it only accounts for things placed in your stockpiles. If this gets too full, it becomes scrollable.
The bottom left is where you'll see some more info on wherever your mouse is located. The soil is important for planting and walking speed, Lit represents the light levels, and above those will be anything located there, whether it's a wall, a tree or materials. This window will be hidden by most open menus.
Now, the bottom bar. We're going to go from right to left. This is going to be a lot of info, so I'll try to be brief.
Besides that is the factions screen. You won't need this much.
The book gives you graphs, messages and statistics. You never need this, but it can be fun to look at.
World opens the world map. This might take a bit, since the world unloads when you haven't used it in a while.
Quests shows all current quests. When you get one, it'll appear as a notification.
Research shows all available, researched and unavailable research.
Wildlife shows all the animals on the map.
Animals show the animals that you've tamed. Currently, that's whatever animal you started with.
Assign lets you pick what your colonists will wear, eat and what drugs they'll use. The default is good, but you fine-tune things as desired.
Schedule lets you manage when your colonists work, sleep and rest. You only really need to change things if someone's a night-owl. You can also restrict where they can go, useful if you need them to avoid an area or stay inside.
Work is where you tell your Pawns what they should and shouldn't do. See a later chapter for more info.
Architect is where you'll spend most of your time. This has a lot of submenu's, with most of them pretty self-explanatory, but let's go over them briefly just in case.
Orders is where you find most tasks. If you want someone to do something, you'll likely find it here.
Zone is where you designate areas in one form or another, whether for growing, avoiding or storing supplies.
Structure is where you'll find walls, doors and the like.
Production is where you'll find furniture needed for making things.
Furniture is pretty general. If it's likely to go inside a house and make people comfortable, it's in this menu.
Power is where you find anything that produces electricity, as well as power conduits to get it places.
Security is where you'll find your defenses.
Misc is miscellaneous. Pretty much anything that doesn't fit elsewhere.
Floors allows you to lay floors so people don't have to walk around in dirt all the time. This is low priority.
Recreation is where you find things to fulfill your Pawn's recreation needs.
Ship is empty, but one day you'll use this to make a spaceship.
Temperature is where you'll find your coolers and heaters.
All of these will fill up as you unlock more tech.
I suggest having a look around to see your options, but you'll get used to the UI pretty quickly.
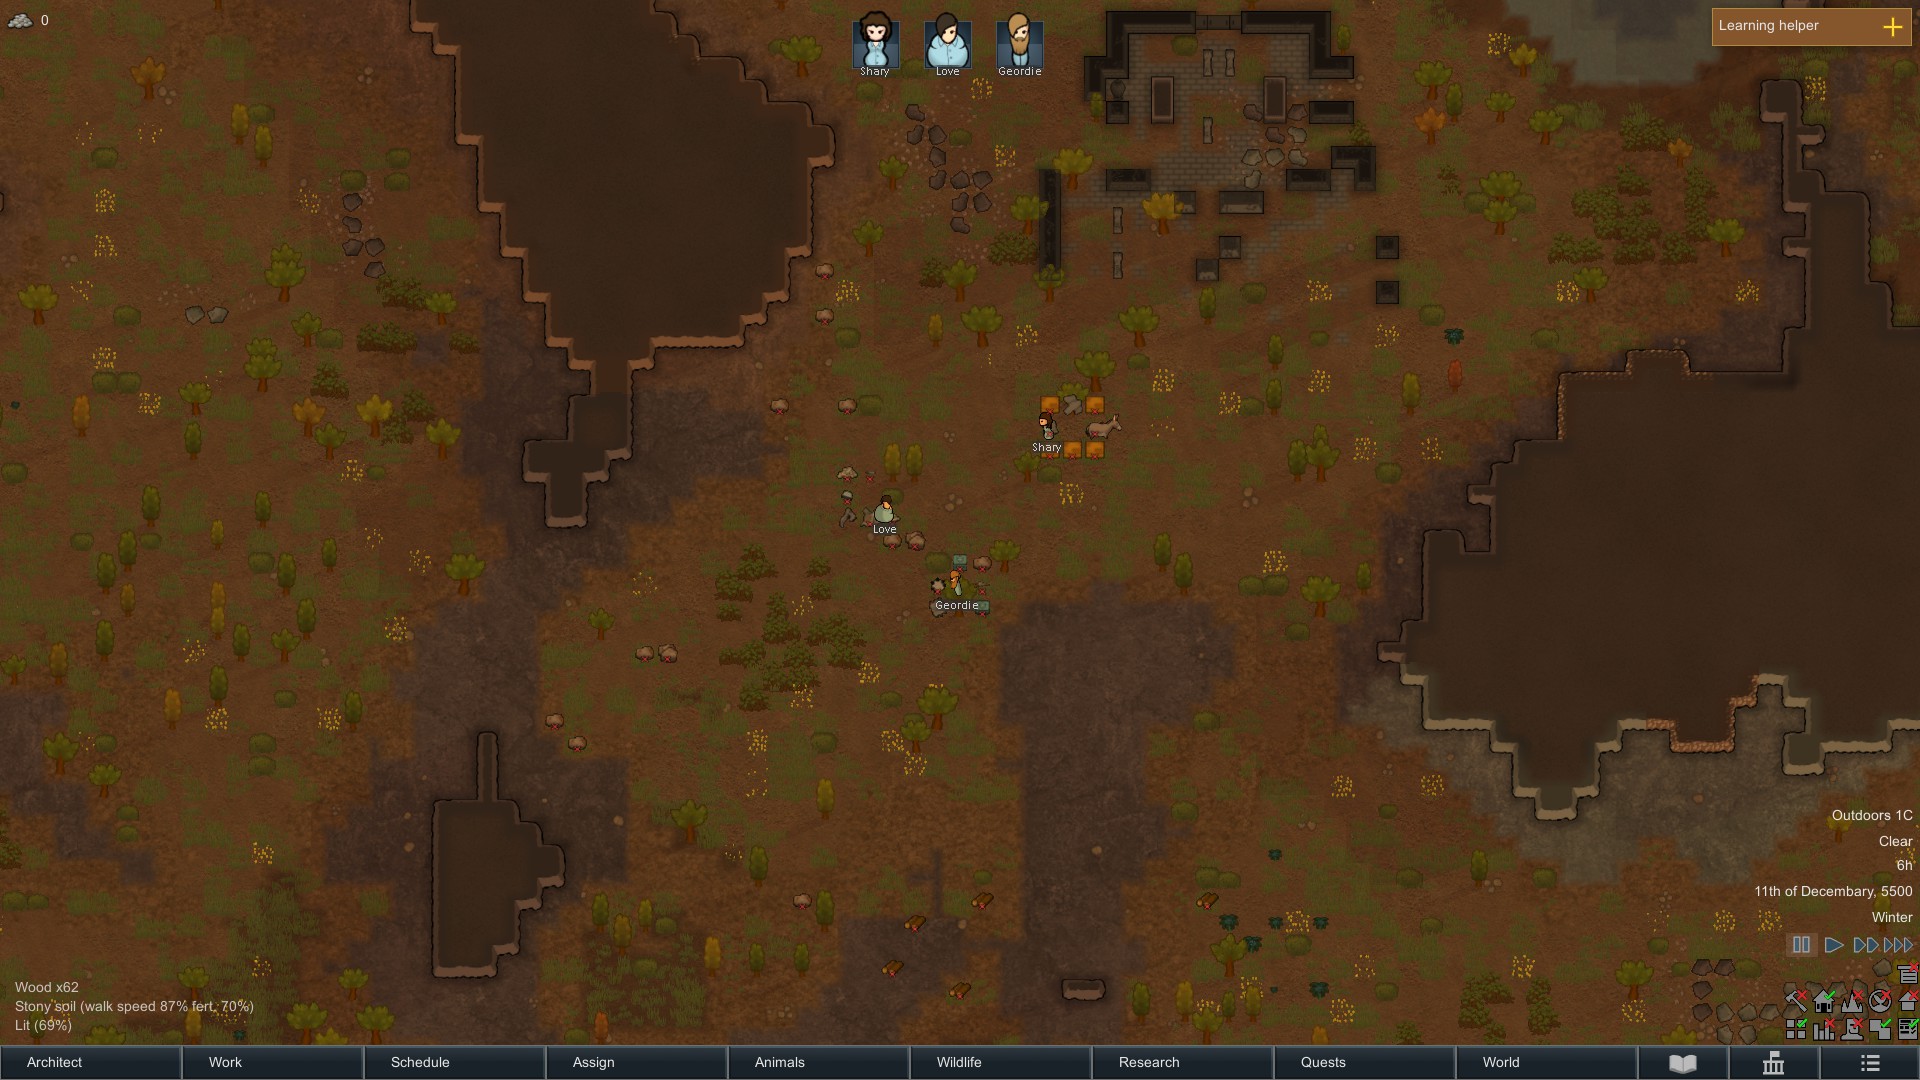
Day one
Time to get started. And by that, I mean staying paused.
Zoom out, and have a look around the map.
If you see what looks like a fully walled off structure, that's an ancient danger. Just ignore this, it doesn't do anything as long as you don't breach the wall. Once one of your pawns walks near it you'll get a warning, but you can safely dismiss that.
You might also see some steam geysers. These will be useful later, for now just leave a 6*6 area around them clear.
We're going to build a basic shelter that's going to turn into a large base eventually.
Depending on what the map looks like, you'll place your base differently. By default, you'll want to build your base reasonably centrally, so you have plenty of time to respond to raids coming in from the sides. This doesn't mean the exact centre, but you'll want at least a bit of distance from the edges. However, if mountains block off one of the sides, you can build against that and only need to worry about 3 sides. If this isn't the case, you're likely to have multiple hills scattered around. Building up against one of them is a decent idea, since one of your walls won't need to be built. You'll want a reasonably open area on at least 2 sides of your base so you have space to grow without needing to mine for it.
You'll want to look for Rich Soil. Plants and crops will grow faster there, meaning your food supply will require less time and work. This looks like browner than usual soil with green grass growing on it. You can hover your mouse over it to check. If your menus are closed, details will appear above 'Architect'. Rich Soil can be easily mistaken for Mud, which looks the same but without the green grass. They'll often border each other, and Mud is useless for crops. The closer you are to some Rich Soil, the easier farming will be.
If the Rich Soil is inconveniently placed, you can do without it. It's less efficient to plant in regular soil, but if you have to walk a long distance to get to the Rich Soil then you lose more time than you win. Just plant a slightly bigger area to account for it.
Now to start with building. If the game tells you you don't have enough wood for something, don't worry. With your starting resources scattered across the map, the game doesn't account for them. Your Pawns will go and pick up any materials they need as long as they're allowed. If something's in the way, they'll move it, cut it or mine it. Try not to make them mine yet though, it takes a while.
You can use the Plan tool under Orders to lay out a floor plan before you start actually putting up walls, as well as plan for future rooms. Don't go wild and try to plan out your entire base in advance, as you'll inevitably need to change plans eventually.
I like to start with a 12*12 room, which means setting the walls at 14*14. You can go smaller, but I don't like rebuilding so I go big from the start. 12 is the widest you can make any roof before you need to put in supports (All walls and columns support roof in a 6-tile radius). Inside, you put 3 beds for your colonists to sleep in. Add a door faced towards your crops.
This room is going to be your living space for a bit. Put a stockpile along the length of one of the walls 3 squares wide. The reason we put a stockpile inside is because most materials and objects deteriorate if left outside. They slowly lose hp and value. Once they reach 0%, they're destroyed. Most items remain fully functional up until the moment of destruction. Once inside a roofed room, this deterioration stops. You'll want to set the Priority of this stockpile to low. Do so by clicking Storage, then click Priority:Normal and change it. We do this so everything will only go here if a better place isn't available.
All of this should be laid out while the game is still paused. This might seem complex, but you're just placing a large room, some beds and a stockpile.
Up next, Growing Zones. As mentioned, Rich Soil is ideal but regular soil will do.
First up, your food crop. There's 4 basic types, Strawberries, Corn, Potatoes and Rice. Everything else isn't food for humans. The difference is pretty simple.
Rice is quick to grow, but costs a lot of labor. This is the best starting crop, since it gets your food production going quickly.
Corn grows slowly, but it requires a lot less effort. Over the same time frame, corn and rice produce nearly the same amount but rice has to be replanted 3-4 times. This is your standard crop from the midgame onwards.
Potatoes are worse than corn and rice, but it is less affected by soil quality. This means that planting it in Rich Soil is a waste, but it grows better than corn and rice in stony soil. This crop is intended for difficult biomes, there's no reason to plant it if you have regular soil available.
Strawberries is an odd crop. It performs worse than corn and rice, the only benefit is that you can eat it raw without a mood penalty. This still runs the risk of food poisoning for eating raw food though. It's only purpose seems to be to supply edible food when you don't have time to cook and don't have nutrient dispensers researched/built. Crashlanded has nutrient dispensers researched by default, so there's pretty much no reason to plant strawberries.
Conclusion: For now, plant Rice. There's no exact figure for how much you should plant, since soil quality varies and bad planters can botch harvesting. 100 tiles should be plenty, while leaving some spare for when you recruit someone. You'll be supplementing this with meat eventually anyway. Every new colonist should increase the area by 20-25 tiles. That way, even a blight killing your crops is survivable.
Good news, the planning is almost over, and you'll get to unpause the game! Just one last thing: Allow everything. Instead of manually clicking every item, you can use the 'allow' tool under orders to drag a square over all of them. Next, set your best melee fighter to pick up the knife, flack vest, flak pants and flak helmet. To know who this is, click on a colonist and press 'Bio'. This show all their skills. You can queue up commands by holding shift when you give a second order, and so on. Set your better shooter to pick up the rifle, and your worse to pick up the pistol. Remember, Pawns can only use a single weapon at a time.
Now unpause, and watch them get to work. By the end of the day, the building should be (mostly) done, the beds made and some crops sown. If you notice your Pawns aren't working on the beds, instead working on the walls, click them, right click the bed and tell them to prioritize it. Sleeping on the ground isn't fun, while sleeping outside isn't too bad. Don't worry about rushing the rest of it, depending on the amount of trees in the way it might take another day to get the basic shelter built. Your food and medicine is probably still lying outside, and that's fine. It'll keep. The roof is unlikely to be finished, since trees get in the way and need to be chopped down, which can take a while for unskilled pawns. Eventually your pawns will go to bed. I recommend speeding up unless you really love watching people sleep.
If you run out of wood, consider ordering your pawns to cut some trees. This is unlikely to be necessary, as they'll probably need to cut trees standing in the way of the walls or in order to plant food.
Time for me to explain why we just did what we did, in case it wasn't clear:
We're trying to make a simple shelter, so our Pawns can sleep inside. We also put our items inside so they don't get worn down by the weather.
Our pawns need to eat. For now, they've got some packaged survival meals, but those will run out. As such, we plant some crops so we'll have a steady food supply when that time comes.
Work Priorities (Optional)
Before the next day arrives, we're going to do some work management. This way, your pawns won't waste time doing something they're bad at. Feel free to pause the game at any time if needed.
Important note: This is not critical. If you don't want to bother with this, that's perfectly fine. You don't need maximum efficiency to play the game, especially on lower difficulties, and micromanaging early on can be harmful. Your pawns will still do their jobs in a pretty smart manner, and you can always come back to this later.
Open the Work tab. Here you can see every task your pawn will perform. Once a task is finished, they'll go down the list from left to right until they find something to do, then do it.
To fine tune this, activate manual priorities. Try not to be daunted by all the seemingly meaningless numbers. I know I was. The system's pretty simple.
Each column is a type of task, potentially related to one or more skills. Pawns will do the tasks that have a lower number first, then the higher number ones. If numbers are equal, tasks on the left are done first. See? Simple. Hover over the words to see what the task is, and hover over a box to see what the relevant skill levels are.
So what's the goal? Well, you want to assign everyone so people do what they're best at, then what they're ok at, then busywork, and normally never do tasks they suck at. Clicking lowers a number, right clicking increases it. When the square is blank, they won't do the task at all. If there is no square, they're incapable of it.
Shift-clicking a word increases the entire column by one. You'll want to do this for Firefight, Patient, Bed rest and Basic so they're all 1 for every colonist. These tasks are vital, and everyone you ever recruit will have the same priorities set.
To briefly explain them: Firefighting means if a fire starts within your home area (around your buildings and crops), they'll go put it out before your base burns down. Patient means that when they're injured, they'll go to a bed and wait for a doctor. Bed rest means that, even after being treated, they'll stay in bed to heal faster. Basic is various minor but important task, like turning something power-using appliances on and off on your orders. This rarely happens, but when you need it you want it done quick.
The only exception will be your doctor, and the backup doctor once you have one. They should have Doctor set to 1 and the others to 2. This way, they won't stop tending to someone in order to put out a fire. Let someone else handle that. If there's no wounded left, they'll go put out fires etc.
Next up, use shift-rightclick to set haul to 4 for everyone and leave Clean turned off. These are generally the least important tasks, and should pretty much always be done last. Cleaning has no purpose for now, once you've got floors or blood in places, turn this up to 4.
Done? Cool. Now deactivate everything else. this gives us a blank slate to work from. Once you're used to the system, you won't have to do this, but it helps for now.
I'm going to give you the short setup and the long setup. Short is just what we're going to use right now, long is preparation for later. Do whichever you feel comfortable with, just set things up properly eventually.
Short:
For Construct, set your best to 2
For Grow and Plant cut, set your best to 2.
The third pawn that doesn't currently have anything on either of these gets both set to 3.
Long:
For Warden, set your best to 2, anyone else that has over 5 skill to 3, the rest to 4.
For Handle, set your best to 4.
For Cook, set your best to 3.
For Hunt, set your best to 3. Note that this can only be a ranged weapon user, otherwise you'll get a notification telling you a hunter has no ranged weapon.
For Construct, set your best to 2.
For Grow and Plant cut, set your best to 2 (must not be constructor).
The pawn not currently assigned to Construct or Grow/Plant cut should have both assigned at 3.
For Mine, set the best to 2.
For Smith, Tailor and Craft, set your best to 3.
For Art, set your best to 3.
For Research, set your best to 3, everyone else to 4.
Done all that? Cool. Now, let me explain what we just did and why.
Warden isn't active yet, since that only comes into play with prisoners.
Handle is mostly about taming animals, which you won't do for a while, but it's useful to have active in case an animal self-tames.
Cook isn't vital right now, we're likely to use nutrient paste for a while. Once we get to cooking, we won't have to worry about forgetting to activate someone.
Hunt requires you to set targets, so it also does nothing for now, so this is more prep for later.
Construct is vital, and at 2 someone will pretty much be doing this until all construction is finished.
Grow is the same. Plant cut is less vital, but when needed you usually want it done quick, and by the most skilled person.
Mine isn't doing anything for now, so more prep.
Smith, Tailor and Craft will all only have 1 person doing them. This won't be for a while. More prep.
Art is the same, except it's based off a different skill, so possibly a different person. Same logic.
Research is something you want done, but it's not as much a rush. If someone has nothing else to do, they'll go research. They'll be bad at it, but something is better than them being idle.
As you can see, most of this is setup for later. It means you won't have to jump back to this menu every time you need someone to do a new task. They'll be doing the same thing as the short version for now, but once a new task is ordered they'll prioritize it as needed.
If some instructions are impossible because of someone being unable to perform a task, just leave it open. You'll find someone new to fill in for them eventually.
You can change these numbers at any time. Construction going to slow? Set another person on construction. Suddenly need a lot of hauling done? Increase hauling priority, once the emergency's done lower it back down.
Eventually, you're likely to have people only doing 1 task continuously, with a couple of others flitting between tasks as required. Since they'll be doing the same task less, they'll also be less skilled.
The only exceptions as mentioned are, Smith, Tailor, Art and Craft. There, only the highest skill pawn should ever do them, since they skill level affect the quality of the result.
Cook is also likely to only have 1 person on it, but that's because 1 person can cook enough for 15 or so people. Grow your base, and you'll need more cooks eventually.
What is Mood?
This being a colony sim, every human has a mood. Essentially, this is how happy they are. The higher the better. If it gets high enough, they might get an inspiration. If their mood gets too low, they might suffer a mental break. We'll come back to those.
You can see a colonist's mood in the background of their image at the top of the screen. The fuller the square, the higher the mood. For details, you select a Pawn and click 'Needs'. Mood changes towards the white triangle underneath the 'Mood' bar, but does so over roughly 20 seconds (depending on game speed). This means that very temporary modifiers are unlikely to cause big swings in mood. Mood also freezes when unconscious, including sleep.
Mood has a baseline, depending on your difficulty. For adventure story, this is 37. Good things add positive modifiers, bad things negative ones. Simple enough.
Below the Mood bar, you'll see all the modifiers. These can vary wildly, and you can hover over them to learn more about them. Certain traits add modifiers, or change how others work. Let's go over the most frequent ones.
At the start of the game, your colonists have 'Extremely low expectations'. This is a mood buff that steadily decreases as your colony grows, changing towards 'Sky high expectations', which doesn't gave any buff. This means you'll need to provide more positive and less negative modifiers as the game goes on. For now, it means you shouldn't need to worry too much about mood. You also start with 'Initial optimism', a temporary buff that helps you get through the first week.
If you somehow get someone to break within this week, something went very wrong.
The six bars to the left of the Mood bar and modifiers are what is most likely to affect your colonists. The top 3 are their base needs, Food, Rest and Recreation. These generally give only negatives (except, rarely, recreation), but as long as food, beds and recreation spots are available your colonists should take care of these on their own.
The next three are a bit trickier, Beauty, Comfort and Outdoors. These are their desires, what they want out of life. They want to be in beautiful places, be comfortable and be outdoors frequently. Outdoors only gives negatives when it gets too low, Beauty and Comfort both give negatives and positives depending on whether they're met.
For now, you shouldn't worry too much about these. You're likely to get minor debuffs, but your starting bonuses are high enough that your colonists' mood should be pretty high. We'll take care of them later on.
Other things you're likely to be faced with right now: Slept in the Heat/Cold, Ate without a table, Disturbed sleep. These can all be taken care of in a bit, but they're minor modifiers so you can safely ignore the harder ones for a while.
The big things we're going to be using long-term to keep people's mood up: room modifiers. While a lot of buffs and debuffs are temporary, some last an entire day. Most important of these is where people ate, where they relaxed, and where they slept. These last all day, and give pretty hefty bonuses. If I tell you to make a room bigger than seems necessary, this is probably why (although I also just like big rooms).
To give a few examples of other ones: Saw a corpse, In pain, Nuzzled (by a pet), Got some Lovin', Witnessed ally's death, Ate fine meal, Inebriated etc. Some of these are uncontrollable, like people marrying or getting divorced.
There's a lot of other ones, but if you want to know all of them read the wiki.
What it all comes down to is that you need to fulfill people's basic needs, give them what they desire and not force them to do awful things. And hope nothing awful happens. Pretty much like regular humans. If you think something is likely to make them unhappy, it probably will.
So what does it matter? Well, that's what Inspirations and Mental Breaks are for.
Inspirations are simple: get someone happy enough, and they might get a temporary buff. Walk faster, shoot better, tame an animal instantly, etc. Nice to have, but not that important.
Mental Breaks on the other hand, these are what can kill a colony. They come in 3 levels, Minor, Major and Extreme. These correlate with the little black marks on the left of the bar. Once below them, you get a random chance of your pawn suffering a break at any moment. Get below the next mark, the severity increases along with the odds.
When your Pawn suffers a mental break, they become uncontrollable and perform one of several actions.
Minor is things like having a sad wander for a while (including into the middle of gunfire), insulting everyone around them (lowering their mood in turn), or hiding in their room.
Major means having a longer wander, throwing a tantrum and attacking objects (including explosive mortar shells), or digging up a corpse and dumping it on the dining room table.
Extreme breaks means they might go berserk, attacking everyone around them (potentially killing other colonists), setting fire to random things (Pyro's do this randomly without cause, which is why we don't let them into our colony), deciding to murder someone or straight up leaving the colony.
Once a mental break naturally ends, the Pawn will get Catharsis (+40 mood) for a while, meaning they won't instantly break again.
As you might guess, you don't want any of this to happen, so try to keep people's mood up. Luckily, there's a couple of ways to deal with mental breaks. You can send a pawn to arrest them, which will end with them either going berserk and attacking or coming quietly to a prison cell. Unfortunately, after you release them from prison they won't get Catharsis and will be even unhappier because they were in prison. Go figure.
The other way is also the only way to deal with berserk pawns: beat them until they go down. As you might expect, this also doesn't give catharsis and will make them unhappier since they're now in pain. Even worse, this is not without risk, as they can die on accident. It is recommended you use blunt damage melee weapons, as this minimizes the odds of them dying.
So overall, if possible, let them continue their break until the end as long as they don't do anything too terrible.
TL;DR: Keep your people happy, or suffer the consequences.
Expanding the base
Up next, adding some extra furniture to the room. Eating without a table makes your pawns unhappy, so build them a 1*2 table, and add 2 chairs besides it, as without chairs a table does nothing.
We'll also need to take care of their recreation needs. Build a horseshoe pin inside. Not all white areas need to be accessible, as long as at least 1 is clear the pin is usable. Then build a chess table. Put it besides one of your table chairs, and put another chair on the opposite side as this also requires chairs to function.
Chair direction doesn't really matter in this game, it's just cosmetic. I would ask you to turn them the right way as much as possible though, as doing otherwise weirds me out.
You can also start planting some Cotton and Healroot. These will provide you with cloth and basic medicine. I recommend around 50 tiles each, expanding to a 100 once every other task is done.
Now sit back and let your pawns work for a bit. There's probably quite a bit of hauling left to do, so let them get to work. If someone is idle, the game will tell you. Plan more tasks for them to do. Note that if they're busy with recreation/sleeping, the idle warning won't go away until they're finished even if there's work to do.
By the end of the second day, your shelter should be done. If it isn't, consider temporarily increasing the priority on construct.
Once that's (mostly) done, it's time to start building again. What we're going to be doing depends on your starting animal. If it's a small animal, you can skip to the next room. If you've got a larger animal, you'll be seeing the notification 'pen needed' on the right.
A pen is an area for most animals you tame to reside. You need an enclosed space, with a door attached. You can do this using walls, but you're better of using a fence since it's far cheaper. Build a 15*15 or so square over regular soil, make sure it has a fence gate, then plant a pen marker (Misc.) inside. A pawn with Handle will lead your animal inside. The marker will indicate if the food supply is sufficient. If it isn't, enlarge the pen. As you tame more animals, the pen will need to grow.
Next, build the second room. Remember you can pause at any time, and it's recommended to do so while you plan construction. That way, if you make a mistake, you won't have to deconstruct a badly placed wall.
In the end, we're going to make this room a quarter of a larger rectangle. On one side of your shelter add a 12*12 room sharing a wall. Leave 2 spaces open on the wall you want to expand the square towards. This is going to be your freezer. It could be smaller for now, but you're going to need the size eventually. It might even need to grow, depending on your needs, although this should suffice for a regular amount of colonists.
So what's a freezer? Well, just like items deteriorate if left outside, food goes bad if left outside and/or in the heat. Your starting meals are an exception to this. So, you essentially want to build a fridge. Ideally, food should be below freezing temperature so it stays good forever. Slightly above freezing it'll rot slower, but sub zero Celsius is the goal here. We do this using coolers. These use electricity (which we don't have yet, that's up next) to cool an area. They also heat the area behind them, so you'll need to leave an open, unroofed space to let the heat out. Not to worry, we'll make sure to leave a small 'room' open to the outside.
For now, your freezer should have 3 regular entrances: Towards the current shelter, towards where the final room will be and towards the outside (usually the corner opposite the inner corner). The fewer doors, the less likely your pawns are to walk through the fridge on their way to a different spot, letting the heat in.
Next up: Putting in coolers, and getting them working.
You should put two coolers in the empty space in the wall. Make sure the blue part (the cooling side) is facing inwards. If you notice your freezer isn't cooling properly, this is the common point of failure. Eventually, this gets so routine that you barely pay attention, and suddenly your fridge is a sauna.
Unfortunately, coolers aren't magic and need electricity to work. If you look in the Power, tab, you'll see that we don't have a lot of options yet. For now, we'll use a windmill, although a wood-fired generator is also an option. Place the Windmill somewhere nearby, preferably somewhere you won't be expanding your base towards.
Windmills need a large area in front and behind them that's clear of obstacles. This means anything tall, including trees, walls and roofs. Rock chunks, plants and pawns are fine. A useful tip is to build them besides or in between your crops, since those don't interfere and will always be cleared of trees. Elsewhere, you might need to occasionally deal with newly sprouting trees.
Run a power conduit from besides it towards the coolers. Waterproof conduits aren't necessary, those are only for under water. Regular conduits handle rain just fine. The conduit doesn't need to touch the coolers, as they have a decent connection range. Preferable, you'll want to run your conduits through walls where possible, as pawns think they're ugly. The closer the windmill, the less conduit you have to build and the easier it is to defend.
Once this is done, set a cooler to a below-freezing temperature. I recommend -6C (21F). If you put it at 0C (32F), it'll stop freezing every time someone lets heat in by walking inside. Set the other cooler to a single degree higher. This way, one cooler will do most of the work and draw full power, while other will only draw minimal power unless it's needed.
Unfortunately, windmills depend on the wind, so on occasion the power will cut out. We're going to work on fixing this, but even if it isn't perfect it'll keep our future food safe for far longer than without intermittent cooling.
What did we do:
We made recreation objects to satisfy our pawns and a table to eat at. We planted cotton to get cloth and eventually make clothes with. We planted Healroot to get some herbal medicine for when decent medicine runs out. We made a freezer with a basic power supply. Optionally, we made a pen to keep large animals in.
Advanced: Freezer optimization
There's a couple of ways to make your freezer more efficient, meaning it'll stay cool longer when the power fails and cost less energy in general. These aren't vital, so you can safely skip these.
Someone made an excellent guide on optimal freezer creation here: https://steamcommunity.com/sharedfiles/filedetails/?id=2885128579
It explains some downright silly mechanics, and I would recommend using only what you need.
Now, a useful concept is the 'airlock'. When pawns move through doors, they let the heat in. Putting a door, an empty space and another door, along with walls on the sides keeps this to a minimum. So, you can build these on all of the entrances to the freezer.
 Airlock:
XOX
X X
XOX
Where X is a wall and O a door.
As you might have guessed by now, the game has a fully fledged temperature system, and this even works through walls. As such, you can double wall your freezer to help it stay cool. More than double walling doesn't affect this. The material doesn't matter.
Building underneath a mountain helps keep things cool, as the default max temperature under a mountain is 15C.
Someone made an excellent guide on optimal freezer creation here: https://steamcommunity.com/sharedfiles/filedetails/?id=2885128579
It explains some downright silly mechanics, and I would recommend using only what you need.
Now, a useful concept is the 'airlock'. When pawns move through doors, they let the heat in. Putting a door, an empty space and another door, along with walls on the sides keeps this to a minimum. So, you can build these on all of the entrances to the freezer.
Airlock:XOX
X X
XOX
Where X is a wall and O a door.
As you might have guessed by now, the game has a fully fledged temperature system, and this even works through walls. As such, you can double wall your freezer to help it stay cool. More than double walling doesn't affect this. The material doesn't matter.
Building underneath a mountain helps keep things cool, as the default max temperature under a mountain is 15C.
Your first Raid
By now, you should be several days in. You'll have received a warning to start building defenses.
For now, don't bother. The attack will occur soon, and is either going to be a small animal going mad and attacking you, or a single badly armed human coming for your table.
Either way, when the enemy shows up draft all your pawns. Do this by selecting them, individually or as a group, and pressing the Draft button (Two crossed swords). This puts them into combat mode. While like this, they won't move unless you order them to and will attack any hostiles in range. Note that their mood and needs still change while like this, so it's possible for them to break.
Get your forces outside, and face them towards the approaching enemy out in the open. Ideally, your 2 ranged combatants should stand together while your melee fighter stands closely in front of them. Once the enemy approaches, your gunmen will start shooting. Don't expect them to hit much, even with good guns and great skill misses are frequent, and you likely don't have either. As the enemy gets closer, their accuracy increases. If you're lucky, they'll take down the enemy before they get to you.
If not, they should attack your armored melee pawn. Your gunmen will keep shooting, and as long as they're close enough they won't hit their teammate.
Barring extraordinarily bad luck, this should be an easy victory. But now you need to deal with the aftermath. In all likelihood, your melee fighter has taken a wound or two. These could be minor scratches, or a bleeding stab wound. To check, click the colonist and open the Health tab. This will give you a detailed breakdown of everything wrong with them, and how it affects them. They're likely to have cryosleep sickness, which is a temporary debuff they got from sleeping aboard cryosleep pods before crashing here. It causes them to occasionally vomit, which you want to clean if it's inside, but will go away on its own.
For now, undraft everyone and your wounded colonist will go to bed in order to heal. Ideally, your doctor will go to tend to them. Unfortunately, they only start tending once someone is in bed, barring manual intervention, and they'll keep doing any task they started until completion even if a wounded person does go to bed. You can manually order them to tend to the casualty in this case. Another simple trick is to pause, draft and undraft them as this resets their tasks.
Your doctor will fetch medicine, and tend to all their wounds. They'll need a bit to heal, and will stay in bed while they do so.
Unfortunately, your doctor might be the one who took the hit. In this case, there's two options: Have your second-best Medical take over by assigning him priority via Work, or have your wounded Doctor self-tend, which causes them to do the job at reduced effectiveness. If your doctor is less than 5 skill levels above your second-best, self-tending isn't recommended.
You can activate self-tend under Health.
With your colonists taken care of, that leaves your defeated foe. If they were an animal, you've got a corpse to deal with. If you're unlucky, Scaria (the disease that drove it mad) will have caused it to rot. In that case, there's nothing useful you can do with the corpse. If it's whole, into the food stockpile/freezer it goes for now.
If they were human, they're either dead or only incapacitated.
If they're dead, we're left with 2 options: putting down a grave and burying them, or getting rid of the body somehow.
Luckily, there's a simple solution to rotting human and animal corpses: Put down a small stockpile somewhere out of sight of your colony, clear all, then allow only corpses. Change the Priority to low, so fresh animals will go to the freezer first. Then just leave them to deal with later. Colonists hate human corpses, and I personally don't like rotting animal corpses around my base, but out of sight, out of mind. Of course, we'll need to deal with them later, but that won't be an issue.
Sure, you could just use a grave, but in my colonies graves are reserved for colonists, not enemy scum. Also, you'll eventually run out of space to place the graves. You're going to see a LOT of enemy corpses pile up eventually.
DO NOT strip the bodies. Colonists do not like wearing the clothes someone died in, nor will anyone want to buy them. It's a waste of time.
The other option is an incapacitated human. This is generally the preferred outcome, as now you can capture and recruit them. For this, you'll need a prison. A prison is an enclosed space, with a bed inside. For now, quickly build a small room (possibly inside one of your current rooms), put either a bed or a sleeping spot inside, then capture the downed foe. Do so by selecting a pawn and right clicking the enemy, then select 'capture'. They'll be dragged to the bed, where the doctor will take care of them.
At this point, you'll need to decide what to do with them( If they survive, that is). Select the prisoner tab, and decide. I recommend 'recruit', but the choice is yours. If you select nothing, they'll be left in their cell forever.
You can check their skills before deciding, but barring the occasional pyromaniac and armless cripple just about everyone's worth recruiting at this point.
When a human goes down, they'll also drop their weapons. Remember to Allow these, so your pawns will go pick them up. You can then freely equip them or sell them to visitors and merchants.
I'll go into more detail on prisoners later. For now, back to work.
There's things to be done, but several events might happen. Most commonly, a visitor might pass by. This is someone you can trade with by selecting a pawn, right clicking the visitor and selecting trade. This will make your pawn walk up to them and open the trade menu. This can be quite confusing, and a later section will explain more.
A pod might have crashed with goods inside. Just Allow these, and your colonists will collect them.
There's several others, but they're pretty self explanatory.
You'll likely still be building, but if you see any of your colonists doing pointless things like cleaning (there's no point in that yet), create more things to do or re-prioritize them under Work.
Once the freezer is done, create a stockpile area inside. Make sure the area doesn't cover any doors, as this will lead to items being placed there and stopping the doors from closing. Select the area, and click Storage. Here, you can change what goes into the stockpile. We only want food stored here, as they're the only thing that needs cooling. The simplest way to do so is to click 'Clear all', then activate 'Foods'. Now only food, both raw and prepared, will be allowed inside the freezer. Deactivate survival meals and pemmican though, as they keep perfectly without freezing. No point in putting them in there.
Make sure to deactivate foods (except survival meals and pemmican) in the general stockpile.
There's a few other foods like this, but we won't go into them here.
You'll also want to allow fresh animal corpses, as they can be changed into meat. To do so, disallow 'rotten' at the top, then open Corpses and allow Animal Corpses. They'll be brought here, and alter we can butcher them for meat and leather.
Next, you'll want to start building a simple research bench, and placing a chair in front of it. The chair isn't a necessity, but it adds to your Pawn's comfort level while working here. This will allow someone to research, which is always useful. For now, open the research screen and select Batteries as your first research. Your pawns will, according to work order, start researching and slowly fill up the research points needed. This can take a while, as it isn't high priority.
What did we do:
Deal with the first raid, deal with the corpse and finish the freezer.
Meal production
By now, you're likely to see a notification telling you you need a meal source, ie a place to cook. Thankfully, we have (inconsistent) power now, so we can place an electric stove. Do so inside the first room, as production goes slower inside cold rooms like the freezer. Make sure it's connected to power. Put a chair in front of it.
You'll eventually also need a butcher table to make meat out of dead animals. This can be placed inside the freezer, as efficiency isn't as important here. As ever, place a chair.
Once built, we'll have a place to cook. Now we need to tell them to actually do so. Almost every production spot, except research benches and a few rare exceptions, need Bills made. A Bill is an order to create something. To do so, select the stove, click Bills and press Add bill. This will show you everything that can be produced here.
You'll see a wide variety of foods. Feel free to look over them, press i to get more info. For now, we'll be cooking simple meals. This turns meat or vegetables into a meal, increasing the nutritional value as well as avoiding debuffs. Fine meals also make people happier, but require more time as well as both meat and vegetables (unless they're vegetarian/carnivore, which are less efficient options). Eventually, you'll switch over to primarily fine meals, but simple meals will do for now. Lavish meals also exist, but take a while to make and consume a lot of food for the same nutritional value. They're primarily used for a quick mood boost during hard times.
Click Cook simple meal. The bill will appear, showing that a single meal will be made. On the top right, you can suspend (pause) the bill, copy it or delete it entirely. Once the bill is complete, it stays there but is inactive. Bills are completed in order from the top down. As such, once 2 or more bills are present, arrows appear to move them up and down the priority queue.
Unfortunately, a single meal won't get us very far. We can use the + and - signs to increase the amount, but we can also change when meals get made. Currently, it's set to make X amount, with X being the amount you set. Every time a meal is finished, the number will drop by 1 until reaching zero and going dormant. We can also set it to make meals forever, which can be useful but is often excessive, or set it to make up to 'Do until you have X', with X being a selected number. It'll show you the number of meals you have compared to the desired amount, and once that number is reached the bill will pause. Once the number drops, it'll automatically reactivate. I recommend setting it to 5 per colonist for now. Once you've got time to spare, you can make more.
You can also click Details to change what ingredients get used, where the ingredients will be taken from as well as manually entering numbers instead of tediously clicking +1.
Pawns eat around 2 meals a day. As the colony grows, this means more time will be spent cooking for everyone, to the point that it becomes a full time job.
Unfortunately, we likely don't have any ingredients for now. Once the crops start coming in, or we butcher an animal, your cook will start working according to his work priority. If you need meals quickly, consider setting it higher for a while.
If you notice yourself running low on food and the crops will take a while to come in, you can look around the map for wild berry bushes. You can harvest these for some quick early game food. Berries are fine to eat raw, but will occasionally give food poisoning.
At the butcher table, set a Bill for butchering creatures. This can be set to Forever, as there's usually no reason not to. Butchering will result in meat and various types of leather. The meat will remain stored in the freezer until it's cooked, while leather will be dragged to the stockpile.
If the stockpile is getting full, consider enlarging it. You've got plenty of space left for now.
Unfortunately, meals spoil a lot quicker than rice does. This is why we need a freezer, and why we only cook what we need. Power can go out, even once you've got batteries to deal with the volatility of the wind, so producing an excess isn't always the best idea.
What did we do: We created a place to butcher animals, as well as a place to cook. We set up an order to cook meals when we need them.
Options
At this point, your colony is pretty stable. Food should be rolling in soon if not already, you've got shelter and a place to store food, and you've got (intermittent) power.
So, there's a couple of things you can do right now. You can complete the core building, you can set up bedrooms, or you can set up defenses. You can do these in any order, depending on your priorities.
We'll start with completing our square building. This'll be a 14*27 room, sharing one of it's long walls with the shelter and freezer. Altogether, this makes your building a nice big square. You'll want to add a door to the shelter and freezer, as well as a couple of doors to the outside.
This big room will be our main storage area. Once it's finished, the dumping zone in the shelter will be moved here, and fill the whole room. This might seem excessive, but trust me, in due time this room will be filled to the brim and will need expansion and/or a second storage room.
The coolers will be facing into this room. That's bad, as they need an unroofed tile to dissipate the heat. As such, we'll be making a small 2-tile (probably door-less) room around their heat zone. Note that you can leave the roof intact and not build the wall if the temperature is low. In that case, some heating might be a good thing. Come summertime, you'll definitely want to unroof and wall this off though.
Unfortunately, once completed your pawns will automatically start roofing the room, which defeats the purpose. As such, we'll use the 'Ignore roof' zone to leave the two tiles unroofed.
If you've started building without reading the entire chapter, the roof might already be there. If so, remove it with 'Remove roof area'.
That takes care of your stockpile for the next long while.
Up next: rooms.
This is where you need to make a decision: what do you want your base to look like? In the future, even the core building you've just built can be customized as you like. Make it larger, smaller, separate the rooms, put up something more basic and rebuild it elsewhere later. But up until now, I've given you solid guidelines.
This is the part where that kind of stops. You've got the basics in place, now you get to build what you feel like building. Do you want to build an interconnected mega-structure, full of labyrinthine hallways? A nice town, with separate buildings and plenty of open space? Leave nature pristine, or pave over everything? You get to decide.
Of course, I'm not going to push you out into the wild entirely. There's still some solid advice to give.
First off, your hallways, whether inside a megastructure, a mountain or a town, should be at least 3 tiles wide. This allows you to more easily defend it. Single tile wide hallways seem great at first, and will allow passage, but in a fight you'll only be able to fight safely with 4 people at most. That's not ideal. I'll go into more depth during defense, but this is a good guideline.
Second, bedrooms: People hate sleeping together in a room unless they're a couple, and don't like anyone disturbing them in their sleep. As such, everyone's going to need their own room. The size can vary, and you can always rebuild them later, but your Pawns prefer a nice big room. a 3*3 is fine for now, but a 5*5 will be good forever. Just make a room, add a single door and a bed, and you're good to go.
For couples, just place a double bed.
A barrack (a place for multiple people in a single room) is definitely feasible though. It won't make people as happy, but is a lot more space efficient and a good one can still produce a modest mood boost.
You can always move beds and most furniture. Just select an object, and use reinstall to place it elsewhere. No need to deconstruct and rebuild them.
Ideally, you want your bedrooms close to the initial room, as that is going to become the dining/recreation room. It's the first place pawns will go in the morning, and the last place they visit in the evening. Having it be across the map will waste a lot of their time.
And that's it. Go nuts.
I'll cover defense in the next section.
What did we do: Make a storage room, make bedrooms.
Basic Defenses
So you want to keep yourself safe? Well, there's a few ways to do so. However, no strategy is without flaws, and you're likely going to need a variety of types.
First off, the simplest: random cover. At the moment, you can't predict where raiders will come from, so we'll want to place cover strewn around the base. The tutorial recommends sandbags, but I'm going to let you in on a little secret: a wall tile will work even better. You see, sandbags provide adequate cover, but a wall tile will protect your pawn entirely until they're ready to lean around the corner and shoot.
As such, strew some random wall pieces around the base. Remember to keep a few around your windmill, as otherwise raiders might ignore you to go destroy it.
This should be enough for the first few raids, but eventually you're going to want something better. And that's why we do what man has done for ages: build a wall around our colony.
The way raiders think is pretty simple: what's the easiest way to get to the enemy? I can either A) try to bash my way through this wall or B) go for that convenient gap in the wall. Extremely non-suspicious gap it is.
This means you're able to control where the enemy is going to come from, and prepare your defenses accordingly as long as you build a wall around your town. This is going to take a while, as that's going to take a lot of wood and construction time. For now, a single tile thick wall will do.
Remember to leave a gap, if there isn't one raiders will have no choice but to go through whichever wall is closest.
Now you know where you're going to be fighting, so it's time to stack the odds in your favor. First off, build some more cover for yourself, directed towards the entrance. This brings us to the use of sandbags: while leaning around a wall is fine, leaning around a wall while still being covered by a sandbag is even better. As such, alternate walls with sandbags for optimal protection.
You might notice that sandbags need fabrics of some kind to build. And you probably don't have nearly enough, if any, and the cotton crops aren't ready yet. Not to worry, you can also build barricades out of wood, which perform identically.
Now that you've taken care of your cover, it's time to take care of theirs. Pawns can take cover behind just about anything, from trees to rock chunks to hills. So, get rid of it all. Make a nice, empty field for the enemy to cross, barren of cover, and they'll be sitting ducks. A couple might lean around your own wall as cover, but that only saves two.
Fortunately, we've got this fun thing called traps. If we know where they're going to come from, and where they're going to take cover, we can put traps there.
Traps are single use obstacles that the enemy can't see. If they walk on them, they'll take damage and potentially go down. You can't place them right next to each other, so just leave a tile between. If possible, your pawns will avoid your own traps and if they are forced to walk over them, the odds of triggering them is low (but never zero).
I recommend building them out of wood. It's the least damaging, but wood is easy to come by and you can just make more. They're ideal against large groups of man-hunting animals, which can be tough to deal with otherwise.
There's other defenses, but this will take care of most basic enemy raids.
Production
So by now, your colony's well established. You've probably got batteries, defenses, all your basic needs are met. So what's next? Well obviously, there's plenty of research to be done. I suggest geothermal power next, as this gives you access to a reliable power supply. It lets you build large geothermal generators on steam vents, which provide sufficient power for a modest base. However, raiders like destroying them, so wall them in if possible. They do need space to release heat though, so wall them in on 3 sides, leave an empty row on one side, then the fourth wall. Make sure it's unroofed, and you'll have a nice, secure power supply. But that's a while off.
At this point, you're likely to be low on steel, so it's time to start mining. Look around the map, and you'll see that hills have different colored segments. Part of this is different stone types, but you'll also find various metals and compact components. You'll mainly want steel and components, so mine these wherever you find them.
By now, you should have turned cleaning back on at low priority. While it's still not too important for now, eventually you'll want a designated cleaner. Dirty spaces decrease work efficiency, make healing harder and increase the odds of food poisoning. Thankfully, we don't have floors yet, so they can't get dirty. Turns out, it's hard to track dirt on dirt, so it stays at a consistent unclean level that's not bad enough to cause issues. Still need to deal with vomit and blood though. And any rough stone floor will also get dirty.
All that aside, it's time to start making things. Under production, you'll find plenty of things to get you started. Let's go over what they're used for.
The Art bench is used to make statue's. It's the only thing in the game that uses the art stat, and statues are used to improve the quality of a room. The only rooms that really matter for now is your bedrooms and the first room, what is now your dining/recreation room. These give permanent bonuses throughout the day. Placing one or two statues, even of low quality, is enough to get a decent mood bonus. More than that faces diminishing returns, and will increase the game's difficulty. You see, statue's are valuable. They're great for selling, but unfortunately difficulty is partially dependent on the wealth of your colony. You should still use them, but don't go overboard.
The tailor bench. Comes in powered and unpowered forms. Get powered when possible. This is where you make clothes. For now, your colonists have enough clothes, but these deteriorate when worn. Eventually, they'll receive mood debuffs for tattered apparel. I'll go over what to wear in a later section, as well as what to use. Uses crafting.
Stonecutter's table: turn rock chunks into bricks, which can be used to build with. Eventually, you'll want to replace all your walls with stone so a stray fire (or one set by raiders) doesn't burn your base down. Uses crafting, but is very low skill and takes a while. Having a secondary crafter do this is recommended once you have a larger population. Often, this Bill is set to forever until an excessive amount of bricks is made. You run through them quickly, and always need more.
Electric Smelter: Here you can smelt things down for material, or destroy them. The main use is smelting steel from steel chunks/slag. This can be set to forever. Consider deactivating this when you don't need it to save power.
Electric Crematorium: Requires granite. Either cut some, deconstruct some granite walls from ruins or trade for it. The main way to dispose of bodies. Just create an order to dispose of all human bodies except colonists. Optionally, create a second order to dispose of rotting (and not fresh) animal corpses. Turn it off when not needed, as it hogs power.
Nutrient Paste Dispenser: Something for you to experiment with on a future playthrough. It replaces cooking, place a Hopper next to it, feed it power, and it makes nutrient paste on demand. Extremely efficient meal type, but your colonists hate it and will get a mood debuff. Saves a lot of time cooking though.
Crafting/Butcher spot: Primitive, ineffective versions of the above, used by tribals. Just ignore these.
So where do you put all of these? For now, in the large storage area. Place chairs in front of all of them, make sure they have power, and use as required. In time, you'll want to make a separate space for these, either in a large room or several smaller rooms.
There's several more you'll unlock through research, but they're pretty self explanatory.
You're going to need light as well. People work slower in the dark, so place lamps in the vicinity of all of these, as well as the research and cooking stations.
You might want to build a second windmill and additional batteries to support all of this until you get geothermal.
Make sure not to build too many batteries, as they can randomly discharge during the ZZZT event and start fires. The more power in the batteries, the larger the fire. This occurs on a random conduit, not the batteries themselves.
Things to do throughout the mid-game.
In no particular order:
All your wooden walls should be replaced with stone, preferable marble. This will prevent your base burning down. Use the stonecutter table to make bricks out of rock chunks. Granite is the strongest stone, use it for your defensive walls.
Hunt down the dangerous animals on the map, ideally using groups. This will prevent them from attacking a lone colonist.
Tame animals, then breed them. This provides a stable supply of meat over time as the population grows, as well as caravan animals. If you're lucky, they can be taught to haul items across the map.
You should start going on quests, if you think you'll be able to handle the enemies and if the rewards are worth it. You can usually get some extra loot from defeated enemies and/or their small base. Remember to bring enough food on your caravan, as well as some big animals to increase carry capacity. The game will auto-assign food, but you can increase this manually. For longer distances, Packaged Survival Meals or Pemmican are a must.
Open the 'Ancient Danger' by destroying a wall. There'll probably be enemies inside, so be prepared. The cryopods will contain people, likely hostile, with advanced weapons and armor.
Build a long-range mineral scanner, and use it to find useful metal deposits across the world. You can then send a caravan to mine them. The resources on your map will run out eventually, after all. This is also the best way to get components, which is a resource that quickly runs out in the mid-game.
Consider deep drilling for resources by scanning for minerals on the map. This might attract infestations, so be careful.
Make some good clothes, and eventually switch to armor.
Make better weapons.
Improve your defenses: double or triple your outside wall. Consider setting up a proper killbox if the raids become too difficult.
Start up beer production.
Improve people's rooms.
End of the beginner section.
That's right, you have completed Sono's basic guide to surviving a week on the Rim.
Congratulations!
I'm sure you feel inadequately prepared, so I've added a bunch of stuff below to give you some idea of where to go from here, as well as a deeper dive into certain systems and mechanics, but you've got all the basic information you need to have a good start.
Some of this is getting into the nitty-gritty details, so those sections have been marked as Advanced, and can be safely skipped.
But for the most part, you should know enough to be able to figure the rest out for yourself, and you can just come back to check a section if you don't understand something. If you run into something that isn't detailed below, feel free to ask and I'll add it.
Good luck!
Big threats (Raids et al)
Let's go over the common big threats that will attack you once the storyteller's threat cycle rolls around (or whenever with Randy).
First, the one that's likely easiest to deal with: Psychic Wave.
This causes all untamed animals of a species to go insane and attack you. They'll attack animals in their way as well. This can be devastating early on, and even later Thrumbos attacking you is difficult to deal with, but by the late game this is laughably easy.
You can also somewhat control the difficulty by making sure there's not too many wild animals of one species on the map through regular hunting.
To explain the other's, I need to explain how they're made up. There's several factions in the game, and each of them can raid you if hostile. They're assigned a number of 'points' to spend on units, which are randomly assembled from the faction to attack you with. These increase over time by multiple factors.
Let's start with Manhunter packs.
This is a horde of animals who want to kill humans. They won't attack structures or animals unless provoked. The pack can consist of anything, from a horde of hamsters to panthers to exploding boomalopes. Of course, the easier the animal, the more of them there are.
They get 40% more points assigned than other attacks, as such you're going to be facing a lot of them. Strong defenses and multishot/AoE weapons are recommended.
If they see a human run through a door, they'll attack it to get to them.
Thankfully, there's a simple way to deal with them: they don't stick around. After 24-54 hours they'll go away. So, you can just hide inside, use Schedule-Allowed area as well as Zone-Expand/clear allowed area to limit where your pawns can go. Of course, animals tend to be fast, so if a human is caught outside they're likely dead.
Next, Enemy Attack (AKA Raids). This can take various forms, so let's go over them.
The most basic is the Assault: Enemies appear near the edge of the map, either by walking in or appearing by drop pod. They can either attack immediately, or wait a little before attacking. If provoked while waiting, they'll attack immediately. Them preparing doesn't actually do anything, it just makes it a little easier for you. They can come from multiple directions, in which case they're technically each their own little raid. Very simple to deal with. Just let them come, then kill them all.
Mid-Base Assault: AKA I just got ♥♥♥♥♥♥. Drop pods land in the middle of your base. They will go through roofs, but not through overhead mountains. Gets less points than regular raids, but they're already inside your defenses. Use your wide halls, doorways and other chokepoints to deal with them. Be prepared to lose some things.
Sieges: Raiders arrive, then set up camp. Drop pods will come in with material, allowing them to build sandbag defenses and mortars. Once complete, they'll start shelling you. Food and ammo will keep dropping in for them, so you can't wait them out. Ideally, you have your own mortars and shell them into oblivion. Once their mortar(s) are destroyed or they suffer significant casualties, they'll attack like a regular raid.
If you don't have mortars, you'll need to attack them. This is not fun. If you're lucky, you might have a sniper rifle while they don't and you can pick them off from a distance until they charge you. If not, get ready to lose some pawns.
On the bright side, they leave their material behind, so this can be lucrative.
Sappers: These will ignore the suspicious opening in your walls and make their own entrance. Especially dangerous to mountain bases. On the other hand, there's less of them than a regular raid. They go towards colonist assigned beds, so you can guess their route.
Thicker, stronger walls will buy you some time.
They also tend to go for weakpoints in the walls, so creating artificial ones helps get them going where you want them to.
Alternatively, if you attack them they'll give up and act like a regular raid.
Can be tricked into opening ancient danger and getting themselves killed/weakened. Or to walk into trapped areas.
Breachers: Sappers' big brother. They will happily go through half a mountain to reach you, and they'll do so quickly. They target whatever's closest, so you can't trick them into going where you want them most of the time.
There's also a lot of them. Thankfully, they usually only appear later in the game.
These really mess with fixed defense chokepoints, so get ready to place defenses everywhere and to get creative.
Lastly, there's insectoid infestations. These don't attack from the outside, instead they dig through the ground underneath mountains. They're especially troubling for mountain bases, and the biggest reason to have 3-tile hallways there.
They're all melee attackers, and they don't directly target you. Instead, they start attacking everything around them and defending the hive.
Hives are structures that slowly generate more insectoids and hives. As such, dealing with insectoids shouldn't be put off, unless you're planning to abandon your base and move elsewhere.
Mining any hill with overhead mountain can result in infestations eventually spawning. Thankfully, for most bases this means they spawn outside your base instead of in the centre.
The jelly they produce as food is reasonably valuable. Their meat shouldn't be eaten though, as it provides serious mood debuffs. Using it in cooking is turned off by default. Use it to make kibble for your animals or chemfuel.
Dealing with them gets it's own section.
Factions
There are several factions in Rimworld, which can be turned on and off as preferred. If they're your enemies, these will Raid you, and we'll mostly be looking at them from that perspective.
First off, Tribals. These come in various flavors of hostility. Some can be befriended. If friendly, they mostly buy and sell primitive goods.
As enemies, they come at you with low-tech weaponry and little armor. On the other hand, they cost few individual points, so there's going to be a lot of them. Armor piercing has little value, and high rate of fire is recommended.
Generally the easiest to deal with.
Next, Outlanders. Like Tribals, can be friendly or hostile. Some can be befriended. If friendly, they sell and but industrial era goods.
If hostile, they come at you with mostly ranged weapons. They wear average to good armor. Will eventually have guys with grenades, rocket launchers and sniper rifles.
Early on, you'll be using weapons you looted from their corpses to arm yourself.
The final humans: Pirates. They're pretty much just Outlanders, but permanently hostile.
Not much to say about them.
All humans will retreat once half their force has been defeated. If split into smaller groups, these break individually. When running, they'll take the shortest route away from you, even if that means digging through walls.
Mechanoids: Terminators, here to kill you. They come in a limited variety, but they're pretty much the hardest foe. They don't break, they're well armored, they've got powerful weapons. Unfortunately, you'll be dealing with them frequently.
They appear in a few different ways. Most of the time they appear in regular raids, including dropping inside your base. Occasionally, one of their ships will crash onto your map. These come in 2 varieties: crop-killing, and mood-debuffing. They both ramp up.
Mood debuffing will target a single gender, and due to ramping will need to be dealt with sooner than later.
Crop-killing has a max range of 100 tiles. They might land on top of your crops, or they might land over a 100 tiles away from them. If so, you can safely ignore it.
After the ship crashes, several mechanoids will lie dormant around it. If the ship is damaged, or one of them is, they'll become active and hostile but stay near the ship until it's destroyed. As such, you can mortar it down and they'll become a regular raid.
They'll also awaken if you build too close to them. As such, you might need to build a bunker a little distance from them before engaging. On the other hand crop-killing ships that don't affect you can be kept around as guard dogs. When an enemy human raid passes by them, build a sleeping spot in the centre of them to awaken them from a distance, causing a fight.
So how do you deal with mechanoids? Depends on the type and party composition. There's 5 types, 2 of which are almost solely ranged, 1 pure melee, a combo tank of destruction and a sapper.
The ranged types can be safely engaged by melee pawns, negating their weapons. They're near useless in melee.
The melee variant should be engaged from a distance, as they're deadly up close. Thankfully, they're faster than the others, so they'll have all died by the time the rest of the raid gets to you.
A mixed group should be fought from a distance until all melee types are down, then fought up close.
The tank and the sapper just need to be slowly ground down.
You get some materials from scrapping their corpses, but it's not much.
Finally, Insectoids. There're 3 types, all melee, weak medium and strong.
They can be present on any hilly/mountainous map with caves at the start, but will be hibernating. If any Insectoid gets harmed, including infestation ones, they'll activate.
Not much to say about them. I've added a section on how to deal with them, and there's plenty of other guides out there.
DLC only: The Empire. Pretty simple: don't get into a fight with them.
They have elite units, heavy weapons and armor, and worst of all: all their gear gets destroyed when they die.
Thankfully, they cost a lot of points per unit so there won't be a lot of them. The enemy also doesn't use psy powers.
Dealing with Insectoids
Insectoids are unlike any other enemy in the game, in that they pop up inside mountains and they're all melee. As such, they require some specialized means of dealing with them.
I'm going to explain how to use pawns and chokepoints to deal with them. This is useful in that it can be applied anywhere, even if they pop up inside your base. There are other ways of dealing with them, like starting a big fire and sealing them in so they all burn to death, but I won't be covering those.
To understand how we're going to deal with insectoids, you need to understand how unit placement works: Only a single unit can stand on each tile. Friendly units can pass 'through' them, but will need to keep moving until they find a spot to stand. Downed units do not count.
As such, if there's an opening only a single tile wide, only a single unit can stand there at a time.
On the other hand, units can fight in melee with anyone in the 8 tiles around them (Up, down, left, right and diagonals). What this means is that 3 units standing in a line in front of a door will be able to attack any unit trying to get through, while they'll only be able to attack one by one. This is known as melee-blocking, and it's the reason we build our hallways 3 tiles wide. It allows us to melee-block any doorways, as long as it's centered. Optionally, you can put in narrowed chokepoints along the corridor, especially at the crossroads, so you have more places to use this.
So while 3 people hold them off, what are the rest of your pawns doing? Simple.
Shooting as many bullets as they can at them. Due to their swarming nature, even a miss is going to hit something. Weapons with lower accuracy are hence more viable, especially since accuracy increases at low range for most weapons (sniper rifles are an exception). This is the primary use for shotguns. So if you have the time, switching weapons to shotguns can be useful for optimal damage.
Friendly fire is a thing, but only for friendlies more than 3 tiles away. Hence, you can safely put 3 lines of ranged units behind your blockers. Past that, more accurate weapons and higher skill pawns will still be able to shoot pretty safely.
Grenades can be used to great effect, but there's several caveats there so look up how they work before using.
Things you shouldn't use: Flame weapons. Burning enemies can set your blockers on fire, causing them to run in a panic, or cause the enemy to panic and run right through your units to get to the tile behind them. When they stop burning, they'll then be attacking your ranged pawns from behind.
Miniguns at range. They seem great, and they are, but if one of your backline is using them they'll occasionally miss and hit a wall. If that happens often enough, the wall might get destroyed, and now you're facing 2 enemies at a time. As such, keep them on the pawns right behind your blockers, if you use them at all.
Hold them off and keep firing until they're all dead. Make sure you finish off any that are left alive, or they might get back up and maul an undrafted pawn. If you have enough units, you can keep a melee pawn in reserve to cycle in if one of your blockers goes down. Then destroy the hives.
How to avoid infestations: You can't. They will happen on occasion. But there are ways to make them appear where you want them to, or at least improve the odds.
We don't fully understand the programming behind infestation spawning, but we know some things.
Infestations only spawn on mountain tiles that are at least -18C. As such, you can theoretically make your entire base a freezer. This is not recommended, nor even feasible. However, temperatures below 8C also decrease the odds, so keeping it cold can help. As long as their bedrooms are warm and they're wearing decent clothing, this won't bother your pawns. At the minimum, you can keep them out of your freezer, and more likely to spawn in your less valuable bedrooms I guess. No matter what, it's pretty much impossible to keep them out entirely.
More useful: You can set up decoys. When you mine out a mountain, it's impossible to destroy it. If you mine out everything, the roof will infinitely collapse, creating rubble tiles. Even small mountains are taller than the Kilimanjaro. Since it's going to be there anyway, make a room out of it. The easiest way is to just not mine out the outer stone tiles, unless they're valuable, and plugging any holes with walls or doors. Put some furniture inside and it'll become a valid infestation target. Add a heater to keep it above 8C, and hopefully they'll pop up there instead of in your hospital.
Make several, and you improve your odds. If they spawn in a decoy, fire tactics also become more viable. Look up another guide for that.
Note that you NEED to deal with any infestation that pops up, as they will multiply over time and chew through their surroundings until they become too much to handle, but this way they hopefully don't destroy any of your stuff while you deal with them.
If you do let them grow, unless you get really lucky your best chance might be to pack as much as you can in a caravan and try to rebuild elsewhere.
If they still pop up inside your base: Accept that you're going to lose some stuff, same as drop pods, and gather everyone together at a good defensive point before dealing with them. As soon as you attack one, they'll all aggro.
What to wear?
How good clothing is depends on 4 things: what it covers, its base stats, its material and its quality.
Let's break that down.
The more a piece of clothing covers, the better, as that means the armor is applied to that body part. A tshirt that only covers the torso is worse than a button-up shirt that covers the arms as well, since besides that the base stats are identical.
The better the base stats, the better the result. Some clothing and armor is just better than others. Recon armor (light power armor) is worse than marine power armor (medium power armor). Of course, often there's trade offs. Marine armor slows you down, recon armor doesn't. Recon armor is also a lot cheaper to make. The same is true for apparel, some offers better protection but is less effective against the cold.
The material adds a modifier onto the base stats. I'm not going to go over all of them, the wiki exists for that, but generally cloth is bad, leather from large animals is better and at the top are devilstrand, thrumbo fur and hyperweave. Hyperweave can't be made, only attained by other means. Thrumbo fur means killing rare and powerful animals. Devilstrand is a plant you need to research (all the way on the left of the tech tree) that takes ages to grow. I recommend growing a lot of it.
This means that as soon as you can, you should research and plant devilstrand, as it's the best material that is readily accessible. Make stuff out of thrumbofur and hyperweave when you have it, but most of your gear will be devilstrand by the mid-game. Early on, you'll be wearing gear made of random leathers and cloth.
Finally, the quality. Like most craftable objects, clothing and armor has a quality rating. These add modifiers to the clothing, making it tougher and longer lasting. This is why only your best crafter should be making clothing.
With that out of the way, let's explain what you can wear and where. There's nothing in the base game for hands and feet, so those will always be vulnerable. Nothing you can do about it.
For the rest of the body, clothing works in 3 layers: skin middle and outer. Clothing can occupy 1 or 2 of these layers. For an example, Marine armor covers the outer and middle layer of arms, legs, torso and throat. This means you can wear a shirt, which only uses the skin layer, underneath it.
The hear generally only has 1 slot. Finally, you can wear a single utility item.
Cool, so what should you wear?
Well, there's been a lot of comparisons, and over time people have figured out the best clothing in temperate weather. On the other hand, the differences tend to be small enough that you can wear whatever you think looks neat.
But if you want the optimal setup:
Duster (covers most of the body's outer layer), Button up t-shirt (skin layer torso and arms), pants (skin layer legs), a Flak vest (torso middle layer) and a Flak helmet
You keep that for most of the game, before switching over to marine armor lategame.
So, let's quickly dive into why:
The Duster covers the most of the body of any outer wear.
The Button-up covers the most of the upper body.
Pants are kind of your only option.
A flak vest provides great protection to your torso, where the most vital organs are.
A flak helmet is the best protection you can get until you research recon armor, at which point you can get a recon helmet instead. Depending on your preference, it might be worth skipping the recon helmet to go straight to the marine helmet.
If you have limited resources, prioritize the duster as it covers the most.
Recon armor, tragically, is worse than a devilstrand duster + flak vest, so nobody uses it. It offers better protection for the arms, but less for the torso and neck, which are far more important.
Apparel/armor, damage and health (Advanced)
Explaining how getting hit works is a bit complex. Accuracy is its own thing, but if you get hit the following is relevant.
First off, understanding what clothing does: Each piece of clothing adds to a Pawn's comfortable temperature range. On top of that, when a pawn takes a hit, clothing can help mitigate it.
The Damage calculations can be a bit confusing, and interactions of different layers is still a bit unknown, but I'll try to explain the basics as clearly as possible.
All wearable items have 3 defensive stats: Sharp, Blunt and Heat.
Sharp is knives, swords, bullets and the like. Blunt is clubs, maces and using a gun in melee. Heat is for rare flame weapons.
Obviously, armor usually has more than regular clothing. Sharp defense tends to be higher than the other 2. As such, blunt weapons are surprisingly effective, even if they're less likely to be instantly fatal.
On top of that, they can have Insulation - Cold and/or Heat. These add to the comfortable temperature ranges.
Regular clothing tends to be better at this. Plate armor is pretty bad at temperature regulation.
So how does damage work? Well, to put it simply: every weapon has armor penetration.
Armor-Penetration=effective armor.
For example: 100% sharp resistance - 30% armor penetration = 70%.
With me so far? Good. Because now it gets weird. Armor isn't a damage modifier. Instead, it's a chance at negating or reducing damage.
The way it works is that half the effective armor becomes a chance to negate damage entirely, and the other half reduces damage by 50%.
For our example of 70% effective armor and a bullet that does 10 damage:
You have 35% chance of taking no damage, 35% of taking 5 and 30% of taking full damage.
Don't ask me how that works with 2 layers of clothing, nobody knows for sure.
In practice, this means that even with the best armor in the game, a lucky arrow can do full damage. But, armor improves your odds, so it's definitely helpful.
Damage depends on where the hit takes place. Pawns have a lot of simulated parts, which all can get damaged or destroyed. A hit to the torso can pierce through into the kidney. A lucky hit might destroy someone's jaw. If the damage is low or reduced, the part will survive the experience and be tended to with a doctor, potentially with some minor permanent damage via scarring.
There's a 3 vital spots: the brain, the heart, and the liver. If those get destroyed, you're done for. The neck, head and torso also mean instant death if their hp reaches 0. Anything else is theoretically survivable. You can live on 1 lung, 1 kidney and without any limbs. Thankfully, prosthetics and organ implants exist to get someone back in working order, depending on your tech level. Get high enough, and your new leg will be better than your old one ever was. On the lower end, you might need to make do with a wooden pegleg or a paraplegic permanently occupying a bed.
There's a lot more going on, but that's the basics.
TL;DR: No armor is perfect, and lucky/unlucky hits happen, but armor is still worth it.
Weapons
There's a lot of weapons in the game, and you're probably wondering what the best ones are.
There are some in depth guides you can find elsewhere, especially in the tutorial nuggets series, so I'm going to be pretty brief.
Higher quality weapons improve dps (and accuracy/armor penetration for ranged weapons), so higher quality 'worse' weapons might outperform weapons with higher base stats. Always have your best crafter make weapons.
For melee weapons, the best vanilla options are the longsword for sharp damage and the mace for blunt damage.
As for material: steel is the default option. For sharp weapons, plasteel is best since it causes faster attacks while increasing sharp damage. For blunt damage uranium is best, since it increases damage. It does lower attack speed, but not significantly so.
In conclusion: A plasteel longsword or a uranium mace are the best weapons. While the longsword has higher dps and armor penetration, sharp armor is usually a lot higher than blunt armor. As such, the mace is usually the better weapon.
Useful note: The longsword will cause more bleeding, but this rarely affects enemies before they die. It will make capturing downed enemies before they bleed out more difficult.
For ranged weapons, the answer to what works best is more complicated due to the large variety of weapons and opponents you might face, as well as accuracy and range being factors. As such, I'm not going to go into much detail.
In general, the best weapons are the charge rifle and the minigun. Charge rifle for single targets, miniguns for everything in a general direction. These are both expensive to make and hard to research.
The default weapon for your ranged pawns should be the heavy smg. Especially on low-skill pawns, it outperforms the other weapons. Only high-skill pawns should get an assault rifle instead. As such, killing fields and killboxes should be built around the range of a heavy smg.
Against insectoids, chain shotguns are best.
For hunting, the bolt-action or sniper rifle are best.
Important note: Weapons like the smg and especially the minigun with relatively low accuracy and high rate of fire will chew through the side walls of your killbox. Take this into account, as long engagements might end up with them destroyed and your enemies flooding in.
Accuracy and Damage (Advanced)
I'm going to be pretty brief here, as just like with armor this can get pretty complex.
Put simply, damage can be dealt in full, halved or negated depending on armor. Depending on where it hits, a bullet can kill instantly or do very little. As such, it can be pretty random how quickly someone goes down even if you hit successfully.
Accuracy is a whole different thing. Accuracy basically doesn't mean what you think it means. The only reliable way to tell your odds of hitting someone is to pause, select a pawn and hover over an enemy. It'll give you your odds of hitting. If the bullet misses, it might hit an adjacent enemy, the floor or a nearby wall.
The formula for determining hit chance is somewhat complex, and involves your weapon accuracy (which is not the actual hit chance, which confuses a lot of new players), the distance to target, cover and user skill.
To keep things brief: More accurate weapons and skilled users improve your odds, but most of the time the best way to make sure you hit something is to spray a lot of bullets in the general direction. This is why Heavy SMG's are so useful.
Comfort
Comfort is a stat that isn't explained that well in game. Here's the nitty gritty of how it works.
Comfort is a bar going from 100 to 0, giving increasing mood bonuses above 60 and mood decreases below 10. These bonuses only increase by +2 every 10%, so don't stress too much about getting comfort as high as possible.
It goes up pretty quickly while using comfortable furniture, and slowly (5%/hour) drops to 0 the rest of the time.
If you check most sitting/sleeping furniture, you'll find a comfort stat. multiplied X100 is the maximum amount of comfort it can give. Essentially, A stat of 0.9 means the comfort bar will trend up to 90%. Any comfort past 1 is pointless.
In practice, due to the slow fall speed, your pawns will never drop to uncomfortable unless they sleep on the ground (even a sleeping spot buys you 6 hours of neutral comfort) and stay up for the rest of the day working without sitting.
So comfort pretty much only ever gives mood boosts. How do we maximize this?
First off, get a comfy bed. A regular bed has 0.75 comfort, increasing with quality. Due to the cheapness of beds, it can be worthwhile to have your best constructor deconstruct and rebuild beds over and over until you have excellent or above beds. Excellent beds give 0.93 comfort, while masterwork beds give over 1.
Second, put chairs in front of workbenches, to be replaced with armchairs when possible. A regular armchair gives 0.8 comfort, excellent gives 0.99. This means your workers will be luxuriantly comfortable for the entire day. This is mostly useful as they're likely to be inside all day, making them unhappy.
Stools only give 0.6, which will never give bonuses, and are hence useless. Only build them at tables when you somehow lack wood for dining chairs, and only because otherwise tables don't work.
Putting fancy armchairs at tables is almost pointless, as pawns spend very little time using them to eat or relax.
Dressers and end-tables give bonus comfort to beds, but once you've got good beds this becomes pointless. Never build them, they're a waste of wood and make the room worse by taking up space. Unless you like how they look, which is perfectly valid. The game is more about having fun than making things optimal. There's a reason plenty of mods add furniture that does nothing but looks neat in your base.
TL;DR: Get good quality beds, armchairs for workstations, and never worry about this again.
Beauty
Beauty is an need stat affected by how pretty a pawn's environment is. Pawns like living in beautiful places, and hate living in ugly ones.
I'm not going to go into a lot of detail on this, as it involves a lot of calculations. If you ever want to quickly grasp a room's beauty, use the beauty display button on the bottom right (human head icon).
Beauty really affects 2 things: the beauty need and the room impressiveness.
The beauty need rises quickly, and falls slowly. As such, make the places pawns spend a lot of time (recreation/dining room, work room, hospitals) beautiful, and don't worry about hallways. Unlike comfort, this stat doesn't rise during sleep, so bedrooms should only be improved for room impressiveness.
The easiest way to improve beauty is to add statues. Statues give a massive amount of beauty, so spread some around your important rooms.
Things that decrease beauty:
Random stuff lying around. Your storerooms are likely to always be ugly. This is fine. If you need to store something in other rooms, like medicine in your hospital, use shelves as that negates beauty.
Vomit/trash/blood/dirt. This is why cleaning is so important, along with health reasons. It's also why we keep dirt floors for a long while. Dirt floors are ugly, but not nearly as bad as dirty floors. Don't think too much about that.This will quickly overcome any amount of statues.
Dirty floors. See above.
Plants/trees/rocks: For some reason, pawns hate nature.
Things that increase beauty:
Smoothed walls. This is done by using the smooth wall/floor order. Only usable on natural stone walls. Takes a lot of work.
Marble walls. If possible, build your inside walls out of marble for this reason.
Flooring/carpet. Note that these require cleaning, so you might be better off not having these. Also requires a lot of work, and increases wealth by a lot. As such, consider only using these later in the game.
Flowers. You can plant roses to improve the outside beauty. If you use a village-style base, this is often worth it.
Statues. As mentioned, these give massive beauty. Unfortunately, they take up space and increase wealth by a lot.
TL;DR: Keep your place clean, make some statues, never worry again.
Room impressiveness
Room impressiveness is one of the best tools to improve your Pawn's moods.
Having a nice bedroom, dining room and recreation room will give permanent mood bonuses.
These bonuses increase with impressiveness, and can give mood decreases if the impressiveness is low enough.
Impressiveness is a combination of 4 factors: Wealth, beauty, space and cleanliness. If any of these stats is very low, you can pump the other three sky high and never increase your impressiveness.
Note that this has diminishing returns. Getting a very impressive room is worth striving for, anything above that is usually a waste of space and money.
Space: Pretty easy, just make rooms big. This is why we make our dining/recreation room so big. For bedrooms, 5*5 is good. Especially early on, going smaller can be helpful, but this is what you should strive for. Going bigger is generally pointless, although (DLC) nobility might require larger rooms. Space can be decreased by placing furniture in the room (half decrease for walkable furniture). As such, don't stuff rooms. Another reason dressers and head-tables aren't ideal.
Cleanliness: Self-explanatory. Don't leave dirt or trash lying around. Floors are important for this, and this is pretty much the biggest reason you'll want to put them in eventually.
Beauty: See the Beauty section. In short, just place statues, floors and marble walls. Remember that statues conflict with space, so don't put in too many.
Wealth: The sum of the market value of all items in the room. Pretty much don't worry about this. This will automatically go up as you take care of beauty and improve your bed. Remember, higher quality increases value of items.
Your priority should be your Dining/recreation room, as this affects all your pawns. Once that's done, focus on bedrooms.
Also remember to improve hospitals and prisons. Your hospital becomes a pawn's bedroom while they're ill, so keep it nice to keep them happy. Prisoners with high mood are easier to recruit, so giving them a nice prison helps with this. It also decreases the odds of a prison break.
If multiple pawns sleep together, their bedroom becomes a barrack. This is functionally identical, except the bonuses are smaller. As such, pawns should ideally have their own rooms.
TL;DR: Give your pawns nice places to live, and they'll be happier.
Trade
When a visitor comes by, you can often trade with them. You'll occasionally have visits from various types of traders, and later will even be able to trade with passing ships.
Unfortunately, the trade screen's a bit of a mess.
Let's start with the basics: who should you have trade?
This is pretty straightforward: The person with the highest social skill. They'll get a discount based on it, so higher is better. The exceptions to this are either someone with a trade inspiration, as that will almost certainly get you a better deal, or if your highest social has a hearing or speaking disability.
You can only sell what's in your stockpiles.
Alright, now let's go over the trade screen.
In short, on the far left you have whatever's for trade. Doesn't matter whose it is, yours or there.
This is what causes the most confusion. To know what's whose, you want to look at where the numbers are compared to the center row with lots of zeroes and arrows. Are they on the left? This is your ♥♥♥♥. On the right? Their ♥♥♥♥. Numbers on the outside are quantity, numbers on the inside are prices.
To add to the confusion: press an arrow on the left to buy, on the right to sell. Think of it as where you want to go: towards your stuff, or their stuff.
You'll get used to it, but it'll still trip you up on occasion.
To see sale modifiers, hover over prices (both buy and sale) to see what is affecting them.
So what should you sell? Well, that's a complicated question. The simple answer is, anything you don't need/want. Looted weapons, old tattered clothing, spare scraps of leather clogging up your storehouse, whatever.
But that's not how you make money, that's how you do spring cleaning without having to put in the work of burning them.
To make money, you want to sell statues, clothing and furniture. See, there's modifiers on actual sales value. Weapons, regardless of actual value, are worth very little when sold. Statues are worth more than their base price.
So, if you need money, make some statues. For furniture, armchairs are the best value for material. For clothing, dusters are the best.
You can also just sell herbal medicine (to tribals) or chocolate, as these are easy to produce in large quantities while having decent value. Once you have the setup, beer is always great. It's albor intensive, but most vendors will buy it.
Difficulty, Raids and Wealth
The game's difficulty scales based on 3 things: The difficulty setting, time and colony wealth.
The difficulty setting is pretty self explanatory: higher difficulty = bigger threats. It affects a lot of other factors as well, like the odds of getting a disease or base mood, but the main factor is how much gets thrown at you in a raid. This does not affect how often things get thrown at you, as that is storyteller dependent.
Time is a relatively minor factor: It mostly includes a grace period at the start of the game where nothing big is thrown at you, and scales up over 20 years to a set maximum.
The final factor is colony wealth. Wealth is calculated based on the total value of all your items, your pawns and animals and your buildings (at half value). The higher your wealth, the more gets thrown at you.
Essentially, wealth is the game's way of seeing how well you're doing and scaling to that. It isn't a linear scale, early on wealth increases difficulty rapidly before the curve flattens a bit. This is mostly because, at the start, the game throws almost nothing at you and actively helps you. Once you've got your feet under you, the game ramps up to actually get challenging. It's assumed that by then, you have some defenses up and more colonists to defend yourself.
Wealth also affects colonist expectations. At certain levels, the expectations increase, meaning you get a lower permanent mood bonus until reaching 0. Your colonists will also need more variety in recreation, so you'll need to get them a tv or a telescope.
So what should you do with this information? Well, basically nothing. Especially on lower difficulty, it doesn't matter too much. The only way to keep your wealth low is to not build anything and live like savages in a cave. In effect, it just means difficulty increases over time indirectly.
But maybe you do want to try and keep this into account and use it to keep the difficulty down, or you're noticing that difficulty jumps before you're ready. So what do you do? Here's a few simple guidelines.
Don't build statues/floors before you need them. Colonists start with a massive mood bonus due to low expectations. They don't need beautiful rooms yet, they'll be fine living on the dirt for now. Only make these later on, when you start needing mood bonuses to keep morale up. Doing this too early can actively decrease mood, as the expectations mood bonus decreases with wealth.
Don't recruit useless colonists. Colonists hold value (just ask slavers), and having more means the game expects you to be able to handle more enemies as well as no longer giving you free ones. Early on, every extra colonist is a major help, but later on you should get pickier. The last thing you want is a colony filled with pacifists.
Don't hoard wealth. Keeping 10.000 silver lying around just attracts raiders to steal it from you. Instead, spend it on something useful. Get some good medicine, or better guns. Maybe a doomsday weapon or two for emergencies.
If you're not using it, get rid of it. Having a hundred weapons you'll never use lying around is pointless. Keep one or two spares for when you recruit someone, and sell the rest. They're just artificially inflating your wealth, especially since weapons don't sell for a lot.
Consider gifting some stuff. If you give stuff for free to other colonies, they'll like you more. This means they won't raid you, will visit more and above 70 you can even call in a trade caravan or some defenders.
Buy materials. You'll always need more plasteel or hyperweave, and you can't get many off the map. Components are also useful, especially early on when you can't make them yourself. Raw materials aren't worth a lot, but are real useful.
But most importantly: don't get obsessive. People on the forums often overstate the effect of wealth. Making a bunch of stuff might mean getting a single raider wielding a stone club added to a raid. As long as you don't accrue wealth for its own sake, you'll be fine.
TL;DR: Difficulty is going to ramp up over time indirectly. Don't keep pointless wealth around.
Recruiting colonists
You're going to need more people eventually - there's always more work to be done, and once you've set up properly you'll have people specialize. You'll need a dedicated crafter and cook, who won't have much time for other jobs. You'll need people who do nothing but haul things around. Your initial colonists won't suffice.
There's a few ways to get colonists, and a few myths you might see pop up on the forums.
The main way you get additional colonists is by recruiting raiders.
As mentioned earlier, it's possible for enemies to go down in a fight without dying, same as yours. When they do, you can capture them, put them in a cell, heal them, and slowly recruit them. Just remember to set them to 'recruit', have someone set to being a warden, and wait.
Occasionally, you'll get people randomly joining up. This mostly happens early on, when you've got few colonists, and gets rarer as your colony grows. They might wander in or crashland.
You can get new colonists as a reward for a quest. This is quite rare.
You can buy slaves. They're expensive, but if you meet a slaver it can be useful.
With the DLC Biotech, you can have kids.
What's important is that you don't grow excessively. Every added colonist is another mouth to feed, and raids getting slightly stronger. Early on, you should recruit pretty much everybody that's not a crippled pyromaniac. Later on, you can be more selective.
Don't try to get 'perfect colonists', as they don't exist. Is someone bad at pretty much everything but being a docter? That's ok, you can always use a spare doctor. Is someone heavily scarred but good at cooking? That's a free cook, potentially freeing up the old cook for other things. Is someone truly terrible at everything? That's still fine. You don't need to be smart, capable, or even know how to tie your own shoelaces in order to drag rocks around. At the same time, if you've got a smoothly running base, do you really need the half-cripple, half blind rude gourmet? Will they really help your colony survive if you've already got 12 colonists?
Generally, more is better, but early on getting more colonists is a lot more important than later.
As for how to down enemies: The most reliable way is to use a Shock Lance. They cost 750 silver to buy, can't be crafted, and have limited uses. But if you want a specific raider, this is the best way to do it. It's not a 100% successful, it occasionally kills, but it's better than the alternative.
If you don't have a Shock Lance, you're stuck with the backup: damaging them enough, and hoping they don't die. This is incredibly unreliable: enemies have a 65% fixed chance to die when downed (some people think this is tied into your population number, those people are wrong). On top of this, enemies might just die from taking fatal damage before they go down. Finally, they'll bleed out while downed, so it's possible you can't save them anyway.
Theoretically, the best way to get the most downed enemies is to use small weapons (lower damage is better, since there's less chance to instakill the enemy), and chip away at them. You can also run away while they're bleeding, making them chase you until they collapse. This increases your odds by a tiny amount.
Overall, you just need to accept that whether enemies are downed is pretty much outside your control.
Colonist traits
To help you pick the 'ideal' colonist, which really isn't the point of the game but you might want to do anyway, here's a list of all the vanilla traits and how good they are. For details, just use the wiki. I'm going to be brief.
I'm going to be rating them in 6 categories: Great, Good, Neutral, Bad, Terrible and Depends. If you disagree with an assessment, feel free to let me know.
Night Owl: Neutral. If you manage their schedule, you'll mostly get a mood bonus, but necessity will mean they're awake during the day sometimes, making them unhappy.
Undergrounder: Good for mountain bases or crafters. Bad for anyone that works outside.
Nudist: Bad. You'll want people wearing armor.
Masochist: Great. No downsides.
Body Modder: Good. Bad early on, but you'll get good prosthetics eventually and then it's all upsides.
Body Purist: Terrible. Nothing but downsides, and everyone loses body parts eventually.
Gourmand: Bad. Increased hunger rate is bad, especially early on, but only binge-eating on minor breaks is somewhat useful. Cooking skill is usually irrelevant.
Ascetic: Bad. Useful early on, but loses out on better mood bonuses from impressive bedrooms and food.
Greedy: Bad. All downsides, but not too difficult to get rid of.
Jealous: Terrible.
Pyromaniac: Immediate Reroll/Exile. Deserves it's own rating. The bad trait all others are compared to. Survivable, but just not worth it. So bad it actively decreases sale value of the pawn. Not even slavers want them.
Bloodlust: Good. More social fights sucks, but they never break during a long fight, can wear tainted armor, carry corpses and will harvest organs without issue.
Cannibal: Good. No downsides, but outside roleplay mostly useful for hauling corpses.
Psychopath: Good. Gives no ♥♥♥♥♥ no matter what happens to others. Will do just about anything. Unfortunately, incapable of liking others, so more social fights if they're ugly.
Nimble: Great. Mainly useful on melee fighters.
Brawler: Good. Forces them to be a melee fighter, and makes them good at it, but they don't necessarily have passion for it.
Tough: Great.
Wimp: Terrible. Will go down quickly in a fight.
Too smart: Good. Increased learning factor is great, although quicker mental breaks is bad.
Fast learner: Great.
Slow Learner: Bad. They'll never be good at anything. Unless they have a high starting skill, this means they're going to be hauler/cleaners.
Quick Sleeper: Great. More time working.
Great memory: Great. Slower skill decay means they reach higher skill levels more easily and stay there.
Tortured artist: Depends. -8 mood is a lot, but they're the only way to make legendary items. Good if they're a crafter or constructor, terrible otherwise.
Kind: Great.
Abrasive: Terrible. Not even slavers like them. Will bring down the mood of the entire colony.
Annoying Voice: Terrible. Will get into social fights.
Creepy breathing: Terrible. Will get into social fights.
Misandrist: Terrible. Will get into social fights. Fun for roleplay.
Misogynist: Terrible. Will get into social fights. Fun for roleplay.
Asexual: Neutral. Not entering a relationship means they won't get mood bonuses, but not breaking up means they won't get mood decreases either.
Gay: Neutral. Might as well be asexual, as the odds of getting two gay/bisexual characters of the same gender in your colony is pretty low. And even if they exist, they might hate each other.
The way sexuality works is apparently something the devs are looking into changing.
Bisexual: Neutral.
Chemical fascination: Good. Once you've got beer, set them to drink daily, and they'll have a permanent buff. Keep away from addictive hard drugs.
Chemical interest: Good. Once you've got beer, set them to drink daily, and they'll have a permanent buff. Keep away from addictive hard drugs.
Teetotaler: Bad. Recreational drug use is great for mood buffs. All downsides.
Industrious: Great. The extra work speed is well worth the the -5 opinion
Hard Worker: Great. The extra work speed is well worth the the -5 opinion
Lazy: Terrible. Work speed affects everything.
Slothful: Terrible. Work speed affects everything.
Jogger: Great.
Fast Walker: Great.
Slowpoke: Terrible. Makes them worse at everything.
Sanguine: Great.
Optimist: Great.
Pessimist: Bad. -6 is survivable.
Depressive: Terrible. -12 is suicide.
Iron Willed: Great.
Steadfast: Great.
Nervous: Bad. They'll reach their break threshold earlier, so keep their mood up.
Volatile: Terrible. Breaks too quickly.
Neurotic: Good. Breaks earlier, but Work speed is really valuable.
Very Neurotic: Good. Work speed is just that valuable.
Careful Shooter: Depends. Good on low-skill pawns.
Trigger-Happy: Good. Best on high-skill pawns. Works great with grenades, which have a fixed miss chance.
Beautiful: Good. People will like them more.
Pretty: Good. People will like them more.
Ugly: Bad. People will dislike them, leading to insults and social fights.
Staggeringly Ugly: Bad. People will dislike them, leading to insults and social fights.
Psychically Hypersensitive. Depends. If you have the Royalty DLC, this can be useful. Otherwise bad, as it increases the mood changes from psychic waves. A little extra mood from psychic soothing is irrelevant, bigger debuff from psychic drone is terrible.
Psychically sensitive: Depends. See above.
Psychically dull: Good. Decreases debuff from psychic drone.
Psychically deaf: Good. Immune to debuff from psychic drone.
Super-immune: Good.
Sickly: Terrible. Will be spending a lot of time in the hospital. Medicine skill is usually irrelevant.
The DLC
So far, Rimworld has received 2 DLC expansions. I'm going to briefly explain what they add.
The first is Royalty. It revolves around a new faction: the Empire.
The Empire is a high-tech faction that runs off a feudal system of government. Early on, you'll get a quest that will give one of your pawns a noble title. Do more quests to climb in the hierarchy, and you'll get bonuses like calling in airstrikes or soldiers. Your noble will also require fancier accommodations, clothing and a throne.
This DLC also adds: Better weapons and armor, special implants and organ replacements, space magic for nobles, a new enemy raid type and various small doodads.
The second is Ideology. It revolves around giving all humans an ideology (think religion/cult/doctrine/beliefs)
Depending on a pawn's ideology, they will like/dislike things (meat-only diets, living underground, scars, prosthetics, being blind). This can cause serious mood up- and downswings.
You can convert others to your ideology, and certain ideologies have different tech available.
You can perform Rituals (Dance party, Smoke circle, Gladiator duel, Ritual blinding, Public execution) depending on your beliefs.
Certain ideologies have role-specific specialist who become better at one thing but refuse to do the majority of other tasks.
This DLC also adds: Quests for Relics related to your ideology, Magic trees you can bond with, which will spawn monsters you can control, a variety of quests, ideology-related buildings and clothing, as well as changing the look of items based on your ideology (add more spikes, go full goth, animal motifs), slavery and a new ending.
The third DLC is Biotech. This DLC adds 3 semi-separate things to the game: babies, controllable mechanoids and genemods.
Babies is pretty self explanatory: your colonists can have kids, you can teach them to make sure they have better stats when reaching adulthood, more warcrimes are available. There's a few extra's, like aging your kids rapidly to get new colonists quickly in exchange for them being worse.
Genemods allow you to alter the traits of colonists. This can mean neon-colored hair, red eyes or hardened skin, or even becoming vampires. If you want your colonists to be less human, this has got you covered.
Mechanoids adds the ability for a colonist to link himself to created mechanoids, who can work, fight and die in their stead. You can call down mechanoid minobosses to fight for loot that unlock more tech. Unfortunately, mechanoids create polution, which if not managed well can be very, very bad for biological life.
This DLC is very recent, so there aren't any significant mods for it yet but it's likely to allow some neat stuff.
Generally, Ideology is considered to be a better purchase than Royalty, holding more content, but it also changes the game significantly. It's possible to use most of what the DLC adds without using the ideology system.
If you're new to the game, I would not recommend using ideology as it complicates matters. Royalty is closer to vanilla.
Biotech probably adds the most, due to adding 3 near-separate systems. Opinions are positive so far, and it's probably the best of the DLC.
All DLC added a significant amount of free content, which is included in the base game.
Starter Mods
Note: this mod list has not been updated for version 1.4, so some mods might not work. EdB Prepare Carefully hasn't been updated, for example, although the author has stated it's being worked on.
Rimworld is a very mod-friendly game, in fact it's been specifically designed to be easily mod-able. Most players use at least some, and they can add a lot to the game. They're also very easy to add to your game. No using external programs, just subscribe, and activate them in-game under the 'mods' menu in the main screen. Some can be added to an active save, others require a new game.
I'm going to list some of what I use, separated into categories. Those are Vital (needed in order for other mods to function), Quality of Life (QoL, mods that make the game simpler to play/add functionality without making the game less difficult), extra content and difficulty reducers(most of these change the colonist AI to be 'smarter', which makes the game easier).
I've added links to collections containing each set of mods so you can find out what they do or add them all at once.
Vital: Harmony, HugsLib, either Mod Manager or RimPY Mod Manager. The first two are needed for a lot of mods to work, one of the other two is useful for ordering your mods properly (there's no clear consensus on which is better).
https://steamcommunity.com/workshop/filedetails/?id=2784989683
QoL: RimHUD, Allow Tool, Replace Stuff, Quality Builder, Blueprints, Defensive Positions, Smarter Construction, Recipe Icons, Where is my Weapon, Relevant Stats in Description, and Everybody gets one.
https://steamcommunity.com/sharedfiles/filedetails/?id=2784992859
Extra content: I'm going to be frank, this is mostly a selection from Vanilla Expanded by Oskar Potocki as well as Wall Light. Little point in listing them here. Just check the collection. Most of this is very well balanced. It mostly fills holes in the base game (like protection for hands and feet) or gives more options. Some of the new options are strictly better than vanilla content, but are still fair.
https://steamcommunity.com/sharedfiles/filedetails/?id=2784997495
Mods that make the game easier: Perfect Pathfinding, No Lazy Doctors, Quality Surgeon, Snap Out, Map Reroll, Common Sense, Pharmacist, PawnTargetFix, Friendly Fire Tweaks, Increased Stack, Simple Sidearms, Pick Up And Haul, Share The Load, Mad Skills, MinifyEverything, EdB Prepare Carefully.
https://steamcommunity.com/sharedfiles/filedetails/?id=2785001074
Note that I, and most other users, use more mods. A lot more mods. 100+ is common. But this is a selection that adds things to the game without making it unrecognizable or flooding your building menu with hundreds of options. These are also all compatible, which isn't always the case for mods.
Once you're comfortable with things, feel free to go nuts. There's mods for just about everything out there. The rest of Vanilla Expanded it a good place to start. There's also mods on other sites, primarily NSFW or child-related ones so you can have kids running around your colony, if that's your thing.
An honorable mention goes out to the CE (Combat Extended) mod, which completely overhauls the combat system. Some people swear by it and never play vanilla again. Others hate it. I haven't tried it myself, but it's one of the most popular mods out there. Note that it isn't compatible with a large amount of mods, to the point that it's a common joke.
Advanced mods
There are a lot of collections, and up to date ones can be a great place to look for new mods. They're more likely to contain mods that work with all the DLC, and don't conflict with eachother. For example, this collection by boytype: https://steamcommunity.com/sharedfiles/filedetails/?id=2891414708
It contains a large selection of mods that works seamlessly together. A lot of users have extensive mod lists, and they're a good place to look for inspiration. You can subscribe to the entire collection, but in all likelihood your preferences will differ from every other player. Do you want a greater focus on melee? A medieval-only playthrough? Instead of cobbling something together yourself, have a look around to see what others have done. You might find something you missed.
It contains a large selection of mods that works seamlessly together. A lot of users have extensive mod lists, and they're a good place to look for inspiration. You can subscribe to the entire collection, but in all likelihood your preferences will differ from every other player. Do you want a greater focus on melee? A medieval-only playthrough? Instead of cobbling something together yourself, have a look around to see what others have done. You might find something you missed.
Dealing with bugs and slowdown
If you play for long enough, you'll encounter a bug. If you can't find the issue, you can post in the Steam Discussions, and 9 times out of 10 someone will help you. That said, I can tell you where the issue is likely to be: Mods.
The game is pretty stable, with bugs being extremely rare (outside major patches) and getting fixed quickly. Mods are a lot less stable. A major patch to the game breaks almost all mods, although the devs give prior notice and the opportunity to adjust the mods. This means that older, abandoned mods might stop working.
On top of this, not all mods play together well. Combat Extended doesn't work with a lot of mods that add weapons and armor, for example. These interactions can be unpredictable. Because of this, adding mods can lead to crashes.
Most mods will work together, but if you add a bunch and the game stops working, this is likely the issue.
How to track a bug: you can look through the files manually, and see if you can find the issue. Most people don't know how, and that includes me. Instead, there's a simpler method.
You could check each mod individually, but there's a faster way: de-activate 50% of your mods, launch the game, and see if the issue is solved. This way, you narrow the potential issue mod by half. Then you repeat, over and over, halving the mods active until you find the one that causes the issue. This is a lot easier than checking each mod individually.
Slowdown can be caused by multiple things. In vanilla, huge maps and a lot of pawns can cause severe slowdowns. The game isn't really built for huge colonies.
Some mods are also a lot more intensive than others. If you notice a slowdown after getting a new mod, they're likely to blame.
A couple of useful tools:
https://docs.google.com/spreadsheets/d/1qwwKyUbSHFGM6yqw_e4tyWFbIYDxAibOvbcTrNOQ3bo/edit#gid=1731985214
This document lists some popular mods, and their impact on performance.
https://steamcommunity.com/sharedfiles/filedetails/?id=2038874626
This mod helps track down what causes slowdown.
Things to add
Room calculations
Statues
Prisoners
Images
Proper lay-out
Prayer to Randy
Statues
Prisoners
Images
Proper lay-out
Prayer to Randy