THE BOWMASTER GUIDE (How to never die)
 Briala
(191 ratings)
Sep 24, 2024 @ 11:47am14,899423
Game ModesGameplay BasicsWalkthroughsWeaponsEnglish
DISCLAIMER (Why this guide exists)
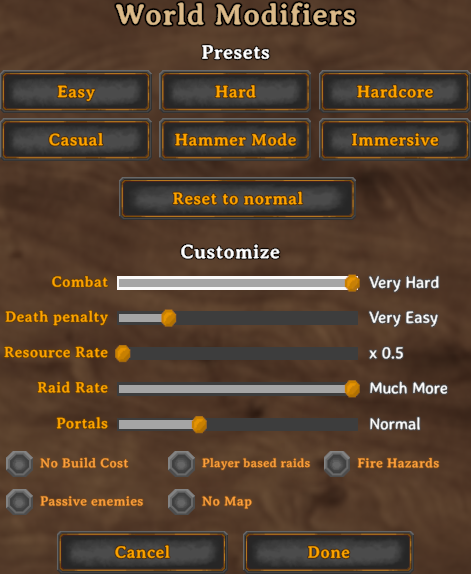 This guide is mostly based on a single-player playthrough in a world with Very Hard combat, Very Easy death penalty, 0.5x resource rate, and Much More raids (and some extra testing afterwards). This guide will focus mainly on Very Hard combat, and will also briefly touch on the other world modifiers so you can succeed in such conditions yourself. I would love to hear from you in the comments if you use this guide to play on such world modifiers (or even more brutal). Even if this guide taught you something you didn't know or helped you improve, I'd love to hear about that as well.
However, I don't recommend tinkering with world modifiers or even reading this guide until you are at least familiar with the basics of Valheim and have reached the mid-game-ish on an unmodified world. Play the game normally first, get a feel for it, and then you can better decide if you want a challenge. However, I will recommend setting the Death penalty to Very Easy or less regardless.
This guide has spoilers for the whole game. The first part of the guide will focus on general strategies and so will spoil items (and some mobs). The second part will spoil entire biomes with more specific techniques. You have been warned.
WHY BOWS (Shieldbearer's tragedy)
If you've found Valheim to not be challenging enough, and are considering bumping up the combat difficulty, know this: some attacks can never be parried starting from Hard combat. The most extreme example of this would be Lord Reto[valheim.fandom.com]of the Ashlands, whose heaviest attack deals a whopping 500 damage. By comparison, the most damage the player can parry is 636.25 (parrying with a level 3 Carapace buckler, with level 100 Blocking skill and an active Evasion Mantle, plus 40% of 325, which is the highest maximum health achievable legitimately, forming the stagger limit). This does mean that normally, everything can be parried, but as soon as you enter Hard combat, impossibilities like this start happening.
Factoring in "natural progression" and considering higher combat difficulties, you will encounter this problem of attacks that are impossible to parry as early as the Black Forest. On Very Hard combat, if you were unlucky enough to encounter a Troll with the best possible shield and health foods the Meadows can provide, you cannot parry it even with Blocking Skill 100.
In short, shields are less viable with more challenging combat settings and in later biomes. With this in mind, this guide shows a playstyle that foregoes shields almost entirely, doing away with this problem.
THE BASICS (General tips that will save your life)
Stamina
- Stamina is your lifeblood. Always watch for the yellow bar at the bottom of your screen, and familiarize yourself with stamina costs to plan out your stamina usage, so you don't get surprised when you run out.
- Make sure to always be Rested, especially while in combat. The boost to your stamina regeneration is essential for longer fights, so don't start a fight when you're not rested (or even when you are but it's about to run out).
- In combat, don't spend stamina on running, jumping or dodging unless necessary or unless you know what you're doing. Stamina used for movement is stamina you could have used to fight.
- The most efficient way to use stamina is to use it all in one go and then not spend any stamina until it's somewhere between half-full and full. The specifics rely on your exact stamina regeneration and total stamina, but the error margin on "the optimal strategy" for this is rather large. Instead, prioritize regenerating enough stamina for what you plan to do with it, though regenerating more will almost always be a good idea. Also be sure to always leave yourself enough stamina to dodge.

Food and Stats
 Food is split into 4 categories, indicated by the color of the fork icon in your inventory: White for balanced, Red for health, Yellow for stamina, and Blue for eitr. Generally speaking, avoid balanced food in unfamiliar territory or in biomes where you're already struggling. The more health you have, the more survivable you are, including increasing how much you can parry (up to a certain point; see above). Alternatively, the more stamina you have, the more running, dodging, or fighting you can do before running out.
Applying the tips from the Stamina section shows the viability of a full-on, 3-health food setup, realizing a slow but methodical playstyle, giving you the best survivability possible in most scenarios. Then, with that as a starting point, as you get more confident in your abilities, you can gradually replace health foods with stamina foods to trade survivability with flexibility. Later, if you're using magic, you can even stop using health foods completely.
Armor
 Even on Very Hard combat (and especially if you ate enough health food), heavier armor will save you from death more reliably than light armor, at the cost of slowing you down. This is less relevant for Bronze armor when compared to other Black Forest-tier armors, and if you're confident enough, you could still use some light armor.
That said, the Root Harnesk stands out for its Pierce damage resistance. Many (but not all) enemy attacks deal Pierce damage, so depending on the situation you should consider using the Root Harnesk instead of the best chest plate you have, even much later into the game.
Upgrades
You should upgrade all armor and weapons you have as much as you can before fighting each biome's boss and moving on. This is because upgrading increases armor, damage, and durability. Later, this becomes less necessary as the benefits of upgrading don't change things as much, but every little bit counts, especially when comparing the level 1 and the maxed versions of each item.Dodging
Dodging is the key to mastering the harder combat difficulties. Valheim is "souls-like" in the sense that your dodge-roll briefly makes you completely immune to damage, making it the key to avoiding damage you can't parry. So long as you can keep timing it, you can avoid taking any damage, even attacks you wouldn't think can be physically dodged, such as Eikthyr's lightning.That said, dodging is only necessary while close to the enemy. If you're not close enough for them to hit you anyway, or the attacks are slow enough, or you have the time to respond, simply walking or running out of the attack's range will generally be more efficient with stamina and even time. However, this can be riskier than dodging. Your mileage may vary.
Show button hints
 In the Settings window (within the Gameplay tab), there is the Show button hints option. Even if you have your controls memorized, you should leave this on for one reason: so long as you're wielding nothing more than a shield, the button hints will show up only if a nearby mob is aware of you or alerted at you. In other words, the game lets you have a sort of "spidey sense" that warns you of nearby danger, though it has its limitations:
- If you play in multiplayer or have friendly mobs with you, this will not warn you of mobs aggro'd at allies (or other mobs in general).
- This doesn't tell you what kind of danger you're in (if you're in danger at all). It is up to you to interpret the situation and infer from context what could happen.
Damage types and status effects
The fan wiki has a pretty good page on damage[valheim.fandom.com], describing damage types and resistances (with detailed calculations in a separate page[valheim.fandom.com]). You should at least familiarize yourself with the various damage types in Valheim (not that you have to memorize every mob's resistances and damage types of its attacks). Still, one aspect the game doesn't explain too well is how the elemental damage types work:- Fire, Spirit, and Poison are damage over time instead of instant damage. Of these, Poison damage doesn't stack (and merely "refreshes", though different sources of Poison can add up if done right), while Fire and Spirit do stack.
- Lightning is the only elemental damage that affects blocking and staggering.
- Frost is paired with a slowing debuff[valheim.fandom.com](which also reduces turning speed). The duration of this slow increases with Frost damage dealt and decreases with the target's maximum health. Mobs will also suffer from being slowed for much longer than the player.
Aiming styles
When aiming with a bow (or any ranged weapon whose projectiles have travel time), you must compensate for your target's movement and your own firing delay. There are three ways to do this, useful in different circumstances:- Movement compensation: Assume your target will keep moving in a straight line, and shoot where it will be. In Valheim, this can be unreliable, as many enemies frequently change the direction of their movement (or stop altogether).
- Stop and shoot: Assume your target will (briefly) stop moving in the near future, and once it does, shoot at where it will be standing. Depending on your target, this can be far more reliable than traditional movement compensation.
- "Move and I shoot": Assume your target will change the direction of their movement and wait to fire until they do. This is essentially the same as movement compensation, with added knowledge of how enemies move. It is advantageous against enemies that "stutter step" or frequently change their direction of movement.
HOW SKILLS WORK (Why bows, for real)
Every action that costs stamina is associated with a skill, and leveling up that skill improves that action. I like to split skills into 4 categories: Melee, Ranged, Movement, and Miscellaneous.
The Melee skills include Axes, Clubs, Fists, Knives, Pickaxes, Polearms, Spears, and Swords, all of which have identical benefits: At skill level 100, you deal +141% damage and knockback on average, and stamina costs are reduced by -33%.
The Ranged skills have the same damage and knockback benefits and have additional advantages:
Finally, the Miscellaneous skills, at level 100, give:
With all of this in mind, you'd think that grinding these skills is very important, if not almost mandatory. I will mention that there are excellent video guides for skill grinding, and the recent additions of T.W.I.G.[valheim.fandom.com]and the Archery target[valheim.fandom.com]make skill grinding even easier than before, but for the sake of respecting your time I'll say that you don't have to grind any skill, and you can rely on "natural progression" (so long as you don't die too much, but hey, that's what this guide is for :) ).
You can begin levelling your Bows skill as early as the Meadows. Then, if you keep at it, you could expect to enter the Black Forest with Bows skill 10-30, then enter the Swamp with Bows skill 50-60, and during the swamp, you can reach Bows 100. You're welcome :)
The Melee skills include Axes, Clubs, Fists, Knives, Pickaxes, Polearms, Spears, and Swords, all of which have identical benefits: At skill level 100, you deal +141% damage and knockback on average, and stamina costs are reduced by -33%.
The Ranged skills have the same damage and knockback benefits and have additional advantages:
- Crossbow skill also cuts draw time by up to -50%.
- Elemental Magic skill also cuts eitr costs by up to -33%.
- Blood Magic skill increases damage and knockback by up to +200% instead, cuts eitr and health costs by up to -33%, and increases protection by up to +250% (more on that later).
- Finally, what we're here for: Bows skill also cuts stamina costs by up to -33% and cuts draw time by up to -80%. This is huge, resulting in an over +600% increase in damage per second at level 100 compared to level 0. This is what we're after in this guide.
Finally, the Miscellaneous skills, at level 100, give:
- Blocking gives +50% block armor.
- Fishing gives +200% reeling speed and -80% stamina costs.
- Sneaking improves, well, sneaking overall (specifically, it gives -60% initial sneak visibility, -20% light-based visibility, and -75% stamina costs).
- Woodcutting gives +141% damage to trees on average.
- Cooking gives -60% cooking time, 25% chance of bonus food on craft and cook in the Stone Oven, and -50% stamina and durability use with the Serving Tray.
- Crafting gives -60% cooking time, 25% chance of bonus craft, and -50% stamina and durability use with the Hammer.
- Farming gives +1 Scythe range, 25% chance of bonus harvest, and -50% stamina and durability use with the Scythe and Cultivator.
With all of this in mind, you'd think that grinding these skills is very important, if not almost mandatory. I will mention that there are excellent video guides for skill grinding, and the recent additions of T.W.I.G.[valheim.fandom.com]and the Archery target[valheim.fandom.com]make skill grinding even easier than before, but for the sake of respecting your time I'll say that you don't have to grind any skill, and you can rely on "natural progression" (so long as you don't die too much, but hey, that's what this guide is for :) ).
You can begin levelling your Bows skill as early as the Meadows. Then, if you keep at it, you could expect to enter the Black Forest with Bows skill 10-30, then enter the Swamp with Bows skill 50-60, and during the swamp, you can reach Bows 100. You're welcome :)
WEAPONS (Don't use only bows)
 No weapon can conquer Valheim alone, and bows are no exception. Bows generally deal Pierce damage (and can do any elemental damage except Lightning (until later)), so we would like to supplement our playstyle with Blunt and Slash damage to exploit enemy weaknesses to the fullest. To this end, I suggest adding Clubs and Swords to your arsenal as sidegrades to your bow for most of the game:
-
Unsurprisingly, Clubs are here for their Blunt damage, but there are additional benefits to using them, namely the high knockback they provide. This includes using Sledges, an Area-of-Effect Blunt weapon that even deals damage through walls.
-
For Slash damage I recommend Swords, primarily thanks to a technique which we will cover later that shows how Swords are capable of dealing the most DPS in the entire game, at the cost of draining your stamina very quickly.

 As you progress, you will also gain access to Bombs and, later yet, Magic. All of these are at least worth looking into, and in my opinion, Magic becomes essential in the Ashlands on the higher combat difficulties.
 The reason for this is the Staff of Protection, which I believe single-handedly makes Magic viable. The bubbles let you forget about health foods, using only Stamina and Eitr foods. Each bubble blocks 200-700 in total, depending on your Blood Magic skill, but can be used to parry infinite damage exactly once before bursting. In some sense, this is superior to shields and armor, as you'll never be one-shotted. Though, especially early on, don't expect each bubble to take more than one hit, so any time your bubble breaks, you'll want to retreat and rebubble asap.
For completeness's sake, I'll also cover the other weapons now:
-
Axes are too slow for my tastes, though the Berzerkir Axes available in the Ashlands are a viable second option for you to consider instead of a sword. Battleaxes are even slower, but they are good at dealing with large crowds. Unfortunately, as combat gets harder, all it takes is one misstep for you to die while wielding a battleaxe, and it's especially easy to overcommit while swinging one of those.
-
Spears are favored by speedrunners and tank players alike, but their quick attacks and versatile throw attack quickly fall out of favor as combat difficulty increases. Since they also deal pure Pierce damage, they often fall behind bows at high skill level.
-
One-on-one, Polearms are similar to Spears in that they are usually worse than a bow due to the fact they mainly deal Pierce damage. Still, their secondary attack is excellent for staggering all sorts of enemies and giving yourself some space within a large crowd. In fact, with Polearms skill 100, each biome's (maxed) Atgeir secondary attack can stagger all enemies up to and in that biome, with some exceptions. Notably, tankier enemies that are resistant to pierce are usually an exception to this, such as Abominations and Stone Golems.
-
Knives are cool for their backstab bonus and quick attacks, making for a decent alternative to swords. Their DPS doesn't compare to swords, though (especially when using the "highest DPS technique", which I'll get to soon).
-
Fist weapons are mostly for fun, due to the fact only 3 out of the 7 biomes even have a Fist weapon.
-
Crossbows deal an initial burst of damage, but compared to a high skill bow I find they fall behind very quickly due to the long arming time, difficult skill leveling, and if you're looking to optimize your inventory space.
-
Though technically not "weapons", tamed animals like Wolves and Asksvin can fight for you, but they become less viable as the combat world modifier is increased. This is because as the combat gets harder, enemies deal more damage, but the tamed animal's health stays the same; thus, using tamed mobs for combat becomes less viable as they die much faster. For example, consider how a 2-star Wolf, one on one, will die to 4 hits from a Stone Golem on Normal combat. This is reduced to 2 hits on Very Hard combat.
TECHNIQUES (Exploits(?))
There are some "less intended" game mechanics that can give you the edge you need, and let you truly master Valheim:
 Most items you can wield or equip have animations for drawing/donning them and animations for sheathing/removing them, with some exceptions: Hammers, Hoes, Cultivators, Scythes, and Serving Trays. These have zero animation time for drawing or sheathing them, even if you're wielding something else at the moment. Since every weapon (besides knives, fist weapons, and bombs) slows you down while wielding it, and the sheathing animation forces you out of running, consider having a Hammer in your hotbar at all times so you can sheath mid-run for a quick and seamless speed boost. I'd recommend putting your Hammer on the 4 key, but use whatever works best for you.
 The Bows skill decreases draw time, which increases your fire rate. The increase to the fire rate is limited because of how the bow's firing animation works: there is always at least a 0.8 second delay between firing your arrows. Getting to this point with high enough Bows skill, or even intentionally firing that fast despite not having enough skill, requires you to get used to this 0.8-second delay. Rapid firing with fully-charged arrows is theoretically achievable at Bows level 85, but in practice, I find that level 88 is approximately when this becomes practical. Though I said you don't have to grind your Bows skill, I still recommend separately familiarizing yourself with Rapid firing, both mechanically and strategically. To that end, once you reach Bows 60 or so, I recommend fighting Eikthyr multiple times while only Rapid Firing with a Finewood Bow, if you haven't already. This lets you become familiar with how you move while Rapid Firing, when to stop, and how to leave yourself stamina for dodging.
Because of Rapid firing, upgrading your bow as much as possible should be a top priority, not only for the increased damage but also the durability. Bows start with 100 durability (except the Crude bow, which starts at 50), and it's effortless to burn through a stack of arrows while Rapid Firing.
Quick sheathing
Most items you can wield or equip have animations for drawing/donning them and animations for sheathing/removing them, with some exceptions: Hammers, Hoes, Cultivators, Scythes, and Serving Trays. These have zero animation time for drawing or sheathing them, even if you're wielding something else at the moment. Since every weapon (besides knives, fist weapons, and bombs) slows you down while wielding it, and the sheathing animation forces you out of running, consider having a Hammer in your hotbar at all times so you can sheath mid-run for a quick and seamless speed boost. I'd recommend putting your Hammer on the 4 key, but use whatever works best for you.Rapid fire
The Bows skill decreases draw time, which increases your fire rate. The increase to the fire rate is limited because of how the bow's firing animation works: there is always at least a 0.8 second delay between firing your arrows. Getting to this point with high enough Bows skill, or even intentionally firing that fast despite not having enough skill, requires you to get used to this 0.8-second delay. Rapid firing with fully-charged arrows is theoretically achievable at Bows level 85, but in practice, I find that level 88 is approximately when this becomes practical. Though I said you don't have to grind your Bows skill, I still recommend separately familiarizing yourself with Rapid firing, both mechanically and strategically. To that end, once you reach Bows 60 or so, I recommend fighting Eikthyr multiple times while only Rapid Firing with a Finewood Bow, if you haven't already. This lets you become familiar with how you move while Rapid Firing, when to stop, and how to leave yourself stamina for dodging.Because of Rapid firing, upgrading your bow as much as possible should be a top priority, not only for the increased damage but also the durability. Bows start with 100 durability (except the Crude bow, which starts at 50), and it's effortless to burn through a stack of arrows while Rapid Firing.
Animation cancelling
Animation cancelling includes Power Combos, Dodge Counters, and Power Emotes, each of which has pretty good videos for it, though I will also add on to each.Power Combos
https://www.youtube.com/watch?v=uivNFTELPu4 - The "secondary dodge power combo" no longer works.
- Berzerkir Axes have some pretty good (block-)jump power combos and a secondary power combo similar to knives.
- Knives actually have 3 more secondary power combos:
- A quick 4-hit combo where the last 3 hits have the secondary attack's damage scaling, achieved by holding Mouse2 barely after you press Mouse1 again for a primary power combo.
- A weird 3-hit combo that may happen if you press Mouse2 too early during the previous combo.
- A (block-)jump power combo where all 4 hits have the secondary attack's damage scaling. This one requires correct timing by pressing Mouse2 quite late (but not before the first hit connects).
- A quick 4-hit combo where the last 3 hits have the secondary attack's damage scaling, achieved by holding Mouse2 barely after you press Mouse1 again for a primary power combo.
- Spears kind of have power combos, except the primary power combo only works via (block-)jump power combos, and the secondary power combo (press Mouse1+Mouse2 at the same time) only makes the throwing animation play faster.
- Magic weapons also have power combos, though none are practical from my experience.
- For block power combos in general, you don't have to be blocking all the time. If you time it right, just tapping block shortly after the first swing will do the trick, too.
- There is a class of unsheath power combos where you start by hiding your weapon with the Hide/show weapon key (default R), then begin a (primary/secondary) fists power combo, and press R just as the power combo starts. When timed correctly, the attack animation speeds up significantly, and, for some weapons, you even get a "superpowered punch". Unfortunately, I couldn't find real uses for this except as a neat party trick, mainly because of the time it takes to set up. Also, if you mistime pressing R, your weapon can get "stuck" on your back, but you can reselect it to unstuck it.
- Technically, block/sneak power combos can be initiated after any attack in the normal attack combo except the last, but they're only useful after the first attack.
Dodge Counters
https://www.youtube.com/watch?v=cK-zSaV9yIk&t=502 Dodge Counters are mostly here as an honorable mention, as in practice, I find that the timing is too precise for some dodge counters and that they're too error-prone for my liking. Regardless, this is outclassed by...Power Emotes
https://www.youtube.com/watch?v=TnU_yNlVLPY Power Emotes are by far the most powerful kind of animation cancelling:For best results, use either of the wave, challenge, cheer, or point emotes for power emotes. Other emotes will either not work for power emotes or won't work as well as these four. Also, you may use the chat window for binding these emotes.
- There is an exception, however: Bows also have a power emote, but it doesn't work with these emotes. Instead, if you use the Dance emote and spam both Dance and Mouse1, you can shoot weak arrows very quickly. This is really only useful for grinding the Bows skill.
- As a power combo starter, you only need to emote once (if you time it right). In particular, the knife's 4-hit secondary power combo works with this very well, with similar results to the jump power combo.
- Magic weapons also have power emotes, useful either for draining your health if you have Bloodstone-infused weapons, or for using the Dead Raiser much faster.
- Berzerkir Axes and Spears also have a primary power emote, but more crucially...
- Swords have both a primary and a secondary power emote, the latter of which I've taken to calling quick-swording. The secondary power emote of swords is so powerful that it may well be the best DPS in the whole game, and because of it I chose my emote key to be H, and I rebound my Secondary attack to the nearby G key, to make this easier to do. This is useful not only for its massive DPS but also for individual quick stabs, which is useful when you need slash damage but want to keep your distance.
WORLD MODIFIERS (besides combat)
This guide is focused on Very Hard combat, so I'll talk here about some of the other world modifiers:
The places where this lower resource rate does change drops as expected is when something can drop multiple of one item before loot multipliers. However, even within this category, crops aren't affected as expected. For one, any crop starting from the Plains cannot drop fewer items than the default, except Ashvines, which drop 2 Vineberries each instead of the usual 3. Also, all "seed crops" drop 2 of each seed.
None of this changes with raid frequency, but it becomes more pressing to fortify your base this way. It also becomes more critical to understand how player base[valheim.fandom.com]works mechanically so you can avoid being raided when you aren't ready for it or exploit it to spawn-proof your base.
This base defense knowledge is mostly irrelevant to one specific Raid, which I'll cover in Part 2.
Very Easy Death Penalty
To keep it short, I can hardly think of a reason anyone would want to play with any higher death penalty, except maybe Hardcore. Do yourself a favor and set your world's death penalty to Very Easy or Casual. Dying is punishing enough even then. x0.5 Resource Rate
This doesn't change the game as much as you'd think, only making it slightly more grindy. This is because anything guaranteed to drop 1 item, including 0-star mobs, will still drop that 1 item on x0.5 resource rate. Loot multipliers from starred mobs apply after this world modifier. Add to this the fact that this world modifier doesn't change probabilities, and most mobs drop exactly the same stuff as they would on x1 resource rate.The places where this lower resource rate does change drops as expected is when something can drop multiple of one item before loot multipliers. However, even within this category, crops aren't affected as expected. For one, any crop starting from the Plains cannot drop fewer items than the default, except Ashvines, which drop 2 Vineberries each instead of the usual 3. Also, all "seed crops" drop 2 of each seed.
Very Frequent Raids
If you aren't prepared for them, Raids can be fatal. If you are, they become more of an annoyance than any test of skill or game sense. This is simply because of your ability to raise ground with the Hoe. I admit, they look pretty ugly (even if you use a Cultivator to give them a "natural" texture), but such earthen walls are impervious to any attack (except for one enemy in the Ashlands), and repel all would-be raiders except for those that can fly. Combined with a moat, your base will be essentially unraidable, so you only need to bunker down in your base, wait for the raid to end (you must be present for the raid's timer to tick down), and if you want, you can also shoot at raiders from within your base. If you end up using raised ground around your base, be careful with fall damage, especially if you opt for an economical version building a quick spire of raised ground.None of this changes with raid frequency, but it becomes more pressing to fortify your base this way. It also becomes more critical to understand how player base[valheim.fandom.com]works mechanically so you can avoid being raided when you aren't ready for it or exploit it to spawn-proof your base.
This base defense knowledge is mostly irrelevant to one specific Raid, which I'll cover in Part 2.
PART 1 DONE, PART 2 BEGINS
So far, the guide has covered general knowledge that can be applied in any scenario. If you think you can take it from here, feel free to stop reading the guide now. However, if you're interested in a more in-depth analysis of the threats you'll face in each biome and the equipment you'll want, read on...
MEADOWS
Starting out, your playthrough will look similar to most, with the basic wooden Club as your first weapon.
-
Neck: The first enemy you'll want to fight is 0-star Neck. These guys are pretty weak, and die quickly to your club. When you venture out far enough, you will encounter starred Neck, but at that point, you should already have a bow to easily shoot them.
-
Boar: With Grilled Neck Tails, Raspberries, and Mushrooms, you will be plenty safe enough to take on Boars with your Club. You should be able to take 4 hits from a 0-star Boar before dying and should even be able to parry them. You'll want to kill at least 8 Boars to begin with so you can make your first Crude Bow, after which these guys become a joke since you can readily shoot them while they're charging at you. You will want more Leather Scraps later (including upgrading your Crude Bow to level 3), so make a habit of hunting any Boars you come across. Also worth mentioning is that you can Tame these guys, but my stance on taming is identical to my stance on skill grinding: nice to have, but not entirely necessary. However, if you are interested in taming, I suggest only doing so if you're lucky enough to have found a 2-star Boar.
Now that you have the Crude Bow, you will probably notice it's not perfectly precise. I find that for most enemies (except larger ones you'll find later) it is reliable while you can see said enemy's health bar, and slightly beyond that range as well. To best progress with your Bows skill you'll want to start using a bow early and often, including the Crude Bow (which I recommend you stick to it if you can bear it). -
Deer: With a Crude Bow in hand, the Deer become the Meadows' interactive shooting gallery. Even after being spotted, you can still shoot them successfully if you know their movements.
- Greyling: I neglected to mention these guys until now since they deal even less damage than a Neck and are easily killed with your Club. However, once you have a bow, their movement makes them perfect practice for all aiming styles. They are also great for practicing Rapid Fire while close or firing arrows not from a full draw. Yes, you don't always have to fire fully drawn arrows. It does make your arrows less accurate, but that means they're still suitable for use up close.
- Bird: Another good habit to have is to hunt any bird you spot. Remember that there is no such thing as too much stuff, just not enough storage :)
Early on, you can make Flinthead arrows and Fire arrows. Flintheads are an upgrade over Wooden arrows, but I don't find the difference significant enough that you should actively stay stocked on anything more than Wooden Arrows (yet). Most of your strength comes from being able to shoot fast rather than shooting single, powerful arrows, so you'll run through your supply faster than you expect. Fire Arrows, however, are different because of their fire damage, so they are better against some enemies. -
Eikthyr: With experience you'll find Eikthyr to be kind of a pushover. Consider kiting him around the sacrificial table (or the other rocks) while shooting him: he generally won't attack with his antlers (unless he's right across from you), and you can dodge his lightning. Also, consider using Fire arrows to make the fight even shorter.
BLACK FOREST
Entering the Black Forest, one of the first things you'll want to do is acquire Core wood to make a Stagbreaker, your first sledge. This will be useful later.
Greydwarf: Bigger and badder Greylings. Their rock throw is often inaccurate and easy to avoid, but you should still be careful, especially around starred Greydwarfs. With enough time to react, you should be able to walk out of range of their melee attack, so dodge-rolling should rarely be necessary against Greydwarfs.
These guys (as well as all Greydwarf variants and even Greylings) are also very weak to Fire, so consider using Fire arrows if you struggle against them.
I'll also mention that Greydwarfs (but not the larger variants) are also scared of fire, meaning if you put down a Campfire they won't approach you for melee. They'll still try to throw rocks at you, so even if this is good in a pinch, you won't be 100% safe. Also, all Meadows enemies are scared of fire, too.Greydwarf brute: Even bigger Greylings that attack faster and are only found near Greydwarf nests or at night. Consider shooting them with Fire arrows just because of how tanky they are. In a pinch, jump on a stump or rock and shoot them from above.
Greydwarf shaman: Bigger Greylings that can also heal other mobs or attack you with a poison spray. Like brutes, you won't find these guys just out and about. Avoid the poison at all costs and prioritize killing these first. Notably, these guys get staggered for much less time, so consider shooting them with arrows that aren't fully drawn to take advantage of the stagger.
Bear: Bears are resistant to Pierce and Blunt, and they're quite tanky on top of that. That would make them a problem, but there are a few saving graces:
- Bears can only hear out to ~15 meters, and aggro only at ~5 meters. They aren't that fast on top of that, so it is very feasible to outright avoid fighting a Bear.
- Bears are weak to Fire, and afraid of fires. This means that to actually fight a bear, you'll want to either bring Fire Arrows for a modest fight, or wield a Torch to keep it scared of you. Just keep in mind it might still attack sometimes, but to prevent that stay as close as possible to the bear. Just make sure to not keep it scared too long, or it might run away. Alternatively, you may use a Campfire to keep the Bear scared, place walls around it to trap it, then attack with impunity. Eitherway, get a Bronze Sword ASAP. If there were one reason I'd recommend you to learn quickswording, it would be for killing Bears.
- Bears can only hear out to ~15 meters, and aggro only at ~5 meters. They aren't that fast on top of that, so it is very feasible to outright avoid fighting a Bear.
Troll: Generally speaking, Trolls attack slowly enough that you can avoid their attacks by just walking away, but Log Trolls have a greater attack range, so against them, I prefer dodge-rolling just to be safe. Though Trolls have a weak spot on their head, don't worry too much about hitting it: shooting wherever you can is more important. With a good enough bow you can not only stagger a 0-star Troll from a sneak attack headshot, but stunlock and effortlessly kill it with further headshots.
Skeleton: The reason you'll want better armor entering Burial Chambers, these guys can be brutal without good enough gear, especially in the numbers you might encounter them. Granted, with a level 3 Wooden shield, you should be able to parry them, and even barely parry 1-star Skeletons, but the damage adds up fast if you're not careful.
Either use a Club up close, the Stagbreaker from behind a door/wall, or your bow (best with Fire arrows). Keep in mind that Ranged Skeletons are harder to avoid without dodge-rolling up close.- Rancid remains: Bigger melee Skeletons that also deal Poison damage. The same advice applies, except don't try blocking/parrying them since the Poison damage will bleed through.
Ghost: Ghosts are simply 0-star melee Skeletons that attack slower. If you want your own T.W.I.G. you will want to hunt them for the Ectoplasm.

The Elder: Your first genuinely challenging fight, you should familiarize yourself with the 3 attacks he can do:
- On a regular(ish) timer, he'll summon roots, which despawn on their own after a while. Either run away from them or kill a few to make a safe area.
- If far enough from him, The Elder's vine barrage attack can easily kill you if it connects. Hide behind the (indestructible!) pillars/runestone to make him walk towards you instead of attacking like this.
- While up close, his stomp attack is easy to dodge-roll, so long as you leave yourself enough stamina. You could walk far enough that it won't hit you, but the stomp has a deceptively large hitbox. To survive getting stomped at least once, eat at least Deer Stew for health, and top off with Carrot Soup and Queen's Jam for stamina.
- The safe option is Fire Arrows while ducking in and out of cover. So long as you watch out for roots and the vine barrage, this is foolproof.
- The slightly riskier and much faster method is quick-swording. You'll want to have stamina, health, and Tasty Meads, to recover stamina as fast as possible, reducing downtime between quick-swording sprees, and be able to heal up from a mistake. Remember to dodge-roll the stomp attack or run from it, and watch out for the roots.
- On a regular(ish) timer, he'll summon roots, which despawn on their own after a while. Either run away from them or kill a few to make a safe area.
SWAMP
The Swamp is a leap in difficulty, both because everything deals even more damage and because there are usually more enemies. Thankfully, this abundance of enemies is exactly what you need to reach Bows 100.
I also recommend making a Longship. It is faster and tankier than the Karve, but bigger and less maneuverable. Also consider replacing your Bronze Pendant with the Nimble Anklet.
Other uses for Iron include the Pickaxe, Mace, Sword, Sledge, Buckler, and Armor, as well as many build pieces, including Forge upgrades. The Pickaxe will be essential for progression, but like any other tool, you don't have to max it out. Iron will continue to have many uses later on, so it will be a good idea to have plenty in stock before moving out of the Swamp. One more thing I like to do before properly leaving the swamp is to make Frost Resistance Mead and take a quick trip to a nearby Mountain for 4 Obsidian, just enough for a Tool shelf to max out the Workbench.
Leech: Just like shooting fish in a barrel, be it somewhat literally with a bow, or less so with quick-swording, a Sledge, or a Mace (especially with its secondary attack). Just don't swim through Leech-infested waters, especially not without a Poison Resistance Mead.
Draugr: Probably the scariest part of the swamp, what with their considerable damage and surprising speed. Prioritize killing the archers.
You could parry them in a pinch, especially with an Iron Buckler and Swamp-tier health food, but be careful. Consider climbing on the indestructible Ancient Trees to escape the melee Draugr.Draugr elite: Bigger and badder melee Draugr that are only found at night, from Body Piles, or occasionally in structures. Making the Iron Sledge requires a Trophy from these guys (as well as Ymir Flesh from Haldor).
Due to their higher damage, you can only really parry 1-star Draugr elite with the previously mentioned setup and 2-star with very high Blocking skill (about 70 or more).Abomination: Quick-swording is the way to go. Abominations are Very Resistant to Pierce damage, and though they are also weak to Fire, they're so tanky that it hardly matters.
Most of their attacks are relatively easy to avoid:- The head stomp can be avoided by being a bit further from the head than the legs are.
- The left hook can be avoided by being directly under the head (or anywhere except in front of the Abomination).
- The right hook is fast and has a large hitbox, but running clockwise relative to the Abomination can let you avoid it. Dodge-rolling will often be necessary, though.
Also, chop down any stumps you see if you want less confusion while frequenting a Swamp. Then, every stump in an area you know you cleared must be an Abomination.- The head stomp can be avoided by being a bit further from the head than the legs are.
Blob: Maces are effective against Blobs, but Blobs are slow and weak enough that shooting them down is still an option. Don't shoot them mid-jump unless you're looking for a challenge, and steer clear of the Poison AoE.
- Oozer: Bigger Blobs that spawn Blobs on death. The same advice applies.
Surtling: These things regularly spawn near geysers, but they take damage from the water (but not the rain), and they're pretty weak. They are usually easy to shoot, especially while avoiding their fireballs. If you want a steady supply of cores and coal, consider making grinders out of the geysers and regularly revisiting them.
Later on, you will start getting raided by Surtlings, and in open fields, they run around much more, but that doesn't change the fact that one arrow will usually suffice to kill them.
I also recommend making a Longship. It is faster and tankier than the Karve, but bigger and less maneuverable. Also consider replacing your Bronze Pendant with the Nimble Anklet.
Other uses for Iron include the Pickaxe, Mace, Sword, Sledge, Buckler, and Armor, as well as many build pieces, including Forge upgrades. The Pickaxe will be essential for progression, but like any other tool, you don't have to max it out. Iron will continue to have many uses later on, so it will be a good idea to have plenty in stock before moving out of the Swamp. One more thing I like to do before properly leaving the swamp is to make Frost Resistance Mead and take a quick trip to a nearby Mountain for 4 Obsidian, just enough for a Tool shelf to max out the Workbench.
Wraith: Found either at night or near some structures, and the Chains they drop can be found as loot, so overall you usually have little reason to encounter Wraiths, or be in a swamp during the night. They're not even the biggest threat at night (see starred Draugr and Draugr elite). Wraiths tend to be easy to spot, and they usually just fly straight at you, so they are trivial to shoot down. With the Huntsman Bow (and enough damage) you can even "juggle" them such that you never get hit from a Wraith even up close due to constantly knocking them back and backpedaling.
- Kvastur: If you found the Bog Witch, you'll likely find one of these fellas with her cleaning the area (in more ways than one). You could make a Leech trap out of one of them, but other than the trophy, you really have no reason to fight them.
Bonemass: For a quick fight use the Iron Mace:
- Bonemass does his swipe attack approximately every 7 seconds; between each, you can definitely manage a power combo. Two is possible but hard to do reliably.
Avoiding the swipe by walking away is an option. To ensure you survive getting hit at least once, consider running full Iron armor + level 4 Cape, a Poison Resistance Mead, and eat Serpent Stew, Turnip Stew, and Muckshake. Also, bring Minor Stamina and Tasty Meads, and use Eikthyr's Forsaken power. - When Bonemass summons Skeletons/Blobs, it's a great reason to keep hitting him, but do kill the summons afterwards.
- The Poison AoE is biased to the front of Bonemass, so you could run behind him whenever he does it. Before the fight, consider flattening a large area near the skull with the Hoe to give yourself more space to do this.
- Bonemass does his swipe attack approximately every 7 seconds; between each, you can definitely manage a power combo. Two is possible but hard to do reliably.

OCEAN
-
Serpent: As you start sailing, you will encounter these in the Ocean during rain/night. The Longship will let you easily outspeed them, but if you are interested in fighting them for their meat, you can shoot them (just don't shoot your boat). For the scales and trophy, you can either lure them to shore (and even beach them with an Abyssal Harpoon) or jump on their head just as you shoot the killing arrow.
MOUNTAIN
For your first few times in the Mountain, bring Frost Resistance Meads.
Armed with Silver, consider heading into the Frost Caves to find Fenris Hair, and eventually make Fenris armor. Uniquely, this armor makes you faster, and since it is only slightly less protective than Iron armor, if you are skilled enough, you should consider using it. Even if you don't think you can handle the entire set, try gradually replacing any metal armor set's pieces with Fenris, bottom up. Even with just the Fenris Leggings you go from -10% speed to only -2%. Remember: there is no shame in admitting you can't do something, nor when trying something new. It is only shameful to think you can do something you can't.
-
Wolf: Individually, Wolves are weak enough that you can parry them with Swamp-tier stuff, and they tend to run in a straight line towards you, so on paper they are easy to shoot. Here's why it's not that simple:
- With the steep terrain of the Mountains, Wolves' pathfinding is usually more erratic, making them harder to shoot. They are also effectively faster when running downhill at you. At least they are also slower running uphill.
- Parrying with that setup is only reliably possible against 0-star Wolves; thankfully, you will not encounter starred Wolves during the day. Even so, if you are staggered by a Wolf, they usually attack fast enough that they are almost guaranteed to hit you again unless you dodge-roll. They tend to attack you 3 times in a row (if not more), which is enough to kill you. In short, running out of stamina in the Mountains or being too careless is a death sentence.
- More often than not, you'll encounter more than 1 Wolf at a time. An important example of this is arguably the most annoying Raid in the whole game: "You are being hunted...". This raid uniquely does not require you to be near your base, but also thankfully expires without needing a player in its radius. Especially with the setting Very Frequent Raids, this makes Mountains very dangerous:
- If you're near a Frost/Howling Cave, run inside and wait for the raid to end. Just be careful of any ambushes when stepping out again.
- If you're near a sheer cliff, find (or make) a ledge to stand on and wait it out. Wolves will either not be able to path to you or will slip down the mountain.
- If you're near a Stone Golem, let the Wolves aggro onto it and then run away.
- Always bring 10 Wood for a Workbench and either materials for a Portal for a quick escape or a Hoe and some stone to quickly raise a spire of earth to stand on safely when all else fails. Bring a Pickaxe to restock on Stones for extended expeditions from the ample boulders and rocks in the Mountains. While mining Silver, leave a similar spire for an easy, safe spot during mining.
- If you're near a Frost/Howling Cave, run inside and wait for the raid to end. Just be careful of any ambushes when stepping out again.
- With the steep terrain of the Mountains, Wolves' pathfinding is usually more erratic, making them harder to shoot. They are also effectively faster when running downhill at you. At least they are also slower running uphill.
-
Stone Golem: Similar to Abominations, Stone Golems are tanky enough that I can't recommend regularly using a bow against them. Instead, the Iron Mace is the most effective weapon against them until endgame. I find it best to dodge-roll their attacks simply because of how large their AoE is and because Stone Golems readjust their attacks as you try running around them.
-
Drake: Target practice, and also dodging practice (don't underestimate the iceballs). Make a habit of hunting these for their Freeze Glands (and mining any Obsidian deposit you see) since that makes for Frost arrows, the most overpowered arrow in the whole game. You can never have enough of them, and they remain viable into the endgame. Though, once something is slowed, another arrow could be used until it's time to slow it again, so don't overuse these ;)
Armed with Silver, consider heading into the Frost Caves to find Fenris Hair, and eventually make Fenris armor. Uniquely, this armor makes you faster, and since it is only slightly less protective than Iron armor, if you are skilled enough, you should consider using it. Even if you don't think you can handle the entire set, try gradually replacing any metal armor set's pieces with Fenris, bottom up. Even with just the Fenris Leggings you go from -10% speed to only -2%. Remember: there is no shame in admitting you can't do something, nor when trying something new. It is only shameful to think you can do something you can't.
- Bat: Likely the first enemy you'll encounter, delving into the caves. Bring a Sledge for these, as their erratic flight makes them hard to shoot and annoying to swat at with any other melee weapon.
Also, if you have any tamed animals, now is the time to ensure they (or at least some of them) are in an airtight space since the Bat raid will kill your animals.
- Ulv: Hit hard, die harder. Not much else to say, just keep your distance and shoot them as they run at you.
-
Cultist: Avoid the fire stream and claws, and keep shooting from a distance. Also don't wear any Root armor piece against these guys, it makes you Weak to Fire.
- Fenring: Not found in caves, but they are found out at night in the Mountains. You'd only want to seek these out for their Trophies as they're used in Fishing and to make the Wolf Sight trinket.
To that end, avoid their leap and melee attacks and keep firing. Conveniently, they howl when they spot you, giving you plenty of time to shoot them, often taking out more than half of their health.
-
Moder: Though she likes flying around a lot, that is not a cue for you to shoot at her, not only because it's hard enough to hit her, but also because of her ice barrage attack. Instead, dig a hole near her spawning platform and wait there until she perches. Once she does, quick-sword her. However, Moder notoriously perches on awkward ledges or boulders, so feel free to shoot her instead. Fire arrows are a decent budget option, but Obsidian arrows are better. If she does perch on somewhat flat ground, remember to leave yourself enough stamina to dodge-roll her attacks.
During the fight, you're very likely to be interrupted by nearby enemies noticing you. Try to clear the area as much as possible, but stay alert during the fight. Crucially, start the fight as early in the day as possible. Don't fight Moder at night.
To prepare for the fight, Silver armor will make you most survivable, and yet you'll want both Serpent Stew and Cooked Serpent Meat to survive at least one hit, leaving the last food slot available for Eyescream. Though you have Bonemass's power now, it will not negate Moder's breath and ice barrage attacks, so you'll still need to avoid those, making Eikthyr's power a decent option for this fight instead.
PLAINS
Fuling: Actually not the biggest threat in the Plains. They do move fast and hit pretty hard, but they like to stutter-step around you, and even while up close, walking backwards usually lets you avoid their attacks. Just keep shooting.
You will find these in much larger groups in Fuling villages, and in these cases, I recommend you lure them out one at a time. Since a bow is a single-target weapon, you are not the type to thrive in chaos.Lox: Obnoxiously tanky and powerful enough that even with the best Mountains-tier stuff and Blocking skill 100, you can't reliably parry these guys. I'm still split on whether to recommend quick-swording or bows against them, but either way, don't waste your better arrows on them.
Deathsquito: If you think you need to improve your spacial awareness (r. paranoia), try streaking through the Plains. Sooner or later, you'll die to a Deathsquito.
On a more serious note, you can't outrun Deathsquitos, but you can dodge-roll their sting if you see it coming. Otherwise, wait for them to fly straight at you to shoot them. They're so weak that you really shouldn't use anything other than Wooden arrows against them. Consider actively hunting them for their needles, as Needle arrows are probably the second easiest arrow to make and are a significant upgrade.
I recommend you bring a Root Harnesk to resist their sting, but that would expose you to more damage from torch-wielding Fulings, so take care.
Fuling berserker: Heading into the Fuling villages (or Stonehenges) you may find one of these guys. If you're still relying on parrying and are unlucky enough to encounter a 2-star berserker, know that they are impossible to parry even with endgame equipment, so take care.
Keep your distance and keep firing. In a pinch, climb onto one of the Fuling structures and shoot from there. Don't rely on the naturally spawning boulders, as they usually (but not always) allow for mobs to climb on.Fuling shaman: Another village-exclusive threat, this is the enemy you should prioritize when fighting a group of Fulings. If you happen to miss (or otherwise aggro one of these guys), their fireballs are another reason not to wear a Root Harnesk (unless you have barley wine), though you can dodge-roll them.
Growth: Growths are aggressive to everything else in the Plains, so you can use these guys to draw aggro for you from other Plains enemies. Other than that, they're basically blobs that shoot back and slow you if they hit, so don't underestimate them. Their projectiles poison and slow you, and while these are fairly easy to avoid, consider bringing Poison resistance meads. If you do get hit, remember you can still dodge-roll while Tarred.
- Wolf (revisited): Though they don't naturally spawn in the Plains, the "You are being hunted..." raid occurs in the Plains too.
Vile: Unlike their living counterparts from the Black Forest, Viles are surprisingly not as much of a problem. By now you should be able to Rapid fire, so Fire/Silver arrows will serve you well, but you really should rather use a Silver Sword. You don't even need to trap a Vile before killing it if you do, especially if you just use a Torch to keep it scared instead.
Overall, Viles are another reason to avoid night-time Plains altogether, unless you're interested in the Vilebone armor.

- Brenna: Basically a free kill. She's hardly more than a fiery melee Skeleton, and the rest of the Skeletons in her Smouldering tomb are hardly worth mentioning at this point in your progression.
Geirrhafa: This one's actually challenging, or annoyingly tanky. Just keep your distance and keep shooting. He'll eventually die. However, if you're lucky enough with the Howling Cave, he will be trapped in a hole, and shooting him becomes much easier.
Zil & Thungr: It's the rest of the Sealed Tower, full of 1-star Fulings and Fuling shamans, that you should be worried about. Consider bringing an Iron Sledge and Ooze bombs to kill some Fulings as you scale the Tower from the outside (just don't break the platforms you stand on). Other than that, the same advice applies.
Once you reach the bottom floor, Zil and Thungr, as a combo, won't attack you so long as you don't step out of the doorway, giving you free reign to shoot at them while they just pace about. Then, once Zil is alone, he's just a tanky Fuling shaman with a melee attack.
I will mention that the Sealed Tower has a unique reward in the form of Chicken eggs, so even if you forego the other two bosses, at least consider beating this one.Yagluth: The one boss that is so annoying to fight (especially on Very Hard combat) that I have no qualms recommending cheese strategies against him. My favorite is glitching into the altar and quick-swording him with the Silver Sword (with stamina and tasty meads), but there are other kinds of cheese for you to consider. I will mention that if you go for the under-the-altar method, abort as soon as you see Yagluth making any of his attacks. You cannot get hit at all, especially not from his meteor shower. Drink a Fire wine, and bring health meads and plenty of Frost arrows, just in case.

MISTLANDS
In the "plot twist" biome, as I like to call it, everything changes due to the introduction of magic. We'll be making use of it ourselves soon enough.
If you're interested in an early start in elemental magic, also make the Staff of Embers, Eitr-weave set and Pulsating Earrings after the Staff of Protection. Keep in mind that low elemental magic skill in the Mistlands is held back by the eitr costs and the slow eitr regeneration, enough so that the Spinesnap and Mistwalker outperform it in nearly all scenarios, so I would recommend making an elemental magic grinder if you're going with this angle.
Hare: Use Ooze bombs to hunt Hares until you get magic. Hares see you through the mist and are fast enough that shooting them with a bow is unreliable. Even while not aggro'd, they roam around fast enough that I wouldn't recommend shooting.
Seeker: Arguably the scariest part of the Mistlands, Seekers move fast, hit hard, and worse yet they can fly. If you haven't been using Frost arrows until now, now is an excellent reason to start using them. However, it is possible to manage without Frost arrows if you have room to kite the Seekers.
The Frostner can also work well against Seekers with its knockback and Frost damage.
Notably, all of a Seeker's attacks (except the pounce attack) are Pierce damage, so consider wearing a Root Harnesk.
If encountered in Infested Mines, bring a Sledge to kill them whenever you find a wall between you and a Seeker (or other enemies in there - I'm looking at you, Ticks).Gjall: Don't dodge-roll their fireballs, they always fire 2 at a time, so dodge-rolling the first will leave you open to the other. Take cover instead, and bring Fire wine, just in case.
Thankfully, Gjall are very weak to Pierce on their underside, so if you spot a Gjall before it spots you, you're likely to kill it quicker than most. However, if you're at too high of an angle, you don't have to shoot the underside.
If a Gjall spawns Ticks, retreat immediately. You don't want to deal with fireballs and bloodsucking Ticks simultaneously.Tick: These things drain your health faster than you realize, especially starred Ticks. You can dodge-roll to detach any Ticks attached to you, but they're likely to immediately leap at you again, so dodge-roll perpendicular to the direction they're connected to and be ready to avoid their second leap.
If you can, shoot them as they leap at you. They are easy targets and even Wooden arrows will stagger them since they are weak to Pierce.
Bring a Root Harnesk to resist their damage, but remember also to bring Fire wine so Gjall (who can summon Ticks) don't kill you at the same time.
Ticks are not only dropped by Gjall but are also found in Giant remains and in Infested Mines. Be prepared for Ticks to swarm you in these places.Dvergr: These possessive fellas won't like it when you take their Extractors or mine Giant skulls under their protection. However, it is possible to cheese this by breaking their ward with a cart, after which you can do whatever you want with their stuff.
If you end up fighting them, consider first luring a Gjall over and making it fight them instead (or at least weaken them). Otherwise:- The rogues are fairly easy to dodge, as you can tell when they will shoot or come close for melee.
- The ice mages are the easiest to dodge, but don't let them hit you.
- The fire mages have devastating attacks with huge AoEs, and must be prioritized above all. Stay as far away as possible while shooting them down.
- The support mages can heal other Dvergr, but I don't believe they prioritize the fire mages over the others. You can shoot down the "Mistile" projectiles they spawn.
- The rogues are fairly easy to dodge, as you can tell when they will shoot or come close for melee.
Seeker soldier: If at all possible, find a spot that it can't reach, and shoot the abdomen from there. Notably, if you parry the stomp attack, it won't turn around, letting you easily quick-sword the abdomen.
If you're interested in an early start in elemental magic, also make the Staff of Embers, Eitr-weave set and Pulsating Earrings after the Staff of Protection. Keep in mind that low elemental magic skill in the Mistlands is held back by the eitr costs and the slow eitr regeneration, enough so that the Spinesnap and Mistwalker outperform it in nearly all scenarios, so I would recommend making an elemental magic grinder if you're going with this angle.
The Queen: I'll start by mentioning a cheese strat, using the Demolisher and the indestructible "starter room" in The Queen's dungeon. You could also use the Iron sledge instead of stopping and repairing the Demolisher. Given how long and tedious this method is, I'll give you 2 strategies for fighting her "properly".
For both methods, bring a stack of (materials for) Wisp torches to clear the mist inside the dungeon, replacing them as they break. This is because of the Queen's spew attack, which (especially on Very Hard) is practically an instant death. You need to be able to see the Queen and her summons and be able to tell how The Queen is about to attack. The Wisplight is not enough for this. You'll also want a stack or two of Bile bombs to deal with the Seeker brood summoned by The Queen's spew attack. Bring the Staff of Protection, Feather cape, Eitr and Stamina meads, and Seeker aspic and Fish'n'bread for 2 of the 3 food slots.- use a Staff of Embers-based strategy with the Eitr-weave set and Yggdrasil porridge as a safer option. Keep your distance while fireballing The Queen and the Seekers she summons. The Spinesnap is also good for shooting the Seekers, making better use of your stamina.
- Go with a "hit-and-run" strategy using a complete Fenris set, Mistwalker, Spinesnap, Tasty Meads, and Mushroom Omelette for the riskier but faster option. You'll be quick-swording The Queen and her Seekers, and the Spinesnap will be another way to kill Seekers.
Pay close attention to The Queen's attacks and always leave yourself enough stamina to dodge-roll them. Crucially, you have to avoid her ground stab attack since it's 2 instances of damage, so if the first part hits and breaks your bubble, the second will kill you. Also worth mentioning is that her bite attack has a very long wind-up time, so it's trickier to dodge-roll.
- use a Staff of Embers-based strategy with the Eitr-weave set and Yggdrasil porridge as a safer option. Keep your distance while fireballing The Queen and the Seekers she summons. The Spinesnap is also good for shooting the Seekers, making better use of your stamina.
ASHLANDS PART 1 (The hard part)
The ravens tell you to prepare for war when heading into the Ashlands. Unfortunately, you are no one-man army, and that's why I suggested preparing an Eitr-weave set and Dead Raiser, as these will be your method of breaching into the Ashlands, along with the Staff of Frost to support your Skeletts. Once you land on the Ashlands, you'll want to always have 3 (later 4) Skeletts by your side. Just be mindful not to let them touch the boiling water (it can kill them), and remember that your Staff of Protection can also put bubbles on your Skeletts, extending their survivability on top of your own. Your Spinesnap will also be useful though.
Most of the danger of the Ashlands comes from the sheer number of enemies you'll encounter. We will first cover each enemy individually before going on to general tips on swarms of enemies:
Most of the danger of the Ashlands comes from the sheer number of enemies you'll encounter. We will first cover each enemy individually before going on to general tips on swarms of enemies:
-
Bonemaw: Easy to shoot, and their fireballs are relatively inaccurate. Don't let them break your Drakkar or that initial portal you placed (you built a portal, right?), especially on your first voyage.
You should be able to hunt them from shore easily. Usually, they will swim close enough that once you kill them, you can jump to their drops and swim back unharmed by the water. Or, once damaged, harpoon them and drag them onto land for an even safer retrieval. -
Volture: Individually also easy to shoot, or even quick-sword if you don't feel like it. However, Vultures are much more dangerous in groups or with other enemies. You cannot outrun Voltures, and their harassment can get deadly. Skillful quick-swording (and your Skeletts) can save your life in such situations. They are susceptible to the Ashlands water, so, in a pinch, luring them into the water may give the needed passive DPS to save you.
- Charred Twitcher: Curiously, shooting a Twitcher causes it to flee and attack from range. You can intentionally use this to scare Twitchers off while dealing with other enemies.
To kill a Twitcher, quick-swording and/or Frost damage will be best since their "cowardice" and erratic movement make their ranged damage unreliable at best. I'll also mention that their melee attack has a deceptively large hitbox, so you can't consistently avoid it just by walking away. -
Charred Warrior: Obnoxiously tanky, even facing one of these is a chore, especially if it happens to be starred. A combination of Skeletts and quick-swording will work best.
Never dodge-roll into a Warrior. Even if you time it, Warriors frequently add feints to their attacks, which messes up any dodge-roll timing you may try to do beyond guesswork. Just keep your distance.
Once you find him, Lord Reto is basically a roided-up Warrior, but your strategy for beating him will be the same. -
Charred Marksman: Either run up and quick-sword them, or use Frost arrows (or at least Carapace arrows). It should be easy to sidestep their individual arrows, but they become annoying or even deadly as part of a group.
Notably, if a Marksman engages you at range, your Skeletts won't aggro on to it unless you either get closer or push them yourself, so keep that in mind and don't let your Skeletts get griefed by these guys. - Lava Blob: Target practice, though it will always be simplest to bait out their explosion and dodge-roll it. Notably, the explosion also hurts other Ashlands mobs, though not a lot.
The explosions also destroy terrain, including earthen walls that you raise yourself. You'll need to be more creative when it comes to base design in the Ashlands. -
Morgen: Use your Skeletts as cannon fodder and quick-sword the Morgen. Expect a long fight.
When a Morgen makes its swipe attack, it will swipe either once or twice, so aggressively dodge-rolling against that is just a waste of stamina. There's also its roll attack, which destroys rocks and trees, thus aggroing even more things to you. However, I have to mention that even though the Morgen isn't hostile to other Ashlands enemies (nor are they hostile to it), its attacks will damage other Ashlands enemies, so with correct kiting, you could employ a Morgen to do your work for you, then you can face the Morgen alone. -
Fallen Valkyrie: Somehow the least of your worries. Fallen Valkyries are easy to spot from a distance, and often, you can shoot them fast enough that they will barely get to do even 2 attacks. However, if you try to shoot from too far away, your arrow will fail to register, so shoot only if you see the body, not just the dark haze.
Like the Morgen, Fallen Valkyrie attacks also damage other Ashlands mobs, though this is riskier and less effective to employ. -
Asksvin: If you manage to shoot an Asksvin before it notices you (at least the 0-star variants), you can often stunlock and kill it with repeated arrows.
The problem is that you can't outrun Asksvin (except through areas with lots of trees or structures), so especially if you're fighting them as part of a swarm, you're in trouble. Their attacks also have no audio cues, making them extra hard to dodge-roll. In a pinch, you can jump and stand on top of an Asksvin to render it temporarily harmless to yourself. Also, these are just like Morgen in that they'll damage other Ashlands mobs, so if you're facing 2 or more, jumping on the back of one will make the other kill it. - "The Swarm": Your general gameplan against the large sizes of enemy groups in the Ashlands is to support your Skeletts with Frost damage, while prioritizing your own life over theirs and staying aware of any sources of ranged damage so you don't die to them while focused on what's in front of you. Your Skeletts should generally even the scales in terms of numbers, but when they're falling apart faster than you can protect them, you should retreat if possible. Also, if reasonable, use Ashlands enemy attacks against each other when a Morgen and/or Asksvin are involved.
-
Charred Warlock: These enemies are unique to Charred Fortresses, which we will want to conquer for the gems they have. If you can spot them, Warlocks should be prioritized over other enemies, if possible. You don't want to deal with even more Twitchers (albeit at lower health) and fiery AoEs.
You could use a Battering Ram to breach fortresses. Arguably, the safer approach is to shoot down the Skuggs, then raise the ground until you can also shoot down the spawners inside (while being careful of any Marksmen), and finally jumping into the fortress, summoning Skeletts inside and fighting it out. You don't even need a Battering Ram for entering the inner room, just dig underneath the wall with a pickaxe. Specifically, go to one of the corners and dig a hole around it as deep as you can. If you do it right, once you wedge yourself in the corner, your pickaxe will hit the ground inside instead of the stone, letting you jump up to the treasures.
ASHLANDS PART 2 (The fun part)
Once you have some gems from the Fortresses, you can make Storm/Root Fang bows, the Staff of the Wild, and the Trollstav. You should also seriously consider using the Jörmundling trinket. Consider also making a Nidhögg the Thundering, but your Mistwalker (or Frostner) will be plenty.
The new magic weapons are such a big deal that I'll describe in more detail how exactly they're beneficial:
The new magic weapons are such a big deal that I'll describe in more detail how exactly they're beneficial:
-
Once you have it, the Staff of the Wild is essentially a direct upgrade to the Dead Raiser, as the roots accomplish the same things as Skeletts but more proactively. If you need to use it defensively, kite enemies around a bunch of your roots and let them do their thing.
You can only have 10 Roots out at any given time, but that's such a high number that it'll barely, if ever, concern you. -
The Trollstav, AKA the panic button, AKA the "screw it" button, is probably my favorite weapon in the game. The Troll you summon is aggressive to everything (including you!), and everything is aggressive to it. That means it doesn't draw aggro from you as reliably as Skeletts, but it is much tankier in return. Also, you can summon 2 at a time, regardless of your Trollstav's tier.
Be careful of the meteor (and the Summoned Troll's ground slam attack). This attack has 2 separate instances of damage, so if it hits you (even with a bubble on), it's an instant death.
As my nicknames for this weapon imply, once you have it, any time you're facing a large group of enemies that you don't feel like dealing with, just drop a Troll on them and run in the opposite direction. Even if you're already fighting, and mid-way into the fight you realize you may be in too deep, all you need to do is drop a Troll or two (again, careful of the meteor!), kite enemies around the Troll(s) until you lose aggro, then run off.
Also, once you have the Trollstav, conquering future Charred Fortresses is nearly trivial: while outside the fortress, summon Skeletts for backup and proceed to drop 2 meteors on each corner from outside the fortress. Continue summoning Trolls into the fortress until nothing else is alive inside, then you can pillar up and jump inside as normal, clearing away your Trolls and looting the place. -
Should you accidentally hurt one (usually via chain lightning with an Iolite weapon), they are no different from Mistlands rogues, so the same advice applies. -
Fader: By now, you'll have everything you need to take on The Emerald Flame.
First, choose an arena as far from lava as possible and raise earthen walls around it to eliminate outside distractions. If necessary, use the arena's walls as scaffolding while raising earth in lava. Just in case, you could build a portal room in one of the corners, but be sure to add a hole before the portal so nothing can grief you as you warp in.
Bring to the fight The Queen's power, Lingering Eitr and Stamina meads, the Embla set and Feather cape (or Asksvin Cloak), Staff of the Wild, Trollstav, and Staff of Protection. For food, eat Marinated greens, Sparkling shroomshake, and Roasted crust pie (or Sizzling berry broth).
Summon 2 Trolls Before the fight, and then call in Fader. The plan is to maintain 2 Trolls, while watching out for any attacks/summons on to you, and lobbing Staff of the Wild at Fader when you have Eitr to spare:
- Even when preoccupied with Trolls, Fader will still target you with fissures and meteors, so you must keep moving. To prevent the fissures from boxing you in, stick to the walls as much as possible and walk away from the fissures along the wall.
- Every time you summon a troll, make sure your distance from it is significantly greater than its distance to Fader (or one of its summons) so it doesn't end up latching on to you. If it does, you could get it to redirect onto Fader by kiting it towards him but don't step on Fader's lingering fires in the process.
- Don't summon Trolls directly into Fader's lingering fires, as those kill them very fast. Once Fader has ignited an area and killed your Trolls, wait for him to move out and summon Trolls in places they won't immediately burn. If done right, Fader immediately shifts his focus to your new Troll.
- Try to keep track of your Trolls' health. Don't overcommit on the Staff of the Wild if your Trolls are about to die.
- Even when preoccupied with Trolls, Fader will still target you with fissures and meteors, so you must keep moving. To prevent the fissures from boxing you in, stick to the walls as much as possible and walk away from the fissures along the wall.
CONCLUSION
- Stamina management is king.
- Prioritize dodging or otherwise avoiding damage over blocking or parrying.
- Upgrade and repair your equipment.
- Bows, especially with high Bows skill, are the best weapon for most situations.
- Up close, learn to use quick-swording for devastating DPS.
Thank you for reading the guide! If you read everything, consider yourself an honorary Bowmaster :) Even if you didn't, thank you for checking out the guide.
I'd like to thank Waffles and the rest of the Waffle Iron community for being amazing people, and for motivating me to come up with this guide, write it, and see it through.