Dead by Daylight 100% Achievement Guide
 Shepherdtf2.ttv
(597 ratings)
Jan 23, 2023 @ 2:30am20,1211,132
AchievementsCharactersClassesCo-opCraftingGame ModesGameplay BasicsLootMaps or LevelsModding or ConfigurationMultiplayerSecretsStory or LoreTradingWalkthroughsWeaponsWorkshopEnglish
Introduction
I am not a good Dead by Daylight player. I am willing to concede this. I have just over 3k hours and usually play a few rounds every other day after work and school WHENEVER I FEEL LIKE IT, OKAY. However, I make it a point to get all of the achievements with each new update, and have been consistent in doing so. Why do it? No idea. Some people just have that completionist itch. If you're here, maybe you do, too.
This guide was primarily made because it seemed another one did not exist. People frequently post on Reddit asking "How the f*** do I get this achievement" (usually referring to Evil Incarnate) and people come up with a slew of good advice, but no guide to refer to. If this guide can be *that* guide, great. If not, maybe it will inspire someone to make a better one.
This guide is being written from the perspective of a mediocre player who only does solo queue. Much of this guide will be easier if you have more experience than me or run a SWF, but I am not writing for those people. These are people who are playing for completion (sweet, worthless completion) rather than mechanical mastery. Look elsewhere to learn how to do Blight's hug tech.
A few notes: this guide will be referring to PC achievements. Console achievements may have different numbers for their achievements, but as far as I can tell those numbers are universally lower: giving advice to someone to snag 100 people out of Trapper's traps should still apply to people looking to snag 10. The exception appears to be the Playstation DBD's version of Skilled Huntress, which requires 100 downs with hatchets at long range. God help you guys.
I will try to keep this guide up to date. I have seen three (!) major changes to how killer adepts function during my time playing DBD. If they change again, I will modify it again.
I got all of my survivor adepts in solo queue, and my killer adepts prior to the rank rework were all done at Iridescent 1. Survivor adepts will be written from the perspective of solo queue, while killer adepts will be written in the current iteration of DBD, where you "just" need a 4k while using only three perks.
The characters Steve Harrington, Nancy Wheeler, and the Demogorgon have been taken off the Steam store and their achievements have been removed. While I did do all of their adepts back in the day, I will not be including them, as they no longer exist. They're back, baby! Their achievements still seem to be gone, but I'll do a write up anyway. The Cenobite is gone ... RIP.
If it seems like there are far too many sections, I agree, but unfortunately there is an 8000 character limit per section. So here we are.
This guide is being written moreso for my own amusement and edification than actually helping anyone. You have been warned.
The current guide is written for the patch 9.5.1. Feel free to point out things that need changing/updating in the comments because it saves me time trying to track down random changes I just remembered I needed to include. Believe me, that happens often.
Achievement Difficulty Table

Inevitable: The player will gain this achievement if they just keep playing the game normally. These are generally milestone achievements and are only being included in this guide for the sake of completion. No Adept Achievement will fall under this category.
Easy: Generally achievable within a single match if focused on, or is easy to achieve but lengthy/tedious. If the latter, I will include tips on how to speed up accomplishment.
Normal: Achievable within a few games if focused on, or can be farmed for with survivors.
Hard: Cannot be farmed for with survivors. Has specific fulfillment conditions that make it difficult to achieve, or may require multiple games to achieve. Frequently requires specific loadouts or offerings.
Very Hard: The bastards. Cannot be farmed for with survivors. Has *very* specific fulfillment conditions, or may take multiple games to achieve with no guarantee of progress on any one game, or both. Nearly always requires specific loadouts or offerings. No Adepts will be of this difficulty, and you should be thankful.
General Achievements
Bloody Millionaire


Accumulate 1,000,000 bloodpoints. Note that this is cumulative, so you don't even need to save BP. You'll get this pretty quickly.
Getting the Hang of it

Raise your grade for the first time on survivor or killer. Even in the dankest depths of solo queue at low MMR, you should be able to raise your grade from Ash to Bronze just by consistently unhooking and doing gens. Keep at it!
Happy Holidays

Open 100 mystery boxes or winter gifts. Mystery boxes have been removed from the bloodweb for being ♥♥♥♥, so you will need to wait until a holiday event for boxes to fill the bloodweb. Very easy to get once they are available.
I, II, III, III-50


Raise your prestige level to I, II, III, and III-50. Very easy to do nowadays, mercifully. Just pick a killer or survivor you like and dump all your bloodpoints into them until you get their achievement. Should take around 7,000,000 BP or so.
It Wakes -

Raise a character to level 10. By virtue of playing the game, either survivor or killer, you will get this achievement. Just don't forget to level up between matches! If they are giving out free bloodpoints at the time you start playing, you might even get this achievement without playing a single match of DBD!
Not Half Bad

Raise any character to level 25. You'll get this pretty quickly, especially since you will want the juicy perk slots you get at 5, 10, and 15. Just push a little further...
Skillful

Purchase a Tier 3 perk from the bloodweb. Just grab a general perk or one of the killer's specific perks while on that killer/survivor (such as Agitation on Trapper.) You want to level perks to level 3 as fast as possible anyway. I recommend picking a killer or survivor you know you will use other perks on - Meg and Hillbilly are good candidates for early leveling, before you've bought any DLC.
Zealous -

Exceed 8000 bloodpoints in any category by the end of a match. The current bloodpoint cap is actually 10,000, which means this achievement is slightly outdated. You might not get this in your first few rounds of DBD, but you really should get this one without trying. If, for whatever reason, you are reading this guide and have *not* gotten this achievement yet, please leave a comment below, you unicorn. As far as getting this one easily, double up on a generator with another survivor while using Dwight Fairfield's perk, "Prove Thyself," and you should max your objectives category within about a generator and a half.
Accumulate 1,000,000 bloodpoints. Note that this is cumulative, so you don't even need to save BP. You'll get this pretty quickly.
Getting the Hang of it
Raise your grade for the first time on survivor or killer. Even in the dankest depths of solo queue at low MMR, you should be able to raise your grade from Ash to Bronze just by consistently unhooking and doing gens. Keep at it!
Happy Holidays
Open 100 mystery boxes or winter gifts. Mystery boxes have been removed from the bloodweb for being ♥♥♥♥, so you will need to wait until a holiday event for boxes to fill the bloodweb. Very easy to get once they are available.
I, II, III, III-50
Raise your prestige level to I, II, III, and III-50. Very easy to do nowadays, mercifully. Just pick a killer or survivor you like and dump all your bloodpoints into them until you get their achievement. Should take around 7,000,000 BP or so.
It Wakes -
Raise a character to level 10. By virtue of playing the game, either survivor or killer, you will get this achievement. Just don't forget to level up between matches! If they are giving out free bloodpoints at the time you start playing, you might even get this achievement without playing a single match of DBD!
Not Half Bad
Raise any character to level 25. You'll get this pretty quickly, especially since you will want the juicy perk slots you get at 5, 10, and 15. Just push a little further...
Skillful
Purchase a Tier 3 perk from the bloodweb. Just grab a general perk or one of the killer's specific perks while on that killer/survivor (such as Agitation on Trapper.) You want to level perks to level 3 as fast as possible anyway. I recommend picking a killer or survivor you know you will use other perks on - Meg and Hillbilly are good candidates for early leveling, before you've bought any DLC.
Zealous -
Exceed 8000 bloodpoints in any category by the end of a match. The current bloodpoint cap is actually 10,000, which means this achievement is slightly outdated. You might not get this in your first few rounds of DBD, but you really should get this one without trying. If, for whatever reason, you are reading this guide and have *not* gotten this achievement yet, please leave a comment below, you unicorn. As far as getting this one easily, double up on a generator with another survivor while using Dwight Fairfield's perk, "Prove Thyself," and you should max your objectives category within about a generator and a half.
Hidden Achievements
These achievements will not show up on the achievement list, but they do exist. Being hidden, you cannot track progress on them, which is slightly irritating, but none of them are very hard.
Agonizing Escape

Leave a match in the Dying state. Hatch or exit gate works. This should happen naturally if a killer spares you, or you can force it by waiting at an exit gate and getting slapped out of the match.
Blood in your Mouth

Kill 25 survivors. Not sacrifice - kill. Bleeding them out doesn't count, either. Moris are the best go to, but Pyramid Head also offers a decent alternative in the form of his execution. Rancor and Devour Hope are decent secondaries. This one is irritating because you won't be able to see your progress, but just keep wasting survivors with moris and you'll get it eventually.
Blood on your Face

Kill all survivors in a single trial. Again, kill, not sacrifice. I recommend Pyramid Head for this one, alongside a suite of Rancor and Devour Hope, just to be sure. Alternatively, you could also just try for Evil Incarnate, which would fulfill this achievement's requirements as well. Up to you! This one is tricky since moris require every survivor to be hooked twice now, so you need to make sure you get an eight hook game. Yet another achievement ruined by people DCing or suiciding on hook. If you're concerned about moris taking too long and losing you gens, the Pig has a very quick mori as well as a potential alternative means of killing people through her RBTs. Bring Tampered Timer, but don't count on it as a guaranteed head pop...
Blood on your Hands

Kill your first survivor. Just bring a mori. Tunnel if you want.
Backdoor Escape

Escape a trial through the hatch. Bring a map or Left Behind if you're worried about finding it.
The Key to Escape

Escape a trial through a hatch with a key. Slightly trickier, since you need the killer to shut the hatch first. I advise bringing Blood Amber to track the killer, as well as Left Behind to make sure you know where the hatch is. Low Profile might also be a good call.
If the gens are done and people are leaving, hang back but out of the killer's sight, and then hunt down the hatch that way. Hopefully the killer has not gone AFK in a huff and is instead breaking ♥♥♥♥ for points.
Tanuki in the Fog

Find the hidden Tanuki. The Tanuki can only be found on either of the Yamaoka maps, so bring an offering. You can only find it on the edges of the maps, usually away from any vaults, pallets, totems, or generators - in other words, in a place you have no place being. It's a little hard to spot, so take it slow, and keep an eye out near the foot of trees. Once you spot it, crouch next to it for a second or two, and it should disappear in a puff of logic.
Note that only one player can find the Tanuki per match, so it would behoove you to try and find it quickly.
Agonizing Escape
Leave a match in the Dying state. Hatch or exit gate works. This should happen naturally if a killer spares you, or you can force it by waiting at an exit gate and getting slapped out of the match.
Blood in your Mouth
Kill 25 survivors. Not sacrifice - kill. Bleeding them out doesn't count, either. Moris are the best go to, but Pyramid Head also offers a decent alternative in the form of his execution. Rancor and Devour Hope are decent secondaries. This one is irritating because you won't be able to see your progress, but just keep wasting survivors with moris and you'll get it eventually.
Blood on your Face
Kill all survivors in a single trial. Again, kill, not sacrifice. I recommend Pyramid Head for this one, alongside a suite of Rancor and Devour Hope, just to be sure. Alternatively, you could also just try for Evil Incarnate, which would fulfill this achievement's requirements as well. Up to you! This one is tricky since moris require every survivor to be hooked twice now, so you need to make sure you get an eight hook game. Yet another achievement ruined by people DCing or suiciding on hook. If you're concerned about moris taking too long and losing you gens, the Pig has a very quick mori as well as a potential alternative means of killing people through her RBTs. Bring Tampered Timer, but don't count on it as a guaranteed head pop...
Blood on your Hands
Kill your first survivor. Just bring a mori. Tunnel if you want.
Backdoor Escape
Escape a trial through the hatch. Bring a map or Left Behind if you're worried about finding it.
The Key to Escape
Escape a trial through a hatch with a key. Slightly trickier, since you need the killer to shut the hatch first. I advise bringing Blood Amber to track the killer, as well as Left Behind to make sure you know where the hatch is. Low Profile might also be a good call.
If the gens are done and people are leaving, hang back but out of the killer's sight, and then hunt down the hatch that way. Hopefully the killer has not gone AFK in a huff and is instead breaking ♥♥♥♥ for points.
Tanuki in the Fog
Find the hidden Tanuki. The Tanuki can only be found on either of the Yamaoka maps, so bring an offering. You can only find it on the edges of the maps, usually away from any vaults, pallets, totems, or generators - in other words, in a place you have no place being. It's a little hard to spot, so take it slow, and keep an eye out near the foot of trees. Once you spot it, crouch next to it for a second or two, and it should disappear in a puff of logic.
Note that only one player can find the Tanuki per match, so it would behoove you to try and find it quickly.
Survivor Achievements, Part 1
Apt Survivor

Start a trial with an offering and an item with two addons. Odds are, you have this already.
Bless You

Bless twenty hex totems. Note it says *hex* totems, not dull totems. This means that, not only do you need to bring a Boon Totem perk for every match until you get this achievement, you have to hope that the killer brings hexes, that you find them first, and that you have the time to veeeeeeeery sloooooowly bless them. God help you if they brought Hex: Thrill of the Hunt - if that is the case, blessing a hex totem will take about forty-eight seconds if all totems are intact.
This achievement is a pain because, if you are shooting for it, you *need* to bring a Boon each game, and you have no control over what the killer brings. Blessing hexes is also blatantly suboptimal gameplay due to the sizable time investment, and it gets even worse if the killer is running a Face the Darkness/Thrill of the Hunt build. If you are lucky, you might get a Plaything/Pentimento gamer and get a few points of progress. There is no trick to this achievement; it's a slog, and you may have to throw games. Sorry. At least it's not mechanically difficult.
Bodyguard

Take thirty protection hits while a killer is carrying a survivor. This achievement is not necessarily fast to accomplish, but it is fun as hell. You can get this slowly by just running in front of a killer and taking one (or two if you don't care) hits when they're carrying someone, but come on. That's *Yui* on that icon. Take Breakout, Mettle of Man, Dead Hard, and Saboteur. Get in the killer's face when they pick someone up. Take hits. Break hooks. Become an entertaining liability to your team. If you're going to get this achievement, do it in style.
Close Shave

Dodge 100 basic attacks or projectiles. This will happen over time. It will happen very quickly against a Trickster.
Cutting Out

Wiggle out of the killer's grip ten times. This will probably happen very slowly over the course of your DBD career, either due to killers granting you mercy or Midwich not spawning any hooks nearby, AGAIN. Note that you have to wiggle, not pallet save yourself, so Power Struggle does not count. If you want to rack up points for this one deliberately, something like Flip Flop, Tenacity, Unbreakable, and Boil Over is likely your best bet. Bring a branch offering to increase the distance between hooks and try to go down somewhere relatively remote. Try not to look too obvious about what you're doing (such as deliberately stopping on a second level somewhere - once the killer sees the Boil Over icon you have a problem) because otherwise the killer will slug you. Possibly to death.
Deep Cleansing

Cleanse 100 hex totems. This will take a while. Prioritize cleansing hexes whenever you see them. Don't worry about Haunted Ground - if it glows it goes. I personally adore Counterforce due to the speed it affords you when cleansing hexes, and it becomes positively beastly against a Plaything/Pentimento killer. Detective's Hunch is another solid perk for locating totems that does not gimp your build to run. Overall, this is going to be a slow burner that you should not worry too much about. You should be cleansing hex totems anyway. If you want to prioritize it, start bringing Counterforce and/or Detective's Hunch. You could also run Inner Healing and bring a map instead of a medkit - that way you can justify going out of your way to hunt bones every now and again!
Dismantle

Sabotage fifty hooks. Between survivor daily challenges and the many, MANY archives that require you to break hooks, this one will come without trying if you're playing normally. If you want to maximize the number of hooks broken in one match, a Commodious Toolbox with maxed charges and Built to Last might let you break as many as 20 hooks - more if you bring Saboteur and use it on every cooldown!
Engineer
Engineer Gaming. Repair fifty generators that have been damaged by the killer. The gen kick meta might be over but Scourge Hook: Pain Resonance and Surge are still quite popular. You will get this one without trying - don't try to force it. Killers will be bashing your gens whether you like it or not.
Escape Artist

Successfully unhook yourself and escape through an exit gate. Bring Deliverance, unhook someone else, and hope for the best. This one is going to be a matter of luck. If you are the last survivor in the trial when you are hooked, you will be automatically sacrificed before you can unhook yourself. Escaping through hatch also does not count for this challenge - it must be an exit gate. If you're unwilling to bring Deliverance to every match and just letting probability run its course, bring Sprint Burst and try getting the killer's attention after the gens are done and going down deliberately next to an exit gate that is open or 99'd. Hopefully they hook you somewhere relatively close by. Unhook yourself and Sprint Burst to the exit gate, where your teammates hopefully have opened it already. Then prance on through. This is not fool proof, but this is the best I've got.
Optional hard mode: accomplish the above, but with Slippery Meat, luck offering(s), and Up the Ante (not recommended.)
Escaping the Nightmare

Open 25 exit gates. Good idea!
Every Last Drop

Deplete thirty items. Toolboxes are probably the most reliably depleted, since great skill checks can sometimes leave medkits with one or two charges. I still wouldn't worry about this one.
Start a trial with an offering and an item with two addons. Odds are, you have this already.
Bless You
Bless twenty hex totems. Note it says *hex* totems, not dull totems. This means that, not only do you need to bring a Boon Totem perk for every match until you get this achievement, you have to hope that the killer brings hexes, that you find them first, and that you have the time to veeeeeeeery sloooooowly bless them. God help you if they brought Hex: Thrill of the Hunt - if that is the case, blessing a hex totem will take about forty-eight seconds if all totems are intact.
This achievement is a pain because, if you are shooting for it, you *need* to bring a Boon each game, and you have no control over what the killer brings. Blessing hexes is also blatantly suboptimal gameplay due to the sizable time investment, and it gets even worse if the killer is running a Face the Darkness/Thrill of the Hunt build. If you are lucky, you might get a Plaything/Pentimento gamer and get a few points of progress. There is no trick to this achievement; it's a slog, and you may have to throw games. Sorry. At least it's not mechanically difficult.
Bodyguard
Take thirty protection hits while a killer is carrying a survivor. This achievement is not necessarily fast to accomplish, but it is fun as hell. You can get this slowly by just running in front of a killer and taking one (or two if you don't care) hits when they're carrying someone, but come on. That's *Yui* on that icon. Take Breakout, Mettle of Man, Dead Hard, and Saboteur. Get in the killer's face when they pick someone up. Take hits. Break hooks. Become an entertaining liability to your team. If you're going to get this achievement, do it in style.
Close Shave
Dodge 100 basic attacks or projectiles. This will happen over time. It will happen very quickly against a Trickster.
Cutting Out
Wiggle out of the killer's grip ten times. This will probably happen very slowly over the course of your DBD career, either due to killers granting you mercy or Midwich not spawning any hooks nearby, AGAIN. Note that you have to wiggle, not pallet save yourself, so Power Struggle does not count. If you want to rack up points for this one deliberately, something like Flip Flop, Tenacity, Unbreakable, and Boil Over is likely your best bet. Bring a branch offering to increase the distance between hooks and try to go down somewhere relatively remote. Try not to look too obvious about what you're doing (such as deliberately stopping on a second level somewhere - once the killer sees the Boil Over icon you have a problem) because otherwise the killer will slug you. Possibly to death.
Deep Cleansing
Cleanse 100 hex totems. This will take a while. Prioritize cleansing hexes whenever you see them. Don't worry about Haunted Ground - if it glows it goes. I personally adore Counterforce due to the speed it affords you when cleansing hexes, and it becomes positively beastly against a Plaything/Pentimento killer. Detective's Hunch is another solid perk for locating totems that does not gimp your build to run. Overall, this is going to be a slow burner that you should not worry too much about. You should be cleansing hex totems anyway. If you want to prioritize it, start bringing Counterforce and/or Detective's Hunch. You could also run Inner Healing and bring a map instead of a medkit - that way you can justify going out of your way to hunt bones every now and again!
Dismantle
Sabotage fifty hooks. Between survivor daily challenges and the many, MANY archives that require you to break hooks, this one will come without trying if you're playing normally. If you want to maximize the number of hooks broken in one match, a Commodious Toolbox with maxed charges and Built to Last might let you break as many as 20 hooks - more if you bring Saboteur and use it on every cooldown!
Engineer
Engineer Gaming. Repair fifty generators that have been damaged by the killer. The gen kick meta might be over but Scourge Hook: Pain Resonance and Surge are still quite popular. You will get this one without trying - don't try to force it. Killers will be bashing your gens whether you like it or not.
Escape Artist
Successfully unhook yourself and escape through an exit gate. Bring Deliverance, unhook someone else, and hope for the best. This one is going to be a matter of luck. If you are the last survivor in the trial when you are hooked, you will be automatically sacrificed before you can unhook yourself. Escaping through hatch also does not count for this challenge - it must be an exit gate. If you're unwilling to bring Deliverance to every match and just letting probability run its course, bring Sprint Burst and try getting the killer's attention after the gens are done and going down deliberately next to an exit gate that is open or 99'd. Hopefully they hook you somewhere relatively close by. Unhook yourself and Sprint Burst to the exit gate, where your teammates hopefully have opened it already. Then prance on through. This is not fool proof, but this is the best I've got.
Optional hard mode: accomplish the above, but with Slippery Meat, luck offering(s), and Up the Ante (not recommended.)
Escaping the Nightmare
Open 25 exit gates. Good idea!
Every Last Drop
Deplete thirty items. Toolboxes are probably the most reliably depleted, since great skill checks can sometimes leave medkits with one or two charges. I still wouldn't worry about this one.
Survivor Achievements, Part 2
Expert Survivor

Reach Survivor Grade: Silver Rank 1. This is not something I can really help you with. While some would say it's a skill issue, I honestly think it's just a matter of having enough free time to play Dead by Daylight consistently. I personally have a hard time motivating myself to play more than a few rounds every now and then unless there's a deadline for a Rift or something. Just keep playing. You'll win some, you'll lose some, but so long as you are persistent, Silver 1 isn't too hard to accomplish.
General rule of thumb: two (long) chases, two unhooks, two generators. Optionally, two full heals, two totems. We'll Make It is excellent for securing a fast full heal after an unhook, and you should not have any issues getting consistent Iridescent Benevolent with that perk. Kindred will also make you a much better teammate while improving your own odds of being rescued. Start from there.
Master Survivor

Reach Survivor Grade: Gold Rank 1. Again, this is mostly a matter of having free time and playing consistently. I will give a few more tips on the emblem system.
Lightbringer is not hard to get Iridescent on, but it is ranked on your personal contribution to generator progress. Avoid doubling up on generators for this reason - if you complete two generators with another person using Prove Thyself, the game only counts it as one generator completed on your part. If you complete two generators on your own, you are set. You can also get more Lightbringer points by completing totems, which can be helpful if you were light on the gens. You get a handful of points for leading killers on long chases, which is more of a consolation than anything. So, avoid using Prove Thyself, and crack a few bones if in doubt.
Evasive grants points based both on chase and simply being near the killer without being detected. On small maps with two floors (such as Midwich and the Game) it is very common to get Iridescent without trying because the killer was frequently nearby but on another level where they could not reach you. If you're not the one getting in chases (or you suck at looping) try stealthing near the killer as much as possible (bring Stake Out so you're not completely wasting everyone's time) and maximize your time in the trial at the end if possible while in the killer's presence (so yes, wait at the exit gate. Don't spam vaults, though.) This will also potentially grant you another chase won if you enter chase and then leave through the exit gate without getting hit.
Legendary Survivor

Reach Survivor Grade: Iridescent 1. This is honestly daunting, and pretty hard to hit within the span of a month if you're not playing several hours a day and know what you are doing. Maximum survivor grade is harder to hit than killer, simply because in solo queue, you are not fully in control of your own team's mistakes and triumphs. This rank also means being actively involved in every game - you will not pip if you complete a few generators and then leave through the exit gate, you *need* to either be chased or spend a lot of time crouching near the killer, you *need* to complete 2-3 generators, and you need to be the one unhooking and healing your teammates.
Run meta builds. Windows of Opportunity is tremendous for running killers successfully if you're still learning, Sprint Burst will let you flee from dead zones, and We'll Make It remains an excellent perk for facilitating altruism.
To get an idea of what it takes mechanically and what it takes to pip on survivor consistently, I would recommend watching Dowsey's Hardcore Survivor series on Youtube. Any season works. You might pick up on new tricks watching their gameplay, but the main thing to pay attention to is their discussions on who needs to do what in order to pip, such as making sure Otzdarva gets unhooks on other players next game in favor of anyone else because he needs to rank up and keeps safety pipping. It's also a ripping good time.
Expert Generalist

Escape 8 times while having repaired at least one generator, and having equipped only two General Survivor perks. These are the perks unaffiliated with any specific survivor, such as Kindred and We'll Make It. Speaking of, Kindred is probably the strongest pick here, and I highly recommend it. We'll Make It is a solid second slot. Third slot should probably go to Deja Vu. This requires a slightly limited loadout, but honestly it's on par with or easier than quite a few survivor adepts ... although you will have to do it quite a few times. A shame all exhaustion perks are survivor specific.
Fleet of Foot

Increase another survivor's speed 50 times. Boon: Dark Theory and Guardian would be the two I recommend; Guardian will let you double up on the speed boost granted by unhooking while Dark Theory can hit multiple teammates repeatedly. Please do not run Dark Theory without Circle of Healing.
Handyman

Repair 100 generators. Excellent suggestion.
Healthy Obsession

Heal the obsession 10 times. This should happen on its own, but Blood Pact would be the go-to perk if you wanted to do this one specifically.
Humanitarian

Affect other survivors with positive status effects 50 times. Dwight has Leader and Prove Thyself, and people running in and out of boons also count. You'll get this one without trying.
Reach Survivor Grade: Silver Rank 1. This is not something I can really help you with. While some would say it's a skill issue, I honestly think it's just a matter of having enough free time to play Dead by Daylight consistently. I personally have a hard time motivating myself to play more than a few rounds every now and then unless there's a deadline for a Rift or something. Just keep playing. You'll win some, you'll lose some, but so long as you are persistent, Silver 1 isn't too hard to accomplish.
General rule of thumb: two (long) chases, two unhooks, two generators. Optionally, two full heals, two totems. We'll Make It is excellent for securing a fast full heal after an unhook, and you should not have any issues getting consistent Iridescent Benevolent with that perk. Kindred will also make you a much better teammate while improving your own odds of being rescued. Start from there.
Master Survivor
Reach Survivor Grade: Gold Rank 1. Again, this is mostly a matter of having free time and playing consistently. I will give a few more tips on the emblem system.
Lightbringer is not hard to get Iridescent on, but it is ranked on your personal contribution to generator progress. Avoid doubling up on generators for this reason - if you complete two generators with another person using Prove Thyself, the game only counts it as one generator completed on your part. If you complete two generators on your own, you are set. You can also get more Lightbringer points by completing totems, which can be helpful if you were light on the gens. You get a handful of points for leading killers on long chases, which is more of a consolation than anything. So, avoid using Prove Thyself, and crack a few bones if in doubt.
Evasive grants points based both on chase and simply being near the killer without being detected. On small maps with two floors (such as Midwich and the Game) it is very common to get Iridescent without trying because the killer was frequently nearby but on another level where they could not reach you. If you're not the one getting in chases (or you suck at looping) try stealthing near the killer as much as possible (bring Stake Out so you're not completely wasting everyone's time) and maximize your time in the trial at the end if possible while in the killer's presence (so yes, wait at the exit gate. Don't spam vaults, though.) This will also potentially grant you another chase won if you enter chase and then leave through the exit gate without getting hit.
Legendary Survivor
Reach Survivor Grade: Iridescent 1. This is honestly daunting, and pretty hard to hit within the span of a month if you're not playing several hours a day and know what you are doing. Maximum survivor grade is harder to hit than killer, simply because in solo queue, you are not fully in control of your own team's mistakes and triumphs. This rank also means being actively involved in every game - you will not pip if you complete a few generators and then leave through the exit gate, you *need* to either be chased or spend a lot of time crouching near the killer, you *need* to complete 2-3 generators, and you need to be the one unhooking and healing your teammates.
Run meta builds. Windows of Opportunity is tremendous for running killers successfully if you're still learning, Sprint Burst will let you flee from dead zones, and We'll Make It remains an excellent perk for facilitating altruism.
To get an idea of what it takes mechanically and what it takes to pip on survivor consistently, I would recommend watching Dowsey's Hardcore Survivor series on Youtube. Any season works. You might pick up on new tricks watching their gameplay, but the main thing to pay attention to is their discussions on who needs to do what in order to pip, such as making sure Otzdarva gets unhooks on other players next game in favor of anyone else because he needs to rank up and keeps safety pipping. It's also a ripping good time.
Expert Generalist
Escape 8 times while having repaired at least one generator, and having equipped only two General Survivor perks. These are the perks unaffiliated with any specific survivor, such as Kindred and We'll Make It. Speaking of, Kindred is probably the strongest pick here, and I highly recommend it. We'll Make It is a solid second slot. Third slot should probably go to Deja Vu. This requires a slightly limited loadout, but honestly it's on par with or easier than quite a few survivor adepts ... although you will have to do it quite a few times. A shame all exhaustion perks are survivor specific.
Fleet of Foot
Increase another survivor's speed 50 times. Boon: Dark Theory and Guardian would be the two I recommend; Guardian will let you double up on the speed boost granted by unhooking while Dark Theory can hit multiple teammates repeatedly. Please do not run Dark Theory without Circle of Healing.
Handyman
Repair 100 generators. Excellent suggestion.
Healthy Obsession
Heal the obsession 10 times. This should happen on its own, but Blood Pact would be the go-to perk if you wanted to do this one specifically.
Humanitarian
Affect other survivors with positive status effects 50 times. Dwight has Leader and Prove Thyself, and people running in and out of boons also count. You'll get this one without trying.
Survivor Achievements, Part 3
Hiding Seeker

End a chase by getting into a locker 25 times. I'm told this one might be bugged, but I suspect it's just finicky. Quick and Quiet should be your go to here, with Head On + Deception being optional (but hilarious.) Lucky Star is also a good idea. You can honestly get this achievement the most consistently by getting into chase with a killer carrying a survivor and then diving into a locker, ASAP. Consider bringing a flashlight so you can pull off b.s. tactics like blinding a killer in a pallet and then fast entering a locker. Get creative! This one will take a while, but I think you'll be surprised how often Quick and Quiet and lockers can throw off killers. Try not to throw too hard, and wave off if the killer has Iron Maiden!
Item of Obsession

As the killer's obsession, escape out the exit gates last without losing a single drop of blood. Okay, so you need to be the obsession, never take a hit, leave out the exit gate, and be the last survivor to do so. Running Mettle of Man is not ideal, Object of Obsession would be suicide, and Decisive Strike also would not activate. For the People makes you the obsession, but also injures you, so that's out. This leaves Sole Survivor, which also has the side effect of making you harder to detect and potentially letting you clutch an exit gate escape as the last person standing, netting the achievement so long as you never got injured. Note that hatch does not count, and bringing a medkit or any perks that activate on taking a hit or rely on being injured in some way is pointless.
Odds are, you can get this achievement through the occasional stomp that happens against killer in pub matches so long as you remember to leave last. However, if you are aiming for this one specifically, I would recommend Sprint Burst, Sole Survivor, Distortion, Open Handed, and running a Key with Blood Amber. Calm Spirit is also worth considering to counter Ultimate Weapon. You're not going to be using the key to get out of the hatch, but you can still get that aura reading on the killer to outmaneuver them from a considerable range. This one might take quite a few tries. Good luck!
I've Got Your Back

Rescue 50 survivors from the hook. I like how we're giving achievements for meeting basic expectations! And some people are failing to meet those expectations anyway!
Leapfrog
Vault 200 windows or pallets while chased by the killer. Run, binch, run!
Left For Dead

As the last survivor alive, repair a generator and escape through the exit gates. This one is *extremely* problematic. Repairing a generator as the last man broadcasts your location to the killer, and it has to happen *after* the last survivor has died (which means their icon has changed to a skull - don't complete the generator until then!) So, the killer knows where you are, and you cannot escape through hatch. So, what can we do?
I am not ashamed to admit that I got this perk when a random Huntress elected to show me mercy and let me out as the last survivor, and I *still* had to refuse hatch after she downed me and put me on top of it. Some killers are aware of this challenge and may take mercy on you, and it cannot hurt to ask (well, as best you can as a survivor) because I would not count on getting this achievement through any other fashion. For the record, this achievement was put in as a complement to Bill Overbeck's original iteration of the Left Behind perk, which used to massively increase generator speeds when he was the last one left alive, so it's something of a leftover from a prior DBD that no longer exists. Interestingly, the current iteration of Sole Survivor now functions similarly to the old version of Left Behind.
As far as building for this specific scenario, Low Profile, Sole Survivor, Wake Up, and Distortion would be my go to recommendations for staying the hell out of the killer's way and getting an exit gate open OUTRAGEOUSLY FAST. Your build is completely gimped and reliant on your teammates dying, but it will maximize your odds of getting the achievement. For items, a toolbox with BNP might not go amiss to blitz the final generator once your teammate is dead, but a medkit or key would also serve you quite well. Just do your best. This achievement is an absolute ♥♥♥♥♥ to complete for what I think are the wrong reasons, and I wish they would change it.
Lifting the Fog

Reveal the killer's aura 50 times. This used to be bugged so you would get it almost immediately upon using any reveal perk. Now, it's still a zero effort achievement. Alert and Kindred will get you there pretty quickly, with Wiretap and Fogwise offering slightly higher effort alternatives.
Looter

Open 100 chests. Look, this isn't something you should make a habit of. Consider running Pharmacy to build a stockpile of green medkits as well as opening the chests much faster and more quietly (so long as you are injured.) Ace in the Hole might not be the worst idea, either! If you are not familiar with chest locations, Plunderer's Instinct is also a good call, while Purple Coin offerings will give you more chests to work with.
Made It Out Alive!

Escape 100 trials. This may take a while, but you'll get there, promise.
Medic

Heal survivors for a total of 100 health states. I recommend We'll Make It - it's a great perk, and it'll rack you up health states with a quickness.
Milk and Cookies

Take 30 items from the chest in the basement. When this perk is not glitched (BHVR claims it's fixed), just bring Plunderer's Instinct and look for that strange underground chest. Bring Appraisal so if someone else robs the basement first, you can still rummage through the chest and pull an item.
End a chase by getting into a locker 25 times. I'm told this one might be bugged, but I suspect it's just finicky. Quick and Quiet should be your go to here, with Head On + Deception being optional (but hilarious.) Lucky Star is also a good idea. You can honestly get this achievement the most consistently by getting into chase with a killer carrying a survivor and then diving into a locker, ASAP. Consider bringing a flashlight so you can pull off b.s. tactics like blinding a killer in a pallet and then fast entering a locker. Get creative! This one will take a while, but I think you'll be surprised how often Quick and Quiet and lockers can throw off killers. Try not to throw too hard, and wave off if the killer has Iron Maiden!
Item of Obsession
As the killer's obsession, escape out the exit gates last without losing a single drop of blood. Okay, so you need to be the obsession, never take a hit, leave out the exit gate, and be the last survivor to do so. Running Mettle of Man is not ideal, Object of Obsession would be suicide, and Decisive Strike also would not activate. For the People makes you the obsession, but also injures you, so that's out. This leaves Sole Survivor, which also has the side effect of making you harder to detect and potentially letting you clutch an exit gate escape as the last person standing, netting the achievement so long as you never got injured. Note that hatch does not count, and bringing a medkit or any perks that activate on taking a hit or rely on being injured in some way is pointless.
Odds are, you can get this achievement through the occasional stomp that happens against killer in pub matches so long as you remember to leave last. However, if you are aiming for this one specifically, I would recommend Sprint Burst, Sole Survivor, Distortion, Open Handed, and running a Key with Blood Amber. Calm Spirit is also worth considering to counter Ultimate Weapon. You're not going to be using the key to get out of the hatch, but you can still get that aura reading on the killer to outmaneuver them from a considerable range. This one might take quite a few tries. Good luck!
I've Got Your Back
Rescue 50 survivors from the hook. I like how we're giving achievements for meeting basic expectations! And some people are failing to meet those expectations anyway!
Leapfrog
Vault 200 windows or pallets while chased by the killer. Run, binch, run!
Left For Dead
As the last survivor alive, repair a generator and escape through the exit gates. This one is *extremely* problematic. Repairing a generator as the last man broadcasts your location to the killer, and it has to happen *after* the last survivor has died (which means their icon has changed to a skull - don't complete the generator until then!) So, the killer knows where you are, and you cannot escape through hatch. So, what can we do?
I am not ashamed to admit that I got this perk when a random Huntress elected to show me mercy and let me out as the last survivor, and I *still* had to refuse hatch after she downed me and put me on top of it. Some killers are aware of this challenge and may take mercy on you, and it cannot hurt to ask (well, as best you can as a survivor) because I would not count on getting this achievement through any other fashion. For the record, this achievement was put in as a complement to Bill Overbeck's original iteration of the Left Behind perk, which used to massively increase generator speeds when he was the last one left alive, so it's something of a leftover from a prior DBD that no longer exists. Interestingly, the current iteration of Sole Survivor now functions similarly to the old version of Left Behind.
As far as building for this specific scenario, Low Profile, Sole Survivor, Wake Up, and Distortion would be my go to recommendations for staying the hell out of the killer's way and getting an exit gate open OUTRAGEOUSLY FAST. Your build is completely gimped and reliant on your teammates dying, but it will maximize your odds of getting the achievement. For items, a toolbox with BNP might not go amiss to blitz the final generator once your teammate is dead, but a medkit or key would also serve you quite well. Just do your best. This achievement is an absolute ♥♥♥♥♥ to complete for what I think are the wrong reasons, and I wish they would change it.
Lifting the Fog
Reveal the killer's aura 50 times. This used to be bugged so you would get it almost immediately upon using any reveal perk. Now, it's still a zero effort achievement. Alert and Kindred will get you there pretty quickly, with Wiretap and Fogwise offering slightly higher effort alternatives.
Looter
Open 100 chests. Look, this isn't something you should make a habit of. Consider running Pharmacy to build a stockpile of green medkits as well as opening the chests much faster and more quietly (so long as you are injured.) Ace in the Hole might not be the worst idea, either! If you are not familiar with chest locations, Plunderer's Instinct is also a good call, while Purple Coin offerings will give you more chests to work with.
Made It Out Alive!
Escape 100 trials. This may take a while, but you'll get there, promise.
Medic
Heal survivors for a total of 100 health states. I recommend We'll Make It - it's a great perk, and it'll rack you up health states with a quickness.
Milk and Cookies
Take 30 items from the chest in the basement. When this perk is not glitched (BHVR claims it's fixed), just bring Plunderer's Instinct and look for that strange underground chest. Bring Appraisal so if someone else robs the basement first, you can still rummage through the chest and pull an item.
Survivor Achievements, Part 4
Near-Death Experience

Escape 25 trials after being downed only once. This used to be bugged so it only applied if only one survivor on the whole team had been downed only once, greatly exacerbating the difficulty for no reason. Now, it works as intended. Try to go down only once by escaping the killer as best you can as per usual. If you make it through the match without ever going down, just wait at an exit gate and use the Point Tech to escape after being downed. (Point Tech means pointing as the killer downs you ('1' key on PC) which will allow you to start crawling immediately after being downed.)
Nerves of Steel

Succeed at 500 skill checks. I've got nerves of steel. Nerves of steel. Nerves nerves nerves nerves-
No One Left Behind

Unhook a survivor after the exit gates have been powered. This just means that all five generators have been completed - you don't need an exit gate open. No One Left Behind is perfect for this challenge (fittingly), since it will give you perfect information on the other survivors and greatly increase the speed of the unhook, reducing the chance you are grabbed.
Not Today

Unhook yourself 50 times. You can only do that once per match! I don't recommend going the Slippery Meat route since it is too random and you are unlikely to get three other PC randos willing to bring Up the Ante and luck offerings. This leaves Deliverance, which requires you to unhook someone else safely first. Unfortunately, Deliverance is cursed, and you will often be the first person hooked. If that happens, don't take the 4% and intentionally second stage yourself - we have enough Quentins doing that already. Just accept that the opportunity was missed this time.
You're going to be running Deliverance for a while. I recommend pairing it with Kindred to maximize the odds of you getting a safe unhook, along with maybe Borrowed Time in case the killer elects to tunnel. You don't need that teammate alive, per se, but you do need that Safe Rescue scoring event to turn on Deliverance!
Outrun Evil

Escape a trial by crawling through the hatch. I find the name of this one ironic, since most of the time you crawl through a hatch it's because a merciful killer dumped you there. This will happen eventually, which is honestly a heartwarming thing to think about.
Insult and Injury

Escape chase 50 times after stunning a killer with a pallet. Just make some distance after the stun and you'll get progress easily. There are some killers who are hard to stun with pallets due to ranged attacks or teleportation, but in standard gameplay, this one will not be hard to progress.
Perfect Escape

Escape with at least 5000 points in each scoring category. Amusingly, 5000 is currently *half* the scoring cap, so apparently it is possible to make a perfect escape with the equivalent of an "F" grade. Objective can easily be accomplished by doubling up on gens, and you also get a +2500 scoring event for escaping through hatch. Survival automatically gets 5000 for escaping. Altruism is easy if you go for unhooks and heal afterward. Boldness is the only potential hiccup, since you generally only get points if chased. If you're a bit light in this category, try breaking a few totems. You get +1000 for each broken. Booning is even better (you bastard!) since it grants +1500. Overall, I wouldn't worry about this one.
Power Moves

Escape eight times after having completed at least one generator's worth of progress and with no perks equipped. So, basically don't play like an ♥♥♥♥♥♥♥ with no perks equipped. Despite the difficulty rating, I don't have much to say on this one since most of the strategy here comes down to player-specific skill. Obviously bring a strong item (medkit recommended) and consider bringing a map offering, and prioritize stealthy cosmetics and a quiet survivor. And then ... play the game as you normally would? Note that you don't need to escape through an exit gate, so a killer DCing or getting hatch counts so long as you completed the equivalent of one gen.
Note: With the advent of additional game modes such as 2v8, this achievement becomes a lot easier. The game considers your loadout "empty" on these modes, so just play a few rounds of survivor if these modes are up.
Rescue Mission

Save five survivors from the killer's grasp with a pallet stun. Sounds hard and random, right? Well, guess what, it counts if you save yourself with Power Struggle (which this achievement originally released with.) So you know what means! It might take a while, but Flip Flop + Power Struggle will eventually get you the saves you need to get this achievement. Don't count on getting it more than once a match, however, since killers will prioritize picking you up immediately after the first pallet bonks them on the noggin. Unbreakable is an optional inclusion to speed up recovery progress, while Smash Hit adds insult to injury by letting you zoom away at high speeds while the killer laughs their ass off at your audacity. Plot Twist/Power Struggle/Flip Flop is also a very good (if evil) way to get progress on this.
Resurgence

Heal a total of ten health states when all survivors are injured, dying, or hooked. Trust me, this is not as rare as it sounds - one Legion match can potentially net you a lot of progress here. Due to the nature of the achievement, I recommend Desperate Measures, which is already a very strong perk, which will speed up the heal by 56%. Resilience is also a solid option, giving you another 9%. You should get this one without trying if you play long enough - it only becomes irritating if you want to gun for it specifically, since this is not really a situation you can outright force. Made for This will make this a bit safer, if you really care.
Escape 25 trials after being downed only once. This used to be bugged so it only applied if only one survivor on the whole team had been downed only once, greatly exacerbating the difficulty for no reason. Now, it works as intended. Try to go down only once by escaping the killer as best you can as per usual. If you make it through the match without ever going down, just wait at an exit gate and use the Point Tech to escape after being downed. (Point Tech means pointing as the killer downs you ('1' key on PC) which will allow you to start crawling immediately after being downed.)
Nerves of Steel
Succeed at 500 skill checks. I've got nerves of steel. Nerves of steel. Nerves nerves nerves nerves-
No One Left Behind
Unhook a survivor after the exit gates have been powered. This just means that all five generators have been completed - you don't need an exit gate open. No One Left Behind is perfect for this challenge (fittingly), since it will give you perfect information on the other survivors and greatly increase the speed of the unhook, reducing the chance you are grabbed.
Not Today
Unhook yourself 50 times. You can only do that once per match! I don't recommend going the Slippery Meat route since it is too random and you are unlikely to get three other PC randos willing to bring Up the Ante and luck offerings. This leaves Deliverance, which requires you to unhook someone else safely first. Unfortunately, Deliverance is cursed, and you will often be the first person hooked. If that happens, don't take the 4% and intentionally second stage yourself - we have enough Quentins doing that already. Just accept that the opportunity was missed this time.
You're going to be running Deliverance for a while. I recommend pairing it with Kindred to maximize the odds of you getting a safe unhook, along with maybe Borrowed Time in case the killer elects to tunnel. You don't need that teammate alive, per se, but you do need that Safe Rescue scoring event to turn on Deliverance!
Outrun Evil
Escape a trial by crawling through the hatch. I find the name of this one ironic, since most of the time you crawl through a hatch it's because a merciful killer dumped you there. This will happen eventually, which is honestly a heartwarming thing to think about.
Insult and Injury
Escape chase 50 times after stunning a killer with a pallet. Just make some distance after the stun and you'll get progress easily. There are some killers who are hard to stun with pallets due to ranged attacks or teleportation, but in standard gameplay, this one will not be hard to progress.
Perfect Escape
Escape with at least 5000 points in each scoring category. Amusingly, 5000 is currently *half* the scoring cap, so apparently it is possible to make a perfect escape with the equivalent of an "F" grade. Objective can easily be accomplished by doubling up on gens, and you also get a +2500 scoring event for escaping through hatch. Survival automatically gets 5000 for escaping. Altruism is easy if you go for unhooks and heal afterward. Boldness is the only potential hiccup, since you generally only get points if chased. If you're a bit light in this category, try breaking a few totems. You get +1000 for each broken. Booning is even better (you bastard!) since it grants +1500. Overall, I wouldn't worry about this one.
Power Moves
Escape eight times after having completed at least one generator's worth of progress and with no perks equipped. So, basically don't play like an ♥♥♥♥♥♥♥ with no perks equipped. Despite the difficulty rating, I don't have much to say on this one since most of the strategy here comes down to player-specific skill. Obviously bring a strong item (medkit recommended) and consider bringing a map offering, and prioritize stealthy cosmetics and a quiet survivor. And then ... play the game as you normally would? Note that you don't need to escape through an exit gate, so a killer DCing or getting hatch counts so long as you completed the equivalent of one gen.
Note: With the advent of additional game modes such as 2v8, this achievement becomes a lot easier. The game considers your loadout "empty" on these modes, so just play a few rounds of survivor if these modes are up.
Rescue Mission
Save five survivors from the killer's grasp with a pallet stun. Sounds hard and random, right? Well, guess what, it counts if you save yourself with Power Struggle (which this achievement originally released with.) So you know what means! It might take a while, but Flip Flop + Power Struggle will eventually get you the saves you need to get this achievement. Don't count on getting it more than once a match, however, since killers will prioritize picking you up immediately after the first pallet bonks them on the noggin. Unbreakable is an optional inclusion to speed up recovery progress, while Smash Hit adds insult to injury by letting you zoom away at high speeds while the killer laughs their ass off at your audacity. Plot Twist/Power Struggle/Flip Flop is also a very good (if evil) way to get progress on this.
Resurgence
Heal a total of ten health states when all survivors are injured, dying, or hooked. Trust me, this is not as rare as it sounds - one Legion match can potentially net you a lot of progress here. Due to the nature of the achievement, I recommend Desperate Measures, which is already a very strong perk, which will speed up the heal by 56%. Resilience is also a solid option, giving you another 9%. You should get this one without trying if you play long enough - it only becomes irritating if you want to gun for it specifically, since this is not really a situation you can outright force. Made for This will make this a bit safer, if you really care.
Survivor Achievements, Part 5
Risk It All

Survive a trial after bringing an iridescent item or addon, without protecting it with a White Ward. Odds are, you'll get this while doing some of the Adepts, or simply while trying out a key or map. Point being, completion will likely be incidental, and you shouldn't be bringing White Wards very often anyway.
Selfless Survival

Heal 30 survivors from the dying state to the injured state. Slugs are usually just picked up instantly in your average game, but sometimes you get lucky. Bring We're Gonna Live Forever to pick that slug up in moments, as well as potentially protect your slug from predators! Buckle Up/For the People also works, but is really rude.
Sorted

Escape a match after spending at least 50% of it injured. You'll get this automatically when you do David King's Adept Challenge, so don't worry about it. Refer to his section for more advice.
Survival Treasures

Escape a match with a new item. This can either be from a chest or pillaged from the corpse of a teammate. Frankly I recommend the latter, since teammates tend to bring better ♥♥♥♥.
Skilled Generalist

Escape a trial after bringing only three General Survivor perks. What is this, a Walmart brand adept? Kindred and We'll Make It remain probably the best options, with the third coming down to personal choice. Personally I love No One Left Behind, but you do you.
Taking One for the Team

Take 250 protection hits while within ten meters of a hook. Ugh, this is going to be a pain in the ass. Hopefully you can rack up progression by just running interference normally when trying to help a teammate, but if you are gunning for this achievement specifically, you want to run Saboteur/Mettle of Man/Breakout to maximize the value of your stupid-ass playstyle. Don't get me wrong, the Mettle of Man/Breakout wiggle build is fun as hell, but it will get you killed. Often. Run Dead Hard or Circle of Healing as a fourth perk, and if you bring a toolbox, bring Alex's. If you bring a medkit, pack as many charges as you can ... you're going to get hurt a *lot* on purpose.
You will also get progress on this one a lot from doing unhooks with the killer nearby, so at least there will be some incidental gains.
Triage

Heal survivors that come to you 30 times. Coming to you is helpfully explained in the perk description now (it didn't used to be) but basically means that, when a survivor gets injured initially, they were at least 16 meters from you, and you didn't budge 16 meters from the spot you were in since they were initially injured. Since this relies on you being away from your teammate, not moving for a decent period of time, and your teammate not going down in chase, this can take a while.
Empathy actually isn't that helpful here, since you cannot go to your teammate. No, this perk was designed with Empathetic Connection in mind, which shows your aura to your wounded teammates and speeds up your healing of them. Since you want to complete your heal, I recommend also bringing Botany Knowledge and possibly also Desperate Measures to reduce the odds of you being interrupted by the killer while healing. Bite the Bullet may also be a good idea, to cancel any noise either of you may be making. This one is slow going, and you need to keep it in mind at all times when you are going for it, since its progress requirements are so specific you are unlikely to make much incidental progress while playing normally. Just keep bringing Empathetic Connection, and don't budge from the generator you're on until a wounded Jane rolls up on you with a hatchet lodged in her back.
Vulture

Survive a match with another survivor's item equipped. Teammates bring good ♥♥♥♥. Steal Meg's flashlight. DO IT.
Whiffing to Success
Cause the killer to miss fifty attacks before vaulting an obstacle. This will happen eventually on its own. Killers are so silly.
With Scars to Show

Get injured during a chase and then escape 50 times. I suggest Overcome and Lucky Break - the killers will give up pretty fast after that first hit.
Wounded Healer

Heal 50 health states while you are also injured. This should happen on its own, but Resilience and Desperate Measures are helpful here. Seriously, Desperate Measures is a bomb perk. Made For This can potentially cover for you here as well.
Survive a trial after bringing an iridescent item or addon, without protecting it with a White Ward. Odds are, you'll get this while doing some of the Adepts, or simply while trying out a key or map. Point being, completion will likely be incidental, and you shouldn't be bringing White Wards very often anyway.
Selfless Survival
Heal 30 survivors from the dying state to the injured state. Slugs are usually just picked up instantly in your average game, but sometimes you get lucky. Bring We're Gonna Live Forever to pick that slug up in moments, as well as potentially protect your slug from predators! Buckle Up/For the People also works, but is really rude.
Sorted
Escape a match after spending at least 50% of it injured. You'll get this automatically when you do David King's Adept Challenge, so don't worry about it. Refer to his section for more advice.
Survival Treasures
Escape a match with a new item. This can either be from a chest or pillaged from the corpse of a teammate. Frankly I recommend the latter, since teammates tend to bring better ♥♥♥♥.
Skilled Generalist
Escape a trial after bringing only three General Survivor perks. What is this, a Walmart brand adept? Kindred and We'll Make It remain probably the best options, with the third coming down to personal choice. Personally I love No One Left Behind, but you do you.
Taking One for the Team
Take 250 protection hits while within ten meters of a hook. Ugh, this is going to be a pain in the ass. Hopefully you can rack up progression by just running interference normally when trying to help a teammate, but if you are gunning for this achievement specifically, you want to run Saboteur/Mettle of Man/Breakout to maximize the value of your stupid-ass playstyle. Don't get me wrong, the Mettle of Man/Breakout wiggle build is fun as hell, but it will get you killed. Often. Run Dead Hard or Circle of Healing as a fourth perk, and if you bring a toolbox, bring Alex's. If you bring a medkit, pack as many charges as you can ... you're going to get hurt a *lot* on purpose.
You will also get progress on this one a lot from doing unhooks with the killer nearby, so at least there will be some incidental gains.
Triage
Heal survivors that come to you 30 times. Coming to you is helpfully explained in the perk description now (it didn't used to be) but basically means that, when a survivor gets injured initially, they were at least 16 meters from you, and you didn't budge 16 meters from the spot you were in since they were initially injured. Since this relies on you being away from your teammate, not moving for a decent period of time, and your teammate not going down in chase, this can take a while.
Empathy actually isn't that helpful here, since you cannot go to your teammate. No, this perk was designed with Empathetic Connection in mind, which shows your aura to your wounded teammates and speeds up your healing of them. Since you want to complete your heal, I recommend also bringing Botany Knowledge and possibly also Desperate Measures to reduce the odds of you being interrupted by the killer while healing. Bite the Bullet may also be a good idea, to cancel any noise either of you may be making. This one is slow going, and you need to keep it in mind at all times when you are going for it, since its progress requirements are so specific you are unlikely to make much incidental progress while playing normally. Just keep bringing Empathetic Connection, and don't budge from the generator you're on until a wounded Jane rolls up on you with a hatchet lodged in her back.
Vulture
Survive a match with another survivor's item equipped. Teammates bring good ♥♥♥♥. Steal Meg's flashlight. DO IT.
Whiffing to Success
Cause the killer to miss fifty attacks before vaulting an obstacle. This will happen eventually on its own. Killers are so silly.
With Scars to Show
Get injured during a chase and then escape 50 times. I suggest Overcome and Lucky Break - the killers will give up pretty fast after that first hit.
Wounded Healer
Heal 50 health states while you are also injured. This should happen on its own, but Resilience and Desperate Measures are helpful here. Seriously, Desperate Measures is a bomb perk. Made For This can potentially cover for you here as well.
Survivor Achievements, Part 6
One More Step

Take a hit while you have Endurance ten times. This usually happens off of hook, but Made For This (fittingly) is made for this. Heal someone else while wounded and then tank the hit. If you're feeling filthy, run For the People and Buckle Up, but don't be surprised if this gets you some ... *special attention* from the killer. People who blow their noses with $100 bills can also consider Styptic Agent.
Second Act

Recover from dying ten times, either on your own or with help. Plot Twist or Unbreakable works here, but this should happen on its own eventually. Nevertheless, getting slugged is kind of unlikely during solo queue, so I would advise bringing Plot Twist if you're impatient, especially since you can use it twice per match.
Make Some Noise

Scream 50 times. Step 1: Don't run Calm Spirit. Step 2: Nothing.
Kitted Out

In 35 different public matches, use a special item. For ♥♥♥♥'s sake, BHVR. Yep, minimum this will take thirty-five matches. Fortunately, Wesker is very popular and loves putting his tentacles everywhere. If you don't have time for getting Wesked over and over, you can instead bring a flashbang and, I don't know, drop it at a teammate's feet when it's least convenient for them, or something. This achievement isn't hard, per se, it's just tedious. If you get Xenomorph, deploy as many turrets as you can!
Shine On

Get thirty flashlight blinds. This is a pain in the ass, more than I expected, mostly because half the killer roster can hit you over a pallet (Huntress, Nemesis, Trickster), ignore it (Nurse), vault over it (Legion, Wesker, Chucky) or break it instantly (Billy, Bubba, Blight.) So you need to get a killer that will actually take the time to kick the pallet instead of subverting your expectations, and unfortunately, that is less common than you would think. Bring a flashlight every single match and comp drop. When the killer stops to break the pallet, blind them. Bring a Purple Flashlight with battery addons and Champion of Light so you can make a bit more distance. Champion of Light also refreshes during chase, so you can theoretically use it multiple times during chase. Don't be surprised if you play multiple games where you get no progress on this challenge - a lot of killers can subvert pallets these days.
Under Pressure

Make 20 great skill checks while injured. If you're really struggling with this, run Stake Out, but this should happen on its own eventually.
Fearless Healer

Heal yourself twenty-five times in the basement. Equip Strength in Shadows and Wicked. Go to the basement every time you get dinged. Heal. If caught, unhook yourself with Wicked. Bring Botany Knowledge if you don't want to spend too much time in the basement. This achievement will give you a very real appreciation for Strength in Shadows - it's a solid perk. This one isn't too bad, so long as you don't make it too obvious to the killer that you keep beelining towards the basement.
Resourcful

Swap held items for items in chests 10 times. So, you need to be holding an item first – make sure to bring one to the match. Bring Plunderer’s Instinct and maybe Appraisal – each chest can only count once, so Appraisal is there in case someone else loots a chest first. If you’re focusing on this achievement, it’s fast. Bring a purple coin offering to add additional chests to the trial.
Desperate Escape

Perform a fast vault 15 times within 3 seconds of getting injured. This will happen naturally, but I would like to note my confusion. I assume this achievement is meant to be paired with the Finesse perk … but that perk only works while you’re healthy. This achievement was released with Lara Croft and she only has one perk related to vaulting, and that’s Finesse. So I’m a little confused by the design philosophy here. Ah, well.
Hero of Wallachia

Stun the killer with a pallet while holding a common, uncommon, or rare item. So anything that isn’t iridescent. Bring Windows of Opportunity so you know where pallets are, Smash Hit if you’re really committed to the bit, and make sure you didn’t bring a Rainbow Map or Iridescent Key. You could also go the Plot Twist/Power Struggle/Flip Flop route, but it will likely only guarantee you one stun that match. Also, it’s evil and will make the killer hate you.
Honor the Bloodline

Reveal the killer for 60 seconds using survivor perks. Kindred works, but I just paired Eyes of Belmont with Alert and got the achievement in one match. Quick and effective.
Take a hit while you have Endurance ten times. This usually happens off of hook, but Made For This (fittingly) is made for this. Heal someone else while wounded and then tank the hit. If you're feeling filthy, run For the People and Buckle Up, but don't be surprised if this gets you some ... *special attention* from the killer. People who blow their noses with $100 bills can also consider Styptic Agent.
Second Act
Recover from dying ten times, either on your own or with help. Plot Twist or Unbreakable works here, but this should happen on its own eventually. Nevertheless, getting slugged is kind of unlikely during solo queue, so I would advise bringing Plot Twist if you're impatient, especially since you can use it twice per match.
Make Some Noise
Scream 50 times. Step 1: Don't run Calm Spirit. Step 2: Nothing.
Kitted Out
In 35 different public matches, use a special item. For ♥♥♥♥'s sake, BHVR. Yep, minimum this will take thirty-five matches. Fortunately, Wesker is very popular and loves putting his tentacles everywhere. If you don't have time for getting Wesked over and over, you can instead bring a flashbang and, I don't know, drop it at a teammate's feet when it's least convenient for them, or something. This achievement isn't hard, per se, it's just tedious. If you get Xenomorph, deploy as many turrets as you can!
Shine On
Get thirty flashlight blinds. This is a pain in the ass, more than I expected, mostly because half the killer roster can hit you over a pallet (Huntress, Nemesis, Trickster), ignore it (Nurse), vault over it (Legion, Wesker, Chucky) or break it instantly (Billy, Bubba, Blight.) So you need to get a killer that will actually take the time to kick the pallet instead of subverting your expectations, and unfortunately, that is less common than you would think. Bring a flashlight every single match and comp drop. When the killer stops to break the pallet, blind them. Bring a Purple Flashlight with battery addons and Champion of Light so you can make a bit more distance. Champion of Light also refreshes during chase, so you can theoretically use it multiple times during chase. Don't be surprised if you play multiple games where you get no progress on this challenge - a lot of killers can subvert pallets these days.
Under Pressure
Make 20 great skill checks while injured. If you're really struggling with this, run Stake Out, but this should happen on its own eventually.
Fearless Healer
Heal yourself twenty-five times in the basement. Equip Strength in Shadows and Wicked. Go to the basement every time you get dinged. Heal. If caught, unhook yourself with Wicked. Bring Botany Knowledge if you don't want to spend too much time in the basement. This achievement will give you a very real appreciation for Strength in Shadows - it's a solid perk. This one isn't too bad, so long as you don't make it too obvious to the killer that you keep beelining towards the basement.
Resourcful
Swap held items for items in chests 10 times. So, you need to be holding an item first – make sure to bring one to the match. Bring Plunderer’s Instinct and maybe Appraisal – each chest can only count once, so Appraisal is there in case someone else loots a chest first. If you’re focusing on this achievement, it’s fast. Bring a purple coin offering to add additional chests to the trial.
Desperate Escape
Perform a fast vault 15 times within 3 seconds of getting injured. This will happen naturally, but I would like to note my confusion. I assume this achievement is meant to be paired with the Finesse perk … but that perk only works while you’re healthy. This achievement was released with Lara Croft and she only has one perk related to vaulting, and that’s Finesse. So I’m a little confused by the design philosophy here. Ah, well.
Hero of Wallachia
Stun the killer with a pallet while holding a common, uncommon, or rare item. So anything that isn’t iridescent. Bring Windows of Opportunity so you know where pallets are, Smash Hit if you’re really committed to the bit, and make sure you didn’t bring a Rainbow Map or Iridescent Key. You could also go the Plot Twist/Power Struggle/Flip Flop route, but it will likely only guarantee you one stun that match. Also, it’s evil and will make the killer hate you.
Honor the Bloodline
Reveal the killer for 60 seconds using survivor perks. Kindred works, but I just paired Eyes of Belmont with Alert and got the achievement in one match. Quick and effective.
Survivor Achievements, Part 7
Ever Vigilant

Complete healing actions twenty times after all the generators have been completed. Okay, so this is a pain in the ass, but it's manageable. The main problem is that, obviously, in solo queue many times you won't even get to this stage of the game, and if you do, you may be down to just a couple of people, if not alone(!) Based on the wording, you should be able to heal yourself with a medkit to get one point of progress on this achievement, but that's ponderous and far from guaranteed. Consider it a consolation prize if you're the last person standing. EDIT: According to commenters below, self heals do not count towards this achievement. The rest of this section should remain valid, however.
What you need to do is equip No One Left Behind. This will give you 100% vision on all other survivors, which is tremendous for tracking down the wounded and just generally knowing where the hell everyone is. This is a general perk, so there's no worries about accessibility - no matter how far behind on DLCs you might be, this perk is available. It also makes you heal much, much faster, and is also very useful for Final Days (shudder.)
Beyond that, consider We're Gonna Live Forever (picks up and protects slugs, can be useful) or Made For This (protects you) but No One Left Behind will do most of your job for you. The next achievement is where the real headache lies...
2v8 Addendum: Progress for this achievement is extremely easy in 2v8. Just play the Medic class and make sure your heals are completed with the heal action and not your AoE heal burst ability.
Final Days

♥♥♥♥ this achievement. Take ten protection hits during the End Game Collapse. Protection hits happen one of two ways - take a hit from a killer while they are carrying another survivor (fairly simple) or take a hit from a killer while roughly within eight meters of another injured survivor. The other survivor MUST be injured - healthy survivors do not count. This needs to take place when the End Game Collapse is occurring, which only happens if a hatch is shut (in which case you are alone except in fringe 2v8 cases) or an exit gate is open.
So not only are we dealing with a relatively uncommon scenario - making it to five generators in solo queue - we are dealing with the end game on top of that, when the game is actively counting down to detonation. There is some slight good news - assuming you are healthy at the start of the EGC, you can make multiple points of progress towards this achievement every time you get a chance. So at least it can theoretically advance more quickly than Outbreak Breakout.
You need to equip No One Left Behind. The information it provides on other survivors is unparalleled, especially since you will need to be near one of them to take a protection hit. Equip Adrenaline and Hope as well - Adrenaline will increase the likelihood you are healthy and thus, able to take an additional hit, during the EGC, while Hope will make it easier for you to intercept an injured survivor and put yourself between them and their pursuer. Fourth perk discretionary - Dead Hard would work for getting a third protection hit, but bear in mind you will be exhausted from Adrenaline. Pick a chase perk that will help you survive the rest of the game instead, like Windows of Opportunity or Sprint Burst.
If the EGC is active and a killer has picked up a survivor, force them to hit you. Don't worry if this is actually a good idea or not, you have the opportunity to make progress on this achievement - go for it. Don't bother 99ing exit gates, just crank them open and then find the killer and the survivor they are chasing. Throw yourself into danger with reckless abandon! ♥♥♥♥ over the other survivors by inadvertently triggering Blood Warden! Hell, that can even help with achievement progress!
Additional notes: Deathslinger can theoretically provide you the most progress for this achievement. When spiked by his gun, it counts as an attack, so if he shoots you while you're around a wounded teammate, it will count as a protection hit. If he smacks you with his melee within a wounded teammate, that's another hit - and you're not even downed yet! This means you can theoretically farm four hits off of one (likely bemused) Deathslinger before even getting picked up. Just bear it in mind.
You may be tempted to run Mettle of Man or Duty of Care for this achievement, but I do not recommend either. Mettle of Man can theoretically get you a free hit if you can activate it by the end game but ... come on, better men/women than us have tried to make that perk work to do far less. Use a Styptic or Dead Hard instead if you really want that endurance hit. Duty of Care is strong, but it speeds up the people around you after a protection hit, which could put them out of range of a second protection hit. It's solid if you actually care about saving your teammates in favor of getting progress of this achievement (I certainly ♥♥♥♥♥♥♥ didn't) but I feel it jeopardizes potential additional progress. I think you can do better.
2v8 Addendum: 2v8 offers a good opportunity for progress on this achievement, when it is available to play. Cracking open the exit gate immediately is common practice here, and you have more survivors to "protect." If you are gunning for this achievement I recommend Escapist (can heal themselves after being hooked once and can reposition quickly with their sprint - also just good for actually making it to the end game generally) or Medic (perfect vision on all wounded survivors.) Once the gate is open, find a survivor to "protect" and encourage the killer to give you one or two love taps.
For both modes, lounging at the exit gate and waiting for teammates before mercilessly taunting the killers is encouraged (I feel terrible) because you want to get hit. Absolutely miserable achievement. I was consistently throwing in the EGCs just to get progress.
The Show Must Go On

Complete ten generators while injured. I thought this one would happen a little more naturally than it did, but turns out I needed a bit of a push to actually remain injured. This should happen on its own naturally, but if you are gunning for it specifically, bring a medkit and Resilience. After you get injured, 99 your heal and work on the generator. Finish the heal in event of emergency. If someone else is healing you, you can break it by holding shift and moving away. Less experienced survivor may become confused or annoyed, whereas more experienced survivors will recognize you have a medkit in your hand and figure you have Resilience. Point at a generator if the confusion continues.
Practice Makes Perfect

Succeed at 100 skill checks while healing or repairing. Yeah, this one takes no effort on your part.
Complete healing actions twenty times after all the generators have been completed. Okay, so this is a pain in the ass, but it's manageable. The main problem is that, obviously, in solo queue many times you won't even get to this stage of the game, and if you do, you may be down to just a couple of people, if not alone(!) Based on the wording, you should be able to heal yourself with a medkit to get one point of progress on this achievement, but that's ponderous and far from guaranteed. Consider it a consolation prize if you're the last person standing. EDIT: According to commenters below, self heals do not count towards this achievement. The rest of this section should remain valid, however.
What you need to do is equip No One Left Behind. This will give you 100% vision on all other survivors, which is tremendous for tracking down the wounded and just generally knowing where the hell everyone is. This is a general perk, so there's no worries about accessibility - no matter how far behind on DLCs you might be, this perk is available. It also makes you heal much, much faster, and is also very useful for Final Days (shudder.)
Beyond that, consider We're Gonna Live Forever (picks up and protects slugs, can be useful) or Made For This (protects you) but No One Left Behind will do most of your job for you. The next achievement is where the real headache lies...
2v8 Addendum: Progress for this achievement is extremely easy in 2v8. Just play the Medic class and make sure your heals are completed with the heal action and not your AoE heal burst ability.
Final Days
♥♥♥♥ this achievement. Take ten protection hits during the End Game Collapse. Protection hits happen one of two ways - take a hit from a killer while they are carrying another survivor (fairly simple) or take a hit from a killer while roughly within eight meters of another injured survivor. The other survivor MUST be injured - healthy survivors do not count. This needs to take place when the End Game Collapse is occurring, which only happens if a hatch is shut (in which case you are alone except in fringe 2v8 cases) or an exit gate is open.
So not only are we dealing with a relatively uncommon scenario - making it to five generators in solo queue - we are dealing with the end game on top of that, when the game is actively counting down to detonation. There is some slight good news - assuming you are healthy at the start of the EGC, you can make multiple points of progress towards this achievement every time you get a chance. So at least it can theoretically advance more quickly than Outbreak Breakout.
You need to equip No One Left Behind. The information it provides on other survivors is unparalleled, especially since you will need to be near one of them to take a protection hit. Equip Adrenaline and Hope as well - Adrenaline will increase the likelihood you are healthy and thus, able to take an additional hit, during the EGC, while Hope will make it easier for you to intercept an injured survivor and put yourself between them and their pursuer. Fourth perk discretionary - Dead Hard would work for getting a third protection hit, but bear in mind you will be exhausted from Adrenaline. Pick a chase perk that will help you survive the rest of the game instead, like Windows of Opportunity or Sprint Burst.
If the EGC is active and a killer has picked up a survivor, force them to hit you. Don't worry if this is actually a good idea or not, you have the opportunity to make progress on this achievement - go for it. Don't bother 99ing exit gates, just crank them open and then find the killer and the survivor they are chasing. Throw yourself into danger with reckless abandon! ♥♥♥♥ over the other survivors by inadvertently triggering Blood Warden! Hell, that can even help with achievement progress!
Additional notes: Deathslinger can theoretically provide you the most progress for this achievement. When spiked by his gun, it counts as an attack, so if he shoots you while you're around a wounded teammate, it will count as a protection hit. If he smacks you with his melee within a wounded teammate, that's another hit - and you're not even downed yet! This means you can theoretically farm four hits off of one (likely bemused) Deathslinger before even getting picked up. Just bear it in mind.
You may be tempted to run Mettle of Man or Duty of Care for this achievement, but I do not recommend either. Mettle of Man can theoretically get you a free hit if you can activate it by the end game but ... come on, better men/women than us have tried to make that perk work to do far less. Use a Styptic or Dead Hard instead if you really want that endurance hit. Duty of Care is strong, but it speeds up the people around you after a protection hit, which could put them out of range of a second protection hit. It's solid if you actually care about saving your teammates in favor of getting progress of this achievement (I certainly ♥♥♥♥♥♥♥ didn't) but I feel it jeopardizes potential additional progress. I think you can do better.
2v8 Addendum: 2v8 offers a good opportunity for progress on this achievement, when it is available to play. Cracking open the exit gate immediately is common practice here, and you have more survivors to "protect." If you are gunning for this achievement I recommend Escapist (can heal themselves after being hooked once and can reposition quickly with their sprint - also just good for actually making it to the end game generally) or Medic (perfect vision on all wounded survivors.) Once the gate is open, find a survivor to "protect" and encourage the killer to give you one or two love taps.
For both modes, lounging at the exit gate and waiting for teammates before mercilessly taunting the killers is encouraged (I feel terrible) because you want to get hit. Absolutely miserable achievement. I was consistently throwing in the EGCs just to get progress.
The Show Must Go On
Complete ten generators while injured. I thought this one would happen a little more naturally than it did, but turns out I needed a bit of a push to actually remain injured. This should happen on its own naturally, but if you are gunning for it specifically, bring a medkit and Resilience. After you get injured, 99 your heal and work on the generator. Finish the heal in event of emergency. If someone else is healing you, you can break it by holding shift and moving away. Less experienced survivor may become confused or annoyed, whereas more experienced survivors will recognize you have a medkit in your hand and figure you have Resilience. Point at a generator if the confusion continues.
Practice Makes Perfect
Succeed at 100 skill checks while healing or repairing. Yeah, this one takes no effort on your part.
Survivor Achievements, Part 8
Stranger Sightings

Reveal or see the killer’s aura eleven times. You will probably get this naturally by doing Eleven’s Adept through the perks We See You and Extrasensory Perception. You can also get this pretty quickly with perks such as Alert, Kindred, or Wire Tap.
Working Overtime

Repair generators for 300 seconds in a single trial. This one is *tough* and is not going to happen in every match. Every generator takes 90 charges to complete fully, with 1 charge added per second at base. So your build CANNOT include anything that increases generators speeds, since we're not focusing on generator progress, just time on generator. In addition, you cannot work with another survivor since that will reduce the amount of time on the generator.
My suggestion? It's filthy. Run Potential Energy and never burn any of its charges. In fact, do your best to deliberately take a hit afterwards to lose those charges so you can spend more time on the generators with Potential Energy. Needless to say you are deliberately throwing by doing this since you need to extend the game as much as possible.
If you don't want to throw, this is pretty much the only actual strategy you can employ. It's completely luck of the draw. Avoid taking chase (run stealth perks I guess), stay on gens, and pray you get someone obsessed with running Thanatophobia, Dying Light, and/or Pentimento.
Key to Success

Use a key to open a chest. Self-explanatory.
Devoted Caretaker

Heal the obsession three times in a single match. As commenter Pringle Dingle discovered, self-healing counts when *you* are the obsession, making this challenge a lot easier than was likely intended. For the easy approach:
Equip Will to Live, Built to Last, a medkit with bandages and gel dressings, and maybe a healing perk (Botany is best.) Will to Live (formerly known as Decisive Strike) will make you the obsession. Get hit and heal yourself three times with your massive medkit, using Built to Last to refill it once it is out. If you lose the obsession status by any method, use Will to Live will get it back. If you're willing to take on a challenge, instead follow the directions below: this is what I did to get the achievement before finding out I had been on hard mode.
Step 1: Equip a Key and add the Unique Wedding Ring addon. This will make sure you are not the obsession and give both of you permanent view of each other. Note that this is permanent - you don't have to activate the key, and it even remains when the killer picks up the survivor. The only way it gets blocked is if you get blinded.
Step 2: Equip Botany Knowledge and We're Gonna Live Forever. Healing them from the downed position counts towards achievement progress so we want to be able to do it fast. Botany decreases the likelihood someone else will be able to join in and reduce the progress on your heal. Additional healing perks is probably overkill, but I was able to get use out of Made For This on the match I finally got this achievement, so consider throwing it in.
Step 3: Avoid the killer and hover around the obsession. Make sure you are the one to unhook. If the killer breaks chase with them after inflicting an injury, make sure you are the one to hunt them down and heal them. They will always know where you are, so as soon as they see your aura running at them, they'll know healing is on the way. From that point on you will have *hopefully* made a buddy who will return to you or wait for you every time they are injured.
Optional: If they get slugged, heal them quick, since that is added progress, and WGLF will give you some insurance. You should never be far from the obsession for this reason.
Final notes: If the killer is using perks that move the obsession around, this gets a lot easier, just use your key to home in on whoever is currently the target. Do not use For the People, since this will make you the obsession, and avoid perks that increase the likelihood of you becoming the obsession, such as Decisive Strike or Mettle of Man. Blood Pact encourages you to stay together but also reduces the likelihood of getting hit - I do not recommend it.
A Worthy Opponent

In one match, be in chase with the killer for 90 seconds. If you are a mediocre player, like myself, this will probably intimidate you, since the achievement is asking you to not suck for a lot longer than usual. This also means that the advice I can give you is a bit limited, since the core of this achievement basically means getting good.
Some killers will be in pursuit of you but not in chase, so don't sweat if you don't get this achievement against them. Examples include Huntress, Wraith, and Henry Creel. The game won't count you as being in chase, but believe me, they will be trying to kill you. You'll need a killer a bit more hands on.
Sprint Burst actively discourages chase. Pick something that will keep you just close enough that killers will not be dissuaded. Balanced Landing, Lithe, and Dead Hard are good. Smash Hit and Overcome are not. Dramaturgy is risky. Off the Record/Decisive Strike are good picks - we want them to tunnel us, but not effectively. Finally, Five Steps Ahead or Windows of Opportunity are excellent at sustaining chase, since they will give you a good idea of where your resources are.
You will get this eventually. The match I got this on was against the Unknown, and we had such a good time we friended each other and played a few matches together. So do not view this as a challenge - view it as an opportunity! I made a new friend through it. My build, for what it was worth: Dead Hard, Decisive Strike, Five Steps Ahead, Botany Knowledge.
Reveal or see the killer’s aura eleven times. You will probably get this naturally by doing Eleven’s Adept through the perks We See You and Extrasensory Perception. You can also get this pretty quickly with perks such as Alert, Kindred, or Wire Tap.
Working Overtime
Repair generators for 300 seconds in a single trial. This one is *tough* and is not going to happen in every match. Every generator takes 90 charges to complete fully, with 1 charge added per second at base. So your build CANNOT include anything that increases generators speeds, since we're not focusing on generator progress, just time on generator. In addition, you cannot work with another survivor since that will reduce the amount of time on the generator.
My suggestion? It's filthy. Run Potential Energy and never burn any of its charges. In fact, do your best to deliberately take a hit afterwards to lose those charges so you can spend more time on the generators with Potential Energy. Needless to say you are deliberately throwing by doing this since you need to extend the game as much as possible.
If you don't want to throw, this is pretty much the only actual strategy you can employ. It's completely luck of the draw. Avoid taking chase (run stealth perks I guess), stay on gens, and pray you get someone obsessed with running Thanatophobia, Dying Light, and/or Pentimento.
Key to Success
Use a key to open a chest. Self-explanatory.
Devoted Caretaker
Heal the obsession three times in a single match. As commenter Pringle Dingle discovered, self-healing counts when *you* are the obsession, making this challenge a lot easier than was likely intended. For the easy approach:
Equip Will to Live, Built to Last, a medkit with bandages and gel dressings, and maybe a healing perk (Botany is best.) Will to Live (formerly known as Decisive Strike) will make you the obsession. Get hit and heal yourself three times with your massive medkit, using Built to Last to refill it once it is out. If you lose the obsession status by any method, use Will to Live will get it back. If you're willing to take on a challenge, instead follow the directions below: this is what I did to get the achievement before finding out I had been on hard mode.
Step 1: Equip a Key and add the Unique Wedding Ring addon. This will make sure you are not the obsession and give both of you permanent view of each other. Note that this is permanent - you don't have to activate the key, and it even remains when the killer picks up the survivor. The only way it gets blocked is if you get blinded.
Step 2: Equip Botany Knowledge and We're Gonna Live Forever. Healing them from the downed position counts towards achievement progress so we want to be able to do it fast. Botany decreases the likelihood someone else will be able to join in and reduce the progress on your heal. Additional healing perks is probably overkill, but I was able to get use out of Made For This on the match I finally got this achievement, so consider throwing it in.
Step 3: Avoid the killer and hover around the obsession. Make sure you are the one to unhook. If the killer breaks chase with them after inflicting an injury, make sure you are the one to hunt them down and heal them. They will always know where you are, so as soon as they see your aura running at them, they'll know healing is on the way. From that point on you will have *hopefully* made a buddy who will return to you or wait for you every time they are injured.
Optional: If they get slugged, heal them quick, since that is added progress, and WGLF will give you some insurance. You should never be far from the obsession for this reason.
Final notes: If the killer is using perks that move the obsession around, this gets a lot easier, just use your key to home in on whoever is currently the target. Do not use For the People, since this will make you the obsession, and avoid perks that increase the likelihood of you becoming the obsession, such as Decisive Strike or Mettle of Man. Blood Pact encourages you to stay together but also reduces the likelihood of getting hit - I do not recommend it.
A Worthy Opponent
In one match, be in chase with the killer for 90 seconds. If you are a mediocre player, like myself, this will probably intimidate you, since the achievement is asking you to not suck for a lot longer than usual. This also means that the advice I can give you is a bit limited, since the core of this achievement basically means getting good.
Some killers will be in pursuit of you but not in chase, so don't sweat if you don't get this achievement against them. Examples include Huntress, Wraith, and Henry Creel. The game won't count you as being in chase, but believe me, they will be trying to kill you. You'll need a killer a bit more hands on.
Sprint Burst actively discourages chase. Pick something that will keep you just close enough that killers will not be dissuaded. Balanced Landing, Lithe, and Dead Hard are good. Smash Hit and Overcome are not. Dramaturgy is risky. Off the Record/Decisive Strike are good picks - we want them to tunnel us, but not effectively. Finally, Five Steps Ahead or Windows of Opportunity are excellent at sustaining chase, since they will give you a good idea of where your resources are.
You will get this eventually. The match I got this on was against the Unknown, and we had such a good time we friended each other and played a few matches together. So do not view this as a challenge - view it as an opportunity! I made a new friend through it. My build, for what it was worth: Dead Hard, Decisive Strike, Five Steps Ahead, Botany Knowledge.
Hand Eye Coordination

Collect the Hand or Eye of Vecna and escape. Why? Why, BHVR, why?
Let me break down why this is appalling. First - there are about thirty killers in this game, so if you don't get The Lich, tough ♥♥♥♥. Vecna hasn't been the most popular killer that I've seen during his debut, so I have no idea how common he will be going forward. As it stands right now (June 2024) it's about 1/7 or so chance of getting Vecna in solo queue.
Second - you have to roll a twenty to get one of his legendary items from a chest. So, 5% chance any time you open a chest. That's not terrific, to put it mildly. While the chests do eventually reset over time, you are still competing with three other survivors to find these items. Moreover, I don't believe it is possible to double up on these items - one person can get the Hand, one person can get the Eye. That's it.
Third - even *if* you are fortunate enough to get the Lich and then get one of his items, you still have to escape. In solo queue. And the Lich ALSO has his own achievement to get a 4k - and picking up the item has made you permanently vulnerable to a fast mori once you are on death hook!
So just getting the opportunity to even get this achievement is very low, and once you do, it is an absolute crapshoot on whether you and your solo queue goons can get anyone out alive, let alone your prosthetic-wearing ass. As for actually using either of these items, I only recommend using the Hand if you are in chase and it's a life or death situation - it will teleport you to a random locker once you dive into one. And even then I have had one poor bastard burst out of another locker directly behind me after using the Hand, prompting an immediate down! In most circumstances, I wouldn't risk it. The Eye turns you invisible and gives you 25% haste for a few seconds, but both items trigger killer instinct as well as an injure after usage - so again, I wouldn't risk it.
Here are some general tips for surviving Vecna - it's all I can help you with, since the rest is luck. Note that you can still wear magic items on top of your Hand/Eye, so take advantage of that.
Mage Hand - pre drop pallets while Vecna is still a decent distance away. Not while he's close - he'll just flip it back up, float through, and hit you. If you drop the pallet and start rotating around the loop while he's approaching, you'll force him to either lift the pallet and begin the chase, hopefully giving you enough time to re-drop the pallet, or he'll just break it and you can move to the next loop. If you get a Mage Hand magic item, make sure to keep it on, the speed boost is very helpful.
Flight of the Damned - if you hear the crackle of bones, CROUCH CROUCH CROUCH. It might be close up, it might be far away, don't risk it.
Fly - he can't attack while it's active but he can cancel it at will, so don't get cheeky and run at him. His power gets canceled if he flies over a window or pallet. It *is* possible to vault back through a window or pallet he just flew over while he's landing, but it's risky. Getting a magic item for this spell is also very useful, since it will let you track Vecna's movements across the map, but I recommend a Mage Hand/Dispelling Sphere combination to maximize chances of survival. You know, if you get the luxury of choice.
Dispelling Sphere - hiding in a locker does not help. Getting a magic item for this will let you see the sphere which is absolutely critical to remaining undetected.
Recommended Build: Windows of Opportunity, Sprint Burst, Urban Evasion, Resilience. Windows will let you know what you have available, Sprint Burst will clear dead zones and potentially let you dissuade Vecna from chasing you, Urban Evasion is very helpful for making distance against Flight of the Damned, and Resilience can give you a slight edge in situations where you need to vault and Vecna is recovering from a spell before he can M1. I will credit JRM for using Resilience and Urban Evasion, and you can see some gameplay of Vecna juicing below, if you need inspiration. He uses Lucky Break instead of Windows of Opportunity, though.
Obviously, it is up to what you most feel comfortable with. This isn't a match you can prepare for - you'll just be spamming solo queue, get Vecna, and then fish this item up. It's up to you to capitalize. God help you. Good luck.
Addendum: I got this achievement the second time I fished an Eye out of a chest against Vecna. The map was Decimated Borgo. The killer was using some weird Blood Warden/Knock Out build and spent far too much time slugging. I lucked out and two of my teammates had brought Circle of Healing and Boon: Exponential, so his strategy wasn't really working. I wasn't using an exhaustion perk, but I did have Windows and Unbreakable, both of which did a lot of work. (Build was Unbreakable, Windows, Hope, and Decisive Strike IIRC.) I don't recommend Unbreakable or DS for this achievement since Vecna can just mori you on your last hook, but again, just use what you are comfortable with.
Bloodied Hands and Break For It
Due to their similarity and difficulty, I've given these two their own section. Good luck! You'll need it.
Bloodied Hands

Safely unhook ten survivors while broken. If you were wondering why so many players were running Invocations and No Mither after the Houndmaster release, these achievements are/were the reason why. Being broken necessitates being injured, which is already a big ask for successfully rescuing someone from hook. Becoming broken is a mercifully infrequent occurrence, but here we need to find a way to conveniently cripple ourselves while ideally not throwing. Here are some strategies:
♥♥♥♥ it, we ball: Do nothing. Sometimes you’ll get lucky where you face killers running Terminus or addons that inflict broken and you can gradually make progress on this achievement. Maybe you’ve been playing normally for a few hundred hours and stumbled on this guide, only to realize you already got this achievement without even realizing it while doing your David Adept. Lucky you! That’s probably what BHVR intended.
Brainless: Just run No Mither. This means you can run invocations if you want, and you can run Resilience and always have it active. This does guarantee every safe unhook will contribute to the achievement, but it also burns a perk slot and will likely get you unwelcome attention from the killer. You *might* get some pity from the killer if you play David and fool them into thinking you are doing your adept (play his default skin if you are doing this) but I would not count on it. Straightforward, but you are throwing with this strategy.
Mostly Brainless: My and many others’ strategy – run Invocation: Weaving Spiders. This will give you broken while also contributing to the team (slightly.) The downside is if someone else is using this perk already, you won’t be able to get broken yourself, and getting caught in the basement is more embarrassing than your parents walking in on you. You should probably run Resilience, Iron Will, and maybe Desperate Measures (faster unhooks) to complement the Invocation. Try not to go for the basement right away. While I was doing this achievement, I usually opted to take a chase and do a gen first and then invoking while already injured. May as well bring a toolbox or flashlight with this strategy as well.
My Brain is Very Large: There are a handful of perks that leave you broken for a length of time before healing you. The sheer timing and luck required to pull this strategy off means I do not recommend this strategy, but it is the closest you can get to farming this achievement without inconveniencing your team much. These perks are Second Wind (the worst of the bunch – you heal in 20 seconds after an unhook which leaves you very little time to unhook someone else); Moment of Glory (activates after opening two chests and then *getting injured*, meaning you can theoretically get hit while unhooking, become broken, unhook, and then hook trade – broken lasts for 60 seconds – overall this is the best perk for this challenge); and Clean Break (Taurie Cain perk, fittingly – heal someone else, and then activate the ability to give yourself broken for 60 seconds and then unhook someone else.)
All the above is ludicrously difficult compared to the prior options, but I am suggesting them in case you don’t want your throwing for achievements to be as obvious.
Two other perk options for giving yourself broken are Deliverance and For the People, but I don’t think either perk puts you in a great position to unhook after using them. Moment of Glory is probably your best bet here.
Break For It

Sweet Jesus – escape the match five times while broken. See Bloodied Hands for some strategies on becoming broken. No Mither is not as good an idea here, since it drastically reduces your odds of survival, so we want to become broken *selectively.* Weaving Spiders is still a decent call (the perk does have a decent amount of upside and gives your teammates an advantage even after you die) but the best way to get this achievement is just to bring For the People and activate it at the exit gate while healing another survivor. Deliverance is also an excellent hedge here, for those end game struggles. If I had to pick four perks for this (note, not running all of them together, but as potential candidates for any build):
For the People for activating at the exit gate (Clean Break could work here too, if you are injured, but For the People is a much stronger perk overall).
Deliverance for unhooking yourself and then running for the exit gate, also a good perk in general.
Moment of Glory for taking a hit at the exit gate and then leaving while broken. Make sure to open two chests first!
Invocation: Weaving Spiders to give team a lasting advantage and give yourself broken. If you’re desperate and the killer is struggling or has given up, you can still use this perk even with the generators powered, so you can double back to basement, give yourself broken, and then leave. Yes, I have done this. If you bring this perk, I recommend building around it with Iron Will and Resilience. The three other perks slot more neatly into builds that are actually trying to help their teammates win.
Bloodied Hands
Safely unhook ten survivors while broken. If you were wondering why so many players were running Invocations and No Mither after the Houndmaster release, these achievements are/were the reason why. Being broken necessitates being injured, which is already a big ask for successfully rescuing someone from hook. Becoming broken is a mercifully infrequent occurrence, but here we need to find a way to conveniently cripple ourselves while ideally not throwing. Here are some strategies:
♥♥♥♥ it, we ball: Do nothing. Sometimes you’ll get lucky where you face killers running Terminus or addons that inflict broken and you can gradually make progress on this achievement. Maybe you’ve been playing normally for a few hundred hours and stumbled on this guide, only to realize you already got this achievement without even realizing it while doing your David Adept. Lucky you! That’s probably what BHVR intended.
Brainless: Just run No Mither. This means you can run invocations if you want, and you can run Resilience and always have it active. This does guarantee every safe unhook will contribute to the achievement, but it also burns a perk slot and will likely get you unwelcome attention from the killer. You *might* get some pity from the killer if you play David and fool them into thinking you are doing your adept (play his default skin if you are doing this) but I would not count on it. Straightforward, but you are throwing with this strategy.
Mostly Brainless: My and many others’ strategy – run Invocation: Weaving Spiders. This will give you broken while also contributing to the team (slightly.) The downside is if someone else is using this perk already, you won’t be able to get broken yourself, and getting caught in the basement is more embarrassing than your parents walking in on you. You should probably run Resilience, Iron Will, and maybe Desperate Measures (faster unhooks) to complement the Invocation. Try not to go for the basement right away. While I was doing this achievement, I usually opted to take a chase and do a gen first and then invoking while already injured. May as well bring a toolbox or flashlight with this strategy as well.
My Brain is Very Large: There are a handful of perks that leave you broken for a length of time before healing you. The sheer timing and luck required to pull this strategy off means I do not recommend this strategy, but it is the closest you can get to farming this achievement without inconveniencing your team much. These perks are Second Wind (the worst of the bunch – you heal in 20 seconds after an unhook which leaves you very little time to unhook someone else); Moment of Glory (activates after opening two chests and then *getting injured*, meaning you can theoretically get hit while unhooking, become broken, unhook, and then hook trade – broken lasts for 60 seconds – overall this is the best perk for this challenge); and Clean Break (Taurie Cain perk, fittingly – heal someone else, and then activate the ability to give yourself broken for 60 seconds and then unhook someone else.)
All the above is ludicrously difficult compared to the prior options, but I am suggesting them in case you don’t want your throwing for achievements to be as obvious.
Two other perk options for giving yourself broken are Deliverance and For the People, but I don’t think either perk puts you in a great position to unhook after using them. Moment of Glory is probably your best bet here.
Break For It
Sweet Jesus – escape the match five times while broken. See Bloodied Hands for some strategies on becoming broken. No Mither is not as good an idea here, since it drastically reduces your odds of survival, so we want to become broken *selectively.* Weaving Spiders is still a decent call (the perk does have a decent amount of upside and gives your teammates an advantage even after you die) but the best way to get this achievement is just to bring For the People and activate it at the exit gate while healing another survivor. Deliverance is also an excellent hedge here, for those end game struggles. If I had to pick four perks for this (note, not running all of them together, but as potential candidates for any build):
For the People for activating at the exit gate (Clean Break could work here too, if you are injured, but For the People is a much stronger perk overall).
Deliverance for unhooking yourself and then running for the exit gate, also a good perk in general.
Moment of Glory for taking a hit at the exit gate and then leaving while broken. Make sure to open two chests first!
Invocation: Weaving Spiders to give team a lasting advantage and give yourself broken. If you’re desperate and the killer is struggling or has given up, you can still use this perk even with the generators powered, so you can double back to basement, give yourself broken, and then leave. Yes, I have done this. If you bring this perk, I recommend building around it with Iron Will and Resilience. The three other perks slot more neatly into builds that are actually trying to help their teammates win.
Killer Achievements, Part 1
A Bite for the Entity

Sacrifice 100 survivors. They deserve it.
A Fast Death

Damage 8 survivors under the effect of haste. This will happen on its own, since it includes survivors using their exhaustion perk, as well as survivors who just got off hook. Point being, haste effects are more present than you think. I was all set to bust out Clown's yellow bottles for this before being spontaneously rewarded it.
A Feast for the Entity

Sacrifice 1000 survivors. Don't watch the progress bar on this one, you'll go mad. Just kill them, and keep killing them.
Apt Killer

Start a trial with two add-ons and an offering. We in the biz call this "playing normally."
Bloodbath

Down 75 survivors with Oni while he's enraged. The lunge and charge attacks will be your go to here, since it downs healthy survivors, but remember you do have a basic M1 as well if you're up against an injured survivor. Oni is a mite tricky to play, but he's lethal enough that you should have very little trouble.
Bound and Downed

With the Deathslinger, down 30 speared survivors. Brush up on your aim and get shooting! Expose perks can be helpful here (NOED and Devour Hope are solid) but my go to would be Save the Best for Last (STBFL) which can allow you to basic M1 a survivor and then shoot them before they make any distance, once you have a few stacks built up.
Broken Bodies

Hook 10 survivors while all others are injured. If you want to get this done even faster, Plague and Legion are probably the best calls, but you should get this one without trying ... so long as you love stabbing. And we all love stabbing, don't we?
Butcherin'

Chainsaw 100 survivors with the Cannibal. Much easier to pull off than Hillbilly, trust me. Chili addons are probably the strongest to run with, here.
Biological Weaponry

Down 65 infected survivors with your tentacle as Nemesis. I adore Nemesis, so I don't view this challenge as terribly difficult. It does mean you will be committing to a lot of 3 hit chases, so still try to take M1s if they are free. I recommend Marvin's Blood to level up faster and Broken Recovery Coin so that survivors have fewer vaccines to work with, increasing the likelihood you only run into infected survivors as the match progresses. Try to whip when they're stuck in vaulting animations. Watch for last second jukes and especially Dead Hard or Styptic Agent! You do *not* want to get stuck in a 4 hit chase.
Bump in the Night

Down 50 survivors during Nightfall as Dredge. Use your increased map traversal to locate survivors quickly during Nightfall. Run the Broken Doll addon to increase the duration of Nightfall so you have more time to secure downs. So long as you locate someone fast once Nightfall starts, the combination of decreased visibility on their part and your ability to cut off their escape with lockers should allow you to eventually secure one or two hits.
Caws of Death

Down 50 survivors with the Artist's power. This is a little harder since you need to down survivors, not just hit or injure them, and Artist's power is frequently a three hit down by necessity. Prioritize locking off loops with your birds and forcing survivors into them to deal damage. Only "bird" them to death at long range or as a last resort if they are making a getaway. "Shotgunning" your birds by placing all three of them facing at slightly different angles to hit a target a medium range is effective at securing a hit, but has a godawful cooldown. In general, try to summon and use one bird at a time so your cooldowns remain short. If you can secure successive hits this way, you should be able to injure survivors before they shake the birds off.
Cleansed in Agony

As the Executioner, put 30 survivors in Cages of Atonement. Survivors are justifiably scared of being tormented, but will still take the status in favor of taking an M1 most of the time. Just loop with a survivor for a bit while using your power and cage everyone you can, and you should get this achievement fairly fast. This achievement will likely involve playing suboptimally while you get it, but don't worry, this too shall pass.
Collision Course

Damage 10 survivors by hitting them with another survivor as The Mastermind. This was originally glitched so that it counted both the thrown and the hit survivor as part of the challenge, but now it seems to be fixed. This one is fairly irritating, but can be farmed for - once survivors realize they have a friendly Wesker, they will be happy to line up to slap your ass and nod at you. Just slam them into each other a few times, and pay them back by letting them heal and pallet stun you.
If you want to get this challenge legitimately, then the easiest way to do so is targeting survivors who are unhooking other survivors. Line yourself up behind the rescuer with your power charged, and once the other survivor has been unhooked, launch yourself into them. This will deep wound the unhooked survivor and injure/down the rescuer. The timing is tricky, but you can do this fairly consistently with practice. If you do it too early or hit the unhooked survivor instead of the rescuer, Wesker will just slap them on the ass, infecting them and taking a health state, but not contributing to the challenge.
Sacrifice 100 survivors. They deserve it.
A Fast Death
Damage 8 survivors under the effect of haste. This will happen on its own, since it includes survivors using their exhaustion perk, as well as survivors who just got off hook. Point being, haste effects are more present than you think. I was all set to bust out Clown's yellow bottles for this before being spontaneously rewarded it.
A Feast for the Entity
Sacrifice 1000 survivors. Don't watch the progress bar on this one, you'll go mad. Just kill them, and keep killing them.
Apt Killer
Start a trial with two add-ons and an offering. We in the biz call this "playing normally."
Bloodbath
Down 75 survivors with Oni while he's enraged. The lunge and charge attacks will be your go to here, since it downs healthy survivors, but remember you do have a basic M1 as well if you're up against an injured survivor. Oni is a mite tricky to play, but he's lethal enough that you should have very little trouble.
Bound and Downed
With the Deathslinger, down 30 speared survivors. Brush up on your aim and get shooting! Expose perks can be helpful here (NOED and Devour Hope are solid) but my go to would be Save the Best for Last (STBFL) which can allow you to basic M1 a survivor and then shoot them before they make any distance, once you have a few stacks built up.
Broken Bodies
Hook 10 survivors while all others are injured. If you want to get this done even faster, Plague and Legion are probably the best calls, but you should get this one without trying ... so long as you love stabbing. And we all love stabbing, don't we?
Butcherin'
Chainsaw 100 survivors with the Cannibal. Much easier to pull off than Hillbilly, trust me. Chili addons are probably the strongest to run with, here.
Biological Weaponry
Down 65 infected survivors with your tentacle as Nemesis. I adore Nemesis, so I don't view this challenge as terribly difficult. It does mean you will be committing to a lot of 3 hit chases, so still try to take M1s if they are free. I recommend Marvin's Blood to level up faster and Broken Recovery Coin so that survivors have fewer vaccines to work with, increasing the likelihood you only run into infected survivors as the match progresses. Try to whip when they're stuck in vaulting animations. Watch for last second jukes and especially Dead Hard or Styptic Agent! You do *not* want to get stuck in a 4 hit chase.
Bump in the Night
Down 50 survivors during Nightfall as Dredge. Use your increased map traversal to locate survivors quickly during Nightfall. Run the Broken Doll addon to increase the duration of Nightfall so you have more time to secure downs. So long as you locate someone fast once Nightfall starts, the combination of decreased visibility on their part and your ability to cut off their escape with lockers should allow you to eventually secure one or two hits.
Caws of Death
Down 50 survivors with the Artist's power. This is a little harder since you need to down survivors, not just hit or injure them, and Artist's power is frequently a three hit down by necessity. Prioritize locking off loops with your birds and forcing survivors into them to deal damage. Only "bird" them to death at long range or as a last resort if they are making a getaway. "Shotgunning" your birds by placing all three of them facing at slightly different angles to hit a target a medium range is effective at securing a hit, but has a godawful cooldown. In general, try to summon and use one bird at a time so your cooldowns remain short. If you can secure successive hits this way, you should be able to injure survivors before they shake the birds off.
Cleansed in Agony
As the Executioner, put 30 survivors in Cages of Atonement. Survivors are justifiably scared of being tormented, but will still take the status in favor of taking an M1 most of the time. Just loop with a survivor for a bit while using your power and cage everyone you can, and you should get this achievement fairly fast. This achievement will likely involve playing suboptimally while you get it, but don't worry, this too shall pass.
Collision Course
Damage 10 survivors by hitting them with another survivor as The Mastermind. This was originally glitched so that it counted both the thrown and the hit survivor as part of the challenge, but now it seems to be fixed. This one is fairly irritating, but can be farmed for - once survivors realize they have a friendly Wesker, they will be happy to line up to slap your ass and nod at you. Just slam them into each other a few times, and pay them back by letting them heal and pallet stun you.
If you want to get this challenge legitimately, then the easiest way to do so is targeting survivors who are unhooking other survivors. Line yourself up behind the rescuer with your power charged, and once the other survivor has been unhooked, launch yourself into them. This will deep wound the unhooked survivor and injure/down the rescuer. The timing is tricky, but you can do this fairly consistently with practice. If you do it too early or hit the unhooked survivor instead of the rescuer, Wesker will just slap them on the ass, infecting them and taking a health state, but not contributing to the challenge.
Killer Achievements, Part 2
Conniption

Write a Steam Community Achievement guide for Dead by Daylight. Alternatively, down 30 survivors after using the Spirit's power. Put on a headset and maybe Stridor if you struggle with Spirit, and equip some speed or haunting duration addons. She's a little more difficult to use than some people give her credit for, but the Spirit has a legitimately strong power. You shouldn't struggle much.
Cripple Them All

Grab 100 survivors from a bear trap with the Trapper. Note that this is not what the achievement description says on Steam, but this is what you need to do. Do *not* hit them out of the trap, you need to walk up to them while they are struggling with the bear trap and press space bar. You will have to do this a comical amount of times.
So long as you remember to grab them instead of hit them, this challenge is not too bad. It is lengthy, however, and you may have to stick to suboptimal gameplay for a bit. Skilled survivors are also very good at avoiding traps, which can complicate things. Try to trap loops or hide them in bushes. The easiest way to grab survivors is to force them into a trap during chase and then snatching them. Just don't hit them, or you'll be forfeiting progress!
Cruelty Loves Company

With the Knight, damage 50 survivors while they are being chased by a guard. This comes pretty naturally, since it's usually pretty easy to herd survivors in certain directions or cut them off once a guard is on their ass. I suggest bringing Dried Horse Meat to extend chase duration, and potentially also the Axe addon that lets you bring the Carnifex twice, since his chase lasts 24 seconds at base. This should greatly increase the chance you can get a hit off before chase ends.
Death of Ignorance

Down 15 survivors suffering from the Oblivious status effect. Best way to inflict this is probably Hex: Plaything, but there are quite a few killer addons that can do this as well. Freddy also inflicts Oblivious automatically over time or after hitting a survivor, so playing 2-3 rounds of him will guarantee this achievement (as well as a loss of sanity.)
Denied

Close the hatch 30 times. This will happen more often than you think! Just remember to start scouring the map as the last survivor goes through the death animation so you can close the hatch before the map ends, and check the match offerings to see if anyone brought a guaranteed spawn for hatch!
Deranged Pursuit

As Legion, down 25 people suffering from the Deep Wounds status effect. Just use your power and stab as many people as possible, then chase and down the last person you stabbed. You can also optionally get this by tunneling people off hook, either hitting them with Frenzy or a M1 and then hunting them down afterwards. This one should come pretty easily. Optionally bring the Filthy Blade and Glasses addons to increase the mending time and see their aura, letting you run into them while they are mending.
Devoted Gatekeeping

Sacrifice all survivors 25 times before generators are repaired. Trust me, given how often survivors suicide on hook, you'll get this faster than you think. Just start working on remembering hatch spawn locations, and consider running No Way Out to make sure the last survivor does not get a cheeky exit gate escape!
Dream Master

Pull 200 survivors into the Dream World as the Nightmare. You could literally AFK all game as Freddy and get this achievement, since survivors will be pulled into the Dream World automatically over time. If you actually do play, hitting them will also achieve this effect. But the fact you literally have a no effort option means that the only difficulty this challenge presents is enduring repeated Freddy matches. I will concede that is slightly terrifying.
End of Days

Hook 15 survivors during the Endgame Collapse. This triggers when either an exit gate has opened or the Hatch has been shut. These are fairly common occurrences, and you will frequently get hooks during them. Consider running Blood Warden for style points.
Write a Steam Community Achievement guide for Dead by Daylight. Alternatively, down 30 survivors after using the Spirit's power. Put on a headset and maybe Stridor if you struggle with Spirit, and equip some speed or haunting duration addons. She's a little more difficult to use than some people give her credit for, but the Spirit has a legitimately strong power. You shouldn't struggle much.
Cripple Them All
Grab 100 survivors from a bear trap with the Trapper. Note that this is not what the achievement description says on Steam, but this is what you need to do. Do *not* hit them out of the trap, you need to walk up to them while they are struggling with the bear trap and press space bar. You will have to do this a comical amount of times.
So long as you remember to grab them instead of hit them, this challenge is not too bad. It is lengthy, however, and you may have to stick to suboptimal gameplay for a bit. Skilled survivors are also very good at avoiding traps, which can complicate things. Try to trap loops or hide them in bushes. The easiest way to grab survivors is to force them into a trap during chase and then snatching them. Just don't hit them, or you'll be forfeiting progress!
Cruelty Loves Company
With the Knight, damage 50 survivors while they are being chased by a guard. This comes pretty naturally, since it's usually pretty easy to herd survivors in certain directions or cut them off once a guard is on their ass. I suggest bringing Dried Horse Meat to extend chase duration, and potentially also the Axe addon that lets you bring the Carnifex twice, since his chase lasts 24 seconds at base. This should greatly increase the chance you can get a hit off before chase ends.
Death of Ignorance
Down 15 survivors suffering from the Oblivious status effect. Best way to inflict this is probably Hex: Plaything, but there are quite a few killer addons that can do this as well. Freddy also inflicts Oblivious automatically over time or after hitting a survivor, so playing 2-3 rounds of him will guarantee this achievement (as well as a loss of sanity.)
Denied
Close the hatch 30 times. This will happen more often than you think! Just remember to start scouring the map as the last survivor goes through the death animation so you can close the hatch before the map ends, and check the match offerings to see if anyone brought a guaranteed spawn for hatch!
Deranged Pursuit
As Legion, down 25 people suffering from the Deep Wounds status effect. Just use your power and stab as many people as possible, then chase and down the last person you stabbed. You can also optionally get this by tunneling people off hook, either hitting them with Frenzy or a M1 and then hunting them down afterwards. This one should come pretty easily. Optionally bring the Filthy Blade and Glasses addons to increase the mending time and see their aura, letting you run into them while they are mending.
Devoted Gatekeeping
Sacrifice all survivors 25 times before generators are repaired. Trust me, given how often survivors suicide on hook, you'll get this faster than you think. Just start working on remembering hatch spawn locations, and consider running No Way Out to make sure the last survivor does not get a cheeky exit gate escape!
Dream Master
Pull 200 survivors into the Dream World as the Nightmare. You could literally AFK all game as Freddy and get this achievement, since survivors will be pulled into the Dream World automatically over time. If you actually do play, hitting them will also achieve this effect. But the fact you literally have a no effort option means that the only difficulty this challenge presents is enduring repeated Freddy matches. I will concede that is slightly terrifying.
End of Days
Hook 15 survivors during the Endgame Collapse. This triggers when either an exit gate has opened or the Hatch has been shut. These are fairly common occurrences, and you will frequently get hooks during them. Consider running Blood Warden for style points.
Killer Achievements, Part 3
Even Punishment

Hit all four survivors at least once after emerging from a trap as Hag. If you play Hag, this should happen eventually, so long as you are setting a lot of traps. Hint: if you are Hag, set lots of traps. Previously bugged, currently working.
Expert Killer, Master Killer, Legendary Killer


Reach Silver, Gold, and Iridescent Grade 1 as Killer. As with survivor, I consider this more a matter of personal time investment than I do skill. This is at least easier than survivor since all killer scoring categories involve doing what killers normally do - chase, injure, hook, kill. In contrast, survivors have to focus on evading the killer, repairing gens, and healing/rescuing teammates in order to pip. You just have to play the game.
Since each killer is unique, I cannot offer a lot of assistance here. Pick one that you enjoy playing, equip strong perks, bring decent addons, and get familiar with their mechanics. The scoring system has been greatly simplified from the past, and so long as you give each game an honest attempt, the balance of power should gradually swing your way. It is just a matter of persistence. If you get a game where you could end it early due to survivor incompetence, draw it out. You get more scoring for your emblems based on successful chases and hooks, so the more you maul them, the more the Entity will like you.
Rank reset is on the 13th of each month. Good luck!
First to the Punch

Down 30 survivors within 8 meters of an upright pallet. This is where most of your downs will be, actually.
From the Deep

Grab 25 survivors hiding inside lockers. This one is annoying, since good survivors won't be ♥♥♥♥♥♥♥ around with lockers. Iron Maiden doesn't help here, since it actively encourages survivors to avoid lockers. You will get this one eventually, but there is very little you can do to encourage it, so to speak. One way you can "force" this achievement is to play instant-kill Myers (either with Tombstone or Tombstone Piece) which will force survivors into lockers fairly often, at the cost of becoming justifiably hated.
I would just farm this one. Make it clear that you are friendly and start hitting lockers until they go inside them and then grab them. Optionally bring Iron Maiden to speed up the grab and save some time, as well as to orchestrate a symphony of screaming survivors once they realize you have the perk. Trust me, they love to spam lockers with Iron Maiden.
From the Void She Kills

Grab a survivor off of a gen after three blinks as Nurse. Yeah, just farm this one. Survivors will be relieved that they are not playing against an actual Nurse player and will quickly realize you want the achievement once you hit a generator a few times with your M1 and then start blinking next to them repeatedly. Don't forget to bring Torn Bookmark addon!
Game Over

Kill 30 survivors after the last generator has been powered. If you want to facilitate this happening more often, an endgame build of No Way Out, Hex: No One Escapes Death, Blood Warden, Terminus/Remember Me will make this a lot more likely.
Ghost in the Machine

Damage 50 generators while undetectable. The easiest way to do this is obviously with stealth killers. Cloaked Wraith is a good choice, since he has a lot of kick speed addons, but a Demanifested Onryo also works. Myers only works in Tier 1, so consider playing a Tier 1 Only Myers. Ghostface works while he is stealthed, but odds are good a survivor will break you out of it while you kick the generator.
Generator damaging perks also count, but being undetected while pulling of a Pain Resonance or Jolt strikes me as rather unlikely, and would probably require another perk to function. Don't do anything fancy, just remember to Demanifest as Onryo and kick some gens. Call of Brine and Eruption are natural inclusions, but let's be honest, you were running those already.
Heavy Burden

Hit 25 survivors while carrying another survivor. Survivors love to take hits while you're carrying someone, so this is not as hard as it sounds. Consider bringing Agitation if you want to facilitate this, so you can chase people down if they have distance on you. Mad Grit is solid but survivors will stop taking hits if they realize you have it (and they will, if they have comms) so I recommend STBFL instead. There has been many a time where I secured 2-3 hits under a hook as survivors took turns crouching under it, only to get smacked faster and faster.
Starstruck is not a good idea, they will run like hell.
High Speed Pursuit

Vault 50 times while chasing a survivor. Look, we all have to do this eventually. Legion, Wesker, and Chucky would get this fastest, since their power lets them vault pallets as well as windows, but you're going to get this without trying if you're playing normally. You could even enter chase and just vault the same window repeatedly, if you want! Hell, in shack, that could even be considered a valid play, on occasion.
Hit all four survivors at least once after emerging from a trap as Hag. If you play Hag, this should happen eventually, so long as you are setting a lot of traps. Hint: if you are Hag, set lots of traps. Previously bugged, currently working.
Expert Killer, Master Killer, Legendary Killer
Reach Silver, Gold, and Iridescent Grade 1 as Killer. As with survivor, I consider this more a matter of personal time investment than I do skill. This is at least easier than survivor since all killer scoring categories involve doing what killers normally do - chase, injure, hook, kill. In contrast, survivors have to focus on evading the killer, repairing gens, and healing/rescuing teammates in order to pip. You just have to play the game.
Since each killer is unique, I cannot offer a lot of assistance here. Pick one that you enjoy playing, equip strong perks, bring decent addons, and get familiar with their mechanics. The scoring system has been greatly simplified from the past, and so long as you give each game an honest attempt, the balance of power should gradually swing your way. It is just a matter of persistence. If you get a game where you could end it early due to survivor incompetence, draw it out. You get more scoring for your emblems based on successful chases and hooks, so the more you maul them, the more the Entity will like you.
Rank reset is on the 13th of each month. Good luck!
First to the Punch
Down 30 survivors within 8 meters of an upright pallet. This is where most of your downs will be, actually.
From the Deep
Grab 25 survivors hiding inside lockers. This one is annoying, since good survivors won't be ♥♥♥♥♥♥♥ around with lockers. Iron Maiden doesn't help here, since it actively encourages survivors to avoid lockers. You will get this one eventually, but there is very little you can do to encourage it, so to speak. One way you can "force" this achievement is to play instant-kill Myers (either with Tombstone or Tombstone Piece) which will force survivors into lockers fairly often, at the cost of becoming justifiably hated.
I would just farm this one. Make it clear that you are friendly and start hitting lockers until they go inside them and then grab them. Optionally bring Iron Maiden to speed up the grab and save some time, as well as to orchestrate a symphony of screaming survivors once they realize you have the perk. Trust me, they love to spam lockers with Iron Maiden.
From the Void She Kills
Grab a survivor off of a gen after three blinks as Nurse. Yeah, just farm this one. Survivors will be relieved that they are not playing against an actual Nurse player and will quickly realize you want the achievement once you hit a generator a few times with your M1 and then start blinking next to them repeatedly. Don't forget to bring Torn Bookmark addon!
Game Over
Kill 30 survivors after the last generator has been powered. If you want to facilitate this happening more often, an endgame build of No Way Out, Hex: No One Escapes Death, Blood Warden, Terminus/Remember Me will make this a lot more likely.
Ghost in the Machine
Damage 50 generators while undetectable. The easiest way to do this is obviously with stealth killers. Cloaked Wraith is a good choice, since he has a lot of kick speed addons, but a Demanifested Onryo also works. Myers only works in Tier 1, so consider playing a Tier 1 Only Myers. Ghostface works while he is stealthed, but odds are good a survivor will break you out of it while you kick the generator.
Generator damaging perks also count, but being undetected while pulling of a Pain Resonance or Jolt strikes me as rather unlikely, and would probably require another perk to function. Don't do anything fancy, just remember to Demanifest as Onryo and kick some gens. Call of Brine and Eruption are natural inclusions, but let's be honest, you were running those already.
Heavy Burden
Hit 25 survivors while carrying another survivor. Survivors love to take hits while you're carrying someone, so this is not as hard as it sounds. Consider bringing Agitation if you want to facilitate this, so you can chase people down if they have distance on you. Mad Grit is solid but survivors will stop taking hits if they realize you have it (and they will, if they have comms) so I recommend STBFL instead. There has been many a time where I secured 2-3 hits under a hook as survivors took turns crouching under it, only to get smacked faster and faster.
Starstruck is not a good idea, they will run like hell.
High Speed Pursuit
Vault 50 times while chasing a survivor. Look, we all have to do this eventually. Legion, Wesker, and Chucky would get this fastest, since their power lets them vault pallets as well as windows, but you're going to get this without trying if you're playing normally. You could even enter chase and just vault the same window repeatedly, if you want! Hell, in shack, that could even be considered a valid play, on occasion.
Killer Achievements, Part 4
Holiday Get Together

Have at least three survivors hooked in a basement in a single trial. Hard to get since survivors enjoy suiciding on hook, especially if there is more than one of them in the basement already. The best way to get this is to bring Agitation, bring someone to the basement, and then try and set up a cascading disaster of a basement save. The Trapper is obviously best at this, but Huntress is no slouch either. Bubba is probably *too* dangerous for this, since most survivors will not voluntarily go into a basement with a camping Bubba inside, or even a proxy-camping Bubba.
Consider bringing an offering that brings the basement to the main building, so if you get a map with a main building, the basement will both be easily accessible for you (so you can drop off your first survivor) and the survivors (so they can easily attempt the save that will DOOM THEM ALL.)
Insidious may be a good call here, if a bit stereotypical. Comms will defeat it, so try not to go dark where they can see you. Kindred is also a problem, but there's nothing you can do about that.
Despite the name, this achievement is not in any way restricted by season, so you can try for it whenever you choose.
I See You

Down 30 survivors suffering from the Exposed status effect. Ghostface and Myers will get this pretty easily, but running NOED and Haunted Ground should make this even easier. Some killers have Exposed addons - Nemesis and Deathslinger stick out as having good ones - so you have options even outside the above listed horror icons. So long as you remember to bring the right killers or perks, this one should be pretty easy.
In the Void She Walks

Hit 500 Blink attacks as Nurse. Okay, this is the one of several older killer achievements that have ridiculous numbers attached to them. The Trapper was already pushing it with his grab achievement. There is nothing I can do to help you here aside from tell you to play the killer, a lot. Farm if you want, but it will be boring as hell and you won't get what you need from a single match. Just play normally. Have fun. Just bear in mind that you will need to play Nurse (as well as a few other killers) a little more than usual. Expect to attract a lot of hate doing this one.
I Want to Play a Game

Place 125 Reverse Bear Traps on the heads of survivors as Pig. Same as above, this is another lengthy and tedious achievement, made worse because you can only bring a maximum of 6 RBTs per match. Bring the addons which gives you an extra, and prioritize putting on hats at every opportunity, even if it would make more sense to save one at the time. This achievement will take, at minimum, 21 matches of Pig, which is just absurd to me. Pig is at least a fun killer, but there is no reason for the number to be that high. You can't even farm this much, since you are capped at 6 RBTs! Stupid, stupid achievement.
Jump Scares

As Wraith, land 100 attacks on survivors after uncloaking. You'll know progress has been made if you see the Surprise Attack! scoring event. Calling this Jump Scares seems a bit rich since Wraith has to bang a bell any time he wants to smack someone, but I suppose you could always bring the Iridescent addon that silences his bell if you want to do this achievement lore accurately. Yeah, this one is easy. And look, the number isn't even that high!
Mad House

As Doctor, bring all four survivors to Madness Tier 3 at least once during a match. If you bring both Iridescent addons and send yourself to a small map, this is practically guaranteed. Optionally bring Terror Radius perks that extends its reach so that almost the entire map is covered by your Static Blast. You should get this one unintentionally while playing Doctor, but if not, just do the above.
Multi-tasker

Down 30 survivors while carrying another survivor. Why the hell is this number higher than the achievement that requires you to just hit survivors?! I recommend STBFL + Agitation as the most consistent means of getting this achievement. Starstruck + Agitation + Awakened Awareness would also work, but survivors will begin giving you a very wide berth pretty quickly when you pick someone up, which could complicate things. STBFL is more subtle. If you want to farm for this achievement, I advise picking a killer that is hilarious with Mad Grit (Demogorgon, Pyramid Head, Knight, Plague, or Nemesis), establish yourself as friendly, then down a survivor and pick them up. Begin spamming the attack animation, then down a survivor or two with your backpack. They might get a bit skittish as you do this, so make sure to never slug all of them, and let the dude wiggle out once he/she indicates they want to get off.
Outrage

Down 100 survivors who dropped a pallet during a chase. I would advise running killers who chew through pallets like Nemesis or Bubba to get this one faster. A Spirit Fury/Enduring build would also work. This one should come over time.
One Thousand Cuts

Deal maximum laceration on survivors 50 times as Trickster. This just means securing a health state 50 times, so you're not even required to get downs, just hit people 8 times with your knives. Easy! Bring extra knife capacity addons if your aim is ♥♥♥♥.
Party Crasher

Damage 100 gens while a survivor is hooked. Given the current meta, this one should come quite quickly. Just bring Call of Brine/Eruption and get kicking. I am not sure whether Scourge Hook: Pain Resonance counts towards this achievement - can anyone confirm?
Have at least three survivors hooked in a basement in a single trial. Hard to get since survivors enjoy suiciding on hook, especially if there is more than one of them in the basement already. The best way to get this is to bring Agitation, bring someone to the basement, and then try and set up a cascading disaster of a basement save. The Trapper is obviously best at this, but Huntress is no slouch either. Bubba is probably *too* dangerous for this, since most survivors will not voluntarily go into a basement with a camping Bubba inside, or even a proxy-camping Bubba.
Consider bringing an offering that brings the basement to the main building, so if you get a map with a main building, the basement will both be easily accessible for you (so you can drop off your first survivor) and the survivors (so they can easily attempt the save that will DOOM THEM ALL.)
Insidious may be a good call here, if a bit stereotypical. Comms will defeat it, so try not to go dark where they can see you. Kindred is also a problem, but there's nothing you can do about that.
Despite the name, this achievement is not in any way restricted by season, so you can try for it whenever you choose.
I See You
Down 30 survivors suffering from the Exposed status effect. Ghostface and Myers will get this pretty easily, but running NOED and Haunted Ground should make this even easier. Some killers have Exposed addons - Nemesis and Deathslinger stick out as having good ones - so you have options even outside the above listed horror icons. So long as you remember to bring the right killers or perks, this one should be pretty easy.
In the Void She Walks
Hit 500 Blink attacks as Nurse. Okay, this is the one of several older killer achievements that have ridiculous numbers attached to them. The Trapper was already pushing it with his grab achievement. There is nothing I can do to help you here aside from tell you to play the killer, a lot. Farm if you want, but it will be boring as hell and you won't get what you need from a single match. Just play normally. Have fun. Just bear in mind that you will need to play Nurse (as well as a few other killers) a little more than usual. Expect to attract a lot of hate doing this one.
I Want to Play a Game
Place 125 Reverse Bear Traps on the heads of survivors as Pig. Same as above, this is another lengthy and tedious achievement, made worse because you can only bring a maximum of 6 RBTs per match. Bring the addons which gives you an extra, and prioritize putting on hats at every opportunity, even if it would make more sense to save one at the time. This achievement will take, at minimum, 21 matches of Pig, which is just absurd to me. Pig is at least a fun killer, but there is no reason for the number to be that high. You can't even farm this much, since you are capped at 6 RBTs! Stupid, stupid achievement.
Jump Scares
As Wraith, land 100 attacks on survivors after uncloaking. You'll know progress has been made if you see the Surprise Attack! scoring event. Calling this Jump Scares seems a bit rich since Wraith has to bang a bell any time he wants to smack someone, but I suppose you could always bring the Iridescent addon that silences his bell if you want to do this achievement lore accurately. Yeah, this one is easy. And look, the number isn't even that high!
Mad House
As Doctor, bring all four survivors to Madness Tier 3 at least once during a match. If you bring both Iridescent addons and send yourself to a small map, this is practically guaranteed. Optionally bring Terror Radius perks that extends its reach so that almost the entire map is covered by your Static Blast. You should get this one unintentionally while playing Doctor, but if not, just do the above.
Multi-tasker
Down 30 survivors while carrying another survivor. Why the hell is this number higher than the achievement that requires you to just hit survivors?! I recommend STBFL + Agitation as the most consistent means of getting this achievement. Starstruck + Agitation + Awakened Awareness would also work, but survivors will begin giving you a very wide berth pretty quickly when you pick someone up, which could complicate things. STBFL is more subtle. If you want to farm for this achievement, I advise picking a killer that is hilarious with Mad Grit (Demogorgon, Pyramid Head, Knight, Plague, or Nemesis), establish yourself as friendly, then down a survivor and pick them up. Begin spamming the attack animation, then down a survivor or two with your backpack. They might get a bit skittish as you do this, so make sure to never slug all of them, and let the dude wiggle out once he/she indicates they want to get off.
Outrage
Down 100 survivors who dropped a pallet during a chase. I would advise running killers who chew through pallets like Nemesis or Bubba to get this one faster. A Spirit Fury/Enduring build would also work. This one should come over time.
One Thousand Cuts
Deal maximum laceration on survivors 50 times as Trickster. This just means securing a health state 50 times, so you're not even required to get downs, just hit people 8 times with your knives. Easy! Bring extra knife capacity addons if your aim is ♥♥♥♥.
Party Crasher
Damage 100 gens while a survivor is hooked. Given the current meta, this one should come quite quickly. Just bring Call of Brine/Eruption and get kicking. I am not sure whether Scourge Hook: Pain Resonance counts towards this achievement - can anyone confirm?
Killer Achievements, Part 5
Perfect Killer

Complete a match with at least 5000 points in each category. I would not be surprised if you got this on your very first match, considering playing killer is a lot more straightforward than survivor, and people at bottom MMR have no idea what they are doing.
Pre-emptive Strike

Hook a survivor before the first generator is completed. Lethal Pursuer and/or Corrupt Intervention will make this easier, but are by no means necessary. Just try to have a quick first chase.
Prowler

Detect 100 survivors with Killer Instinct. Quite a few killers have this built into their kit, but Legion is the one with most consistent access, and will rack up progress very quickly. Nemesis and Wesker are not terrible choices either, but will still not get nearly as many detections per match as Legion would.
Quick Draw

Interrupt ten survivors cleansing a totem. This happens incredibly rarely, so I recommend just farming. Establish yourself as friendly, find a totem, start slapping it, then get grabs. Do this as many times as you want.
If you want this achievement legitimately, Hex: Retribution afflicts survivors with Oblivious while they are cleansing and Hex: Thrill of the Hunt will slow them down massively. Snag 'em while they're unawares! Alternatively, Ghostface can sneak up and grab people off totems pretty consistently. Hex: Undying will also let you see survivors who are cleansing or blessing dull totems, which can be very helpful. I don't think this achievement counts for interrupting blessing, but there's nothing you can do about that. If you find them on the bones, grab 'em by the stones.
Serial Killer

Sacrifice the Obsession 30 times. This comes naturally.
"I'm not a ... serial killer." -Dr. Kriegler
Shocking Treatment

Hit 500 survivors with your Shock Therapy as Doctor. This is another of those "Early Killer Achievement We Had No Idea What We Were Doing" cases, so just commit yourself to playing a lot of Doctor. If you are epileptic, I would suggest getting someone else to do this one for you (not sarcasm, meant sincerely.)
Silent Approach

Grab 25 survivors off generators. Tinkerer is a good bet here, and Ghostface/T1 Myers are excellent for snagging people off of generators. Again, however, you can farm for this one, so if you want it soonish, that is what you should do. Establish friendliness by hitting a generator a lot, then make some grabs.
Skilled Huntress

Down 20 survivors with Huntress's hatchets at a distance of 24 meters or more. Yeah, it has to be a down, not an injure, so that crazy great shot you just made doesn't count because it only winged Felix instead of decapitating him.
Farming for this is hard, and many maps do not even have the sightlines necessary to pull this achievement off (♥♥♥♥ you, Lery's!) I recommend Midwich (big hallways), Ormond, Father Campell's Chapel/Disturbed Ward, any Macmillan, Autohaven, or Thompson farm maps, or Borgo. I had the most consistent luck on Midwich and Ormond.
A good way to farm progress on this achievement is to down survivors who are waiting for you at the exit gate. Survivors typically enjoy being little ♥♥♥♥♥ at the exit gate and showing off their pro dodging skills, so they should hang around as you hurl hatchets at them from long range. Score a few downs this way when you get a chance!
Fun fact: while doing this achievement, I went against a Fog Whisperer. They were angry because I had camped a 3 gen with a survivor hooked inside it, and spent their stream ranting at me and accusing me of "cowardice" because I was maintaining distance from the exit gate and didn't want to see them leave (actually I was trying for this achievement and chucking hatchets at long range while they teabagged.) This was my first encounter with a Fog Whisperer, and to say it was disappointing would be an understatement. No, I don't remember who it was, and I wouldn't tell you even if I did. Update: He is no longer a Fog Whisperer. He got called out for toxic behavior and resigned. Good riddance.
Smoked

Down 100 survivors afflicted by the Afterpiece Tonic as Clown. This one really isn't difficult, especially since basekit is now 6 bottles. Just remember that if you throw the bottle at an elevated position, such as the trunk of a tree, it can help spread the gas around over a larger area.
Speed Kills

Hit 30 survivors with Lethal Rush as Blight. I suck as Blight, but I would still say this is easy. There are plenty of tutorials on flicks and techs if you want to get fancy or better at hitting consistently with his power. Lilith Omen I believe is considered the go-to Blight guru.
Swirling Death

Throw 1000 hatchets as Huntress. Yet another old and tedious Huntress achievement. Hope you like listening to her song!
Complete a match with at least 5000 points in each category. I would not be surprised if you got this on your very first match, considering playing killer is a lot more straightforward than survivor, and people at bottom MMR have no idea what they are doing.
Pre-emptive Strike
Hook a survivor before the first generator is completed. Lethal Pursuer and/or Corrupt Intervention will make this easier, but are by no means necessary. Just try to have a quick first chase.
Prowler
Detect 100 survivors with Killer Instinct. Quite a few killers have this built into their kit, but Legion is the one with most consistent access, and will rack up progress very quickly. Nemesis and Wesker are not terrible choices either, but will still not get nearly as many detections per match as Legion would.
Quick Draw
Interrupt ten survivors cleansing a totem. This happens incredibly rarely, so I recommend just farming. Establish yourself as friendly, find a totem, start slapping it, then get grabs. Do this as many times as you want.
If you want this achievement legitimately, Hex: Retribution afflicts survivors with Oblivious while they are cleansing and Hex: Thrill of the Hunt will slow them down massively. Snag 'em while they're unawares! Alternatively, Ghostface can sneak up and grab people off totems pretty consistently. Hex: Undying will also let you see survivors who are cleansing or blessing dull totems, which can be very helpful. I don't think this achievement counts for interrupting blessing, but there's nothing you can do about that. If you find them on the bones, grab 'em by the stones.
Serial Killer
Sacrifice the Obsession 30 times. This comes naturally.
"I'm not a ... serial killer." -Dr. Kriegler
Shocking Treatment
Hit 500 survivors with your Shock Therapy as Doctor. This is another of those "Early Killer Achievement We Had No Idea What We Were Doing" cases, so just commit yourself to playing a lot of Doctor. If you are epileptic, I would suggest getting someone else to do this one for you (not sarcasm, meant sincerely.)
Silent Approach
Grab 25 survivors off generators. Tinkerer is a good bet here, and Ghostface/T1 Myers are excellent for snagging people off of generators. Again, however, you can farm for this one, so if you want it soonish, that is what you should do. Establish friendliness by hitting a generator a lot, then make some grabs.
Skilled Huntress
Down 20 survivors with Huntress's hatchets at a distance of 24 meters or more. Yeah, it has to be a down, not an injure, so that crazy great shot you just made doesn't count because it only winged Felix instead of decapitating him.
Farming for this is hard, and many maps do not even have the sightlines necessary to pull this achievement off (♥♥♥♥ you, Lery's!) I recommend Midwich (big hallways), Ormond, Father Campell's Chapel/Disturbed Ward, any Macmillan, Autohaven, or Thompson farm maps, or Borgo. I had the most consistent luck on Midwich and Ormond.
A good way to farm progress on this achievement is to down survivors who are waiting for you at the exit gate. Survivors typically enjoy being little ♥♥♥♥♥ at the exit gate and showing off their pro dodging skills, so they should hang around as you hurl hatchets at them from long range. Score a few downs this way when you get a chance!
Fun fact: while doing this achievement, I went against a Fog Whisperer. They were angry because I had camped a 3 gen with a survivor hooked inside it, and spent their stream ranting at me and accusing me of "cowardice" because I was maintaining distance from the exit gate and didn't want to see them leave (actually I was trying for this achievement and chucking hatchets at long range while they teabagged.) This was my first encounter with a Fog Whisperer, and to say it was disappointing would be an understatement. No, I don't remember who it was, and I wouldn't tell you even if I did. Update: He is no longer a Fog Whisperer. He got called out for toxic behavior and resigned. Good riddance.
Smoked
Down 100 survivors afflicted by the Afterpiece Tonic as Clown. This one really isn't difficult, especially since basekit is now 6 bottles. Just remember that if you throw the bottle at an elevated position, such as the trunk of a tree, it can help spread the gas around over a larger area.
Speed Kills
Hit 30 survivors with Lethal Rush as Blight. I suck as Blight, but I would still say this is easy. There are plenty of tutorials on flicks and techs if you want to get fancy or better at hitting consistently with his power. Lilith Omen I believe is considered the go-to Blight guru.
Swirling Death
Throw 1000 hatchets as Huntress. Yet another old and tedious Huntress achievement. Hope you like listening to her song!
Killer Achievements, Part 6
Tag Team

As the Twins, down 10 survivors while Victor is latched on to them. Fairly simple, although this is not typically considered optimal play - usually you want to secure the first hit with Charlotte and then down them with Victor. Here, I would recommend unleashing Victor from a medium distance (so, not during chase) and then latching on to a survivor. They are Oblivious while Victor is on them, and will not know where you are. Cut them off as they break away to either take Victor hostage or frantically figure out where you are so they can make distance.
Terminal Illness

As the Plague, down 50 survivors who are affected by maximum sickness. This will come pretty naturally - just puke on them until they are broken, then whack 'em. Rinse and repeat. Wait - actually, don't rinse.
Texas BBQ

Hook 25 survivors in the basement. Way to lean into the stereotype, BHVR. Bring Agitation if you want to get progress on this one more consistently.
The Grand Sacrifice

Sacrifice all four survivors during a trial. You'll get this one if you play. Eventually. Just don't mori anyone!
The Grind

Hit 100 survivors with Hillbilly's chainsaw. Hillbilly is hard to play, so this can actually seem daunting. I recommend bringing Lo-Pro chains so you can hit people through dropped pallets and make this easier. I also recommend bringing the green chains addon that reduces the stun penalty on colliding with something, because if you are not used to Hillbilly, you will be doing that a lot.
Backrevving (getting directly behind someone and charging your chainsaw) is the most consistent way for beginners to land chainsaw hits. Don't worry about snipes and curves.
The Man Behind the Bush

Stalk survivors for a total of 300 Evil Within tier ups as the Shape. Possibly the worst and most tedious of BHVR's "We Have No Idea What We Are Doing" era. You can only get 5-6 tier ups per round, so you're going to be playing dozens of rounds as the Shape, which can get tiresome. You also do not want to bring addons that offer increased time in Tier 3 in return for requiring more stalk - this will actually reduce the number of tier ups you can get per round as you are forced to squeeze more juice from survivors. I recommend bringing addons that increase the speed at which you stalk, and nothing else. That way you can get your tier ups faster, and hopefully maximize the number of tier ups you can get per game.
Totally Vulnerable

Down 50 marked survivors as Ghostface. This is going to take you a few games, but trust me, survivors will not see you coming for that first down.
Tools of the Trade

Achieve a Merciless Victory as killer 5 times with only 3 General Killer perks equipped. This is actually pretty annoying, since it is forcing you to 4k repeatedly with only a handful of mediocre perks. NOED is one of your only solid options here. Monstrous Shrine is still a joke. Bitter Murmur is okay. Just pick a strong killer and do your best. Remember: three perks only! And no survivors...
Triggered

Have survivors trigger 300 traps as Hag. Ending us on a sour note, we have another "BIG NUMBER GO BRR" achievement. At least you don't have to hit the survivors - they just need to trigger the trap. This means that you should get a few dozen points of progress per game, which is far better than most of the other "Wait, How Many 0's?" achievements.
Viral Video

Afflict 30 survivors with Condemned as Onryo. Just one stack, so all you have to do is teleport semi-intelligently. Bring the addon that spreads Condemned on heal to get this even faster.
Chrous of Chaos

Make survivors scream 30 times. Survivors scream when you knock them down and when you hook them, but if you want this achievement OUTRAGEOUSLY FAST just play Doctor with Ultimate Weapon. Just hope you don't go against nothing but Calm Spirit users!
Prey Upon

Down survivors with UVX twenty times. UVX is a surprisingly potent power, so if you stick with the Unknown and learn to aim, this should not be too problematic. Remember that the blast can go through walls - very useful at shack.
As the Twins, down 10 survivors while Victor is latched on to them. Fairly simple, although this is not typically considered optimal play - usually you want to secure the first hit with Charlotte and then down them with Victor. Here, I would recommend unleashing Victor from a medium distance (so, not during chase) and then latching on to a survivor. They are Oblivious while Victor is on them, and will not know where you are. Cut them off as they break away to either take Victor hostage or frantically figure out where you are so they can make distance.
Terminal Illness
As the Plague, down 50 survivors who are affected by maximum sickness. This will come pretty naturally - just puke on them until they are broken, then whack 'em. Rinse and repeat. Wait - actually, don't rinse.
Texas BBQ
Hook 25 survivors in the basement. Way to lean into the stereotype, BHVR. Bring Agitation if you want to get progress on this one more consistently.
The Grand Sacrifice
Sacrifice all four survivors during a trial. You'll get this one if you play. Eventually. Just don't mori anyone!
The Grind
Hit 100 survivors with Hillbilly's chainsaw. Hillbilly is hard to play, so this can actually seem daunting. I recommend bringing Lo-Pro chains so you can hit people through dropped pallets and make this easier. I also recommend bringing the green chains addon that reduces the stun penalty on colliding with something, because if you are not used to Hillbilly, you will be doing that a lot.
Backrevving (getting directly behind someone and charging your chainsaw) is the most consistent way for beginners to land chainsaw hits. Don't worry about snipes and curves.
The Man Behind the Bush
Stalk survivors for a total of 300 Evil Within tier ups as the Shape. Possibly the worst and most tedious of BHVR's "We Have No Idea What We Are Doing" era. You can only get 5-6 tier ups per round, so you're going to be playing dozens of rounds as the Shape, which can get tiresome. You also do not want to bring addons that offer increased time in Tier 3 in return for requiring more stalk - this will actually reduce the number of tier ups you can get per round as you are forced to squeeze more juice from survivors. I recommend bringing addons that increase the speed at which you stalk, and nothing else. That way you can get your tier ups faster, and hopefully maximize the number of tier ups you can get per game.
Totally Vulnerable
Down 50 marked survivors as Ghostface. This is going to take you a few games, but trust me, survivors will not see you coming for that first down.
Tools of the Trade
Achieve a Merciless Victory as killer 5 times with only 3 General Killer perks equipped. This is actually pretty annoying, since it is forcing you to 4k repeatedly with only a handful of mediocre perks. NOED is one of your only solid options here. Monstrous Shrine is still a joke. Bitter Murmur is okay. Just pick a strong killer and do your best. Remember: three perks only! And no survivors...
Triggered
Have survivors trigger 300 traps as Hag. Ending us on a sour note, we have another "BIG NUMBER GO BRR" achievement. At least you don't have to hit the survivors - they just need to trigger the trap. This means that you should get a few dozen points of progress per game, which is far better than most of the other "Wait, How Many 0's?" achievements.
Viral Video
Afflict 30 survivors with Condemned as Onryo. Just one stack, so all you have to do is teleport semi-intelligently. Bring the addon that spreads Condemned on heal to get this even faster.
Chrous of Chaos
Make survivors scream 30 times. Survivors scream when you knock them down and when you hook them, but if you want this achievement OUTRAGEOUSLY FAST just play Doctor with Ultimate Weapon. Just hope you don't go against nothing but Calm Spirit users!
Prey Upon
Down survivors with UVX twenty times. UVX is a surprisingly potent power, so if you stick with the Unknown and learn to aim, this should not be too problematic. Remember that the blast can go through walls - very useful at shack.
Killer Achievements, Part 7
Thrill of the Chase

Down ten survivors while they have a claw trap on. Just play Skull Merchant and try to contain your urge to vomit. If you plant drones in high traffic areas or during chase, you should be set.
Complete the Evolution

Injure or down three survivors afflicted by hindered. Clown works, but so does (ugh) Skull Merchant. You probably won't get this achievement on purpose.
Slip Into the Stream

Hit a survivor you have teleported to 30 times. Thirty isn't that many, but Singularity is actually pretty hard to pilot, and his power can even be disorienting. Remember you have to infect them first with an environmental pod before you can teleport to them directly. Also remember that you can swing through pallets if they drop them on your head while you are overclocked, so swing into pallets as much as possible. You should eventually get this by attempting the adept because, boy, that's probably going to take a few tries.
Terror of LV-426

Hit survivors with your tail attack 30 times.Tail attacks can take some getting used to (the hitbox is a smidge jank) but you should be able to reliably get hits at windows and pallets. Beware of last second jukes and, of course, turrets. If you get knocked off Crawler Mode, try to get it back as soon as possible by diving into a tunnel. You should get this achievement pretty naturally while playing xeno.
Joke's On You

Hit a survivor within three seconds of performing a scamper, ten times. This is now a righteous pain in the ass since you can only scamper during a charge. My recommendation? If you don't want to play many tedious games trying to force this, just farm for it. Hit a downed pallet repeatedly and have the survivor stand in front of it, then charge, scamper, and slice. It is fortunate that this particular achievement can be farmed for, because getting this one legitimately is a tall ask. Most survivors will be grateful not to playing against yet another sweaty Chucky, so they should be fairly amenable.
Turk Turkleton has this to say for those going for it legitimately: "I just did Chucky's Joke's on you achievement, averaging 3 hits per match. I'd recommend the addons Rat poison and Yardstick to see auras during slice'n'dice and scamper. While survivor's can dodge you with 90 degree turns, you're actually able to hit crazy angles after scampering. Fake Banette's tips helped me a lot with this:
https://www.youtube.com/watch?v=G4ABsoUg6NA"
Outta Nowhere

Hit 40 survivors with a basic attack while undetectable. Note that it is a basic attack, not your power, so if you are playing Chucky, don't use your power. Ghostface is another good choice to get progress on this challenge, but I personally also advocate using the Nemesis stealth addon that gives undetectable when one of your rotting friends dies, alongside Tinkerer. That way you can play somewhat normally (if a little M1 happy) while getting a lot of progress for this achievement. But, most likely, you'll get this achievement playing Chucky. Remember - M1, not M2 while stealthed!
Disarm and Dismember

Hit 50 survivors carrying a special item. Special items are items that are spawned during the match, either by a killer's power or a perk. Looks like powers work here as well, but this achievement is still a massive pain in the ass. Not all killers have special items, and Sadako's apparently doesn't count. This leaves Nemesis, Singularity, Pinhead (yeah, good luck), Wesker, and Xenomorph. Or, y'know, you can hit 50 people carrying flashbangs. Right. Of these five, Singularity and Wesker are probably the most viable, since survivors will be using special items constantly, and Wesker's even has two uses. Nemesis also works since survivors will frequently carry vaccines with them, but they only have four of them. If you want consistent progress beyond getting maybe 1-2 hits a match, play Wesker and Singularity.

Hit 25 survivors within fifteen seconds of casting a spell. Ordinarily, this will be Mage Hand - lifting a pallet and then slicing a survivor is basically the old one-two punch for Vecna. This achievement will come very quickly once you learn how to play Vecna properly, especially since the vast majority of your downs will be coming from M1s. So long as you do not neglect your spellbook (i.e. play properly) there is nothing to worry about.
Rightful Owner

Retrieve either the Hand of Eye of Vecna and then kill all four of the survivors. Okay, so to "retrieve" your body part, first a survivor needs to fish one out of the chests. There is a 5% chance of this occurring whenever survivors open a chest, so you are not going to see one every match. Once the item is in play, you need to get that survivor to death hook and then down them one more time. Now, you will see prompt to "retrieve" when you stand next to the downed survivor. Hold down M1. You will kill that survivor. There - item "retrieved." If you simply kill everyone without doing this specific action - even if one or more of them are carrying the Hand and/or Eye - you won't get the achievement.
Because this is basically a second adept for Vecna that is also completely dependent on luck to actually trigger, I'm giving this a four star rating. It may take quite a few hours on Vecna before the stars align and you can pull this one off. And unfortunately, there's no farming with survivors for this one - a non-negotiable 4k is a pretty tough sell. You're going to have to play hard ball. Good luck! If it is any consolation, the survivor version of this challenge is far worse.
Down ten survivors while they have a claw trap on. Just play Skull Merchant and try to contain your urge to vomit. If you plant drones in high traffic areas or during chase, you should be set.
Complete the Evolution
Injure or down three survivors afflicted by hindered. Clown works, but so does (ugh) Skull Merchant. You probably won't get this achievement on purpose.
Slip Into the Stream
Hit a survivor you have teleported to 30 times. Thirty isn't that many, but Singularity is actually pretty hard to pilot, and his power can even be disorienting. Remember you have to infect them first with an environmental pod before you can teleport to them directly. Also remember that you can swing through pallets if they drop them on your head while you are overclocked, so swing into pallets as much as possible. You should eventually get this by attempting the adept because, boy, that's probably going to take a few tries.
Terror of LV-426
Hit survivors with your tail attack 30 times.Tail attacks can take some getting used to (the hitbox is a smidge jank) but you should be able to reliably get hits at windows and pallets. Beware of last second jukes and, of course, turrets. If you get knocked off Crawler Mode, try to get it back as soon as possible by diving into a tunnel. You should get this achievement pretty naturally while playing xeno.
Joke's On You
Hit a survivor within three seconds of performing a scamper, ten times. This is now a righteous pain in the ass since you can only scamper during a charge. My recommendation? If you don't want to play many tedious games trying to force this, just farm for it. Hit a downed pallet repeatedly and have the survivor stand in front of it, then charge, scamper, and slice. It is fortunate that this particular achievement can be farmed for, because getting this one legitimately is a tall ask. Most survivors will be grateful not to playing against yet another sweaty Chucky, so they should be fairly amenable.
Turk Turkleton has this to say for those going for it legitimately: "I just did Chucky's Joke's on you achievement, averaging 3 hits per match. I'd recommend the addons Rat poison and Yardstick to see auras during slice'n'dice and scamper. While survivor's can dodge you with 90 degree turns, you're actually able to hit crazy angles after scampering. Fake Banette's tips helped me a lot with this:
https://www.youtube.com/watch?v=G4ABsoUg6NA"
Outta Nowhere
Hit 40 survivors with a basic attack while undetectable. Note that it is a basic attack, not your power, so if you are playing Chucky, don't use your power. Ghostface is another good choice to get progress on this challenge, but I personally also advocate using the Nemesis stealth addon that gives undetectable when one of your rotting friends dies, alongside Tinkerer. That way you can play somewhat normally (if a little M1 happy) while getting a lot of progress for this achievement. But, most likely, you'll get this achievement playing Chucky. Remember - M1, not M2 while stealthed!
Disarm and Dismember
Hit 50 survivors carrying a special item. Special items are items that are spawned during the match, either by a killer's power or a perk. Looks like powers work here as well, but this achievement is still a massive pain in the ass. Not all killers have special items, and Sadako's apparently doesn't count. This leaves Nemesis, Singularity, Pinhead (yeah, good luck), Wesker, and Xenomorph. Or, y'know, you can hit 50 people carrying flashbangs. Right. Of these five, Singularity and Wesker are probably the most viable, since survivors will be using special items constantly, and Wesker's even has two uses. Nemesis also works since survivors will frequently carry vaccines with them, but they only have four of them. If you want consistent progress beyond getting maybe 1-2 hits a match, play Wesker and Singularity.
Hit 25 survivors within fifteen seconds of casting a spell. Ordinarily, this will be Mage Hand - lifting a pallet and then slicing a survivor is basically the old one-two punch for Vecna. This achievement will come very quickly once you learn how to play Vecna properly, especially since the vast majority of your downs will be coming from M1s. So long as you do not neglect your spellbook (i.e. play properly) there is nothing to worry about.
Rightful Owner
Retrieve either the Hand of Eye of Vecna and then kill all four of the survivors. Okay, so to "retrieve" your body part, first a survivor needs to fish one out of the chests. There is a 5% chance of this occurring whenever survivors open a chest, so you are not going to see one every match. Once the item is in play, you need to get that survivor to death hook and then down them one more time. Now, you will see prompt to "retrieve" when you stand next to the downed survivor. Hold down M1. You will kill that survivor. There - item "retrieved." If you simply kill everyone without doing this specific action - even if one or more of them are carrying the Hand and/or Eye - you won't get the achievement.
Because this is basically a second adept for Vecna that is also completely dependent on luck to actually trigger, I'm giving this a four star rating. It may take quite a few hours on Vecna before the stars align and you can pull this one off. And unfortunately, there's no farming with survivors for this one - a non-negotiable 4k is a pretty tough sell. You're going to have to play hard ball. Good luck! If it is any consolation, the survivor version of this challenge is far worse.
Killer Achievements, Part 8
What Lurks Beneath

Injure survivors 25 times in the basement. This was a lot harder than I initially gave it credit for. It's difficult to farm for because survivors naturally get quite squirrely in the basement, and basement is typically where people either get deposited on hook or receive a deep wounds as they are getting out of it, neither of which count towards the challenge. Camping or proxy camping basement is also more likely to result in a gen rush and a dead survivor than any injures against a good team.
Killers that can teleport back to basement are ideal for this challenge - Unknown, Dredge, Hag, and Demogorgon come to mind. Trapper is probably *too good* at defending the basement, so I don't recommend him. Huntress is solid at getting hits on survivors on the way out, but you'll have to proxy in order to intercept the survivors on the way out. The good news is that both injures and downs in the basement count towards the challenge, so you can theoretically get two points of progress off of one survivor; the only thing that does not count is receiving a deep wound from an injure (so try to hit the rescuer and not the unhooked victim.) The "basement" extends a short way up the stairs, so you can hit people rounding the corner and still have it count. If you want a better idea of what is considered the basement, play survivor with Strength in Shadows and see where it lights up when you head down the stairs.
Territorial Imperative can help with finding people who enter the basement, but really there is no easy way to get this challenge unless you get some weirdly cooperative and understanding survivors. If you're hunting for this challenge, bring Agitation to facilitate an easier time hooking people in the basement. I ran Monstrous Shrine a few times for this challenge alongside Pain Resonance for ♥♥♥♥♥ and giggles, and confused a few survivors who wondered why their gens kept exploding on basement hooks. Ultimately this challenge is going to take a while and will probably make the survivors pretty angry. Hopefully you can live with that.
Symphony of Fire

Injure 20 survivors with Dracula’s Hellfire. His Hellfire is hard to aim and punishing to cancel, but it does have the major upside of being able to hit multiple survivors, and being able to hit over short loops. I still have a great deal of trouble hitting people with this power, however it is perfect for nailing people trying to unhook and, bafflingly, sometimes people try to bodyblock for each other against this killer. If you see this happen, summon a column of flame to fill them with shame.
Taste the Darkness

Interrupt 10 survivors while they are vaulting. Unfortunately, despite my hopes otherwise, this means initiating a grab while they are slow/medium vaulting or vaulting a pallet while injured. These are pretty infrequent occurrences, so I would try to farm for this one. If trying for this one legitimately, play Clown – his purple gas forces survivors to medium vault, allowing for many cheeky grabs. If survivors give up, take some time whacking windows or pallets until they start vaulting them repeatedly. Then drop them after the grab. Rinse and repeat.
Deadly Plunge

Fall 1000 meters as a killer. This is actually a pain in the ass. Your average drop is only a few meters – while it is possible (and indeed, inevitable, if you’re playing normally) to get this achievement, doing so will likely take dozens of matches. Here are my recommendations for those who are willing to burn a few map offerings and just farm the achievement while the survivors look on in disbelief:
My Strategy – Play Wraith, use movement speed addons. Burn an Eyrie of Crows map offering (sacrilege!) Go to the main building, run up the stairs while cloaked, and fall off. If you do this constantly, you can get about 300m of falling done before the survivors all leave.
Reddit Strategy – Play Nurse, bring the Game offering. Take the vault off of the pipe structure that drops you off underground (you know the one I mean! The one that takes you up a flight of stairs to a ledge.) Vault it, then blink back up to the top. Rinse and repeat. I don’t think it’s as fast as Wraith, but I thought it was clever so I’m leaving it here. Bring Bamboozle and Dark Arrogance to increase vault speed by 40%.
Angel Strategy – Play Vecna and burn an Eyrie of Crows offering. This is slower than Wraith, but it will give survivors the opportunity to get Hand Eye Coordination. God bless you if you select this!
There are plenty of maps with drop offs, and the longest drop is probably from Ironworks of Misery, but you are not guaranteed that map from a map offering, and it takes a long time to actually clamber up the stairs before dropping. Eyrie of Crows is easily accessible, and there are multiple stairs up to the second level, all of which take you there very quickly.
Binding Teeth

Injure 25 survivors detained by your dog. This actually isn’t that hard – the Houndmaster has a lot of issues and she’s certainly no Deathslinger when it comes to the speed of her, uh, projectile, but playing the Houndmaster normally will get you this achievement in no time. Believe it or not, she’s quite fun, despite having numerous technical problems.
Injure survivors 25 times in the basement. This was a lot harder than I initially gave it credit for. It's difficult to farm for because survivors naturally get quite squirrely in the basement, and basement is typically where people either get deposited on hook or receive a deep wounds as they are getting out of it, neither of which count towards the challenge. Camping or proxy camping basement is also more likely to result in a gen rush and a dead survivor than any injures against a good team.
Killers that can teleport back to basement are ideal for this challenge - Unknown, Dredge, Hag, and Demogorgon come to mind. Trapper is probably *too good* at defending the basement, so I don't recommend him. Huntress is solid at getting hits on survivors on the way out, but you'll have to proxy in order to intercept the survivors on the way out. The good news is that both injures and downs in the basement count towards the challenge, so you can theoretically get two points of progress off of one survivor; the only thing that does not count is receiving a deep wound from an injure (so try to hit the rescuer and not the unhooked victim.) The "basement" extends a short way up the stairs, so you can hit people rounding the corner and still have it count. If you want a better idea of what is considered the basement, play survivor with Strength in Shadows and see where it lights up when you head down the stairs.
Territorial Imperative can help with finding people who enter the basement, but really there is no easy way to get this challenge unless you get some weirdly cooperative and understanding survivors. If you're hunting for this challenge, bring Agitation to facilitate an easier time hooking people in the basement. I ran Monstrous Shrine a few times for this challenge alongside Pain Resonance for ♥♥♥♥♥ and giggles, and confused a few survivors who wondered why their gens kept exploding on basement hooks. Ultimately this challenge is going to take a while and will probably make the survivors pretty angry. Hopefully you can live with that.
Symphony of Fire
Injure 20 survivors with Dracula’s Hellfire. His Hellfire is hard to aim and punishing to cancel, but it does have the major upside of being able to hit multiple survivors, and being able to hit over short loops. I still have a great deal of trouble hitting people with this power, however it is perfect for nailing people trying to unhook and, bafflingly, sometimes people try to bodyblock for each other against this killer. If you see this happen, summon a column of flame to fill them with shame.
Taste the Darkness
Interrupt 10 survivors while they are vaulting. Unfortunately, despite my hopes otherwise, this means initiating a grab while they are slow/medium vaulting or vaulting a pallet while injured. These are pretty infrequent occurrences, so I would try to farm for this one. If trying for this one legitimately, play Clown – his purple gas forces survivors to medium vault, allowing for many cheeky grabs. If survivors give up, take some time whacking windows or pallets until they start vaulting them repeatedly. Then drop them after the grab. Rinse and repeat.
Deadly Plunge
Fall 1000 meters as a killer. This is actually a pain in the ass. Your average drop is only a few meters – while it is possible (and indeed, inevitable, if you’re playing normally) to get this achievement, doing so will likely take dozens of matches. Here are my recommendations for those who are willing to burn a few map offerings and just farm the achievement while the survivors look on in disbelief:
My Strategy – Play Wraith, use movement speed addons. Burn an Eyrie of Crows map offering (sacrilege!) Go to the main building, run up the stairs while cloaked, and fall off. If you do this constantly, you can get about 300m of falling done before the survivors all leave.
Reddit Strategy – Play Nurse, bring the Game offering. Take the vault off of the pipe structure that drops you off underground (you know the one I mean! The one that takes you up a flight of stairs to a ledge.) Vault it, then blink back up to the top. Rinse and repeat. I don’t think it’s as fast as Wraith, but I thought it was clever so I’m leaving it here. Bring Bamboozle and Dark Arrogance to increase vault speed by 40%.
Angel Strategy – Play Vecna and burn an Eyrie of Crows offering. This is slower than Wraith, but it will give survivors the opportunity to get Hand Eye Coordination. God bless you if you select this!
There are plenty of maps with drop offs, and the longest drop is probably from Ironworks of Misery, but you are not guaranteed that map from a map offering, and it takes a long time to actually clamber up the stairs before dropping. Eyrie of Crows is easily accessible, and there are multiple stairs up to the second level, all of which take you there very quickly.
Binding Teeth
Injure 25 survivors detained by your dog. This actually isn’t that hard – the Houndmaster has a lot of issues and she’s certainly no Deathslinger when it comes to the speed of her, uh, projectile, but playing the Houndmaster normally will get you this achievement in no time. Believe it or not, she’s quite fun, despite having numerous technical problems.
Killer Achievements, Part 9
Remember Who I Am
Complete thirty "perfect" grab attacks. When you grab someone as Ghoul (it's not hard) the prompt will appear on your screen. It will then darken and then finally bloody. This happens in the space of about a second and a half, for reference. Once it is bloody, hit the prompt (it will be M1 on the PC.) This will give you a lengthier Enraged Mode, but you want to do this because it advances the achievement. There is a score event to let you know you've done this properly. You can only execute a proper grab on the second and third Kagune Leaps, so don't try to just snag a survivor right off the bat. This also only works on survivors who are not already deep wounded, and you will not be given this prompt if your leap carries you over a pallet or window.
This can take a couple of games to get the hang of (it's a friggin' action command, BHVR, why?!) but survivors will generally let you farm for it if you choose to make clear you're not hostile. They're pretty sick of Ghouls, and will be relieved to not have to deal with your gamebreaking ♥♥♥♥♥♥♥♥ for once.
Awakened Anger

Hit a survivor who just blinded you in the last thirty seconds. You originally had to do this thirty times (♥♥♥♥ THAT) but they reduced it to just one without notifying anyone last patch. I am perfectly at peace with this change. Survivors enjoy blinding killers at pallets, so this achievement will happen naturally. If it hasn't and you want to gun for it specifically, don't play a killer that breaks pallets instantly such as Blight, Hillbilly, or Nemesis, and equip Shadowborn so you can catch up with your cheeky survivor much more quickly. This achievement went from unreasonable nightmare to a footnote, and I am still infinitely grateful.
None the Wiser

Hit five survivors with a basic attack while they are oblivious. Fairly simple, every killer will be using their M1 to an extent. There are plenty of addons that grant oblivious in addition to perks. If you're hunting for this one specifically, I recommend Hex: Retribution. However, for zero effort, playing Freddy (the Nightmare) will get you this achievement in one match. Shame about the taste in your mouth.
Jump Scared

Grab 15 survivors out of the security office as the Animatronic. Good news, you can farm this one! It's tedious and difficult to communicate to the survivors what you want, but you can do it! I did. Here was my strategy - get a 2k, find one of the two remaining survivors, down them, and then pick them up and start hitting the security door repeatedly. They will probably reveal you on camera first, so just keep hitting the door until they understand. Once they go inside, follow them inside to get an instant grab.
If you're trying to get this legitimately, I would use Lethal Pursuer to maybe get a cheeky grab at the start of the match, alongside BBQ and Chili to keep track of distant survivors and maybe intercept them. Across about a dozen Springtrap matches I got only one legitimate grab with the rest farmed so, props if you go the distance on this one, but I wouldn't bother. This is a dumb achievement. My proposed method is basically a means to negotiate with survivors after you've already won, which they were pretty receptive to. You might have more luck if you are friendly from the get-go to get grabs, but I don't really advocate going back to back matches as a friendly killer if you can help it.
Neither Seen Nor Heard

Apply Oblivious to survivors thirty times. Use Hex: Retribution or play Freddy. If you want a general perk, use Hex: Fortune's Fool (formerly Hex: Plaything) to get a point of progress every time you hook someone for the first time (assuming any totems are left.) If you are confused where this perk came from, it is a recycled perk from the retired Cenobite DLC, so if you have it already, that's why. The same goes for Beyond Broken, the next on this list.
Beyond Broken
Injure survivors suffering the broken status fifty times with a basic attack. This is going to be slow, so you are lucky if you already got this achievement before it was recycled from whatever Cenobite achievement it was before. Some addons grant broken if you use your power, but generally broken is applied after survivors do something naughty, like use For the People or an Invocation. Legion has a button addon that applies broken after survivors mend themselves - try starting there. Twins and Springtrap inflict broken while Victor/the Fire Axe are lodged on a survivor, so you can also follow up with a M1 to make steady progress on this achievement. If you take the time out to find ways to apply broken, this achievement should not take too long. Be prepared to face a bunch of bugs if you play Twins, though. If you don't have emetophobia (fear of vomiting) Plague is also an obvious pick, although she's a little tricky to pilot.
Lost All Hope

Down a survivor at the exit gate. Survivors are usually all too happy for you to "wave" them out. Bad sportsmanship in this game is inevitable. If you want a solid killer for this, Huntress is a good call.
Death Flight

Injure 20 survivors shortly after a vault in chase. I'm not sure what the timeframe is for this achievement, but it is short - I would say maybe ten seconds if we're being generous. Krasue is fairly solid at this, but I found Legion strangely lacking, probably because survivors tended to hover around pallets while I was in Feral Frenzy. For fastest results, play Xenomorph. Equip Bamboozle, Dark Arrogance, and his purple addon that increases vault speed as long as he is in Crawler Mode. There - survivors will vault a window and expect some distance - PSYCHE! You vault faster than they do. Watch the turrets.
You've Got Guts

Down 20 survivors with the Krasue's intestinal attack. Once you've figured out how the Krasue works, this comes commendably intuitively. The Head Mode is a bit clunky, so I usually tried to get the infection and injured in her normal form first before swapping, but you could pretty easily get two hits provided you are prepared to deal with the clunkiness of being a floating head. Bamboozle and Dissolution make hits even easier to obtain.
Complete thirty "perfect" grab attacks. When you grab someone as Ghoul (it's not hard) the prompt will appear on your screen. It will then darken and then finally bloody. This happens in the space of about a second and a half, for reference. Once it is bloody, hit the prompt (it will be M1 on the PC.) This will give you a lengthier Enraged Mode, but you want to do this because it advances the achievement. There is a score event to let you know you've done this properly. You can only execute a proper grab on the second and third Kagune Leaps, so don't try to just snag a survivor right off the bat. This also only works on survivors who are not already deep wounded, and you will not be given this prompt if your leap carries you over a pallet or window.
This can take a couple of games to get the hang of (it's a friggin' action command, BHVR, why?!) but survivors will generally let you farm for it if you choose to make clear you're not hostile. They're pretty sick of Ghouls, and will be relieved to not have to deal with your gamebreaking ♥♥♥♥♥♥♥♥ for once.
Awakened Anger
Hit a survivor who just blinded you in the last thirty seconds. You originally had to do this thirty times (♥♥♥♥ THAT) but they reduced it to just one without notifying anyone last patch. I am perfectly at peace with this change. Survivors enjoy blinding killers at pallets, so this achievement will happen naturally. If it hasn't and you want to gun for it specifically, don't play a killer that breaks pallets instantly such as Blight, Hillbilly, or Nemesis, and equip Shadowborn so you can catch up with your cheeky survivor much more quickly. This achievement went from unreasonable nightmare to a footnote, and I am still infinitely grateful.
None the Wiser
Hit five survivors with a basic attack while they are oblivious. Fairly simple, every killer will be using their M1 to an extent. There are plenty of addons that grant oblivious in addition to perks. If you're hunting for this one specifically, I recommend Hex: Retribution. However, for zero effort, playing Freddy (the Nightmare) will get you this achievement in one match. Shame about the taste in your mouth.
Jump Scared
Grab 15 survivors out of the security office as the Animatronic. Good news, you can farm this one! It's tedious and difficult to communicate to the survivors what you want, but you can do it! I did. Here was my strategy - get a 2k, find one of the two remaining survivors, down them, and then pick them up and start hitting the security door repeatedly. They will probably reveal you on camera first, so just keep hitting the door until they understand. Once they go inside, follow them inside to get an instant grab.
If you're trying to get this legitimately, I would use Lethal Pursuer to maybe get a cheeky grab at the start of the match, alongside BBQ and Chili to keep track of distant survivors and maybe intercept them. Across about a dozen Springtrap matches I got only one legitimate grab with the rest farmed so, props if you go the distance on this one, but I wouldn't bother. This is a dumb achievement. My proposed method is basically a means to negotiate with survivors after you've already won, which they were pretty receptive to. You might have more luck if you are friendly from the get-go to get grabs, but I don't really advocate going back to back matches as a friendly killer if you can help it.
Neither Seen Nor Heard
Apply Oblivious to survivors thirty times. Use Hex: Retribution or play Freddy. If you want a general perk, use Hex: Fortune's Fool (formerly Hex: Plaything) to get a point of progress every time you hook someone for the first time (assuming any totems are left.) If you are confused where this perk came from, it is a recycled perk from the retired Cenobite DLC, so if you have it already, that's why. The same goes for Beyond Broken, the next on this list.
Beyond Broken
Injure survivors suffering the broken status fifty times with a basic attack. This is going to be slow, so you are lucky if you already got this achievement before it was recycled from whatever Cenobite achievement it was before. Some addons grant broken if you use your power, but generally broken is applied after survivors do something naughty, like use For the People or an Invocation. Legion has a button addon that applies broken after survivors mend themselves - try starting there. Twins and Springtrap inflict broken while Victor/the Fire Axe are lodged on a survivor, so you can also follow up with a M1 to make steady progress on this achievement. If you take the time out to find ways to apply broken, this achievement should not take too long. Be prepared to face a bunch of bugs if you play Twins, though. If you don't have emetophobia (fear of vomiting) Plague is also an obvious pick, although she's a little tricky to pilot.
Lost All Hope
Down a survivor at the exit gate. Survivors are usually all too happy for you to "wave" them out. Bad sportsmanship in this game is inevitable. If you want a solid killer for this, Huntress is a good call.
Death Flight
Injure 20 survivors shortly after a vault in chase. I'm not sure what the timeframe is for this achievement, but it is short - I would say maybe ten seconds if we're being generous. Krasue is fairly solid at this, but I found Legion strangely lacking, probably because survivors tended to hover around pallets while I was in Feral Frenzy. For fastest results, play Xenomorph. Equip Bamboozle, Dark Arrogance, and his purple addon that increases vault speed as long as he is in Crawler Mode. There - survivors will vault a window and expect some distance - PSYCHE! You vault faster than they do. Watch the turrets.
You've Got Guts
Down 20 survivors with the Krasue's intestinal attack. Once you've figured out how the Krasue works, this comes commendably intuitively. The Head Mode is a bit clunky, so I usually tried to get the infection and injured in her normal form first before swapping, but you could pretty easily get two hits provided you are prepared to deal with the clunkiness of being a floating head. Bamboozle and Dissolution make hits even easier to obtain.
Killer Achievements, Part 10
Torn Asunder

Damage survivors fifty times with your Vine or Undergate attack. You’ll need to reach Worldbreaker Mode to accomplish this, but this should be possible within about five games or so with New!Vecna. Bear in mind you have to be taking health states for this one, so no progress until you get into Worldbreaker!
Master Manipulator

Damage a survivor while they are healing another or repairing five times. You have to take a health state somehow, not merely interrupt them with say, Pain Resonance/DMS, so you have to be clever about this. Obviously New!Vecna’s attacks while in Worldbreaker Mode works, but I personally favor Pyramid Head with a stealth build and Nurse’s Calling – I recommend Trail of Torment. This gives you the ability to interrupt heals through walls with your power. You can probably also achieve regular interrupts with Ghostface or by using Tinkerer on most killers. This achievement is irritating if going for it directly, but should generally happen on its own, if slowly.
Share the Pain

Have all four survivors injured at the same time. Play one round as Legion, Plague, or Ghoul. Frankly, this will happen pretty frequently in any match when you're the killer. Legion would probably do this fastest.
Prized Possession

Finish a trial with a hex still standing. This is trickier than it looks, since hexes either have activation conditions or get cleansed early. I recommend running a full Hex build with Pentimento, that way when the match is closing out you can rekindle a totem, or at the very least double the number of totems they have to cleanse (that'll slow them down, those little rats.) Don't pick Plaything, since it shuts off when its corresponding survivor dies.
Deadly Obsession

Hook the obsession 300 times. I thought we were through with this achievement design, BHVR. You *will* get this eventually, but the best way to speed this up is run perks that change the obsession. I recommend Friends 'til the End and/or Furtive Obsession. Nemesis probably isn't strong enough, but is another option.
Damage survivors fifty times with your Vine or Undergate attack. You’ll need to reach Worldbreaker Mode to accomplish this, but this should be possible within about five games or so with New!Vecna. Bear in mind you have to be taking health states for this one, so no progress until you get into Worldbreaker!
Master Manipulator
Damage a survivor while they are healing another or repairing five times. You have to take a health state somehow, not merely interrupt them with say, Pain Resonance/DMS, so you have to be clever about this. Obviously New!Vecna’s attacks while in Worldbreaker Mode works, but I personally favor Pyramid Head with a stealth build and Nurse’s Calling – I recommend Trail of Torment. This gives you the ability to interrupt heals through walls with your power. You can probably also achieve regular interrupts with Ghostface or by using Tinkerer on most killers. This achievement is irritating if going for it directly, but should generally happen on its own, if slowly.
Share the Pain
Have all four survivors injured at the same time. Play one round as Legion, Plague, or Ghoul. Frankly, this will happen pretty frequently in any match when you're the killer. Legion would probably do this fastest.
Prized Possession
Finish a trial with a hex still standing. This is trickier than it looks, since hexes either have activation conditions or get cleansed early. I recommend running a full Hex build with Pentimento, that way when the match is closing out you can rekindle a totem, or at the very least double the number of totems they have to cleanse (that'll slow them down, those little rats.) Don't pick Plaything, since it shuts off when its corresponding survivor dies.
Deadly Obsession
Hook the obsession 300 times. I thought we were through with this achievement design, BHVR. You *will* get this eventually, but the best way to speed this up is run perks that change the obsession. I recommend Friends 'til the End and/or Furtive Obsession. Nemesis probably isn't strong enough, but is another option.
Map-Specific Achievements, Part 1
All Aboard

Complete the Generator on the boat in the Pale Rose. This one is fairly simple. The boat generator is a pain in the ass for the killer to chase on and will usually be ceded to pursue survivors on easier ground. Prioritize it first thing when you load in and make distance if the killer shows up. This should not take many attempts. Pay attention to where the vaults off the boat's second floor are, and consider bringing Balanced Landing to make an easy escape.
Ancestor's Rite

Repair the generator inside the Yamaoka Family Residence and then escape. This can actually be difficult, since it is a common killer strategy to use the residence side of the map to establish a 3/4 gen and win off of that, and the residence generator sits smack in the middle. I would recommend bringing a strong toolbox with BNP to try and blitz the middle generator as soon as possible. Expect company - when the killer shows up, leave out the *front* of the residence and try to throw them off by going to the other side of the map before returning to the generator as soon as possible. Odds are they will not pursue and instead check the other two/three generators on that side and get into a chase there.
As far as escaping, Yamaoka Estate is fairly survivor sided so long as you do not get three genned. A hatch escape is possible to get this achievement. Once you complete the residence generator, your odds of survival should go up sharply. The middle of the map has the weakest loops, so try to stick close to either shack or either side of the residence if you get into chase, only leaving when the pallets are gone/windows are blocked.
Campbell's Chapel's Legacy

Complete the generator inside Campbell's Chapel and escape. Fairly simple. Bring Balanced Landing so you can abuse the main building properly and make sure you know where the vaults are on the first floor. This is a very survivor-sided map thanks to the strength of its main building, and running Balanced Landing means even the upper floor windows that do not have a vault become a means of escape. Make sure you keep on eye on both sides of the main generator - the killer usually comes in through the window rather than the stairs.
Cherish Your Life

Complete the bathroom generator on the Game and escape. I still believe the Game is survivor-sided, but this is a risky generator to complete. The killer can either drop in through the hole or come in through the door, and if they come in through the door you will most likely take a hit. If you go down, the generator is also right next to the basement, which is absolutely *lethal* on this map. This generator is very well-known since it is a guaranteed spawn and frequently comes with a totem, so survivors are drawn to it. Expect traffic if the killer cannot find anybody.
If you're worried about getting cornered, consider running Quick and Quiet + Head On to make use of the bathroom's lockers. That way you can dive into a locker when you hear the terror radius, stun the killer, and then round the corner into the basement hallway which has two very strong pallets. Once you get out of the bathroom, you're golden, since there are so many pallets nearby.
Once the generator is complete, the sliding door to the right will open, making the room much easier to enter and leave, but also weakening the pallets. Use that part of the map to loop the killer safely if you get into a chase. If you get into a hatch situation, remember the hatch only spawns on the lower floor.
Classy Act

Repair the generator in either the Music room or Chemistry Lab on Midwich Elementary and then escape. Since you have two generators to pick from, odds are you will get this achievement just by playing on Midwich enough times. Simply do your best to survive and don't worry about prioritizing this achievement - you're most likely going to get it without trying. General Midwich survival tips include not running Lithe (very few vaults) and using Windows of Opportunity to avoid ending up in a classroom without a pallet. Shadowstep and Circle of Healing are very strong picks here since they cover two floors at once. Avoid the courtyard in the center of the map if at all possible, since there is rarely much to work with beyond using the hedges to obstruct killer visibility. Remember that the hatch only spawns on the bottom floor *or* the landings of the staircases.
Cottage Owner

Repair the generator on top of the main building in Mother's Dwelling and escape. Mother's Dwelling is a ludicrously massive map and the main generator is very difficult to access for the killer, meaning they will usually give up unless they are the Nurse or have a ranged attack that can harass survivors on the gen. Bring Balanced Landing to swing things even further in your favor. This is a very easy challenge, and you will probably get it without trying - the middle generator on this map is already a beacon to survivors, and killers do not want to deal with the absurdly strong windows in main building.
Flight to Freedom

Complete the middle generator on Eyrie of Crows and escape. Eyrie of Crows is already degenerate, and the middle generator is surrounded by strong windows and an upstairs with strong pallets. Bring Balanced Landing (seeing a pattern?) and Circle of Healing/Shadowstep and turn the main building into your own personal clubhouse. If the killer DCs after you complete the main generator, you still get the achievement. This one really isn't difficult.
Complete the Generator on the boat in the Pale Rose. This one is fairly simple. The boat generator is a pain in the ass for the killer to chase on and will usually be ceded to pursue survivors on easier ground. Prioritize it first thing when you load in and make distance if the killer shows up. This should not take many attempts. Pay attention to where the vaults off the boat's second floor are, and consider bringing Balanced Landing to make an easy escape.
Ancestor's Rite
Repair the generator inside the Yamaoka Family Residence and then escape. This can actually be difficult, since it is a common killer strategy to use the residence side of the map to establish a 3/4 gen and win off of that, and the residence generator sits smack in the middle. I would recommend bringing a strong toolbox with BNP to try and blitz the middle generator as soon as possible. Expect company - when the killer shows up, leave out the *front* of the residence and try to throw them off by going to the other side of the map before returning to the generator as soon as possible. Odds are they will not pursue and instead check the other two/three generators on that side and get into a chase there.
As far as escaping, Yamaoka Estate is fairly survivor sided so long as you do not get three genned. A hatch escape is possible to get this achievement. Once you complete the residence generator, your odds of survival should go up sharply. The middle of the map has the weakest loops, so try to stick close to either shack or either side of the residence if you get into chase, only leaving when the pallets are gone/windows are blocked.
Campbell's Chapel's Legacy
Complete the generator inside Campbell's Chapel and escape. Fairly simple. Bring Balanced Landing so you can abuse the main building properly and make sure you know where the vaults are on the first floor. This is a very survivor-sided map thanks to the strength of its main building, and running Balanced Landing means even the upper floor windows that do not have a vault become a means of escape. Make sure you keep on eye on both sides of the main generator - the killer usually comes in through the window rather than the stairs.
Cherish Your Life
Complete the bathroom generator on the Game and escape. I still believe the Game is survivor-sided, but this is a risky generator to complete. The killer can either drop in through the hole or come in through the door, and if they come in through the door you will most likely take a hit. If you go down, the generator is also right next to the basement, which is absolutely *lethal* on this map. This generator is very well-known since it is a guaranteed spawn and frequently comes with a totem, so survivors are drawn to it. Expect traffic if the killer cannot find anybody.
If you're worried about getting cornered, consider running Quick and Quiet + Head On to make use of the bathroom's lockers. That way you can dive into a locker when you hear the terror radius, stun the killer, and then round the corner into the basement hallway which has two very strong pallets. Once you get out of the bathroom, you're golden, since there are so many pallets nearby.
Once the generator is complete, the sliding door to the right will open, making the room much easier to enter and leave, but also weakening the pallets. Use that part of the map to loop the killer safely if you get into a chase. If you get into a hatch situation, remember the hatch only spawns on the lower floor.
Classy Act
Repair the generator in either the Music room or Chemistry Lab on Midwich Elementary and then escape. Since you have two generators to pick from, odds are you will get this achievement just by playing on Midwich enough times. Simply do your best to survive and don't worry about prioritizing this achievement - you're most likely going to get it without trying. General Midwich survival tips include not running Lithe (very few vaults) and using Windows of Opportunity to avoid ending up in a classroom without a pallet. Shadowstep and Circle of Healing are very strong picks here since they cover two floors at once. Avoid the courtyard in the center of the map if at all possible, since there is rarely much to work with beyond using the hedges to obstruct killer visibility. Remember that the hatch only spawns on the bottom floor *or* the landings of the staircases.
Cottage Owner
Repair the generator on top of the main building in Mother's Dwelling and escape. Mother's Dwelling is a ludicrously massive map and the main generator is very difficult to access for the killer, meaning they will usually give up unless they are the Nurse or have a ranged attack that can harass survivors on the gen. Bring Balanced Landing to swing things even further in your favor. This is a very easy challenge, and you will probably get it without trying - the middle generator on this map is already a beacon to survivors, and killers do not want to deal with the absurdly strong windows in main building.
Flight to Freedom
Complete the middle generator on Eyrie of Crows and escape. Eyrie of Crows is already degenerate, and the middle generator is surrounded by strong windows and an upstairs with strong pallets. Bring Balanced Landing (seeing a pattern?) and Circle of Healing/Shadowstep and turn the main building into your own personal clubhouse. If the killer DCs after you complete the main generator, you still get the achievement. This one really isn't difficult.
Map-Specific Achievements, Part 2
Grim Pilgrimage

Complete the generator in the middle of the Sanctum of Wrath and then escape. Every Sanctum of Wrath game is defined by the struggle for the middle generator, which is critical for the killer maintaining most 3 gens and also offers an excellent view of survivor's movements throughout the map. There are strong drop offs again, so bring Balanced Landing. Also bring a strong toolbox because you are going to be fighting nonstop over that middle generator. I do *not* recommend using the toolbox right away, because the killer is inevitably going to force you off the gen. Instead, use it as a mains to brute force the remainder of the progress if you know the killer is involved in another chase. Prove Thyself and Potential Energy (build up stacks on another generator) are also good ways to blitz progress on this tightly contested generator.
As far as escaping goes, completing the generator is half the battle. Continue using Balanced Landing on the main structure and at hills to deter chases, and if you see a small squeeze between an object and some bamboo, play it safe and go around - the fat shaming is infamous on this map.
Haeomophobia

Escape from Disturbed Ward without losing a single drop of blood - this means you cannot get injured even once. Medkits and second chance perks are pointless - you need a setup that discourages contact with the killer altogether. For that reason, bring a Skeleton Key with Blood Amber and Prayer Beads so you can track the killer and keep your distance. My recommended perk setup would be: Sprint Burst, Open Handed, Windows of Opportunity, Kindred/Fogwise/Alert. You can also run Built to Last and keep reusing your key instead of any of those last three perks. This way you can vacate quickly, know where the pallets are (predrop EVERYTHING), have massive aura reading range on your key, and have consistent tracking on the killer.
The main building of Disturbed Ward is brutal and you should use it as much as possible. Windows of Opportunity should show you where the critical vaults are, and you have 4-5 strong pallets to predrop if chased. Try not to exhaust the buildings' resources too quickly or too early in the match, and try to let others complete the central generator, because the killer will be frequenting it.
Once you make it to an exit gate, open it and leave. Do not risk this achievement, because it is a righteous pain in the ass in solo queue. Let your teammates do the bleeding!
Old West Oasis

Complete the generator atop the Dead Dawg Saloon and escape. Look, even though the map is small and generally popular with killers, no one likes dealing with Dead Dawg's main building. It has about eight different breakable walls and several strong vaults. Survivors can see you coming from any direction. This generator usually gets completed early and with minimal contest from most killers. Focus on this generator early so you can complete it before someone else does, and then focus on just surviving. Try to pick a survivor with cosmetics that blend into dark backgrounds and use Bite the Bullet and medkits to hide in bushes. Use Windows of Opportunity to bamboozle killers in the looping maze next to the water tower. It's not hard. Balanced Landing optional.
Operation: Survival

Complete the generator in the main operating room in Lery's and escape. This one is tricky just because this is the only generator where everyone knows where it is, and it is also quite central. If someone else gets an early extended chase, get this one done fast. Otherwise, clear off, because this is the first place the killer will check. This is another case where I recommend bringing BNP and a strong toolbox because you are going to be on a timer whenever you are on this generator for the killer showing up. This is another map where Windows of Opportunity comes in clutch because, while the map is claustrophobic and confusing, it also chains together windows like no other map does, and Windows will let you exploit that to its fullest. Finally, note wherever basement is and do *not* get downed near it. Basement in the main room is easily patrolled and frequently camped, while the office basement is very difficult to get in and out of unscathed due to its limited exits.
Don't Open, Dead Inside

The real trick is actually getting this map to show up to begin with. Unfortunately there is very little you can do about that. Even worse, the main "building" of this map is a small tower in the northeast corner that contains a decent window and pallet ... and that's it. That's where the generator you need to complete is. This isn't really an achievement you can prepare for now that map offerings have been nerfed - even bring the offering for this realm only gives you a 1/4 chance of getting this map specifically. Ugly. Get well-versed on your looping fundamentals and bring Windows of Opportunity, and get on the DONT DEAD OPEN INSIDE generator as soon as possible. Burn your toolbox if you've got one. Aside from the main "building" this map is nothing but shack, standard jungle gyms, and filler pallets. Really high effort stuff, BHVR.
Complete the generator in the middle of the Sanctum of Wrath and then escape. Every Sanctum of Wrath game is defined by the struggle for the middle generator, which is critical for the killer maintaining most 3 gens and also offers an excellent view of survivor's movements throughout the map. There are strong drop offs again, so bring Balanced Landing. Also bring a strong toolbox because you are going to be fighting nonstop over that middle generator. I do *not* recommend using the toolbox right away, because the killer is inevitably going to force you off the gen. Instead, use it as a mains to brute force the remainder of the progress if you know the killer is involved in another chase. Prove Thyself and Potential Energy (build up stacks on another generator) are also good ways to blitz progress on this tightly contested generator.
As far as escaping goes, completing the generator is half the battle. Continue using Balanced Landing on the main structure and at hills to deter chases, and if you see a small squeeze between an object and some bamboo, play it safe and go around - the fat shaming is infamous on this map.
Haeomophobia
Escape from Disturbed Ward without losing a single drop of blood - this means you cannot get injured even once. Medkits and second chance perks are pointless - you need a setup that discourages contact with the killer altogether. For that reason, bring a Skeleton Key with Blood Amber and Prayer Beads so you can track the killer and keep your distance. My recommended perk setup would be: Sprint Burst, Open Handed, Windows of Opportunity, Kindred/Fogwise/Alert. You can also run Built to Last and keep reusing your key instead of any of those last three perks. This way you can vacate quickly, know where the pallets are (predrop EVERYTHING), have massive aura reading range on your key, and have consistent tracking on the killer.
The main building of Disturbed Ward is brutal and you should use it as much as possible. Windows of Opportunity should show you where the critical vaults are, and you have 4-5 strong pallets to predrop if chased. Try not to exhaust the buildings' resources too quickly or too early in the match, and try to let others complete the central generator, because the killer will be frequenting it.
Once you make it to an exit gate, open it and leave. Do not risk this achievement, because it is a righteous pain in the ass in solo queue. Let your teammates do the bleeding!
Old West Oasis
Complete the generator atop the Dead Dawg Saloon and escape. Look, even though the map is small and generally popular with killers, no one likes dealing with Dead Dawg's main building. It has about eight different breakable walls and several strong vaults. Survivors can see you coming from any direction. This generator usually gets completed early and with minimal contest from most killers. Focus on this generator early so you can complete it before someone else does, and then focus on just surviving. Try to pick a survivor with cosmetics that blend into dark backgrounds and use Bite the Bullet and medkits to hide in bushes. Use Windows of Opportunity to bamboozle killers in the looping maze next to the water tower. It's not hard. Balanced Landing optional.
Operation: Survival
Complete the generator in the main operating room in Lery's and escape. This one is tricky just because this is the only generator where everyone knows where it is, and it is also quite central. If someone else gets an early extended chase, get this one done fast. Otherwise, clear off, because this is the first place the killer will check. This is another case where I recommend bringing BNP and a strong toolbox because you are going to be on a timer whenever you are on this generator for the killer showing up. This is another map where Windows of Opportunity comes in clutch because, while the map is claustrophobic and confusing, it also chains together windows like no other map does, and Windows will let you exploit that to its fullest. Finally, note wherever basement is and do *not* get downed near it. Basement in the main room is easily patrolled and frequently camped, while the office basement is very difficult to get in and out of unscathed due to its limited exits.
Don't Open, Dead Inside
The real trick is actually getting this map to show up to begin with. Unfortunately there is very little you can do about that. Even worse, the main "building" of this map is a small tower in the northeast corner that contains a decent window and pallet ... and that's it. That's where the generator you need to complete is. This isn't really an achievement you can prepare for now that map offerings have been nerfed - even bring the offering for this realm only gives you a 1/4 chance of getting this map specifically. Ugly. Get well-versed on your looping fundamentals and bring Windows of Opportunity, and get on the DONT DEAD OPEN INSIDE generator as soon as possible. Burn your toolbox if you've got one. Aside from the main "building" this map is nothing but shack, standard jungle gyms, and filler pallets. Really high effort stuff, BHVR.
Outbreak Breakout, Part 1

"Open the exit gate and escape from either of the 2 Raccoon City Maps 20 times."
Yes, this bastard gets its own section. This was the achievement that made me finally break down and ask the Reddit mods on the DBD subreddit for the Platinum flair, because ♥♥♥♥ me if BHVR ever releases an achievement like this again. It also inspired the creation of this guide, so that I can spare others some of the suffering I inflicted upon myself.
On the face of the description, it does not look that bad. Survivors escape maps all the time, and RPD has a reputation for being infuriating for killers to play in, right? Well, there's two wrinkles. The first is that, you don't need to escape the RPD, you need to *open an exit gate and escape.* There's a massive difference there in terms of both player input and the likelihood of this happening. Hatch does not count. We cannot ♥♥♥♥♥♥♥ our way through this by laying low and escaping with a key. We need to get those gates open and escape, which means keeping other survivors alive ... although this also means running the risk of letting *those* rat ♥♥♥♥♥ get the achievement progress instead if they open the gate first! Infuriating! And we can't bully the killer into disconnecting, either (pretty easy with Boon: Shadowstep.) Although, shame on you for even considering that!
The second wrinkle is that both RPDs are actually pretty killer-favored. The East Wing frequently ends with a disgusting three gen, while the West Wing offers a bit more leeway for hiding and looping. It's still pretty easy to get lost on the map if you are unfamiliar with it, but if the killer *is* familiar with it, expect to be cut off unexpectedly as the killer anticipates your escape routes and takes a shortcut down a staircase or around another hallway.
How can we win, when fools can be kings?
Before we discuss strategy, let's look at the outcome we want. Open exit gate and escape. There are actually three ways for the game to count this, although we should only strive for one.
1. You open the exit gate and then escape. Self-explanatory. I do not recommend 99ing the gates in this instance. Open that sucker immediately and then either leave or save teammates. If you 99, odds are someone else will open it. I have had this happen.
2. You open the exit gate and escape through hatch. Excessive, but amusing. Yes, the game counts this since the wording is "open an exit gate" (which you did) and then "escape" (you did that as well!) I cannot plausibly see a tactical reason for doing this, however it could potentially give you an out if you open the gate, double back to save someone, and then everyone else leaves while the killer is on your ass. If that happens, take the hatch with no remorse!
3. You opened the exit gate and then the killer disconnected. Yes, this really counts - it happened to me. This is another reason should open the gate ASAP instead of 99ing. If the killer disconnects before you open that door, you get no progress!
Badges. Lots of badges.

First, we're gonna need a lot of these. Every time you are in a survivor bloodweb, look for these. Then buy them. Buy every single one. We're going to need them. If you're playing solo queue normally, feel free to ask others to burn this map offering if they have them. I've had others ask me after I was done with the challenge (another reason I'm writing this) and I was happy to oblige. Can't hurt to ask!
If you have a main already, just buy the offerings on them. If not, consider picking a smaller, quieter survivor so that you can hide in dark patches and avoid the killer. A P3 Claudette would be the go to for this. I did the challenge on a wide range of survivors, but I bought most of my offerings (and subsequently got most of my progress) on shirtless David, so don't take cosmetic optimization too seriously.
Note: These now only increase the odds of going to RPD by 20%, which is obviously going to make the achievement much harder. There is unfortunately nothing you can do about this. Burn the map anyway and hope for the best. No, burning multiple will not help. If you think this sucks, it does, but survivors and killers alike had been abusing map offerings (mostly Eyrie and Haddonfield) for almost a decade now.
Perks, or "thank God this is not an Adept as well"
I highly recommend these three:
Distortion will not only enable you to stay the hell out of the killer's way, it will also give you invaluable information on their build. The most critical reason to include it is to counter Lethal Pursuer - avoiding an early game chase and potential tunnel/camp is critical. If you see the perk trigger at the game's start, stay away from your teammates! Also remember that while the perk is active, you leave no scratch marks, so RUN LIKE HELL!
Wake Up does two very important things. The first is that it opens the exit gate faster, which is our primary objective. The second is that it will permanently highlight the two exit gate locations, which is very useful if you are unfamiliar with the map or were in chase when the gate icons were highlighted. Ordinarily I would not recommend this perk over say, something like Dead Hard, but since our objective is rather specific, it helps to A. do it faster and B. beat both the killer and/our teammates to the alternative gate if the main gate is unavailable due to either being already open or a murderous psychopath forbidding its use.
This is already a meta perk, so it does not need much of an explanation. The heal is very helpful if you are injured and especially if you are in chase, but the speed boost is where it is at. Five seconds of sprint burst greatly increases your chances of making it to an exit gate first before another survivor does, in addition to outrunning the killer. I generally did not run an exhaustion perk while I did this challenge, so the 40 seconds of exhaustion did not hamper me in any way.
Your fourth slot is free, although I generally went with Botany Knowledge to complement my extremely strong medkit. Sole Survivor is an interesting choice, since it can assist with stealth and speed up opening exit gates if you are the last person standing, however waiting for a killer to close hatch while you stand next to an exit gate is awkward. I never successfully escaped while using this perk, and I think it hedges too hard on an unfavorable scenario. I think Wake Up does its job better.
The obvious pick would be an exhaustion perk. Balanced Landing pairs pretty well with the main hall area, but I think Sprint Burst would be better for the average solo queuer since it allows you to make massive distance before the killer arrives and discourages chase. There aren't many great places to Lithe in RPD, so I do not recommend it.
Prove Thyself is risky but useful for finishing one of the central gens. Kindred will provide both you and your teammates very valuable information. I would go for a "comfort" perk for the fourth slot. Whatever lets you feel better about this awful challenge.
Outbreak Breakout, Part 2
Okay, but what do I do with my hands
Item selection is simple. Since we have to escape through an exit gate, and we are using Wake Up to see their location at all times, keys and maps are out. Flashlights are for Youtubes and wannabes. That just leaves medkits and toolboxes.


While you *can* go the Brand New Part/Hyperfocus/Stake Out combo and bust out one of the middle gens very quickly, I found it much more valuable to have reliable healing on hand. For this reason, I would recommend bringing the Purple Medkit with as many charges as possible. If you bring Gel Dressings + Bandages and use Botany Knowledge as your fourth perk, you will have almost two heals at +50% speed, decent, but really solid for your teammates. Consider Streetwise if you want that second heal.
Actual gameplay
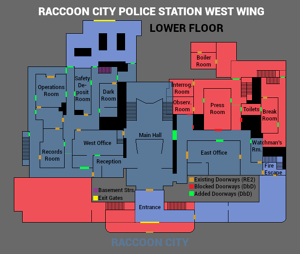
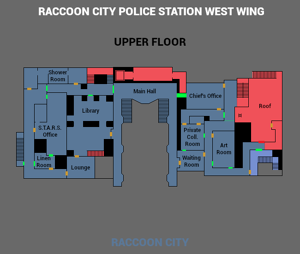
Killers usually make a beeline for the main hallway when they first spawn, so try not to jump on a generator right away. Wait for the killer to make an appearance and scope out the area, then get on a gen when they leave.
The Upstairs West Hallway (outside the S.T.A.R.S. office) gen is a very common spawning point for survivors and is usually completed early. It is also very commonly the first area swept by killers after they check the main hallway. If you spawn here, I advise leaving immediately.
The West Wing bathroom generator is high traffic. It is easily accessed from the main hallway and will be checked frequently. It may also be part of a three gen. It is very easy to take hits here since you have to leave the room through either the floor (which means a stagger) or out through the hallway (running without pallets or windows for several seconds.) Leave as soon as you hear a terror radius.
A generator often spawns in the safety deposit room of the West Wing. This is usually pretty out of the way and safely completed. Try to save it until later, since I usually only saw it get patrolled either in the early game if the killer can't find anyone, or the late game when it is one of the very last generators remaining.
The West Upstairs Office generator is nice and secluded, and comes with a strong loop built in. There is also a totem under the desk that makes for a great boon. It can be safely completed later because it is both out of the way and a pain in the ass for the killer to chase in.
The West Hallway gen may be easily accessed from the main hallway, but it is not readily visible. It can be safely completed later and makes for a very weak three gen.

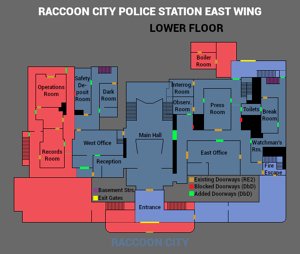
The main hurdle you need to overcome is the three gen. If the killer is both knowledgeable of the map and pissed, it is possible they will stake out the two main hallway gens and one other close by generator and refuse to move. If they also have Eruption, you're probably screwed. Fortunately, only one in maybe thirty killers will do this. You need to somehow coordinate with your teammates to split focus on one-three of these gens until one of them is eventually finished. Again, against Eruption and in solo queue, this may be impossible.
Once one of the main hallway generators is complete, your job gets a lot easier. Keep a low profile and try to pick generators that are isolated. If a generator spawned on the library ledge (only possible on RPD East Wing) this is a good pick, although you have very few options if the killer does come calling.
The East Office has two generator spawn locations, but I didn't see them that often. They are very easily accessed from the main hallway, however killers typically have an aversion to chasing survivors in that area due to the strength of the loops. These can be safely done later.
Killers usually head to the Helicopter Rooftop after the main hallway, since survivors usually spawn there, and in great numbers. If you spawn there, I highly suggest leaving immediately, because you're going to have company.
A generator usually spawns in the forward courtyard which comes with two reasonable loops close by, so it's a good early pick since you should have a lot of warning if the killer is coming.
The Interrogation Room generator is an ABSOLUTE pain in the ass, and I very rarely saw it get done. Despite it being equipped with a very strong vault, it is highly visible and has multiple avenues of entry and basically nowhere to hide. I would advise trying to get it done early, because if it is one of the last generators standing and you're down one or more teammates, you are going to have a bad time.
After repeated abuse by survivors, the Library second floor has been sealed off. Good riddance. The Library is available on both versions of the RPD. but features only a single moderately strong loop. Survivors usually only run here when they have nowhere else to go, and generally the library becomes a place where survivors die, more than anything else. Try to avoid being here, unless you have Balanced Landing.
Item selection is simple. Since we have to escape through an exit gate, and we are using Wake Up to see their location at all times, keys and maps are out. Flashlights are for Youtubes and wannabes. That just leaves medkits and toolboxes.
While you *can* go the Brand New Part/Hyperfocus/Stake Out combo and bust out one of the middle gens very quickly, I found it much more valuable to have reliable healing on hand. For this reason, I would recommend bringing the Purple Medkit with as many charges as possible. If you bring Gel Dressings + Bandages and use Botany Knowledge as your fourth perk, you will have almost two heals at +50% speed, decent, but really solid for your teammates. Consider Streetwise if you want that second heal.
Actual gameplay
Killers usually make a beeline for the main hallway when they first spawn, so try not to jump on a generator right away. Wait for the killer to make an appearance and scope out the area, then get on a gen when they leave.
The Upstairs West Hallway (outside the S.T.A.R.S. office) gen is a very common spawning point for survivors and is usually completed early. It is also very commonly the first area swept by killers after they check the main hallway. If you spawn here, I advise leaving immediately.
The West Wing bathroom generator is high traffic. It is easily accessed from the main hallway and will be checked frequently. It may also be part of a three gen. It is very easy to take hits here since you have to leave the room through either the floor (which means a stagger) or out through the hallway (running without pallets or windows for several seconds.) Leave as soon as you hear a terror radius.
A generator often spawns in the safety deposit room of the West Wing. This is usually pretty out of the way and safely completed. Try to save it until later, since I usually only saw it get patrolled either in the early game if the killer can't find anyone, or the late game when it is one of the very last generators remaining.
The West Upstairs Office generator is nice and secluded, and comes with a strong loop built in. There is also a totem under the desk that makes for a great boon. It can be safely completed later because it is both out of the way and a pain in the ass for the killer to chase in.
The West Hallway gen may be easily accessed from the main hallway, but it is not readily visible. It can be safely completed later and makes for a very weak three gen.
The main hurdle you need to overcome is the three gen. If the killer is both knowledgeable of the map and pissed, it is possible they will stake out the two main hallway gens and one other close by generator and refuse to move. If they also have Eruption, you're probably screwed. Fortunately, only one in maybe thirty killers will do this. You need to somehow coordinate with your teammates to split focus on one-three of these gens until one of them is eventually finished. Again, against Eruption and in solo queue, this may be impossible.
Once one of the main hallway generators is complete, your job gets a lot easier. Keep a low profile and try to pick generators that are isolated. If a generator spawned on the library ledge (only possible on RPD East Wing) this is a good pick, although you have very few options if the killer does come calling.
The East Office has two generator spawn locations, but I didn't see them that often. They are very easily accessed from the main hallway, however killers typically have an aversion to chasing survivors in that area due to the strength of the loops. These can be safely done later.
Killers usually head to the Helicopter Rooftop after the main hallway, since survivors usually spawn there, and in great numbers. If you spawn there, I highly suggest leaving immediately, because you're going to have company.
A generator usually spawns in the forward courtyard which comes with two reasonable loops close by, so it's a good early pick since you should have a lot of warning if the killer is coming.
The Interrogation Room generator is an ABSOLUTE pain in the ass, and I very rarely saw it get done. Despite it being equipped with a very strong vault, it is highly visible and has multiple avenues of entry and basically nowhere to hide. I would advise trying to get it done early, because if it is one of the last generators standing and you're down one or more teammates, you are going to have a bad time.
After repeated abuse by survivors, the Library second floor has been sealed off. Good riddance. The Library is available on both versions of the RPD. but features only a single moderately strong loop. Survivors usually only run here when they have nowhere else to go, and generally the library becomes a place where survivors die, more than anything else. Try to avoid being here, unless you have Balanced Landing.
Map-Specific Achievements, Part 3
Outrun the Overlap

Complete the generator in the main building of the Garden of Joy and escape. Garden of Joy is notoriously awful for killer. The generator is right next to a window drop, so bring Balanced Landing. Killers hate fighting for this generator, so you're unlikely to have company past the early game. Frankly, consider bringing a strong toolbox so you can get this generator done before anyone else does or the killer disconnects - the map (and main building) really are that oppressive.
Raccoon City Recruit

Complete the main hallway generator (closest to the entrance) and escape. Refer to the Outbreak Breakout section. If you are on the RPD, whether on purpose or by chance, you should focus on Outbreak Breakout instead of this. Trust me, you will spend more than enough time on the RPD to get this achievement.
Rebuilding the Borgo

Repair the generator in the main building in Shattered Borgo and escape. This generator comes next to a strong window drop, so bring Balanced Landing. It is also pretty central and serves as a major landmark on an otherwise dull map, so the killer will be dropping by often. I recommend bringing a strong toolbox and Prove Thyself, because your teammates will be gravitating to this generator as well. Consider bringing Lightweight to further bamboozle the killer if they are pursuing you, especially if they are colorblind - seriously, this maps' color palette is awful.
Shock Therapy

Complete the generator on the top floor of Disturbed Ward's main building and escape. Refer to the section on Haemophobia for some tips on abusing the main building. The killer will be checking this generator fairly regularly, so bring a toolbox. I actually would recommend Lithe or Sprint Burst over Balanced Landing here, because you can lead killers on a merry chase inside the main building pretty easily, while dropping out of it will encourage the killer to follow because, hey, you might be zooming away, but at least you're not in ♥♥♥♥♥♥♥ main anymore. This one should come pretty easily - Disturbed Ward's main building is among the most degenerate in the game. Just don't go down next to basement if it spawns in main...
Shrine Apparatus

Complete the generator on the bottom floor of Temple of Purgation and escape. Unlike many other examples, this one actually takes place on a lower floor rather than an upper, and the killer has more entrances than you do exits. Killers can also hear generator progress through the floor upstairs, so you really will not have much privacy. Balanced Landing is still useful for dropping off the main building, but you are probably better off using Sprint Burst and getting off the generator and up the stairs.
If you do complete the gen, it actually opens a gate and makes a very strong pallet available. Very useful for leading the killer on an extended chase after the generator is done. There's also a chest in there, if you're desperate. Aside from the main building, the Temple spawns a lot of strong loops. So long as you're not up against a killer that can hit you over low walls (Nemesis, Trickster, Huntress) this is a fairly simple map to escape from ... but you're going to be very exposed while working on main.
Unforgettable Getaway

Complete the generator in the main building on Ormond and escape. I actually really like this map as both killer and survivor, but I will acknowledge that the main building can be tough to deal with, and this generator will be a fight for both sides. The killer is going to be checking this generator *constantly,* but usually will not pay it much mind at the very beginning of the match, since survivors do not spawn in middle and this generator is easy to check. For that reason, I recommend going Toolbox Gremlin mode, bringing Distortion, and getting to this generator as fast as possible. Prove Thyself may be a good idea as well, since this generator frequently gets double teamed.
Surviving on Ormond after that isn't hard, since there are a lot of strong pallets. If you're not familiar with main building, bring Windows of Opportunity, since there are a lot of plays you can make there. Balanced Landing will let you abuse both main building and the ski shack, but you will probably get by just as fine with Dead Hard or Sprint Burst.
Complete the generator in the main building of the Garden of Joy and escape. Garden of Joy is notoriously awful for killer. The generator is right next to a window drop, so bring Balanced Landing. Killers hate fighting for this generator, so you're unlikely to have company past the early game. Frankly, consider bringing a strong toolbox so you can get this generator done before anyone else does or the killer disconnects - the map (and main building) really are that oppressive.
Raccoon City Recruit
Complete the main hallway generator (closest to the entrance) and escape. Refer to the Outbreak Breakout section. If you are on the RPD, whether on purpose or by chance, you should focus on Outbreak Breakout instead of this. Trust me, you will spend more than enough time on the RPD to get this achievement.
Rebuilding the Borgo
Repair the generator in the main building in Shattered Borgo and escape. This generator comes next to a strong window drop, so bring Balanced Landing. It is also pretty central and serves as a major landmark on an otherwise dull map, so the killer will be dropping by often. I recommend bringing a strong toolbox and Prove Thyself, because your teammates will be gravitating to this generator as well. Consider bringing Lightweight to further bamboozle the killer if they are pursuing you, especially if they are colorblind - seriously, this maps' color palette is awful.
Shock Therapy
Complete the generator on the top floor of Disturbed Ward's main building and escape. Refer to the section on Haemophobia for some tips on abusing the main building. The killer will be checking this generator fairly regularly, so bring a toolbox. I actually would recommend Lithe or Sprint Burst over Balanced Landing here, because you can lead killers on a merry chase inside the main building pretty easily, while dropping out of it will encourage the killer to follow because, hey, you might be zooming away, but at least you're not in ♥♥♥♥♥♥♥ main anymore. This one should come pretty easily - Disturbed Ward's main building is among the most degenerate in the game. Just don't go down next to basement if it spawns in main...
Shrine Apparatus
Complete the generator on the bottom floor of Temple of Purgation and escape. Unlike many other examples, this one actually takes place on a lower floor rather than an upper, and the killer has more entrances than you do exits. Killers can also hear generator progress through the floor upstairs, so you really will not have much privacy. Balanced Landing is still useful for dropping off the main building, but you are probably better off using Sprint Burst and getting off the generator and up the stairs.
If you do complete the gen, it actually opens a gate and makes a very strong pallet available. Very useful for leading the killer on an extended chase after the generator is done. There's also a chest in there, if you're desperate. Aside from the main building, the Temple spawns a lot of strong loops. So long as you're not up against a killer that can hit you over low walls (Nemesis, Trickster, Huntress) this is a fairly simple map to escape from ... but you're going to be very exposed while working on main.
Unforgettable Getaway
Complete the generator in the main building on Ormond and escape. I actually really like this map as both killer and survivor, but I will acknowledge that the main building can be tough to deal with, and this generator will be a fight for both sides. The killer is going to be checking this generator *constantly,* but usually will not pay it much mind at the very beginning of the match, since survivors do not spawn in middle and this generator is easy to check. For that reason, I recommend going Toolbox Gremlin mode, bringing Distortion, and getting to this generator as fast as possible. Prove Thyself may be a good idea as well, since this generator frequently gets double teamed.
Surviving on Ormond after that isn't hard, since there are a lot of strong pallets. If you're not familiar with main building, bring Windows of Opportunity, since there are a lot of plays you can make there. Balanced Landing will let you abuse both main building and the ski shack, but you will probably get by just as fine with Dead Hard or Sprint Burst.
Map-Specific Achievements, Part 4
Hack the Mainframe

Repair the generator by the command center on Shelter Woods and escape. Hey, Shelter Woods got a main building! Balanced Landing can be helpful here, since you can head up the staircase and dive out the window, but Sprint Burst might be a better call here to get a head start on the killer. I also recommend Windows of Opportunity so you can see where the windows and pallets on the ground floor are. Bring a strong toolbox and make a beeline for the command center - however, bear in mind that this is usually a priority for everyone on the map, so try not to burn charges until you see someone else is in chase. Otherwise, the real challenge of this achievement is getting this map in the rotation and then surviving solo queue.
Extraterrestrial

Complete the generator at the base on Toba Landing and escape. Bring Balanced Landing and a strong toolbox. Killers will expect you to use the vault, so consider waiting at the other edge - they won't expect this, and they won't hear you drop so long as you aren't exhausted. Then you can make tracks. If you can complete this generator, it should make any three gen scenarios on the map a *lot* weaker, and you should have a lot of warning for when the killer is approaching the generator.
MU/TH/UR Dearest

Complete the generator at the mess hall and escape. That's the front generator - you know, the one that is easily accessible and visible from most of the map. Balanced Landing actually cannot help you here (well, not much) so Sprint Burst is probably a better choice. This will be the first place the killer looks, so maybe hold off until you see someone else in chase and try to get on another generator. As usual, bring a strong toolbox and dump progress into the generator once you are sure the killer is occupied. Rushing this generator is ideal regardless, just try not to draw too much attention to yourself at the beginning of the match.
Movie Buff

Complete the movie generator and escape. Oh, this is a pain in the ass. The good news is that repairing this generator is easy - it's next to a strong ledge and the killer will be occupied with the center of the map - you know, where all the gens are. Then you'll finish the generators and discover you are stuck with 3-4 generators in close proximity in the center of the map linked only by weak pallets and realize this map is completely ♥♥♥♥♥♥. My recommendation is to bring a toolbox and Sprint Burst and burn the toolbox on one of the center generators, then use Sprint Burst to take the killer to main or the shack if necessary. In solo queue, this map is absolutely brutal. Don't prioritize the movie generator unless you know other people are working on it, since unlike the rest of these map achievements, completing that generator actually makes escaping the trial harder. You will probably have better odds completing this generator and getting hatch than actually getting out a gate.
Dungeon Crawler
Complete the dungeon generator and escape. Another ball buster. The generator you want is the one surrounded by torture equipment and skeletons at the deepest part of the map. Sprint Burst will serve you well here again. Bring Windows of Opportunity as well - it's easy to get turned around in the dungeons, so Windows will at least take you towards the pallets. There is a portal out of the room you can use if the killer is coming down the long way around. Try to get this one done early since other survivors will likely be interested in it, as well as to increase overall likelihood of survival. There's a 3/4 split on this map topside/bottomside for generators, so nibbling off a bit of both sides is critical to prevent a lockoff by the killer. This map sucks for both sides. Quite a feat!
Repair the generator by the command center on Shelter Woods and escape. Hey, Shelter Woods got a main building! Balanced Landing can be helpful here, since you can head up the staircase and dive out the window, but Sprint Burst might be a better call here to get a head start on the killer. I also recommend Windows of Opportunity so you can see where the windows and pallets on the ground floor are. Bring a strong toolbox and make a beeline for the command center - however, bear in mind that this is usually a priority for everyone on the map, so try not to burn charges until you see someone else is in chase. Otherwise, the real challenge of this achievement is getting this map in the rotation and then surviving solo queue.
Extraterrestrial
Complete the generator at the base on Toba Landing and escape. Bring Balanced Landing and a strong toolbox. Killers will expect you to use the vault, so consider waiting at the other edge - they won't expect this, and they won't hear you drop so long as you aren't exhausted. Then you can make tracks. If you can complete this generator, it should make any three gen scenarios on the map a *lot* weaker, and you should have a lot of warning for when the killer is approaching the generator.
MU/TH/UR Dearest
Complete the generator at the mess hall and escape. That's the front generator - you know, the one that is easily accessible and visible from most of the map. Balanced Landing actually cannot help you here (well, not much) so Sprint Burst is probably a better choice. This will be the first place the killer looks, so maybe hold off until you see someone else in chase and try to get on another generator. As usual, bring a strong toolbox and dump progress into the generator once you are sure the killer is occupied. Rushing this generator is ideal regardless, just try not to draw too much attention to yourself at the beginning of the match.
Movie Buff
Complete the movie generator and escape. Oh, this is a pain in the ass. The good news is that repairing this generator is easy - it's next to a strong ledge and the killer will be occupied with the center of the map - you know, where all the gens are. Then you'll finish the generators and discover you are stuck with 3-4 generators in close proximity in the center of the map linked only by weak pallets and realize this map is completely ♥♥♥♥♥♥. My recommendation is to bring a toolbox and Sprint Burst and burn the toolbox on one of the center generators, then use Sprint Burst to take the killer to main or the shack if necessary. In solo queue, this map is absolutely brutal. Don't prioritize the movie generator unless you know other people are working on it, since unlike the rest of these map achievements, completing that generator actually makes escaping the trial harder. You will probably have better odds completing this generator and getting hatch than actually getting out a gate.
Dungeon Crawler
Complete the dungeon generator and escape. Another ball buster. The generator you want is the one surrounded by torture equipment and skeletons at the deepest part of the map. Sprint Burst will serve you well here again. Bring Windows of Opportunity as well - it's easy to get turned around in the dungeons, so Windows will at least take you towards the pallets. There is a portal out of the room you can use if the killer is coming down the long way around. Try to get this one done early since other survivors will likely be interested in it, as well as to increase overall likelihood of survival. There's a 3/4 split on this map topside/bottomside for generators, so nibbling off a bit of both sides is critical to prevent a lockoff by the killer. This map sucks for both sides. Quite a feat!
Survivor Adept Guidelines and General Tips, Part 1
The good news is that the survivors adepts are much, much easier than the killer adepts. The requirement is only that you escape, hatch counts just as much as the exit gate. You used to be able to receive adepts if the killer disconnected, but that no longer seems to be the case.
The bad news, of course, is that you cannot choose your perks, a handful of which can be actively detrimental. Compared to your average match of solo queue, you are going to have an even smaller amount of information and fewer second chances, and honestly that prospect alone can be pretty terrifying. But don't worry, I'm higher to administer that hopium. That sweet, sweet hopium. Hold the ♥♥♥♥ still.
Dress for Success
Select darker clothing cosmetics where possible. Prestige outfits generally darken default outfits thanks to all the blood, so equip them if they are available and nothing better presents itself. Some Legendary Cosmetics actually quieten the survivor (!) but outside of Sheva Alomar I'm not sure there are any other candidates. Overall, you want to keep as low a profile as possible. If a killer is looking across Autohaven Wreckers and sees a shirtless man with blue paint splashed across his torso, that killer will feel something. Fear at your audacity. Possibly arousal. And then they will try to kill you, while Claudette will hide in a bush. Please review this guide and act accordingly.
Send the Killer to an Awful Map
I believe in fair play. I do not bring map offerings unless there is an achievement involved. I Task Manager as killer if someone tries to send me to Garden of Joy. However, there is an achievement involved. The stakes are low, but measurable. We have to resort to scummy tactics.
If the killer quits while the map is loading, you are refunded your offering, so just try again. If you load in and they immediately DC, congratulations, you just traded a map offering for a mixed sense of amusement and guilt.
If the game does play out normally, then you are at a sizable advantage because, fortunately for us, the DBD map team is ♥♥♥♥♥♥♥ awful at their jobs. Here are the offerings to bring:

If you *maybe* want a fair game with also decent odds of getting a strong map, pick Azarov's Key. Blood Lodge and especially Gas Heaven are very survivor sided, while the rest are pretty balanced. Picking this offering is highly unlikely to offend the killer, and probably good for your karma. Let's be honest, if you play DBD, your karma could probably use all the help it could get.

The best odds of giving the killer a balanced game, and the offering you should feel least guilty about. If you feel bad for something you did, feel free to bring this offering, but I'm only including it because it is fair. I would not recommend it if you are truly concerned with getting an achievement.

I would look askance at anyone who picked this. This is the sleeper option for those who are truly evil. Badham is a bad time. If you are truly committed to your adept and you don't care about the killer having anything close to a good time, pick this. Hatch can be hard to find on Badham, but that is about the only downside. Pallets regularly spawn around shack, and you have the house of pain. I will think less of you if you pick this. Badham is not the last resort of the desperate, it is the first resort of the sadistic.

Otzdarva rated this map as killer favored, but I am still going to politely disagree. It is just too easy to chain pallets, even without Windows of Opportunity. Some killers will really struggle here, while others will do fine - Artist and Nurse come to mind. Of course, when doesn't the Nurse do fine? This is always a solid pick. Remember that hatch always spawns on the bottom floor!

A monument to the map design team's sins, this map has an extremely exploitable main building and tiles are easy to chain. It got nerfed recently and I *still* recommend it. Eyrie has been the go-to "have a bad time" map offering for survivors since its release and that is unlikely to change. If you are unsure of what map to pick for your adept, Eyrie is always a safe bet. It has everything. My first match against four P100s, they sent me here, which should tell you something.
Then I killed them all.

One of the most recent pieces of evidence that map design remains BHVR's biggest weakness, Garden of Joy is disgusting. The main building has multiple exploitable windows, the streets are littered with pallets (which shack easily chains into), and the bushes have wonky hitboxes that can throw off certain killers. Also, the upstairs of the main building is extremely dark and can be hidden inside. Garden of Joy is complete ♥♥♥♥♥♥♥♥, and thus a solid pick for any adept, provided you can withstand the cost to your soul. There is now one downside, however - there is a 50% chance you will send yourself to Sable/The Unknown's map, which is bonkers killer-sided. So weigh the risks on that one.
The bad news, of course, is that you cannot choose your perks, a handful of which can be actively detrimental. Compared to your average match of solo queue, you are going to have an even smaller amount of information and fewer second chances, and honestly that prospect alone can be pretty terrifying. But don't worry, I'm higher to administer that hopium. That sweet, sweet hopium. Hold the ♥♥♥♥ still.
Dress for Success
Select darker clothing cosmetics where possible. Prestige outfits generally darken default outfits thanks to all the blood, so equip them if they are available and nothing better presents itself. Some Legendary Cosmetics actually quieten the survivor (!) but outside of Sheva Alomar I'm not sure there are any other candidates. Overall, you want to keep as low a profile as possible. If a killer is looking across Autohaven Wreckers and sees a shirtless man with blue paint splashed across his torso, that killer will feel something. Fear at your audacity. Possibly arousal. And then they will try to kill you, while Claudette will hide in a bush. Please review this guide and act accordingly.
Send the Killer to an Awful Map
I believe in fair play. I do not bring map offerings unless there is an achievement involved. I Task Manager as killer if someone tries to send me to Garden of Joy. However, there is an achievement involved. The stakes are low, but measurable. We have to resort to scummy tactics.
If the killer quits while the map is loading, you are refunded your offering, so just try again. If you load in and they immediately DC, congratulations, you just traded a map offering for a mixed sense of amusement and guilt.
If the game does play out normally, then you are at a sizable advantage because, fortunately for us, the DBD map team is ♥♥♥♥♥♥♥ awful at their jobs. Here are the offerings to bring:
If you *maybe* want a fair game with also decent odds of getting a strong map, pick Azarov's Key. Blood Lodge and especially Gas Heaven are very survivor sided, while the rest are pretty balanced. Picking this offering is highly unlikely to offend the killer, and probably good for your karma. Let's be honest, if you play DBD, your karma could probably use all the help it could get.
The best odds of giving the killer a balanced game, and the offering you should feel least guilty about. If you feel bad for something you did, feel free to bring this offering, but I'm only including it because it is fair. I would not recommend it if you are truly concerned with getting an achievement.
I would look askance at anyone who picked this. This is the sleeper option for those who are truly evil. Badham is a bad time. If you are truly committed to your adept and you don't care about the killer having anything close to a good time, pick this. Hatch can be hard to find on Badham, but that is about the only downside. Pallets regularly spawn around shack, and you have the house of pain. I will think less of you if you pick this. Badham is not the last resort of the desperate, it is the first resort of the sadistic.
Otzdarva rated this map as killer favored, but I am still going to politely disagree. It is just too easy to chain pallets, even without Windows of Opportunity. Some killers will really struggle here, while others will do fine - Artist and Nurse come to mind. Of course, when doesn't the Nurse do fine? This is always a solid pick. Remember that hatch always spawns on the bottom floor!
A monument to the map design team's sins, this map has an extremely exploitable main building and tiles are easy to chain. It got nerfed recently and I *still* recommend it. Eyrie has been the go-to "have a bad time" map offering for survivors since its release and that is unlikely to change. If you are unsure of what map to pick for your adept, Eyrie is always a safe bet. It has everything. My first match against four P100s, they sent me here, which should tell you something.
Then I killed them all.
One of the most recent pieces of evidence that map design remains BHVR's biggest weakness, Garden of Joy is disgusting. The main building has multiple exploitable windows, the streets are littered with pallets (which shack easily chains into), and the bushes have wonky hitboxes that can throw off certain killers. Also, the upstairs of the main building is extremely dark and can be hidden inside. Garden of Joy is complete ♥♥♥♥♥♥♥♥, and thus a solid pick for any adept, provided you can withstand the cost to your soul. There is now one downside, however - there is a 50% chance you will send yourself to Sable/The Unknown's map, which is bonkers killer-sided. So weigh the risks on that one.
Survivor Adept Guidelines and General Tips, Part 2
Bring the right tools
Obviously item selection is important, since unlike your perks, you actually have a choice on what to bring. Each Survivor Adept has a recommended item, however I will give a brief overview of what to bring (along with addons) here.
Medkits are the most obvious pick. Solo queue healing is sometimes a dubious prospect, so it makes sense to look out for number one. Brown and yellow medkits are the cheap options, but this is not the time to cheap out. Let's look at our better options.
The Ranger (purple) Medkit offers the best healing speed on teammates, which is invaluable when a killer may be barreling down on you after an unhook. On its own, it is useful, but not invaluable. It is only when we add Gel Dressings (+16 charges) and Bandages (+12 charges) that it becomes exceptional, since that permits a second self heal or three reasonably fast team heals. On average, I recommend bringing this medkit with Gel Dressings and either one of the instant heal addons (Anti-Hemorrhagic Syringe or Styptic Agent) or a 15% healing speed increase addon. If you bring a Syringe, I recommend bringing a brown medkit with a +8 charges add on. That way you can self-heal once normally and then guarantee enough charges for a syringe heal later on.
I don't recommend toolboxes very often in this guide, since they do not ultimately contribute much to your survival, even if they can be invaluable to your team's overall victory. Nevertheless, if you bring one, I recommend bringing a Commodious with either a Wire Spool + Brand New Part combo, or a Wire Spool + Springs combination. The former will cut down on max repair time for the generator followed by speedy repairs, while the latter will increase your repair speed for a loooong time. Use for sabotage optional and not recommended. Overall this is a weak pick for most adepts. The other toolboxes are inferior to Commodious, and do not bear worth a mention beyond DON'T.

Not often recommended, but an interesting choice nonetheless. While it can be used for locating hexes and generators, its primary function in an adept challenge is find hatch quickly and bail. For this reason, I would recommend running a range addon and a charge addon to insure its use throughout a match and then quickly locating the egress if things go badly. The map is usually a weaker pick than a medkit, but it is far from useless.

The real dark horse, the key is underrated. On its own, it gives you a hedge against the hatch being shut, provided you can get through the opening animation unmolested. With addons, specifically these:


the key becomes an incredible aura reading tool that can detect the killer from a decent distance and either let you avoid them entirely or cancel out any mind game they might attempt. Bear in mind that you *cannot* open hatch if all charges are depleted, so try not to use this item for too long at a time! The other key addons are not really worth mentioning, but these two addons turn the key from an interesting historical factoid into the second strongest item one can bring on their adept behind a medkit. I recommend the key several times during this guide, and you should strongly consider bringing one if you are having consistent trouble with an adept.

I do not recommend the flashlight for almost all of the survivor adepts. I will not go so far as to say they are worse than bringing nothing at all, but adepts do not usually give you the tools to capitalize on flashlight blinds. If you have the experience necessary to make flashlights worthwhile, you do not need this guide, and you're probably making videos on Youtube or Twitch. Good on you! But you don't need me.
...no one needs me.
Don't be a Hero
Your priority is your own survival. If it comes down between saving someone from a facecamping Bubba or opening the exit gate, OPEN THE ♥♥♥♥♥♥♥ EXIT GATE AND BAIL. Let idiots complain, you are here for those sweet achievements. There will be time for thrilling heroics once you are not stuck to three perks only that you did not choose. Don't go for sabo plays or flashlight saves. Do gens, escape chases, heal your wounds.
That being said, most of the time your own survival is going to hinge on your teammates. Don't be a sandbagging coward either! If you know you are clear for a save and no one else is likely to, go for it! The more survivors alive, the more gens get done, the more likely you don't have to scrounge for hatch while the Huntress's humming gets louder and louder. This also does not mean forgoing healing your teammates in favor of gens - it just means prioritizing the objectives and your own survival over what might usually be considered good etiquette, such as attempting endgame saves.
Ultimately, it is up to you what your limits are, but after enduring a few hours of solo queue, I assure you that the human impulse of altruism will begin to subside.
Obviously item selection is important, since unlike your perks, you actually have a choice on what to bring. Each Survivor Adept has a recommended item, however I will give a brief overview of what to bring (along with addons) here.
Medkits are the most obvious pick. Solo queue healing is sometimes a dubious prospect, so it makes sense to look out for number one. Brown and yellow medkits are the cheap options, but this is not the time to cheap out. Let's look at our better options.
The Ranger (purple) Medkit offers the best healing speed on teammates, which is invaluable when a killer may be barreling down on you after an unhook. On its own, it is useful, but not invaluable. It is only when we add Gel Dressings (+16 charges) and Bandages (+12 charges) that it becomes exceptional, since that permits a second self heal or three reasonably fast team heals. On average, I recommend bringing this medkit with Gel Dressings and either one of the instant heal addons (Anti-Hemorrhagic Syringe or Styptic Agent) or a 15% healing speed increase addon. If you bring a Syringe, I recommend bringing a brown medkit with a +8 charges add on. That way you can self-heal once normally and then guarantee enough charges for a syringe heal later on.
I don't recommend toolboxes very often in this guide, since they do not ultimately contribute much to your survival, even if they can be invaluable to your team's overall victory. Nevertheless, if you bring one, I recommend bringing a Commodious with either a Wire Spool + Brand New Part combo, or a Wire Spool + Springs combination. The former will cut down on max repair time for the generator followed by speedy repairs, while the latter will increase your repair speed for a loooong time. Use for sabotage optional and not recommended. Overall this is a weak pick for most adepts. The other toolboxes are inferior to Commodious, and do not bear worth a mention beyond DON'T.
Not often recommended, but an interesting choice nonetheless. While it can be used for locating hexes and generators, its primary function in an adept challenge is find hatch quickly and bail. For this reason, I would recommend running a range addon and a charge addon to insure its use throughout a match and then quickly locating the egress if things go badly. The map is usually a weaker pick than a medkit, but it is far from useless.
The real dark horse, the key is underrated. On its own, it gives you a hedge against the hatch being shut, provided you can get through the opening animation unmolested. With addons, specifically these:
the key becomes an incredible aura reading tool that can detect the killer from a decent distance and either let you avoid them entirely or cancel out any mind game they might attempt. Bear in mind that you *cannot* open hatch if all charges are depleted, so try not to use this item for too long at a time! The other key addons are not really worth mentioning, but these two addons turn the key from an interesting historical factoid into the second strongest item one can bring on their adept behind a medkit. I recommend the key several times during this guide, and you should strongly consider bringing one if you are having consistent trouble with an adept.
I do not recommend the flashlight for almost all of the survivor adepts. I will not go so far as to say they are worse than bringing nothing at all, but adepts do not usually give you the tools to capitalize on flashlight blinds. If you have the experience necessary to make flashlights worthwhile, you do not need this guide, and you're probably making videos on Youtube or Twitch. Good on you! But you don't need me.
...no one needs me.
Don't be a Hero
Your priority is your own survival. If it comes down between saving someone from a facecamping Bubba or opening the exit gate, OPEN THE ♥♥♥♥♥♥♥ EXIT GATE AND BAIL. Let idiots complain, you are here for those sweet achievements. There will be time for thrilling heroics once you are not stuck to three perks only that you did not choose. Don't go for sabo plays or flashlight saves. Do gens, escape chases, heal your wounds.
That being said, most of the time your own survival is going to hinge on your teammates. Don't be a sandbagging coward either! If you know you are clear for a save and no one else is likely to, go for it! The more survivors alive, the more gens get done, the more likely you don't have to scrounge for hatch while the Huntress's humming gets louder and louder. This also does not mean forgoing healing your teammates in favor of gens - it just means prioritizing the objectives and your own survival over what might usually be considered good etiquette, such as attempting endgame saves.
Ultimately, it is up to you what your limits are, but after enduring a few hours of solo queue, I assure you that the human impulse of altruism will begin to subside.
Survivor Adepts - Dwight, Meg, Claudette, Jake, Nea

Pros: Strong info perk, Leader is a general workhorse, can fly through gens
Cons: No exhaustion perk
Recommended item: Medkit
Fittingly for *the* starting character, Dwight has it pretty easy. Bond will give you an excellent idea of where your teammates are at all times, which is very handy for both avoiding the killer and seeking healing. Speaking of which, Leader means they will also heal you faster than usual at 12 seconds rather than 16! Double up on gens wherever possible to exploit Prove Thyself, one of the must busted survivor perks in the game, and make sure to let someone else do the exit gate while you stand next to them; Leader boosts the exit gate opening speed by 25%! If you are enjoying a standard sweat-free match of DBD, this one should come pretty easily - Leader is the only perk Dwight has that is not meta, and even then I think you will find it surprisingly helpful. Just try to avoid getting in chases if you can - your build is most useful when paired with other survivors well out of the action.

Pros: Two meta perks, one of which is arguably the best exhaustion perk in the game
Cons: Meg
Recommended item: Medkit
Probably the easiest adept overall. Sprint Burst will allow you create sizable distance from a killer, even in a dead zone, while Adrenaline can come in clutch if in chase as the last generator is finished, or if you are unhooked after the last generator is finished. The only dud is Quick and Quiet, which ordinarily would be paired with Head On, and even then it can be used for a silent locker entry to bamboozle a killer. Since your primary goal is survival, try to use your Sprint Burst lead to take the killer to difficult structures such as main or shack. They will either have to endure a difficult chase or, more ideally, leave you for a target that is easier to catch. Try to discourage chases, but feel free to get braver once you are down to the final generator.

Pros: Good information, infinite self healing, fast healing
Cons: No chase perks, Self Care can be a trap
Recommended item: Medkit
Another easy one. Healing in solo queue can be a bit precarious, but Claudette will never lack for wound treatment! Botany Knowledge does not speed up Self Care as much as you might think (it's not a flat +50% speed bonus unfortunately) so you should still bring a purple medkit with as many charges as possible to counteract Botany Knowledge's downside. Prioritize healing others when you can, since your heals will be very quick, but don't go out of your way to be a hero and hook trade. And it goes without saying, wear the darkest colors in your Claudette's wardrobe!

Pros: Iron Will is better than you think, Calm Spirit will reduce overall map profile
Cons: Not remotely stealthy, no chase perks, Saboteur will get you killed, Calm Spirit is awful
Recommended Item: Medkit, Alex's Toolbox if you're really committed to Saboteur
Time was, packs of Jakes roamed the Realm saboing every hook they saw, but no longer! Jake's perks have some incidental bonuses that you probably will not intentionally capitalize on (most survivors do not worry about setting off crows) but at least you cannot accidentally turn off Iron Will by getting exhausted (although some killer addons can inflict it.) If you get into chase and get wounded, try to break line of sight as much as possible since the killer will have trouble hearing you. Capitalize on the effect by wearing dark clothes and hiding in dark corners (upstairs main of the Garden of Joy is perfect!) Calm Spirit will slow down totem cleansing and box opening, but you shouldn't be doing that anyway. Jake does not have a lot going for him, but his perks are not actively detrimental to his survival. Avoid the killer as much as possible and for the love of God, don't go for Saboteur plays unless it is a matter of life and death.

Pros: Built-in exhaustion perk, stealthy
Cons: Killers hate Neas! Some maps render Balanced Landing unusable
Recommended Item: Medkit, Toolbox if confident
This is another easy one. Balanced Landing is an excellent chase extender and a good way to lose a killer entirely if you start the chase with it. Try to bring a map offering with a lot of drop offs (Haddonfield is a classic, but the Game is also very good - avoid MacMillan and Autohaven). Urban Evasion is mostly a gimmick perk but it can be used in chase to avoid certain killers' projectile attacks (Plague, Huntress, Nemesis) around loops. Using it to stealth around is valid, although it may attract mockery. Streetwise will greatly extend the shelf life of a toolbox, so if you are feeling confident in your chase skills, bring a Commodius with a Wire Spool and Springs and go to town on the gens. Overall, so long as you bring a map with a bit of elevation to it, Nea should be untouchable compared to the majority of survivors doing their adepts.
Survivor Adepts: Ace, Bill, Feng, David, Quentin

Pros: Chests have better goodies (usually), massively extended aura reading
Cons: Your perks are mostly irrelevant
Recommended Item: Key, Map
Ace's Adept is a fun time if you don't take it too seriously. Dig through chests and see what you can find! Convince the other survivors to bring Salty Lips and start kobeing in the killer's face! Use Open Handed and a Rainbow Map to find and destroy every totem before any gens are done! Roll the dice, baby! In all seriousness however, you should bring a Map or a Blood Amber Key to exploit the massive aura reading offered by Open Handed. A key would probably be superior since knowing the killer's location or opening hatch is more important than finding generators or chests, but if you want to do some dumpster diving, feel free to bring a map. You get to keep your addons if you escape the trial, so feel free to bring the flashiest ♥♥♥♥ you've got - only to gamble it all away as you get another Nurse match.

Pros: Can see hatch's aura, can break out of one slug, has a hell of an endgame save perk
Cons: Loud as ♥♥♥♥
Recommended Item: Medkit, Key, cough syrup
Bill's Adept is easy simply because he can see the aura of the hatch in the endgame. If your solo queue experience goes predictably wrong and you are the last loser standing, you have a massive edge over the killer when it comes to finding hatch, so long as it does not spawn directly under them. Consider bringing a key so that, if they do find it, you can still pop it open - you can still see the hatch even if it is shut. Aside from that, Bill's perks are only good in situations you will not or should not be putting yourself into. Borrowed Time can come in clutch since it still works in the end game, but your priority should be the achievement, not pissing off the killer when they have nothing else to do but kill the person who tried to unhook in their face. Unbreakable is strong, but slugging is rare in solo queue. If you get injured, try to heal *fast* because Bill coughs constantly when injured and is among one of the easier survivors to find.

Pros: Excellent exhaustion perk, excellent info perk, Technician is embarrassingly useful, stop lying
Cons: Distinctive injured sounds
Recommended Item: Medkit
This Adept is the Adept that will make you realize how useful Alert is. You'll be able to keep constant track of the killer as they smash walls, pallets, and generators (unless of course it is a Nurse) and Lithe is very easy to use to affect an escape. Technician will make failed skill checks hurt more, but also prevent a loud noise notification which can be very useful in the early game. Honestly, Adept Min plays itself. Just watch the funny pink aura through the walls until you hear the loud music, then vault away from the scary man/woman/doggo. My only recommendation would be to avoid maps with relatively few window vaults (The Game is the only one that comes to mind) and avoid vaulting out of high windows, since you will lose about half your speed boost on the fall and subsequent stagger.

Pros: Dead Hard
Cons: No Mither
Recommended Item: Key
Probably the most infamous Adept, and with good reason. You will spend the entire match injured, and the killer will be aware of this. If they're a bastard, expect an early tunnel that you will most likely not survive. Dead Hard can buy you some time, but the fact of the matter is your chase is going to take half as long as usual on average. Use your Blood Amber key and reduced noise to maneuver in high wall loops around the killer as much as possible, and make distance whenever you can. Some killers will suspect a No Mither David is doing their Adept and spare them accordingly, but it would be foolish to count on this. If they are slugging you, especially after two hooks, it's likely because they want you to live. There is not an awful lot I can say about this challenge - time your Dead Hard at pallets or windows when you can, stay away from the killer as much as possible, and don't be a hero. Maybe warn your teammates (if they can read your chat) that you are doing your David Adept, just so they are aware.

Pros: Guaranteed green medkits, fast exit gate open
Cons: One of your perks only really helps your teammates
Recommended Item: Medkit, Map
Pharmacy means you don't have to bring a medkit if you don't want to - you'll always be able to scrounge a green one out of a chest if you're injured (but ONLY if you are injured! This also applies to the chest opening speed.) Vigil is only going to be relevant to you if killers bring expose perks, but it is nice to have. Wake Up will let you know where the exit gates are at all times and will tell the other players that you are on a gate, which is honestly underrated. Quentin has a fairly bog standard Adept, with only Pharmacy opening up any potential gameplay changes - feel free to bring a map to find chests and use the perk in lieu of bringing your own medkit. Try to stay close to the exit gate once you hit the last gen, so you can get it open as fast as possible.
Survivor Adepts: Tapp, Kate, Adam, Jeff, Jane

Pros: Excellent info perk, gens will go a little faster
Cons: No exhaustion perk
Recommended Item: Medkit
Technically you can bring a Map and it will record everything you see through Detective's Hunch, but I think that would be overkill. Just bring a medkit. If you get slugged, remember that Tenacity lets you recover while moving in addition to moving a lot faster while downed, so make as much distance as you can so the killer cannot find you. You will be surprised how often this works. Stake Out will exist in the background and will likely shave off a few seconds of generator time, but it's nothing outstanding. Tapp will only truly shine if the killer brings hex perks, in which case Detective's Hunch will let you hunt them down. Pretty average survivor Adept.

Pros: Can become unhookable in certain scenarios, has one of the best looping perks
Cons: No exhaustion perk, killers really hate Boil Over
Recommended Item: Medkit
Kate's Adept is pretty simple thanks to Windows of Opportunity. Seriously, that perk is so good. No more guessing which side of the loop the pallet is on, or where the next tile is! Windows will tell you all of this at a glance. Even if you've got a Nemesis on your ass from the very beginning of the game, you should be able to run him for two or three gens if you start off in a favorable location. Dance With Me compounds the issue for the killer since it may throw them off for a precious few seconds when you lose your scratch marks after a fast vault. Despite the lack of an exhaustion perk, Kate's Adept enables some truly degenerate looping courtesy of all the information she brings, which will only be compounded if you bring a strong map offering (which you should.) If you go down, try to do so in an elevated location far from the nearest hook to increase your chances of wiggling. Boil Over may outright force the killer to slug. Just bear in mind this also greatly increases the chance the killer decides to spend the rest of the match making sure *you* die in favor of any other survivor, and I cannot really blame them. Try not to be too much of a degenerate!

Pros: All his perks are a Fun/10
Cons: His perks will get you killed
Recommended Item: Medkit
Deliverance is a strong perk, but it forces you into a situation you should be ideally avoiding (unhooking another survivor) to activate, and then is only relevant in *another* situation you should be avoiding (getting hooked.) While it can definitely come in clutch, especially in end game, do not go out of your way to run across the map solely to activate the perk. Also bear in mind that Deliverance is regarded poorly by many killers, especially if the game has been going poorly for them, and unhooking in their face is suicide, guaranteeing a tunnel to second hook. Diversion is hilarious but will do nothing unless the killer feels like playing fetch, and Autodidact is addictive but TERRIBLE. Try to get stacks of it in situations where you know the killer is nowhere nearby, because regressing heals at the eleventh hour is a surefire way to kill your teammates. I should know, I have been that teammate several times! If it weren't for Autodidact being an active hindrance, this would be a 3/5 difficulty, but since that perk seems to delight in going out of its way to outright ♥♥♥♥ you, this Adept can be a bit of a challenge. If you absolutely need someone healed fast, use your medkit instead, since Autodidact only applies to regular healing.

Pros: Surprisingly stealthy, good information perks
Cons: Loud as ♥♥♥♥, incredibly large
Recommended Item: Medkit
Distortion is underrated and counters two very common killer perks: Nowhere to Hide and Lethal Pursuer. If you start the match and hear a funny noise with Distortion lit up, keep away from your other teammates - the killer can see them, but not you, and you want to keep it that way. Countering Nowhere to Hide means you can keep close to gens and get back on them when the killer sees the "coast is clear" (snicker.) So long as you aren't wounded, you can keep a surprisingly low profile. If you are wounded, heal ASAP because Jeff does not moan in pain, he bellows. Aftercare is also surprisingly useful since it can give you perfect info on your teammates if you heal or unhook them, and even more uniquely will give them information back! Feel free to be a bit more altruistic to exploit this. Finally, Breakdown's primary mechanic of breaking the hook is mostly useless unless you get dumped on a Scourge Hook, but it also gives you aura reading on the killer for six seconds, which can give you the info you need to plan accordingly. Honestly, so long as he isn't injured, Jeff's Adept is smooth sailing, giving you a lot of map and killer knowledge all the way through.

Pros: Gorgeous
Cons: Loud, highly visible, perks are useless unless you want to piss off the killer
Recommended Item: Medkit
Head On needs Quick and Quiet to be effective, and it is a declaration of war on the killer even if you do pull it off. The only situation I can see it being effective in is if you are being pursued by a revved up Billy or Bubba. Every other situation is going to be interpreted as BM and will probably get you grabbed or at least injured. Solidarity might speed up a heal for yourself in desperate situations, but you should prioritize getting yourself healed (ideally with a medkit) since Jane is so loud. Poised is the only perk that puts in any work by hiding you from the killer for a bit after a generator is complete, but this is still so utterly marginal that I cannot give it too much praise. You can safely ignore her perks and play normally while getting slight value, which is what I would recommend doing; at least none of her perks are actively hampering your chance at survival.
Survivor Adepts: Ash, Yui, Zarina, Cheryl, Felix

Pros: Groovy.
Cons: Large, loud, useless perks
Recommended Item: Medkit
If you manage to get legitimate Mettle of Man value out of this Adept, you have my sincere congratulations. Do bear in mind that the killer has continuous aura reading on you once you've activated the perk and you are healthy, so don't go out of your way to eat protection hits (you shouldn't be doing this anyway.) Buckle Up is overpowered but very risky, while Flip Flop only provides value in the rather rare situation where you are slugged and subsequently picked up far from the nearest hook. Try to reposition yourself accordingly to facilitate this. This is a case where I would recommend bringing a purple medkit just to make sure you can heal yourself as much as possible - Ash is RIDICULOUSLY loud when injured, and he's already highly visible thanks to his large size and propensity for brightly-colored outfits. It will also help if you need to trigger Buckle Up. I honestly think this Adept is harder than David's - at least WGLF and Dead Hard are excellent perks, and No Mither at least solves the issue of David being loud! Consider asking your teammates to bring Circle of Healing and/or Exponential to increase your own odds of survival.

Pros: Perks provide solid info and make it hard for the killer to track you
Cons: Perks lack support, no exhaustion perks
Recommended Item: Medkit
None of Yui's perks are useless, but Breakout is risky even with a full perk loadout, which we lack. Lucky Break is an absolute nightmare to deal with as killer, but the lack of Overcome or Iron Will to make additional distance or mask Yui's profile means it may not be as effective as usual - make as much distance as you can with your speed boost, try to break line of sight, and ideally try to get hit while vaulting over a strong window or pallet so the killer takes a while to catch up; a lack of scratch marks means they will usually give up. Any Means Necessary will provide a surprising amount of information on both where people are being chased as well as where the dropped pallets are, as well as enabling the potential re-use of tiles. While ordinarily I would scold anyone planning on using Breakout for their Adept, I recall doing just as much during my own and sparing an Ash from being deposited in the basement by a Trapper, so just be careful.

Pros: Off the Record is very strong
Cons: It also turns off in the end game, Red Herring is ass, For the People will get you killed
Recommended Item: Medkit
Off the Record recently got a new lease on life which has made it one of the best survivor perks, fortunately for us. Red Herring is convoluted and low impact, don't bother even thinking about it. For the People leaves you broken, turns you into the obsession, and is most effective when picking up a slug when the killer is nearby. In other words, exactly the kind of situation we should be avoiding. That does not mean do not use the perk, only that its use is limited to non-ideal situations. Using it when you do not have to is an active hindrance, so in all likelihood you should ignore that perk as well. Off the Record will make you resistant to tunneling but that does not mean you should get healed and then shove yourself in the killer's face to engage in a three hit chase. Use it to dissuade the killer or extend chase, then move on. And remember: it turns off in the end game, or when you engage in a conspicuous action, which includes healing yourself! Let others heal you if you can so you can keep the endurance effect for as long as possible.

Pros: While situational, her perks are very strong in those situations
Cons: No stealthy outfits, basically no chase perks
Recommended Item: Medkit
Cheryl's perks are *weird*. Repressed Alliance may come in clutch if you're up against a killer with a gen kicking build, but you still need to be careful not to screw over your teammates by preventing them from finishing a critical generator. Blood Pact means you will not be the obsession, which means nothing, but it will give you and another teammate perfect information on each other, which can be useful. Don't bother looping together to keep the 7% speed boost, it really is not that noticeable or useful unless you are trying to make a Youtube video. Soul Guard is unlikely to come into play, but is nice to have. If a Hex is in play and you are slugged, consider whether you can recover fully before the killer gets back or not. If yes, remain in place, pick yourself up in front of him/her, and then zoom off after they smack you. If not, reposition so they cannot find you and try to recover somewhere else. Hexes are not as common as they used to be, but this could still come in handy.

Pros: Fast heals and unhooks, stupid number of item uses, excellent gen information
Cons: No exhaustion perk
Recommended Item: Toolbox
Yes, Built to Last is strong enough with a toolbox that I would recommend it over a medkit in this case. Adept Felix is still a merciless gen jockey, and Desperate Measures also means he will heal teammates pretty quickly when they come to him. You are not remotely built for chase, but you are an excellent support teammate, able to heal and unhook fast while also finishing generators in about a minute. Bring a Commodious with maxed charges and refill it as many times as you can while breaking any possible three gen by using Visionary to determine the optimal generators to complete. Fittingly for an architect, if you plan properly with this Adept using the tools on hand, you should have an easy time.
Survivor Adepts: Elodie, Yun Jin, Jill, Leon, Mikaela

Pros: Perks are fun
Cons: They're also mostly useless, Elodie makes distinctive noises, very noticeable default outfit
Recommended Item: Medkit
All three of Elodie's perks are combo perks (Deception works best with Head On/Quick and Quiet, Appraisal works better with Plunderer's Instinct or Pharmacy, Power Struggle needs Flip Flop) which means they are unlikely to do much during your Adept, although Deception can be fun. Appraisal should only be used if your current medkit is out of charges or your item gets hit by Franklin's Demise. This is a case where the difference between the Adept and bringing no perks at all is fairly marginal; at least none of Elodie's perks are outright harming you. If you get slugged, try to position yourself outside a jungle gym or somewhere where you know a pallet is a short distance away in order to free yourself. Remember: without Flip Flop, none of your recovery progress will transfer to struggle, so don't place yourself directly under a pallet.

Pros: Has an exhaustion perk, Self Preservation is actually perfect for Adept, is bae
Cons: Worst exhaustion perk in the game, other perks are low impact, highly visible fashion victim
Recommended Item: Medkit
Yun Jin is unique in that her exhaustion perk likely will not help her very much since it is hard to activate, and almost impossible against some killers; trying to Smash Hit a Huntress or Nemesis is a recipe for disaster. Fortunately her other two perks facilitate a "gen rat" playstyle where you let other players take the hits while you slink away and power gens. Fast Track will shave off a few seconds from gens, which is more than most perks can claim, and Self Preservation makes it far less likely that a killer will find you so long as other people are in chase. So long as you keep a low profile (difficult in some of her outfits) you should be able to either power the generators in peace or make a hatch play when everyone else is dead, girlboss style.

Pros: Blast Mine is hilarious, Resurgence has decent value, Counterforce beats Pentimento
Cons: No chase perks, distinctive outfits
Recommended Item: Medkit
Jill is a certified badass and it is an honor to have such a legendary character to play as! That being said, her perks do not do a lot to make your Adept easier, unfortunately. Blast Mine is solid since Pop Goes the Weasel and Nowhere to Hide are still popular, but ultimately only slows the killer down while they make a mental note to kill you first. Try not to make it clear you mined the gen before it blows in their face. Resurgence means you can potentially get away with fewer charges, but I generally prefer to use medkits to heal after making distance rather than after being unhooked, so I'd still recommend the standard Green Medkit + Gel Dressings combo. Counterforce is unlikely to be relevant, but God help the killer if they brought Pentimento or a hex-based build. Note that the speed bonus increases for every totem broken, even if Pentimento puts you over the usual limit of five speed boosts. Finally, if you have the Sheva Alomar legendary skin, run that instead of the base or Claire Redfield - her injured sounds are practically nonexistent. Claire Redfield should be avoided, as she is infamously loud, in addition to wearing a bright red jacket.

Pros: Simp bait, cool brown jacket
Cons: No useful perks, highly visible, inexplicably reduces player's IQ when played
Recommended Item: Medkit, a copy of How to Loop For Dummies
Leons have a reputation of being highly altruistic doofuses who kill their entire team on accident. Try not to perpetuate that stereotype. That being said, your perks are unlikely to make you much of an asset to the team unless you are one of those dreaded 'bang players who can rescue teammates consistently with Flashbang. If you are, you don't need this guide, and I probably owe you my life. Your medkit will let you get value out of Bite the Bullet (underrated perk) and you should bring as many charges as possible for that reason as well. Remember that Bite the Bullet applies to both yourself and the target you are healing if both of you are injured! Take advantage of this in desperate situations. Finally, Rookie Spirit exists. You should activate it without difficulty. If you get value out of it, congratulations, but it is a perk whose existence is forgotten about consistently for a reason. Try not to get suckered in by the allure of Flashbang unless you are super experienced.

Pros: Strong perks, built-in hatch aura read, becomes even stronger on small multi-level maps
Cons: Killers will try to kill you once they realize you brought Shadowstep
Recommended Item: Key
It's a toss-up between Meg and Mikaela on who has the easiest Adept. Mikaela brings extremely efficient healing, a chase perk that becomes outright abusive on maps like RPD or the Game, and a third perk that is ordinarily useless, but here can be used to find hatch. For this reason, Mikaela should probably bring a key to reopen hatch if it gets shut, and use Clairvoyance to hunt it down. Note that you do need to be empty-handed to use Clairvoyance, so some shuttling back and forth may be necessary. Until the endgame, just use the key to track the killer and cancel out their mindgames, while simultaneously abusing Shadowstep to make it very difficult to actually be found. If you bring a map offering for a strong Shadowstep map, it is not impossible the killer will DC. Ordinarily I would discourage playing this way, but for the purposes of our Adept, this is sadly perfect. I would not anticipate much difficulty with this Adept if you play it even slightly sweaty.
Survivor Adepts: Jonah, Yoichi, Haddie, Rebecca, Ada

Pros: Good exhaustion perk
Cons: War criminal
Recommended Item: Medkit
My least favorite survivor, but at least he comes somewhat prepared with Overcome, which is honestly perfect for an Adept. Just make distance and heal! Feel free to boon in a high traffic area, but don't expect to get much mileage out of it. Corrective Action is unlikely to do much, but it can smooth out some of the usual solo queue irritation if you opt to double team a gen. Jonah makes it into the easy tier simply on the strength of the W key. So long as you don't ♥♥♥♥ up and spend the speed boost careening into a log, you should have an easier time with this one than most.

Pros: Yellow Jacket Men reign supreme, heals others faster
Cons: The perks, they do nothing!
Recommended Item: Medkit
Pretty average Adept. I have gotten value out of Dark Theory exactly once, and this was still on a Quad Boon; I have yet to get value out of it when it was the only boon on a totem. Boon if you like, but expecting anything to come of it is optimistic in the extreme. Just do gens instead. Parental Guidance is best used with Decisive Strike or Head On, which we obviously do not have, but it will make your pallet stuns more effective. So that's nice. Empathetic Connection is a perk I genuinely like, an will both provide your team with solid information and (slightly) increase your healing speed on your teammates. Ten percent isn't much, but yellow bar still goes brr. Swapping out your yellow jacket for a less visible cosmetic is blasphemy.

Pros: Decent information perk, can speed up gens slightly
Cons: No chase perks
Recommended Item: Medkit
Even with Residual Manifest, you should still bring a medkit. Your guaranteed flashlight is also always a basic one, so nothing to be excited about there; the perk is sadly a trap. Overzealous justifies breaking a totem if one is in reach and actually gets good if the killer brought a hex, but I would not count on it. Don't go out of your way to hunt down a dull just to get the speed boost. Inner Focus is genuinely excellent for our purposes, acting as a ♥♥♥♥♥♥ combination of Bond and Alert that nevertheless provides a lot of information. Use it to seek out heals from survivors or stay the hell out of their way as they are chased. Haddie's perks are ultimately low impact and two of them generally require more effort than they are worth to activate, but there's nothing here to impede your adept so long as you do not get distracted by anything shiny.

Pros: Can counter camping killers, can do generators OUTRAGEOUSLY FAST
Cons: No chase perks, her stronger perks need to be used carefully
Recommended Item: Medkit unless you are very good at skillchecks, in which case Toolbox
Better Than New provides a completely negligible bonus in value, but it does not get in our way. Hyperfocus is absolutely *bonkers* if you are left unattended for a while, but it is genuinely difficult to hit repeated great skill checks. If you are up to the challenge, bring a Commodius with maxed charges and test your skill. It's hard to build up a chain without Stake Out, but people manage. Reassurance can potentially save the game (and your Adept) if the killer opts to camp early, but it is very high risk. Do not go out of your way to use it just because you can.

Pros: Solid info perk, strong hatch game, makes very little noise
Cons: No chase perks, Low Profile does not even last indefinitely
Recommended Item: Medkit or Key
Low Profile provides yet another example of a perk that is ordinarily useless but has utility during an Adept - my own Adept was actually saved through the noise and scratch mark muffling effect! Consider bringing a key to both outmaneuver the killer during an endgame scenario as well as popping the hatch back open afterwards. However, this is likely an unnecessary hedge; a medkit will serve better on average. Reactive Healing is also not something to be relied on, but it can occasionally provide a nice burst of healing. Wiretap is genuinely excellent and surprisingly quick to activate. In most situations, I would recommend planting a tap on a gen as soon as it is available, since it gives the information to your entire team and is easily replaced. If you are injured, take heart that Ada is one of, if not the, quietest survivors when injured, and it should be easier than usual to hide from the killer. Finally, bear in mind that Low Profile can trigger multiple times, but it only lasts for 90 seconds each time. Don't go sprinting around the map if Low Profile's icon is no longer lit up during endgame!
Survivor Adept: Vittorio, Renato, Thalita

Pros: Can break three gens, excellent information
Cons: Two of his perks are traps, no chase perks
Recommended Item: Medkit
Similar to Haddie, two of Vittorio's perks will hamper your Adept if used incorrectly while the third sits in the back and provides valuable information. Quick Gambit should be ignored - if you are in chase (already not ideal) bringing the killer to gens being worked on is a bad idea. Potential Energy can break a 3 gen *if* used correctly, and that is a massive and rare if. Do not use it just to see the cool animation. (And it is very cool.) Fogwise, however, is excellent assuming you can hit the occasional great skill check. Similar to Alert, it should provide an excellent overview of what the killer is up to from the very beginning of the game, and let you plan accordingly. Run from the killer early, and try not to use Potential Energy unless you are absolutely positive it will get you value. Also, putting your shirt back on is sacrilege.

Pros: Sometimes you go REALLY FAST
Cons: Most of the time you do nothing
Recommended Item: Medkit - Flashlight if you are ballsy
This is the only adept where I might recommend a flashlight, since Background Player pairs well with it. That being said, this is also a very good way to piss off the killer, and you've given up the ability to self-heal, which probably isn't worth it. There is essentially no circumstance in which you will be able to use Blood Rush for any means except a very silly suicide. Collective Stealth does nothing. This is basically a normal adept except sometimes you will cross the map in about five seconds. Pay attention to when BP activates so that you don't accidentally waste it if you don't need it (unlikely.)

Pros: Your perks won't actively hinder you
Cons: Nor will they help you, also you are a walking tie-dye advertisement
Recommended Item: Medkit
Thalita's perks stand out for doing basically nothing whatsoever. Teamwork perks were DOA and utterly marginal, so being forced to use them is kind of annoying. If you are really dead set on getting value, try pairing up with another teammate to heal or do generators with in order to secure your ... very minor bonus. Cut Loose might enable you to pull off a cheeky double vault in chase, but most likely will do nothing. Thalita isn't gimped like say, David, but she really doesn't have anything going for her either.
Survivor Adept: Gabriel, Nicolas Cage, Ripley, Alan

Pros: Strong aura perk, kinda good with toolboxes, decent chase perk
Cons: Two of his perks need to be turned on, man is bright orange
Recommended item: Medkit, but toolbox could work if you're cracked
Made For This is still good, mostly because it can turn itself on. Bring a medkit so that, when you are wounded, you can heal someone else very quickly and get the endurance effect in case the killer finds you two. If you get smacked, nice 3% bonus. Troubleshooter will teach you where not to run by illuminating the gen with the most progress, but also gives you perfect information on the killer for several seconds. Try to take advantage of that. If you take advantage of his perks, Gabe can actually become a pretty effective looper. If you really want to bring a toolbox, bear in mind you can dig one out of a chest for free with Scavenger, so it probably isn't worth it. If you refill a toolbox, shift to healing or getting chased by the killer for a bit until the repair penalty wears off.

Pros: Has an exhaustion perk, can get all items, has a self-heal
Cons: *screams*
Recommended item: Medkit or Toolbox
Nicolas Cage actually has an effective suite of perks. Plot Twist can heal you up to full - twice if you make it to the endgame - and Dramaturgy can provide a burst of distance in chase ... and sometimes get you killed at random. Scene Partner can provide a lot of information, but can also interrupt critical heals, totem cleanses, or unhooks. Basically all of his perks are a gamble, and using them improperly (or just getting unlucky) can mean getting you or other people killed. My recommendation is to use his perks extremely conservatively - Dramaturgy only when you are at no risk of being immediately downed, and Plot Twist in very remote areas. Scene Partner is harder to turn off, but you should be able to mitigate it by looking directly up, at the ground, and generally just away from the killer when they are not chasing you. Play it smart - and be prepared to scream a lot.

Pros: Can make chase a living hell for the killer, good at keeping a low profile
Cons: Chemical Trap plays are extremely situational
Recommended item: Medkit
Turn on Chemical Trap ASAP, but bear in mind it is only useful on very strong pallets. You need to force the killer into the no-win scenario of you making a ton of distance whether they break the pallet or are forced into a very strong loop. One of the best examples of a submissive and trappable pallet would be the God pallet on Midwich next to the staircase - slam a trap on that to ruin a killer's day. If you put it on a weak or even average pallet, they will ignore it. Chemical Traps also tend to really piss off killers. Note that while the Knight can avoid Chemical Traps, Nemesis cannot - his tentacle will still trigger it. Lucky Star can give you good info on teammates and help you avoid the killer when you are injured, but you'd have to be pretty desperate to want to make that kind of play. Having quiet footsteps is nice but marginal. Ripley is basically an average survivor adept who nevertheless has the option to really complicate chases for the killer if played properly. Don't throw just to drop a trap on a pallet (I've done this. Sorry, teammates.)

Pros: Champion of Light is almost an exhaustion perk, quiet and dark clothing
Cons: Other perks don't do anything, you're probably stuck with a flashlight
Recommended item: Flashlight or medkit
Champion of Light slows down the killer enough at a pallet that it's comparable to Lithe in terms of distance made. However, a lot of killers can hit you over pallets or break them instantly, so it's honestly going to be strong against M1 killers, which isn't terribly strong. Boon: Illumination provides enough useful solo queue information that you may as well put it up, especially if you are in an indoor map. If you're injured, try to remember your skill checks will be frequent and crazy. If you're confident with a flashlight this should be a reasonably easy adept, since Champion of Light gives you an option for distance that most other survivors don't get and Deadline isn't a massive nerf to Alan's survivability.
Note: Champion of Light does not really make flashlight saves any more effective - prioritize using it at pallets while the killer is breaking it so you can make a getaway. Strongly consider using a medkit since Champion of Light is useless against a lot of stronger common killers, such as Nurse or Huntress.
Survivor Adept: Sable, Troupe, Lara, Trevor, Taurie, and Orela

Pros: Strong self healing, possible self-unhook, invocation if you're crazy
Cons: You may spend half your time in the basement
Recommended item: Toolbox or key
Sable actually has a pretty strong set up, although a lot of that is coming off of Strength in Shadows, which is low-key one of the best solo-queue abilities. The primary downside of actually using her perks is if the killer figures out what you're up to - the first unhook is free, the second one less so. Note that Wicked triggers on every unhook, so it will still gift you free information even later in the game. Your invocation can potentially make the game a lot shorter, but this is far more likely because the killer will kill your permanently broken ass than because the generators just had a few seconds shaved off of them. I do not recommend using the invocation.
You don't need a medkit for this adept thanks to Sable's strong self heal, so bring a toolbox to burn down a generator or a key with Blood Amber in order to keep a better eye on the killer when you're stuck in the basement.

Pros: Still Sight brings everything you could want to do an adept, your lute usually amuses the killer
Cons: Weirdly bulky character model, Mirrored Illusion is useless
Recommended item: Medkit
Standing still literally tells you where everything is, making this a very simple adept. Don't know where the killer is? Stand still for a few seconds. Need to find the next generator? Stand still. Still Sight is yet another strong and well-designed perk that sadly does not provide information to SWFs, and thus will likely not see much play. Take advantage of this perk while you have it to plan your next moves. If you are doubling up on a generator, it could not hurt to play the lute, but it's not a high impact perk overall.
If the match is going south, you can always try to amuse the killer by playing the lute for them. Many of them will have mercy if your comedic timing is on point, especially if your teammates are throwing.

Pros: An actual good chase perk
Cons: Your other perks are marginal and take work to activate
Recommended item: Medkit
Finesse is excellent but it only works when you’re healthy, so don’t expect to have any benefits in chase if you’ve already been smacked once. You can open chests if you feel like it to enable your perks, but you aren’t going to make back the time you lost on generators unless you open a ton of them and burn them on the last gen in a three-gen scenario. So, not very bloody likely. If you get in a chase, Finesse works on vaulting pallets as well as windows and can let you get away with some cheeky chases. You should still try to avoid the killer where possible. This is a pretty standard adept, albeit spiced with an unconvincing plummy accent.

Pros: Some free information
Cons: You’re kinda large, and the devs need to stop making chest opening happen, it’s not going to happen
Recommended Item: Medkit
Eyes of Belmont means you will periodically see where the killer is, assuming they are unstealthed. The rest of your perks involve opening chests which … I mean, you can do that if you want, but spending time in the basement is not typically a good use of your time, especially on an adept. I personally think the Alucard skin on this survivor is a lot more visually appealing, however you also become highly visible … this is just an “eh” adept that will try to tempt you away from your objective with more chest opening perks.

Pros: None of her perks will hinder you if you ignore them
Cons: For the love of God, ignore them
Recommended item: Medkit
Taurie has one of the most insidious adepts. While David King and Laurie are actively hindered by their mandatory perks and Adam’s perks will screw him randomly, Taurie’s perks do absolutely nothing … but they’re so tempting. The only advice I can give here is to ignore them. Shoulder the Burden is suicidal, and you’d be better off angling for a hatch play if things are going completely pear-shaped early in the match. Her Invocation sucks. Clean Break is tempting, but generally it would be safer and faster to accept the heal. It’s not like you have Resilience to capitalize on. If you’re trying to get some of the “do X while broken” achievements while also doing an Adept, David King is a much more productive bet.

Pros: Heals like a champ, free info if exhausted by killer addons or perks
Cons: Occasionally gets targeted by bigots ... really :(
Recommended Item: Medkit
Fairly simple Adept. You should be a bit braver unhooking others since you will heal them a lot more quickly and give them a speed boost if you get smacked in the meantime. Don't go crazy with the heroism, but you should play to your strengths. All Orela's cosmetics are fairly visible, so stealth isn't much of an option anyway, may as well make yourself useful. I do not recommend triggering your aura read perk by fast exiting a locker - just treat it as a free aura read bonus anytime someone brings along an exhaustion addon or perk. Shame it won't work through Mindbreaker, though. No downsides to this adept - heal fast and haul ass.
Survivor Adept: Rick, Michonne, Vee, Dustin, Eleven, Tae Young

Pros: Amusing Screams
Cons: Perks are completely useless, loud as hell
Recommended Item: Medkit
Holy crap his perks are garbage. What were they thinking? Apocalyptic Ingenuity is the closest you will get to a usable perk, and it needs to be turned on with two chest openings. Absolutely not. Just ignore the perks and focus on gens. Come and Get Me will likely drive the killer towards you (reminder: you are trying to LIVE) while Toughen Up may provide marginal value at best if someone ELSE is playing the game well. None of Rick's perks hinder him unless you waste your time actually trying to trigger them. Pretend you're playing perkless and you'll be fine.

Pros: Perks actually do something, even if they are a bit risky
Cons: Actually trying to use these perks can end badly
Recommended Item: Medkit, Flashlight if cracked
Michonne's perks actually do something, which is a welcome change. Having a very situational and hard to activate means of stunning the killer is still a big upgrade from ... nothing. It should charge over the Trial - keep it in mind once it is active but don't go out of your way to stun the killer with it if you don't have to - it's a trap. Granting other people endurance is situational and hard to pull off, but it gives you an incentive to use a flashlight if you are extremely confident and someone is getting tunneled. Conviction can potentially give you an out in an End Game Collapse situation, which again isn't ideal but at least Michonne has the option. This is an Adept with three edge-case perks, but all three are extremely good in their edge case, so Michonne's Adept is advantaged compared to the average Adept.

Pros: Adorable, can charm the killer
Cons: Not very useful overall
Recommended Item: Medkit
Similar to Aestri, Vee can use her musical instrument to occasionally charm the killer if things have gone completely pear-shaped, and that's about the extent of her perks' usefulness. She can't even get exhausted, so Ghost Notes is useless unless the killer exhausts her somehow, and Road Life is the most comically worthless healing perk we have seen in some time. I guess you will randomly heal one person much much faster at some point in the Trial if you have been hitting greats? Marvelous work. Standard Adept, feel free to use your tambourine to make the killer laugh or boost morale at the start of the match.

Pros: A lot of info, so much info your skull will burst open
Cons: Nothing in chase
Recommended item: Medkit
Well, one of your perks will speed up the generators a bit, and you’ll probably know where the killer is at all times. Extrasensory Perception is pretty useful at the beginning of the match for finding generators and totems, and the oblivious does not mean much since it reveals the killer aura. Just remember to stay crouched. Fairly standard adept, although Eleven provides a LOT of info, especially if the killer brings aura reading, with the obvious drawback that this means you are far less likely to get away with hiding if that is the case.

Pros: Very solid and flexible perks
Cons: None really, aside from me finding the character annoying
Recommended item: Toolbox
About the only ding against Dustin’s adept is the lack of exhaustion perk, but this is otherwise one of the easiest adepts to work with. Change of Plan encourages you to bring a Commodius and convert it into a medkit once the charges are exhausted, while Bada-Boom can make chases hellish for killers that want to vault a window frequently (such as Bubba or Legion. Note that the slow lasts a whopping six seconds!) You also have a perk that increases the speed you double up on gens, which is just gravy. Really the only advice I can give is to remember to bring a toolbox so you can take advantage of Change of Plan. Dustin pushes gens, has options in chase, and can give himself self-healing.

Pros: Two strong perks, one of which helps in chase extensively
Cons: No exhaustion perk, but that would frankly be overkill
Recommended item: Medkit
This is basically a tutorial on how to use Five Steps Ahead. The aura reading will only activate when the terror radius is active, and it will go on cooldown as soon as you drop a pallet. Windows of Opportunity this is not, but it will improve your situational awareness and chase planning significantly. You are a bit disadvantaged against stealth killers, but they are still preferable to dealing with Blight. Flow State grants you a stacking heal bonus to both yourself and others, so your medkit will improve as the match goes on. The unhook speed bonus is not to be underestimated, but try not to put yourself at risk if all the generators are done. Tae Young has a quintessential easy adept - strong chase perk, strong heal perk, and a third perk that is inoffensive and can be safely ignored.
Killer Adept Guidelines and General Tips
Introduction
"Playing a killer is playing the Alcoholic Parent Simulator. You're tired and all these kids are running around, knocking things over and gnawing on the electrical wiring." -Shepherd
Killer Adepts have been greatly simplified but are still harder than survivor adepts by a considerable degree. To achieve a killer adept, you need to run only that killer's three associated perks (they can be any rank) and kill all four survivors, achieving a "Merciless Killer" status at the end of the match. If you are in Ash-Silver grade, it may be possible to achieve a "Merciless Killer" through the Emblem system, but I would not risk it. Nuke the survivors from orbit, just to be sure.
Any offerings are okay, any addons are okay. All that matters is that you bring only those three perks and kill all four survivors. Obviously there is going to be a wide gamut of viability as each killer has both a varying degree of strength to their power, as well as perks of varying usefulness. Sometimes you get a weak killer with strong perks, or a strong killer with weak perks. On a few unfortunate occasions, you will be forced to run a weak killer with weak perks.
Addons and map offerings can make up some of the difference, but the fact of the matter is, these adepts are going to take time. Most of them will take multiple attempts. I strongly recommend playing a few regular games with any killer you want to attempt an adept with before committing to an actual adept. Some killers are relatively simple and you might be able to jump into an adept right away (Clown, Legion) but there are others who require at least some degree of mastery to counteract the handicap of running only three specific perks (Artist, Nemesis.)
Oh, and it goes without saying - camping, tunneling, and slugging are fair game here. Whatever it takes to win.
2025 Addendum: I used to recommend addons for each section, however the addons (and to a lesser extent the killers themselves) are getting changed so often that I cannot be arsed to keep track, so those sections have been removed. General rule of thumb - if it increases your efficiency doing something your killer does all the time (like reloading on Deathslinger or throwing hatchets at Huntress) it's probably a good call. Information and instant down perks are also pretty good. I still occasionally recommend addons in the text in the case of egregiously strong addons, such as Ghostface's Driver License addons.
Maps
This section will be briefer than the survivor version for the simple reason that most of the maps are horrifically survivor-sided. You absolutely want to bring a map offering for every adept attempt to maximize your odds of 4king. You are already working with only 3/4 perk slots, and you didn't get to pick your build. Survivors already have enough of an advantage through that. Send them somewhere nice.
The nicest of the options I am suggesting, as far as playing fairly with the survivors goes. They get to get a shot at Outbreak Breakout, and you get a map with an unchanging set up that is favorable to a wide variety of killers. Ranged killers will have an easier time in the main hallway while stealth killers have a variety of avenues with which to approach generators. A 3 gen is harder to establish without access to slowdown perks, but you can still slow the game down quite a bit if your killer has a bit of mobility. Not recommended for killers who struggle with collision, such as Hillbilly, Blight, or Wesker.

Lery's has a *lot* of vaults but it is also claustrophobic and easy to get lost in. This would be my go to recommendation for stealth killers, because it is very easy to sneak up on survivors. I would not recommend it for collision killers (see above) and it is also rubbish for Nurse.

I personally struggle with Dead Dawg, and both its main building and its "maze" of windows and pallets next to the water tower afford survivors a lot of protection. However, it is a very small map that guarantees a nasty three gen off of the scaffold. If you opt to protect that early, you can make things a living nightmare for the survivors, especially if you have a slowdown perk or they're already down a person. Dead Dawg is always a solid choice, and should be considered for every adept. However...

Midwich remains the uncontested king of killer-favored maps. It is effective for stealth killers, mobility killers, or your average Joe killer who showed up drunk with a knife. Survivors are spotted easily in the long hallways and the loops range from good to barely okay. Classrooms remain the only recourse for survivors, and some of them have no pallets or windows. Windows in general are in short supply in this map, and some of them can be weakened by getting rid of breakable walls.
The central garden is a death trap with barely anything for survivors to work with, and the exit gates have a guaranteed spawn location that is extremely easy to patrol. Hatch only ever spawns on the bottom floor or on a stair landing, making it fairly easy to find. If there is a drawback to Midwich, it is that boons are extremely effective due to its two floor nature, and reaching the second floor when you hear a generator being worked directly above you can be rather difficult (remember - there is a staircase of some kind in each corner of the school!) Hook spawns are also notoriously wonky, so be careful where you hook survivors on their last hook, since you may be creating a dead zone in the future. However, it has the highest kill rate for a reason, and it would be my go to pick for any killer adept over any other map.

Since its last rework, Haddonfield has become the undisputed deadliest killer map in the game. There are relatively few loops, the map is surprisingly small, and the main building has been nerfed and possesses a guaranteed basement. While it is nice that the tables have been turned on survivors, this map is a little *too* evil for my tastes. Select it if you are fed up and just want your adept over with - survivors usually run out of resources fairly quickly and then die.
"Playing a killer is playing the Alcoholic Parent Simulator. You're tired and all these kids are running around, knocking things over and gnawing on the electrical wiring." -Shepherd
Killer Adepts have been greatly simplified but are still harder than survivor adepts by a considerable degree. To achieve a killer adept, you need to run only that killer's three associated perks (they can be any rank) and kill all four survivors, achieving a "Merciless Killer" status at the end of the match. If you are in Ash-Silver grade, it may be possible to achieve a "Merciless Killer" through the Emblem system, but I would not risk it. Nuke the survivors from orbit, just to be sure.
Any offerings are okay, any addons are okay. All that matters is that you bring only those three perks and kill all four survivors. Obviously there is going to be a wide gamut of viability as each killer has both a varying degree of strength to their power, as well as perks of varying usefulness. Sometimes you get a weak killer with strong perks, or a strong killer with weak perks. On a few unfortunate occasions, you will be forced to run a weak killer with weak perks.
Addons and map offerings can make up some of the difference, but the fact of the matter is, these adepts are going to take time. Most of them will take multiple attempts. I strongly recommend playing a few regular games with any killer you want to attempt an adept with before committing to an actual adept. Some killers are relatively simple and you might be able to jump into an adept right away (Clown, Legion) but there are others who require at least some degree of mastery to counteract the handicap of running only three specific perks (Artist, Nemesis.)
Oh, and it goes without saying - camping, tunneling, and slugging are fair game here. Whatever it takes to win.
2025 Addendum: I used to recommend addons for each section, however the addons (and to a lesser extent the killers themselves) are getting changed so often that I cannot be arsed to keep track, so those sections have been removed. General rule of thumb - if it increases your efficiency doing something your killer does all the time (like reloading on Deathslinger or throwing hatchets at Huntress) it's probably a good call. Information and instant down perks are also pretty good. I still occasionally recommend addons in the text in the case of egregiously strong addons, such as Ghostface's Driver License addons.
Maps
This section will be briefer than the survivor version for the simple reason that most of the maps are horrifically survivor-sided. You absolutely want to bring a map offering for every adept attempt to maximize your odds of 4king. You are already working with only 3/4 perk slots, and you didn't get to pick your build. Survivors already have enough of an advantage through that. Send them somewhere nice.
The nicest of the options I am suggesting, as far as playing fairly with the survivors goes. They get to get a shot at Outbreak Breakout, and you get a map with an unchanging set up that is favorable to a wide variety of killers. Ranged killers will have an easier time in the main hallway while stealth killers have a variety of avenues with which to approach generators. A 3 gen is harder to establish without access to slowdown perks, but you can still slow the game down quite a bit if your killer has a bit of mobility. Not recommended for killers who struggle with collision, such as Hillbilly, Blight, or Wesker.
Lery's has a *lot* of vaults but it is also claustrophobic and easy to get lost in. This would be my go to recommendation for stealth killers, because it is very easy to sneak up on survivors. I would not recommend it for collision killers (see above) and it is also rubbish for Nurse.
I personally struggle with Dead Dawg, and both its main building and its "maze" of windows and pallets next to the water tower afford survivors a lot of protection. However, it is a very small map that guarantees a nasty three gen off of the scaffold. If you opt to protect that early, you can make things a living nightmare for the survivors, especially if you have a slowdown perk or they're already down a person. Dead Dawg is always a solid choice, and should be considered for every adept. However...
Midwich remains the uncontested king of killer-favored maps. It is effective for stealth killers, mobility killers, or your average Joe killer who showed up drunk with a knife. Survivors are spotted easily in the long hallways and the loops range from good to barely okay. Classrooms remain the only recourse for survivors, and some of them have no pallets or windows. Windows in general are in short supply in this map, and some of them can be weakened by getting rid of breakable walls.
The central garden is a death trap with barely anything for survivors to work with, and the exit gates have a guaranteed spawn location that is extremely easy to patrol. Hatch only ever spawns on the bottom floor or on a stair landing, making it fairly easy to find. If there is a drawback to Midwich, it is that boons are extremely effective due to its two floor nature, and reaching the second floor when you hear a generator being worked directly above you can be rather difficult (remember - there is a staircase of some kind in each corner of the school!) Hook spawns are also notoriously wonky, so be careful where you hook survivors on their last hook, since you may be creating a dead zone in the future. However, it has the highest kill rate for a reason, and it would be my go to pick for any killer adept over any other map.
Since its last rework, Haddonfield has become the undisputed deadliest killer map in the game. There are relatively few loops, the map is surprisingly small, and the main building has been nerfed and possesses a guaranteed basement. While it is nice that the tables have been turned on survivors, this map is a little *too* evil for my tastes. Select it if you are fed up and just want your adept over with - survivors usually run out of resources fairly quickly and then die.
Trapper Adept

Pros: Perks save some time, can shut down strong loops, can lock down basement
Cons: Takes time to set up, no slow down, no chase power, Unnerving Presence can help survivors
The nice thing about Trapper's perks is that they require no effort on your part; Brutal Strength and Agitation are used to save time doing things you were already planning on doing, so that is nice. Unnerving Presence unfortunately makes it easy for survivors to hit great skill checks, but you never know - maybe someone will mess up.
As a Trapper running Agitation, you should check every time you pick up a survivor where the basement is. If you pass the basement, make a mental note of it. Don't start dropping traps there until you've got a survivor marinating on a hook, since you cannot reposition traps once they are set.
Dead Dawg saloon is probably a better call than Midwich here, since you can hide traps in bushes and the grass. The smaller size also makes it easy to find survivors and drag them to basement, and you can shut down the worst of the main building's loops with your traps. Setting up an early three gen is also likely in your best interest - defend the gallows and two gens around them, and make use of the scrub. Basement is also easily accessed from here regardless of where it spawns, making it an optimal area to make your stand.
Unfortunate addendum: Haddonfield is lethal to survivors and possesses a guaranteed basement in the main building, which is now very unsafe. You have Agitation. Do the math. It is very easy to put one or two survivors in the basement and then defend the house until they die. Slug the third survivor and hunt down the fourth. Evil, evil strategy, but recommended if you are struggling. Pray for forgiveness.
Be prepared for a long game if survivors recognize you are attempting a three gen. The ideal scenario is hooking a survivor in basement and snowballing from there. Do not spend too much time on any one chase, and try to push survivors towards your web of traps.
Even with all of this preparation, this is still one of the harder adepts. Good luck!
Hillbilly Adept

Pros: Instant down, high mobility, strong perks, fun as hell
Cons: Highest skill ceiling on any killer, no slowdown perks, collision on a lot of maps is wonky
Hillbilly's perks are excellent - Tinkerer can let you make grabs on generators that have no business getting usually, while Enduring and LoPro Chains means you have very little to fear around pallets. Lightborn is a neat bonus as well, letting you go about your business without fear of flashlights or 'bangs. The instant down his chainsaw offers makes Hillbilly highly lethal when survivors are caught out of position, or when he is guarding hooks. The mobility Hillbilly has is just the cherry on top.
However, his power is incredibly difficult to control and takes a lot of practice. I *strongly* suggest looking at Otzdarva's guide (included below) and modify the game settings to his instructions (set Q and E to turn, up controller sensitivity to 100%. I believe this is no longer necessary, as BHVR has changed it. The below videos still provides good fundamentals, but you don't have to worry about changing arbitrary game settings any longer.) Then spend some time getting used to the chainsaw. You don't need to hit curves or snipes to get this adept, but you should be comfortable backrevving. Low Kickback chains is recommended on the basis that you are still hitting the odd wall, and it will make these mistakes far less punishing. If you are more confident, you could try a Doom Engravings or one of the steering addons.
For your map, Midwich is surprisingly the best. The long straight hallways are perfect for Billy, and the loops are also curvable (if that is your thing.) If you play it correctly, you should be able to secure a M1 or a LoPro hit through a pallet at any of these loops. Billy is also very weak to windows, which this map lacks in abundance. It's perfect!
If you catch a survivor in the open and they are uninjured, always go for the chainsaw. If they are injured, M1 - there is no shame in doing so, and you are far less likely to eat a devastating Dead Hard. Always play aggressively against pallets - you have Enduring. If they notice your aggression and start predropping, bulldoze through them with LoPro.
Tinkerer only procs once off of each generator now, but should greatly reduce your profile and give you a lot of valuable information. Try to use that stealth to get up close to the generator for a grab, or chainsaw someone's buttocks off.
This is a tough one. Billy is difficult to play with a full loadout, and you definitely don't have that. Learning him is intensively gratifying, though, and so long as you don't end up on an awful map like the Eyrie, you should have fun with this adept.
Since his buff, Billy is a lot more forgiving but everything above should still apply. Overdrive gives you the ability to keep pace with survivors if they are continually abandoning loops to run from you, and gives you the potential to cross the map in an instant. Remember to take M1s whenever necessary and not become a purely M2 Andy - you can't afford to do so as part of an adept.
Wraith Adept

Pros: Strong and varied addons, straightforward gameplay, good mobility
Cons: Useless useless useless perks
If you have issues following scratch marks and blood, at least you've got Bloodhound and Predator today. However, seeing as we're bringing All-Seeing Blood, it's not like tracking is going to be terribly difficult regardless. Shadowborn exists to get you addicted to Shadowborn.
Wraith has the best addon suite in the game, so pick what suits your play preference. His pallet breaking addons are very useful, as are any addons that increase the speed of his decloaking. One addon essentially gives him Sloppy Butcher after ambush hits - very useful, given you lack perks that otherwise do anything. You can always opt for the aura-read iridescent addon - survivors will not have much of a counter to constant perfect information from their killer.
Survivors will still be able to hear your growling even with the Clapper, so try to stay out of sight and at a slight distance from survivors as you uncloak, and then catch them at the tip of your lunge. Your lunge can also be used around loops to catch survivors, but this can take some practice.
Stick to smaller maps for Wraith. While he has great mobility, time is not on his side as far as gens go, and you want to find and down people quickly. His speed when cloaked is considerable, letting him make the rounds on generators with ease. The less space between them the better. As a stealth killer, he does well on Lery's, but Midwich is also prime hunting ground (again.)
Wraith is extremely straightforward and a victory here is going to depend more on getting a team that does not slam gens as opposed to mechanical mastery. Your perks will be of absolutely no help and the hit and run playstyle is far less effective without Sloppy Butcher or gen slowdown, so try and focus one survivor unless they take a lot of your time.
Nurse Adept

Pros: Strongest killer in the game, lower skill floor than you think, strong perks, power invalidates survivor gameplay
Cons: Takes some getting used to, frustrating when initially played
Take a few games to get used to the Nurse's power, and then 4k. What, you want more advice? The Nurse is absolutely busted, able to ignore pallets, windows, and even walls with her power. To add insult to injury, her perks are also actually useful - Nurse's Calling will let you teleport directly to wounded survivors through walls, while Thanatophobia can offer stiff slowdown if you wound everybody. Stridor is unlikely to do much, but I guess it will make Claudette stand out more when she hides in a bush, or help you find slugs.
Her Flannel addon will show her blink location when it is equipped, so start there. Once you get a better idea of her Blink distance, you can swap it out for another addon. It basically exists as training wheels. You could probably even get her adept with the training wheels still on, such is the strength of Nurse.
Survivors will occasionally DC as soon as they hear your first blink. So that should make things easier.
Your first few games of Nurse will have survivors run rings around you. Then, once you get the blink distance figured out, you will start killing the ♥♥♥♥ out of everything. Nurse is an excellent slugger, so feel free to leave people bleeding on the floor if you spot another survivor close by.
Midwich is small and multileveled, letting you abuse your power to go up and down floors when you catch survivors healing. The only drawback is that the slightest mess up in aiming your power will have you end up on a different floor, possibly the basement if you are extremely unlucky. Nevertheless, Midwich once again gets the nod from me.
You have the slowest movement speed of any killer, so use your first blink to cover distance. Your second blink should only ever be used to secure a hit, since it has a shorter range and gives you a longer cooldown. Remember - first blink to cover distance, then stop if no target is in range. You can still cross the map surprisingly quickly this way. Remember to look up while charging your blink to increase the distance of your teleport.
Hag Adept

Pros: Strong perks, strong addons, unparalleled camper, people are unfamiliar with counterplay
Cons: All perks can be shut off, can be bullied badly if survivors know what they are doing, lengthy setup
The Hag is another killer that is very unconventional and will require a few games to get the hang of. Fortunately, she remains one of the strongest killers in the roster, and even with Ruin's horrendous nerf, having any slowdown is very welcome. She can defend her hexes very effectively, especially if you opt for range increase addons.
As the Hag, pick an area you want to defend early in the game and start dropping traps. Do not search for survivors until you have a web, and even then, do not stray too far from it. If you have generators inside your traps, trust me, the survivors will come. Your small terror radius and frame means it may take a while for survivors to realize they are up against a Hag - many a Hag game for me has been spent doing two generators wondering what the hell is going on and then spending the remaining gens fighting for my life against a Hag with an impenetrable wall of traps.
Devour Hope and Ruin are worth defending, and Third Seal shuts off Windows of Opportunity, so try and keep one or two of your hexes within your web. You don't have Undying to defend them, after all. If you can get a survivor in the basement, do so. They're not getting out.
Replace traps as they get popped - a Hag with 8-10 traps available is a Hag that is losing. Survivors who know what they are doing will deliberately harass you and pop traps while you are carrying another survivor. Replace those traps ASAP!
If you manage to get 3 stacks on Devour Hope, odds are you have already won. If you get a single hit on a healthy survivor with it active, that alone is massive value. Don't worry about pushing for 5 stacks, just worry about killing everyone by any means necessary. Your Cicada addon should allow you to move away from the survivor and then teleport back after the unhook, so take advantage of this to secure free hits after you get a Devour stack.
Midwich is again the go to, since its small size and narrow hallways make it very hard for survivors to avoid traps, while also leaving the Hag almost permanently in teleport range.
Doctor Adept

Pros: Excellent information, okay chase power, decent slowdown perk
Cons: Can struggle in chase, weak perks overall
Pick the addons with the longest descriptions. Trust me, you don't need to worry about what they do.
Use Static Blast early to find survivors and try to let them off consistently after hooking or if you have not seen anyone for a while. You can force people off unhooks with your Shock Therapy, should you feel the need to camp someone to death. Making people hit Tier 3 madness is not something to strive for, but it will buy you time, so try and catch as many people as possible in each Static Blast.
Monitor and Abuse is unfortunately going to reduce the range of your Static Blast if you are out of chase, but it will make you much stealthier. Between the constant hallucinations and your small terror radius, survivors will have a hard time sussing out your location. Bring yourself to Lery's to take advantage of this and try to come at survivors from unexpected angles.
Shock Therapy will prevent vaults if the survivor is not already locked into an animation. Animation locks can be detected by the survivor's item disappearing from their hands. Try to time your Shock Therapy to land before that happens.
Weak teams will fold to Doctor pretty easily, since he invalidates hiding and thrashes weak loopers. If you go up against a survivor putting up stiff resistance, try finding someone else. Weak links are easy to pick up as Doctor, and once you've found and hooked them the first time, the hallucinatory doctors and constant screaming should let you find them again.
If you can Static Blast during chase without throwing, do so. It will reach 40 meters and greatly increase the likelihood of hitting multiple people - without it, thanks to Monitor and Abuse, you are stuck at a piddly 24 meters.
Overcharge is much better since its buff, so feel free to kick gens at will. Skill checks in Madness can be very difficult to hit, so you might get a surprising number of explosions on your screen if you keep kicking generators. Overcharge also absolutely shreds progress if left untouched, leaving survivors in a right Catch 22. Provided you don't go up against hardened veterans, the Doctor Adept should be fairly simple. Keep the map small and the chases short.
Huntress Adept

Pros: Very strong power and solid addons
Cons: Very slow, very noisy, survivors are very experienced against Huntress, useless perks
Well, at least this adept is fun. The perks won't be helping much. Try to hit survivors with your hatchets in favor of your M1 whenever possible - despite the loss of ammunition, you move much faster after a hatchet toss than during a wipe animation.
If a survivor is sticking to a strong high wall loop and you can't catch them, either leave it or force the pallet. You are a 110 killer that has to periodically reload and has no slowdown perks - you do not have time to spare.
Keep an eye on Territorial Imperative. If it lights up, someone is in the basement and is thus very vulnerable. Huntress defends the basement extremely well, so getting someone hooked down there is tremendously beneficial.
Huntress does very well on Midwich, since she can take advantage of its open sightlines and many of its loops are low. Lockers are also plentiful and easy to find, and Huntress Lullaby even stands a chance of not being immediately cleansed!
If you can secure three hooks with Lullaby intact, less experienced survivors will be in trouble. Every skill check they miss will drastically worsen their position and let you snowball. Once any team becomes aware of the Hex's existence, they will make a point to search for it, just because it is annoying. Usually, however, it gets cleansed in 5 seconds. Lery's and Midwich at least offer hidden totem locations.
Survivors are going to hear you coming from a long way off and will keep their distance. Try to approach generators from unexpected positions.
If you are proxying a hook, aim carefully to hit the rescuer, not the person who is hooked. This wastes the hatchet. Survivors will frequently shield themselves with their hooked teammate; if they do this, close the distance. If the hooked survivor insists on taking a protection hit here, reward their bravery with an immediate tunnel - they won't get far against Oak Haft.
Cannibal Adept

Pros: Instant down, chews through pallets, good info perk, denies item use, LOL BASEMENT
Cons: Weak at windows, no slowdown
Time your revs at pallets to force survivors to decide to either drop the pallet (PALLET GONE) or try and loop your steadily accelerating chainsaw. Weak survivors will generally fold to the chainsaw. Decent survivors will predrop. Good survivors will run your chainsaw and then stun you with the pallet on the second pass. Try to avoid chasing good survivors.
The lack of Bamboozle really hurts Bubba here, so try to avoid survivors who beeline for strong windows. Shack becomes a pain in the ass, but if it has basement ... oh boy!
If you see a survivor with a medkit or toolbox, consider smacking them with a M1 when possible. Survivors, even good ones, get weirdly stupid when it comes to Franklin's Demise, and you can use their greed and stubborness against them by protecting their dropped item.
BBQ and Chili is still good, people. People rarely go into lockers to avoid it anymore, as well. Use that info to find more chases quickly after a hook - camping should only result if you know one or more other survivors are in the area. Occupying their time by keeping them off gens is extremely beneficial. If they go for the unhook while you are close, chainsaw them. Chainsaw them all.
Midwich has few vaults and pallets that will not offer much distance once Bubba has sawed them in half. Just take care to not chainsaw anyone near a breakable wall - due to standard BHVR coding, the chainsaw will prioritize the wall instead of the survivor.
Nightmare Adept

Pros: Can be sneaky, good map mobility, can set up devastating end game scenarios
Cons: Weak power, weak addons, weak perks
Freddy previously held the unfortunate distinction of being terrible in practically every imaginable dimension for his adept. The rework to Merciless Killer made him slightly better, since in the past you would lose your adept if they opened the exit gate - now you can actually use all your perks. Finally, his rework has brought up to the laudable heights of "slightly worse than Clown." The teleport does give him some decent mobility, though.
Midwich is the best call here, since Freddy can actually traverse floors pretty easily due to his teleport. The exit gates are also both very easy to guard, meaning you might be able to secure the 4k even if you make it to the end game with more than one survivor alive.
Killing the Obsession should be your priority. The Obsession alone can get the exit gates open fast - without the Obsession, the endgame becomes much more painful for survivors, especially on Midwich. There is a valid argument for tunneling the Obsession out of the game before doing anything else, since Freddy will be at his strongest at the later stages of the game.
Remember that your hinder only works on asleep targets, and that you can place them through windows. Remember that there is a slight delay on your dream pallets exploding, and they won't do damage unless the victim is asleep - try to get them asleep before using your powers if possible!
Don't force the Blood Warden by opening your own exit gate - Remember Me and your Box should buy you more than enough time to find a survivor to down and trap the others with.
Fire Up is the only perk that speeds up pick up speeds, which can potentially throw off survivor flashlights. I wouldn't count on it, though. If the game is late, consider getting more aggressive by vaulting windows more often - a 18% or 24% increase in vault speed is quite notable.
If they are foolish enough to attempt a heal while asleep and your teleport is off cooldown - darn. Get 'em.
Pig Adept

Pros: Built in slowdown, good info perk, good instant down perk
Cons: Weak chase, RNG reliant, needs to down people to use slowdown abilities
Amanda's perks are all over the place but that does not mean they are bad. Hangman's Trick actually extends up and down levels, meaning you can actually get information on survivor locations while carrying another survivor (another reason to bring Midwich.) Make Your Choice is an excellent way to secure downs, if a little tricky to activate on small maps, but you bet your bottom the person who unhooked will make it difficult on you. Still, couldn't hurt to try.
Surveillance isn't terrific, but it provides a lot of info if you keep bashing gens. So bash gens whenever you can. Your stealth is most effective at the beginning of the map, but can also be used very effectively in Midwich, Hawkins, and Lery's, where the tight quarters can keep you out of sight until it is too late.
Your Ambush isn't great, but it can be used as an antiloop at weaker pallets. Charge it up, fake going one direction, and then slide the other way to hopefully catch them as they vault the pallet.
You sadly do not have time to accept boops.
Clown Adept

Pros: Strong chase, strong perks, straightforward playstyle
Cons: No map presence, yellow bottles are hard to utilize correctly, weak to predrop
Clown's perk suite puts most of the other killers to shame. Pop Goes the Weasel may not be as good as it used to be, but it can still seriously hurt a generator. Coulrophobia can seriously mess with a survivor's ability to heal, especially on small maps where the Clown's terror radius may be difficult to escape, even if he is on another floor. Bamboozle is, of course, excellent, letting the Clown pursue survivors through strong vaults while also shutting them down. Given that the survivor likely had to medium vault due to clown gas, they probably will not make much distance.
Try to save your Pop Goes the Weasel for generators with at least two pistons going. Anything less will likely waste the perk. Your yellow bottles are finicky to use and can be safely ignored if you're unfamiliar with them - the purple bottles will let you make distance on survivors very quickly if your aim is good. Using yellow bottles for mobility out of chase is only worthwhile if you are reloading or picking up a survivor.
Similar to Wraith, there is not a lot to say about Clown. Slow people down and then slice them. He is fortunate that he has solid addons and very solid perks to back his otherwise mediocre playstyle, making this one of the easier adepts, especially on somewhere like Midwich.
Spirit Adept

Pros: Strong power, good mobility, decent perks, RIDICULOUS addons, some instant down potential
Cons: High skill cap, no slowdown, hard for people who are hard of hearing
Haunted Ground can potentially grant you a lot of value, but it is going to be random if or when it triggers. If it is active, try to chase healthy survivors. Rancor will provide a smidgen of info throughout the game, as well as potential for an instant kill at the end, but otherwise will do nothing aside from scare the ♥♥♥♥ out of the Obsession. Spirit Fury is less useful without Enduring, but you may still be able to secure a cheeky hit on a survivor who is not expecting it.
Your lunge is greatly extended when coming out of Phase, so by all means, lunge early and often. Listen for footsteps and watch for rustling leaves and grass to detect survivors. Don't spend too long trying to loop survivors the regular way - while your innate phasing may throw survivors off at a critical moment, your 110 speed is still a massive liability. Use your power to secure hits and downs.
The main difficulty with this adept is that Spirit takes a bit of getting used to, and it takes a little while to learn the tells of survivor locations while phasing. Still, once the initial learning curve is overcome, this adept should not prove too much trouble. Spirit is also not horribly map dependent, but I would still recommend bringing an offering to one of the smaller maps for obvious reasons.
Legion Adept

Pros: Easy to use power, decent info perk, nasty addon combination, survivors tend to give up out of sheer hatred
Cons: Weak in chase, no slowdown
Discordance is the only one of your perks worth a damn, but it is actually pretty solid. It should allow you to find some stabbing targets in both the early game, when survivors frequently team up on a gen, or late game, when they are frantically trying to get the last generator done. Prioritize gens with Discordance on them (obviously.) Your other two perks are not worth mentioning, although get ready to hear a chorus of screams if a survivor gets salty and decides to give up by fast entering/exiting a locker over and over.
If you Feral Frenzy and stab one survivor, and then see no Killer Instinct, try and cut your stab victim off and cancel your power before following up with a M1. There is no shame in securing an easy down if you know you cannot get a chain stab off. There is also no shame in using your power to vault break a pallet and then instantly canceling your power - survivors will make much less distance this way than if you had just kicked the pallet, and you will get your power back instantly.
With this addon combination, there is an argument to send yourself to the Game. The small size and multilevel environment makes your Killer Instinct very effective, while the pallets are obviously useless against your addon combination. You would still likely be better served on Midwich, but still something to consider ... that might be the most fun adept of your life!
Plague Adept

Pros: Strong perks, strong addons, strong power, invalidates medkits
Cons: High skill cap, RNG reliant, highly visible
Ah yes, the Vommy Mommy. Corrupt Intervention remains top notch and will likely herd the survivors towards you. If it falls off early, well, quick downs are always good. If not, then you got good value out of it and hopefully infected a lot of survivors. Infectious Fright is great for snowballing, which is likely if survivors start cleansing early.
In the early game, puke on all the gens. In chase, puke on the survivors. The more fully infected people you have, the more the infection will spread if they work together, and the more information you have. Survivors are reluctant to work on diseased generators if they are healthy, which is just more slowdown for you.
If survivors begin cleansing, begin preparing for a Corrupt Purge play. Corrupt Purge is devastating at unhooks and in tight quarters, since it goes through survivors. Use your Black Incense to locate the survivors who have not yet cleansed and take an easy down with your red puke. Slug if Infectious picks up additional targets. Avoid getting pallet stunned at all costs, since you will lose your power. Head On and Decisive Strike will not end your power, however.
If you hit the Obsession, take the time to break off and use your newfound stealth to ambush an unaware target. Bear in mind you are the most visible killer in the game (7 feet tall with a headdress and carrying a censer constantly emitting fumes) so try and approach them from where they cannot see you.
I am tempted to give Dead Dawg the nod over Midwich here, since the fountain spawns might get awkward with two levels to work with. You can easily infect survivors working on the central gen on Dead Dawg, and overall a three gen on that map should be very easy to defend with this killer.
Honestly, this is one of the easier adepts if you are used to playing Vommy Mommy. Her adept build isn't even that gimped!
Ghostface Adept

Pros: Decent info perks, very strong addons, stealthiest killer, instant downs
Cons: Very weak in chase, survivors easily break him out of his power
Uniquely, Ghostface has access to an addon that lets him blow up gens with his mind. Use that to your advantage, since your perks certainly will not be slowing any gens. "Philly" is just wonderful in general, but you could substitute with another addon that suits your playstyle. Driver's License is tough to ditch, though, since 20% loss of gen progress during an adept is very strong.
Learn to 99 survivors, but feel free to hit them with a maximum mark if they are on a generator in order to blow it up. Stealthing in chase can be risky, but if the survivor cannot see you when you stealth, it becomes a 50/50 on whether they run into you or not. Two tapping survivors is not ideal, especially if they are close to full stalk, but if they are body blocking or looping you well, sometimes you need to take it.
I ordinarily do not bring up cosmetics, but if you want to maximize your stealth, the red devil mask is much harder to notice than the others. Let's be honest though, none of us want to take off the WHAZZUP mask.
Thrilling Tremors is an info perk, not a slowdown perk. When you pick up a survivor, note which gens are not blocked and then trot over there after the hook. I'm All Ears has a lengthy cooldown but can seriously help in chase. Try to use that knowledge and your stealth to head off the survivor and stab them.
You are the only stealth killer that gives no indication they are present. Try to take advantage of this; make your presence known by instantly downing someone. Avoid getting spotted and try to blow up a gen before stabbing your victim. It will be much harder to sneak up on survivors once they see the first victim get marked.
Midwich is a terrifying map to face Ghostface on. Send them there. Alternatively, now that Hawkins is back, the close quarters also make it an excellent option. In fact, that was where I got my own Ghostface Adept, many moons ago.
Oni Adept

Pros: Instant downs, high mobility, can shut off Dead Hard
Cons: High skill cap, weak early game, very weak to predrops, weak perks
As Oni, your perks are rubbish and you are highly dependent on survivors messing up early. The sooner you get your first hit on someone, the sooner you can begin snowballing. Wounding as many survivors as possible will not only increase the amount of blood on the map, it will also power up Blood Echo and potentially shut down Dead Hard. Nemesis is useless for our purposes, but Zanshin Tactics can allow you to approach loops optimally and prevent survivors from reaching pallets or windows.
Save your first Blood Fury (which should ideally be after hooking your first survivor) for when you know where one or more survivors are. Wasting it would be a massive loss. Once you Blood Fury for the first time, your goal is to snowball as much as possible. Ideally, this would mean securing two more downs and hooking one of them. The more slugs you leave in your wake as Oni, the harder the survivors will have to try to regain control of the situation. Hooking should be your secondary priority - you don't want to give survivors any kind of reprieve.
Remember that you have an extended lunge during Blood Fury that can break pallets. You can also flick at corners to hit survivors that try to juke you. Be wary of survivors who try to FOV tech you when you begin your lunge; try not to hold on to your M1 any longer than necessary. If you can secure an early down and begin downing survivors with Blood Fury, odds are you can begin snowballing as survivors bleed continuously all over the map, granting you your power continuously.
Oni has a weak perk set up and a tricky power to use, but I think you'll find that, when you do earn this adept, it will be because the survivor's defenses collapsed all at once under your relentless onslaught. And trust me, it will feel *great.*
Deathslinger Adept

Pros: Murderous in chase, decent perks, decent addons, instant down
Cons: High skill ceiling, a lot of downtime, slowdown perk dependent on killer finding survivors
Gearhead will occasionally provide info, which is nice. Hex: Retribution will either do nothing or grant perfect information for 15 seconds, likely at a moment you cannot use it. So it's most likely not going to do anything. Dead Man's Switch remains excellent, even when unpaired with Pain Resonance, and should allow you to shove survivors off gens and keep them unmolested for a sizable period of time.
You can hit survivors over windows by shooting them and then reeling them in or pulling yourself up. Pallets are a different story, but you should still break off the chain in them if they're uninjured ... give 'em something to complain about. Whenever possible, you should M1 first and then shoot them. Doing the reverse means you have to reload or catch up to them, which is unlikely on Mr. 110 killer over here.
You have a 32 meter terror radius on a 110 killer. Your terror music is quiet, but people are still going to run early. You're going to need to learn to aim. Lead your targets based on their distance and you'll be surprised at how often you hit them. Survivors who are shot while unhooking will have their action canceled and you will start to drag them towards you.
Dead Dawg unsurprisingly gets the nod here, since it has multiple generators in elevated locations that survivors can be yanked off of, and Dead Man's Switch is strong in 3 gen situations, which Dead Dawg is known for.
If you miss a shot on a survivor and they make a ton of distance, consider reloading and finding someone else. As a 110 killer you are going to take a while to catch up, and you can't cross map survivors like a Huntress or Artist can. Deathslingers rip weak links to shreds since they bring a gun to a loop fight, so back away from any survivor who is actually looking behind themselves and consistently juking your shots and blocking your path with pallets.
Executioner Adept

Pros: Strong killer power, can tunnel like no one else, can shut down a lot of second chance perks
Cons: Very hard to use, weak addons, even weaker perks
Just use his ranged addons - Wax Doll and Burned Man Painting. Everything else is garbage. Extra range is very useful, but it is a shame we cannot bring something stronger or more interesting.
Pyramid Head's perks are notoriously useless, although Forced Penance has gained a second lease on life in the boon meta. It is still no one's first pick. Try to use Trail of Torment when you think you can get the drop on people, but otherwise ignore it. Deathbound might give you info at some point. Might.
Pyramid Head is a tough killer to utilize, but rips survivors to pieces in skilled hands. His M2 blast travels through walls and survivors, greatly complicating loops and rescue efforts, however it is slow and fairly telegraphed. You also don't have the aura reading perks that would really make his power shine, like Nurse's Calling, so you're properly gimped here. Just make your best guesses if you cannot see the survivor, and remember your power can travel down stairs, but not up stairs.
The ideal Pyramid tunnel looks like this: Hook, Cage, Hook. Get them tormented, then hook them. Once they are off the hook, cage them. Then, when you see the loud noise notification from their cage rescue, beeline towards them, down them, and hook them for the final time. Being uncaged does not trigger any kind of second chance perk, meaning you are free to down and kill them immediately. If they get tormented *again*, just end them then and there.
Learn to time your power to hook rescues. Used early, you will only hit the unhooker. Used on time, you will deep wound the victim and hit the rescuer, which is highly efficient!
Survivors are loath to step on the funny red lines. Use this to your advantage in loops to either force the Torment or get them off the loop. Either is advantageous.
Your M2 has a shorter recovery time than a M1, so if you can guarantee either, go for the M2.
Fittingly, Midwich is a good map for Pyramid Head. His trails will be quite difficult to avoid if you paint the hallways a bit, and there are quite a few generators you can "check" through walls. Trail of Torment may serve to muffle your presence a bit as well, but overall you're going to be highly noticeable and visible. This will likely be one of the harder adepts, not because Pyramid Head is bad, but because his perks suck and he's one of the tougher killers to master. Still, you get to play one of the most iconic monsters ever created in videogame history. How cool is that?
Blight Adept

Pros: Second strongest killer, absurd mobility, BUSTED addons, also has strong perks
Cons: High skill cap, survivors are used to playing against Blight
What is there to say about Blight? His collision can occasionally be wonky and he is a bit susceptible to Dead Hard, but his power is undeniable. Bring him to Midwich to take advantage of the long, straight corridors and secure easy hit after easy hit. Your Iridescent addon also provides a unique scoring event, so look for that; if it pops up when you are not in chase, odds are a survivor is nearby, possibly in a locker. You can also break walls with your first dash, now.
Definitely play a few rounds of this guy first so you can understand how his power works, since unlike Nurse he takes a decent while to get used to. Once you have a basic understanding of how he works, the above addons will rip most survivors to shreds.
To add insult to grievous injury, Blight not only brings a Hex that shuts down pallets, he protects it with Hex: Undying ... which also usually gives him solid early game information. I would say "at least he doesn't have an insta down," but nope, Dragon's Grip gives him (very conditional) access to a one hit down as well. Don't worry about kicking gens and getting value out of it, you're already inundated with value.
Be aware that survivors have played against Blight many times. They will time Dead Hards against your Lethal Rushes. Use one of your Rushes to run *past* them instead of hitting them, letting them Dead Hard uselessly, then dash back and give 'em a smack. Other survivors will try a last second swerve, so don't swing until you are right on their back. You can flick about forty-five degrees with Blight using normal mouse DPI, but you're going to need to be pretty close to hit the survivor as they dodge.
Bring the addons, send yourself to Midwich, and start dashing. Your average solo queuer will not stand a chance, and will be rightfully pissed.
Twins Adept

Pros: Strong power, very strong in chase, can be in two places at once, survivors unused to playing against Twins
Cons: Clunky power, useless perks, high skill cap, shut down by some healing perks
Unfortunately, the Twins update features the most underwhelming set of perks ever brought to Dead by Daylight, all of which were broken on release. Hoarder will actually help survivors by giving them extra chests, but at least it will give a bit of information if survivors screw with chests or try to pick their items back up if Victor snatches them. Coup de Grace is solid, but miserable to waste stacks with, and perks that get stronger as you lose the game are generally not terrific. Oppression has a ludicrous cooldown, but at least you have some slowdown. Barely.
Mercifully, since your goal is just to kill everyone, you can slug to your heart's content. Try to secure the first hit with Charlotte before downing your victim with Victor. This way they cannot take Victor hostage and you can potentially attack someone else before returning to Charlotte and hooking the first survivor. If a survivor gets the best of you in a loop or has retreated to a strong area, send out Victor. He moves at 150% movement speed and is one of the hardest things to avoid in the game against a good player. Try to predict their movements and if you miss, back up immediately to try and dodge their kick.
Once all survivors are injured, the game becomes much easier. Send out Victor as much as possible to track their blood and down them back to back. If they have We're Gonna Live Forever, you're in trouble, but there is nothing you can do about that. If they set up boons, you need to snuff them ASAP, because Circle of Healing is a hard counter to your power.
You should try to pursue any target that has Victor latched on to them. If they take him hostage, it will take a while to get him back, and having no power is miserable. Still, you will be stealthed when you return to Charlotte, so if you think you can get the drop on another survivor and are reasonably sure the first survivor will dislodge Victor, feel free to split the pressure.
Victor is excellent as a sentry. Due to an oversight, you can park him by a hook and then dump someone on the hook and use him as a radar. You cannot park him next to a hook with a survivor already on it. You can also park him near the basement to make survivors' lives miserable. You can also park him somewhere you know survivors will run to and then swap to him to cut them off - it feels awesome when this happens, like you're actually working as a team.
The Twins has a lot of cooldowns built in and your perks are not going to be much help. If it's any consolation, the survivors are also having a miserable time.
Trickster Adept

Pros: Survivors hate him, can secure free injures and downs pretty easily, strong addons and perks
Cons: Murdered by long wall loops, weak against Endurance effects, has to reload
Trickster was hit hard by basekit Borrowed Time and the introduction of Off the Record. He requires eight hits to take a health state, and Endurance cancels that out. He's much weaker punishing unhooks now, but he is still a terror in most unhook scenarios. He is one of the few killers that can effectively engage multiple targets, especially if Main Event is active. Speaking of which, don't be afraid to let Main Event go without using it if there's no reason to activate it - sometimes it's just not worth your time, although the increase in "DPS" can let you secure surprisingly fast downs even after a survivor fast vaults. Learn to aim and trust your judgement.
Try to avoid chasing survivors in high wall loops. It is very difficult to get knives on the survivor enough times to inflict an injury. Try to engage targets in the open, who cannot avoid your knives very well, or near low loops where you can hit over them. Midwich and Dead Dawg are again excellent options for this killer.
Your knife throw rate will speed up as you throw, however accuracy will decrease. has been nerfed but accuracy is perfect. You should feel comfortable engaging in medium range and predicting jukes. You will no longer have to fight for control over the recoil.
Crowd Control will frequently block one useless window in a chase and then get destroyed. Such is life. Starstruck is tough to utilize but at least it means you will usually be unmolested while carrying a survivor. No Way Out is an excellent hedge if the match comes down to exit gates and 1-2 survivors, and virtually guarantees a 4k if you close the hatch. Don't worry about hooking four different survivors to power it up, though.
Watch for Dead Hards if survivors are already injured. Pause before the eighth knife is thrown if you are confident you can hit it, see if they Dead Hard. If a survivor makes no noise after being unhooked, they have Off the Record and should *not* be a priority target.
If a survivor causes you to dump all your knives without taking a single health state, leave them, reload, and chase someone else. It's easy to get into a sunk-cost fallacy mindset as Trickster, because you just need *one more knife.* In general this killer swings between oppressive against survivors and utterly hopeless, depending on how quickly they can make it to a high loop. Can be a bit of a miserable experience. Good luck. (He's still one of my favorites.)
Nemesis Adept

Pros: Good info on zombies, very strong perks, shreds pallets, strong anti-loop
Cons: Zombies are rubbish, three hits to down, incredibly conspicuous, takes time to power up, high skill cap
Your primary goal is to get to Tier 2 ASAP. Once you have Tier 2, you can break pallets and shorten chases considerably. To this end, you need to infect survivors. Lethal Pursuer means you will at least know where the bastards are, so get on them fast and turn them blue. Tier 3 is also incredibly useful for its extra reach but will take much longer to achieve. Infecting two separate survivors with your tentacle will grant Tier 2.
Killing zombies with your tentacle should only be down if it will get you a Tier or they are stuck on geometry. Otherwise, leave the things alone. Check their aura constantly to get an idea of where survivors are - they're pretty decent radars, and on Midwich they may even secure a hit or two.
Nemesis Adept means Eruption. Hot damn! Kick high priority gens and watch them explode. Nothing else to it. Hysteria is basically useless but may occasionally cause injured survivors to run into you and ♥♥♥♥ themselves.
Your tentacle can guarantee hits at pallets and windows, however survivors will frequently Dead Hard or juke at the last second. Wait until they are locked in animation (their item will disappear shortly before they vault or drop the pallet) and then smack them. They get a speed boost after being infected, so be prepared to break off chase and find someone else if it takes too long to catch up. The more survivors infected early the better - they will run out of vaccines pretty quickly thanks to the addon, and the game will likely run long thanks to Eruption.
If you want to break a pallet with your tentacle but do not want to hit the survivor to deny them a speed boost, aim to the side. The pallet will break and the chase can continue.
Midwich is the best map here, because its tight doorways and hallways mean that zombie hits are actually rather frequent, especially if the survivor is in a panic. It can sometimes be difficult to find survivors in the early game on Midwich, which Lethal Pursuer cancels out neatly.
Artist Adept

Pros: Strong perks, strong power, strong addons, excellent reach, survivors hate her
Cons: Tough to utilize
Bird Lady is strong. She can cross map like Huntress, although it will take a second hit to secure an injure. Her power grants her both incredible anti-loop potential as well as information that can span the map. Her perks also grant her exceptional slowdown - Grim Embrace can outright shut the match down for 45 seconds if you can trigger it early, and Pain Resonance is meta for a reason. Pentimento is unlikely to come into play, but God help the survivors if it does.
Try to use only one bird at a time when targeting people being attacked by a flock at a loop. Multiple birds greatly extends your cooldown, which you want to avoid. If a survivor has fled to midrange or you are trying to hit multiple targets, then you can try the "shotgun" approach by sticking birds in slightly different directions and launching.
Try to leave birds where the survivor cannot see (for example, behind a shack wall) and then force them in that direction. If a survivor is being particularly cautious, you can start zoning them with your power to force a M1. You are at your strongest at straight loops (think cars or logs with a pallet) since you can cut off directions for the survivor very quickly. Do not be afraid to hit them through a wall to get them bird-infested and then follow up with a quick second hit - they tend to have trouble dodging you while distracted by all the crows.
If you can hook all four different survivors naturally, do it, but otherwise don't pay attention to Grim Embrace. Pain Resonance is more than strong enough to carry this Adept - just keep dragging people to Scourge Hooks.
Artist actually struggles with multi-level maps, so neither Dead Dawg nor Midwich are terrific here. I would select a nice, flat map of reasonable size. A MacMillan or Azarov's offering would be my suggestion. Lery's could also work, but I think you would be hard pressed to secure consistent injures with her power due to the abundance of windows.
Bird up!
Onryo Adept

Pros: Really strong perks, addons almost make her have a power, sometimes sneaky, good mobility, condemned is oppressive, smol
Cons: Not much of a stealth killer, almost no power in chase
Here we have an adept carried hard by three strong perks. Playing the Sadako adept is not that far off from playing regular Sadako. Call of Brine is a decent regression perk by Adept standards, Merciless Storm comes in clutch surprisingly often, and Floods of Rage is one of the best information perks in the game. Do try to avoid killing survivors on your Scourge Hooks, though. Floods of Rage only triggers on unhook.
Since Adept now just means killing people, we can lean into Condemned as an additional threat to deal with. Teleport constantly and refresh your TVs by hitting survivors. If a survivor becomes condemned, try to cut them off from any TV you see them heading to, since they are likely carrying a tape. They now drop tapes when you hit them, in addition to getting a burst of condemned. It is not uncommon to get 1-2 "care bear stares" per game because of this.
Condemned should be your secondary priority, however. Nice if it happens, but these gens will not protect themselves. Instead, use your mobility to constantly harass survivors across the map and shove them off gens. Then, kick them with Call of Brine. Your Manifest/Demanifest can be used to throw survivors off at short loops, but this is unreliable at best. You're going to have to eat pallets the old fashioned way, while slowly grinding out the game with Condemned and Call of Brine. Create dead zones in key areas and force survivors into them.
Sadako is smol. Take advantage of this at loops where survivors cannot see you to catch them unawares. Demanifesting can help here. Speaking of, Demanifesting allows you to phase through survivors - very useful if they are trying to body block. It also now prevents pallet stuns, which can be very helpful.
Midwich or Lery's work very well for Sadako, as you can traverse the map very quickly and secure a lot of Condemned stacks while approaching from unexpected directions. Hiding, ordinarily fairly effective on these maps, will be canceled out by Floods of Rage if you can get a few people on Scourge Hooks.
Dredge Adept

Pros: Strong map mobility and detection, okay perks
Cons: Not very strong in chase, takes a while to build up, no slow down, built in counterplay
Dredge is a lot of fun, even if his perks kind of suck. You will very likely never notice if you get value out of Septic Touch. Dissolution gives survivors a lot of warning and leeway, but will still frequently get you hits if you corner a survivor and force them to vault with it active. Darkness Revealed is excellent, especially on Midwich, and will get you a lot of information and potentially even a free grab.
Nightfall greatly increases Dredge's mobility and visibility while sharply reducing the survivors'. For that reason, you want to secure hits as soon as possible, since it will build fast over wounded survivors. If Nightfall is close, you can optionally activate your power and begin strolling away from it, or hide in a locker for a bit to force Nightfall. Then you can begin teleporting all over the map and looking for killer instinct. Optionally use Darkness Revealed to determine where to go.
Your power isn't terrific at loops but it can force lopsided 50/50s. Use it at less strong loops to either teleport back and hit the survivor, or just walk into them and then smack them after canceling your power.
Try to destroy the locks on locked lockers that you see. It doesn't take long and will likely pay off later.
During Nightfall, you teleport and recover your power outrageously fast. Use it to cut off survivors and scare the ♥♥♥♥ out of them. Your power is not much use in chase out of Nightfall, unfortunately, so try to capitalize on the dark when it descends.
It goes without saying that locker-heavy Midwich should be your go to with this guy. He loves it there. And not just because he eats children!
Mastermind Adept

Pros: Built-in slowdown, decent perks, high mobility, strong addons
Cons: Large terror radius, high skill cap
Wesker has an easy time of it. Superior Anatomy lets him keep up in chase even without using his power, Awakened Awareness will grant him even more free information, and Terminus complicates the endgame for survivors. His power also denies the power of SHIFT + W, as well as God pallets and windows. Couple that with a power that forces survivors off of generators to cleanse themselves or otherwise suffer terrible consequences, and you get an adept that is easier than most.
Try to secure M2 hits whenever possible. The more infections means the more time spent cleansing infections and slowly draining the map of resources. This gets especially vicious given that you will see them once they spray and can potentially infect them *again.* As the match goes on, the most easily accessible sprays will be further and further from the remaining gens, slowing the game down further.
When a survivor is fully infected, they are exposed for 30 seconds, become instantly downable from a M2 smash, and also lose 8% movement speed. Get on their ass ASAP if they achieve full infection.
Superior Anatomy does not affect the vault speed from your dash. Use it to make up distance when your dash is unlikely to connect but your M1 would.
If you know a survivor is about to drop a God pallet or drop down a strong window, charge up your power and prepare to follow them. Don't charge until you hear or see them act, however. Many a Wesker has been embarrassed by a survivor faking them out and laughing as they dive out a second story window or directly into a dropped pallet.
Midwich is again our friend. Wesker can make a lot of distance in its hallways, and the sheer size of his terror radius on this small map will make him hard to pinpoint. His power also counters several strong windows and pallets that would otherwise buy survivors a lot of time.
Knight Adept

Pros: Can multitask, built in decent slowdown, can drive survivors off loops, strong perks
Cons: Weak to Shift + W, clunky power, power can sometimes just not work properly, BHVR removed most of his capability to two-tap
The Knight actually has a lot of usable addons, so feel free to choose whatever you like most. Typically this will align with whatever Guard you like to summon the most (it's probably the Assassin.)
The Knight gets a lot of hate, but not for his perks. Hubris can easily secure you one or two free downs, while Nowhere to Hide is rapidly becoming meta for good reason; kick gens often and flush those cowards out. Face the Darkness will lurk in the background and provide free information, which is more than many perks can claim.
To succeed as Knight, you need to use your guards correctly. The Carnifex can be used early to break walls, or in chase to swiftly break pallets, but he does nothing special in chase. Don't be afraid to drop this guy often, so long as it is to break something. He breaks pallets and gens instantly, which can be problematic if you wanted to keep survivors on one side or off of the generator longer. The other two take about 6 seconds to break ♥♥♥♥, which can be a marvelous means to delay survivors.
The Assassin chases survivors at 110 speed and inflicts deep wounds. He doesn't see well and he doesn't chase long, but he usually gets his man. Drop him off at generators you know are being worked on and watch them scurry. He catches up more often than not.
The Jailer gets a bad rep, but he's the one who most consistently spots survivors and wastes their time. If you don't want to use him, send him to break something so you can rotate him. Otherwise, drop him at high traffic spots or where you know survivors are; he consistently flushes them out. He is also the best at guarding hooks, due to his lengthy patrol time. He now also chases survivors the longest, making him something of an Ol' Reliable among the Guards. Need to occupy a survivor for a sizable length of time with no expectation of actually catching anyone? Jailer.
When you are not in chase, get within moderate distance of where survivors are and then summon a guard on top of them. They'll get on their ass quick, courtesy of his recent changes, and they will have no warning since the green orb now vanishes as you send it. Then, march in and cut off the person being chased by your guard, assuming you're just not trying to occupy their time.
If you are in chase and a survivor has you at a loop, either force the pallet down and break it with the Carnifex, or just spawn a guard in place to force them off the loop. Boring, but it works.
If a gen is about to pop in the distance, send your guard out and break it. If it's Carnifex, they instantly lose 5% progress, and you should send another ASAP. If it's the other two, the survivors will be kicked off the gen for 6 seconds ... and then lose 5% progress. Use that time to close the gap and get them off that gen.
Make sure to multitask! If you are picking up a survivor, drop a guard to cover you from rescuers, or send him to break that pallet the survivor just dropped while you scoop them off the ground. The ability to do two things at once should not be underestimated; you can save a lot of time on Knight.
Thanks to his Guard's ability to float up floors to catch survivors, Dead Dawg Saloon is his best map. You can defend Gallows and Main from the bottom floor just by posting a guard from below. Survivors unfamiliar with this tactic will immediately crap themselves as the Assassin floats up to them, Return of the King style, and shanks their ass.
Skull Merchant Adept

Pros: Brainless gameplay, deploy power at high traffic areas, deploy power at loops, slay
Cons: She's currently terrible by design, and she has the weirdest and cringiest fanbase
Her perks are terrible, but it doesn't really matter, since so is everything else about her right now. Try to be somewhat strategic with THWACK! if you have access to breakable walls. Game Afoot is utterly marginal but may contribute to making chases even more brainless.
Your drones grant considerable stealth capability, so use this to sneak up on generators. She has addons that can contribute to this playstyle if it appeals to you.
Midwich again is the best place for this adept - THWACK! will work through multiple levels and there are basically no ways of avoiding the drones if you put them in the middle of hallways. It is also very easy to keep yourself undetectable while crossing the entire map, letting you get free hits. Don't be surprised if survivors D/C.
Skull Merchant was deliberately nerfed in order to fix the justified criticism surrounding her garbage gameplay and she is in the process of being reworked. This section will be reworked alongside her when the NEW! and IMPROVED! Skull Merchant releases. At present, she's basically just a M1 killer that survivors will occasionally refuse to play against out of sheer pettiness.
OPTIONAL RANT:
This is the only killer that I would approve of BHVR removing from the game. I rank killers based on three categories: visual design, lore, and gameplay. Skull Merchant is the only killer that gets bad marks in all three areas. I actually stopped playing the game for a period after her release, partially to get ready for Baldur's Gate 3, partially to complete the WoW Hardcore challenge (success, by the way), but also because I was disgusted by her DLC. While I am grateful that BHVR reworked her, she is still miserable to play against, however this is at least partially because most solo queue survivors simply give up rather than learn counterplay. Nevertheless, her godawful visual design and mindbogglingly poor lore leaves me with very little sympathy for this killer or the people who conceived her. Like, the Twins came out broken and has suffered from crippling bugs and clunky gameplay ever since her release, and her visual design is about as lackluster as one could expect when the baseline is "malnourished French peasant with horrible birth complication," but her lore is among the best in Dead by Daylight.
Project W was followed by Project L and anyone who thinks this killer is a worthwhile addition to the game is on some serious copium - and anyone who mains her is a vicious psychopath. (Okay, some slight hyperbole here.)
Singularity Adept

Pros: Very strong chase potential, good map knowledge, can deny loops with skilled play
Cons: DOES ANYONE KNOW HOW TO WORK THIS INFERNAL CONTRAPTION?
Equip your best perks, select the strongest addons, and play this killer a few times before attempting the adept. This is perhaps one of the most mechanically complex and demanding killers in the game, and it would help a great deal if you have at least a nominal familiarity with how HUX operates before jumping in the deep end.
Your perks for this adept - forget about them. At most, remember to kick two gens that are being worked on to get some incidental value out of Machine Learning. Everything else is going to be marginal. Your main goal is to get into chases and secure downs as fast as possible.
To that end, here is the most valuable advice I have ever been given by a Singularity main: your power is a chase power. Don't use it for map surveillance, there are too many EMPs. Spot a survivor, drop a pod if possible, stick them, then get in chase. Family Photo will help you catch up faster, and the Iridescent Addon will start the match very strong with everyone slipstreamed and no EMPs available. Get into chases ASAP. If you can drop a pod somewhere that has an excellent view (for instance, on the front of the house in Garden of Joy) do so, but be prepared to replace it later. You're not going to be a camera master with this killer with total map knowledge and control - keep moving, keep dropping pods, stay in chase.
Overclock Mode isn't tremendous, but it does drastically reduce the efficacy of pallets and also increases vault speed. Use that to trim down your chases. And swing into every pallet! You'll get a lot of surprise hits that way.
Singularity unfortunately has a lot of counterplay built into him, and he can be pretty confusing to play. He is also an overwhelming force to be reckoned with if he can get the pressure on early. I guarantee that whatever game you secure the Adept on, you will feel like a big brained genius.
For maps, Midwich is too cramped to make ready use of his ability. Hawkins is also outright bugged, and its very hard to place pods. I recommend Dead Dawg for the balance of being a reasonably smallish map and having a lot of places to attach strong pods. Also, they aren't going to be able to hide from you at the beginning of the match, which is when you are going to be strongest.
Xenomorph Adept

Pros: Strong anti loop and map mobility, Ultimate Weapon is busted
Cons: Tail is really funky to control, built in counterplay, no Bloodlust
When you start the match, dive into a tunnel immediately to get your power. Then start looking for footsteps or turrets. You *can* use Ultimate Weapon early in the game, but I think it is better used after hooking a survivor. Keeping your tail up should be your priority.
Xeno's tail feels really weird to use. It has a short delay on use and its range is deceptively short, but it is stupid difficult to avoid at closeish range. There's a reason survivors will try to burn you out of Runner Mode as much as possible. If you lose your tail, consider whether it is worth finishing the chase or getting your M2 back and commit to that action as soon as possible.
Rapid Brutality is kind of unfortunate here. Ordinarily we would want to M2 over M1 on a killer like this, however a M1 here gives us a 5% speed boost that can come in handy. If you have a choice between getting a M2 or a M1 (like you caught a survivor in a corner doing a totem or something,) select the M1 whenever possible. Super lame, but otherwise the adept takes away your Bloodlust for nothing.
Since you have no Bloodlust, you're going to need to figure out quickly whether you can continue a chase around a loop or not if you don't have your power. More often it may be prudent to just break the pallet and then dive back underground to get your tail back. Don't be afraid to pop in and out of tunnels - when you are in Crawler Mode, you have a reduced terror radius as well as a very nasty anti-loop power. It's fully worth it.
Similar to Demo, skilled survivors will frequently attempt to juke last second at pallets and windows. Either wait until they commit to the action or look for their item disappearing - if their medkit vanishes, they committed to the vault - blast 'em! Xeno's cooldown on a tail miss is super punishing, so try to avoid it.
Alien Instinct is underrated and can potentially really screw over a survivor. Bear in mind that Oblivious is less useful on Xeno since the flame turrets can track its presence, but perfect information on an injured survivor is still super useful, especially since you can cross the map in seconds. Pay attention to the rest of the map after every hook and see what you can see!
Similar to Demogorgon, Xeno can traverse Midwich's floors super easily (explain THAT one, atheists!) so it would probably be your best map for this achievement.
Good Guy Adept

Pros: Strong perks, strong power, strong addons, third-person perspective is very useful
Cons: Slight adjustment period to this little psycho
The above addons supply aura reading after scampering or performing a Slice and Dice. Given that Chucky is absolutely murderous in chase, hiding is usually a good option against him - well, we just took that away. Given how frequently you will be running around and brandishing a knife like a lunatic, you will be getting good info super often.
Chucky is, as I am sure many of you can attest to, very strong. Friends 'till the End will scare the ♥♥♥♥ out of the survivors for the entire match and possibly secure you an easy down or two, while Batteries Included should shorten chases if survivors get cheeky and lead you to finished generators.
You can scamper over or under pallets once you are already charging. Use this to cut off strong loops like shack or embarrass people who just pre-dropped in front of you. Don't be afraid to use your power to close the distance between yourself and a survivor, either - the cooldown is pretty short, your addon will give you info, and the survivor will find themselves with a lot less room to maneuver.
At the beginning of the match your power will be on cooldown, but try to resist the urge to activate it as soon as it is available, unless you plan on using it for map traversal. It's extremely useful in chase, and it is better to have it when you need it.
You can still M1 while you are in Hidey-Ho Mode, and if it is the beginning of the Mode, you will even have a little power left over afterwards. It is perfectly feasible to activate your power, M1 a survivor, and then M2 to catch up and possibly hit them when you have only a second or two of power remaining. This combination gets ever more brutal with Save the Best for Last, but alas...
Chucky is good on basically any map because he spits on pallets, but as a stealth killer, he is probably best on Midwich or Hawkins. He has been upgraded to two stars to three stars on difficulty due to the change to Scamper, but he is still a fairly simple adept with practice.
Unknown Adept

Pros: Good stealth perk, strong power, strong map traversal
Cons: High skill floor, lengthy chases if power is mishandled
The Unknown stands out for being absolutely brutal if played properly, especially if the survivors are not managing his hallucinations. Pay attention to where you "shed" your hallucinations and tap your M2 if you're dropping it off somewhere unfavorable. Keeping 2-3 hallucinations in a three-gen area will greatly assist in keeping survivors pressured and gradually forcing them into dead zones. The above addons will allow you to use your hallucinations more aggressively and give you free weakens on survivors who complete generators, making chases a lot shorter provided you land your shots.
When in chase, if the survivor is already weakened, break line of sight as much as possible. Hide behind trees while you wait for your power to recharge, move unpredictably, and don't be afraid to teleport to either flank the target (very useful at shack if you shed a hallucination there) or to check on a generator you know has progress.
Similar to huntress, if you injure a survivor with your UVX as opposed to your melee, you catch up to the survivor a lot faster thanks to the faster cooldown. It is downright common to tag a survivor with your purple goop and then put them on the floor with a swift axe swing as they waste their speed boost in a panic. Prioritize using your UVX when possible, but try to keep the number of three hit chases to a minimum. For this reason, infecting a survivor and then breaking off to pursue someone else is perfectly valid - you might be able to shorten a chase with them later.
Two of your perks activate off of kicking generators. Don't count on getting counters for Undone, but Unforeseen is a really good perk and will allow you to get the drop on survivors quite often. Unbound means you might be able to catch up with some survivors after vaulting, but don't rely on it too much.
Midwich is a small, killer-favored map whose two levels are easily taken advantage of by the Unknown, who can teleport between both floors provided you drop off a few hallucinations. The close quarters also enhance his UVX quite nicely, making his blasts a lot harder to avoid.
Lich Adept

Pros: Spells for every situation, mobile, good information
Cons: Adjustment period as you try to figure out what the ♥♥♥♥ is going on
What a change of pace. Vecna is a killer with four powers rolled into one, who also feeds survivors magical items that can further change the pace of play. The above addons will make your Mage Hand more effective and reduce the cooldowns of all your spells every time you land on M1, which will be often. Despite being a Wizard, Vecna is quite hands-on while in the realm. I guess he studied at the Xykon school on the application of power.
To break it down, Mage Hand is your chase power. Use it on an undropped pallet to hold it in place, or a dropped pallet to lift it back up. Use it at close range in order to capitalize on the pallet being out of play.
Flight of the Damned does damage, but is only useful at close range and will very rarely actually connect with survivors, since they can just crouch to avoid it. Use it when survivors are behind cover and you are out of line of sight to either hit them, or force them to crouch - which usually lets you catch up and hit them with your knife. Health state either way. This is also a chase power, and I've never had any success using it at long range. Save that for the Artist.
Fly can be used either for map traversal, or to follow up a M1. After hitting a survivor, swap to Fly and follow them. You can cancel Fly at will, and can also fly over one pallet or window. After flying over a window or pallet, your spell will stop, so be careful about where you travel.
Dispelling Sphere should be used whenever it is up, since it cancels out the survivors' magical equipment for about forty seconds while also giving you their locations with killer instinct. Note that it bypasses hiding in lockers, so it is quite handy for finding the last survivor if they're being a rat.
Weave Attunement provided me with a bonkers amount of value during my adept attempts, since it causes survivors to automatically drop items and then gives aura reading around dropped items. So if you see a lot of survivor silhouettes running around while attempting this achievement and aren't sure why - that's why. Your other perks are sadly irrelevant, although periodically inflicting exhaustion on survivors might cancel out a Dead Hard or two. Shame you'll never know if that is the case. Don't worry about the equipment survivors pick up from your chests - you can shut it down with Dispelling Sphere, but otherwise it's just providing them with minor haste and info. Potentially problematic, but not game-ending. If they get one of the legendary items, well, they just made themselves very vulnerable to a tunnel if they've already been hooked once or twice.
Midwich is once again the best map to get this Adept. Vecna's Dispelling Sphere will get enormous information as you send it down the corridors, Fly and Mage Hand can be used to counter the bare handful of pallets and windows you do have to deal with, and Flight of the Hand will continue to either do nothing or make survivors ashamed of themselves. Try playing Vecna a couple of times with addons and perks of your choice to get used to his spellbook - his power really is something else.
If a survivor is carrying the Eye or Hand of Vecna (they will have a golden hand or eye icon next to their portrait) then you will be able to mori them on their final hook. The mori is very fast and is also part of another achievement you need to get, so you may as well.
Dark Lord Adept

Pros: Strong anti-loop, high map mobility, some slowdown
Cons: Only one of your perks does anything, killer is complex
The Dark Lord will feel very familiar to anyone who has kept up to date on playing most of the rest of the killer roster. He shares elements of Wesker, Spirit, Pyramid Head, and Demogorgon. The problem comes if you are playing this killer without experience in the prior killers and with little knowledge of how this killer operates.
Shorthand: Vampire form has a short range anti-loop attack that goes over low objects, pallets, and windows, and can hit multiple survivors in a straight line. Wolf form has a double lunge attack and can pick up “scent orbs” to temporarily boost his movement speed and recharge his lunge. Very useful in loops with straight lines, such as shack or four lanes. His charge also breaks pallets if he launches himself into them. Bat form moves at 150% movement speed and can fly over windows and pallets, but cannot attack and cannot see survivors. You can still break pallets and walls in any form by pressing the relevant button.
Try playing a few games as Dracula first to become familiar with the button presses required to transform as well as how his Hellfire operates. It’s not quite as clunky as Pyramid Head’s ranged attack, but it’s more cumbersome than the Nemesis (my love.) The main thing to remember is that canceling the Hellfire slows you down drastically afterwards, so you better damn well commit.
If you’re going somewhere, turn into a bat. This should be your first action after the game starts. You move insanely fast and you can still hear survivors running around or see generators being worked on, so there’s really no disadvantage to being a bat so long as you are paying attention. You swap forms fairly fast, so changing into a bat to fly over a god pallet works pretty well, provided you try and body block the survivor from vaulting back. Remember that you also have a short range teleport to windows and dropped pallets as a bat, which can help you traverse multiple stories easily.
Wolf form got buffed recently to make it more appealing. If you have played Wesker, it will play very similarly, except you don’t get to choose whether to use your second charge or not – the only way to cancel the second lunge is by hitting something, be it a survivor, pallet, or wall (ouch.) Generally, your vampire form is going to be more useful since it can be used to counter walls and pallets, however in loops comprised of straight lines, the ability to lunge to a corner and then lunge again at a 90 degree angle to hit a survivor is very useful. Vampire form is better at dealing with tricky terrain, but wolf form keeps better pace with the survivors at simple loops. Bat form counters holding W.
Your one good perk is automatic. Dracula is good enough to play well even with limited perks, you will mostly only be limited by the lack of slowdown against good teams.
Midwich’s multi-layer nature and relative simplicity of the loops means it is, yet again, the recommended map to send the survivors to. Haddonfield if you're a batstard.
Houndmaster Adept

Adept Houndmaster
Pros: Solid map mobility and detection capability, hound goes VROOM
Cons: Perks are mediocre, no slowdown, buggy power
I haven’t seen much hate for Houndmaster, which I am grateful for. She’s one of the more inspired powers we’ve seen recently, and I think the overall concept is decent (contrast to Skull Merchant, which was never a good idea to begin with.) Shame the dog is still bugged to ♥♥♥♥.
Her hound can be very awkward to aim and frequently the power won’t work because the dog got stuck on something thirty seconds ago, and the game hasn’t decided to teleport him back to you yet. There’s not much you can do there aside from maintain chase and try to pin the survivor down at a loop before they realize you don’t have your dog.
Assuming your power works (Jesus, BHVR, I shouldn’t have to write that) then it’s worth noting that sometimes, the threat of getting hit by the dog is greater than actually being caught by the dog. Sending it to chase one side of the loop and forcing the survivor to dodge into your waiting arms is a viable strategy, so don’t be afraid to send your hound out frequently. Depending on the loop, you can also sometimes angle your charge so the dog will swing around the object, so pay attention to the charge indicator to see if the orange lines bend or remain straight.
If you do send your dog charging at a survivor, bear in mind that they can stop your dog dead by dropping a pallet on him, or even drop a pallet on him while he’s tugging at their sleeve. This limits you a bit at loops, so try sending the dog around the side rather than through the middle when possible.
While you can initiate a second charge (or "redirect") after sending the dog out, it is very tricky to actually hit survivors with it, and I would only recommend doing so if the survivor has very little room to maneuver, such as in a tight hallway, and I would always recommend leading the target, as Snug is surprisingly slow.
You can send your dog to generators and exit gates while in search mode. Useful for finding people, but moreso for letting you traverse the map quickly by following your dog. Your Scourge Hook perk will point out generators with the most progress – try to capitalize on that.
Remember that you have an extended lunge off of drops! This can let you get some very cheeky hits.
The straight lines and elevation changes in Midwich make it the best Houndmaster map, unsurprisingly. Note that while I recommend maps, it is fully possible to get any of these adepts on any of the maps, because these adepts are far more dependent on getting a bad team than anything else – for reference, I finally got my Houndmaster adept on Eyrie of Crows. Since her buffs, Houndmaster is pretty solid, offering a mix of detection, mobility, and anti-loop that most killers do not possess. Shame her visual design and lore are still kinda lame, though.
Ghoul Adept

Pros: Insane mobility, free injures, absurd anti-loop, overall unfair killer shut up
Cons: Constant screaming unless you shell out for Rize, bad perks
I am going to give slight credit to Kaneki players, it took me two or three games before I understood the command prompts to use his Kagune Leap. For that reason, play a couple of games with bots or just messing around in public matches with your standard perk array and get familiar with how he works (hold right click to activate ability, left click on available terrain to launch forward.) Then kill everyone. Similar to Nurse, it really is that simple.
Kaneki rivals Blight for raw map mobility, able to cross even the largest maps in seconds with his terrain-utilizing ability. However, he will not get his third leap until you drain a survivor. This is quite easy. Find a survivor, leap near them (or leap to cut them off somehow) and then bring your cursor to their body. An image of an open mouth will appear. Click. They are now deep wounded, you have your full power. Proceed to terrorize everyone else, forever.
The main skill expression of the Ghoul is to use his Leap to put yourself between a fleeing survivor and their window or pallet. So after you are done draining that helpless Kate, pull yourself in front of her, and then pull yourself between the pallet and the survivor. You can now cancel your power (CTRL on PC) and M1 within a second or two. Simple as. The secondary skill expression is to use your power at loops to pull yourself over a pallet, which will both hinder the survivor and shortly put you in M1 range. If they are cheeky and try to hug the pallet to vault back over it, the game auto hits them, same as Wesker. If you are having flashbacks to how Chucky used to work with Scamper, congratulations, you have a better memory than BHVR.
Midwich is honestly a bit too cramped for a killer of this mobility, I would recommend Dead Dawg since I struggle to think of any loops that threaten this dude in that map and he will have an excellent view of what is going on at all times. Haddonfield has become shockingly killer-favored since its last rework, but I am revoking your gold star if you send survivors to Haddonfield while playing as the Ghoul. ♥♥♥♥ off.
Your perks are worthless but it does not matter.
Animatronic Adept

Pros: Solid map mobility and stealth, nasty chase ability, good info perk
Cons: Two perks are useless, skill curve on power, if you fall behind the map mobility is useless
Well, he's finally here, and he brings a little bit of everything. Phantom Fright will grant you a lot of free information as you wander around the map - it's not something you can control, so just keep your head on a swivel if you hear a scream, since that means someone's aura is now revealed. Aside from that, kick a gen if you like to activate Help Wanted, but it's not a big deal if you don't. Help Wanted speeds up chases where you already got a hit, which is pretty pathetic compared to Machine Learning.
Springtrap has a pretty good reach for pulling his axe out of peoples' backs for a special grab. Bear in mind they can still Dead Hard or drop a pallet, so lunge or delay your hit/grab as necessary. You cannot cross map with your fire axe, so keep your tosses to short and medium range. If you have a choice between M1 or M2 at close range, try for the M2, since the recovery afterwards is much shorter, and you will move faster while you are recovering. If in an open area, it is not hard to throw the axe and catch up to grab before they can get anywhere, especially if they attempted something ill-advised like a spin.
Your doors grant you stealth. If you are using the Glitchtrap cosmetic your steps will be pretty silent, but otherwise you will have great clunking footsteps, so the lack of aura will only help your approach to an extent. Frequently check gens you know are being worked on, but also consider picking a further away door to make a stealthy flanking approach from a direction they are not expecting. Most survivors will keep their eyes glued to the closest security door while working on a generator, so coming in from another direction can help.
Your doors are great for keeping on top of generators and maintaining pressure but if you start to fall behind it becomes very difficult to find the time to reach a door to cross the map and initiate stealth. That's typically an indication you are losing - keep your chases short, and if you are taking too much time early in the match to down your first survivor, try finding someone else. Springtrap is pretty strong in chase, so weak links should disintegrate if you focus on them.
Finally, you are a 4.4 (110%) killer at base, only becoming a 4.6 (115%) after throwing your axe. If you are going to chase someone down in a M1, considering ditching your axe to get a speed boost - Foxy's Hook can help with this. It also gives you some detection briefly, which can help find which direction a survivor is moving. Overall this should not be too tough of an Adept once you are familiar with how his axe tosses - this is a strong killer with a very versatile basekit. And to any new DBD players from the FNAF fanbase reading this, welcome. Try not to take anything too personally. This community is lovely when they're not actually playing against each other.
Krasue Adept

Pros: Three good perks, good mobility, high chase lethality, survivors have PTSD and will DC
Cons: Tough to get the hang of, provides survivors with counterplay if played improperly
This is one clunky-feeling killer, but damn is she relentless if played properly, and her Adept is among one of the more painless once you understand how she works. Like most of the more complex killers, I recommend playing a few regular matches with her using meta perks and gaining a grasp on how she operates. In normal form she is a standard M1 killer, and her projectile is fast moving and can "splatter" if fired against a solid object. Shooting at people directly works but takes accuracy. If they're juking, instead aim at a nearby wall/tree/pallet and watch how the projectile goes everywhere and infects them. A comparison - think of it like clown's bottles. Throwing them up high or at a surface can result in a much wider surface area and catch them in its radius.
Either way, once they are infected they can now take damage from the Head Form's M1. The Head Form has an extended lunge but doesn't corner very well, making it tricky to use at short loops. It vaults pallets instead of breaking them, but you're not really equipped to take advantage of this in the Adept. There is also a lengthy cooldown after whiffing your M1, however the cooldown coming off of the Headlong Flight (your mobility M2) is very short, so survivors cannot hold W against you. If you hit an uninfected survivor with your M1, you will partially infect them and deal no damage, so skilled teams will try to bodyblock. You are advised to leave Head Form immediately if this occurs and resume spitting on and slashing at them. Note that *every time* you go into Head Form, you produce a mushroom that cleanses infection, so you cannot spam the form and expect good results. Use it expediently, and try to infect as many people as possible in base form before swapping.
Your perks are surprisingly helpful. Your Hex perk will not survive the match, but it substantially reduces your profile and provides information on a survivor's location, which only gets more useful as the match goes on. Getting stealth and info on one perk in an Adept is rare. Wandering Eye will occasionally provide valuable information but otherwise sits in the background doing nothing. Ravenous, however, can be game-changing if set up properly. Prioritize finding healthy survivors once it triggers and keep it in mind until it does. I don't believe your Head's M1 is affected by exposed (someone correct me if I am wrong) so stick to base form if chasing an exposed healthy survivor.
Once you understand the Krasue's rhythm she is a monster, but there is a learning curve and coordinated teams will absolutely frustrate you. This is bordering on a 3 star difficulty, but the raw strength of her perks and the insane mobility of Head Mode make her substantially easier than most other Adepts. This killer is an acquired taste, and survivor will hate you, but this is actually a fun Adept. Have a good time!
Adept First

Pros: Absurd snowball potential, absurd chase potential, strongest perk setup in the game
Cons: Slight learning curve, suffers on maps with line of sight blockers
Your biggest weakness is people making distance against you. There are (for now) addons to help manage this while coming out of Undergate, so use those if they still exist. Otherwise, The First uses the same skillset honed by Pinhead and Nurse players – aim well, predict survivor movements, and know when to M1. The last skill may not seem that important, but I (and other survivor players) have thrown Henry players off by vaulting into them or otherwise closing the gap while they are aiming and this can throw you off, so don’t be afraid to just smack them if you have already taken a health state.
Your perk setup is obscene, incorporating strong information and slowdown. Take advantage of Turn Back the Clock whenever possible – if it’s up, use it. Ten percent is justifiable using on any generator on any percentage because it’s big but not too big – the main thing is to keep generators regressing. Your Undergate ability is for map traversal and should realistically only be used in chase if it is up and someone has dropped a strong pallet on you and made distance – and even then I would still recommend breaking chase with that survivor and find someone weaker.
If a survivor has four Worldbreaker tokens (their portrait is entirely red) you will trigger Worldbreaker every time you hit them, and if they are at two hooks and injured while you are in Worldbreaker, it will trigger a mini-mori. I highly encourage tunneling survivors in this position, since Decisive Strike will not trigger if you just, you know, snap their neck, and it’s so fast you can initiate it and pursue a nearby survivor with ease.
Note that Henry Creel has been badly overexposed due to his release, so survivors are pretty good at playing against him now. Many will outright DC (and bots suck against him) which is an upside, but keep an eye out for people faking pallets and windows – they will run straight at them in chase, and then veer off at the last second. Wait for that and hit them while they are trying to veer off. This is not a hard Adept – the perks and killer are both very strong – so feel free to attempt it right off the bat after dumping some bloodpoints into it. I’d wish you luck, but I don’t think you need any for this one.
Acknowledgements
People who point out errors or make suggestions will be put here. For now, I just want to thank:
Thanks to the Dead By Daylight Wiki folks for maintaining up to date icons and info on achievements. I pulled a lot of these images from there. Very convenient. They do wonderful work.
Its__Sun, PewienCzlowiek, Yuriko, and VentingSylarTTV for pointing out errors, making suggestions, and letting me know when achievements are unbugged. Thanks to Turk Turkleton for some advice on a troublesome Chucky achievement, which I have quoted. Thanks to Brickhammer04 for pointing out a discrepancy in the Ever Vigilant achievement section. Thanks to Skaraok for ongoing advice and Hex: Nancy’s Face for reminding me to replace some achievements. Thanks to Pringle Dingle for providing information on Devoted Caretaker. Thanks to ORA ORA ORA for feedback on the Nicolas Cage adept.