Resident Evil 9: Requiem – 100% Completion Guide
 SuperBrat12
(362 ratings)
Feb 27 @ 5:58am24,4541,004
AchievementsCharactersClassesCo-opCraftingGame ModesGameplay BasicsLootMaps or LevelsModding or ConfigurationSecretsStory or LoreTradingWalkthroughsWeaponsWorkshop
About This Guide
⚠️ SPOILER WARNING ⚠️
This is a complete Steam-only 100% achievement guide for Resident Evil Requiem.This guide contains heavy spoilers for the story, characters, and ending of Resident Evil 9: Requiem. Proceed at your own risk!
This guide:
✔ Follows Steam achievement order
✔ Is structured by Chapter Missions
✔ Explains when to unlock each achievement
✔ Prevents missables
Recommended First Playthrough:
Difficulty: Normal (Modern)
Why:
- Unlimited saves
- Learn enemy placements
- Unlock Easy completion automatically
- Prepare for harder difficulty achievements later
Do NOT attempt:
- No-heal run
- Speedrun
- Minimalism run
- Those come later.
Category
Description
Number of Achievements
Story Progression
Unlocked naturally by completing chapters and story bosses
11
Difficulty & Speed
Completion ranks (Rookie to Remarkable) and Speed Demon
5
Collectibles
All Files, Safes, Mr. Raccoons, and BSAA containers
13
Challenge Runs
No-heal, Minimalism, 200k Credits, and Bloodlust
8
Optional / Combat
Special kills, parries, crafting, and weapon-specific tasks
12
Total
All official Steam achievements in the game
49
Chapter 1 - Wrenwood Outbreak
Icon
Achievement & Description
Strategy / How to Unlock

Déjà vu
Encounter an outbreak in Wrenwood.
Type: Story-Related
Unlocks automatically after finishing Leon’s first story section in the prologue. Cannot be missed.
Unlocks automatically after finishing Leon’s first story section in the prologue. Cannot be missed.

Untouchable
Parry an enemy attack.
Location: First street combat section.
As Leon, with the combat axe, press Space (or your Parry bind) just before a zombie’s melee attack hits you.
Best spot: Narrow alley encounter near the burning vehicle.
As Leon, with the combat axe, press Space (or your Parry bind) just before a zombie’s melee attack hits you.
Best spot: Narrow alley encounter near the burning vehicle.

Can I Borrow This?
Throw a weapon dropped by an enemy.
Location: Prologue (Wrenwood).
1. Kill an infected carrying a pipe or melee weapon.
2. Press F to pick up and automatically throw it.
3. It must deal damage to another enemy to unlock. This can be done when ever but i recommend to do it in the start to just get over with it
1. Kill an infected carrying a pipe or melee weapon.
2. Press F to pick up and automatically throw it.
3. It must deal damage to another enemy to unlock. This can be done when ever but i recommend to do it in the start to just get over with it

The Ol’ Fashioned Way
Use an ink ribbon to save at a typewriter.
Requirement: Standard (Classic) or Insanity Difficulty.
Ink Ribbons do not exist on Casual. Find a ribbon (round black icon) and use it at any typewriter save point to unlock.
Ink Ribbons do not exist on Casual. Find a ribbon (round black icon) and use it at any typewriter save point to unlock.
Chapter 2 - Rhodes Hill Care Center
Icon
Achievement & Description
Strategy / How to Unlock

The Hunt Begins
Destroy one Mr. Raccoon figure
Location: Rehabilitation Ward.
Listen for a ticking sound and shoot the small statue. This is the first of 25 collectibles.
Listen for a ticking sound and shoot the small statue. This is the first of 25 collectibles.

Out of Sight, Out of Mind
Store an item in the item box as Grace.
Do this immediately when you find your first storage box. Simply deposit any item to trigger the unlock.

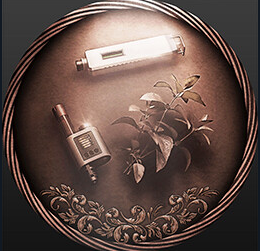
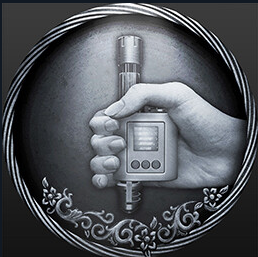
Fatal dose
Defeat a zombie using the hemolytic injector.
Location: Hallway outside the Lab.
After obtaining the injector, weaken a zombie and use the injector as the killing blow.
After obtaining the injector, weaken a zombie and use the injector as the killing blow.

Science!
Unlock a crafting recipe using analysis.
Interact with the analysis station inside the Lab to unlock your first recipe.
The power of blood
Craft an item using the blood collector.
Collect infected microsamples and craft any blood-based item in the crafting menu.

Chop Chop
Defeat three zombies with a hatchet finishing attack.
Character: Leon
Stagger an enemy and trigger the melee finisher. Repeat 3 times (best done before the Chef boss).
Stagger an enemy and trigger the melee finisher. Repeat 3 times (best done before the Chef boss).
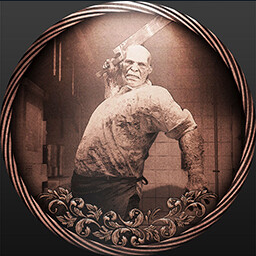
Order Up!
Defeat the Chef.
Boss Strategy:
- Shoot legs to stagger.
- Avoid rage charges.
- Grenade during stagger.

Descent Into Darkness
Reach the basement.
Story progression. Unlocks automatically as you proceed to the lower levels.

Like Mother, Like Daughter
Use a master key (lockpick) to open a drawer.
Locate a lockpick and use it on any locked drawer within the Care Center offices.

Harsh reality
Get out of the medical center.
Story progression. Unlocks upon your final escape from the medical facility.
Achievement / ID
Location Image
Notes & Strategy
The Hunt Begins First Mr. Raccoon
(Raccoon #1)
[/previewimg]
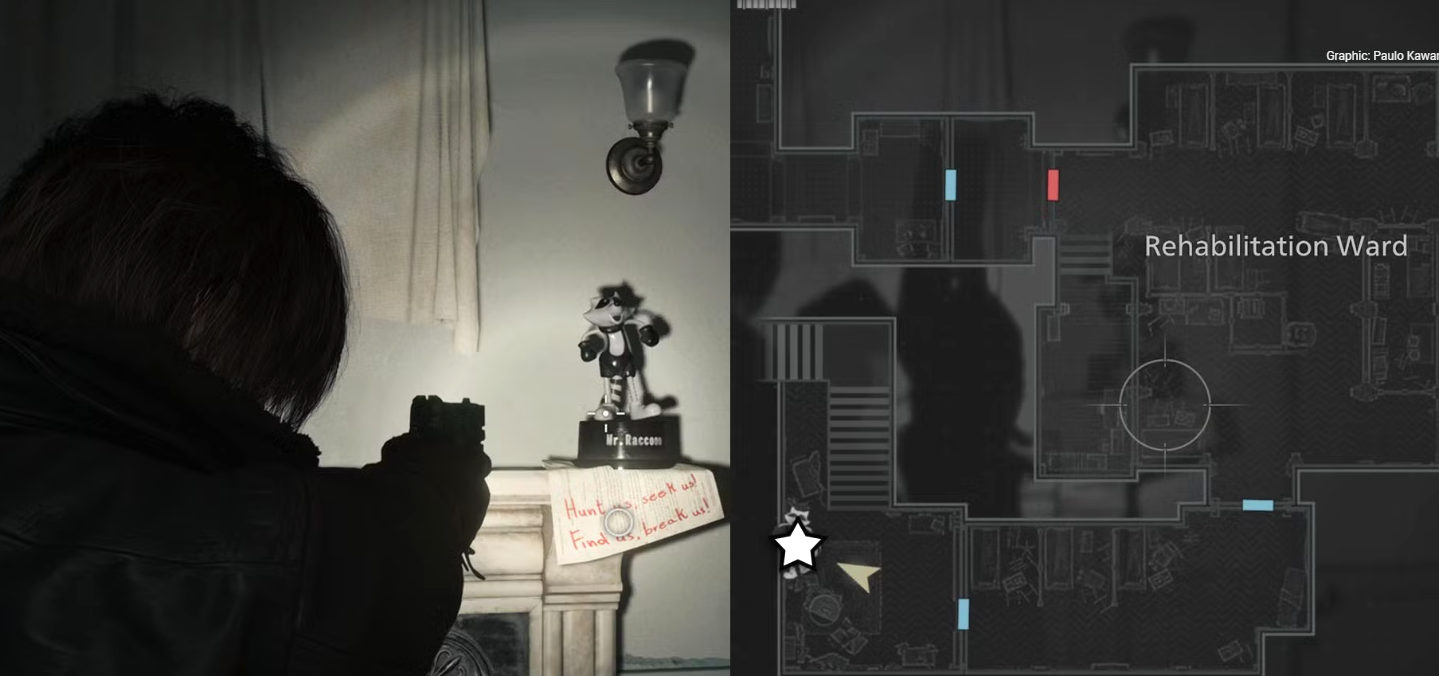
Rehabilitation Ward: Destroy your first figure to unlock this achievement.
Progresses "You Little Rascal!"
Progresses "You Little Rascal!"
🦝 #2 – East Wing Reception
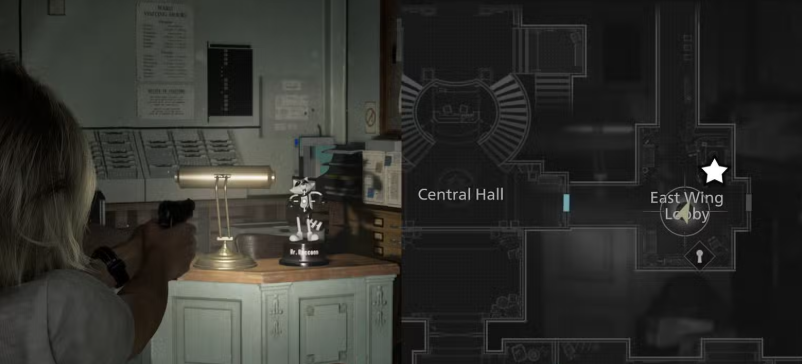
Grace: Found on the reception desk in the East Wing lobby.
🦝 #3 – East Wing Stairs
Grace: On the landing area near the East Wing staircase.
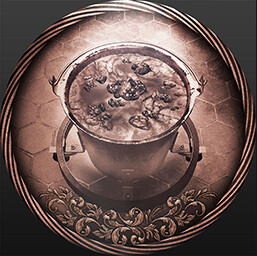
🦝 #4 – Kitchenette
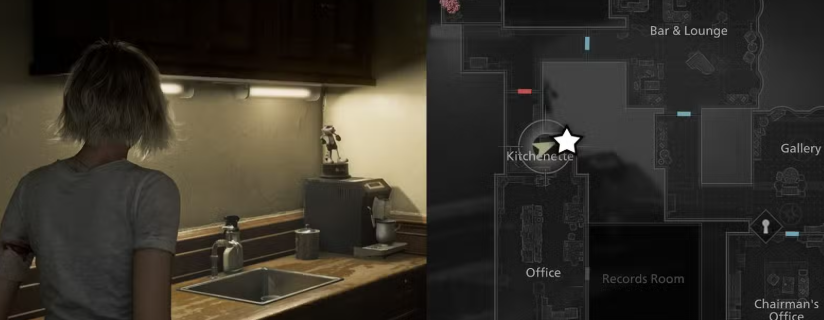
Grace (2F): Located on top of the coffee pot in the kitchen area.
🦝 #5 – Medication Room
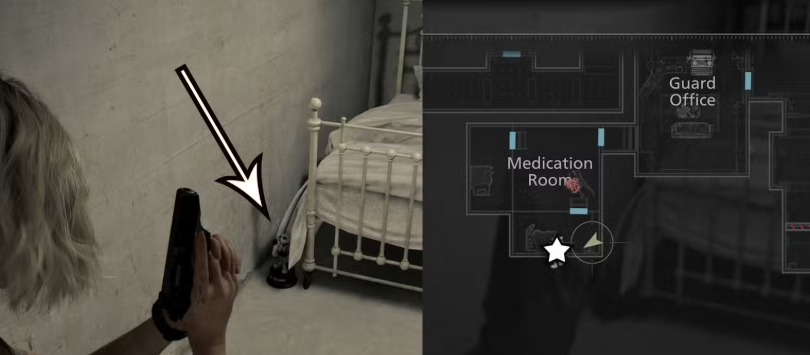
⚠️ MISSABLE: Requires Wristband Lv 3. Open the cell next to Emily’s as Grace or it stays locked.
🦝 #6 – Records Room
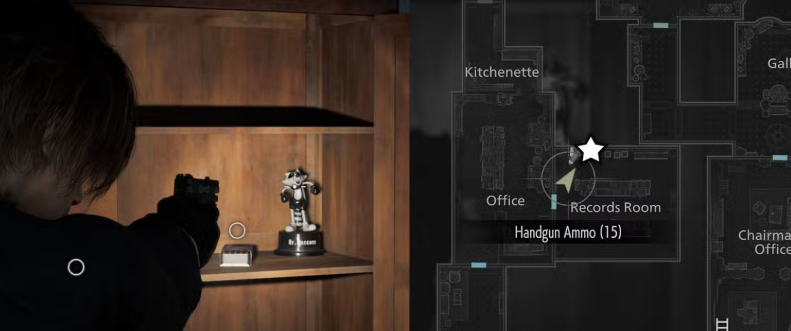
Leon Only: Break the warped cabinet door with the hatchet. Grace cannot get this.
🦝 #7 – Basement Workshop
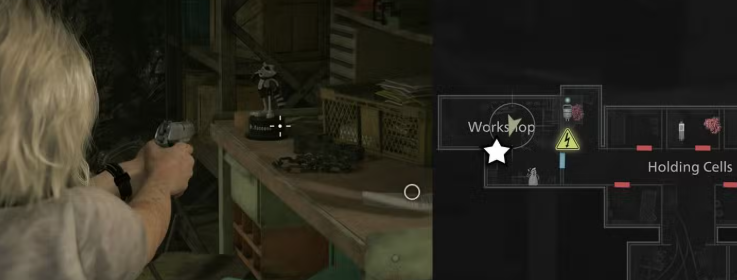
Grace: On the desk. Tip: Use the knife to avoid waking zombies.
🦝 #8 – Basement Bunkroom
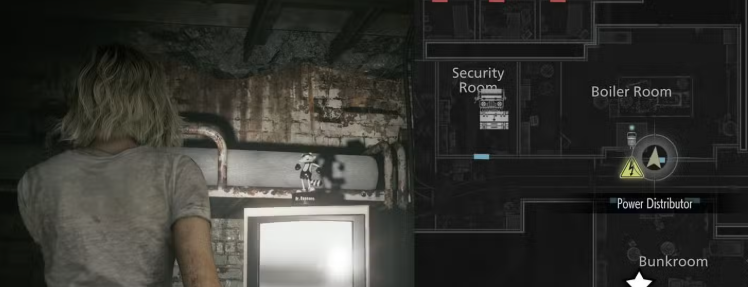
Grace: Backtrack after getting the joint plug. It's on top of the TV.
🦝 #9 – Private Lab
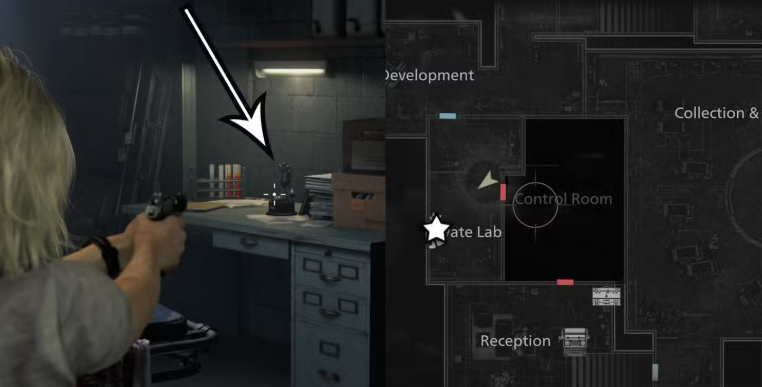
Grace: In the monitor room (Helicopter Key area). Check the shelves.
🦝 #10 – Chapel Yard
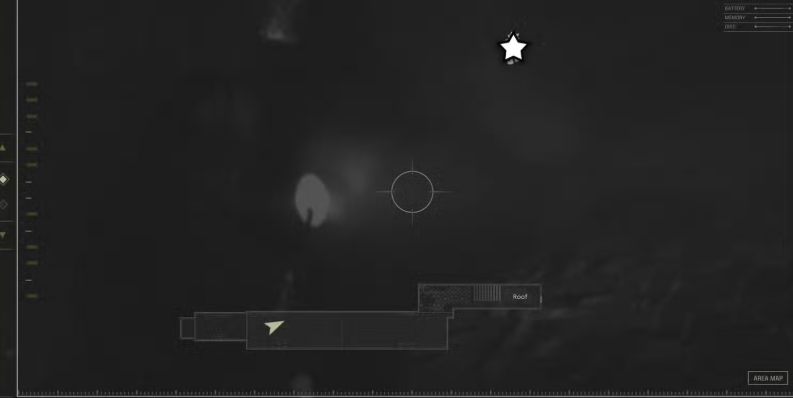
Leon (Sniper): Look through the broken attic window at the lamppost. Must use Rifle.
Care Center 1st Floor Care Center 2nd Floor
 Care Center Basement
 Care Center Courtyard Facility
 Care Center Courtyard Rooftop
Chapter 3 - Raccoon City Streets
Icon
Achievement & Description
Strategy / How to Unlock

Internal Dispute
Make a zombie attack another zombie.
Location: Narrow subway corridors.
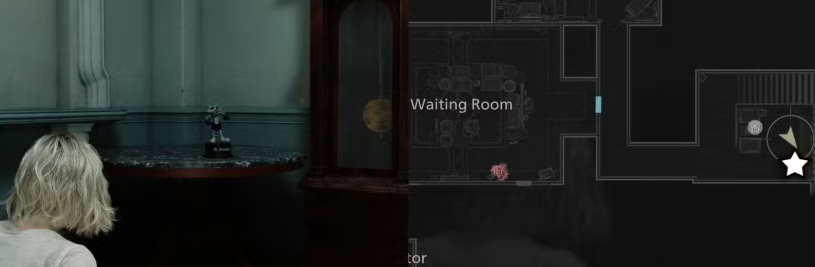
Stand between two zombies and dodge so one hits the other, or throw a bottle to cluster them. Must deal damage to count. I would recommend to do this one in Rhode Hills in the Waiting room where the zombie is that is walking with the blood bag.
Stand between two zombies and dodge so one hits the other, or throw a bottle to cluster them. Must deal damage to count. I would recommend to do this one in Rhode Hills in the Waiting room where the zombie is that is walking with the blood bag.

Retail therapy
Buy an item from the supply box.
Simply purchase any item from a supply box once you reach the city streets.
Grace and Goliath
Defeat Chunk while playing as Grace.
Strategy: Fight near a doorway. Bait his heavy slam, step through the door to reset him, and counterattack during his recovery.

Tailor Made
Upgrade a weapon.
At a supply locker, open the "Tune Up" menu and purchase any upgrade for your weapons.

Road Rage
Interrupt one of Victor’s attacks on the highway.
During the highway sequence, deal enough damage or use an explosive to stagger Victor during one of his wind-up attacks.
Blood! More blood!
Use 300 microsamples of infected blood.
Accumulated by crafting. If it hasn't popped, craft enhanced ammo repeatedly until you hit the 300 mark.

Bang For Your Buck
Kill 3+ enemies with one shot from the Requiem.
Setup: Line up 3 zombies in a narrow alley or subway hall. Fully charge the shot and fire through all of them. All 3 must die.

Deadly Duo
Defeat the two Singers.
Boss Strategy: Shared health pool. Keep your distance, interrupt their screams, and use grenades when they group up.

Seasoned Pro
Kill 300 enemies.
Will likely unlock naturally through combat by the end of Mission 3 or start of Mission 4.
🦝 Mr. Raccoon Locations (#11-20)
ID & Location
Screenshot(s)
Details & Strategy
🦝 #11 – Café Oasis
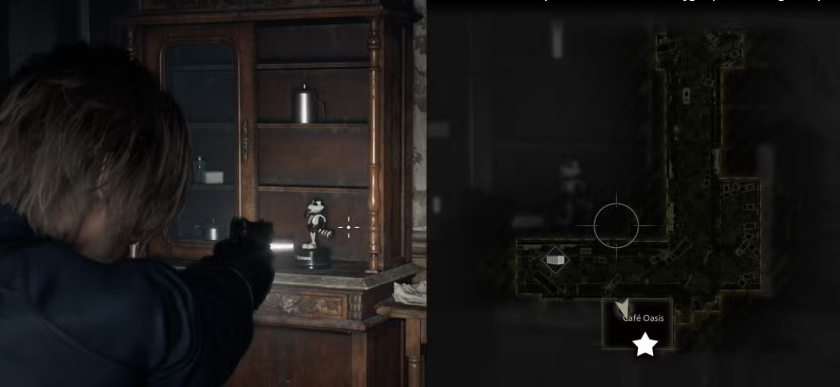
Leon: Located directly next to The Applegate Hotel. Head inside the café and check the cabinet.
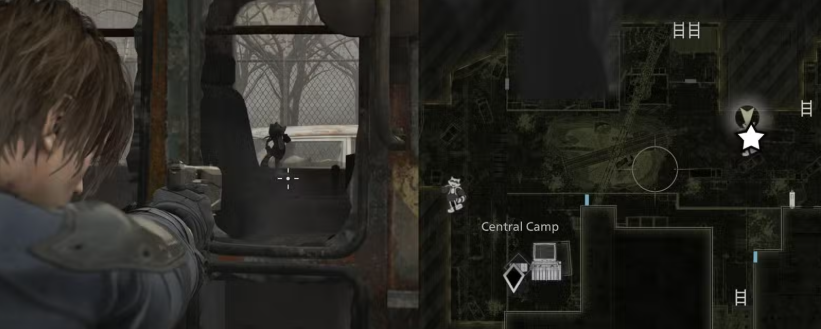
🦝 #12 – Logistics Warehouse
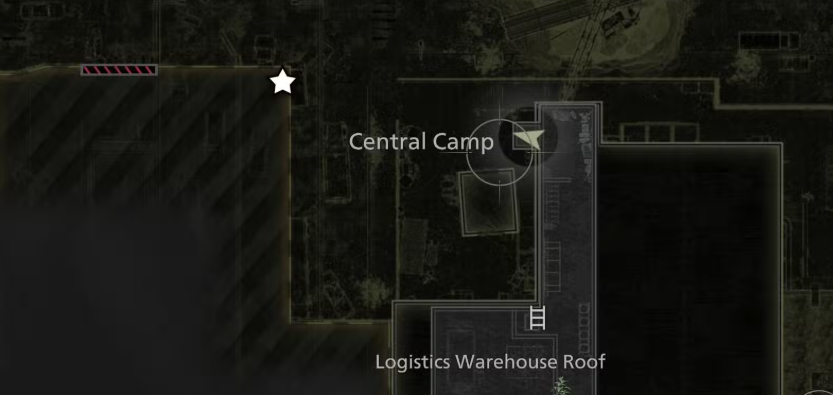
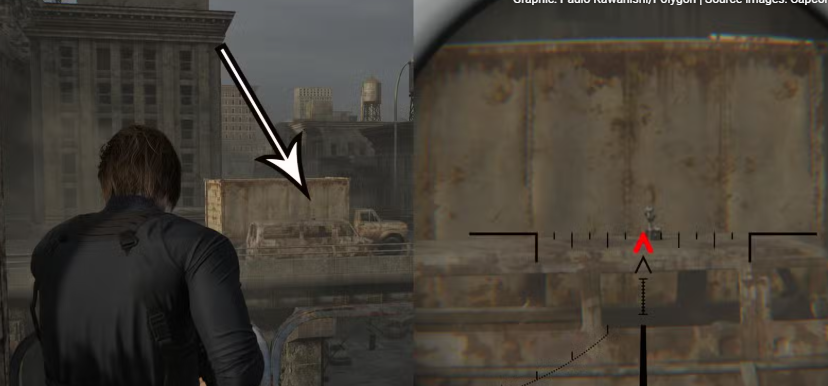
On the west side of the Warehouse roof. Use a Sniper Rifle to look at the bridge west of Central Camp; it's on top of a car.
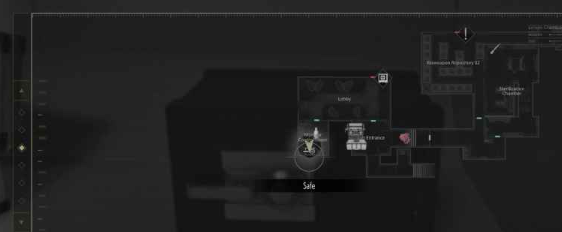
🦝 #13 – Underground Parking
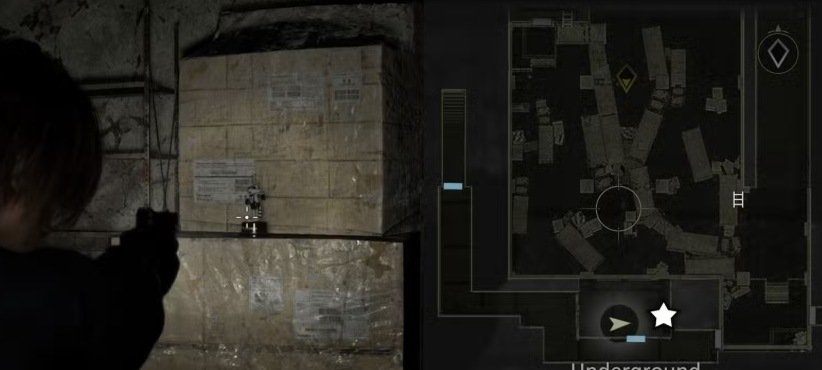
Found inside a small room in the Parking Garage area, sitting on top of a stack of boxes.
🦝 #14 – Cedarbrook Apartments
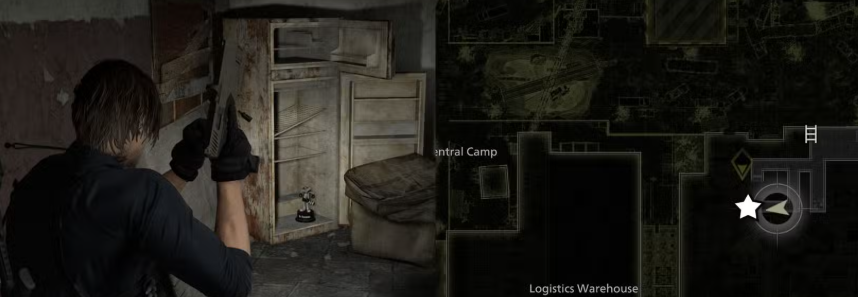
On the top floor (below the roof), enter the doorway to the right. Check the southwestern corner inside an open refrigerator.
🦝 #15 – Ruined Bus
Located outside Cedarbrook Apartments. Look through the driver's seat window of the ruined bus.
🦝 #16 – Gas Station
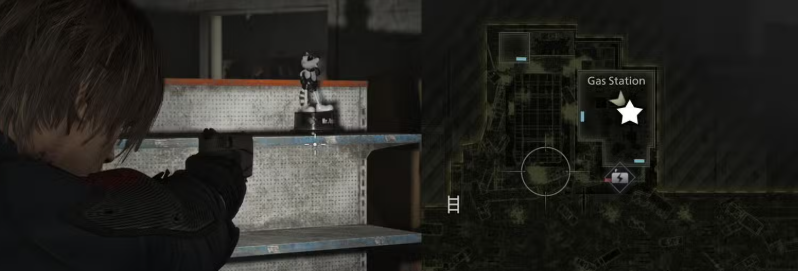
Inside the main Gas Station building. Look to the right to find the statue on the top shelf.
🦝 #17 – Sewer Entrance Pipe
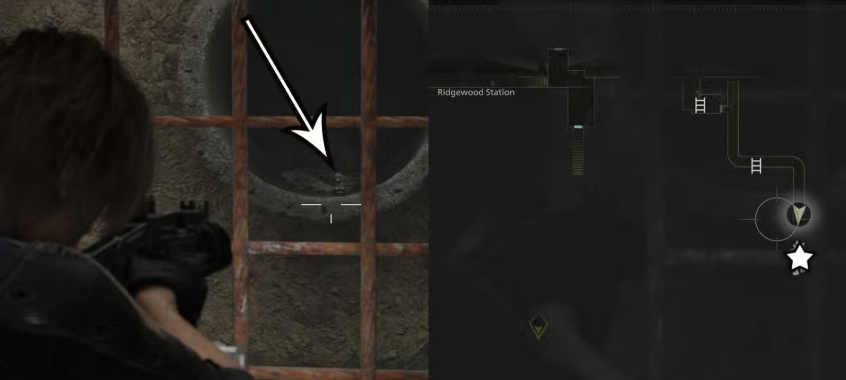
Enter the sewers via the generator hatch. Follow the path to the end (near the briefcase) and look at the pipe across from you.
🦝 #18 – Subway Car
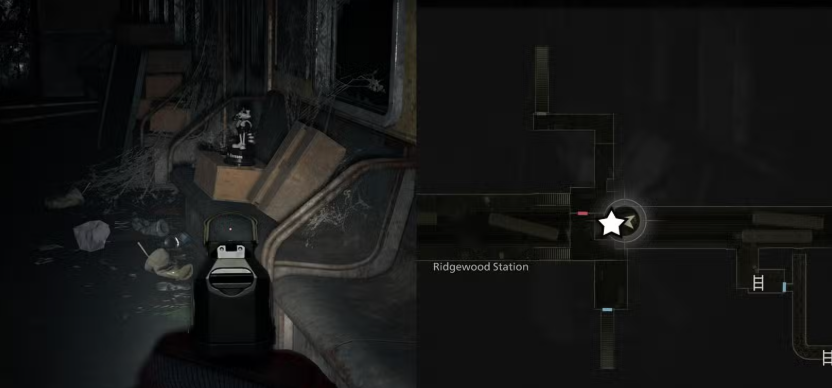
Found inside a subway car while traveling west through the sewers toward Ridgewood Station.
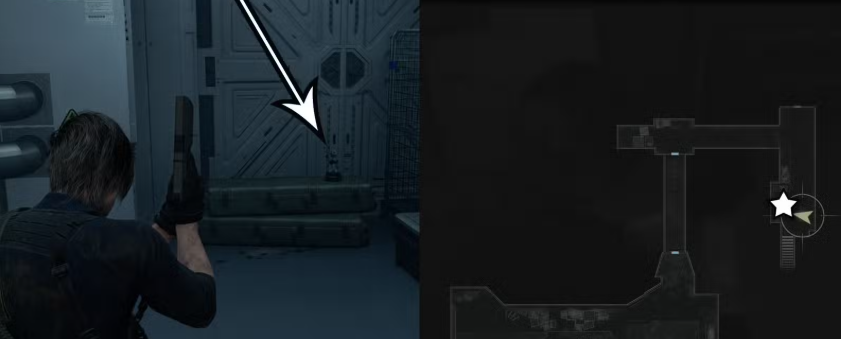
🦝 #19 – Willis Tower
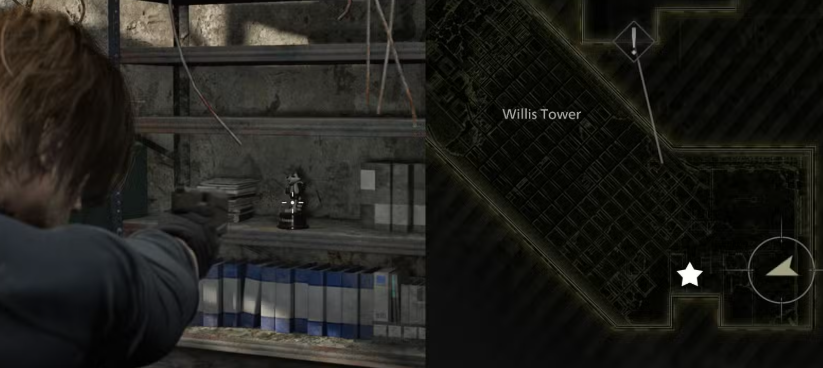
After the first flight of stairs, turn right twice. It's sitting on a shelf.
🦝 #20 – Post-Motorcycle / RPD
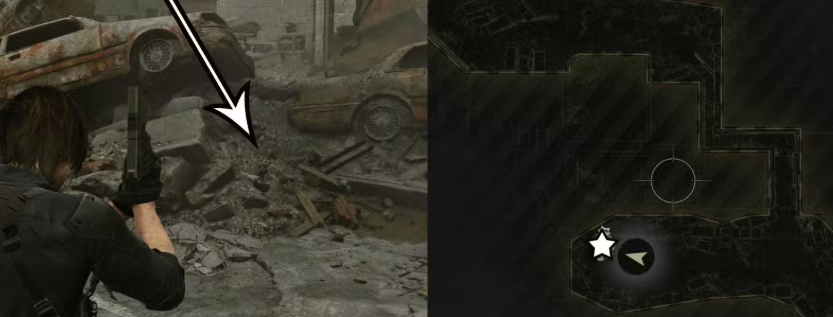
After the motorcycle sequence, head west. The statue is sitting beside a few broken cars.
East Raccoon City Ground East Raccoon City Lower Level
 East Raccoon City 4th Floor
Chapter 4 - Umbrella Underground Facility
Icon
Achievement & Description
Unlock Condition / Strategy

You Little Rascal!
Destroy all Mr. Raccoon figures.
Unlocks immediately after destroying the 25th statue (Final Lab Antechamber).

Bring Out The Big Guns
Stun the Girl with Requiem
Story-related; You get the Requiem gun when grace meets Leaon, then when you see the Girl shoot her in the head(Stun) her with the gun

It’s Been a Long Night
Reach the courtyard of the care center
Story-related.
Going down?
Descend on a suspended platform.
Triggered during the descent sequence. Focus on clearing nearby flying threats to ensure a safe landing.

The Hero’s Return
Arrive at the R.P.D.
Story-related. Triggers upon reaching the Police Station entrance.

The Umbrella Legacy
Discover the truth files.
Unlocks during the central archive story cutscene.
The Final Mission
Start exploring the lower levels of ARK.
Story-related.

I Remember That, Too
Defeat the Super Tyrant.
Boss Fight: Keep moving to avoid the instant-kill charge. Aim for the heart and save your heavy ammo for his roar/stagger phase.
Hope and Requiem
Finish the main story.
Congratulations! This unlocks after the final credits begin to roll.
🦝 Mr. Raccoon Locations (#21–25)
ID & Location
Screenshot
Details & Strategy
🦝 #21 – Research Wing
Leon: In the Research Wing Corridor. Look up at the top of the broken server rack before entering the lab doors.
🦝 #22 – Cryogenic Storage
Leon: Located directly behind the containment tank inside the storage room.
🦝 #23 – Security Control
Leon: Found on the upper shelf situated behind the bank of monitors.
🦝 #24 – Elevator Shaft
Leon: After the power outage sequence, check the maintenance ledge within the shaft.
🦝 #25 – Final Antechamber

Grace: On top of the supply crate near the typewriter just before entering the final boss arena.
Raccoon City Center Ground Raccoon City Center 2nd Floor
Menu Achievements
Icon
Achievement & Description
Unlock Condition / Strategy

Model Mania
View all models.
Go to the Bonus Menu. You must purchase the models using Challenge Points earned during your playthroughs, then view them all in the viewer.
Curator
View all sketches.
Similar to models, these are unlocked and viewed through the Bonus Menu using your accumulated Challenge Points.
Challenge Run Achievements
Hardcore Challenges & Difficulty Achievements
Do NOT attempt these on your first run. Focus on learning the game first.Icon
Challenge / Difficulty
Strategy & Tips

Emergency reserve
Beat story without herbs or injectors.
Strategy: Best done on Assisted difficulty. Use save-scumming and prioritize dodging over combat to keep your health high.

Minimalism
No blood collector usage (Grace).
Plan your route carefully. You will have fewer resources, so avoid unnecessary fights and save your best ammo for bosses.

Speed Demon
Speed-based completion.
Memorize puzzle solutions, boss weaknesses, and the most efficient routes for key items. Skip all optional pickups.

Credit Where Credit Is Due
Earn 200,000 Credits.
Accumulated over the course of the game. Loot everything and sell treasures/excess items to the merchant consistently.
Bloodlust
It's for collecting 5000 blood samples.
Don't run past enemies. Clear out every room and backtrack to areas where enemies respawn to pad your numbers. Collect as much blood samples as possible.

Rookie Agent
Complete on Easy or higher.
Base completion achievement.
Rising Agent
Complete on Normal (Modern) or higher.
Modern difficulty features standard checkpoints and auto-saves.
Resolute Agent
Complete on Normal (Classic) or higher.
Classic difficulty features limited saves and tougher resource management.

Remarkable Agent
Complete in Madness mode.
The ultimate challenge. Enemies are faster, hit harder, and resources are extremely scarce.
Completion & Collection Achievements
These are profile-based and may unlock during or after your first run.
Read all documents in the main story.
Cut a Licker B2’s tongue with a hatchet.
Craft every possible item (Leon).
Defeat all the Plant 43 seedlings.
Open every safe in the game.
Open all BSAA containers.
Icon
Achievement & Description
Unlock Condition / Strategy
Case Closed
Read all documents in the main story.
Every file must be picked up and opened in your inventory. If you miss one, you will need to replay that specific section to register it.
Cat Got Your Tongue?
Cut a Licker B2’s tongue with a hatchet.
Time your melee strike as the Licker launches its tongue attack. Best attempted on lower difficulties to minimize damage.
Master Craftsman
Craft every possible item (Leon).
Ensure you combine every type of gunpowder and resource available to Leon at least once across your playthrough.
Not Today, Buds!
Defeat all the Plant 43 seedlings.
Location: Greenhouse section. Use fire-based weapons and ensure you check every side room; do not skip any pods.
A safe is not a safe place
Open every safe in the game.
Locate and unlock all dial safes using the codes found in nearby documents or environment clues.
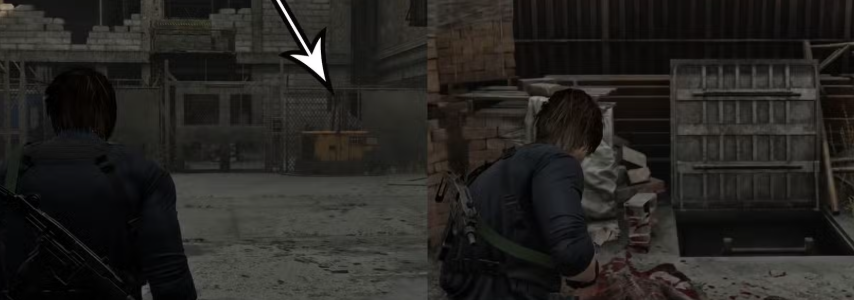
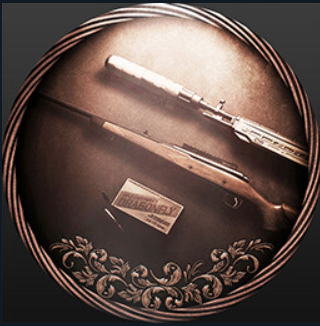
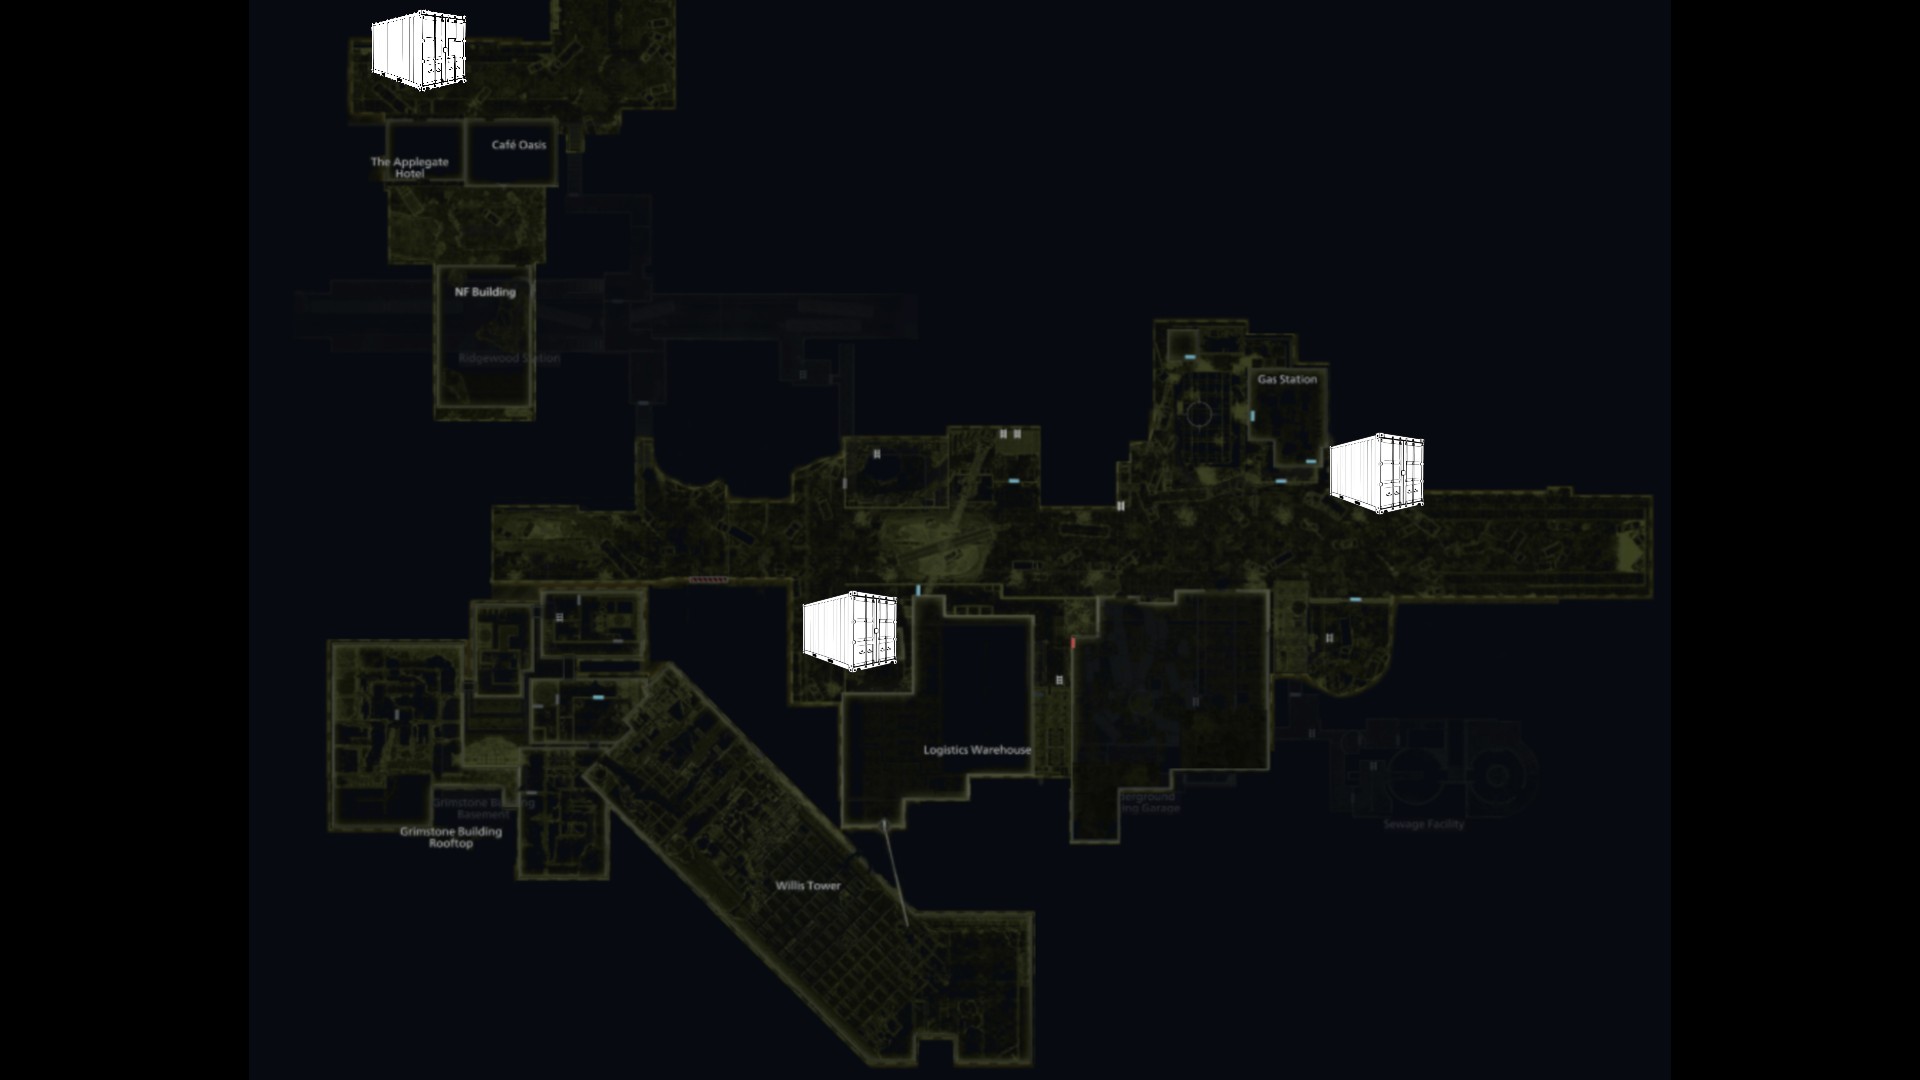
Crate Expectations
Open all BSAA containers.
Leon Only: You must open all three in a single playthrough using the story-related BSAA Key.
- []#1: Near Café Oasis/Applegate Hotel. Unlock the gate near the train station.[]#2: Inside the main supply area at Central Camp.
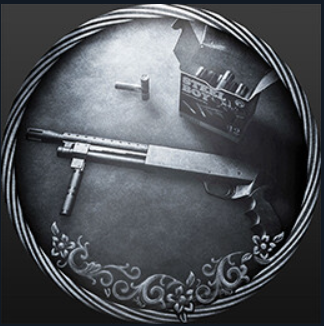
- #3: Behind the Gas Station. Climb the ladder behind the large truck and drop down. (Contains a Sniper Rifle).
BSAA Container Map Reference
All Safe Codes & Locations
Chapter 1: Care Center (Rhodes Hill) – Grace
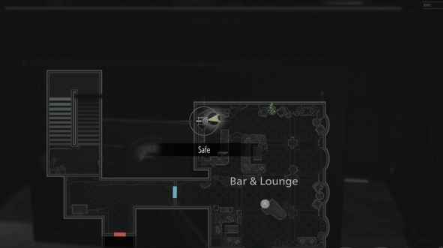
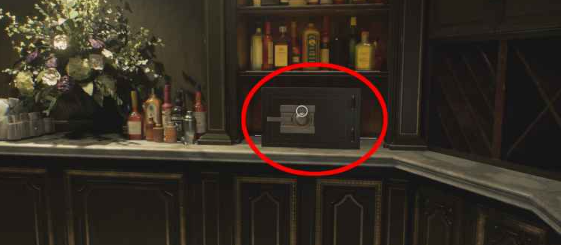
Safe #1 – Bar & Lounge
- Location: 2nd Floor Bar & Lounge, on the bar counter behind enemies. Story walkthrough forces you through this room (singing zombie in white dress).
- Contents: 3 Antique Coins.
- Combination (Casual): Left 10 → Right 80 → Left 30
- Combination (Insanity): Right 20 → Left 50 → Right 30
- How to find normally: File: Bar & Lounge Safe Code
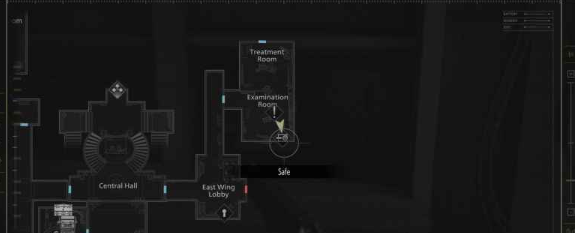
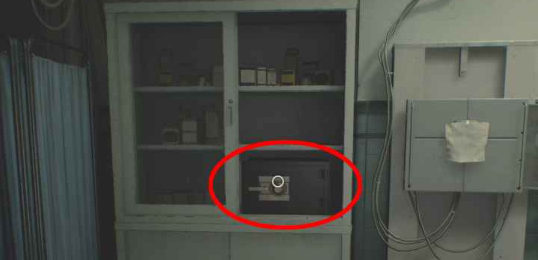
Safe #2 – Examination Room
- Location: After using the Keycard in Central Hall to open the East Wing. Safe is inside the cabinet in the corner.
- Contents: 3 Antique Coins.
- Combination (Casual): Right 30 → Left 10 → Right 50
- Combination (Insanity): Left 50 → Right 30 → Left 90
- How to find normally: File: Examination Room Safe Code
Chapter 2: Care Center Basement (Rhodes Hill) – Grace
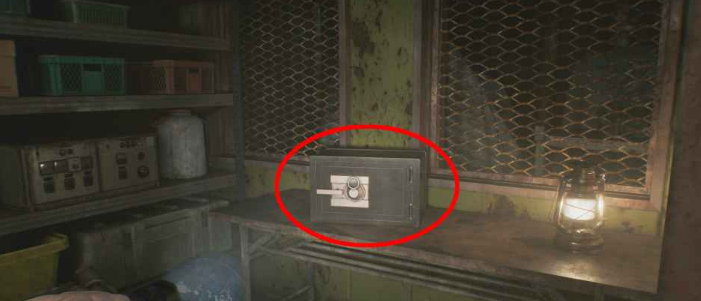
Safe #3 – Furnace Room
- Location: Insert Joint Plug in Furnace Room door (central room). Safe is in side office on the right.
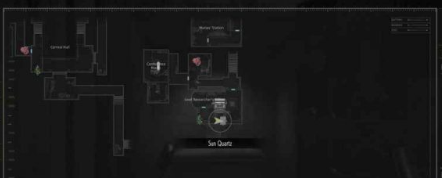
- Contents: Document marking Mr. Raccoon locations on the map.
- Combination (Casual): Right 60 → Left 40 → Right 80
- Combination (Insanity): Left 70 → Right 50 → Left 20
- How to find normally: File: Basement Safe Code (found by Leon earlier in Attic)

Chapter 3: ARK – Grace
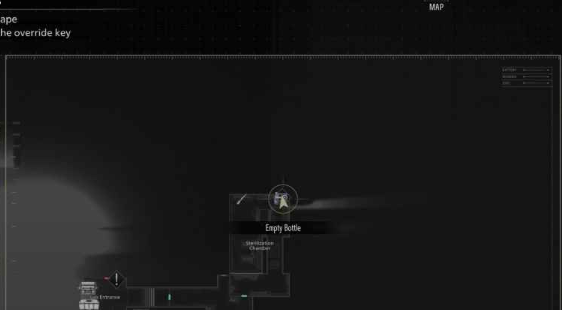
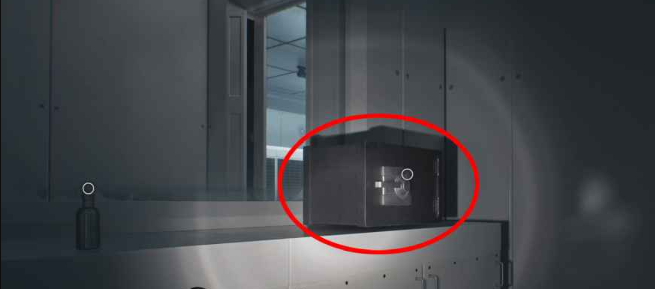
Safe #4 – Sterilization Chamber
- Location: After returning to Grace in ARK, reach the typewriter save point, then go through the open right door. Safe is on the window ledge in front. Avoid Licker enemy.
- Contents: Key supplies for Grace’s progression.
- Combination (Casual): Right 10 → Left 90 → Right 20
- Combination (Insanity): Left 80 → Right 50 → Left 0
- How to find normally: File: Sterilization Chamber Safe
Safe #5 – Monitor Control Room
- Location: After grabbing Magnetic Key, use it on red door by typewriter upstairs. Enter first green door on left. Safe is near the monitor on the right side.
- Contents: Key progression items / bonus documents.
- Combination (Casual): Left 50 → Right 60 → Left 80
- Combination (Insanity): Right 20 → Left 0 → Right 70
- How to find normally: File: Monitor Control Room Safe

All File Locations & Order Prologue – Wrenwood (Grace → Leon)
Chapter 1: Document Tracker – Wrenwood Hotel
Note: Read the Investigation Report in your inventory as soon as you reach the hotel to ensure it registers.Icon / Preview
Document & Description
Location / How to Acquire
No Image
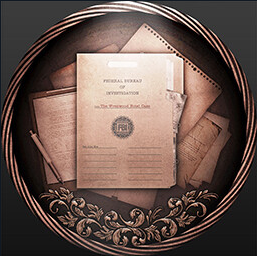
Investigation Report
Auto-acquired: Starts in your inventory. You must Inspect the folder and interact with the photo to "collect" it.
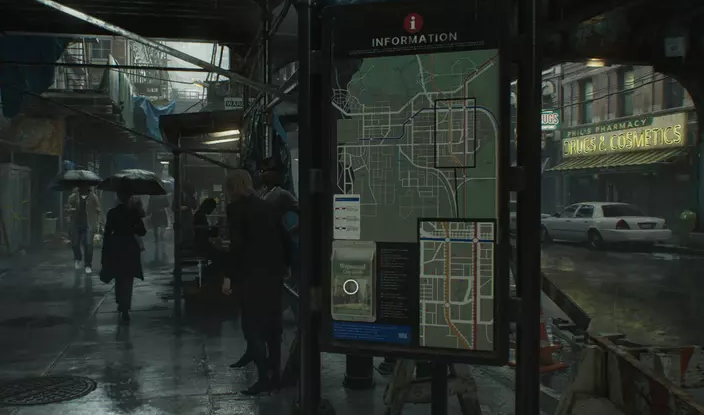
Wrenwood City Guide
Found on the street (near the bus area) before entering the hotel. Look for the city map display.
Notice of Closure
Behind the reception desk in the Office. Look inside the blue drawer.
Hotel Pamphlet
Located in the Hotel Lobby. Check the floor near the base of the main stairs.
No Image
Alyssa’s Journal
Story-related: Acquired automatically through gameplay progression.
No Image
Report on Victor Gideon
Leon Segment: Auto-acquired during the cutscene transition to Leon’s gameplay.
The Wrendwood Hotel First Floor Locations:
The Wrendwood Hotel Second Floor Locations:
All File Locations & Order Rhodes Hill (Grace)
This is a massive list for Chapter 2! I've organized all 25 documents into a clean, scannable table following the exact formatting we used for Chapter 1.
Since you didn't provide specific screenshot IDs for these individual notes yet, I've left the "Icon" column ready for them.
Since you didn't provide specific screenshot IDs for these individual notes yet, I've left the "Icon" column ready for them.
Chapter 2: Document Tracker – Medical Care Center
Note: Some documents are tucked inside containers or require specific items like the Pencil to reveal.Icon
Document Name
Exact Location & Notes
TBD
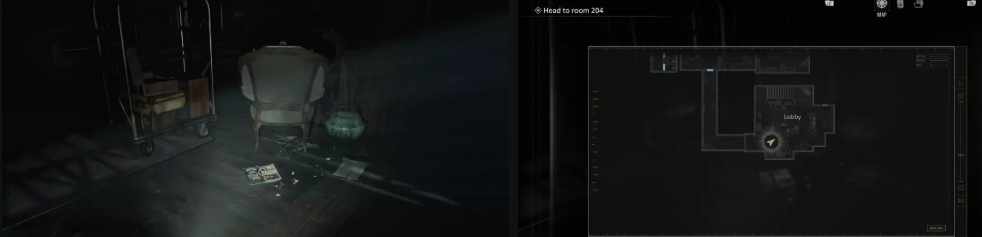
Progress Notes
Room 203, found on a small table.
TBD
Note on Cardboard Box
Room 202, inside the closet after you grab the Lighter.
TBD
Care Center Pamphlet
Guard Office (Safe Room), on the couch table.
TBD
Whiteboard Scrawl
Guard Office (Safe Room), written on the wall whiteboard.
TBD
Folded Note
Gallery 2F West Wing, inspect the lab coat hanging there.
TBD
Copy of an Email to a Manager
Chairman’s Office, inside the cupboard.
TBD
Note to a Chairman
Chairman’s Office, check the trash bin in the backroom.
TBD
Chairman’s Note
Chairman’s Office. Requirement: Use pencil shading to reveal.
TBD
Blood Compound Synthesis
Blood Lab, on a table at the very end of the corridor.
TBD
Safe Replacements
Waiting Room, sitting next to the open safe.
TBD
Lead Researcher’s Picture 1
Lead Researcher’s Office, sitting on the desk.
TBD
Lead Researcher’s Picture 2
Lead Researcher’s Office, in the backroom cupboard.
TBD
Lead Researcher’s Picture 3
Lead Researcher’s Office, framed picture on the desk.
TBD
Lead Researcher’s Message
Lead Researcher’s Office, inside the cupboard.
TBD
Victor’s Journal Entry
Blood Lab, behind the Level 1 wristband door.
TBD
Construction Notice
Custodian’s Office, written on the whiteboard.
TBD
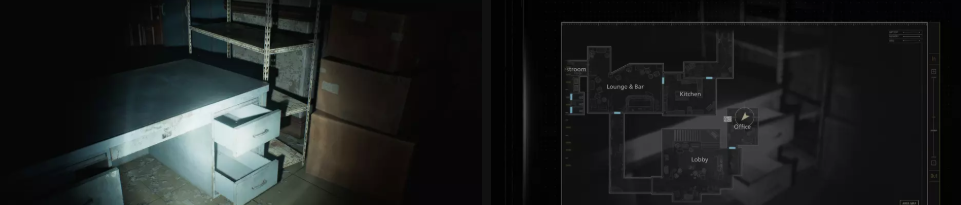
Bar & Lounge Safe Code
Office, on the first desk you encounter.
TBD
Background Check
Office, on the desk in the back right corner.
TBD
Disposal Team Report
Records Room, found inside a cardboard box.
TBD
Examination Room Safe Code
2F East Wing, inside a locker near the Chunk enemy.
TBD
Patient Medical Records
Conference Room (the one with the singing zombie).
TBD
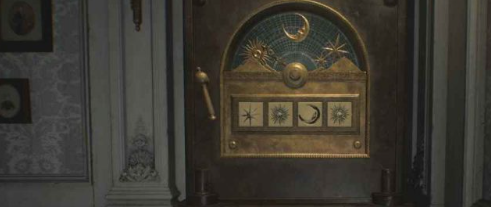
Unlocking the Organ Box
Lead Researcher’s Office, inside the Puzzle Box (Star-Sun-Moon-Sun).
TBD
Spencer’s Research I
Also found inside the Lead Researcher’s Puzzle Box.
TBD
Double Mutation
Isolation Ward, inside a cardboard box.
TBD
Nurse’s Log
Isolation Ward, sitting on the desk.
Care Center 1st Floor
Care Center 2nd Floor
Care Center 3rd Floor

All File Locations & Order Rhodes Hill (Leon)
Icon
Document Name
Exact Location & Notes
TBD
Satiety Suppression Records
Located in the Attic. Look in the back of the room, directly opposite the cupboard.
TBD
Basement Safe Code
Found in the Closet past the Attic. Requirement: You must use the Hatchet to break it open.
TBD
Dishwasher’s Note
Located in the Closet near the Chairman’s Office.
All File Locations & Order Care Center Basement (Grace)
I've added these basement documents to the Chapter 2 collection. These include the automatic story beats and the specific field notes found near the cells and furnace.
Chapter 2: Document Tracker – Medical Care Center (Basement)
Icon
Document Name
Exact Location & Notes
Auto
Special Directive for Raccoon City
Auto-acquired: Obtained during the transition cutscene.
Auto
Report on Raccoon City Syndrome
Auto-acquired: Obtained during the transition cutscene.
TBD
Staff Member’s Last Words
Located in the Tunnel, sitting beside a corpse.
TBD
Operation to Eliminate “The Girl”
Found in the Security Room (the room with the CCTV monitors).
TBD
Unlocking the Cells
Located in the Holding Cells area, posted right above the lever.
TBD
Technician’s Note
Found on a workbench inside the Workshop.
TBD
Security Guard’s Report
Located in the Furnace area, inside the small side office.
Care Center Basement
All File Locations & Order Center Courtyard (Grace)
I've added these final Courtyard documents to the Chapter 2 collection. These cover the critical story revelations found in the VIP Suite and Labs.
Chapter 2: Document Tracker – Medical Care Center (Courtyard)
Icon
Document Name
Exact Location & Notes
TBD
Visitor Record
Located in the VIP Suite, found inside the wooden cupboard.
TBD
Note Regarding Research Results
Located in the VIP Suite, sitting on the desk.
TBD
Spencer’s Research II
Found on the Reception desk in the courtyard facility.
TBD
Subject 170 Record
Located in the Collection & Testing area, sitting on a stretcher.
TBD
Grace Ashcroft Blood Analysis
Found in the Private Lab, on the main desk. Critical lore item.
Care Center Courtyard Surface
Care Center Courtyard Facility
All File Locations & Order Water Treatment Plant (Grace)
Roof Hatch Manual – Storage Bay, next to typewriter.
Water Treatment Plant Storage Bay
All File Locations & Order East Raccoon City (Leon)
- Report on the Raccoon City Incident – Auto on arrival.
- Raccoon City Incident Newspaper – Ground near trash bags.
- Orders for the Engineer Corps – Central Camp, blue BSAA tent.
- Battery Storage Locations – Underground Parking Garage, fuse box.
- Inventory List - Container near Cedarbrook Apartments entrance.
- Engineer Corps Note – Cedarbrook Apartments rooftop, near Yellow Box.
East Raccoon City Ground
East Raccoon City Tower Level
East Raccoon City Tower Level
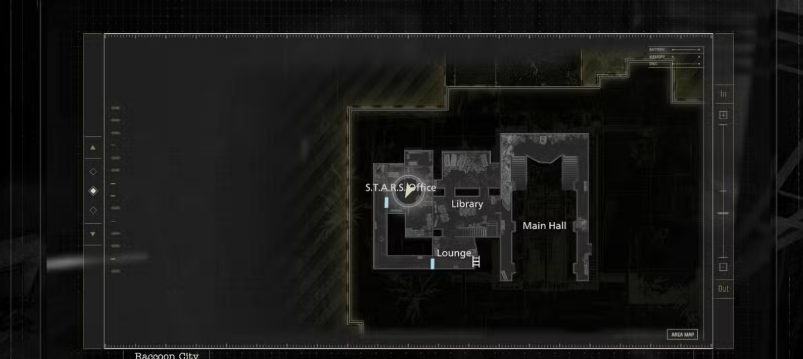
All File Locations & Order Raccoon City Center – RPD (Leon)
- R.P.D Perimeter Report – Main Hall, opposite save point.
- Top Secret Operation – West Office, desk.
- Record of Events – Operations Room chalkboard.
- Scavenger Hunt – Clue 2 – STARS Office, shelf.
- Library Card – STARS Office, side desk.
- Scavenger Hunt – Clue 1 – STARS Office, brown jacket.
- Barry’s To Do List – STARS Office, leftmost desk.
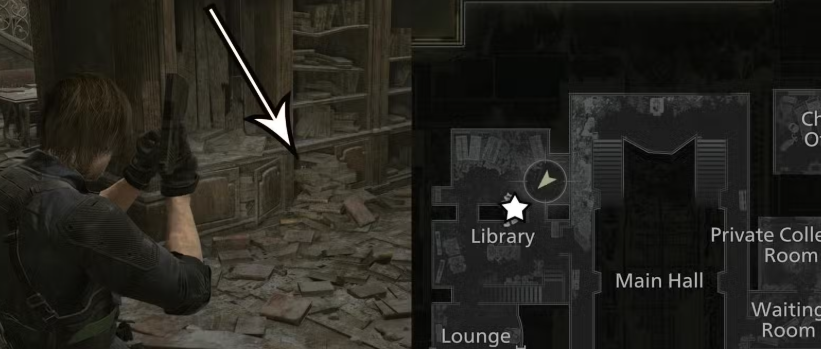
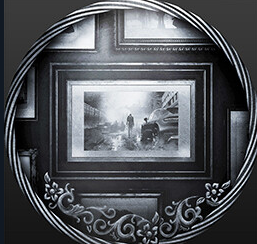
- Photograph – Library, bookshelf; spawns only after all 4 STARS Office files.
Raccoon City Center (RPD) Ground
Raccoon City Center (RPD) 2nd Floor
Raccoon City Center (RPD) 3rd Floor
All File Locations & Order Orphanage (Leon)
- Toe Tag – Crypt, coffin lid.
- Series 60 Results – Lab (white corridor), green-glowing door.
- New Researcher’s Notebook – Lab desk, back right corner.
Orphanage Basement
Orphanage Secret Facility
All File Locations & Order Raccoon City Center – Leon (After Orphanage)
Guide Pamphlet – Main Hall bench, eastern upper floor.
All File Locations & Order ARK – Leon
- N0-AH Status Report – Decontamination tunnel, monitor.
- Raccoon City Bioweapon Research – Report – Guest Lounge monitors.
- Product Catalog 1 (2026) – Guest Lounge monitor.
- Product Catalog 2 (2026) – Guest Lounge monitor.
ARK Facility Top Floor
All File Locations & Order ARK – Grace
- Access Log: 51st Assembly Minutes – Monitor Control Room, green door.
- Sterilization Chamber Safe – Anteroom, crate.
- Monitor Control Room Safe – Bioweapon Repository 05, rightmost open container.
- Access Log: First Assembly Minutes – Archives, right-side monitor.
ARK Facility Basement 2
All File Locations & Order ARK – Leon / Grace (Endgame)
- Alyssa’s Interview Notes – Auto from cutscene.
- Letter from Patrick – Auto from cutscene.
ARK Facility Basement 3
All Puzzle Guide
Care Center: Analyzer Blood Specimens
Note: Solving these unlocks essential crafting recipes for ammo and health.Specimen Type
Solution / Button Inputs
Location
Icon
Denatured
Click the second square from the left.
Blood Lab
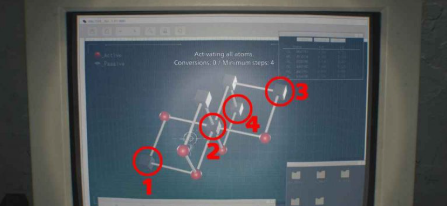
Converged
1. Click top square (joins the two above it).
2. Click the second bottom square.
2. Click the second bottom square.
Closet (Waiting Room Lvl 1)
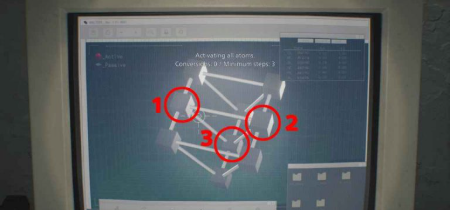
Reversible
1. Left-most square.
2. Bottom-central (Left).
3. Extreme Right.
4. Bottom-central (Right).
2. Bottom-central (Left).
3. Extreme Right.
4. Bottom-central (Right).
Private Lab (Behind Lvl 2 Door)
Polymerized
(Insanity Only) Middle-Left > Middle-Right > Middle-Bottom.
Closet (Waiting Room Lvl 1)
Care Center: Key Item Puzzles
Puzzle Name
Solution / Input
Requirements / Location
Icon / Preview
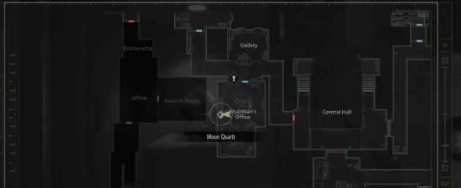
Chairman’s Office Box
Moon – Sun – Star – Moon
Use the Pencil on the desk notebook in the Chairman's Office.
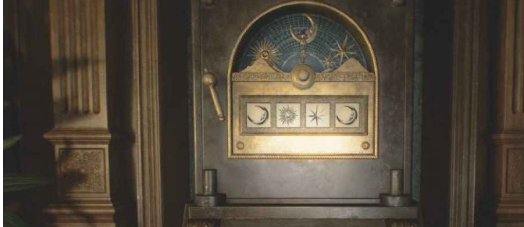
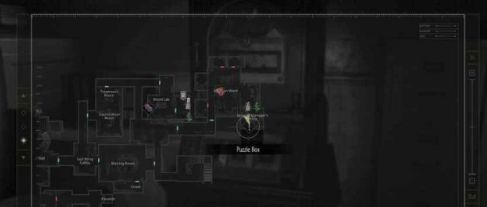
Lead Researcher’s Box
Star – Sun – Moon – Sun
Melt padlock with Corrosive. Clues are in office photo backgrounds.
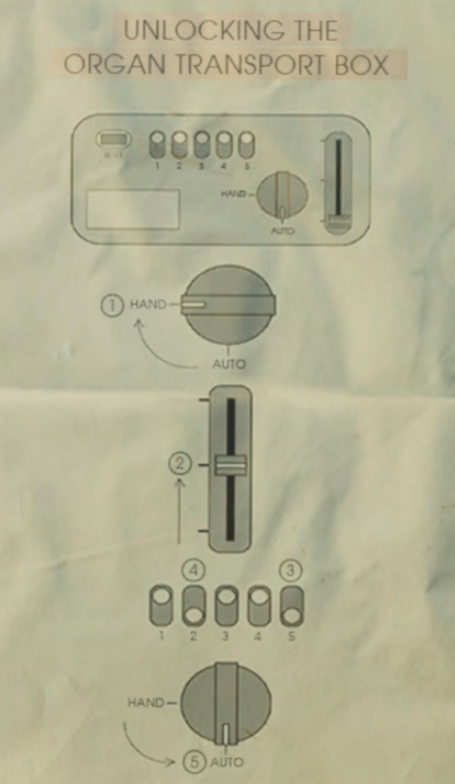
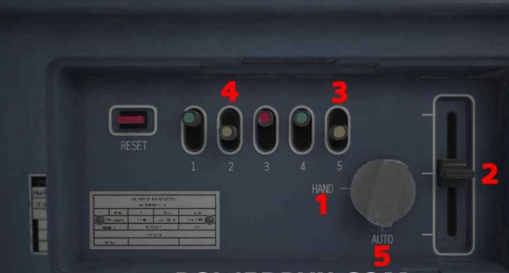
Organ Transport Box
1. Set switch to HAND.
2. Move right slider to Middle.
3. Press Button 5, then Button 2.
4. Set switch back to AUTO.
2. Move right slider to Middle.
3. Press Button 5, then Button 2.
4. Set switch back to AUTO.
Located in the Garage. ID Wristband Lvl 1 required to reach this area.
Double Helix Puzzle
Rotate the bottle to reveal the Helix. Insert it into the lectern.
VIP Suite. Interact with the wine bottle near the entrance.
Security Manager’s Box
Interact with the box while Emily is following you.
Requires Lvl 3 Wristband. Rescue Emily from her cell first.
Raccoon City Puzzles
Puzzle Name
Solution / Strategy
Reward
Icon / Preview
RPD Briefcase
Enter code: R R R in the S.T.A.R.S. Office (2F).
Power Shades Charm
Barry's Scavenger Hunt: R.P.D. Step-by-Step
Step
Objective & Location
Reference Images
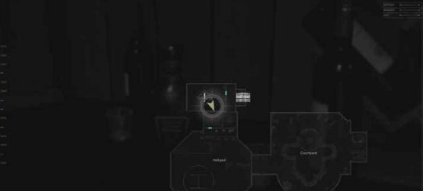
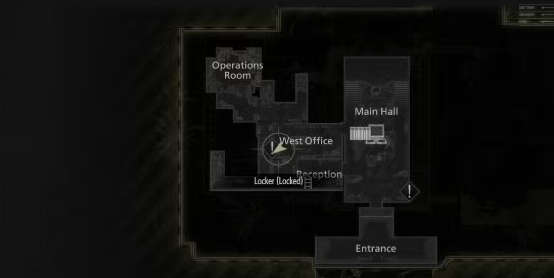
1
Locate the Target (West Office): First, head to the West Office (1F). This map shows the specific locker you'll be returning to later.
2
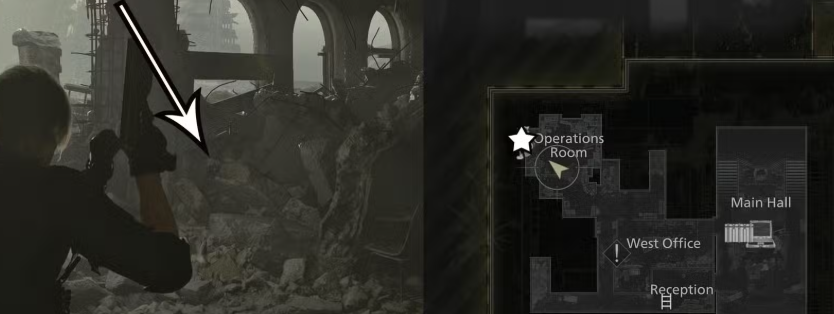
Find the Office Clues: Head to the S.T.A.R.S. Office (2F). Interact with the Jacket on the wall and the Locker by the door to trigger the hunt.
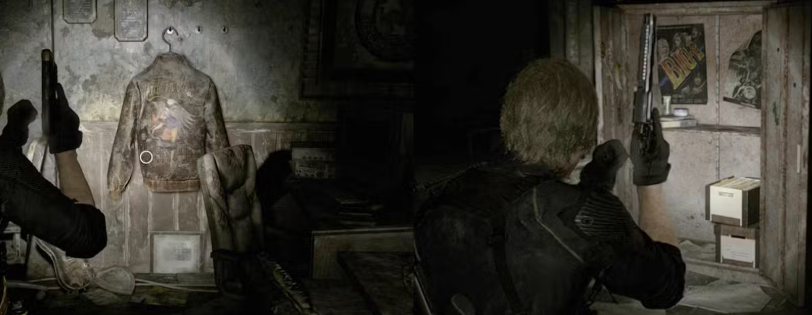
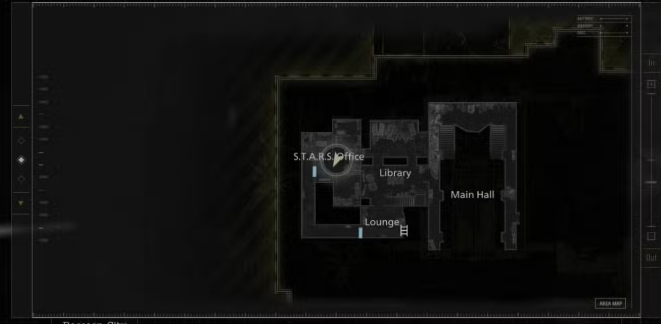
3
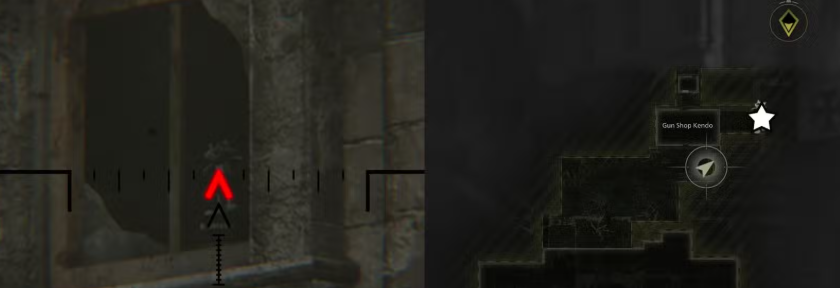
The TV & Key Location: Go to the Operations Room (1F). Climb the crates and look at the ceiling-mounted TV to find Jojo's Locker Key.
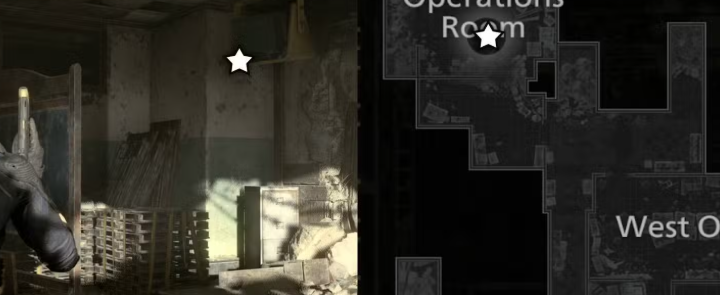
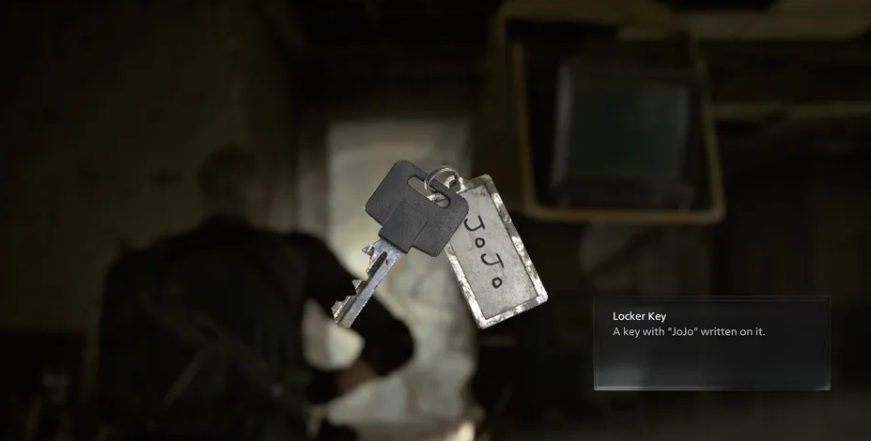
4
Claim the Reward: Return to the West Office locker. Use the key to unlock your new gear.
Final Puzzle Guide
🌟 The "Final Puzzle" Investigation
Challenge: "Let the sweet pair hear the voice."Reward: 20,000 CP & Secret Audio Log.
Step 1: The Setup (Run #1)
You must trigger these specific flags during your first playthrough to make the doll appear in the endgame. Missing any of these will require a full restart.- Meat Processing (Basement): Stay in the room for 15 minutes while the bodies move. Do not leave early.
- The Grinder: Do NOT kill the zombies inside the grinder yourself. Let the machine kill every single one of them. Note, you can use a gun to knock them down but do not kill them.
- Drain the Blood: After the grinder sequence, go back and fall down into the puddle of blood. Locate the switch on the wall and pull it. The blood will drain, and you will see the message: "A ton of blood has been drained."
- The Severed Hand: When you take the elevator up from the basement and cut the hand of The Girl, make sure to go back and pick it up. This is a key item for the next run.
- The Toilet: Go to the Rhodes Hill Restroom and flush any toilet 8 times in a row.
- Marie's Doll: During the facility escape (after obtaining the Helicopter Key), pick up the doll
- located at the bottom of the stairs.
Step 2: New Game+ Transition
Complete the game while holding both Marie's Doll and the Severed Hand.
Save your clear data and start a New Game.
Progress until you unlock the Lab.
Use the analyzer in the lab on the Severed Hand.
Step 3: Decoding the DNA Sequence
Scanning the hand provides the sequence: GGC AAG AUA ACG UGU CAU. Based on clues found throughout the game (Kendo's Hint and Planet Logic), the letters translate as follows:Letter
In-Game Clue
Logic
Symbol
G
150,000,000
Miles to Sun
☀️ Sun
U
380,000
KM to Moon
🌙 Moon
C
4.2 ly
Distance to Star
⭐ Star
A
"Ignore A"
Kendo's Hint
DELETE
Step 4: The Final Input
Ensure Marie's Doll is in your inventory. Take Emily to the Lead Researcher's Office and input the translated sequence into the Moon/Star/Sun box:Row 1:
☀️ Sun
☀️ Sun
⭐ Star
Row 2:
☀️ Sun
🌙 Moon
⭐ Star
Row 3:
☀️ Sun
🌙 Moon
☀️ Sun
Row 4:
🌙 Moon
⭐ Star
🌙 Moon
The box will click, a child will laugh, and the secret log will be yours!
Other RE9 Guides