Monster Hunter Wilds Dual Blades Guide & Set Compilation
 Pilgrim
(66 ratings)
Mar 30, 2025 @ 2:59am3,045134
ClassesGame ModesGameplay BasicsWalkthroughsWeaponsEnglish
Written by Team Leviathan
Bro4U
July
KreaTV1
OreoPancakes
Pilgrim2092, author of Dual Blades Guide (Rise)[docs.google.com], Dual Blade Guide (Sunbreak)[docs.google.com], and Dual Blades Guide (World & Iceborne)[docs.google.com]
Refia❤️, author of Dual Blades Progression (World & Iceborne)[imgur.com], DB Rise Endgame Builds[imgur.com], and Quick Wilds DB Gearing Guide (Wilds)[docs.google.com]
Slott
For the primary and original source, click here[docs.google.com].
Tired of Raw gaming? Are you sick of missing your True Charge Slash or Zero Sum Discharge and losing out on hundreds of damage? Want to make good use of Element weapons? You might be hearing the call to try Dual Blades! Dual Blades are the fastest Blademaster Weapon in the game and prioritize optimal damage towards the opposition by sticking to the monster like an irritating mosquito.
Dual Blades are designed to utilize Element damage. They have lower Motion Values so pure Raw sets tend to fall behind quickly to their Element counterparts. As hunters, you will select the right equipment for the right job. Don't think of your weapons as just two swords, but as the silver bullets specifically designed to hunt your target. This guide intends to help improve your sets and understanding of opposing monsters. Hunters with Dual Blades should always focus on the monster’s weakest Hit Zone to maximize damage output. In addition, having higher levels of Sharpness buffs not only Raw Damage but Element Damage as well!
The damage averages posted are tested via the Demon Flurry I into Blade Dance II & III combo against Sever Hit Zones of 60 and Element Hit Zones of 20. There is an additional section dedicated to Sever Hit Zones of 30 and Element Hit Zones of 10 as well for the non-Weakness Exploit matchups.
If you would like to support Pilgrim and his coffee addiction and the super secret but not that secretive project, check out the buy me a coffee page.[www.buymeacoffee.com]
1 - Supplementary Material
1.1 - Version History and Calculators
Version 1.020.01.00 (4 July 2025):
- Title Update 2 released; adjustments made.
Version 1.010.00.00[docs.google.com] (12 April 2025):
- Arch-tempered Rey Dau event; not relevant to Dual Blades meta (2 May 2025).
- Emergency edit, better armour variant is found.
- Title Update 1 released; adjustments made.
Version 1.000.05.00[docs.google.com] (28 March 2025):
- Guide released.
Calculator - Coming at some point.
1.2 - A Conversation on Sharpness — wait, it’s different!?
One of the struggles of writing this guide and as a Dual Blades user altogether is figuring out what the hell to use for Sharpness comfort. The problem with being the fastest weapon in the game is that they dull fast. Skills like Handicraft, Master’s Touch, and Razor Sharp help ease the pain, but the question is, how can we calculate this mathematically? First off, let’s talk about the jargon… wait. Something is different.
Dual Blades DO NOT have a natural Sharpness loss modifier of 66.667% like others in the franchise. Wilds introduces a new variable which will be referred to from now on as Wear & Tear. Wear & Tear is defined by the dedicated multiplier each move has for how many Sharpness points are removed from the Sharpness Gauge. It is no longer random or chance, and how many hits can be deduced based on the attacks used. Effectively, Blade Dance and Heavenly Blade Dance have low Wear & Tear (good), while the majority of Dual Blades’s other moves have high Wear & Tear (bad).
Okay… back to basics. A sliver of Sharpness is five points on the Sharpness Gauge. Handicraft adds two slivers worth of Sharpness. Razor Sharp or Master’s Touch adds a natural Sharpness modifier that confuses the hit count by adding a random chance if Sharpness is reduced or not. Master’s Touch is also a unique calculation, as its natural Sharpness is only as common as how high your Affinity is, and many hunter’s Affinity percentages heavily utilize Weakness Exploit. Simple, right?
So you can see how this becomes confusing. The next question: How long should Dual Blades last before requiring a Whetstone? There’s also Protective Polish, which makes a weapon impervious to durability loss for thirty-ninety seconds. Sharpening has also introduced a new mechanic where the hunter can cancel out of sharpening with partial gains. Whetfish is similar to the old system, but requires a commitment of two sharpenings.
It would be fantastic to go through the entire fight without having to sharpen, but then you may be losing damage output using Combat Decoration slots. Oh, that is the other thing. Sharpness-specific decorations are only available on weapons now, meaning things are tighter than ever. To stabilize set building, expectations are that builds have 300 hits minimum assuming Wear & Tear is equal to Demon Flurry I into Blade Dance II and III. Optionally, Sharpness skills can be substituted with Protective Polish if hunters prefer that playstyle. The builds below are recommended based on this philosophy (Pilgrim2092).
1.3 - Comfort Skills, Meta, and Speedrunning
To understand the point of this article, it must be understood that it is for developing meta-builds. We will not be giving a pinpointed explanation about what dictates meta, but for Monster Hunter, a meta-build is designed for the fastest clear time with the highest chance of success. This can vary depending on a build’s pilot, but that specific pilot might not be well-practiced yet and may need additional comfort. Speedrunners desire specific builds and optimal scripts based on the matchup, but a non-runner focuses on tactics more than strategy. Meta-builds marry these different thought processes.
What dictates comfort? In essence, any skill that makes playing more user-friendly. Skills that improve durability are comfort but are also negated by their necessity. With Dual Blades in Wilds, hunters now use the Demon Gauge often to use Demon Flurry and Blade Dance, making Focus and Power Prolonger more useful. Power Prolonger also increases the Demon Boost Mode duration, making it significant. Evade Window synergizes with Adrenaline Rush and Perfect Dodging, and Constitution enables us to dodge more often.
Team Leviathan has decided to forego comfort skills for the time being until it becomes apparent when one becomes relevant. It is up to the reader if they wish to drop skills for additional support.
Yes, this guide can be considered “opinionated,” but this is not a critical assumption. The article intends to balance both sides harmoniously and offer an optimal experience for the hunter. Hunters who wish to build around specific monsters need to consider modifying a build for that specific target; this article is meant to universally tackle all monsters (Pilgrim2092).
Another important point to keep in mind, to understand builds and reasons we take certain skills, is “uptime”. Some skills are passively active from the get go such as Attack Boost which is present at all times, while some need to be triggered like Adrenaline Rush which needs hunters to actively dodge enemy attacks or Agitator which requires the monster to be enraged, thus, they aren't active whole hunt and we can’t make calculations based on 100% uptime for them: it wouldn’t be realistic, making skills look more important than what they actually are.
Two main skills we look for proper uptime is Agitator and Adrenaline Rush. Agitator depends on how fast and how long the monster is Enraged while we are hunting it. If the monster is not enraged due to not reaching damage threshold, due to being tired, or due to special mechanics, Agitator value is effectively 0 raw and 0 affinity, so in cases of Guardian Monsters, it would be better to run something else since uptime will be really low, or in case of Zoh Mama, it is activate at all times on last phase. Enrage no longer has a cooldown period post-Enrage in Wilds, making Agitator and enrage more difficult to gauge (Bro4U & Pilgrim2092).
Adrenaline Rush will always depend if we keep dodging enemy attacks, like we should since it also helps our Demon Boost Mode uptime. It's worth emphasizing that it will not be able to be refreshed while it is active; there could be moments where we dodge an attack but Adrenaline Rush is already active and about to end, thus losing the buff for some time until we can dodge again. For multiplayer, it is important to mention that uptime for Adrenaline Rush could be actually lower, due to the monster focusing another player and not being able to dodge the attack or teammates using traps, paralyze, mounting, etc (Bro4U).
As things get more complicated, it is better that we are up front with uptimes. The uptimes the team expects are (Pilgrim2092):
Adrenaline Rush: 75% (85% if the hunter has Razor’s Edge I/II enabled)
Agitator: 75%
Burst is always maxed
Coalescence: 0% (38% if the hunter has Black Eclipse I/II enabled)
Convert Element: 50%
Counterstrike: 50%
Elemental Absorption: 50%
Frenzy onset is expected to last 20 seconds with Black Eclipse I/II enabled)
Latent Power: 40%
Leviathan’s Fury: 40% (50% if the hunter has Azure Bolt II enabled)
Seregios’s Tenacity: 50%
1.4 - tl;dr what changed?
Title Update 2 (July 4/5th, 2025):
Title Update 1 (April 3rd/4th, 2025):
- New weapon skills have been added. Bladescale Honing adds +6 unique points maximum of Sharpness to the gauge whenever the hunter successfully dodges an attack. The points are unique because they influence the Sharpness Multipliers. Instead of whatever Sharpness Colour the weapon is at, the Sharpness Multipliers change to x1.4 Raw and x1.25 Element.
Convert Thunder Resistance is simple and effective. For each point of Thunder Resistance, add +4 Thunder. There are lots of ways to gain Thunder Resistance, so this becomes powerful quickly. - New Set Bonus skills have been added. Usually, Adrenaline Rush lasts about thirty seconds. With Razor’s Edge, the skill’s duration changes to 45 seconds, as well as allows one reset with another successful dodge. With the second bonus, the hunter also receives a x1.05 Raw increase on the second dodge.
Azure Bolt is a mix of Scorcher and an Affinity bonus. Azure Bolt I’s damage trigger is 30 plus Thunder hit zone multiplied by 0.7, while Azure Bolt II’s damage trigger is 60 plus Thunder hit zone multiplied by 2. The Affinity bonus is +15% and lasts 20 or 30 seconds respectively. After the Set Bonus fades, there is a 30 second cooldown before triggering again. - Lots of changes to moveset. Motion Value buffs, Element and Status Multiplier nerfs, movement speed increase, Demon Boost Mode changes (now x1.15 Raw and x1.3 Element), one new action, and attack speed increase.
Title Update 1 (April 3rd/4th, 2025):
- Corrupted Mantle is nerfed. who would have guessed Raw multiplier is nerfed from 10% to 5% and Affinity is nerfed from 30% to 10%. The duration is also reduced from 120 seconds to 90 seconds. On top of it, all of the additional attacks had their Motion Values, Element Multipliers, and Status Multipliers cut in half. Saying this, the mantle is still good. Other mantles received duration and other various buffs. If hunters are comparing Evasion Mantle to Corrupted Mantle, be aware that only its use duration is buffed, not its damage duration of 10 seconds.
- New weapon skills have been added. Depending on conditions, Slicked Blade can add either 0% up to a maximum of 30% Affinity. As cool as it is, it is extremely strict. The hunter has to be hunting in the rain, waterblighted, or in a body of water, and/or have been hit by one of Mizutsune’s bubbles or have Bubbly Dance II.
Whiteflame Torrent is an oddball skill. It activates only on specific moves and is a flat 50 damage trigger. When equipped alongside Scorcher, it completely modifies how the skill functions. The formulas look like so:
Scorcher I & Whiteflame Torrent = 60 * (1 + ((Fire hit zone / 100) / 2))
Scorcher II & Whiteflame Torrent = 80 * (1 + (Fire hit zone / 100)) - New Set Bonus skills have been added. Dodging with Bubbly Dance II enough times triggers the hunter to have minor bubbleblight, which is useful for Slicked Blade and Coalescence. Yet, for some reason, the Mizutsune armour does not have Resuscitate which would have made great use of the skill.
Like its predecessors, Super Recovery allows the hunter to regenerate health beyond the red portion. Nothing cool to mention here. It is pretty slow. Be aware that Recovery Speed only works on the red portion of the health gauge. - New Group skill has been added. Guts (Tenacity) is Felyne Moxie as a Group skill. The hunter can survive a strong hit if their HP is beyond a specific threshold. It also modifies Attack and Defense based having either yet to trigger the lethal threshold and after. Before is +5% more Raw and -5% less Defense, and after, +5% more Defense and +3 additional Elemental Resistance.
- Skills with “Flayer”-like functions have been reworked. Supposedly, after one hit with a trigger-able move, a three second cooldown occurs before the next trigger can happen. Each time a trigger fails, the odds of a successful occurring doubles, starting at 25%. The third trigger will always succeed.
2 - Endgame Sets
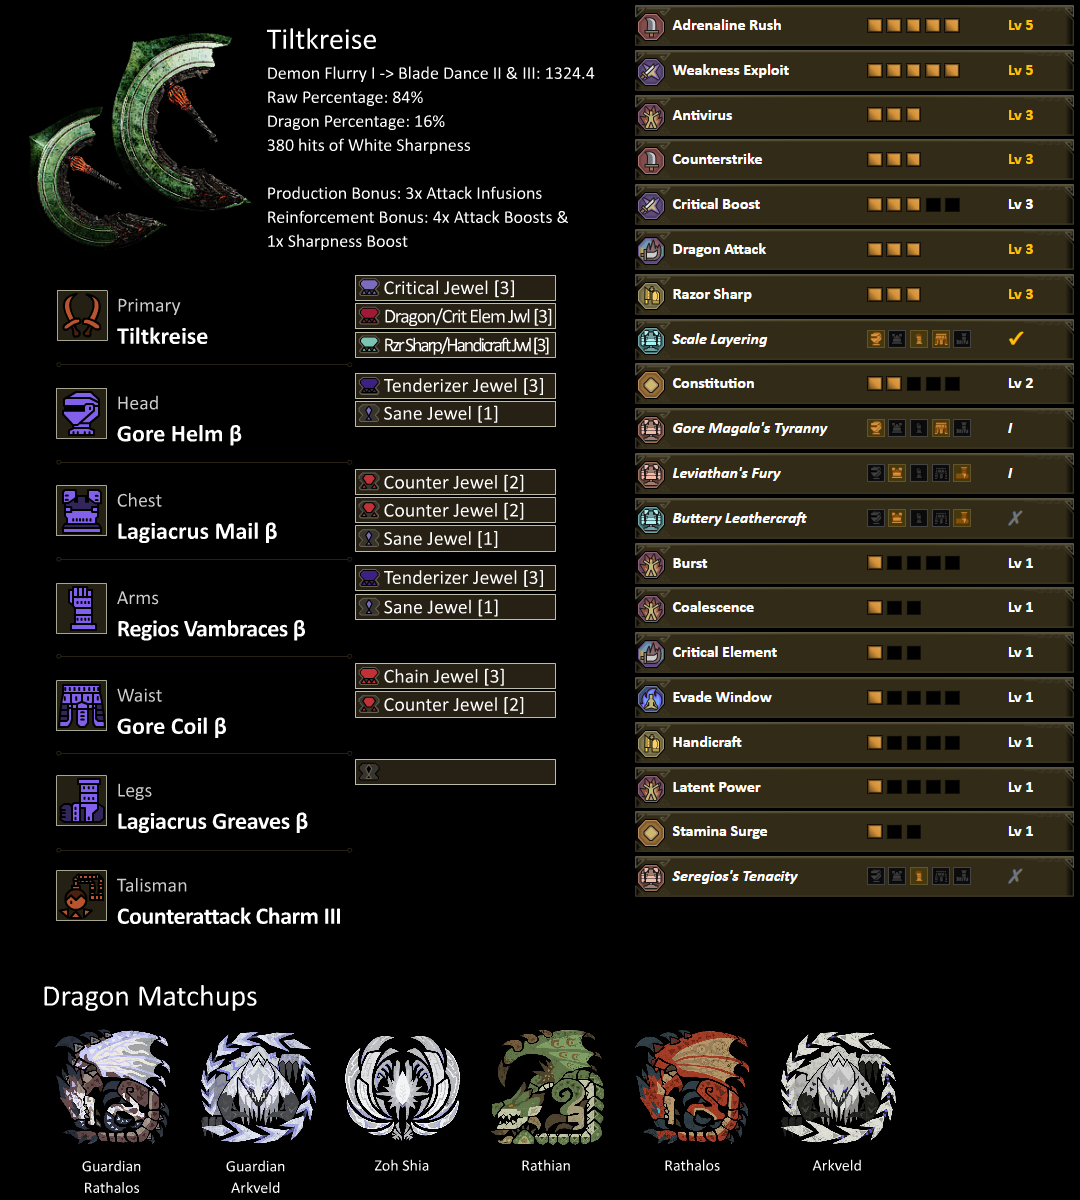
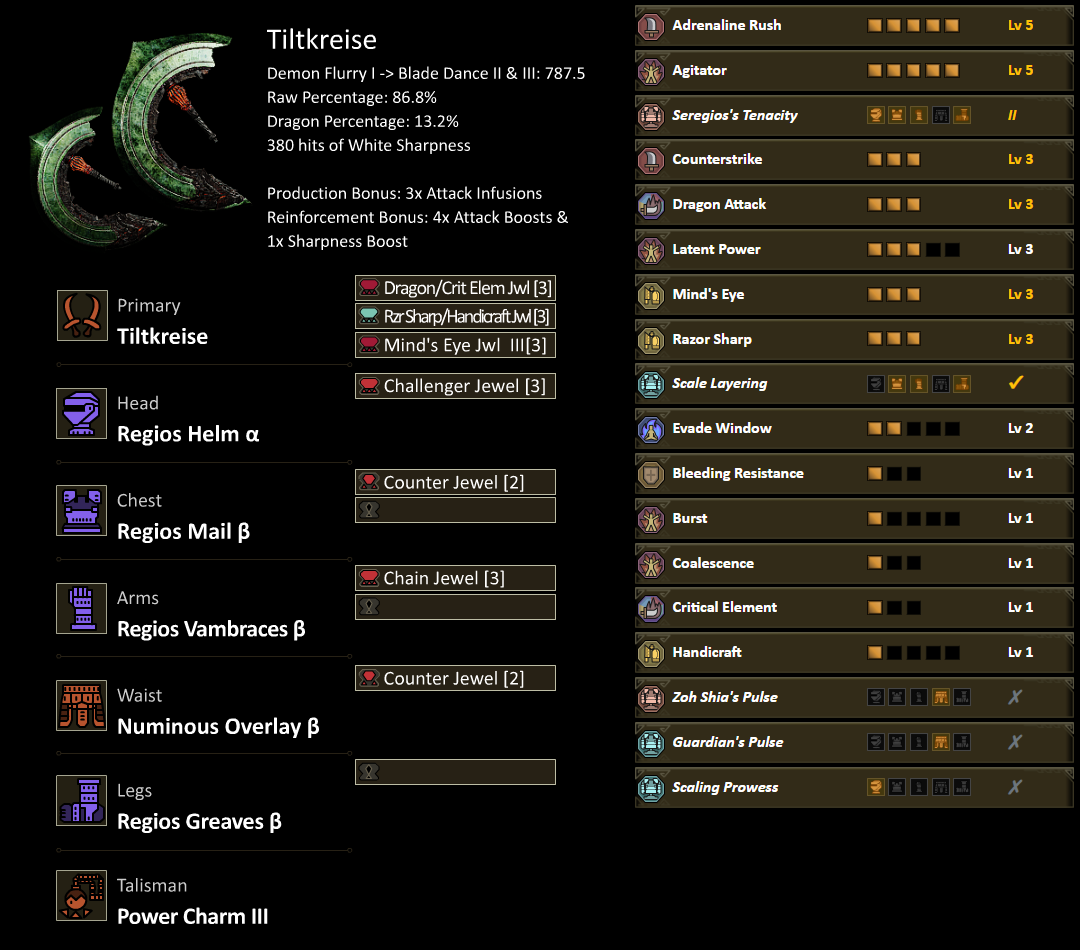
Alright, so how has Title Update 2 spiced up Dual Blades? To begin with, no, Black Eclipse I is still a thing when considering builds with Tiltkreise. Yet, the first smithable Dual Blades to overcome the Artian threshold has made an appearance! Say hello to Levin Acrus. May its reign be long and healthy.
Tiltkreise sets mix Black Eclipse I and Azure Edge I, mostly for their Affinity bonuses. Levin Acrus is hungry for Thunder Resistance, so it prefers Rey Dau γ armour for Guts (Tenacity) Group skill, as well as Lagiacrus armour for Azure Edge. Both of these sets have high Thunder Resistance.
Black Eclipse I is used for its ability to self-inflict Frenzy Virus. The reason for Frenzy is the built-in Affinity bonus it gives when Cured, and the easy-to-insert Lv 1 decoration “Sane Jewel” gives the new skill Antivirus which when maxed, provides +10% Affinity during the Frenzy-Cure status. Coalescence also activates after being Cured of Frenzy for thirty seconds, which activates a +10% Element boost.
A quick explanation of Critical hits: When should hunters start using Critical Boost over Critical Eye? When the hunter has a consistent Affinity of 34% and above. With the above skills, hunters now will get a better damage average from Critical Boost.
Burst Lv 1 is mandatory; the first hit, it is inactive. The following four hits grants +5 Raw and +30 Element, and then any further hits add +8 Raw and +40 Element.
Damage skills prioritized are Weakness Exploit and Adrenaline Rush. The former grants +30% Affinity on 45 Sever hit zones and an additional +20% Affinity on wounds at Lv 5, while the latter grants +30 Raw at Lv 5 whenever the hunter successfully dodges an attack. Adrenaline Rush activates under the same conditions as a Perfect Dodge making it an important synergy skill. The buff is a little easier to activate than Perfect Dodge but cannot be reactivated while it is triggered like Demon Boost Mode.
Although ignored in previous guide versions, Counterstrike and skills like it shall be considered from now on. When the hunter is knocked back, the hunter receives a +25 Raw increase at Lv 3. This skill is extremely easy to slot in and does a weird amount of damage for what is essentially a band-aid skill.
The best infusions and reinforcements are to max Attack Infusions, four Attack Reinforcements, and one Sharpness Reinforcement. Unfortunately due to the changes to Dual Blades moveset, Element was nerfed enough to make it actually the worst Reinforcement. Reinforcement preferences go from Attack, to Affinity, to Element now.
The last thing to mention is whenever there are empty Lv1 slots left over. These slots can be filled with whatever the hunter desires, though the team advises either Constitution or Marathon Runner (Pilgrim2092).
2.0 - READ ME BEFORE LOOKING AT SETS
- The sets listed here are endgame sets. It is expected that you have at minimum defeated Arkveld in High Rank and are at HR31. If you’re looking for progression sets, check 4.1 - Progression Sets.
- There is no best universal Dual Blades set. Each set below is tailored for specific foes. It is time to get good, son.
- Weakness Exploit is not good in every matchup. For monsters like Gore Magala, it may be smarter for the hunter to use a Mind’s Eye set. This is up to the hunter, but the primary sets for meta Dual Blades are immediately below. For those who do not wish to use Weakness Exploit, go to 3 - Mind’s Eye Sets. For monster matchup tips, refer to the Endgame Sets.
- Heroics are not suggested in any of the meta-templates. It is an extremely powerful boost but requires the hunter to play very dangerously.
- None of the sets listed will be using Flinch Free Lv1. What does this do? It prevents you from being tripped, which can be super helpful in multiplayer if you are getting side-swiped by teammates. Should you be adding it? It’s up to you. Demon Mode has built-in Flinch Free Lv1, but outside of it and with poor stamina management, there’s a good chance getting tripped can get you carted. It’s definitely a skill worth considering.
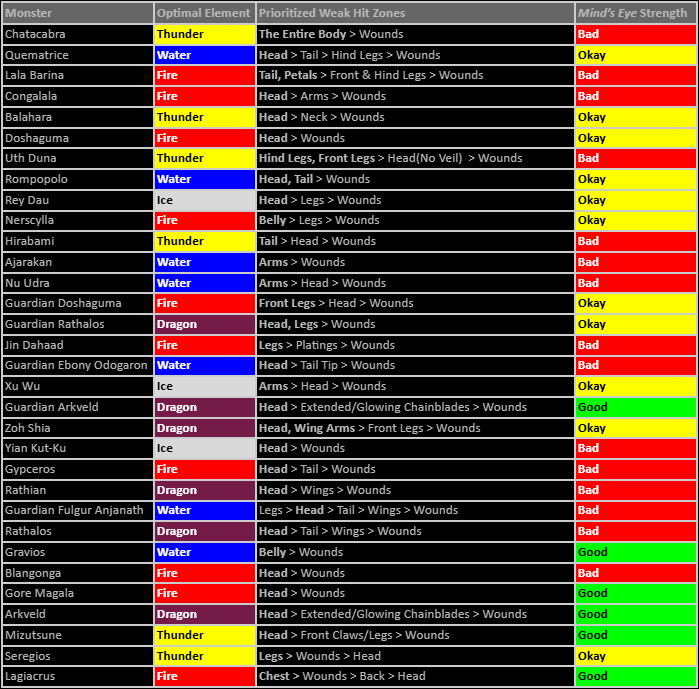
- While this guide covers what Elements you should be using against each monster, you should consider using Kiranico’s website for a general look on hit zones. There is also a 4.5 - Cheat Sheet at the bottom of the article.
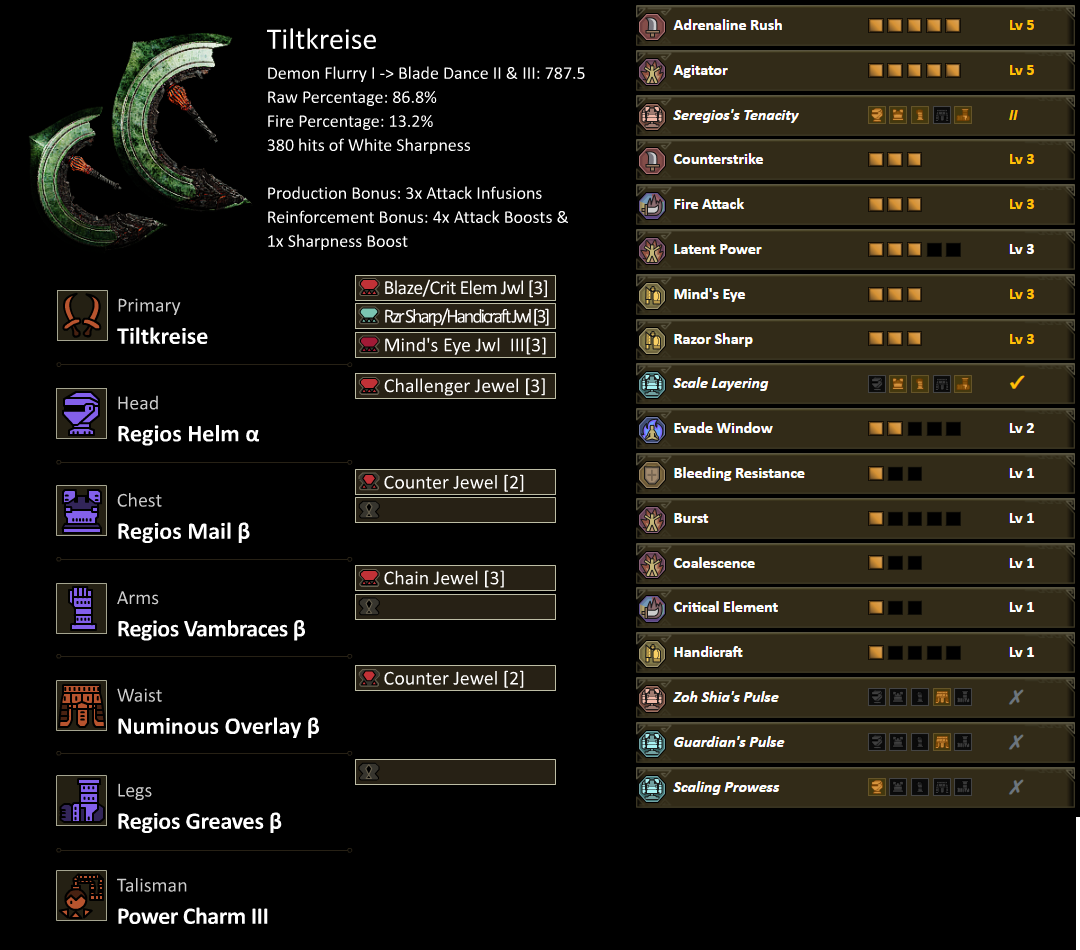
2.1 - Fire ~ Tiltkreise

Most monsters in Monster Hunter Wilds are weak to Fire. There is not too much to be said about Congalala, Blangonga, Gypceros, or Gore Magala. These fights are mostly “aim for the head” type fights when the hunter can, each tends to maneuver around the arena a lot. Doshaguma and its Guardian variant also have a weak head hit zone, but due to their stature, it can be difficult to reach. The hunter should aim for the forelegs with the intent of reaching the head.
For the Temnoceran encounters, Lala Barina and Nerscylla, the brunt of your attacks should be focused on their abdomen. It is a large target with good hit zones. If a Wound appears on the legs, they will provide a valuable topple when the Wound is popped. It is recommended to not Focus Strike these Wounds. Break them normally with attacks as the Focus Strike swings the hunter around too much to take full advantage of a leg break topple. The hunter should generally avoid Focus Striking Lala Barina especially, as it has an annoying spore spread mechanic that will paralyze the hunter if they touch them. Focus Strike often causes the hunter to get paralyzed through its violent swings as the spores are also in the air (July & Pilgrim2092).
Gypceros is the original Tzitzi-Ya-Ku, but more fun. It will play dead, but hunters will not fall for it (we hope). Be aware that when Gypceros begins its flash attack animation, the head can be Focus Striked and cancel the animation. Destroying the beak will also cause the flash attack to fail (Pilgrim2092).
Jin Dahaad is a mini siege battle with multiple phases and a rather large health pool. The primary tactic will be to topple Jin multiple times by breaking the legs repeatedly and taking advantage of topples by hitting favorable hit zones. Each of Jin’s legs can be broken twice.
When Jin is toppled, the hunter should focus on breaking Jin’s various weak hit zones. The Tail Plating, Abdominal Plating and Head Plating can each be broken once, exposing the Large Plating on his upper back. When the Lg. Iceplate on his upper back is destroyed, Jin loses the ability to use a majority of his cold based moves. In addition to turning off his moves, each Plating is a 95/20 hit zone until destroyed (Head is 75/20). When all 4 platings are destroyed, the hunter should focus on either the Abdominal Plating or Lg. Iceplate for the rest of the fight during downs (75/10). The Lg. Iceplate cannot be destroyed until after Jin does his ultimate move, as such a hunter can take advantage of that 95/20 Weak Point far more than intended.
Jin has forced health transitions and will stop taking damage at 90% life and move to the second area. At 68% health, Jin moves to the 3rd area, and at 40% to the last area. As such, it’s recommended to hold onto the corrupted mantle until one of the later stages. Focus Strike is actually not a bad move here, as it forces a knockdown and deals quite a bit of damage (Slott).
One quick note about Jin Dahaad is that almost all of its body is not weak to any Element and is Raw favoured, the only areas where a Fire weakness appears are the head and the two separate iceplates when toppled. Since for the majority of the fight hunters will not be wailing on its head, they should consider Raw related skills for this matchup such as only 1 level of Burst and more levels of Adrenaline Rush and including Weakness Exploit and Agitator. It is also recommended to either use Fire DB with the Raw favoured armour skills (No Blaze Jewel, use Critical Jewel instead) or start with Blast and switch to Fire during the first or second transition (July & Slott).
A triumphant roar for the Lagiacrus fans as it finally returns in 4k glory. This fight has an underwater portion that this guide will not go into depth. As for the fight on dryland, Lagiacrus’ juicy hitzone is the chest. The body part that is beneath its long neck. You will find yourself constantly hitting this as Lagi’s head is too high or too long to reach (the hitzones are also worse). Focus on wounds whenever they present themselves. An additional hitzone can be its back spikes where you will see Lagi uses it to charge electricity. If you are able to land hits on this zone, you will topple it on a break and you will additionally be able to damage it more. These backspikes are the best hitzones for Lagi but you will not always be able to hit them. While it may be tempting to focus strike the long lizard of the shocking torrents when weakpoints present themselves, it is still not recommended unless you can guarantee you will end up at its face instead of its tail or if you really really REALLY need breathing room. The damage of our spineride is still too low to consider as a proper damaging combo.
As for movesets, just pay attention to the head movements. Those give the biggest tells on which moves it will be doing. Lagi has a few AOE electric attacks that are heavily telegraphed and easily avoidable (July).
2.2 - Water~ Tiltkreise
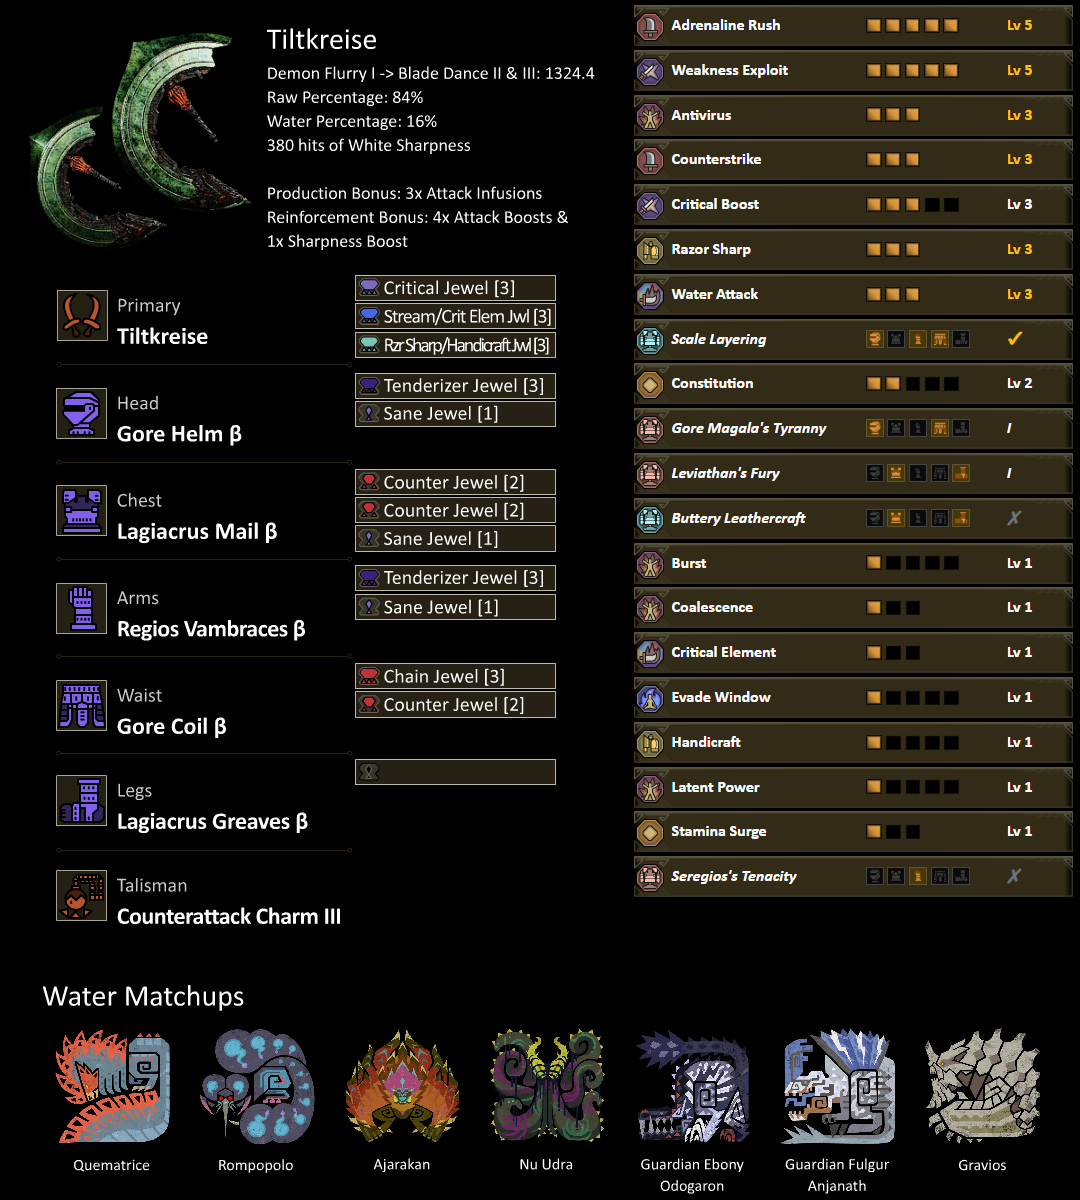
Guardian Ebony Odogaron is the most normal matchup of the bunch, where its head boasts an extremely high 40 Water hit zone. Hunters should always try to aim for its head. Guardian monsters boast extra explosions with glowing claw attacks that land on the ground that inflict Dragonblight. The hunter must be prepared for these attacks and to not dodge too preemptively or too short of a distance. The other encounters are a bit different.
Due to how Ajarakan’s and Nu Udra’s movesets and body anatomies are designed, the hunter should prioritize the arms/tentacles first and foremost. On Ajarakan, the hunter should always be aiming for the arms even on topples, due to the arms having higher raw and element hit zones. On Nu Udra, the hunter should aim for the big arms/tentacles and prioritize the head/mouth when the opportunity presents itself.
For the non-guardian Brute Wyvern encounters such as Quematrice and Rompopolo, aiming for the head will be the major priority. These two also have juicy hit zones on their tails so focusing on these parts when the opportunity presents itself is prioritized. Guardian Fulgur Anjanath is mainly a leg fight matchup. The hunter should aim to Wound and break Anjanath’s legs to topple it , and then wail on its tail, wings, or head when the opportunity presents itself (July).
Gravios is possibly Dual Blades easiest matchup. Due to having exceptionally weak Water hit zones, Gravios’s tough exterior is easily reduced to rubble through the hunter’s high Element damage output. To cart Gravios the fastest, the hunter should aim for Gravios’s belly. Eventually, it will break and leave a permanent opening (Pilgrim2092).
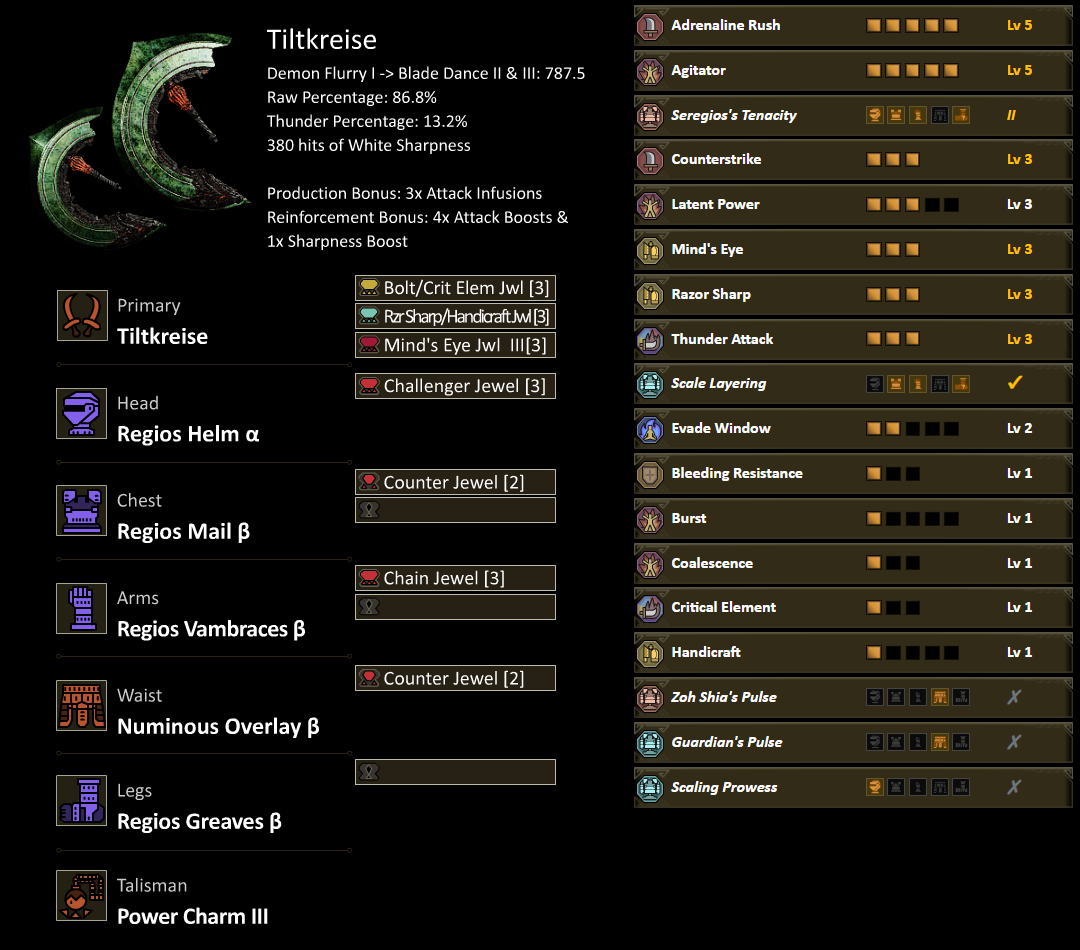
2.3 - Thunder ~ Tiltkreise
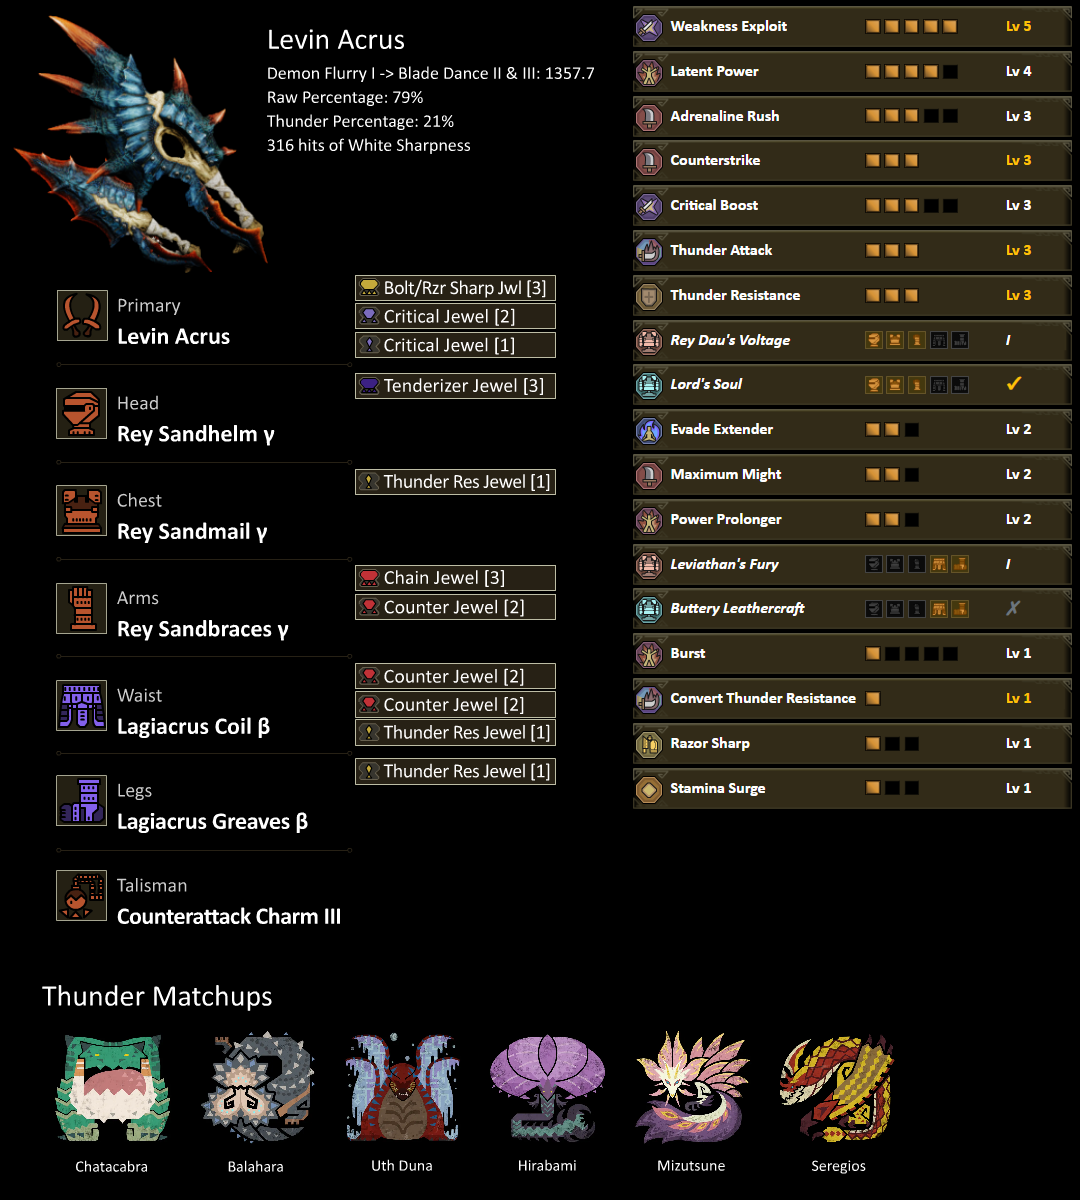
Oh my lord, is this a set that does not use an Artian weapon!? Yes, indeed! Levin Acrus has overcome this stupid threshold! How? Convert Thunder Resistance is REALLY strong. With it, it steals the Hirabami matchup from Fire Tiltkreise. The armour pieces that come with Guts (Tenacity) and Azure Edge I each have 4 Thunder Resistance, allowing us to push the meta forward. Make sure to eat a village meal!
Chatacabra and Balahara are a couple of the earliest new monsters in Monster Hunter Wilds and are designed to be tutorials. Chatacabra’s whole body is weak and is designed to teach hunters what a good hit zone looks like. Balahara is also designed to teach hunters to Focus Strike on certain attacks — When it opens its mouth, a red aura will appear and offer an opportunity for the hunter to Focus Strike and knock it down. The area Balahara likes to rest in also has a fixed event where it tries to climb fulgurite and attack hunters with projectiles. The hunter can pull the fulgurite down with the slinger and cause the Balahara to fall with it.
Uth Duna has one of the most unusual mechanics in Monster Hunter. The apex leviathan has unusual modifiers applied to its veil which covers most of its body. It can be identified when the hunter sees their damage score as light blue with a shield symbol beside it. The veil is a super weak hit zone that’s Raw values are modified to become significantly less (the 90 Sever hit zones become 25.714 for Dual Blades). Every attack on the veil will trigger hitstop, which can be quite irritating. Element values are unaffected by the modifier. Due to being a weak hit zone, Weakness Exploit works on it but Mind’s Eye does not. The hunter’s goal is to remove the veil by attacking it so they can reach the hind legs, forelegs, and torso areas. If Uth Duna dives into the river or the lake to retreat, hunters should pay attention to collapsible roofs. Pulling it down should force Uth Duna out of the water and knock it back for a time.
Hirabami is probably the most irritating monster. Due to its levitation and unusual rhythm, it makes hitting it quite difficult. Most of its body is weak, so the strategy is to get it on the ground and keep it there (Pilgrim2092).
Mizutsune’s weakest hitzone throughout all phases is the head, which takes significantly more Raw damage but less Element than the rest of its body. Due to how much of our damage comes from Raw, hunters should focus on the head when possible. After entering soulseer mode (glowing blue eye), Raw damage improves substantially on the rest of its body, so the damage loss from hitting other parts becomes smaller. While still receiving less damage than the head, hitting the front claws will cause topples when they break, and the tail is severable.
Mizutsune is very agile and aggressive, and its tempered version becomes one of the hardest hitting monsters in the base game, capable of one shotting with its tail slam. Hunters should get used to utilizing Demon Flurry I to gap close and shorten their combo lengths to be ready to dodge incoming attacks. Bubbles can also be used to easily trigger perfect dodges by dodging into them, since you will enter the hitbox while i-framed, triggering it at no risk if spaced properly (OreoPancakes).
Seregios’ fight has gone through multiple iterations across the series. This time in Wilds, we are focusing on the legs. The legs have the best hitzones and also force topples on wound and part breaks. The legs are your one and only target. Against tempered versions, the tempered wounds might be an alternative but these will only create topples rather than allow for proper damage. If, by the grace of bad rng, you find yourself unable to hit the aforementioned chicken feet, then the chicken head is a serviceable alternative for that moment. The fight itself boasts some new moves that will require you to manage stamina much more efficiently as Seregios loves to use multi-hit combos. Many of these moves will force bleed so this fight truly tests your ability to manage stamina and time your perfect dodges. Use flash pods if you find yourself struggling against Steve. These help to keep it focused in one direction; just keep in mind that flash pods do not topple Steve as long as they do on Rathalos (July).
Seregios is a perfect fight to practice getting used to Demon Dodge -> Blade Dance II -> Blade Dance III, as many of its final attacks in its sequence will land it in close proximity to you, under the assumption that you actually managed to dodge that attack (July).
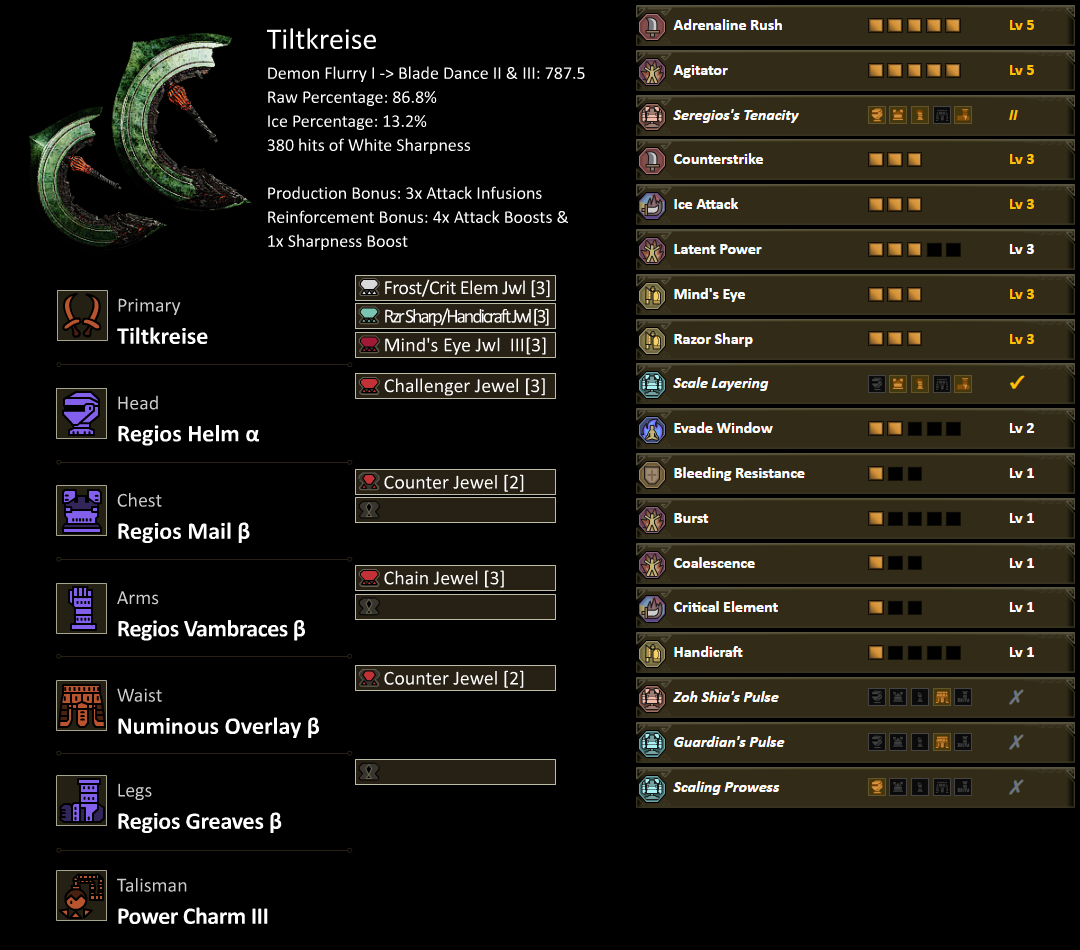
2.4 - Ice ~ Tiltkreise
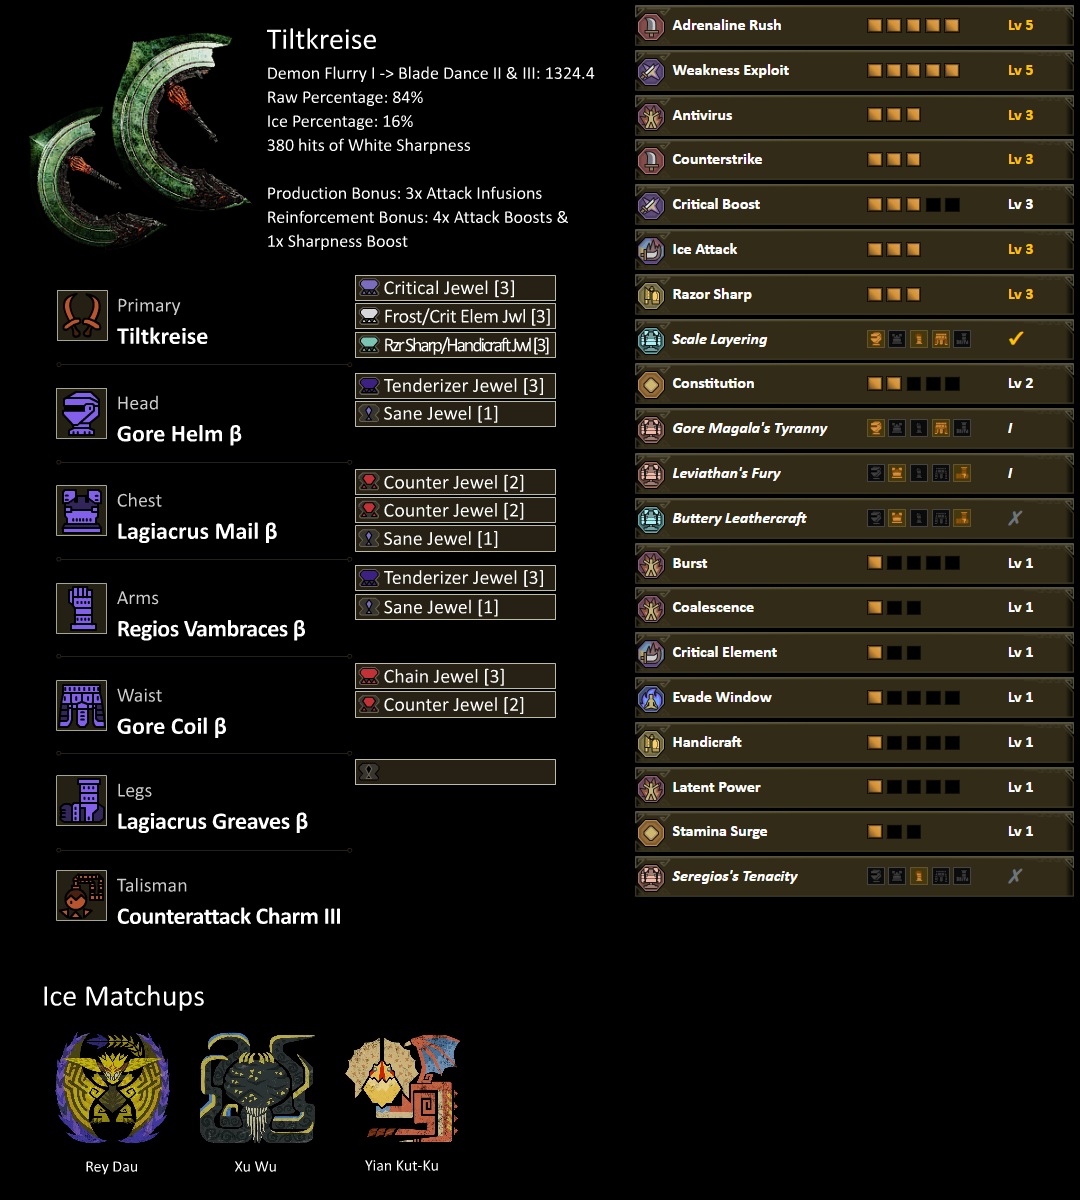
Rey Dau’s primary hit zone as usual is its head. After discharging one of its bolt attacks, a red aura will appear on its head, allowing the hunter an opportunity to Focus Strike and collapse Rey Dau for a moment. Unfortunately, due to its body length, the hunter is often poorly positioned after a spine ride. When at its nest, the hunter should pay attention above, as a crumbling dragonator can be dropped upon an unsuspecting Rey Dau. This goes for many of the areas in the Windward Plains biome.
Xu Wu is extremely weak to ice, but the cephalopod’s slippery maneuvers can still cause lots of trouble to the slick moving hunter. The hunter will have to reposition often. Most of its hit zones are weak and if flipped over, the center is a super weak hit zone.
Whether frenzied or not, Yian Kut-Ku’s small body is almost entirely an attack hitbox. It pays to be a little more cautious as a single attack commonly sends the hunter flying back. The go-to hit zone is its head. It usually has a lower health pool, so as long as the hunter is somewhat conscious of the bird wyvern’s aggression, it should be a quick fight (Pilgrim2092).
2.5 - Dragon ~ Tiltkreise
Arkveld is the monster hunters will likely hunt the most and is an odd matchup for Element weapons. In its normal form, it has one of the worst Element hit zones in the game, with the only notable one being the Head (5). Its weakness to Dragon only really shows when a Wound opens up. The Wounds on Arkveld’s chains take the highest damage out of all its body parts.
Rathian and Rathalos are the classic returning Flying Wyverns. As usual, they attack with poison and fireballs, which are great opportunities to activate Demon Boost Mode on. Rathalos seems more eager to fight airborne, so hunters should take any knockdowns to really get damage in. At times, when attacking Rathalos with Blade Dance while it is airborne, the camera will zoom out and Rathalos can be seen struggling in place. Continue attacking it in this state and it will fall down, creating a big opening — similar to throwing a Flash Bomb.
Guardian Rathalos has similar traits to regular Rathalos, and can also get knocked out of the air. The guardian variant will create explosions on most claw attacks and create crystals out of wyvern milk. They will explode after a second upon contact with a fireball, which makes them a consistent source for activating Demon Boost Mode once you get the timing of the explosions down (KreaTV1).
Zoh Shia is a multiphase fight. The monster starts with its whole body covered in Wylk making it take less damage. When it attacks during this phase, it creates Wylk Crystals that the hunter can break with Elemental Pods that can be picked up in the arena, making it explode and deal Element damage. Sometimes doing this will force a down on Zoh and also can be used to the hunter’s advantage to get a Demon Boost out of it. The main targets that hunters should be trying to hit are its wingarms and its head.
Later in the fight, it reveals the black dragon within and it starts using Fire attacks, but also when it reveals the black parts those parts are more susceptible to Dragon damage. After dealing more damage to Zoh, it will fly to the center of the arena and create Wylk Crystals all over it. Hunters should start breaking as many crystals as they can to create as many safe zones as they can from the big spreading fire breath. After this cinematic attack, the arena will produce two shrine fragments that hunters can knock down and hit Zoh with to topple and deal massive damage to it. At the last third of the fight it will shed all of its Wylk armor making it easier for the hunter to deal a lot of Dragon damage to it and use red lightning attacks (Refia❤️).
3 - Mind’s Eye Sets
The Mind’s Eye sets prioritize Raw damage modifiers over Element or Affinity. Due to Seregios’s Tenacity having access to many strong skills, it ends up being the best at pushing sets that do not rely on Weakness Exploit. Element and Affinity boosting ends up being subpar due to Mind’s Eye pushing Raw as much as it does. Levin Acrus is not meta when considering Mind’s Eye matchups. As to be expected from Artian propaganda, all the sets look identical.
To quickly explain how Mind’s Eye works, it triggers on any hit zone 44 and below. These sets should be used when the hunter expects they will have little access to juicy hit zones. At Lv 3, Mind’s Eye adds x1.3 additional Raw. This buff can make rough fights like Gore Magala go a lot smoother.
Check out the primary guide[docs.google.com] for Mind's Eye matchup details.
3.1 - Fire ~ Tiltkreise
3.2 - Water ~ Tiltkreise

3.3 - Thunder ~ Tiltkreise
3.4 - Ice ~ Tiltkreise
3.5 - Dragon ~ Tiltkreise
4 - Progression, Moveset, Cheat Sheet, & FAQ
4.1 - Progression Sets
Progression in Wilds is mostly a smooth experience, although veterans will notice the lack of Thunder and Ice representation early on. Thunder is not relevant until the hunter enters the final progression set. Story beats will lock the hunter from resting until the event is finished, and Low Rank is not as open of an experience as one may think. The world does not really open up till the final boss of High Rank is defeated. Although the sets are optimized for their specific section of the game, hunters should use the templates as milestones and upgrade them when they are sensing a difficulty spike (Pilgrim2092).
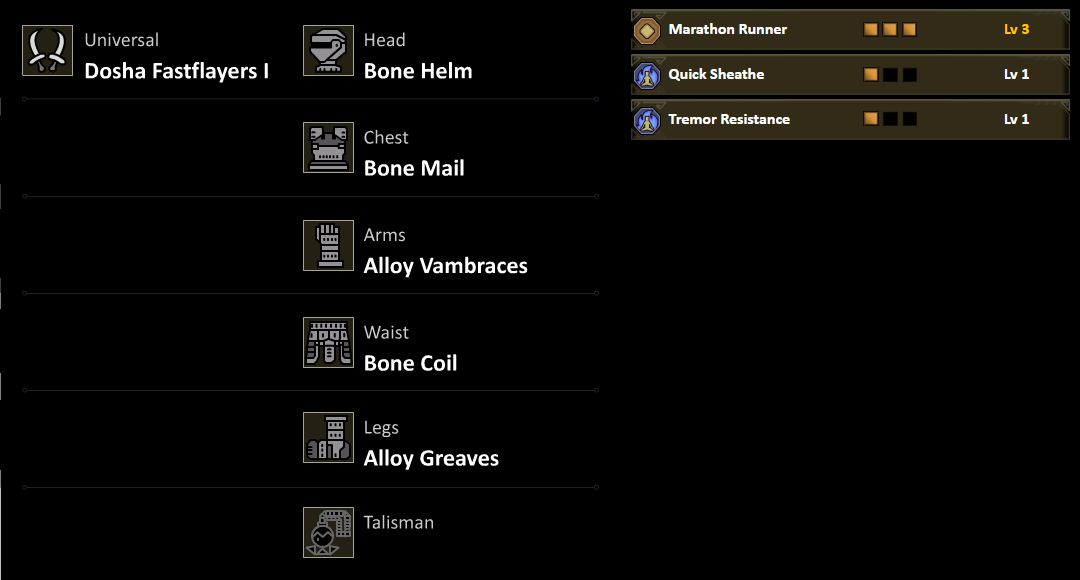
Once Doshaguma is defeated, the strongest early Dual Blades are the Dosha Fastflayers I. There are not any major armour pieces to look forward to at this point in the game. The ones chosen will help with stamina, but that is pretty much it for optimization. Once Uth Duna is repelled, the hunter will begin to discover useful Element options.
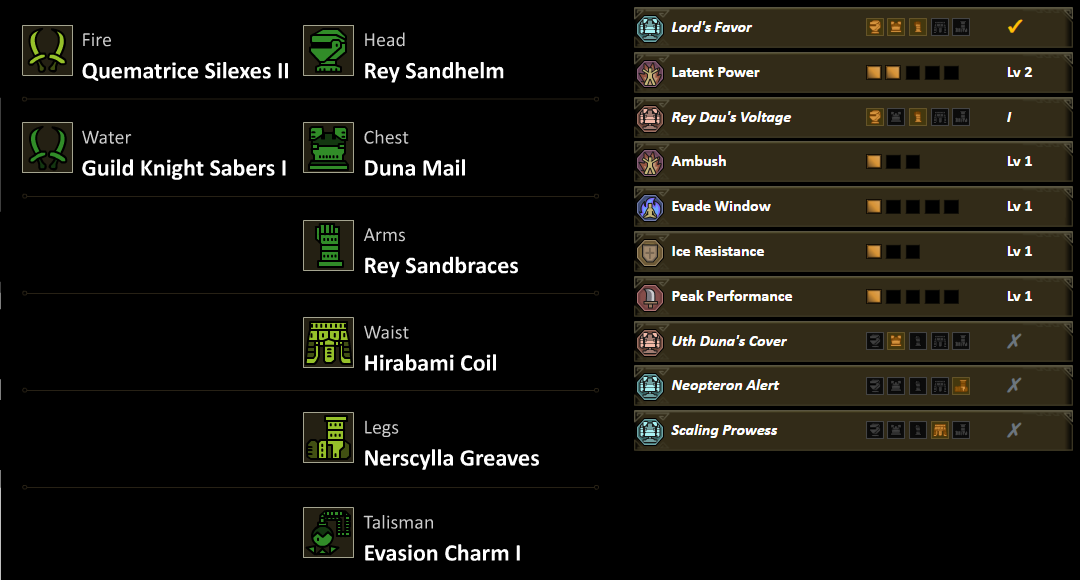
Guild Knight Sabers are extremely strong Dual Blades, and will end up being the best for most matchups. Quematrice Silexes II takes on a few matchups, but there is an argument that the hunter can run through most of this section of the game with the Water Element Dual Blades alone.
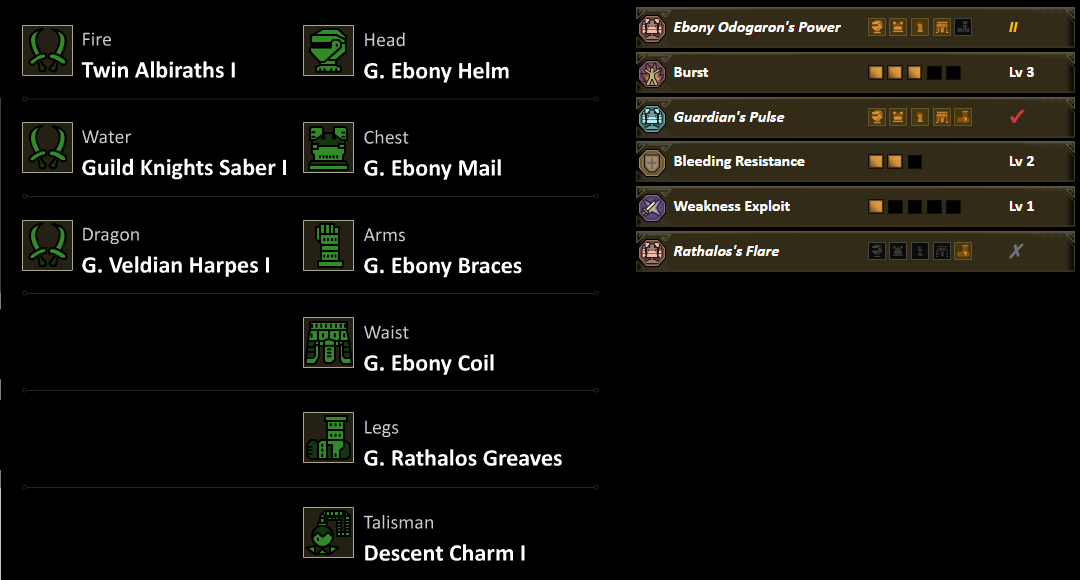
Up till now, Dual Blades have had no important armour skills to look forward to. The time has come — Burst is Dual Blades most relevant skill. It is very overtuned. The hunter also gets to take advantage of Ebony Odogaron’s set bonus, Burst Boost II. With this set, the hunter is very ready to take on Low Rank’s final boss.
Not much changes entering High Rank. The hunter can Kut-Ku Mail β for Agitator and a Counterattack Charm I for Adrenaline Rush, and that is pretty much it until the hunter regains access to the Ruins of Wyvernia. Adrenaline Rush is activated whenever the hunter dodges an attack, so it synergies well with Dual Blades.
With the new version of the Guardian Ebony armour, the hunter has room for Adrenaline Rush. It should be noted that Thunder Dual Blades can be obtained during this period, but they are not relevant in any matchups.
This is the inbetween equipment before the hunter gains access to the endgame decorations and Artian weapons. It only considers equipment that can be crafted or melded.
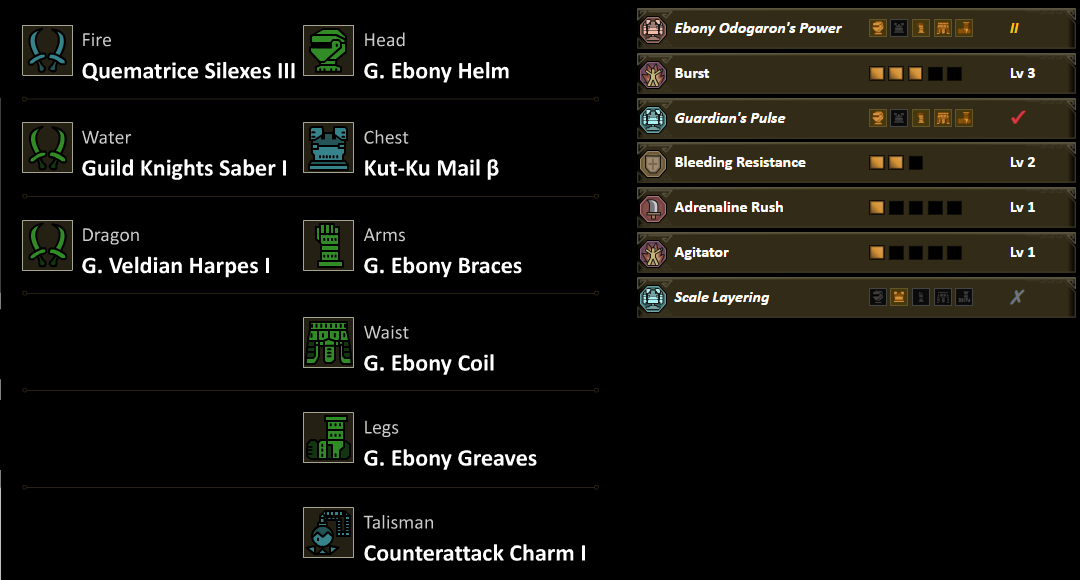
Starting Low Rank Gear (beginning to repel Uth Duna)
Once Doshaguma is defeated, the strongest early Dual Blades are the Dosha Fastflayers I. There are not any major armour pieces to look forward to at this point in the game. The ones chosen will help with stamina, but that is pretty much it for optimization. Once Uth Duna is repelled, the hunter will begin to discover useful Element options.
Mid-Low Rank Gear (to Black Flame’s defeat)
Guild Knight Sabers are extremely strong Dual Blades, and will end up being the best for most matchups. Quematrice Silexes II takes on a few matchups, but there is an argument that the hunter can run through most of this section of the game with the Water Element Dual Blades alone.
End-Low Rank Gear (to the end of Low Rank)
Up till now, Dual Blades have had no important armour skills to look forward to. The time has come — Burst is Dual Blades most relevant skill. It is very overtuned. The hunter also gets to take advantage of Ebony Odogaron’s set bonus, Burst Boost II. With this set, the hunter is very ready to take on Low Rank’s final boss.
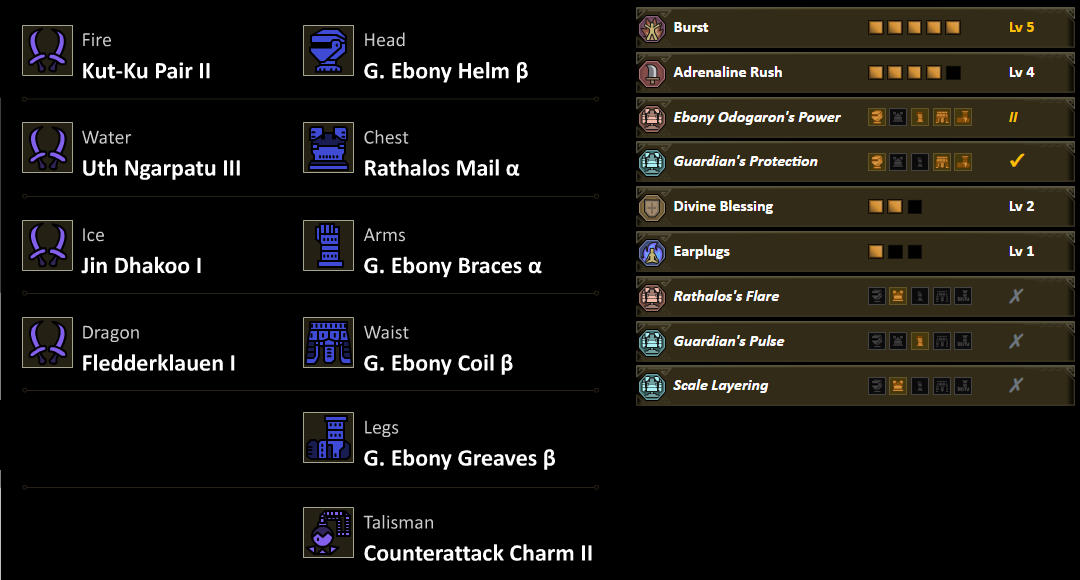
Starting High Rank Gear (to Guardian Fulgur Anjanath’s defeat)
Not much changes entering High Rank. The hunter can Kut-Ku Mail β for Agitator and a Counterattack Charm I for Adrenaline Rush, and that is pretty much it until the hunter regains access to the Ruins of Wyvernia. Adrenaline Rush is activated whenever the hunter dodges an attack, so it synergies well with Dual Blades.
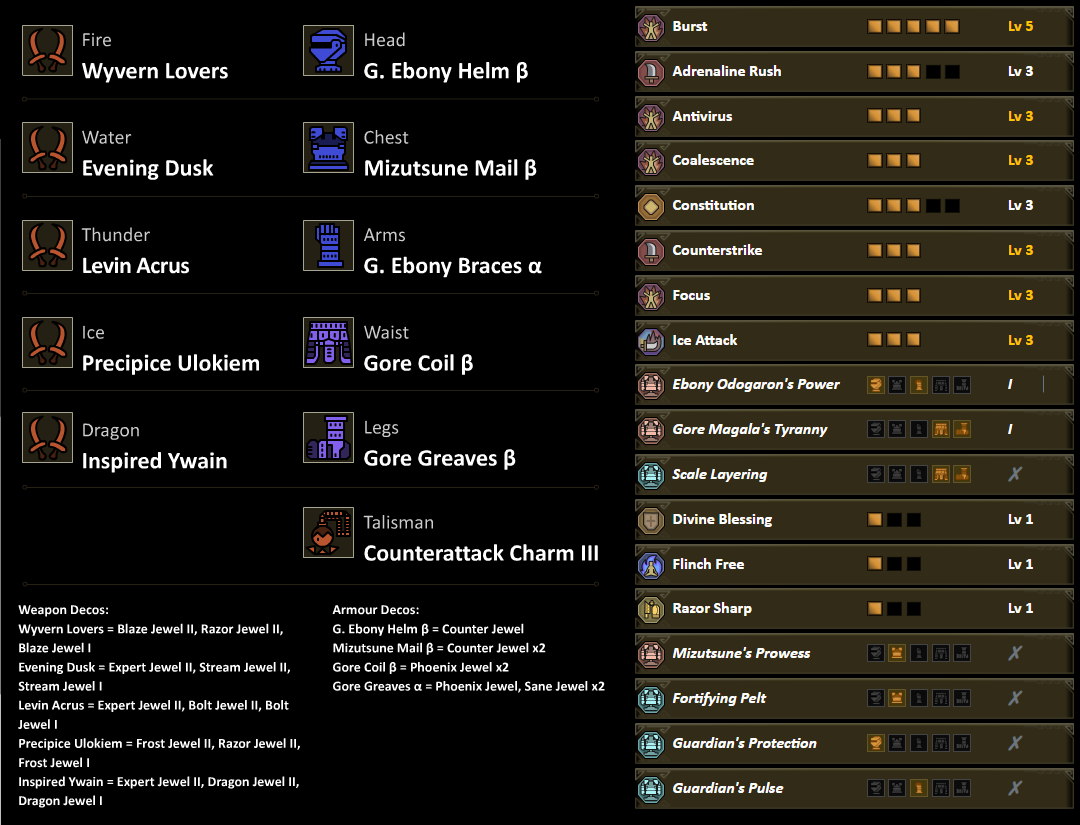
Mid-High Rank Gear (to Arkveld’s defeat)
With the new version of the Guardian Ebony armour, the hunter has room for Adrenaline Rush. It should be noted that Thunder Dual Blades can be obtained during this period, but they are not relevant in any matchups.
Pre-Endgame High Rank Gear
This is the inbetween equipment before the hunter gains access to the endgame decorations and Artian weapons. It only considers equipment that can be crafted or melded.
4.2 - Weak Points & Wounds
While previous titles had hit zone Values corresponding to the monster’s state such as normal, agitated and broken, Monster Hunter Wilds introduces two new differing states:
The hunter should take advantage of these Wounds and Weak Points, as it may decrease their hunt time (Slott).
- Wounds - Wounds have a finite number of applications per hit zone. The hunter will note a white Wound forming, followed by a red Wound, followed by a Scab. Once the Scab appears, a new Wound cannot be opened on that body part for a duration.
Red Wounds take extra damage according to a Wounded hit zone value until breaking and a Scab forms. Red Wounds can also be targeted with Focus Strikes. Breaking certain red Wounds, using a Focus Strike on Wounds, or breaking tempered Wounds often forces an enemy to be knocked down. - Weak Points - Certain conditions force an enemy’s hit zone to have a reddish/pink glow while in Focus Mode. This is an additional hit zone state, which typically causes the enemy to take extra damage. Examples are Jin Dahaad’s Plating (one time Weak Points until broken), and various breath attacks. These areas take significantly more damage for a set duration before reverting to their non-Weak Point state.
The hunter should take advantage of these Wounds and Weak Points, as it may decrease their hunt time (Slott).
4.3 - Corrupted Mantle
Corrupted Mantle needs to be discussed before combos and moves. Free Title Update 1 brought heavy nerfs to this mantle while increasing the duration of all the other mantles. Its strength was basically cut in half and is thirty seconds less active than before. This change was made in order to let the hunter more freely choose between mantles, without one of them sticking out as the undeniable best option. Yet it still remains the highest damage boost for Dual Blades, but making Evasion Mantle worth to consider for longer fights if the Hunter can keep sufficient uptime (KreaTV1)
The obvious thing the mantle does is increase Raw damage by 0-5% and Affinity between 5-10% depending on Burst-like mechanics, but permanent once active and the mantle is still functioning. The mantle lasts for 90 seconds. It also adds additional hits to basic attacks, such as Circle Slash combo, Sixfold combo, and Demon Flurry Rush. More involved attacks like Blade Dance or Demon Flurry do not get any additional hits (Pilgrim2092 & KreaTV1)
For speedrunners wanting to push past the meta sets, there are interesting ways to exploit the mantle. The Corrupted Combo (explained in the appropriate section) keeps the hunter in Archdemon Mode and therefore, no stamina is being drained. This opens up options for Maximum Might shenanigans (Pilgrim2092).
It is also possible to equip and unequip the mantle without the need to sheathe. Simply hold Front L and press Rear R to toggle your Mantle on or off. This is especially useful mid-fight, allowing for more fluent combat (KreaTV1).
4.4 - Combos and Moves
Just button mash lul. /guide. (I'm kidding.)
The Basics
Dual Blades are a relatively simple weapon that play extremely reactionary. If hunters button mash, they will get locked into more lengthy animations and probably get punished for it. A good majority of basic moves flow into each other really well, including interrupting combos to dash out of the way. Stay mobile, reposition, and keep up the pressure.
The standard combo is done by pressing Up Face Button/Left Click three times. In standard stance, press Right Face Button/Right Click to use Lunging Strike. To activate Demon Mode, press Rear R/MB4. In Demon Mode, Demon Flurry Rush used by pressing /Right Click by itself. Press Right Face Button/Right Click multiple times to use Left or Right Roundslash. Blade Dance is activated by pressing Up and Right Face Buttons/Left and Right Click simultaneously. In Monster Hunter Wilds, things get quite a bit more complicated.
Managing the Demon Gauge
Underneath the Sharpness Gauge is the Demon Gauge which is a total of 100 points. The Demon Gauge is used to activate Archdemon Mode which replaces the standard stance. Blade Dance and Demon Flurry also use up Demon Gauge, making it more important than ever. When in Demon Mode, hunters can use Sixfold Demon Slash Combo, Demon Flurry Rush, and Focus Strike: Turning Tide to fill the Demon Gauge. The gauge will also be filled whenever popping a Wound with the Focus Strike. Below is how much each move fills the gauge by:
Sixfold Demon Slash combo (61.5)
Demon Fangs = 7.5
Twofold Demon Slash (R) = 5
Twofold Demon Slash (L) = 5
Sixfold Demon Slash (L1) = 2.5
Sixfold Demon Slash (R1) = 2.5
Sixfold Demon Slash (R2) = 7.5
Sixfold Demon Slash (L2) = 7.5
Sixfold Demon Slash (L3) = 12
Sixfold Demon Slash (R3) = 12
Demon Flurry Rush (20)
Demon Flurry Rush (R1) = 2.5
Demon Flurry Rush (L1) = 2.5
Demon Flurry Rush (R2) = 2.5
Demon Flurry Rush (L2) = 2.5
Demon Flurry Rush (R2) = 5
Demon Flurry Rush (L2) = 5
Rising Slash (5)
Rising Slash = 5
Double Roundslash (37.5)
Spinning Slash (1) = 2.5
Spinning Slash (2) = 5
Spinning Slash (3) = 10
Double Roundslash (1) = 5
Double Roundslash (2) = 5
Double Roundslash (3) = 10
Focus Strike: Turning Tide, no Wound (5)
Focus Strike: Turning Tide (R) = 2.5
Focus Strike: Turning Tide (L) = 2.5
Perfect Dodge (7)
Perfect Dodge (R1) = 1.5
Perfect Dodge (L1) = 1.5
Perfect Dodge (R2) = 2
Perfect Dodge (L2) = 2
Screw Slicer (14)
Screw Slicer (R1) = 2
Screw Slicer (L1) = 2
Screw Slicer (R2) = 2.5
Screw Slicer (L2) = 2.5
Screw Slicer (R3) = 2.5
Screw Slicer (L3) = 2.5
Filling the Demon Gauge is very important. With Archdemon Mode, hunters gain Demon Flurry and Demon Flurry Rush. Without Archdemon Mode being available, stamina management with switching between Demon Mode and standard stance is much more difficult, as the /Right Click attack is just the average Lunging Strike. More importantly, there is Dual Blades’ new bread and butter.
Dual Blades users' new main tech is mixing Demon Flurry and Blade Dance. To use, Demon Gauge is required, although being in Archdemon Mode is not. On using either of the moves, the Demon Gauge is reduced by the below values:
Blade Dance I = 5% of Demon Gauge
Blade Dance II = 10% of Demon Gauge
Blade Dance III = 15% of Demon Gauge
Demon Flurry I = 5% of Demon Gauge
Demon Flurry II = 10% of Demon Gauge
Managing the gauge is the lifestyle of the Wilds Dual Blades hunter. Focus and Power Prolonger help significantly with maintaining Blade Dance and Demon Flurry’s high damage per second, but learning effective strategies through knowledge of each combo give and take, and practice will propel the hunter to great success!
Absolutely Perfect Shrouded Dodgy Adept Vault of Evasion… & Screw Slicer
In either Archdemon Mode or Demon Mode, Down Face Button -> Up Face Button
In either Archdemon Mode or Demon Mode, Space Bar -> Left Click
Moves: Demon Dodge (turns into Perfect Dodge if conditions are met) -> Screw Slicer
Motion Value Total: 22 (Perfect Dodge) + 55 (Screw Slicer)
Element Multiplier Total: 1.2 (Perfect Dodge) + 2.6 (Screw Slicer)
Hit count: 3 hits (Perfect Dodge) + 6 hits (Screw Slicer)
Silly names aside, Perfect Dodge is Dual Blades most important new tool. It is a repeatable dodge that requires good timing and to connect with an attack hitbox. What is meant by repeatable is that the only cooldown is the hunter’s stamina, for there is no Hunter Art or Wirebug cooldown. It also activates Demon Boost Mode, which is a buff that triggers a 20% increase to the hunter’s Raw stat and a hidden 20% Element post-multiplier for 24 seconds. The hunter’s red aura will be replaced with a blue aura. If the hunter sheathes, Demon Boost Mode will wear off. If the hunter successfully Perfect Dodges while in Demon Boost Mode, a few seconds is added to the buff timer.
The other cool tech with Demon Boost Mode is that it turns Demon Dodge into an attack and changes the followup attack to Screw Slicer, increasing Dual Blades mobility. Learn the monster’s behaviour and timings and the hunter will become the greatest of mosquitoes!

Blade Dance
In Demon Mode, Up and Right Face Buttons -> Up and Right Face Buttons -> Up and Right Face Buttons
In Demon Mode, Left Click + Right Click -> Left Click + Right Click -> Left Click + Right Click
Moves: Blade Dance I -> Blade Dance II -> Blade Dance III
Motion Value Total: 393
Element Multiplier Total: 20
Combo Duration: 5.39 seconds
Hit count: 27 hits
Blade Dance has received an interesting utility buff — by clicking Up and Right Face Buttons repeatedly, the hunter extends the combo, doing an extreme amount of damage. The combo is long and is best used when the monster is down. The other fantastic benefit of this combo is that it has low Wear & Tear, making the hunter’s strongest general combo also the least wasteful. Angeal would be proud.

Blade Flurry
In Demon Mode, Up and Right Face Buttons -> Rear R -> Rear R -> Rear R -> Rear R
In Demon Mode, Left Click + Right Click -> R -> R -> R -> R
Moves: Blade Dance I -> Demon Flurry I -> Blade Dance II -> Demon Flurry II -> Blade Dance III
Motion Value Total: 393 (Blade Dance) + 110 (Demon Flurry)
Element Multiplier Total: 20 (Blade Dance) + 7.2 (Demon Flurry)
Combo Duration: 7.25 seconds
Hit count: 35 hits
The new major mechanic for Dual Blades in Monster Hunter Wilds is Blade Dance’s modularity. What does this mean? The hunter can change to Archdemon Mode mid-combo by pressing Rear R and vice versa after beginning Blade Dance or Demon Flurry. They can also continue the current mode’s combo by pressing Up and Right Face Buttons again. Now, hunters should be aware that this combo is not damage efficient, but understanding the combo’s mobility is important knowledge, as it allows the hunter to reposition. Demon Flurry also has inefficient Wear & Tear.

4.4 - Combos and Moves (continued)
Demon Flurry I into Blade Dance II & III
In Archdemon Mode, Up and Right Face Buttons -> Rear R -> Up and Right Face Buttons
In Archdemon Mode, Left Click + Right Click -> R -> Left Click + Right Click
Moves: Demon Flurry I -> Blade Dance II -> Blade Dance III
Motion Value Total: 255 (Blade Dance) + 60 (Demon Flurry)
Element Multiplier Total: 10.8 (Blade Dance) + 4 (Demon Flurry)
Combo Duration: 4.14 seconds
Hit count: 19 hits
Hunters may ask, “what is the optimal Blade Dance Demon Flurry mix?” The answer is to begin with Demon Flurry I, followed by the rest of the Blade Dance combo. It offers the best mobility and gets the hunter into its strongest attacks the quickest. Demon Flurry II is fairly weak, so Blade Dance II is the superior follow-up. The hunter should be either using Blade Dance full combo or this for optimal damage output.

Eightfold and Corrupted Mantle
In Demon Mode, Up Face Button -> Up Face Button -> Up Face Button
In Demon Mode, Left Click -> Left Click -> Left Click
Moves: Demon Fangs -> Twofold Demon Slash -> Sixfold Demon Slash
Motion Value Total: 116 (Sixfold combo) + 14 (Corrupted Mantle)
Element Multiplier Total: 5.4 (Sixfold combo) + 1.5 (Corrupted Mantle)
Combo Duration: 2.27 seconds
Hit count: 14 hits
Requires: Corrupted Mantle equipped
Corrupted Mantle has the unusual mechanic of adding additional hits onto basic attacks. Many of the standard combos have these additional hits, but nothing more complicated like Blade Dance or Demon Flurry. Sixfold effectively becomes Eightfold, as two additional attacks are added. Damage per second-wise, it improves Sixfold by a little bit but definitely not more than the bread and butter combos, but the real neat thing it does is add more fuel into the Demon Gauge.

Meme Rider
Hold Rear L -> Front R
Press Alt to enter Focus Mode -> Shift
Moves: Focus Strike: Turning Tide
Spine rider makes a return, and it takes breaking the laws of physics one step further. Levi-on-demand is a useful feature if the monster is about to retreat, as the move often causes a stagger. The hunter uses Monster Hunter Rise’s Demon Flight as either a gap closer or to pop Wounds, followed by Heavenly Blade Dance. Damage per second-wise, this is a mediocre attack that often poorly positions the hunter. It is also somewhat glitchy, having the hunter fly in weird directions and takes too long to connect to the monster. The positive thing is that it usually fills the Demon Gauge by two-thirds.

Corrupted Combo
In Archdemon Mode, Up Face Button -> Up and Right Face Buttons
In Archdemon Mode, Left Click -> Left Click + Right Click
Moves: Double Slash -> Demon Flurry I
Motion Value Total: 79 + 4 (Corrupted Mantle)
Element Multiplier Total: 5.2 + 0.6 (Corrupted Mantle)
Combo Duration: 1.31 seconds
Hit count: 8 hits
Requires: Corrupted Mantle equipped
Alright. The real new degenerate tech is the Corrupted Combo. The combo is rapid and lacks any delay between combos. Double Slash also moves the hunter a step forward, so positioning is important. It rivals the Demon Flurry I into Blade Dance II & III combo in damage per second, but just a little less. The Corrupted Combo is no longer Dual Blades hunter’s strongest combo on long downs but it is still tech worth considering if the hunter wishes to save Demon Gauge. It still needs the Corrupted Mantle equipped to be useful, so use this combo when the hunter can optimize the mantle’s uptime.

Boosted Blade Dance
In Demon Boost Mode, Down Face Button -> Up and Right Face Button -> Up and Right Face Button
In Demon Boost Mode, Space Bar -> Left Click + Right Click -> Left Click + Right Click
Moves: Dodge -> Blade Dance II -> Blade Dance III
Motion Value Total: 277
Element Multiplier Total: 12
Combo Duration: 3.82 seconds
Hit count: 18 hits
Dual Blades hunters received a new combo in Title Update 2. If Demon Boost Mode is active, the hunter can dodge and immediately skip into Blade Dance II! Now, how does this compete with other variations of Blade Dance? Demon Flurry I into Blade Dance II & III is still the strongest tech DPS-wise, but this is another fantastic tool to have in the arsenal for those quick bursts.

Slinger
Hold Left Trigger -> Click Left Stick
Press Alt to enter Focus Mode -> Mouse 3
A tool to always have in the back pocket is the slinger ammo. What the hunter may not know is that the slinger can be used while the weapon is unsheathed!
The slinger currently has two major uses: to Flash Pod fliers or temporarily blind the monster, and to use a Luring Pod. Luring Pods may be used to bring a monster over to an environmental hazard, to aggro them from other hunters, and to stop them from retreating! GET OVER HERE!

In Archdemon Mode, Up and Right Face Buttons -> Rear R -> Up and Right Face Buttons
In Archdemon Mode, Left Click + Right Click -> R -> Left Click + Right Click
Moves: Demon Flurry I -> Blade Dance II -> Blade Dance III
Motion Value Total: 255 (Blade Dance) + 60 (Demon Flurry)
Element Multiplier Total: 10.8 (Blade Dance) + 4 (Demon Flurry)
Combo Duration: 4.14 seconds
Hit count: 19 hits
Hunters may ask, “what is the optimal Blade Dance Demon Flurry mix?” The answer is to begin with Demon Flurry I, followed by the rest of the Blade Dance combo. It offers the best mobility and gets the hunter into its strongest attacks the quickest. Demon Flurry II is fairly weak, so Blade Dance II is the superior follow-up. The hunter should be either using Blade Dance full combo or this for optimal damage output.
Eightfold and Corrupted Mantle
In Demon Mode, Up Face Button -> Up Face Button -> Up Face Button
In Demon Mode, Left Click -> Left Click -> Left Click
Moves: Demon Fangs -> Twofold Demon Slash -> Sixfold Demon Slash
Motion Value Total: 116 (Sixfold combo) + 14 (Corrupted Mantle)
Element Multiplier Total: 5.4 (Sixfold combo) + 1.5 (Corrupted Mantle)
Combo Duration: 2.27 seconds
Hit count: 14 hits
Requires: Corrupted Mantle equipped
Corrupted Mantle has the unusual mechanic of adding additional hits onto basic attacks. Many of the standard combos have these additional hits, but nothing more complicated like Blade Dance or Demon Flurry. Sixfold effectively becomes Eightfold, as two additional attacks are added. Damage per second-wise, it improves Sixfold by a little bit but definitely not more than the bread and butter combos, but the real neat thing it does is add more fuel into the Demon Gauge.
Meme Rider
Hold Rear L -> Front R
Press Alt to enter Focus Mode -> Shift
Moves: Focus Strike: Turning Tide
Spine rider makes a return, and it takes breaking the laws of physics one step further. Levi-on-demand is a useful feature if the monster is about to retreat, as the move often causes a stagger. The hunter uses Monster Hunter Rise’s Demon Flight as either a gap closer or to pop Wounds, followed by Heavenly Blade Dance. Damage per second-wise, this is a mediocre attack that often poorly positions the hunter. It is also somewhat glitchy, having the hunter fly in weird directions and takes too long to connect to the monster. The positive thing is that it usually fills the Demon Gauge by two-thirds.
Corrupted Combo
In Archdemon Mode, Up Face Button -> Up and Right Face Buttons
In Archdemon Mode, Left Click -> Left Click + Right Click
Moves: Double Slash -> Demon Flurry I
Motion Value Total: 79 + 4 (Corrupted Mantle)
Element Multiplier Total: 5.2 + 0.6 (Corrupted Mantle)
Combo Duration: 1.31 seconds
Hit count: 8 hits
Requires: Corrupted Mantle equipped
Alright. The real new degenerate tech is the Corrupted Combo. The combo is rapid and lacks any delay between combos. Double Slash also moves the hunter a step forward, so positioning is important. It rivals the Demon Flurry I into Blade Dance II & III combo in damage per second, but just a little less. The Corrupted Combo is no longer Dual Blades hunter’s strongest combo on long downs but it is still tech worth considering if the hunter wishes to save Demon Gauge. It still needs the Corrupted Mantle equipped to be useful, so use this combo when the hunter can optimize the mantle’s uptime.
Boosted Blade Dance
In Demon Boost Mode, Down Face Button -> Up and Right Face Button -> Up and Right Face Button
In Demon Boost Mode, Space Bar -> Left Click + Right Click -> Left Click + Right Click
Moves: Dodge -> Blade Dance II -> Blade Dance III
Motion Value Total: 277
Element Multiplier Total: 12
Combo Duration: 3.82 seconds
Hit count: 18 hits
Dual Blades hunters received a new combo in Title Update 2. If Demon Boost Mode is active, the hunter can dodge and immediately skip into Blade Dance II! Now, how does this compete with other variations of Blade Dance? Demon Flurry I into Blade Dance II & III is still the strongest tech DPS-wise, but this is another fantastic tool to have in the arsenal for those quick bursts.
Slinger
Hold Left Trigger -> Click Left Stick
Press Alt to enter Focus Mode -> Mouse 3
A tool to always have in the back pocket is the slinger ammo. What the hunter may not know is that the slinger can be used while the weapon is unsheathed!
The slinger currently has two major uses: to Flash Pod fliers or temporarily blind the monster, and to use a Luring Pod. Luring Pods may be used to bring a monster over to an environmental hazard, to aggro them from other hunters, and to stop them from retreating! GET OVER HERE!
4.5 - Cheat Sheet
Due to the… uncomplicated meta, it is assumed the hunter knows for Optimal Dual Blades which colour corresponds with which Element of Dual Blades… which mostly have the same name.
4.6 - Frequently Asked Questions
Q: “Should I go Raw or Element?”
A: (Really? C’mon man…) To quote the introduction, “Dual Blades are designed to utilize Element damage.” The hunter should prioritize Element sets and learn the appropriate matchups (Pilgrim2092).
Q: “What if I want just one set?”
A: Stop it.
Q: “I don’t like the Artian Dual Blades, what do I use instead?”
A: By crafting the final version of a weapon branch, you gain the option to layer your current weapon with the skins of that weapon branch (KreaTV1 & Pilgrim2092)!
Q: “I don’t like Protective Polish.”
A: Cool, it is optional (Pilgrim2092). 👍👍
Q: “What's my skill priority?”
A: In general for a mixed build in endgame, Sharpness comfort (durability should be 300 hits minimum or 120 hits minimum with Protective Polish), Burst Lv1, Adrenaline Rush Lv1, Weakness Exploit Lv1-5, Adrenaline Rush Lv2-5, Agitator Lv1-5, then Burst Lv2-5 (Pilgrim2092).
Q: “Do I want X or Y Reinforcement on my Artian Element Dual Blades?”
With Title Update 2, it is recommended to get one Sharpness reinforcement and as many Attack reinforcements as possible. This is followed by Affinity, then Element (Bro4U & Pilgrim2092).
Q: “I found a better set”
A: There is always room to improve with your own preferences. These are just our recommendations for places to start making endgame Dual Blades’ sets (Pilgrim2092).
Q: “I saw a speedrunner using X.”
A: We appreciate the extreme proficiency runners have with their weapons, but you should not assume that the builds they use are the best possible builds because the said runner is using it. Use math and what applies to you to decide what you should build instead of simply copying that runner. They may be fighting with a different philosophy for that specific hunt (Pilgrim2092).
Q: “I like to use X set/skill.”
A: There is no wrong way to play. If you are having fun, you do not have to adjust to the uniform meta. Some people like to play in their own unique ways. As long as you are having fun, that is okay! That being said, if you are coming to a set guide for validation in your personal sets, we cannot really help you (Pilgrim2092).
Q: “Should I use Flinch Free or Shockproof?”
A: Completely up to you. Demon Mode has built-in Flinch Free. It will only be useful in the other stances, but is a valuable skill in cooperative play (Pilgrim2092).
Q: “Dual Blades love to dodge! Why aren’t the sets using Evade Extender?”
A: Evade Extender actually may make playing Dual Blades worse. You can absolutely get used to it, but more often than not, you will overshoot your destination (Pilgrim2092).
Q: “Dual Blades love to dodge! Why aren’t the sets using Evade Window?”
A: Evade Window is a fantastic skill! It is now a utility skill over a comfort skill, as it improves Demon Boost Mode uptime by improving your ability to dodge through attacks (Pilgrim2092)!
Q: “Does Evade Window increase the Perfect Dodge window?”
A: It does! Each level of Evade Window increases the base iframes by another 5% (KreaTV1).
Q: “Do Dual Blades use Focus Mode?”
A: While our Focus Strike Turning Tide, as further explained in the Combos and Moves, it is unreliable in practice, using just Focus Mode to aim your hunter’s attacks is a very strong new tool. Sixfold Combo and Blade Dance Combo should almost always be accompanied by Focus Mode (KreaTV1).
Q: “Ok, so I want to be in Focus Mode all the time?”
A: Hunters will want to operate in and outside of Focus Mode. Though there are lots of advantages in utilizing the Focus Mode during combat, it should not be turned on all the time. For example the move Screw Slicer (after a Perfect Evade) suffers from being used in Focus Mode because it’ll ignore directional input and always lunges toward the center of your screen. This is problematic after a Demon Boost Mode Dodge when trying to close the gap and the monster is not perfectly centered. It may therefore send off-target. To fix this, briefly disable Focus Mode before using Screw Slicer for better control (KreaTV1).
Q: “When do I unlock layered weapons?”
A: As soon as you complete any weapon branch (Pilgrim2092)!
Q: "Why is Sharpness such a big deal?"
A: It is because each tier of Sharpness increases Raw and Element via a multiplier. Getting to white is going to be the best source of damage for a lot of meta options. Sharpness loss mitigation is required because Dual Blades eat through Sharpness as an owl goes through tootsie pops. If you want to stay at your optimal Sharpness levels without stopping to sharpen too often, you're going to need the appropriate weapon skills (Pilgrim2092).
Q: "Should I be using Dash Juice?"
A: Up to you. Dual Blades can manage their Stamina pretty well in Wilds, even with the restriction of getting forced out of Demon Mode at empty Stamina, so it is not a necessary buff but can certainly help. Dash Juice reduces the effects of both the Stamina lost on evading, as well as Demon Mode’s continuous Stamina drain. It is a 25% Reduction to both, stacking with the skills Constitution and Marathon Runner multiplicatively. However, a fixed cap of 50% reduction is forced upon the stacking of the stamina reduction buffs. The buff provided by Dash Juice will therefore greatly decrease in combination with the highest level of either Stamina Skill (KreaTV1).
Q: "What ingredients should I eat?"
A: Hmm… This is a tough question. In the game’s current state, ingredients are difficult to come by without spending a bunch of resources and wasting lots of time. We would advise taking advantage of any Village meal event which occurs randomly and can be seen on the World Map, as they last an hour and offer the best bonuses for free. Otherwise, for now, just basic meals of Meat. We are meat lovers. If you are to optimize a meal, it would be Meat, Tumbler Meal (Hi), and whatever Secondary Ingredient sounds best for the situation (Pilgrim2092).
Credits
Team Leviathan (Bro4U, July, KreaTV1, OreoPancakes, Pilgrim2092 [team lead], Refia❤️, and Slott), for their passion for the weapon type and creating the document,
AsteriskAmpersand and dtlnor for their ongoing work and contributions to the community,
mhwilds-db[mhwilds.wiki-db.com] for their amazing and useful armour set search engine,
r/MonsterHunterMeta for its continued global accessibility for all things meta and to the brilliant people in it,
Monster Hunter Gathering Hall[discord.gg] and its emotional support animals (you know who you are, you wonderful people),
The Monster Hunter team and Capcom,[www.capcom.com] for working on this masterpiece of gaming entertainment,
And of course, you, the reader. Thank you. Now get out there and go hunting.