Helldivers 2 Game Update Routine
 アンジェル
アンジェル(289 ratings)
Apr 29, 2024 @ 2:49pm16,906673
Modding or ConfigurationEnglish
Thank You for Your Support!
If this guide helped you, please consider supporting my guide for beginners
https://steamcommunity.com/sharedfiles/filedetails/?id=3208648129
https://steamcommunity.com/sharedfiles/filedetails/?id=3208648129
Thank you very much for every upvote.
It keeps me motivated to make guides for you!
It keeps me motivated to make guides for you!
Step 1: Disable Steam Cloud
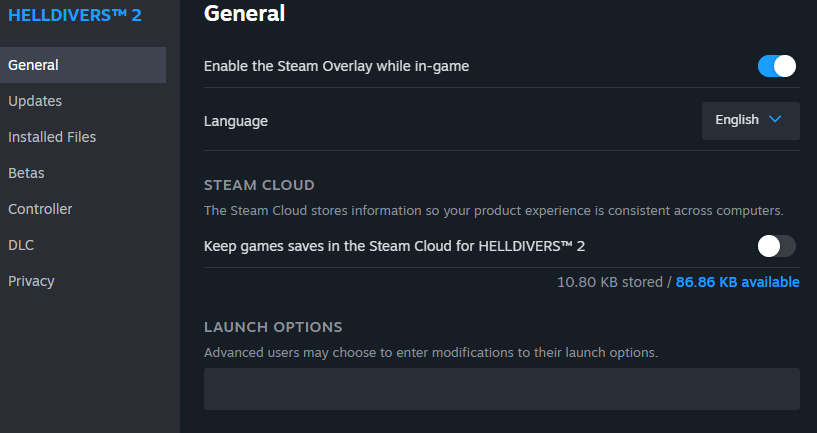
Right-click on the game in your Steam Library -> select Properties
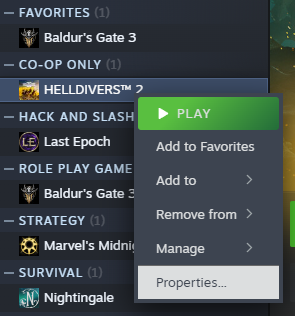
Disable Steam Cloud for Helldivers 2
Disable Steam Cloud for Helldivers 2
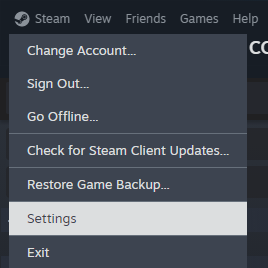
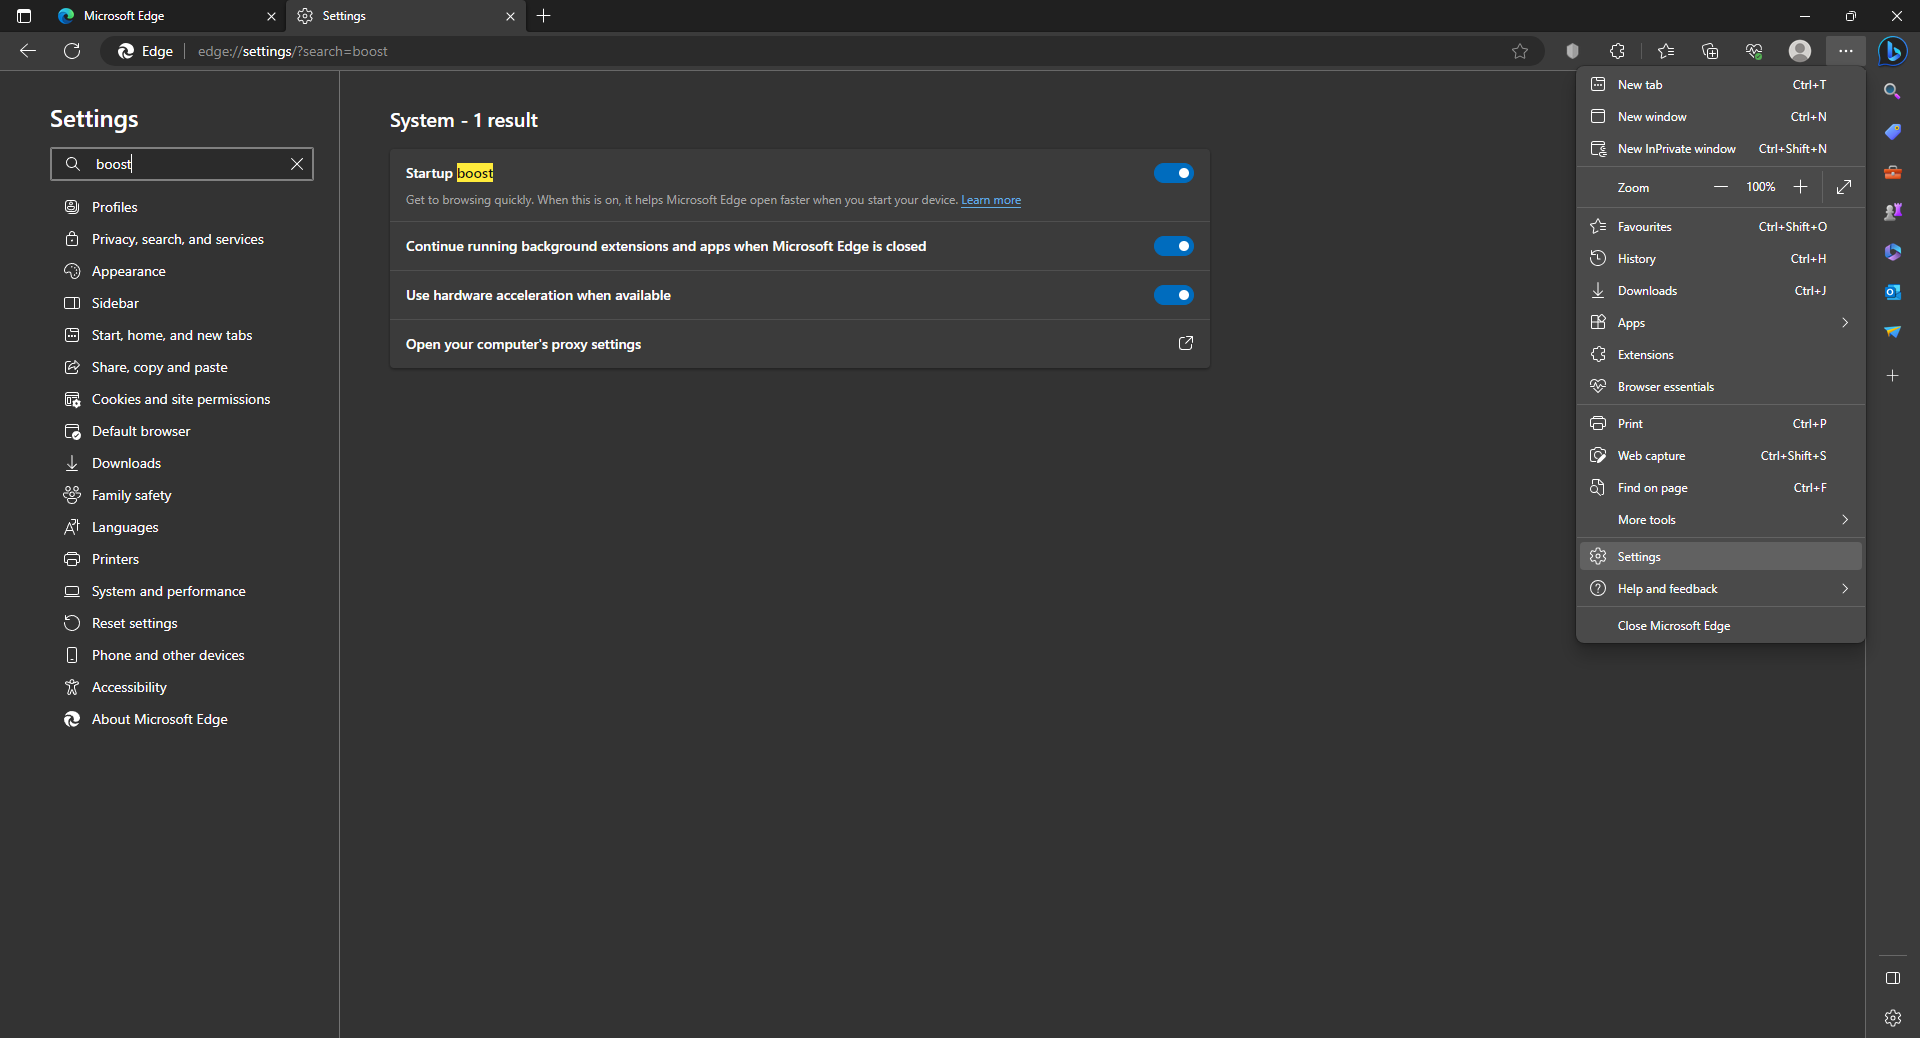
Step 2: Disable Shader Pre-Caching
Open Steam Settings from the main menu of Steam
Go to Downloads tab, Clear Download Cache and disable Shader Pre-Caching below
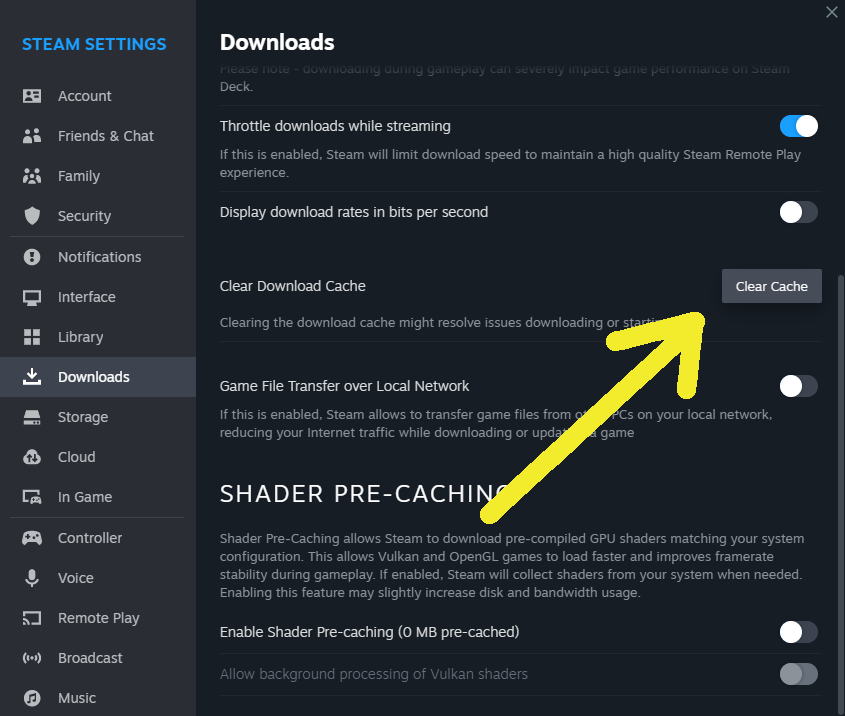
Go to Downloads tab, Clear Download Cache and disable Shader Pre-Caching below
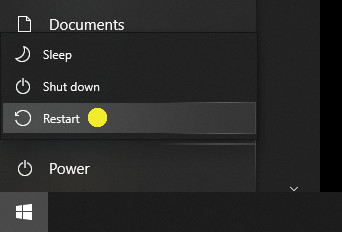
Step 3: Restart Your PC
You have to use proper "Restart" as just shutting down the PC over night will not count unless you are using advanced Windows user settings.
In case you want to set shut down working correctly, this is the option you need to lookout for:
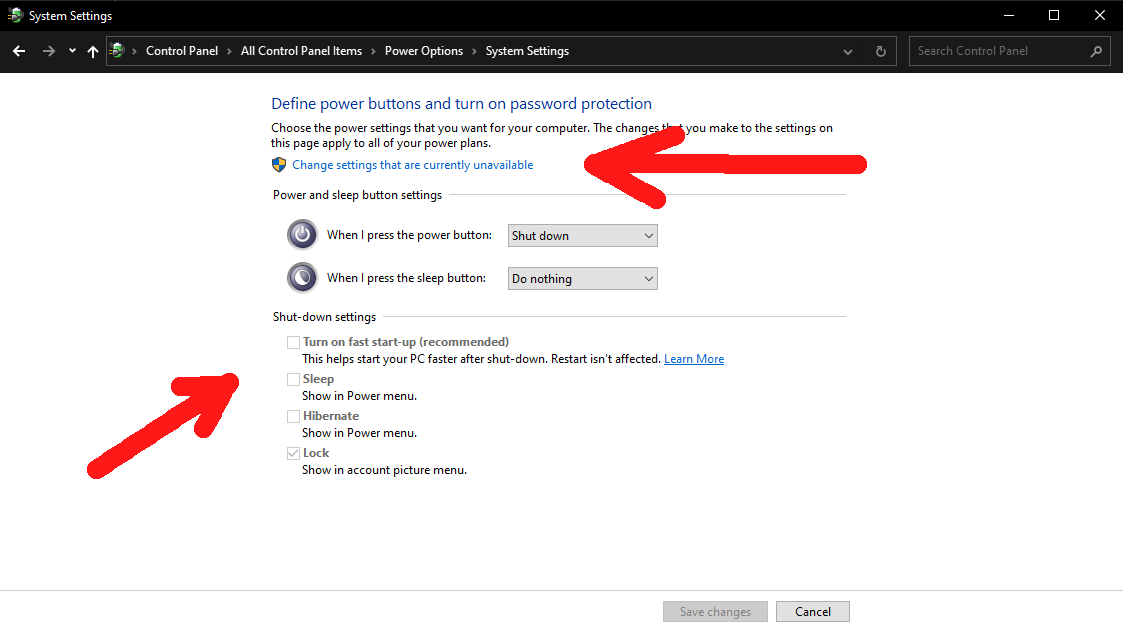
Fast Start-Up has to be disabled. Fastest way to access the Windows control panel by typing "control" into run (WIN+R) or your Windows Explorer address bar.
In case you want to set shut down working correctly, this is the option you need to lookout for:
Fast Start-Up has to be disabled. Fastest way to access the Windows control panel by typing "control" into run (WIN+R) or your Windows Explorer address bar.
Step 4: Delete Cache
Enter
either in your Windows Explorer address bar or via Run (WIN+R)
(it is a shortcut to C:\Users\YourWindowsUsername\AppData\Roaming\Arrowhead\Helldivers2)
there you delete everything except the saves folder and user_settings.config file.
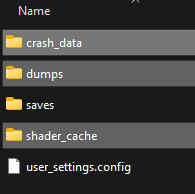
Delete the mentioned exceptions if you have issues launching the game at all, as it would reset your settings.
https://steamcommunity.com/sharedfiles/filedetails/?id=3389607883
%USERPROFILE%\AppData\Roaming\Arrowhead\Helldivers2
either in your Windows Explorer address bar or via Run (WIN+R)
(it is a shortcut to C:\Users\YourWindowsUsername\AppData\Roaming\Arrowhead\Helldivers2)
there you delete everything except the saves folder and user_settings.config file.
Delete the mentioned exceptions if you have issues launching the game at all, as it would reset your settings.
Bonus Tip
There is a trick to keep your cache always fresh.https://steamcommunity.com/sharedfiles/filedetails/?id=3389607883
Step 5: Delete All Cache (Optional)
If you have troubles launching the game, issues with logging in / purchasing Super Credits / connecting with friends, it can help deleting all local Helldivers 2 files. This method is also officially endorsed by Arrowhead's official support for Helldivers 2.
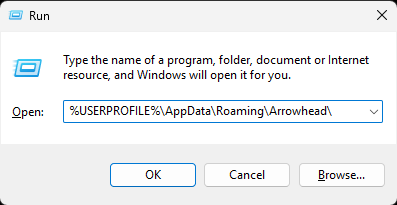
To manually clean up your game's cache and local data for troubleshooting, press WIN+R to open the Run terminal and there enter

Confirm with OK and delete the Helldivers 2 folder entirely. Then restart your PC.
To manually clean up your game's cache and local data for troubleshooting, press WIN+R to open the Run terminal and there enter
%USERPROFILE%\AppData\Roaming\Arrowhead\
Confirm with OK and delete the Helldivers 2 folder entirely. Then restart your PC.
Step 6: Repair the Steam Library
Open Steam Settings from the main menu of Steam
Go to the Storage tab, select the drive on which your game is installed, then pick the Repair Folder option from the menu (the three dots "...")
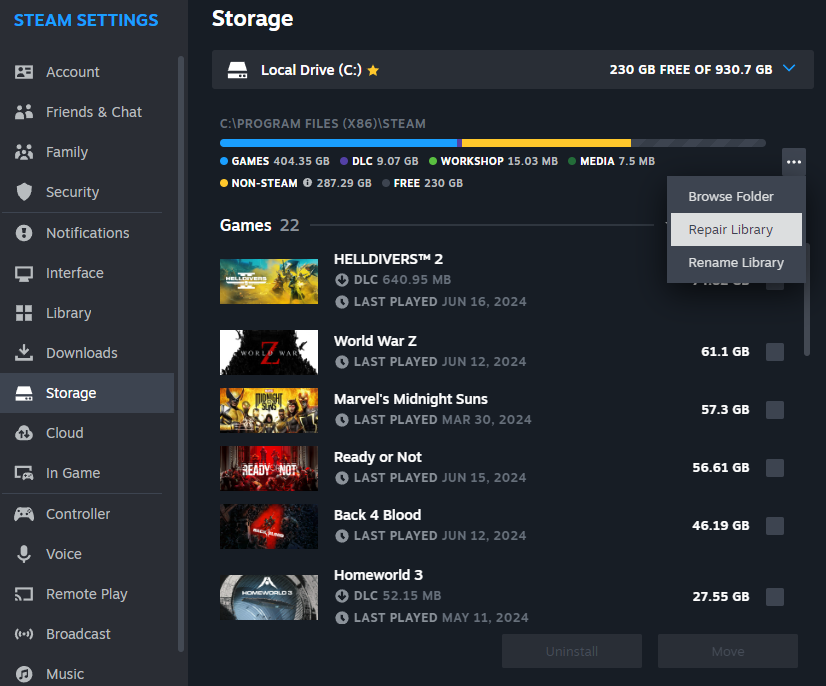
Go to the Storage tab, select the drive on which your game is installed, then pick the Repair Folder option from the menu (the three dots "...")
Step 7: Verify Game Files
Right-click on the game in your Steam Library -> select Properties
Go to the Local Files tab and select Verify integrity of game files
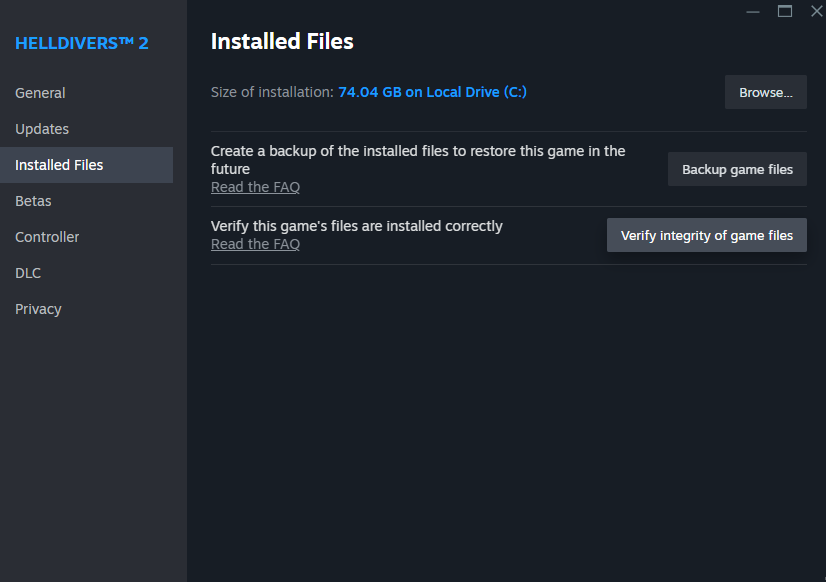
Go to the Local Files tab and select Verify integrity of game files
That was it!
If you repeat the steps before every update, you can be certain that you will never run into game update related issues.

Performance Tip 1: Memory Leak
Use ISLC to Cure Memory Leak Issues
Download the tool for free and launch it without installation after extractionhttps://www.wagnardsoft.com/forums/viewtopic.php?t=1256
Select
Start ISLC minimzed and auto-Start monitoring.
Launch ISLC on user Logon.
for convenience
Hit Start to let it do it works and it will automatically effectively negate the effects of what you know as "memory leak". Keep the window open while you play/minimise only.
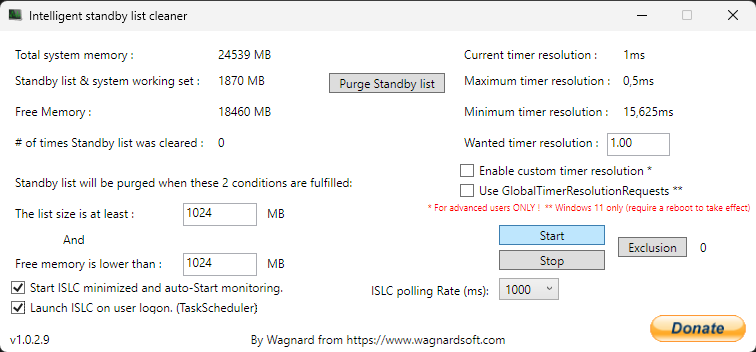
The default values are good as they are for Helldivers 2 and any PC setup.
And it works for other games too!
Advanced Settings

- enable custom timer resolution
- use GlobalTimerResolutionsRequests
- set wanted timer resolution to 0.5
- set the condition free memory is lower than to half of your memory *
Performance Tip 2: Borderless Gaming
Run the game in windowed mode and use Borderless Gaming
https://store.steampowered.com/app/388080/Borderless_Gaming/
It sounds counter-intuitive as the game already supports borderless windowed mode and running another app usually decreases performance. But it has been proven that the tool can indeed improve performance slightly.
The app is available as freeware - the Steam version is to support the author.
https://github.com/codeusa/borderless-gaming/releases
Performance Tip 3: Virtual Memory
Go to Settings and there select the System category, then go to Advanced system settings
In the subsection Performance Options we go for the Advanced tab and select change for the Virtual Memory
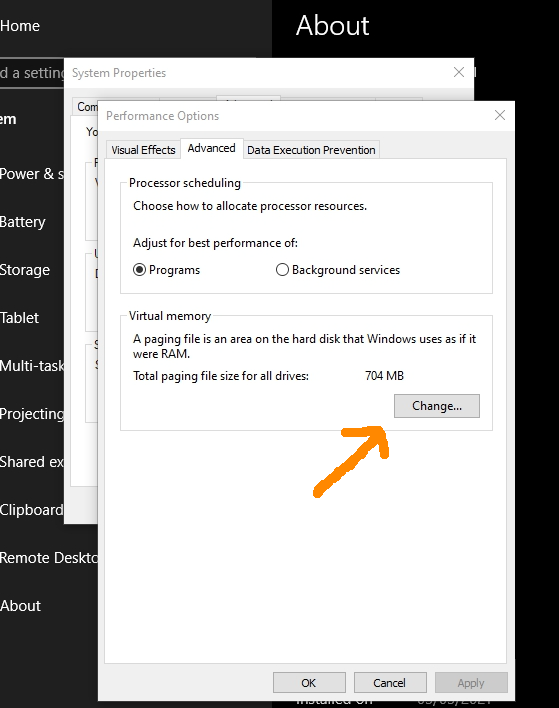
As you can see in this example, it is pretty low.
I recommend a size of at least 8-16 GB, better 24-32 GB
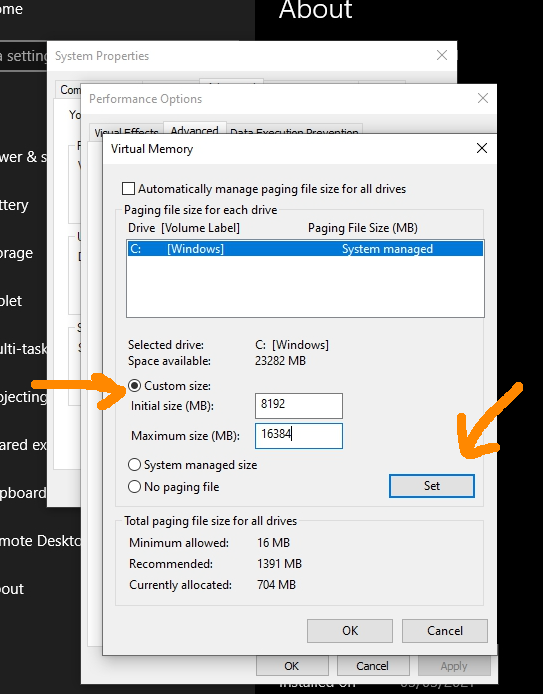
In the subsection Performance Options we go for the Advanced tab and select change for the Virtual Memory
As you can see in this example, it is pretty low.
I recommend a size of at least 8-16 GB, better 24-32 GB
Performance Tip 4: Windows Effects
Configure Windows' visual effects for optimal performance, diminishing extraneous animation effects to enhance system performance. The impact of this adjustment is notably more pronounced on low-performance PCs compared to high-performance systems.
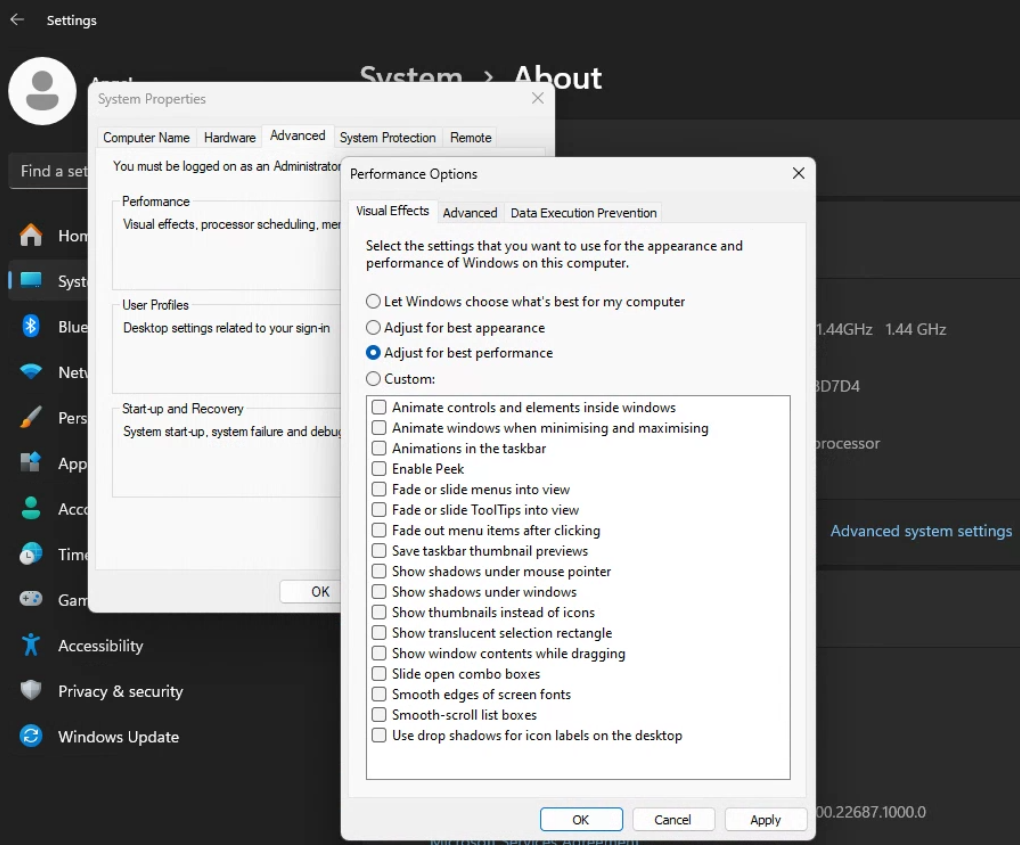
System -> About -> Advanced System Settings -> Performance
You might be surprised what difference it could make on most PCs
System -> About -> Advanced System Settings -> Performance
You might be surprised what difference it could make on most PCs
Performance Tip 5: Shader Cache
This option can be found in Nvidia's control panel
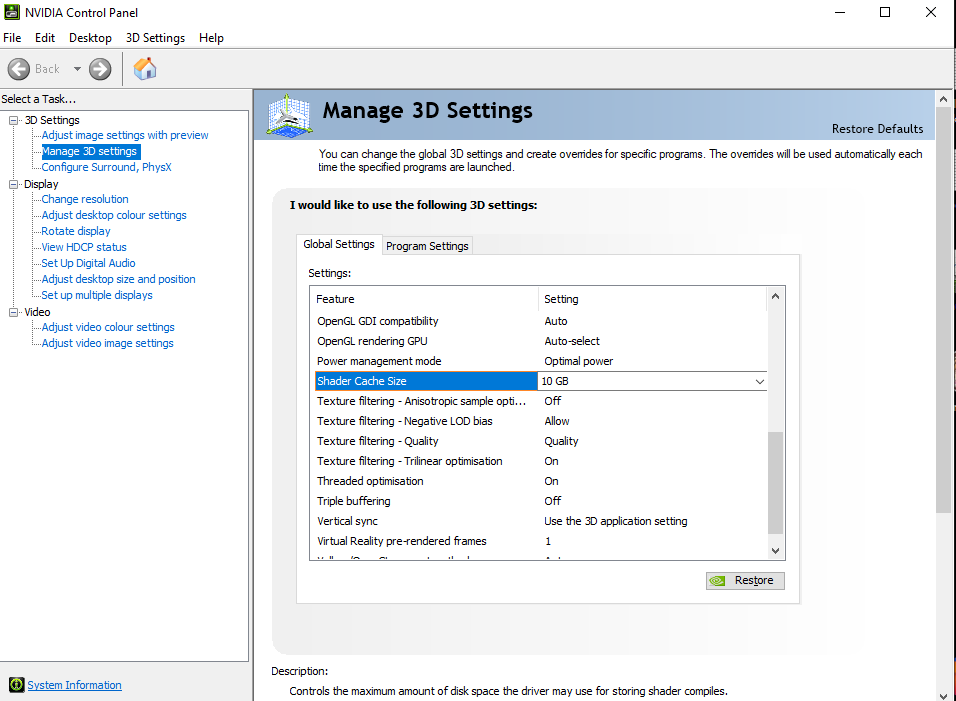
Set to 10 GB minimum (in this image it shows the Nvidia Control Panel for Nvidia graphics cards)
For AMD cards you need to open regedit (WIN+R, then enter regedit) go to
or
then change there "ShaderCache" from "30 00" or "31 00" to "32 00"
Set to 10 GB minimum (in this image it shows the Nvidia Control Panel for Nvidia graphics cards)
For AMD cards you need to open regedit (WIN+R, then enter regedit) go to
HKEY_LOCAL_MACHINE\SYSTEM\CurrentControlSet\Control\Class\{4d36e968-e325-11ce-bfc1-08002be10318}\0000\UMD
or
HKEY_LOCAL_MACHINE\SYSTEM\CurrentControlSet\Control\Class\{4d36e968-e325-11ce-bfc1-08002be10318}\0001\UMD
(it might be something similar to this)then change there "ShaderCache" from "30 00" or "31 00" to "32 00"
Performance Tip 6: Increase CPU Priority
Either use the task manager to increase the game's priority, or use this registry entry to permanently run Helldivers 2 in higher priority than other applications in Windows.
One-click-file[d.kuku.lu]
Content of the file
To summon the Task Manager press CTRL+ALT+DEL and select Task Manager - this can be done while the game is running
While the game is running, go to the Details tab and select helldivers2.exe to set its priority to High.
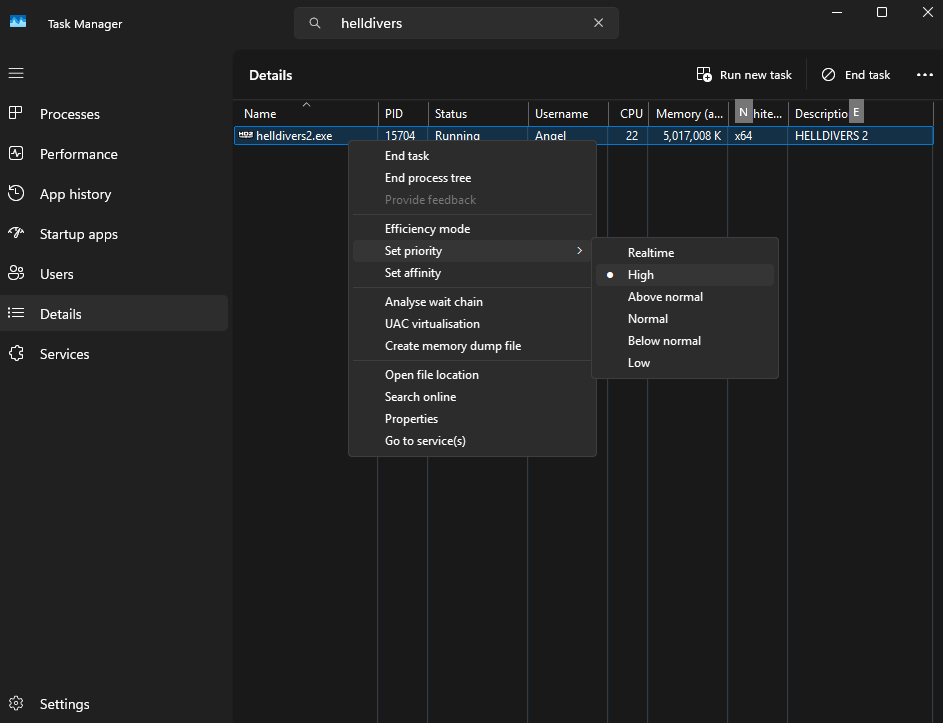
You have to do this every time when running the game. Using the One-click-file above which adds the registry entry comfortably is surely more convenient.
Also worth using is Park Control by bitsum
https://bitsum.com/parkcontrol/
By turning off the CPU cores parking and frequencing you kinda force your CPU into maximum performance. The free version is fully sufficent for Helldivers 2 to manually turn the functionality on/off.
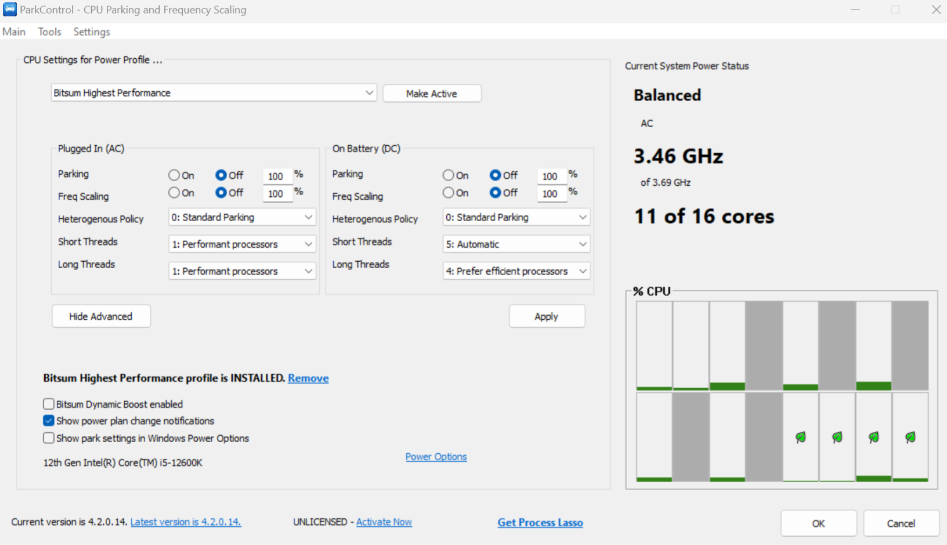
Turn Parking and Freq Scaling all off and hit Apply.
This has to do with the way Windows scheduling works with the AMD CPU architecture. However, this only applies to older AMD CPUs and PCs not running the latest version of Windows. It might be worth a try to see if you get an FPS boost from the tweak. Easily reversible and safe to try.
Long story short: players with an AMD CPU and/or an older and weak CPU can give running the game with DirectX 11 a try. With old and weak and AMD PCs it can result in a significant performance boost.
To run the game with DirectX 11
Right-click on the game in your Steam Library -> select Properties
add
to the Launch Options
Note: Using DirectX 11 will cause the game to use a different shader cache - some people mistake this for a performance boost due to DirectX 11. But more often it would give identical results just by cleaning up the existing cache.
My recommendation: automate the cache cleanup for best results.
https://steamcommunity.com/sharedfiles/filedetails/?id=3389607883
One-click-file[d.kuku.lu]
Content of the file
Windows Registry Editor Version 5.00
[HKEY_LOCAL_MACHINE\SOFTWARE\Microsoft\Windows NT\CurrentVersion\Image File Execution Options/helldivers2.exe/PerfOptions]
"CpuPriorityClass"=dword:00000003
"IoPriority"=dword:00000003
the other to revert the new settings (aka deinstall)To summon the Task Manager press CTRL+ALT+DEL and select Task Manager - this can be done while the game is running
While the game is running, go to the Details tab and select helldivers2.exe to set its priority to High.
You have to do this every time when running the game. Using the One-click-file above which adds the registry entry comfortably is surely more convenient.
Also worth using is Park Control by bitsum
https://bitsum.com/parkcontrol/
By turning off the CPU cores parking and frequencing you kinda force your CPU into maximum performance. The free version is fully sufficent for Helldivers 2 to manually turn the functionality on/off.
Turn Parking and Freq Scaling all off and hit Apply.
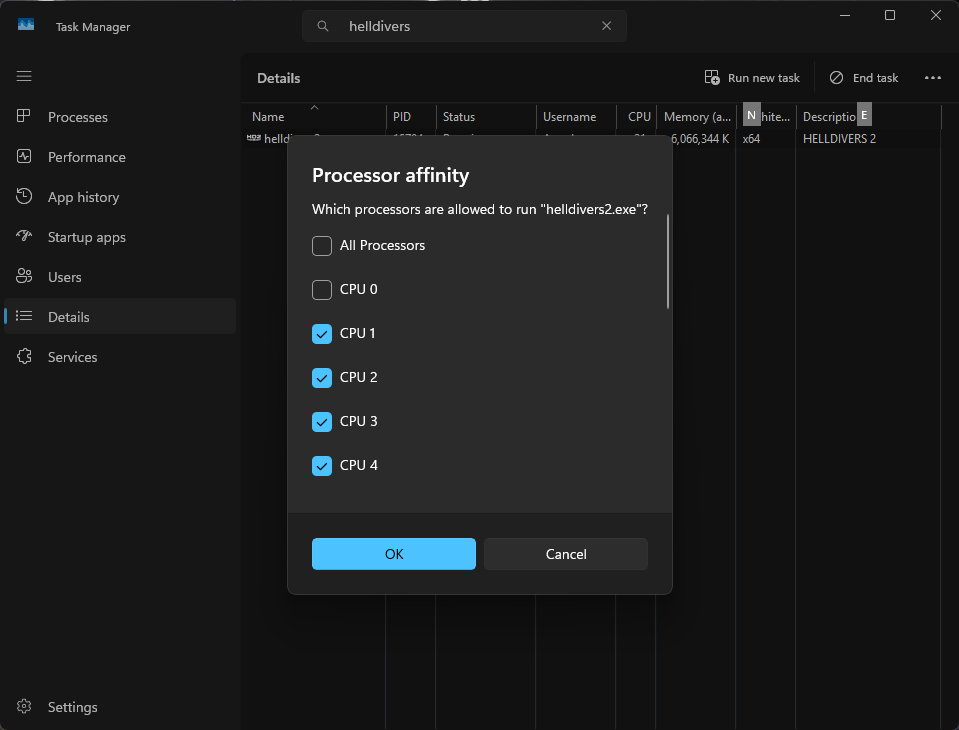
AMD Specific CPU Issue
Deactivating the affinity for core 0 with AMD CPUs can result in higher performance.This has to do with the way Windows scheduling works with the AMD CPU architecture. However, this only applies to older AMD CPUs and PCs not running the latest version of Windows. It might be worth a try to see if you get an FPS boost from the tweak. Easily reversible and safe to try.
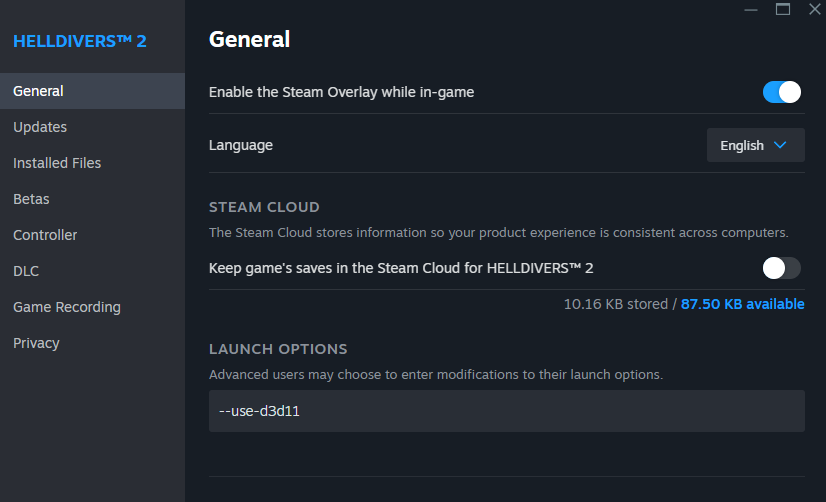
Using DirectX 11 with AMD/older and weak CPUs
DirectX 12 delivers better performance over all - that is if you are running it on modern PCs with modern CPUs. As DirectX 12 creates more CPU-Overhead to utilise multicore CPUs to their maximum, it can turn out too demanding on older CPUs, causing interruptions in the processing.Long story short: players with an AMD CPU and/or an older and weak CPU can give running the game with DirectX 11 a try. With old and weak and AMD PCs it can result in a significant performance boost.
To run the game with DirectX 11
Right-click on the game in your Steam Library -> select Properties
add
--use-d3d11
to the Launch Options
Note: Using DirectX 11 will cause the game to use a different shader cache - some people mistake this for a performance boost due to DirectX 11. But more often it would give identical results just by cleaning up the existing cache.
My recommendation: automate the cache cleanup for best results.
https://steamcommunity.com/sharedfiles/filedetails/?id=3389607883
Performance Tip 7: Max Power
Ensure that your PC and graphics card is running at maximum performance when playing the game
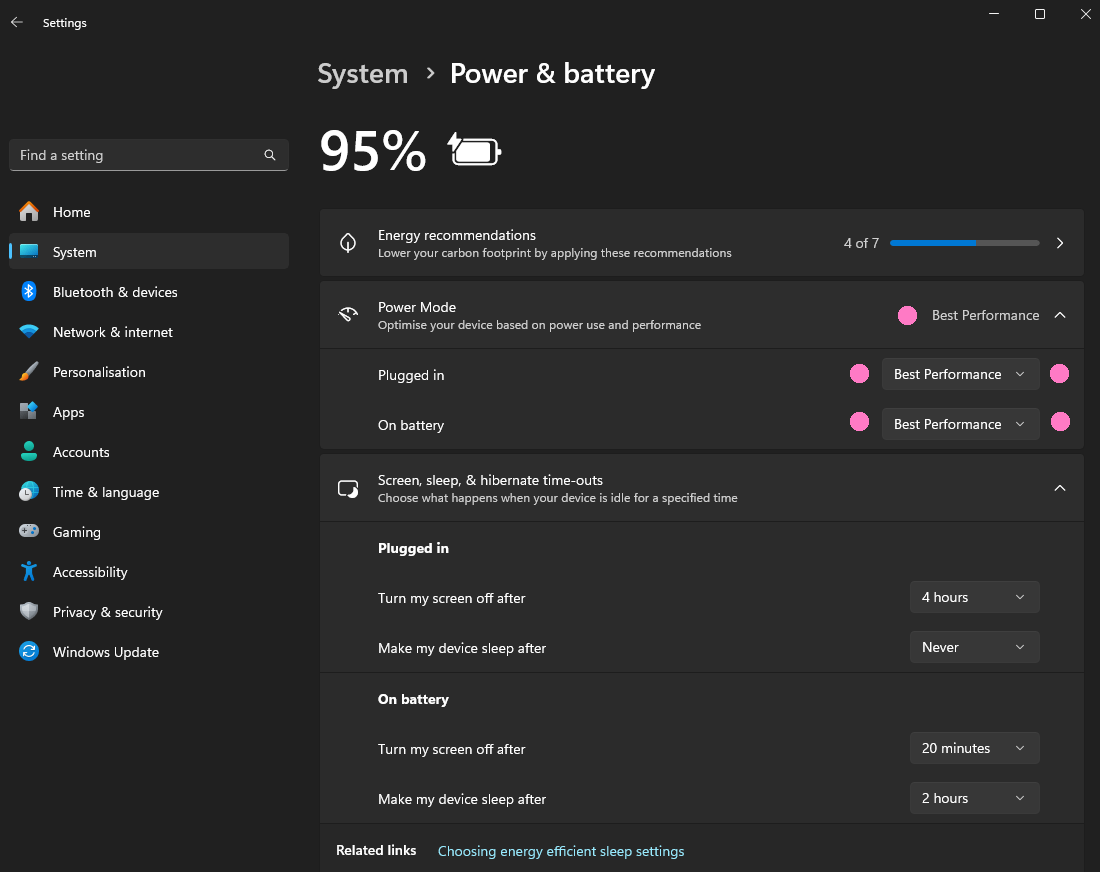
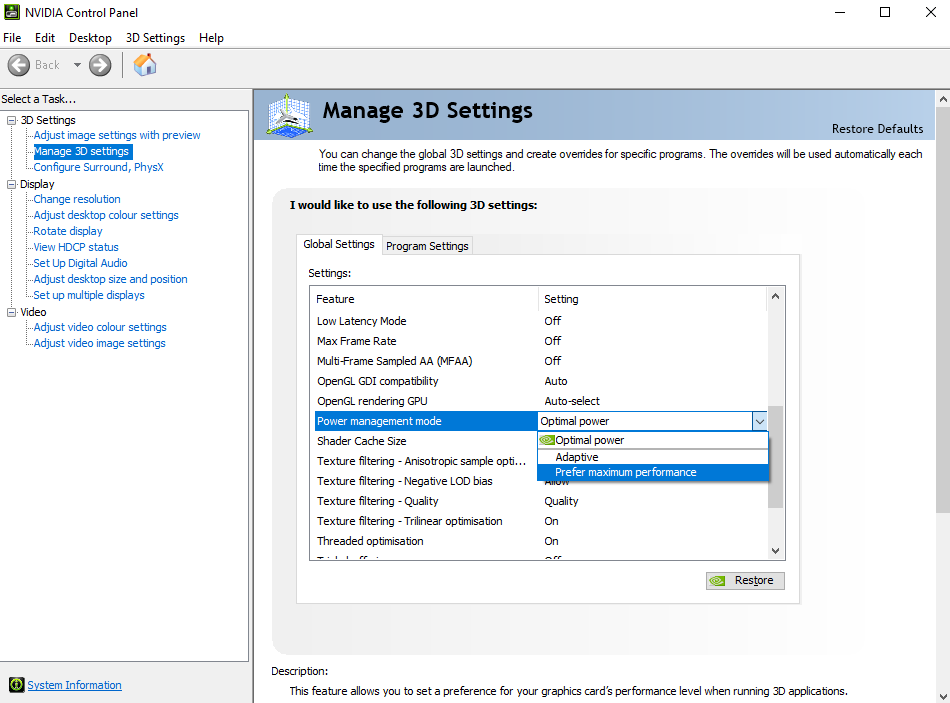
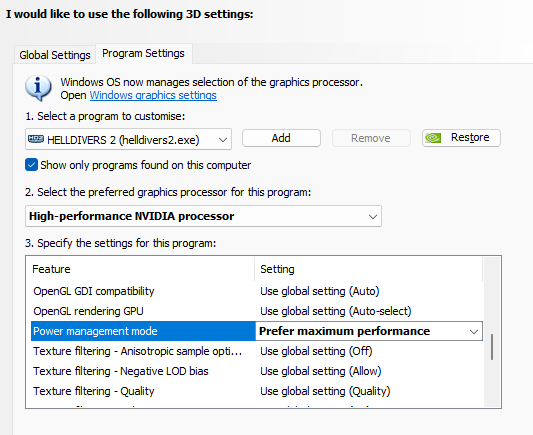
With Windows you find the settings below with the Advanced graphics settings

Disable Windows' optimisation for windowed games to prevent performance interference
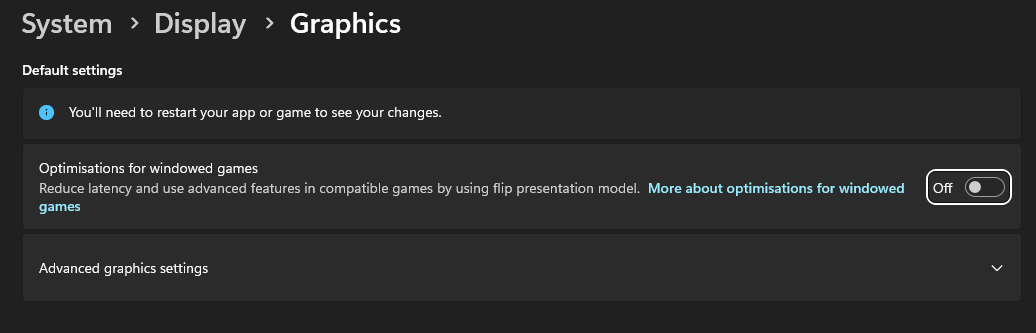
With Windows you find the settings below with the Advanced graphics settings
Disable Windows' optimisation for windowed games to prevent performance interference
Performance Tip 8: Core & VMP
In Windows 11 you can find virtualisation features called memory integrity and the Virtual Machine Platform (VMP).
VMP provides core virtual machine services for Windows, while memory integrity helps prevent attackers from injecting malicious code. It is enabled by default with every Windows installation.
Benchmarks have shown, that depending on the game, an improvement in FPS by circa 30% with 4k can be achieved after disabling those features. Once more, especially players with AMD hardware can benefit from disabling those features.
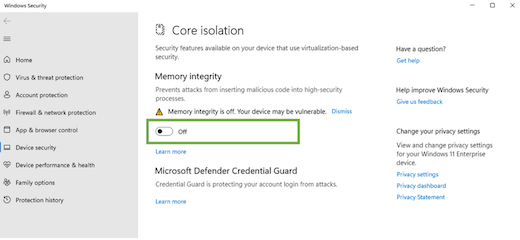
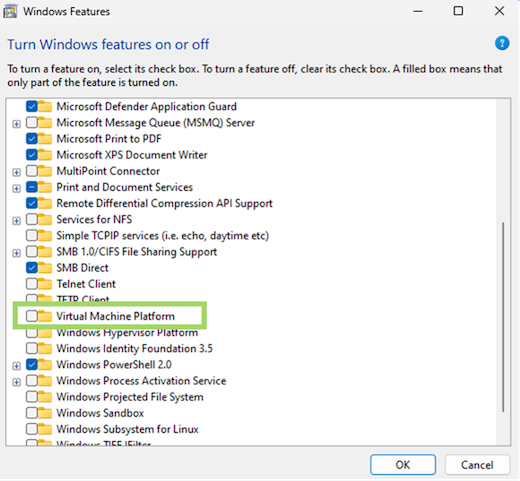
VMP you can safely keep off, unless you are actualy using VMs.
VMP provides core virtual machine services for Windows, while memory integrity helps prevent attackers from injecting malicious code. It is enabled by default with every Windows installation.
Benchmarks have shown, that depending on the game, an improvement in FPS by circa 30% with 4k can be achieved after disabling those features. Once more, especially players with AMD hardware can benefit from disabling those features.
VMP you can safely keep off, unless you are actualy using VMs.
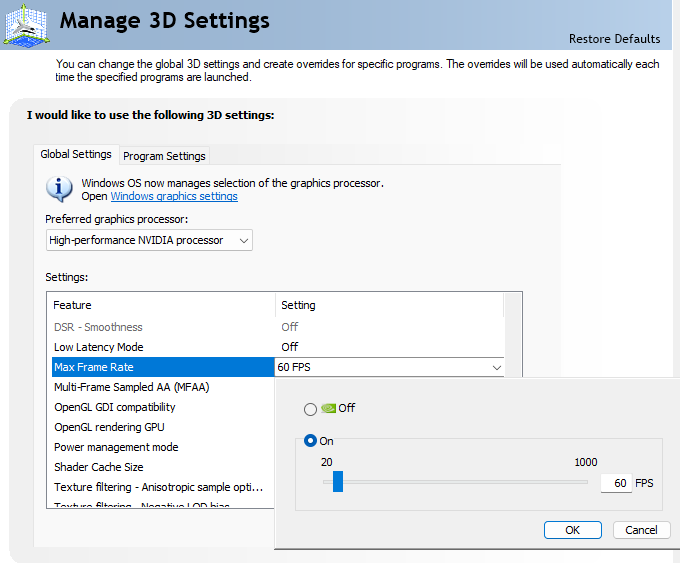
Performance Tip 9: Cap FPS
To increase stability of the game, you can also cap the global FPS using your graphics card software, rather than the in-built game's settings. Matching it your display's refresh rate is recommended - for weaker PCs start with capping it to 60 FPS and check whether increasing the cap goes without performance losses.
Performance Tip 10: Registry Cleanup
Most PC users can benefit greatly from cleaning up their registry and properly managing their startup and background applications. The results may surprise you!
I recommend the free version of CCleaner for the task.
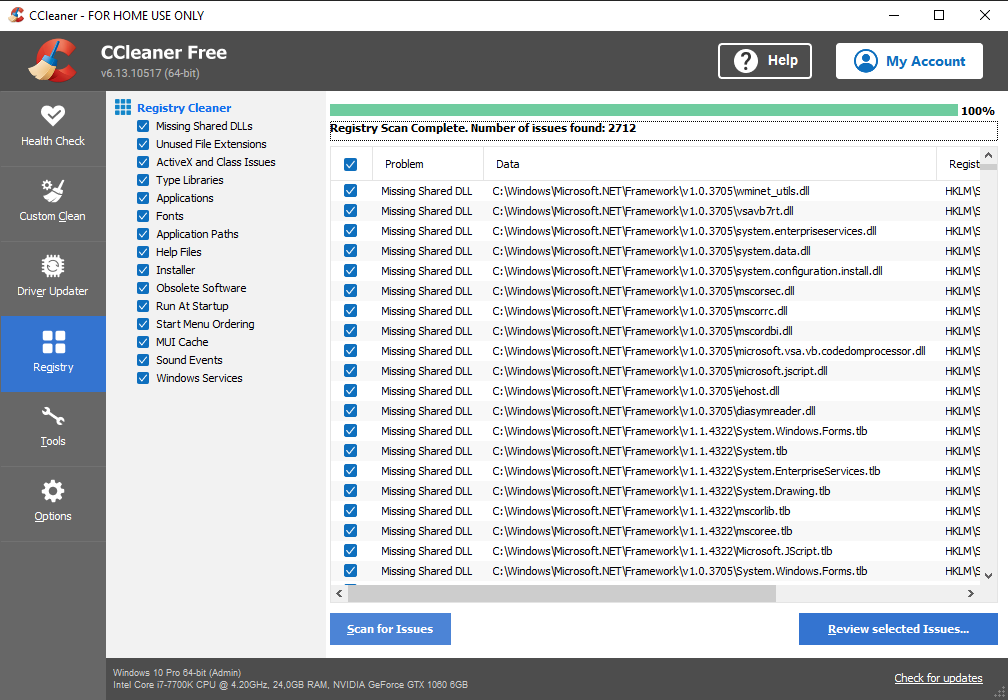
A convenient free version of CCleaner (portable) that does not require installation can be found here: https://www.ccleaner.com/ccleaner/builds
O&O ShutUp10++ might also be of interest for you.
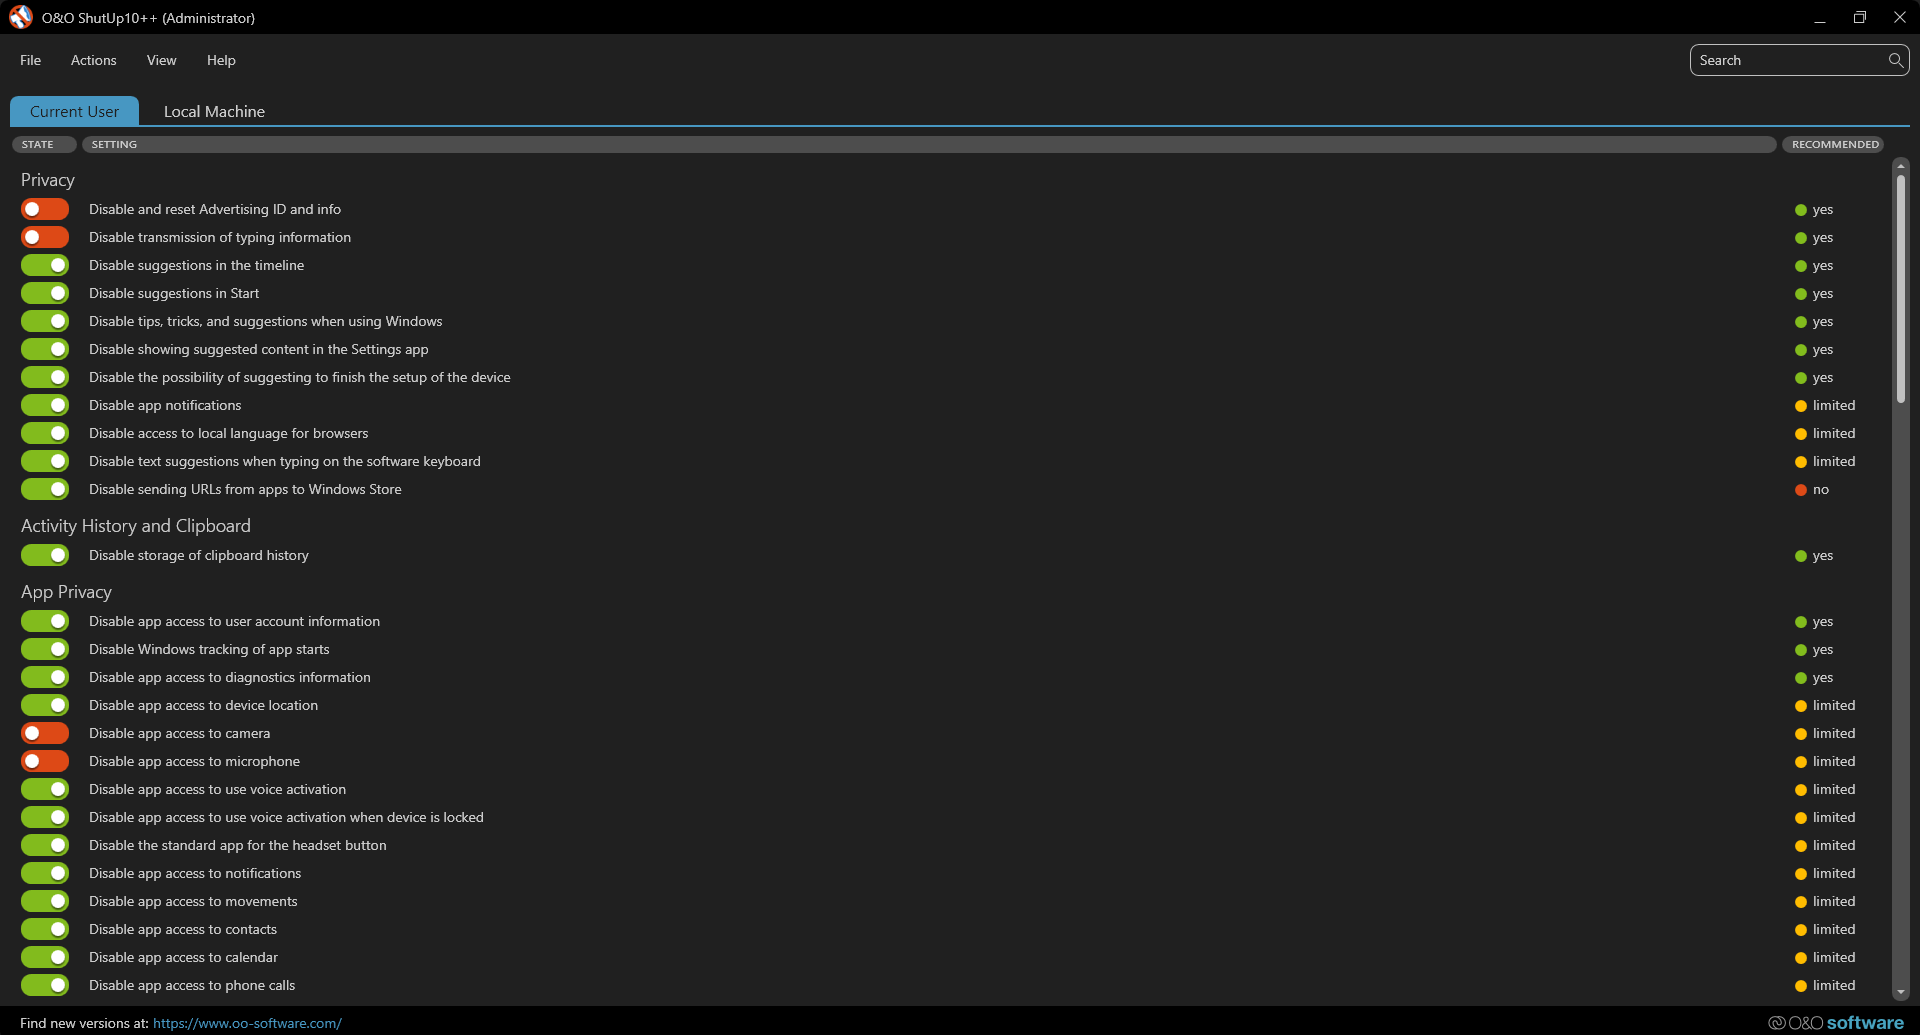
The less adware on your PC, the more performance available for games.
https://www.oo-software.com/de/shutup10
I recommend the free version of CCleaner for the task.
A convenient free version of CCleaner (portable) that does not require installation can be found here: https://www.ccleaner.com/ccleaner/builds
O&O ShutUp10++ might also be of interest for you.
The less adware on your PC, the more performance available for games.
https://www.oo-software.com/de/shutup10
Performance Tip 11: Auto-Clean-Cache
https://steamcommunity.com/sharedfiles/filedetails/?id=3389607883
Keeping the game and GPU cache clean between PC starts greatly reduces the risk of FPS issues due to outdated cache files. By simply automating this task, you can forget about it once it is set up.
Keeping the game and GPU cache clean between PC starts greatly reduces the risk of FPS issues due to outdated cache files. By simply automating this task, you can forget about it once it is set up.
Performance Tip 12: Disable Edge
Attempting to completely remove Microsoft Edge is futile, as its functionalities are deeply integrated within the core of the operating system. Nevertheless, if you opt for a different browser instead of Microsoft Edge, it is advisable to disable its Startup Boost functionality. This will help free up system resources that would otherwise be allocated to the application without being utilized.
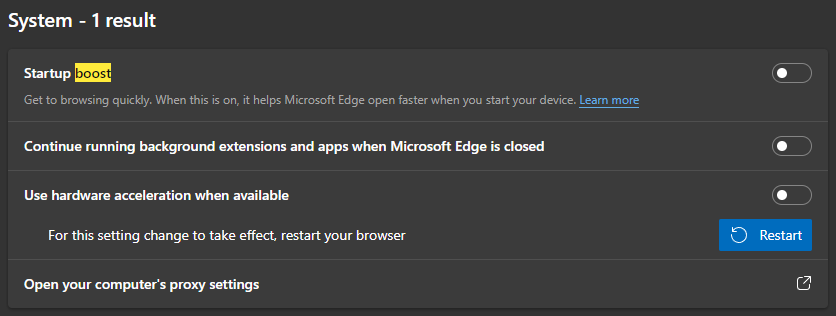
A convenient free version of Revo Uninstaller that does not require installation can be found here: https://portableapps.com/apps/utilities/revo_uninstaller_portable
Can you imagine? I keep forgetting about OneDrive, because it is one of the first things I have removed after a fresh Windows installation. And it is one of those softwares too which keep causing issues for gamers.
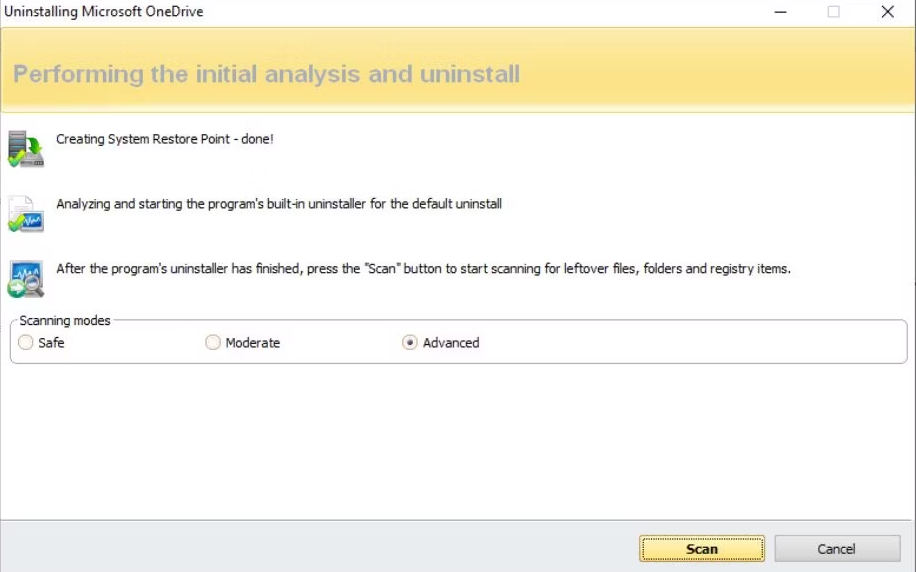
Bonus Tip
If you have not already removed Microsoft OneDrive and are not using it, you should remove it completely. Use Revo Uninstaller to cleanly remove such unwanted bloatware.A convenient free version of Revo Uninstaller that does not require installation can be found here: https://portableapps.com/apps/utilities/revo_uninstaller_portable
Can you imagine? I keep forgetting about OneDrive, because it is one of the first things I have removed after a fresh Windows installation. And it is one of those softwares too which keep causing issues for gamers.
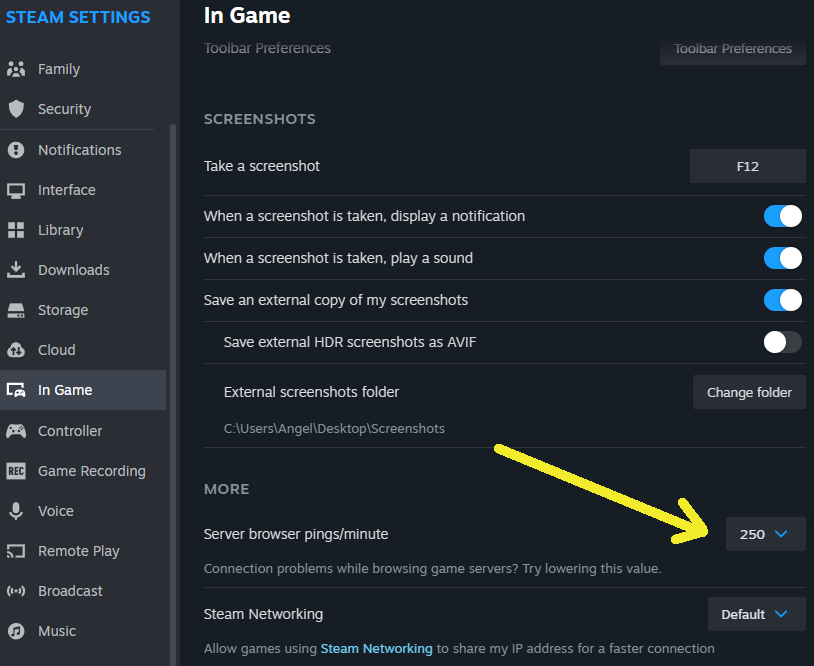
Network Tip 1: Limit Matchmaking
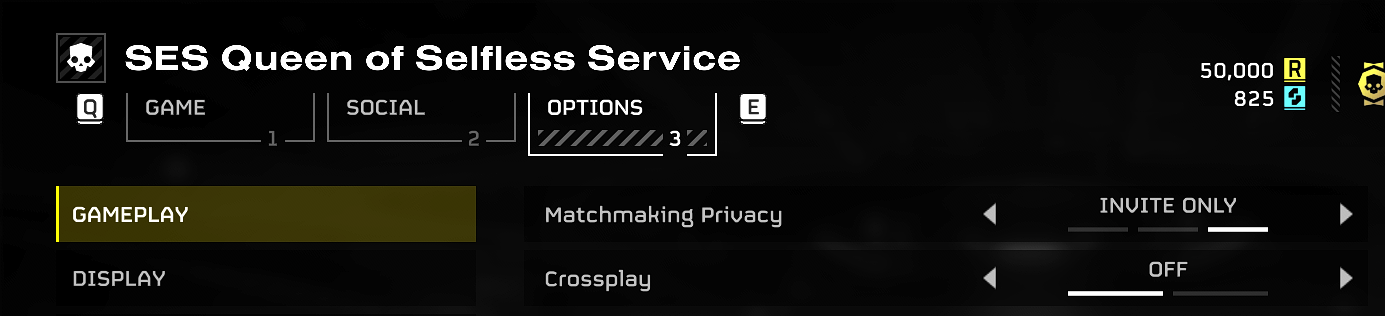
If you have your game set to public with crossplay enabled, your game will always be in matchmaking, even if you are in a full party. Think of it as a super famous, popular and exclusive club that everyone wants to get into.
Sometimes two or more players want to join at the same time -> the game may have desynchronisation problems and the joining players may get stuck in the loading screen.
Sometimes only one player in your squad might have a very tiny micro time-out -> the game will try to replace them as soon as possible, leading to more synchronisation. Like when you were about to leave the club for some fresh air only to see someone rush in to take your place in the exclusive club. And so on.
Turning off crossplay will significantly reduce the amount of automatic matchmaking and stabilise the connection. The same goes for switching the game to private. Experienced players who use the (official Helldivers 2) Discord know from experience that a team formed with in-game matchmaking disabled always has a much more stable connection.
In addition to that you can further limit matchmaking by telling Steam to allow matchmaking only with players who have a maximum of 250 ping. You can find that option with the Steam settings.
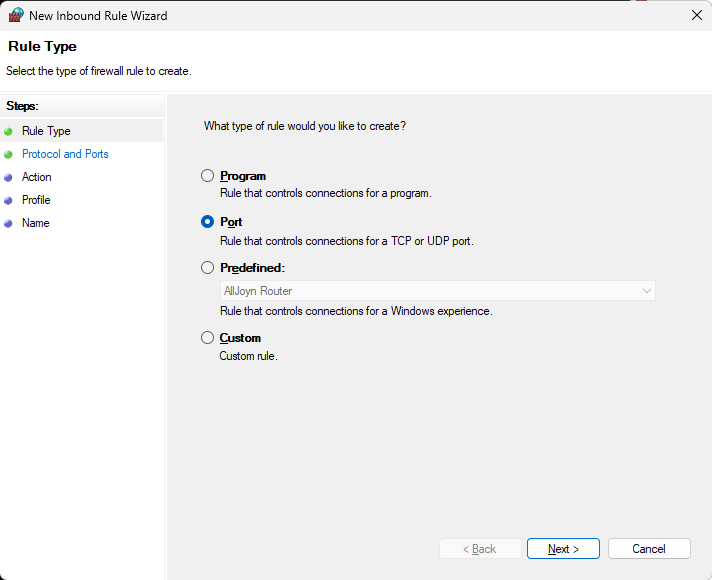
Network Tip 2: Open Ports
In most cases Windows and your router take care of these settings by themselves without additional manual action needed. In rare cases, especially with older PCs and routers, you still need to open the ports for the game. As host of games it is strongly recommended to have the ports opened to ensure connection stability.
Ports to open
TCP 3478, 3480, 27015, 27036
UDP 3074, 3478, 3479, 27015, 27031-27036
For how to open your ports with your router, check the router manual.
For Windows you go to the Windows Security settings and lookout for the Firewall & network protection -> Advanced Settings
There you create a new rule for inbound rules
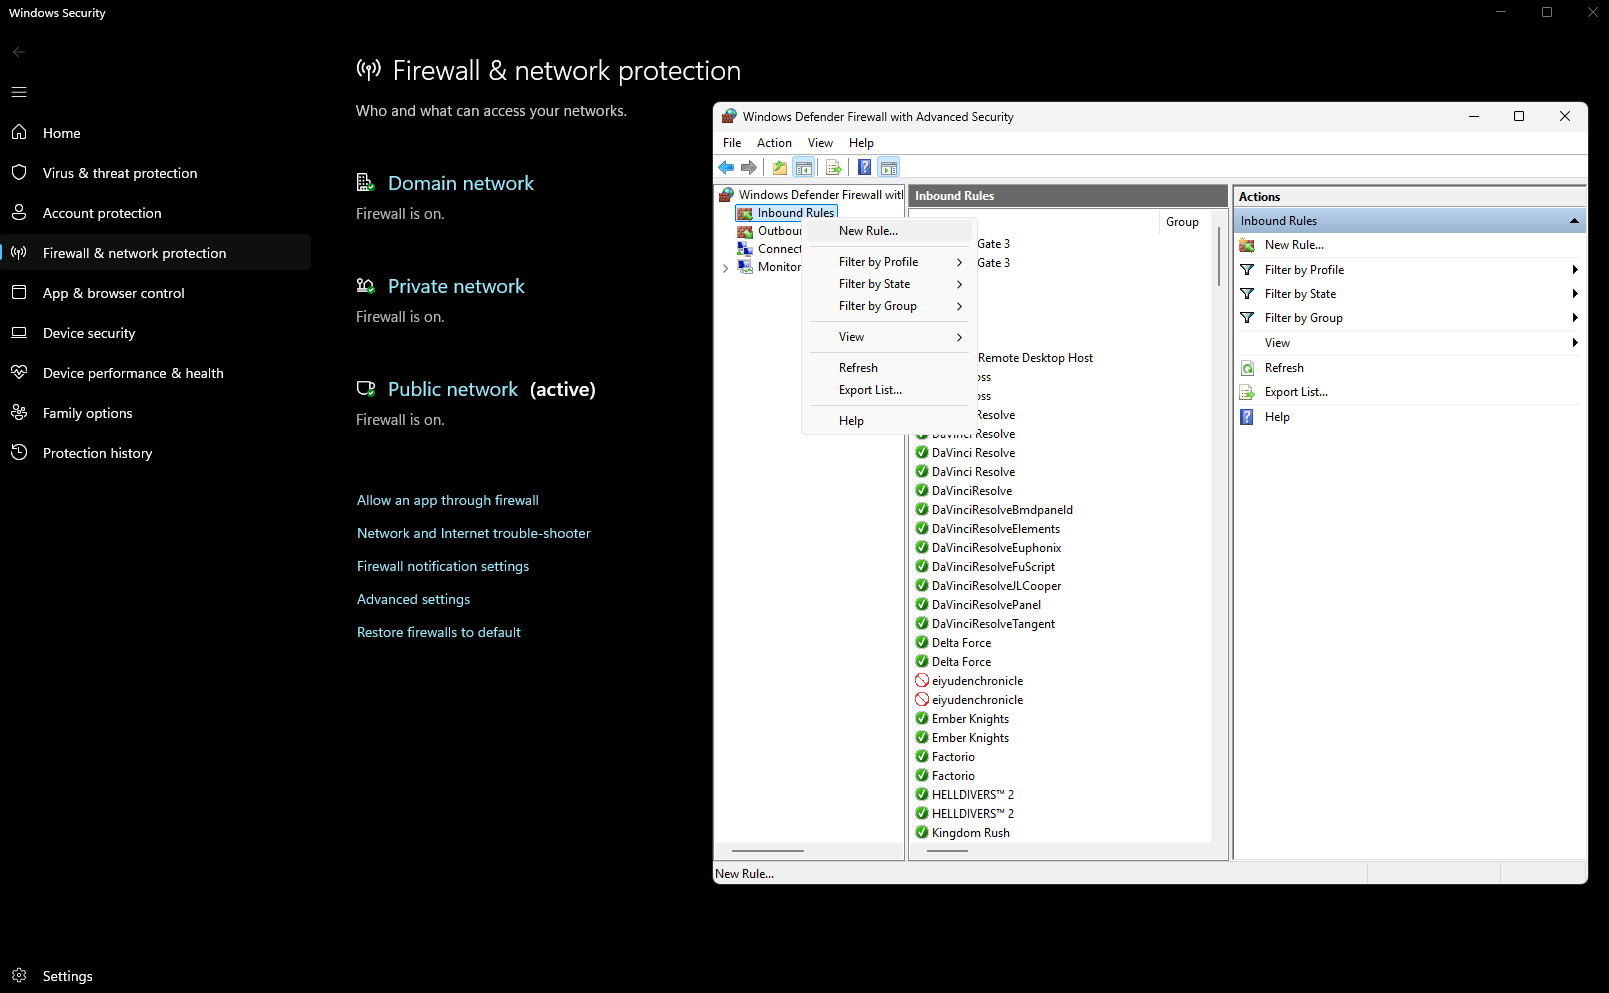
And enter the numbers for TCP
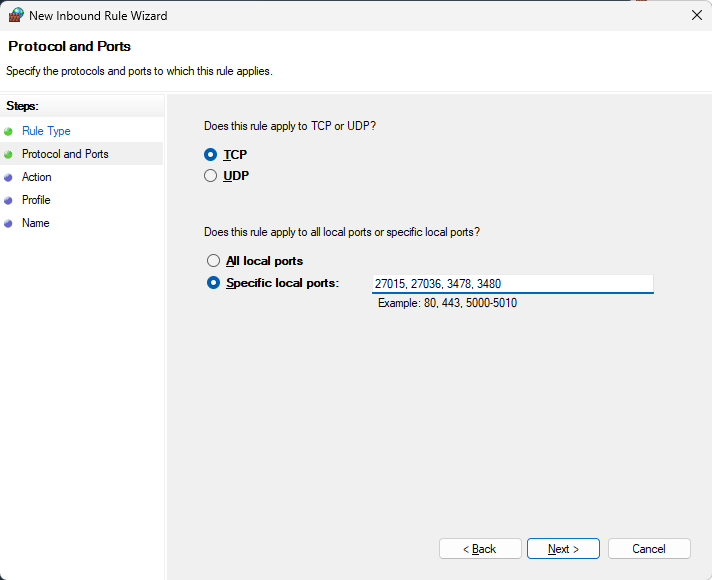
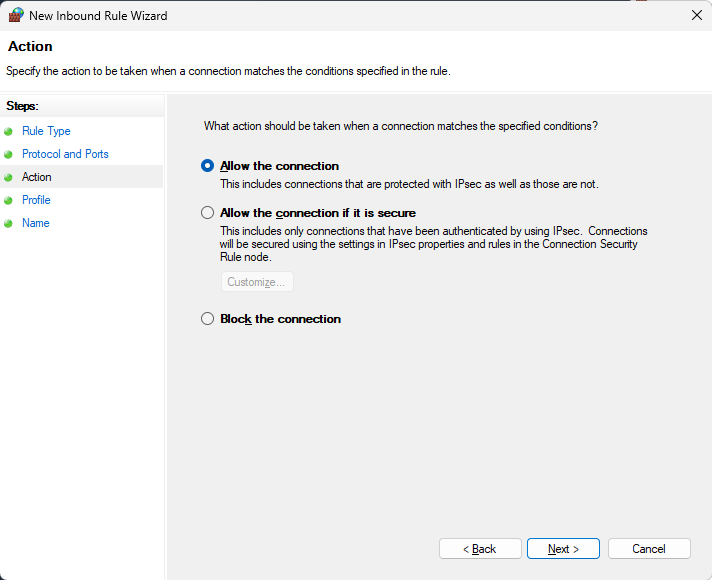
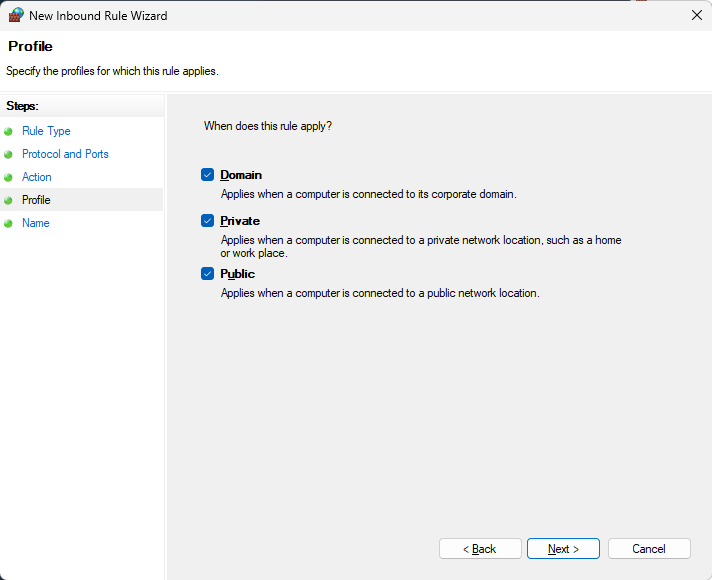
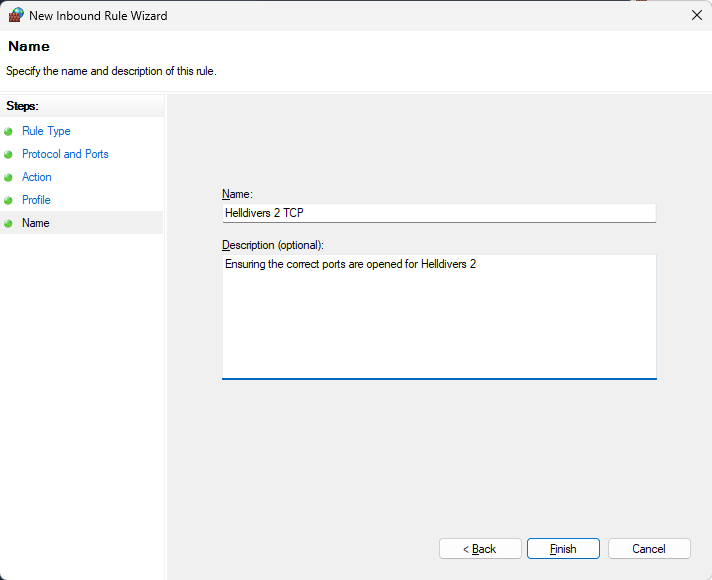
Once done repeat for UDP
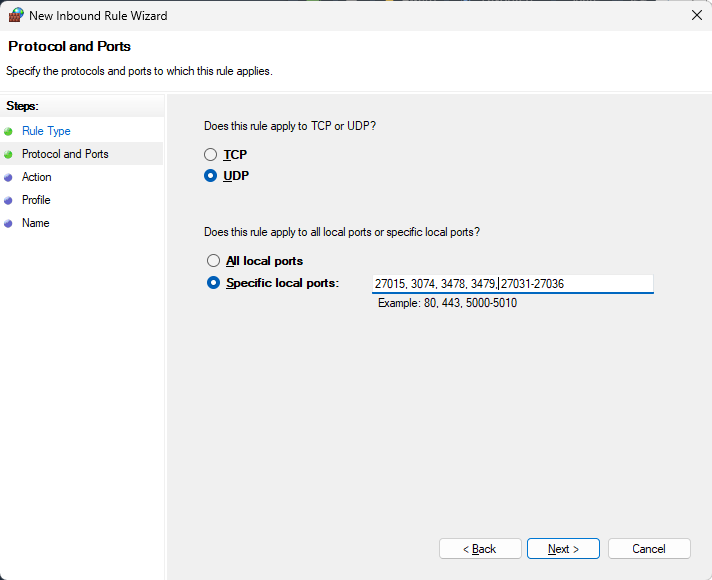
And do not forget to do the same, TCP and UDP again for outbound rules as well
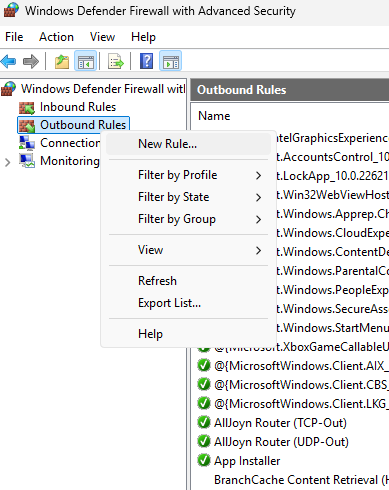
Make also sure to whitelist Helldivers 2 in your internet security software of your choice.
Ports to open
TCP 3478, 3480, 27015, 27036
UDP 3074, 3478, 3479, 27015, 27031-27036
For how to open your ports with your router, check the router manual.
For Windows you go to the Windows Security settings and lookout for the Firewall & network protection -> Advanced Settings
There you create a new rule for inbound rules
And enter the numbers for TCP
Once done repeat for UDP
And do not forget to do the same, TCP and UDP again for outbound rules as well
Make also sure to whitelist Helldivers 2 in your internet security software of your choice.
Network Tip 3: Flush DNS Cache
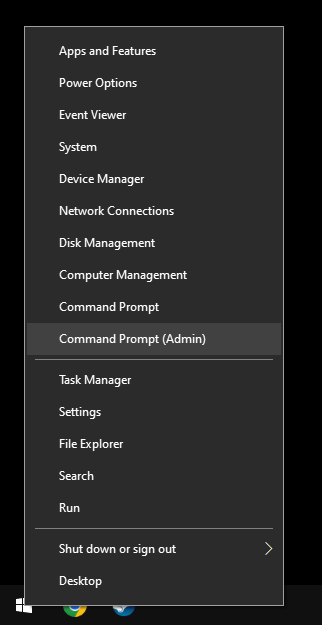
Right-click on the Windows logo on your taskbar

Select Command Prompt (Admin) from the menu
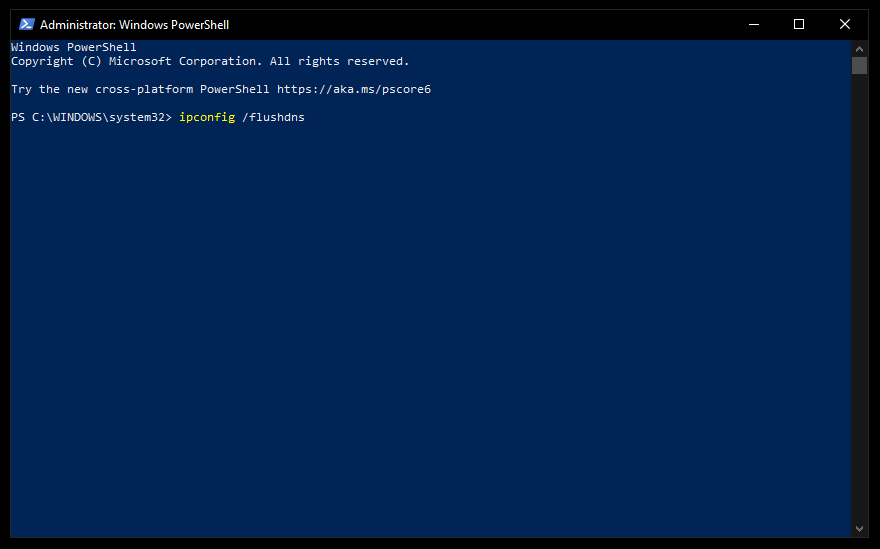
Enter each of the following lines one by one and confirm each with ENTER
(you can use copy & paste)
Then you go to Windows Settings
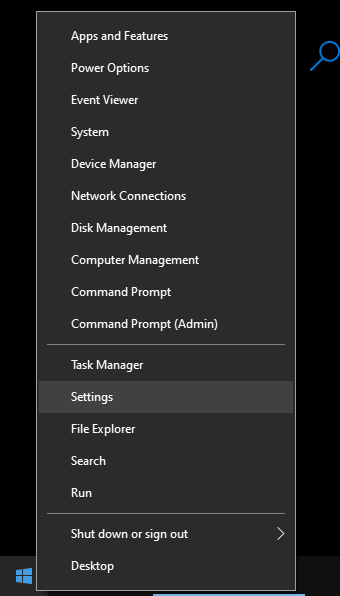
Select Network & Internet

Select Network reset

Select Command Prompt (Admin) from the menu
Enter each of the following lines one by one and confirm each with ENTER
(you can use copy & paste)
ipconfig /flushdns
ipconfig /registerdns
ipconfig /release
ipconfig /renew
netsh winsock reset
Then you go to Windows Settings
Select Network & Internet
Select Network reset
Restart your PC once you are done.
Network Tip 4: Change DNS Server
To improve ping and overall connection stability we utilise the Cloudflare DNS Server, which is known to be the best for gaming.
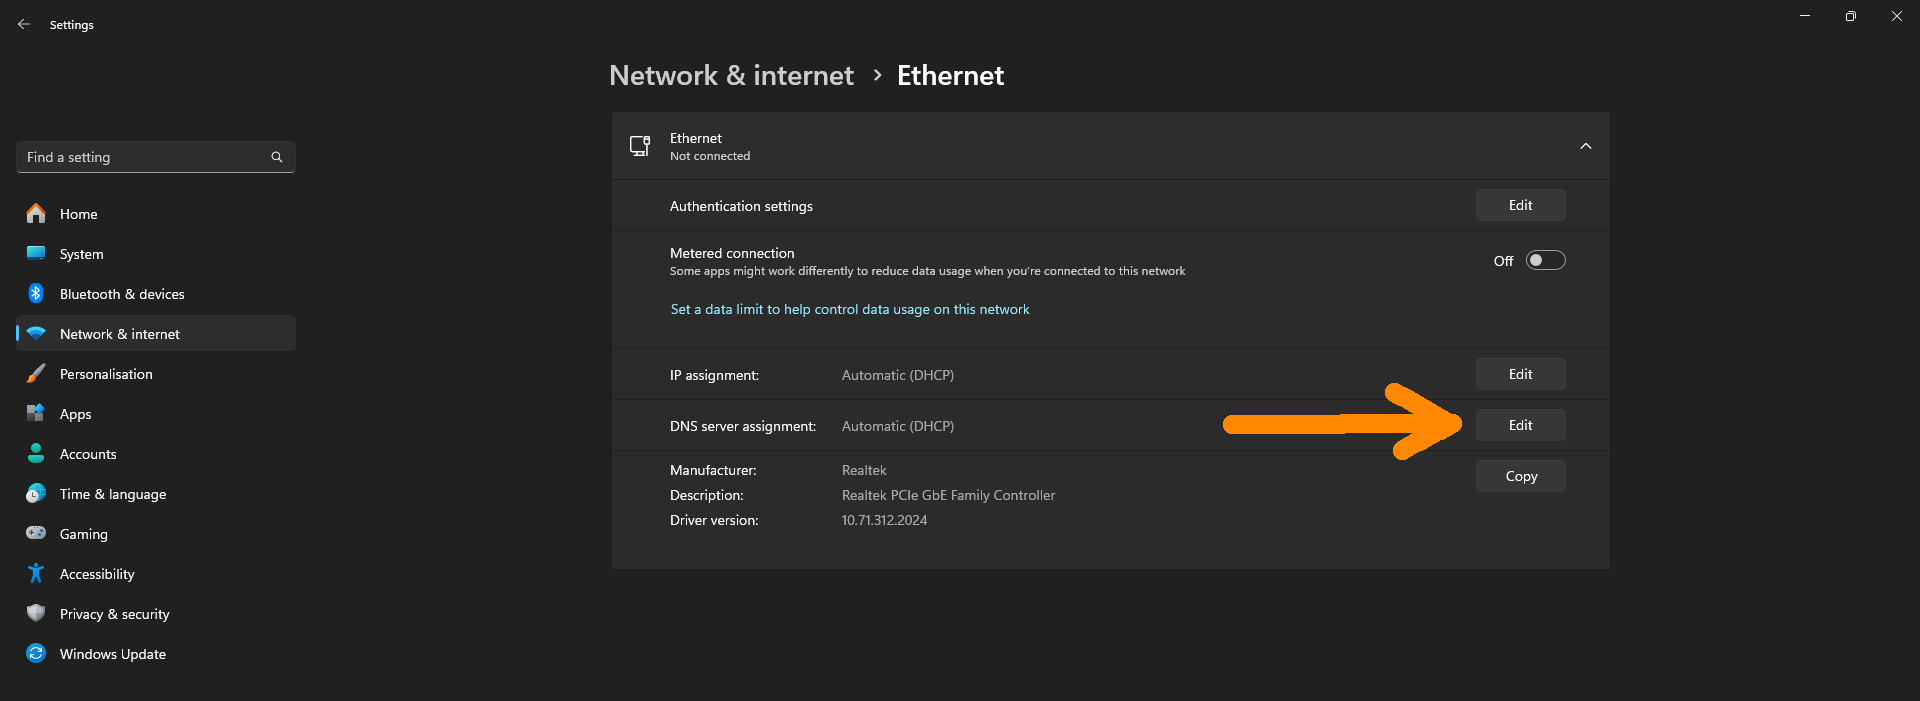
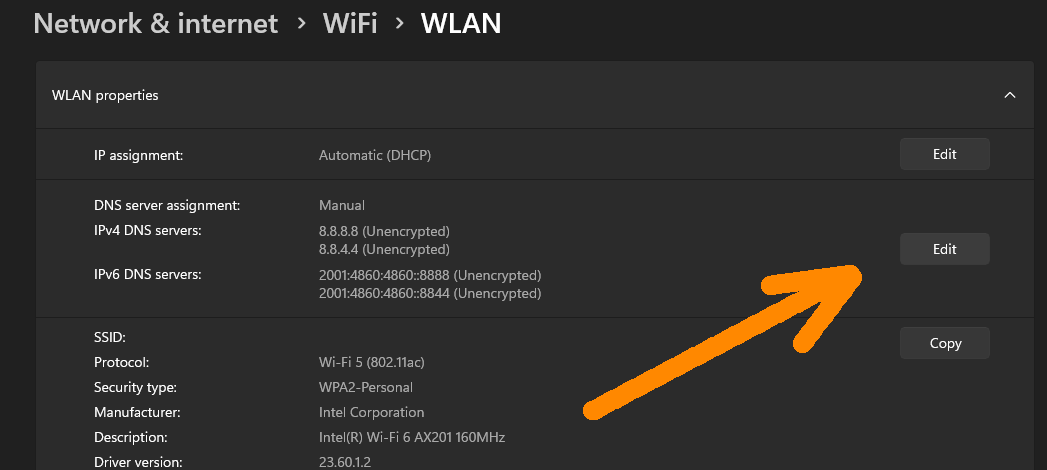
Go to Windows Settings and select there Network & internet
you can get there by right click on the Windows icon in your taskbar and select Settings
Select the connection type you are using
in this example we start with Ethernet aka wired connection
Edit the DNS server assignment
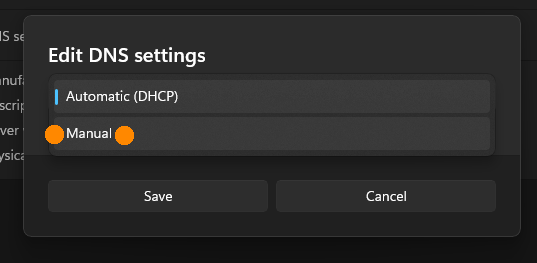
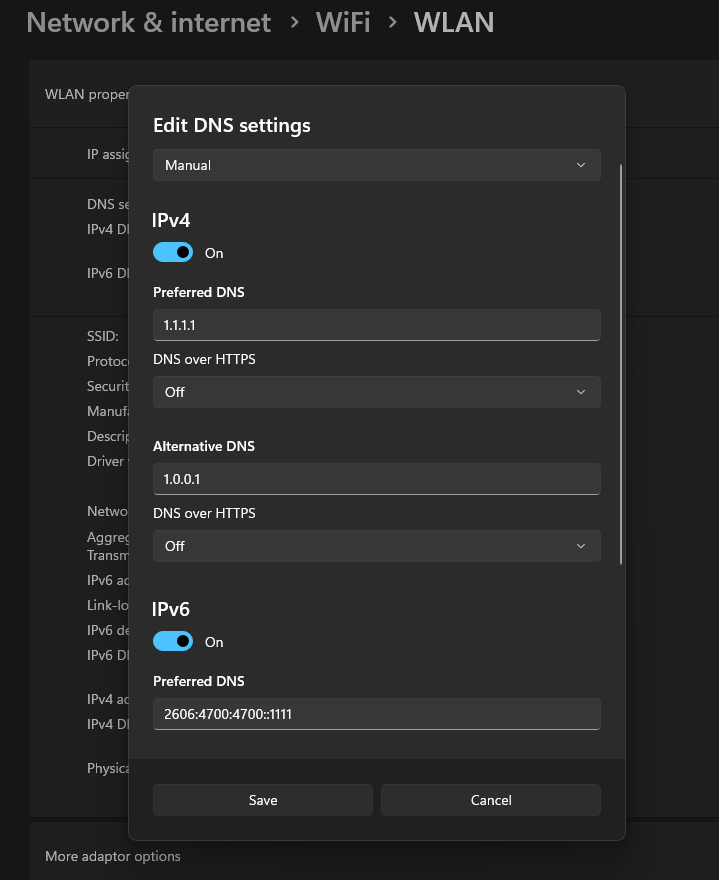
Select Manual
Expand the options for IPv4 and IPv6
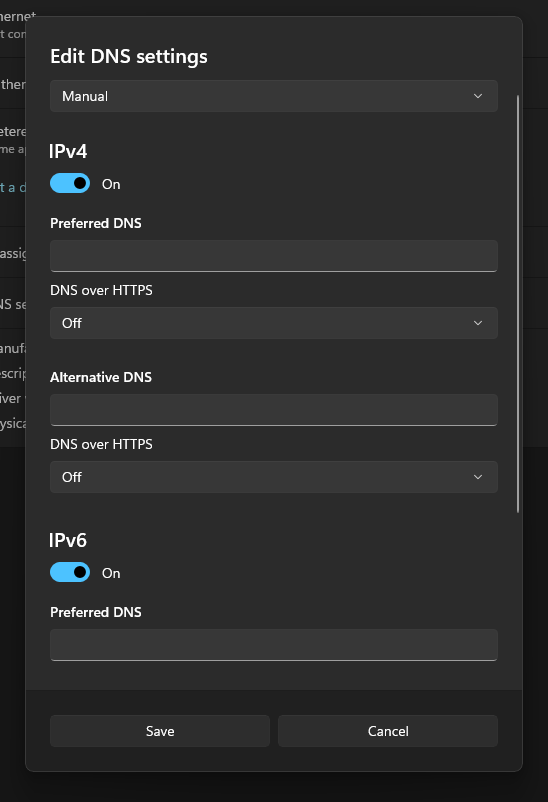
The Cloudflare Public DNS IP addresses (IPv4) are as follows:
The Cloudflare Public DNS IPv6 addresses are as follows:
You can use either address as your preferred or alternative DNS server.

When you are done Save and restart your PC.
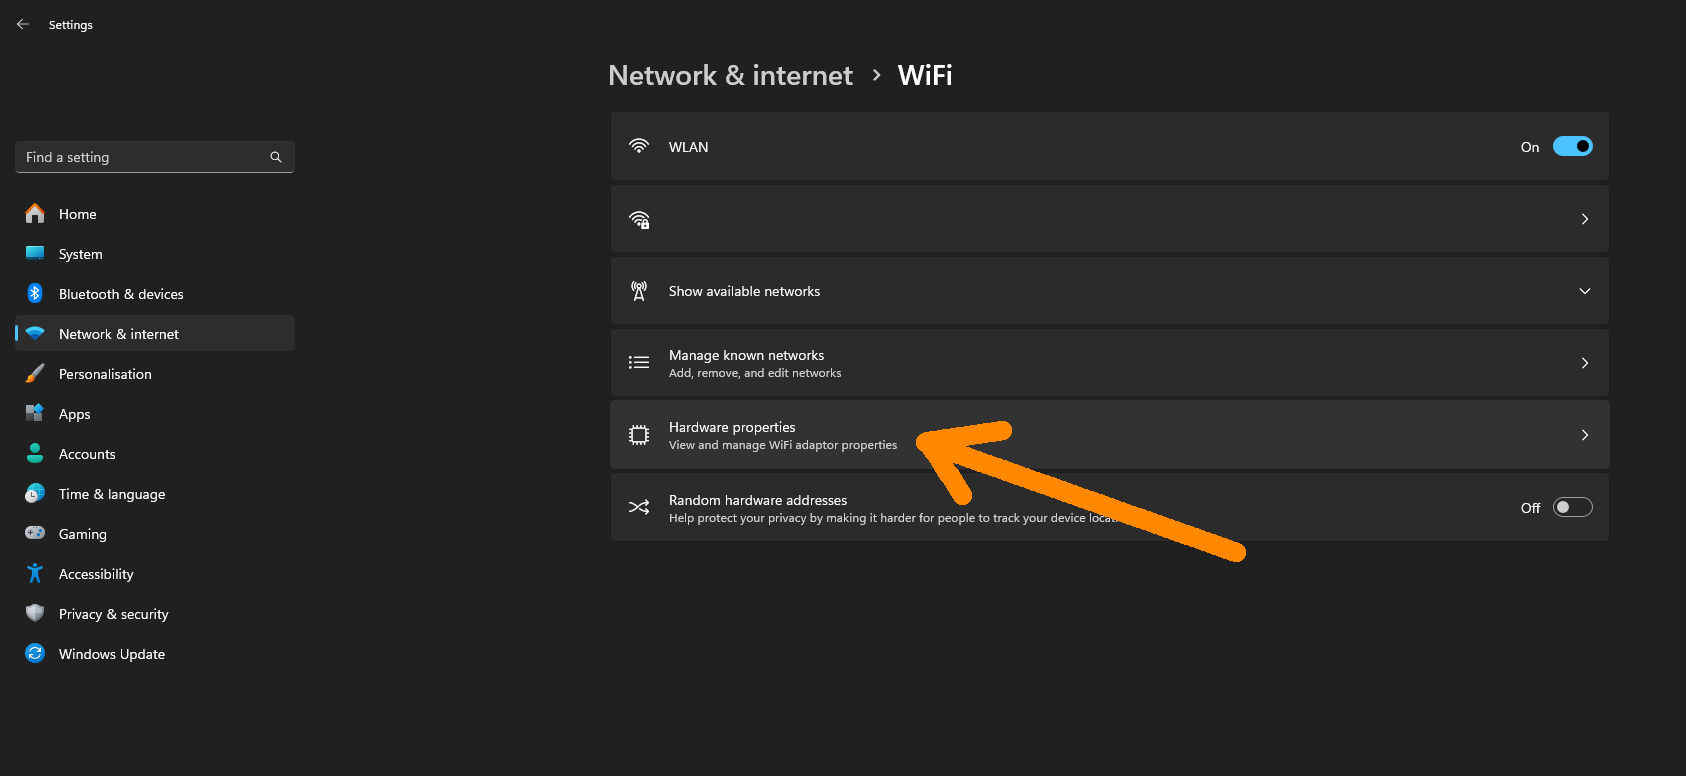
Same can be done for Wifi - select the Hardware Properties to access the option
Then do the same as above
And that all despite everything on your side seems to be in order.
Well.
Changing the DNS (Domain Name System) servers, those which are responsible to assign your connections to the worldwide servers, from the default ISP one to a different service might just do the trick.
Changing DNS Server has always reliably improved connectivity for gaming services, especially well known among Playstation players.
Go to Windows Settings and select there Network & internet
you can get there by right click on the Windows icon in your taskbar and select Settings
Select the connection type you are using
in this example we start with Ethernet aka wired connection
Edit the DNS server assignment
Select Manual
Expand the options for IPv4 and IPv6
The Cloudflare Public DNS IP addresses (IPv4) are as follows:
- 1.1.1.1
- 1.0.0.1
The Cloudflare Public DNS IPv6 addresses are as follows:
- 2606:4700:4700::1111
- 2606:4700:4700::1001
You can use either address as your preferred or alternative DNS server.
When you are done Save and restart your PC.
Same can be done for Wifi - select the Hardware Properties to access the option
Then do the same as above
Why Changing DNS Server
Stuttering, freezes, connection issues.And that all despite everything on your side seems to be in order.
- You have a good download and upload rate.
- You have a stable wireless connection at highest standards or use a cable to connect your PC with your ISP (Internet Service Provider) device or router.
- You have a good PC which is not lacking any resources to run internet services at all.
- You are running out of ideas what else you could possibly do but moving to a different place as it might be a regional ISP hardware thing.
Well.
Changing the DNS (Domain Name System) servers, those which are responsible to assign your connections to the worldwide servers, from the default ISP one to a different service might just do the trick.
Why would it differ and how could it?
This is likely due to the inadequate local infrastructure. When Internet Service Providers (ISPs) prioritize making new contracts with more users instead of upgrading the infrastructure properly, it can result in poor performance. It is like a traffic jam, where new cars keep entering the road, but the lanes have not been adjusted for a long time. The ISP, who could address the issue, is reluctant to take action to cut costs, while those who could push for a change fail to grasp the importance of a reliable internet connection.Changing DNS Server has always reliably improved connectivity for gaming services, especially well known among Playstation players.
Network Tip 5: TCP Optimizer
For older PCs and routers the SG TCP Optimizer can help by removing network limiters set by Microsoft to prioritise their Windows updates over anything else.
The changes are in general insignificant for users who own a high end PCs and a very good internet connection. Users with bad local internet service benefit most from removing those limiters.
https://www.speedguide.net/downloads.php
All you need to do is to select your bandwith speed and apply optimisation.
Any changes made with the app can be easily reverted and it is safe to use.
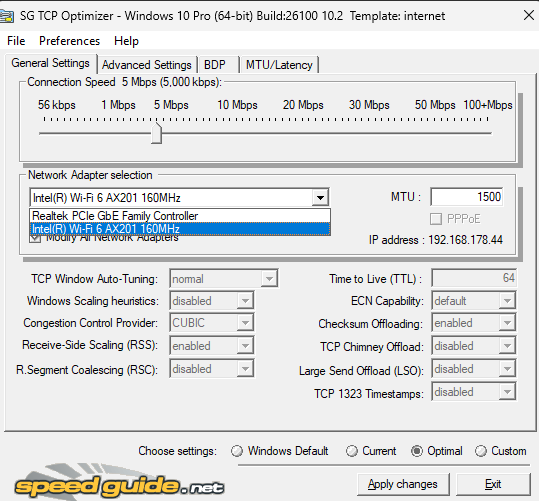
Select the internet speed you are having, the network adapter (whether you use cable or wifi) and then select optimal for settings (at the bottom) and hit Apply changes.
The changes are in general insignificant for users who own a high end PCs and a very good internet connection. Users with bad local internet service benefit most from removing those limiters.
https://www.speedguide.net/downloads.php
All you need to do is to select your bandwith speed and apply optimisation.
Any changes made with the app can be easily reverted and it is safe to use.
Select the internet speed you are having, the network adapter (whether you use cable or wifi) and then select optimal for settings (at the bottom) and hit Apply changes.
Bonus Tip
To check your internet speed just enter the keyword "speed test" into google.com. You can either use the Google service or Speedtest by Ookla which is commonly used among gamers.
Network Tip 6: Accept It
!!! IMPORTANT !!!
Crashes and Disconnects are caused by Desynchronisations
If you still have issues, please keep in mind that the game is a peer-to-peer game (P2P) as it is explained in the official AH statement on anticheat. in the Steam forums.Crashes and Disconnects are caused by Desynchronisations
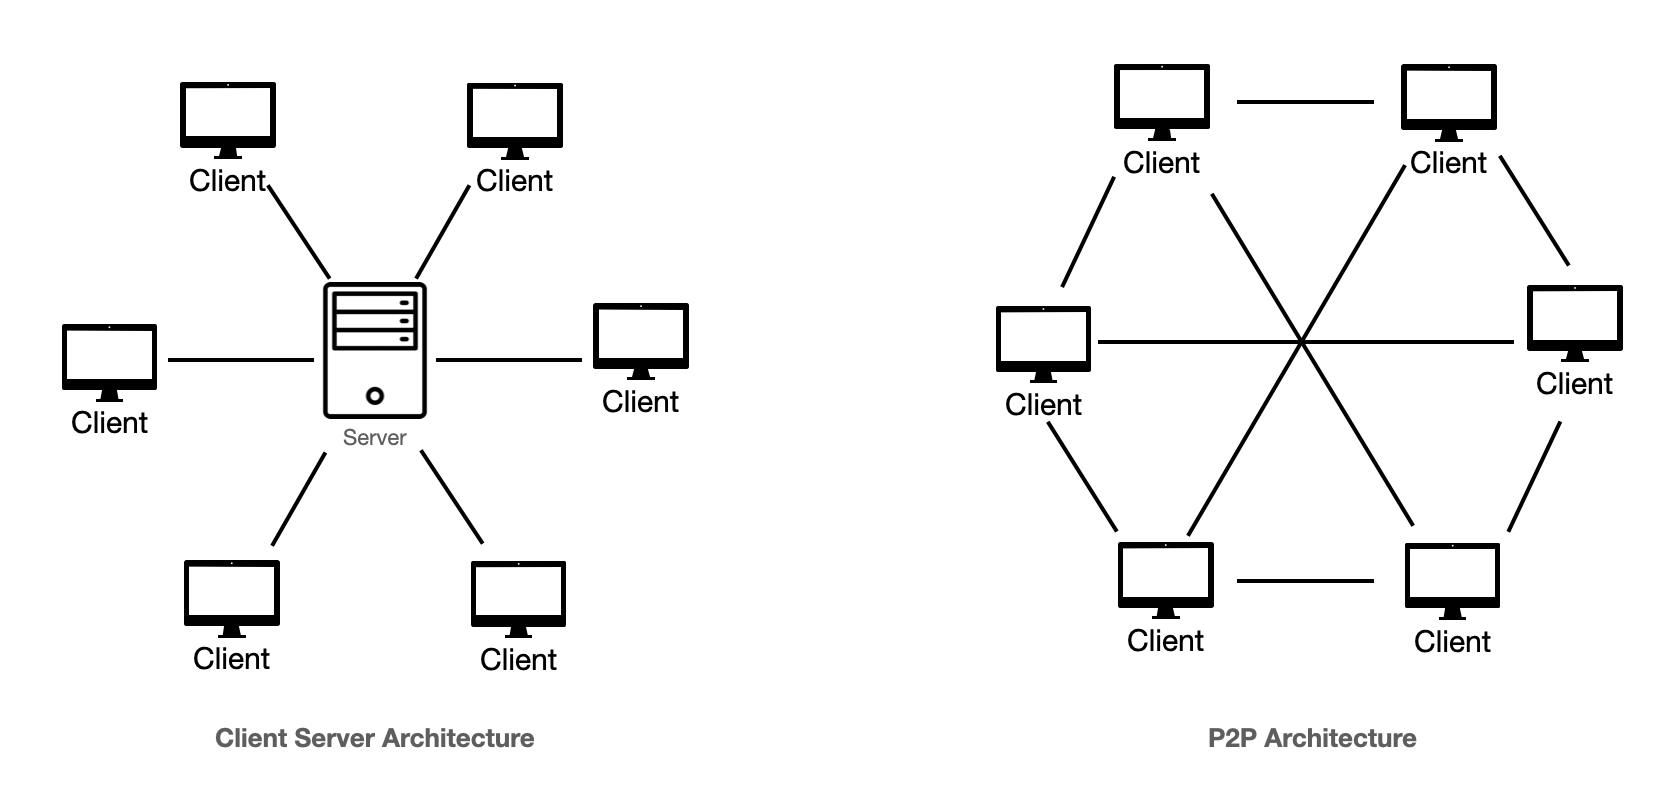
This means that your current game session is not running on a server, but is hosted by either you or another player on a PC or Playstation 5. This means that any problems with the hosting PC or Playstation 5 will immediately affect your game session.
It is important to understand: even if You, personally, have a good and stable internet connection, a desynchronisation caused by your fellow squadmates can also cause game crashes. It is not all just on You. When playing with friends remind them friendly to check their settings as well. Such is the nature of peer-to-peer games.
No matter how much you optimised your system to prevent any issues - unless you can ensure that EVERYONE in your party did the same complete full optimisation - there will be always a chance for connection issues caused by someone elses internet connection, bad/virus infected PC, or their background apps causing microdisconnects leading to desynchronisation issues and then to disconnects or at worst game crashes.
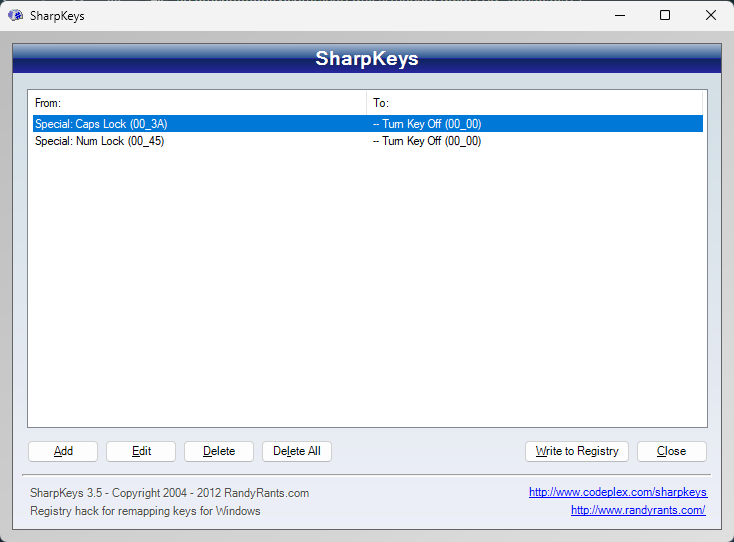
Tip to Disable Caps Lock
A straightforward registry entry does the job, and it will not impact your PC in any other way. I employ the freeware SharpKeys to keep the process uncomplicated and user-friendly.
https://github.com/randyrants/sharpkeys/releases
https://github.com/randyrants/sharpkeys/releases
Tip for better Mouse Aiming
Disable Enhance pointer precision by all means with the advanced mouse settings in Windows.
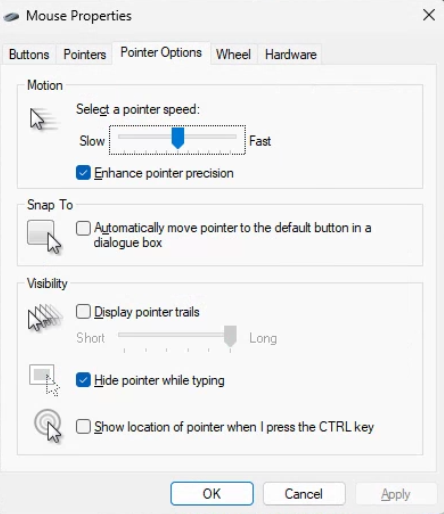
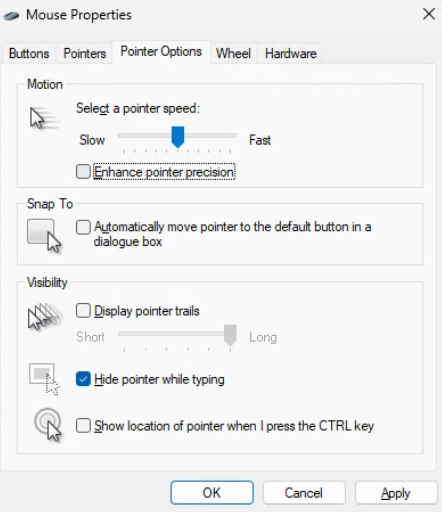
It will always mess up with your precision aiming otherwise.
Making this a must-do-tweak for professional gamers.
In other languages the option is not described as "Enhance pointer precision", but instead something which translates into "Accelerate pointer movements". It is a great feature if you use a touchpad with laptops, but it will definitely mess up your aim in shooter games.
Therefore ironically it actually messes up with your precision, and turning the feature off helps you to create a better feeling for aiming.
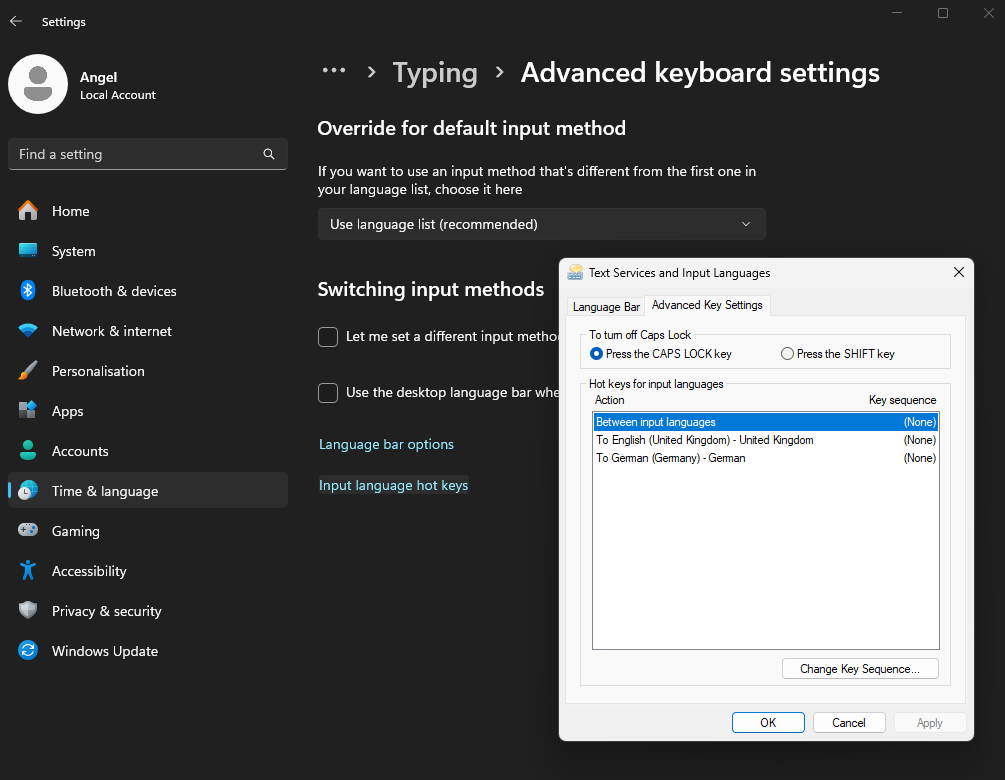
Tip for Multiple Input Layouts
Disable the hotkey to change keyboard layout as it can collide with sprinting and diving.
General Troubleshooting
Delete all local game cache files
Go to
%USERPROFILE%\AppData\Roaming\Arrowhead\
Delete the whole Helldivers 2 folder there
Reinstall DirectX
https://www.microsoft.com/en-us/download/details.aspx?id=35Reinstall Visual C++ Redistributables
https://www.microsoft.com/en-us/download/details.aspx?id=53840Use .NET Framework Repair Tool
https://www.microsoft.com/en-us/download/details.aspx?id=30135All in One (01/2025) - DLLs included (ntdll.dll, ucrtbased.dll)
https://www.nexusmods.com/helldivers2/mods/93See section Special Troubleshooting: Replace DLLs below for details on how to replace DLLs
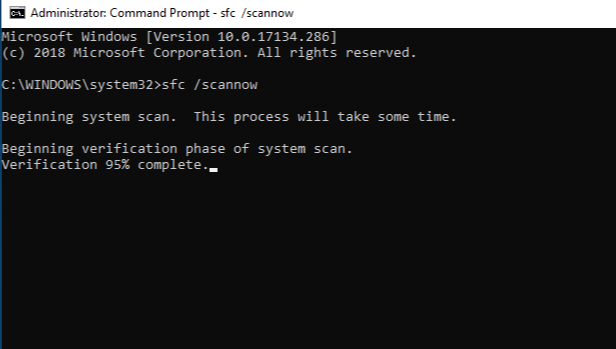
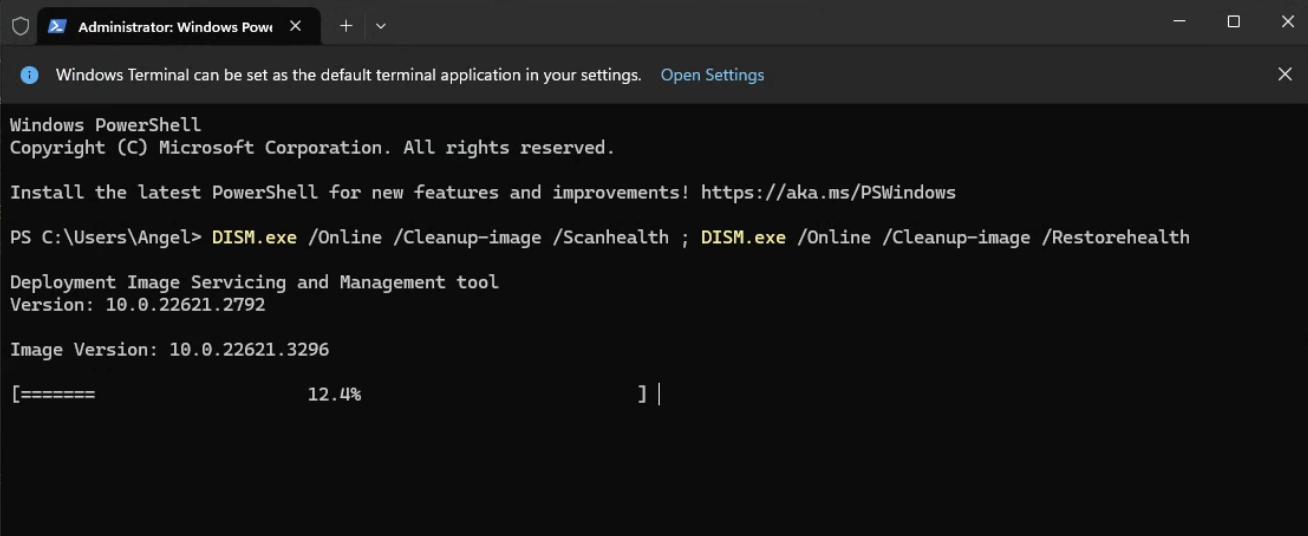
Check your Windows Installation for Errors
Select the administrator option for Terminal from the Windows menu by opening the menu via Win+X or right-click on the Windows icon on the taskbar then copy & paste the following code snippets and confirm them with enter while running the command prompt toolsfc /scannow
DISM.exe /Online /Cleanup-image /Scanhealth ; DISM.exe /Online /Cleanup-image /Restorehealth
There are always a few files that fail to validate on Steam
That is completely normal and nothing to worry about. Those are authentification files which change every time you start the game.
You can ignore that on the long term, as long as it is no more than ten files which fail to validate.
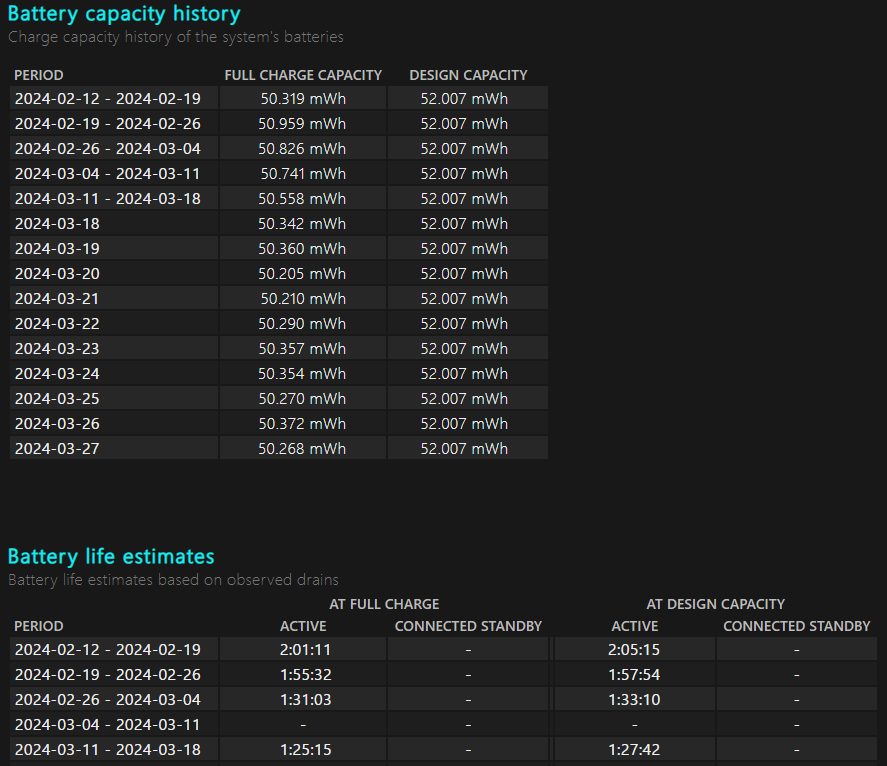
Checking Battery Life
Want to find out in what condition your laptop battery is? Use in Terminal the commandpowercfg /batteryreport
GPU Troubleshooting 1: DDU
Use Display Driver Uninstaller
If there is one internal device in your PC that complains a lot, it is probably your graphics card. And when it does complain, it is usually due to either bad settings or bad drivers. Bad/outdated drivers are the number one cause of a wide range of problems, from graphical issues to games not starting or even crashing, and more.Hang on a minute! My GPU drivers are up to date!
While that may be true, it is also true that over time, after countless updates, there may be conflicting leftover files that have not been properly removed. As they accumulate over time, no one can tell which of your driver files is doing what and why, eventually causing issues without you even knowing. To be on the safe side, we want to perform a clean installation of your graphics cards' drivers to rule out the presence of corrupt files. To do this, we use a special tool that does the job more thoroughly than the standard uninstallers that come with your video drivers. That would be Display Driver Uninstaller, also known as DDU.The best way to do this is to download the latest driver software for your graphics card first so that you can install it immediately after using DDU.
1. Download your latest graphics cards drivers from official resources
For the latest Nvidia drivers: http://www.nvidia.com/Download/index.aspx
For the latest AMD drivers: http://support.amd.com/en-us/download
2. Download DDU
Display Driver Uninstaller
http://www.guru3d.com/files-details/display-driver-uninstaller-download.html
Display Driver Uninstaller (DDU) is freeware. Only download it from this trusted source.
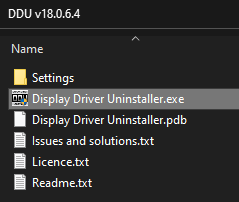
3. Unpack DDU
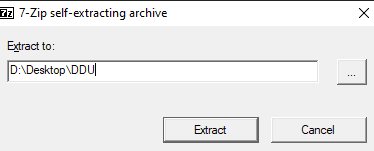
I recommend to unpack it onto your Desktop - makes it easy to find
4. Run DDU
Select your GPU manufacturer from the drop-down menu.
If you are happy with the options (the default is fine), click the Clean and restart button.
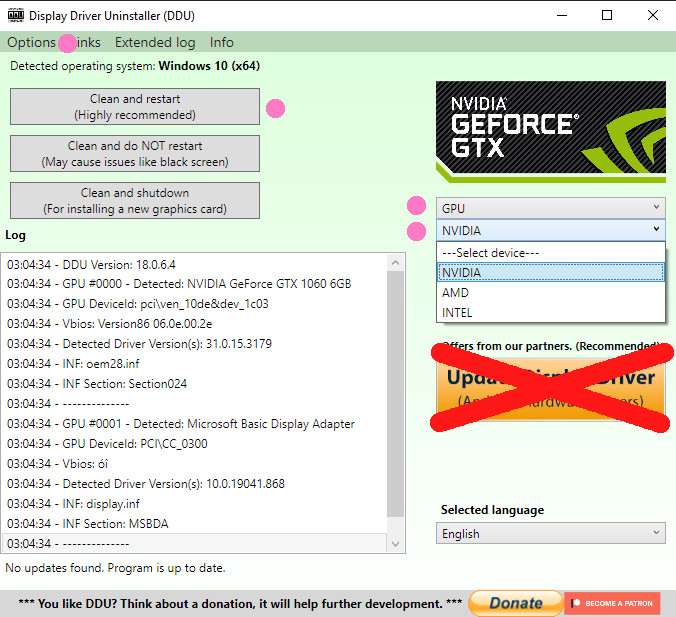
Ignore the advertisement
5. Install Your graphics card latest driver which you have downloaded before
6. Restart Your PC
When you are finished, you can safely delete the folder containing the DDU from your PC.
GPU Troubleshooting 2: Debug Mode
Disable Overclocking
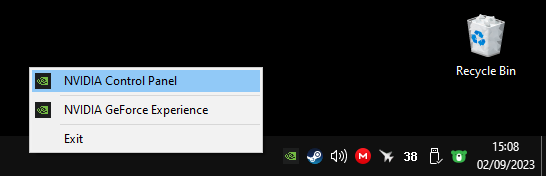
A quick way to check if your overclocked graphics cards are the problem is to enable debug mode in the graphics card control panel. This will disable any factory overclocking settings for a limited time. For a long-term solution, I recommend MSI Afterburner.For Nvidia right-click on the taskbar logo and select control panel
There you go for the debug mode
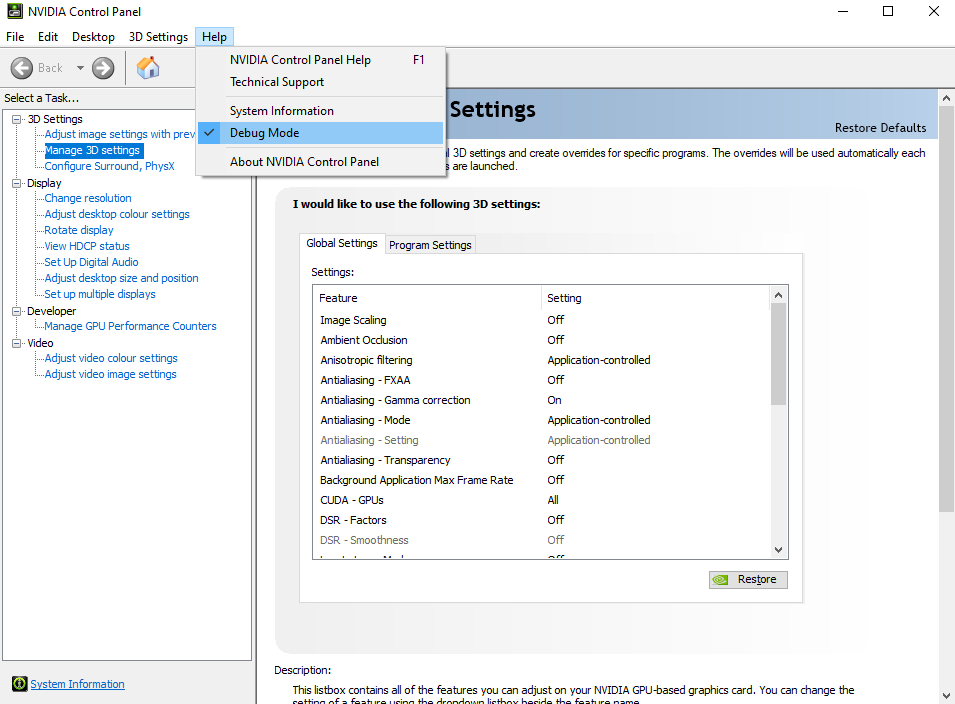
The effect lasts only as long as the option is checked / until next PC restart
GPU Troubleshooting 3: AMD
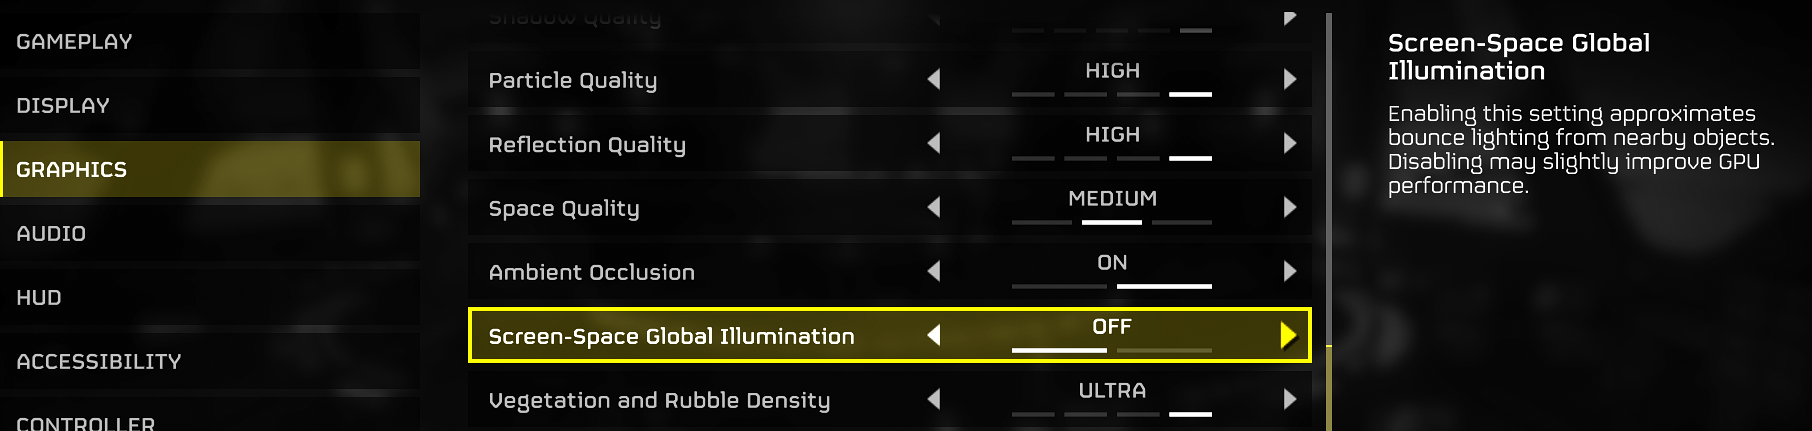
AMD users should disable Screen-Space Global Illumination, as it seems to cause instability specifically with AMD hardware.
Network Troubleshooting 1: Steam
Steam Downtime and Server Maintenance
https://help.steampowered.com/en/faqs/view/7016-8AFD-19F7-F397There is a kind of rule of thumb schedulde, which expects a regular Steam downtime which is weekly when the date changes from Monday to Tuesday around midnight Central Europe Time. Due to the fact, which is described on the website mentioned above, that not all servers go down simultaneously it is hard to talk about a fixed time frame. Common observation by European users describe recognised downtimes starting around 9pm Monday until 7am Tuesday.
Keep in mind, that Steam maintenance is not limited to that timeframe, and can actually happen any time due circumstances which are not made public. A reliable website, which is unofficial, but offers a great live service to observe such issues is https://steamstat.us/
Matchmaking server issues might not affect all players equally at the same time. It can happen like a ripple effect throughout the servers, and if you are lucky you do not notice it at all.
Rule of thumb: when the matchmaking server is down due to Steam Server Maintenance it can last up to 12-24 hours until the matchmaking server becomes stable again
If a lot of Helldivers 2 players experience issues at the same time, there is a very high chance you can notice a temporary / partial downtime reflected on the mentioned unofficial website.
You can often notice during downtimes, that the Steam Community servers are affected as well - while the storefront rarely ever. Why? Selling games has priority, so the storefront is kept more stable than anything else on Steam.

Something Went Wrong
We were unable to service your request. Please try again later.
E502 L3
Network Troubleshooting 2: Friendlist
If you have ever wondered why no one is joining your game even though it is set to public, check your Steam profile settings and friends list.
1. Steam matchmaking will not work for you if you have your Steam profile set to private.
2. If you have too many people on your Steam friends list / blocklist, in rare cases matchmaking may not work for you as Steam checks these lists for matchmaking. Having too many people on these lists can lead to timeout errors, causing matchmaking to stop working.
Network Troubleshooting 3: NAT & IPv6
In rare case, mostly by using old routers / having bad internet service provider, the default usage of modern IPv6 can lead to unexpected issues. Disabling the option reduces the risk of timeouts caused by network address translations.
You can find the setting with the adaptor's options
(WIN+R -> enter "ncpa.cpl" -> right click on the adaptor you are using)
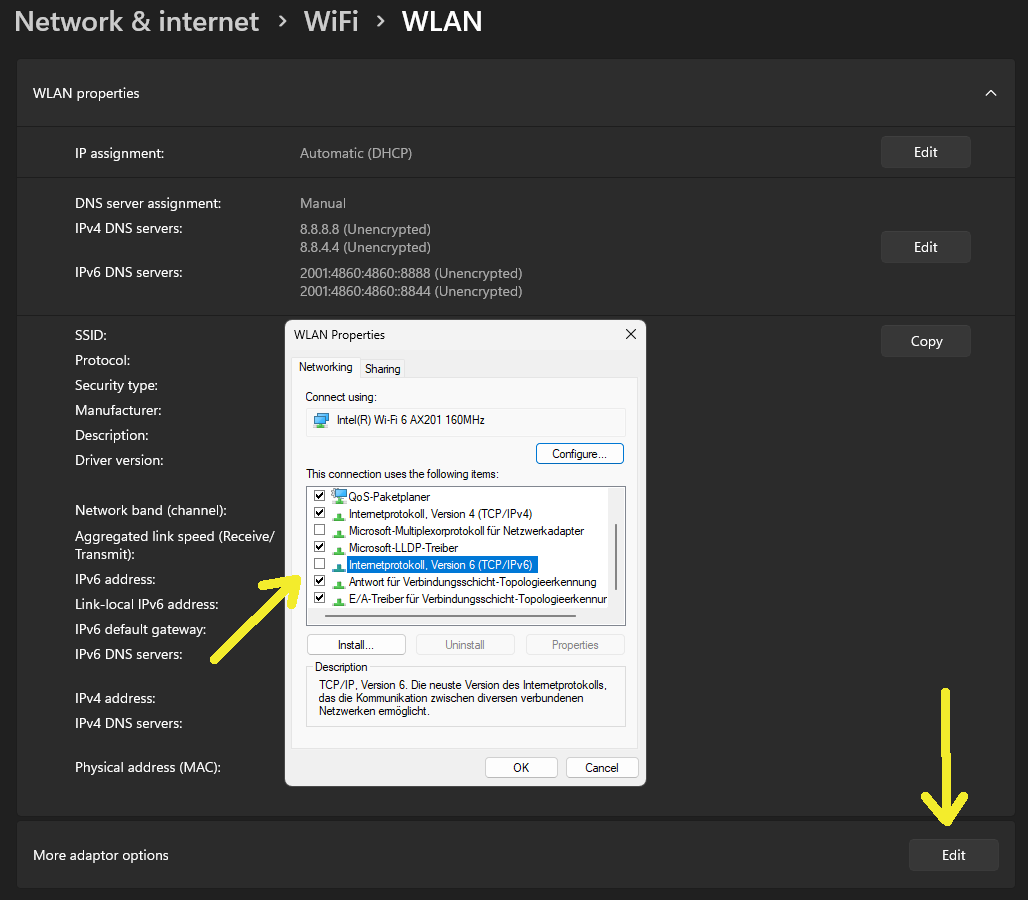
If you are using cable for your internet connection, change the setting with your Ethernet adaptor
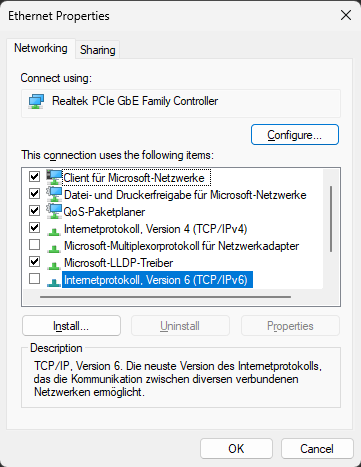
Make also sure to check if your router needs additional adjustments.
You can find the setting with the adaptor's options
(WIN+R -> enter "ncpa.cpl" -> right click on the adaptor you are using)
If you are using cable for your internet connection, change the setting with your Ethernet adaptor
Make also sure to check if your router needs additional adjustments.
Special Troubleshooting: UAC & DEP
To address BEX64 related issues like this one
You can try to disable the Data Execution Prevention (DEP) and Windows User Account Control (UAC) by enterting following code in the terminal.

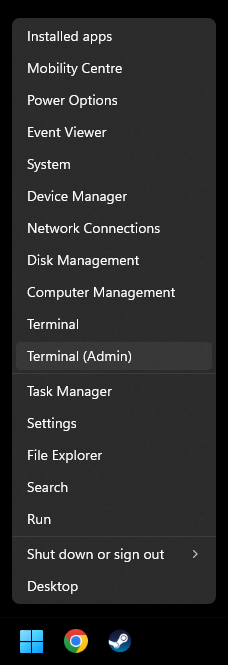
To open the terminal press WIN+X and select Terminal (Admin) / Powershell (Admin)
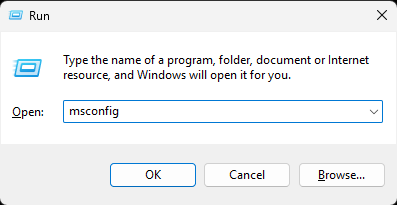
Turn off the UAC by pressing WIN+R and enter msconfig
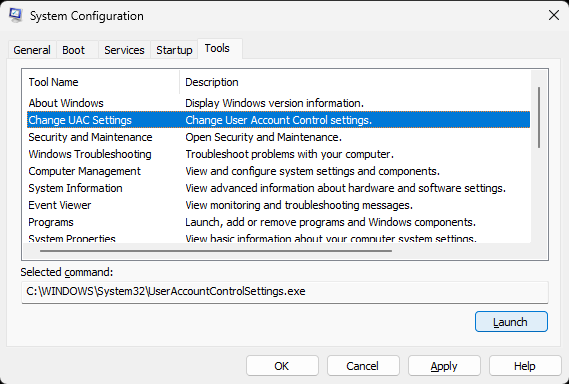
Go to the Tools-tab and select Change UAC Settings
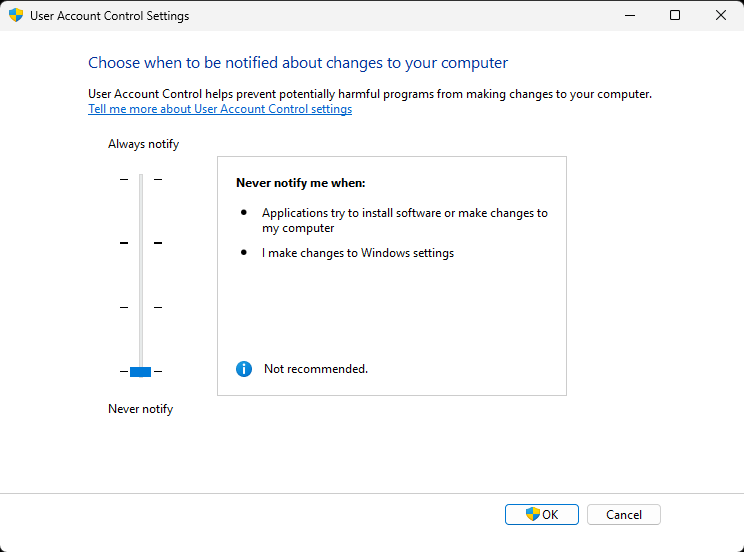
Set the settings to Never notify, like in the screenshot
Check if the game runs properly afterwards
To revert the setting use after you are done with troubleshooting use
and repeat the steps above to access UAC accordingly
Event Name: BEX64
Problem signature:
P1: helldivers2.exe
P2: 1.8.26367.0
P3: 67619569
P4: ntdll.dll
You can try to disable the Data Execution Prevention (DEP) and Windows User Account Control (UAC) by enterting following code in the terminal.
bcdedit.exe /set {current} nx AlwaysOff
To open the terminal press WIN+X and select Terminal (Admin) / Powershell (Admin)
Turn off the UAC by pressing WIN+R and enter msconfig
Go to the Tools-tab and select Change UAC Settings
Set the settings to Never notify, like in the screenshot
Check if the game runs properly afterwards
To revert the setting use after you are done with troubleshooting use
bcdedit.exe /set {current} nx AlwaysOn
and repeat the steps above to access UAC accordingly
Special Troubleshooting: Clean Boot
To be certain that none of your other apps is causing issues with Helldivers 2, it is worth to try launching the game after a clean boot. A clean boot means to disable any other unneeded software from launching before you launch the game. To achieve that
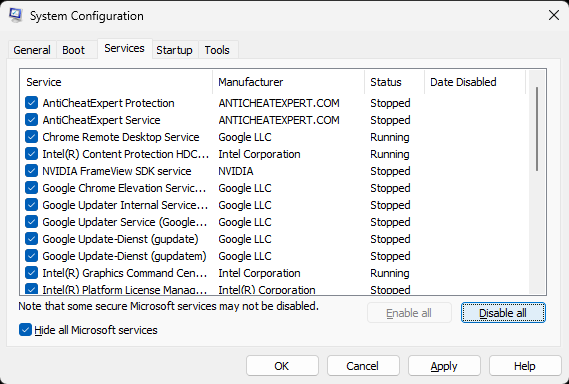
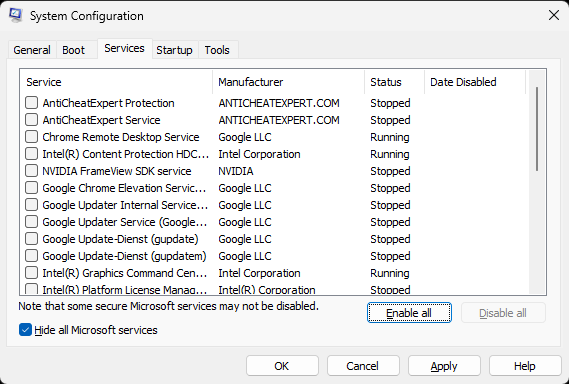
Press WIN+R to get the Run prompt and enter msconfig
Go to the Services-tab and select Hide all Microsoft services (those are the only ones we need) and then select Disable all
So it looks like this
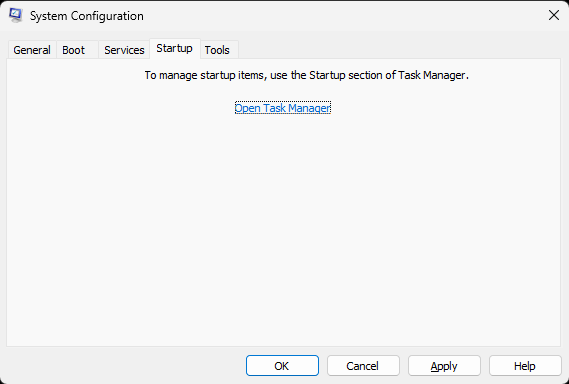
Switch to the Startup-tab and click on Open Task Manager
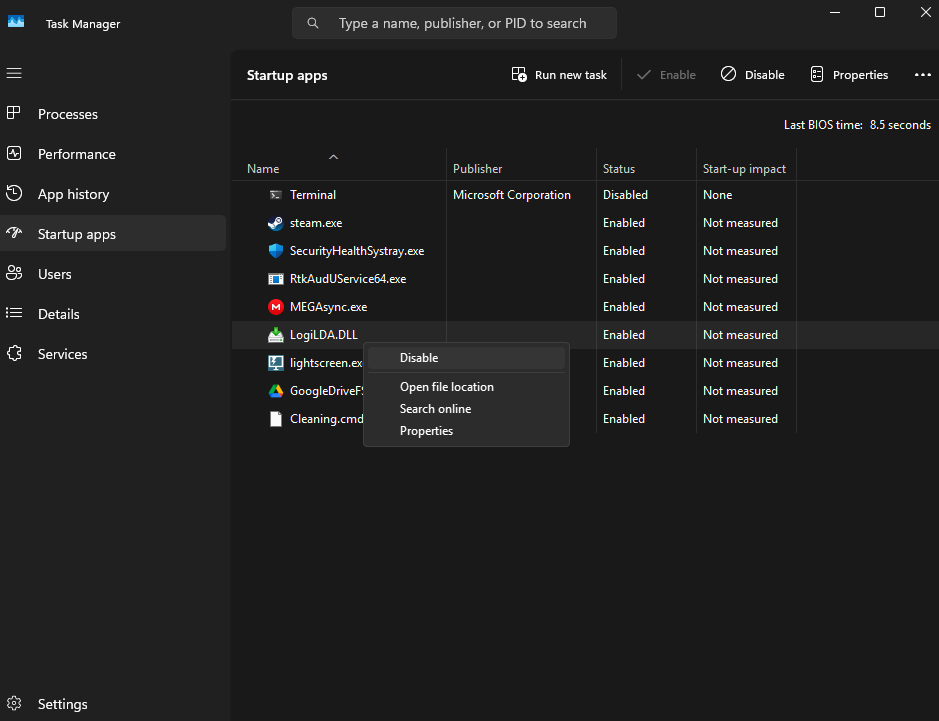
Disable every single item you can find there
Check if you can successfully launch Helldivers 2.
If you can, that means that some software among those which autostarts is causing the issue.
The most common culprits are third-party-apps by device manufacturers such as ASUS, Logitech G-Hub, Razer Synapse and those which add additional overlays like discord, Overwolf e.g.
You can turn the services and startup items back on, one at a time - followed by a PC restart - until you identify the culprit.
My tip: the fewer unnecessary startup items you have, the better it is for your overall PC performance.
For example, services such as Dropbox/OneDrive are often included in the startup process for convenience.
But think about it: how often do you actually use them when they are supposed to start automatically on your PC? It is enough to start them manually when you need them, and only then.
Press WIN+R to get the Run prompt and enter msconfig
Go to the Services-tab and select Hide all Microsoft services (those are the only ones we need) and then select Disable all
So it looks like this
Switch to the Startup-tab and click on Open Task Manager
Disable every single item you can find there
Check if you can successfully launch Helldivers 2.
If you can, that means that some software among those which autostarts is causing the issue.
The most common culprits are third-party-apps by device manufacturers such as ASUS, Logitech G-Hub, Razer Synapse and those which add additional overlays like discord, Overwolf e.g.
You can turn the services and startup items back on, one at a time - followed by a PC restart - until you identify the culprit.
My tip: the fewer unnecessary startup items you have, the better it is for your overall PC performance.
For example, services such as Dropbox/OneDrive are often included in the startup process for convenience.
But think about it: how often do you actually use them when they are supposed to start automatically on your PC? It is enough to start them manually when you need them, and only then.
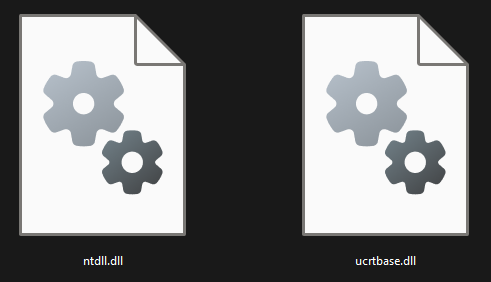
Special Troubleshooting: Replace DLLs
A set of commonly replaced Windows DLLs for troubleshooting can be found here, alongside of installers for commonly used Windows troubleshooting tools.
https://www.nexusmods.com/helldivers2/mods/93
Make sure to acquire system files, such as DLLs only from a trustworthy site.
Nexusmods scan all the files you download to prevent you from downloading malicious code. Alternatively, which I recommend strongly, ask a friend who has no related issues for the files.
To replace faulty DLLs, such s ntdll.dll, you need to run Windows in Safe Mode.
If you are not used to start Windows Safe Mode, the easiest way to do so is
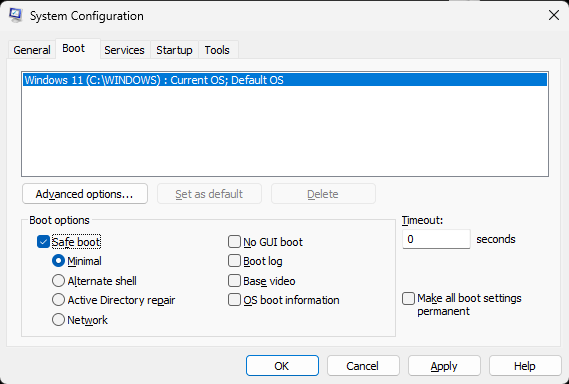
Press WIN+R to open the Run prompt and enter msconfig
Select in the Boot-tab Safe boot and restart your PC
Once you are in Windows Safe Mode the location to replace the DLLs can be found by default in
Once you have replaced the files, repeat the steps above to access msconfig to de-select the Safe boot option, so your PC will restart in normal mode again afterwards.
https://www.nexusmods.com/helldivers2/mods/93
Make sure to acquire system files, such as DLLs only from a trustworthy site.
Nexusmods scan all the files you download to prevent you from downloading malicious code. Alternatively, which I recommend strongly, ask a friend who has no related issues for the files.
To replace faulty DLLs, such s ntdll.dll, you need to run Windows in Safe Mode.
If you are not used to start Windows Safe Mode, the easiest way to do so is
Press WIN+R to open the Run prompt and enter msconfig
Select in the Boot-tab Safe boot and restart your PC
Once you are in Windows Safe Mode the location to replace the DLLs can be found by default in
C:\Windows\System32
Once you have replaced the files, repeat the steps above to access msconfig to de-select the Safe boot option, so your PC will restart in normal mode again afterwards.
Special Troubleshooting: PlayFab
If you see this error
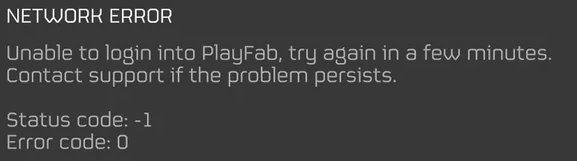
That means something is blocking your connection to the Helldivers 2 login servers.
The most common culprit is Avast.
This kind of issue happens often with a fresh install of Helldivers 2, where the user skipped permitting Helldivers 2 to setup necessary configurations to run. Hence it can help to reinstall the game, which triggers the permission prompts once more - which is often not necessary as whitelisting the game in your security app and opening network ports suffices.
Special Troubleshooting: Error 114
Same as above with PlayFab. Something at your side is blocking the game, or the anti-cheat, to connect with the Helldivers 2 login servers. Check your security app and whitelist the game and anti-cheat / open your routers ports.
It might also help to run the Helldivers 2 as administrator if you are normally running your Windows on limited permissions.
In rare cases, try reinstalling the anti-cheat software GameGuard.
By default you find the tools to do that in *
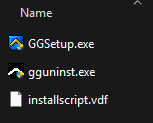
Run first gguninst.exe to properly uninstall the anti-cheat software
then restart your PC
then use GGSetup.exe at the same location to reinstall.
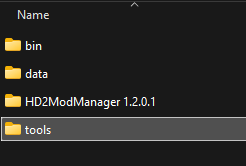
* for easy access you can also right-click on the game in your Steam Library -> Browse local files -> select the tools subfolder
It might also help to run the Helldivers 2 as administrator if you are normally running your Windows on limited permissions.
In rare cases, try reinstalling the anti-cheat software GameGuard.
By default you find the tools to do that in *
C:\Program Files (x86)\Steam\steamapps\common\Helldivers 2\tools
Run first gguninst.exe to properly uninstall the anti-cheat software
then restart your PC
then use GGSetup.exe at the same location to reinstall.
* for easy access you can also right-click on the game in your Steam Library -> Browse local files -> select the tools subfolder
Special Troubleshooting: Hold Mouse
This addresses the issue when holding the left mouse button behaves like a single click instead of a continously action. To cure that seek out the file input_settings.config which can be found in
and change
into
C:\Program Files (x86)\Steam\userdata\YOURSTEAMID\553850\remote
and change
{
trigger = "Press"
device_type = "Mouse"
input = "MouseButtonLeft"
threshold = 0.20000000298023224
input_type = "Button"
}
into
{
trigger = "Hold"
device_type = "Mouse"
input = "MouseButtonLeft"
threshold = 0.20000000298023224
input_type = "Button"
}
Special Troubleshooting: Run as Admin
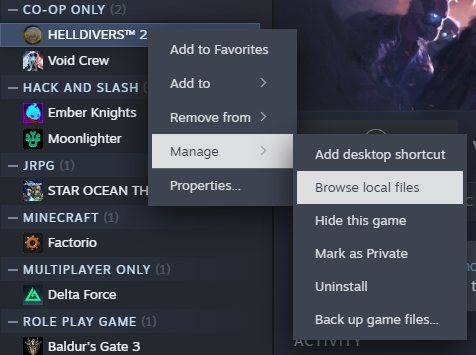
To run the game as admin, select the helldivers2.exe, which you can find via
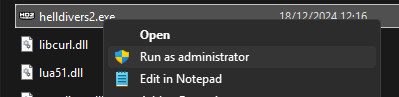
Right-click on the game in your Steam Library -> Manage -> Browse local files -> bin folder
Right-click on the executable in the bin folder and select Run as Administrator
You can also set the game to permanently start as administrator by going to the file's properties
And select the option at the Compatibility-tab
How to Share DxDiag Report
Enter "dxdiag" into either your Windows search bar or the command prompt.
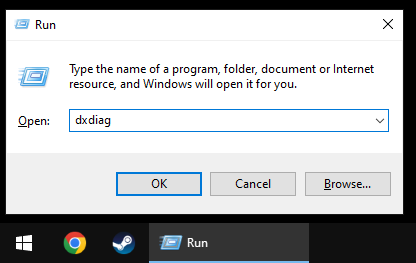
To access the command prompt, simply press Windows Key + R. Alternatively, you can follow the official method provided by Microsoft:
https://support.microsoft.com/en-us/windows/open-and-run-dxdiag-exe-dad7792c-2ad5-f6cd-5a37-bf92228dfd85
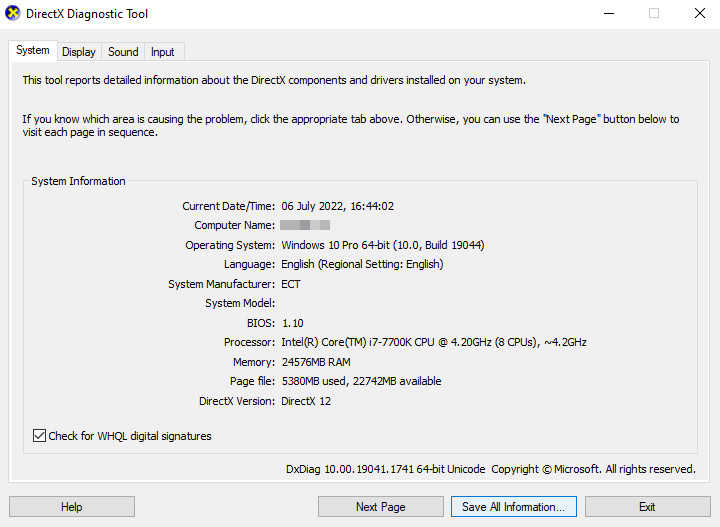
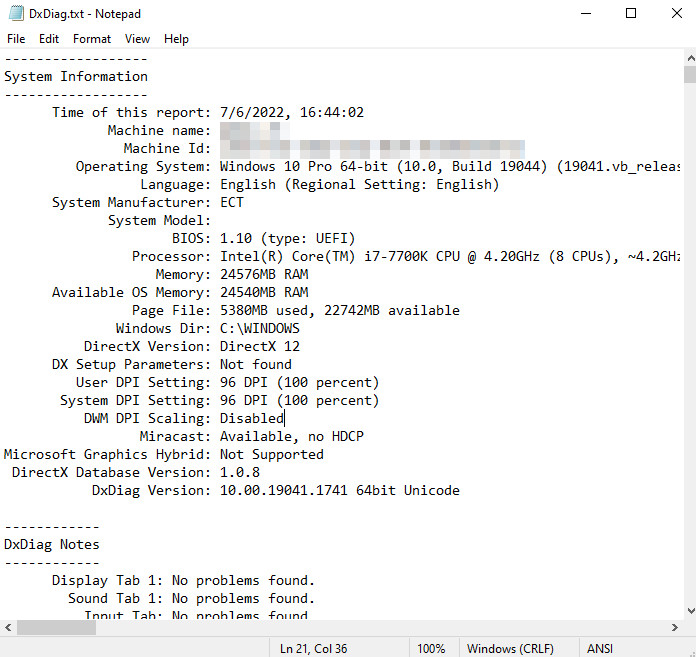
Opting for the "Save All Information" function generates a text file that is readily accessible.
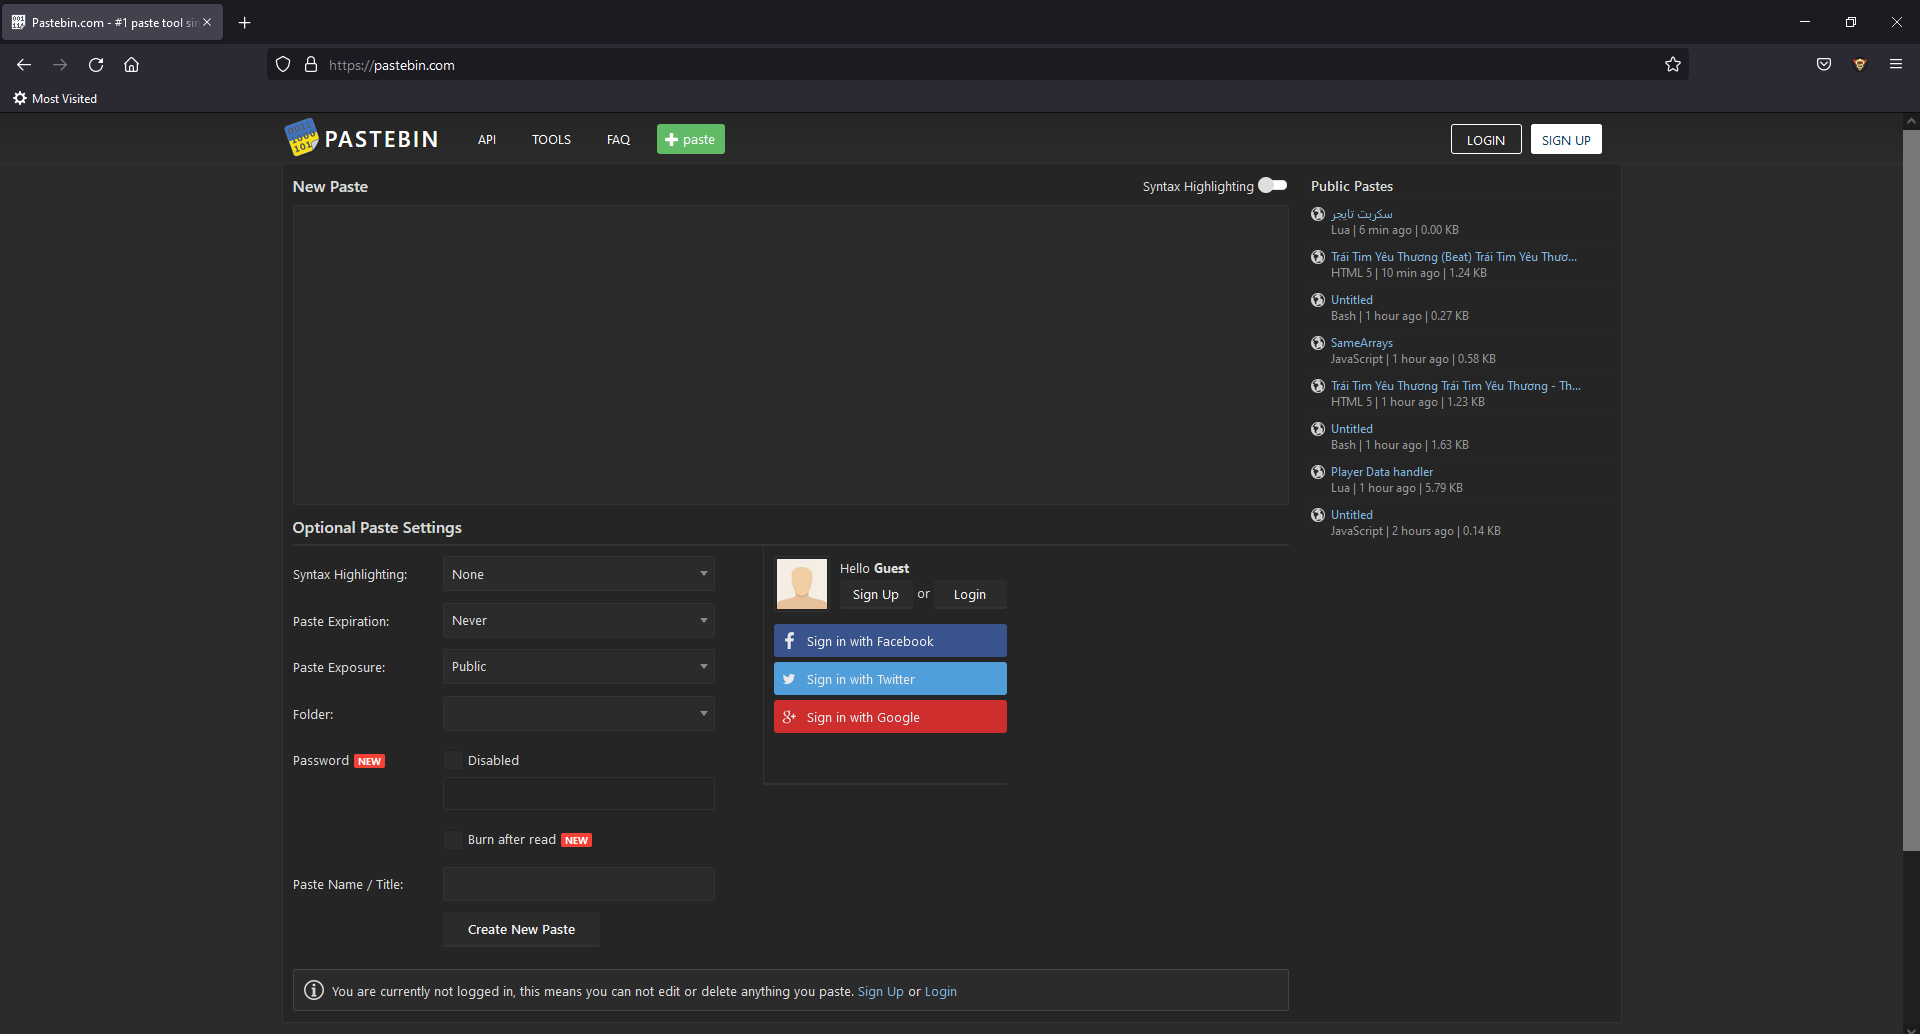
You can then share this file through various methods, such as sharing it with the third party through a publicly accessible section of your personal webspace, for instance, using platforms like Google Drive or Dropbox.
While you have the option to remove any personal information from the file, it's imperative to retain the remainder of the data. Otherwise, a thorough analysis by a third party could potentially lead to misguided or erroneous conclusions.
pastebin.com is fine too and it does not need any registration to be used
To access the command prompt, simply press Windows Key + R. Alternatively, you can follow the official method provided by Microsoft:
https://support.microsoft.com/en-us/windows/open-and-run-dxdiag-exe-dad7792c-2ad5-f6cd-5a37-bf92228dfd85
Opting for the "Save All Information" function generates a text file that is readily accessible.
You can then share this file through various methods, such as sharing it with the third party through a publicly accessible section of your personal webspace, for instance, using platforms like Google Drive or Dropbox.
While you have the option to remove any personal information from the file, it's imperative to retain the remainder of the data. Otherwise, a thorough analysis by a third party could potentially lead to misguided or erroneous conclusions.
pastebin.com is fine too and it does not need any registration to be used
Thanks for Reading!
I wish you a great time with Helldivers 2! Happy Gaming!