Tips for Beginners
 アンジェル
アンジェル(316 ratings)
Apr 1, 2024 @ 2:15pm17,974497
Co-opGameplay BasicsLootMaps or LevelsModding or ConfigurationMultiplayerWeaponsEnglish
Welcome to Helldivers 2!
At the time of writing this guide, I was a new player in Helldivers 2 myself.
The tips I share here are a mix of hard lessons I learned on my own and valuable tips from the community that I got from awesome fellow Helldivers 2 players.
If you are an advanced player, this guide is not for you.
This guide is for anyone who is brand new to the game and would like some written guidance in the overwhelming world of Helldivers 2.
First thing first ~
Every new player is warmly welcomed by the community as Helldivers 2 is a co-op and community driven experience. You may encounter the odd problem with rogue players, alien sympathisers and traitors - but I assure you that the majority of players will welcome you with open arms!
Every new player, young or old, on any platform, from anywhere on Super Earth, is a future brother or sister in arms on the battlefield we love to play with!
Have fun, enjoy the game and thank you for your service to Super Earth!
The tips I share here are a mix of hard lessons I learned on my own and valuable tips from the community that I got from awesome fellow Helldivers 2 players.
If you are an advanced player, this guide is not for you.
This guide is for anyone who is brand new to the game and would like some written guidance in the overwhelming world of Helldivers 2.
First thing first ~
Welcome to Helldivers 2!
Every new player is warmly welcomed by the community as Helldivers 2 is a co-op and community driven experience. You may encounter the odd problem with rogue players, alien sympathisers and traitors - but I assure you that the majority of players will welcome you with open arms!
Every new player, young or old, on any platform, from anywhere on Super Earth, is a future brother or sister in arms on the battlefield we love to play with!
Have fun, enjoy the game and thank you for your service to Super Earth!
Active Work in Progress
As I progress through the game myself, I will be adding more content to the guide over time.
Why am I not waiting to release this guide until it is finished?
Because I feel that there could be countless new tips and I want to share them with you as soon as possible. I am writing this as I experience my own journey through the game, and you can think of the entries as a kind of diary. Come back later to discover more!
No Pay 2 Win, No Buy Necessary
Warbonds Explained
There are a lot of games out there that claim to be free-to-play/freemium/whatever, that lure you in with cheap entry/free gameplay, but then take a lot of money from you to give you access to the fun stuff.Helldivers 2 is not such a game.
It is true that you can unlock everything in Helldivers 2 just by playing.
It is true that it can "feel like a grind", that is if you are doing it wrong.
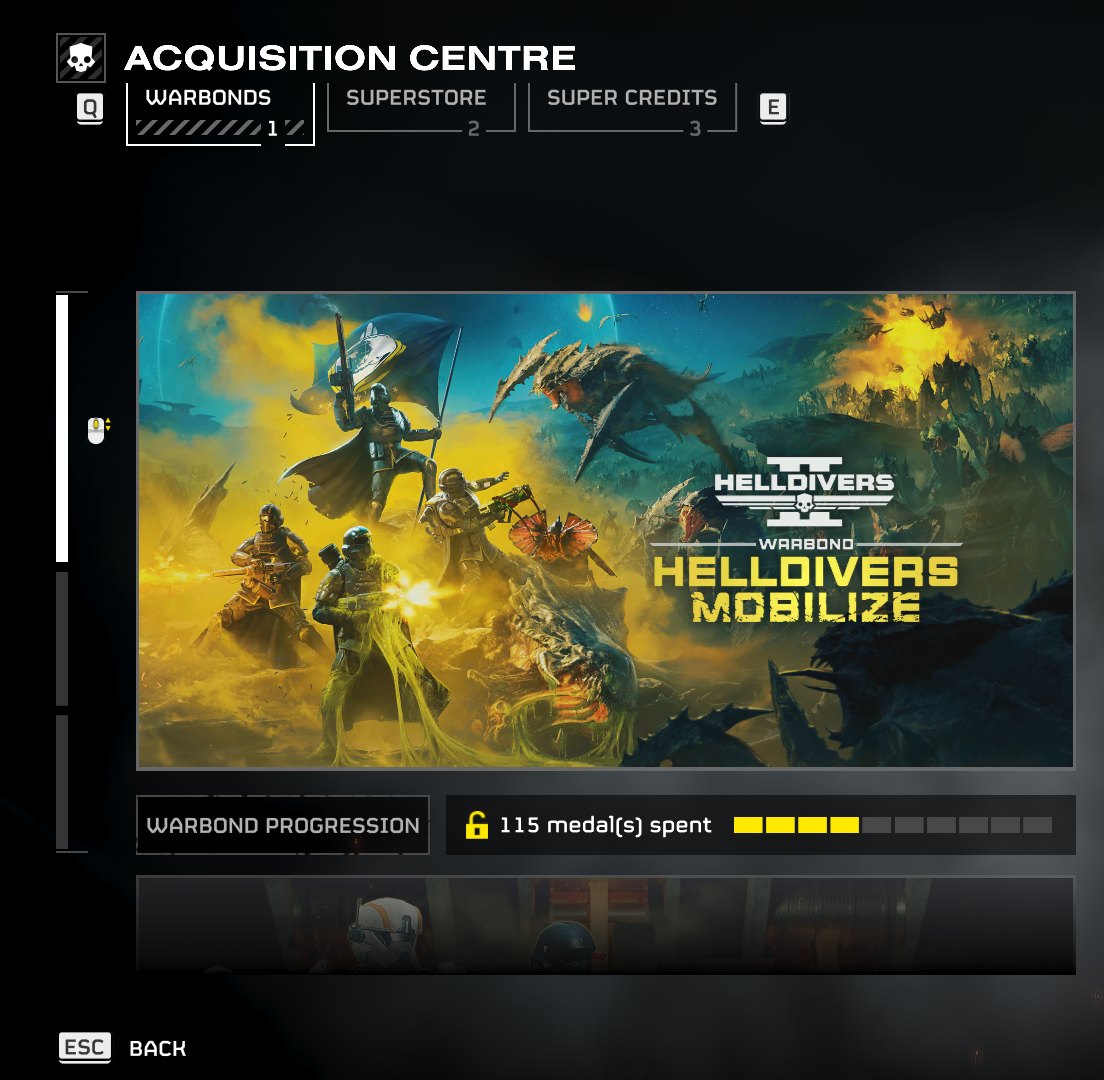
Warbond = Expansion Pack/Battlepass Hybrid
Unlike battlepasses you know from many other games, Warbonds are not time-limited. There is no need to worry about missing out if you do not use or get them in time.Remember: you do not need to pay any penny to get them.
You could use money to get them faster, but you can unlock everything just by playing.
You could use money to get them faster, but you can unlock everything just by playing.
It is planned by Arrowhead that a new Warbond will be released every second Thursday of a month. If you play frequently (circa two hours per day) you can easily unlock one Warbond every month.
Super Credit Currency and How to Get without paying Extra
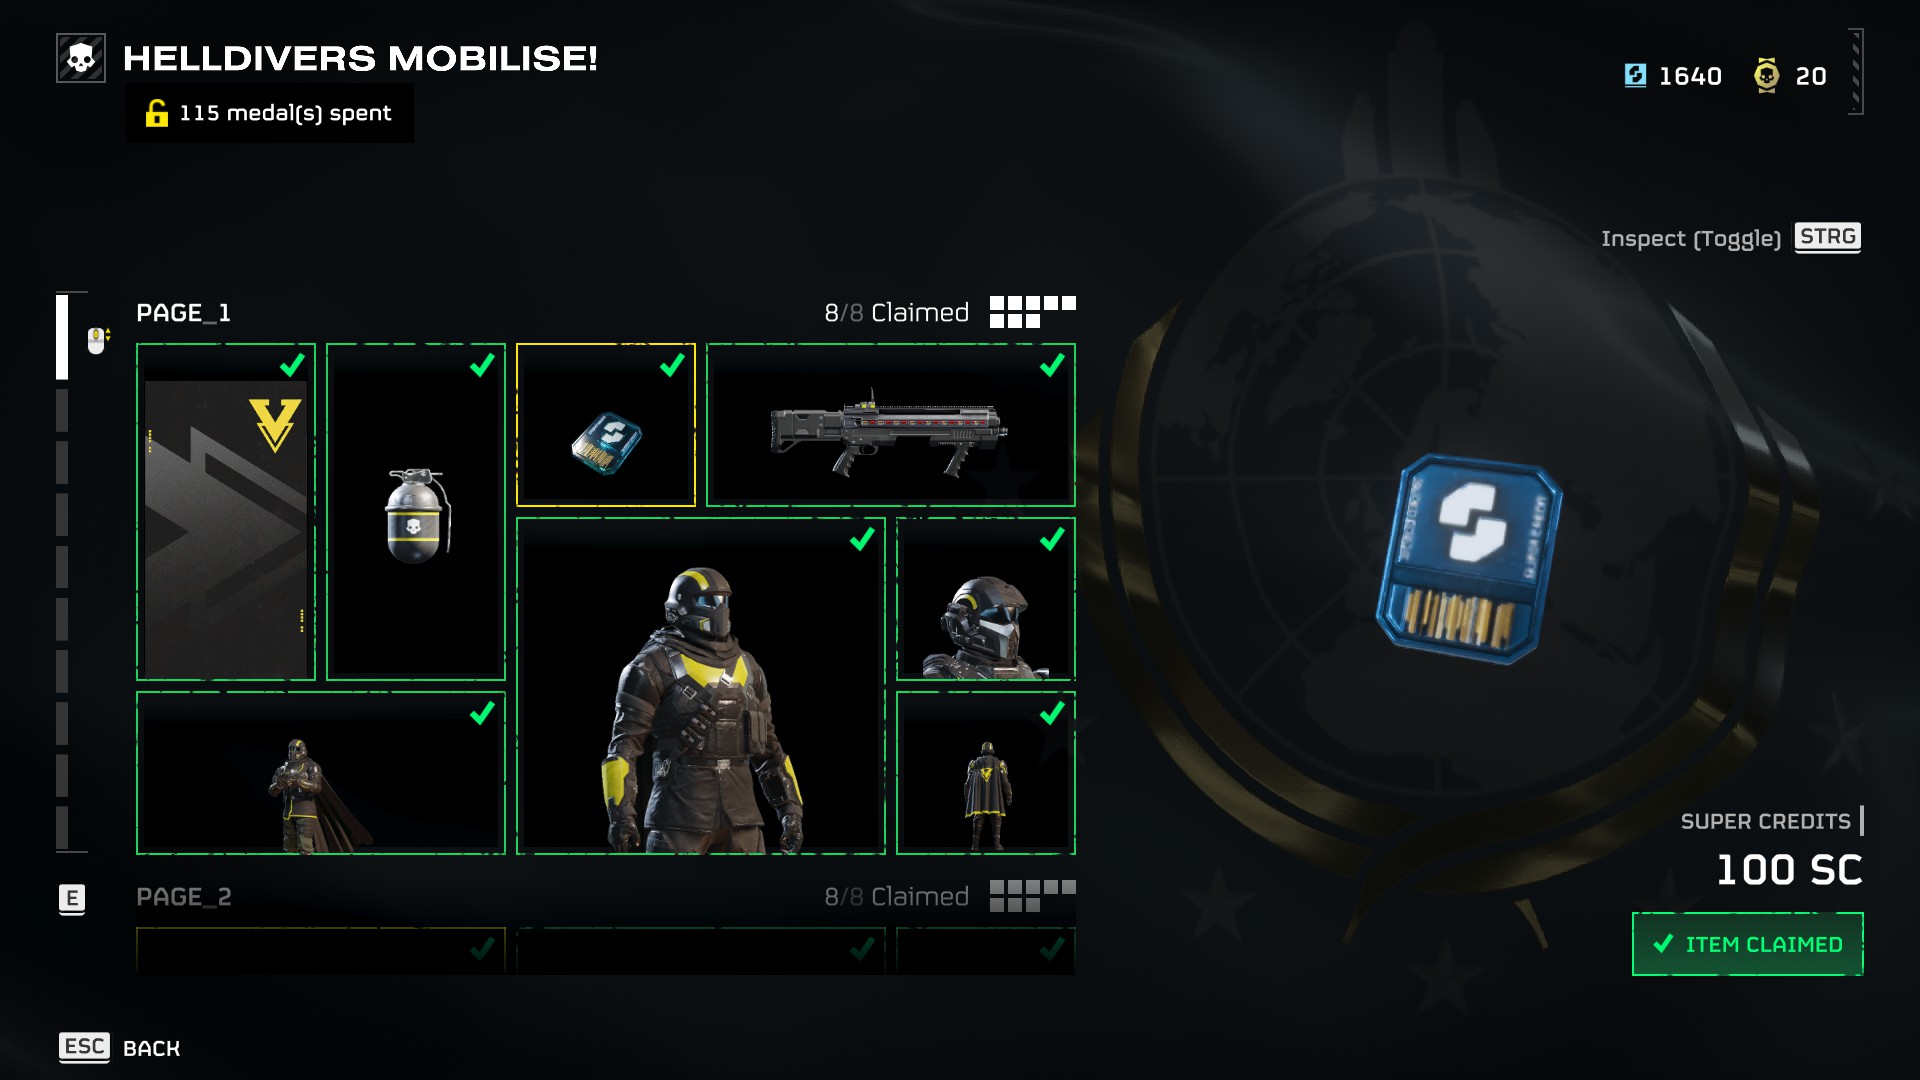
1. Unlocking Super Credit via Standard Warbond
The standard Warbond is included with the game and you can unlock up to 600 Super Credits by spending medals you get as a reward from missions. That is by all means not much, and just taking those into consideration you are still 400 Super Credits away from being able to unlock an extra Warbond.
2. Mission Loot
The best and quickest source for Super Credits are via mission loot. You can find them randomly on the map at points of interests. My personal luck rewarded me with 10 Super Credits per mission in average. With that kind of luck that means just by playing 40 missions you could get the needed 400 Super Credits to unlock another Warbond.
But that is just my personal luck!
Experienced Helldivers who specialise in farming for Super Credits, I call them Tomb Raiders, love to brag that they can get 100 Super Credits per mission guaranteed*. One more believable claim mentioned they got so lucky with finding up to 80 Super Credits. So there is an actual range, depending on the difficulty you play, which determines the amount of Super Credits you can get. And as a matter of course: how much of the map you are willing to explore while doing a mission.
* turned out there was an exploit which has been patched with patch 01.000.203
There are indeed possible drops of 100 Super Credits.
Once we even found in a session 200 Super Credits, which has to be Super-Rare.
Rule of thumb: the more you play, the easier it becomes with equipment upgrades.
That makes paying extra truly just an unnecessary pledge to support the publisher and developers behind the game. Unnecessary, but not unwelcome if you enjoy the game so much that you are willing to pay extra. Just - by all means! - do not go overboard with your pledges. The game is meant to bring joy and not to dry up your wallets!
Super Citizen Edition
As mentioned before: you can unlock all Warbonds just by playing.
Justifying the Super Citizen Edition with the included Warbond = equals 10 EUD extra pay as if you exchanged currency extra for plainly the wrong mindset.
What you get in actual value is only this:
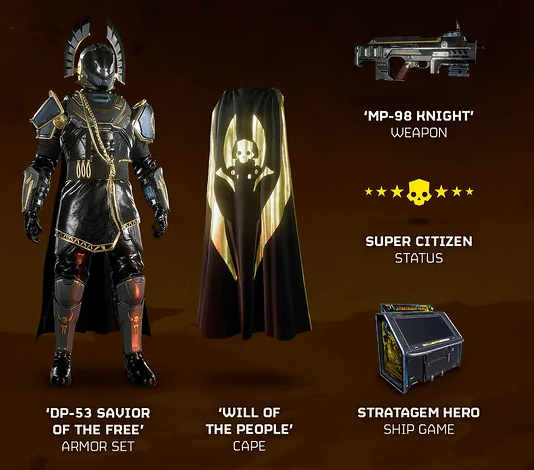
A prestige skin and title, a weapon you will not use much and a minigame which should be standard as it can help train new players to memorise stratagems.
Whenever you buy something extra, consider it always as a mean to support the developer studio and publisher behind the game. It is never a necessity. The only necessity the game asks you for is having fun. The more players are having fun together, the better it is for the game and community!
Justifying the Super Citizen Edition with the included Warbond = equals 10 EUD extra pay as if you exchanged currency extra for plainly the wrong mindset.
What you get in actual value is only this:
A prestige skin and title, a weapon you will not use much and a minigame which should be standard as it can help train new players to memorise stratagems.
Whenever you buy something extra, consider it always as a mean to support the developer studio and publisher behind the game. It is never a necessity. The only necessity the game asks you for is having fun. The more players are having fun together, the better it is for the game and community!
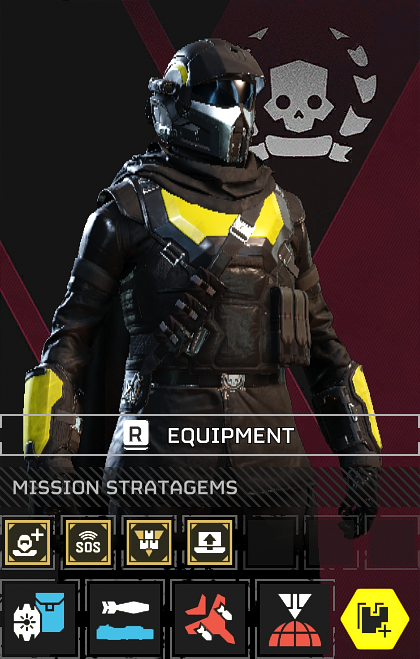
Superstore: Just litte more than Skins
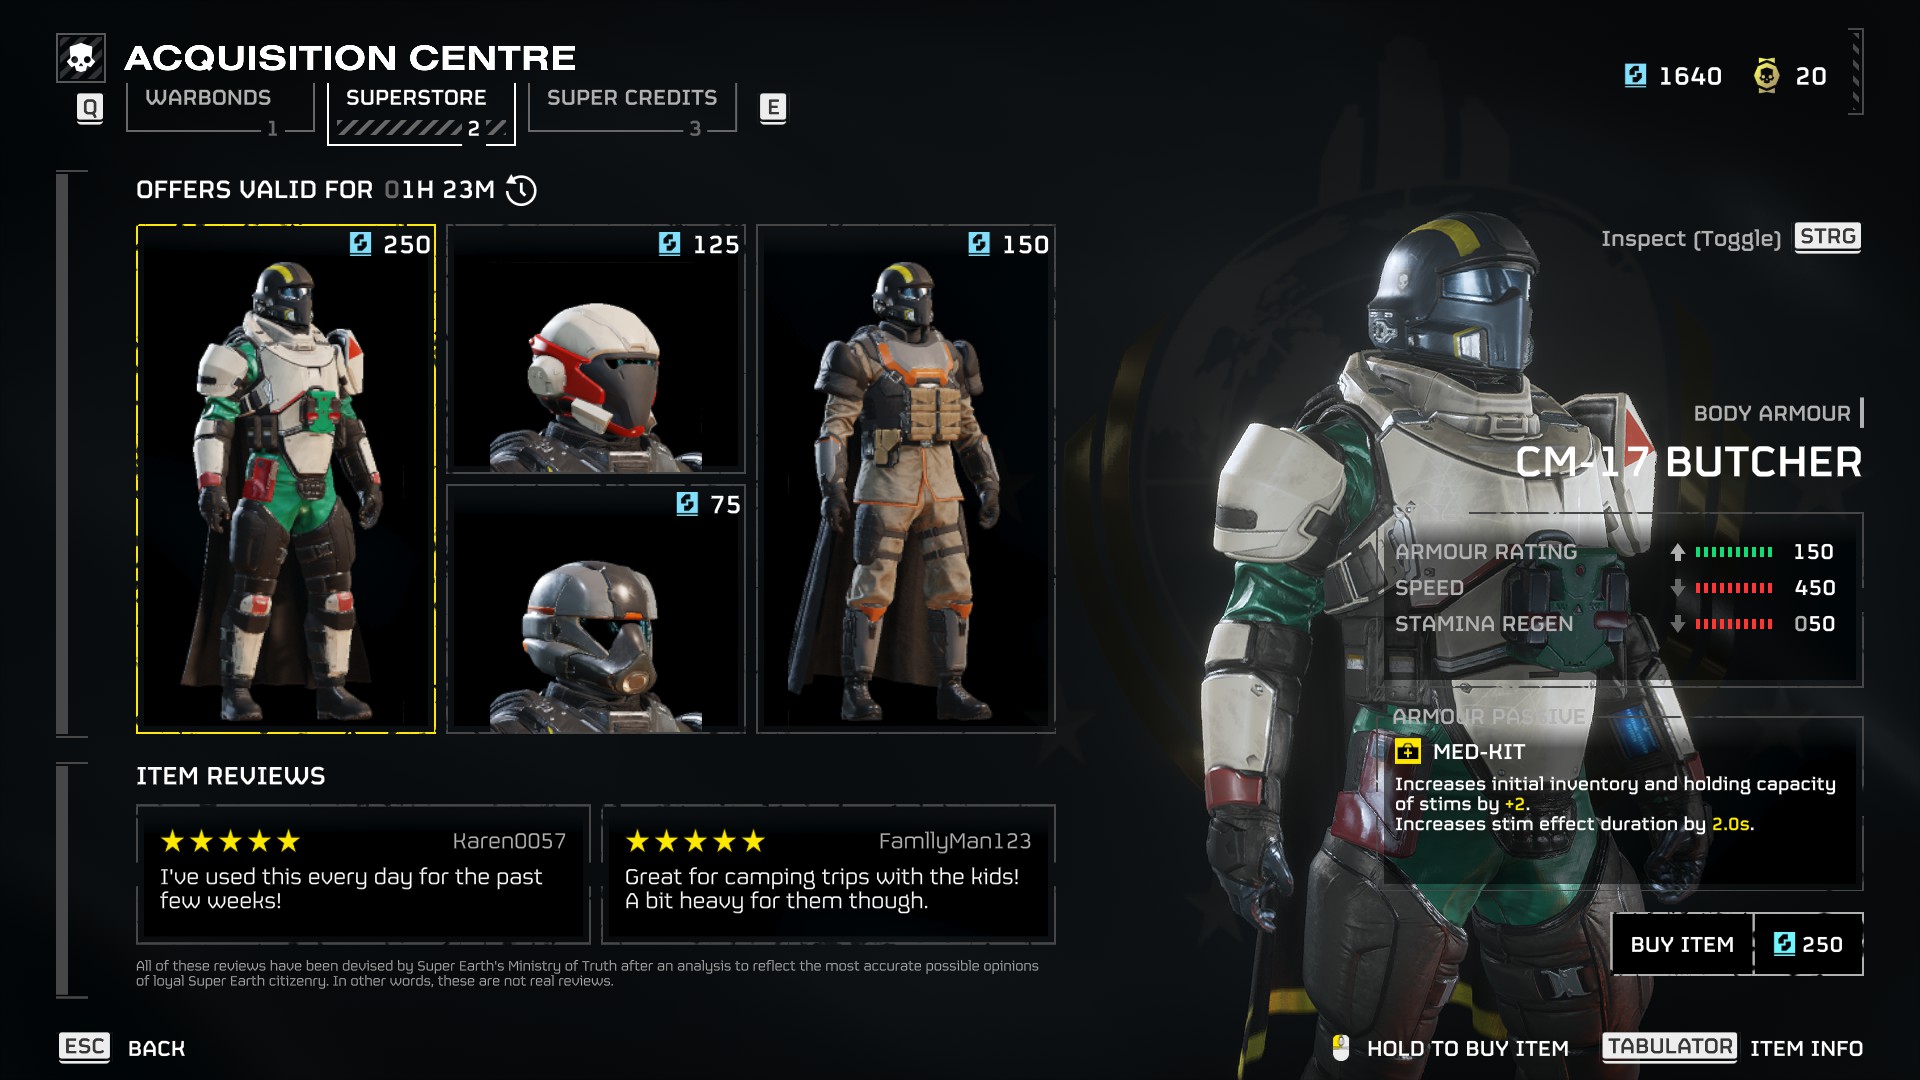
While the offered armours have effects, armours with the same passive boni can be unlocked using medals. For example, the armour with the same passive effects as above can be found on page four with the standard included Warbond.
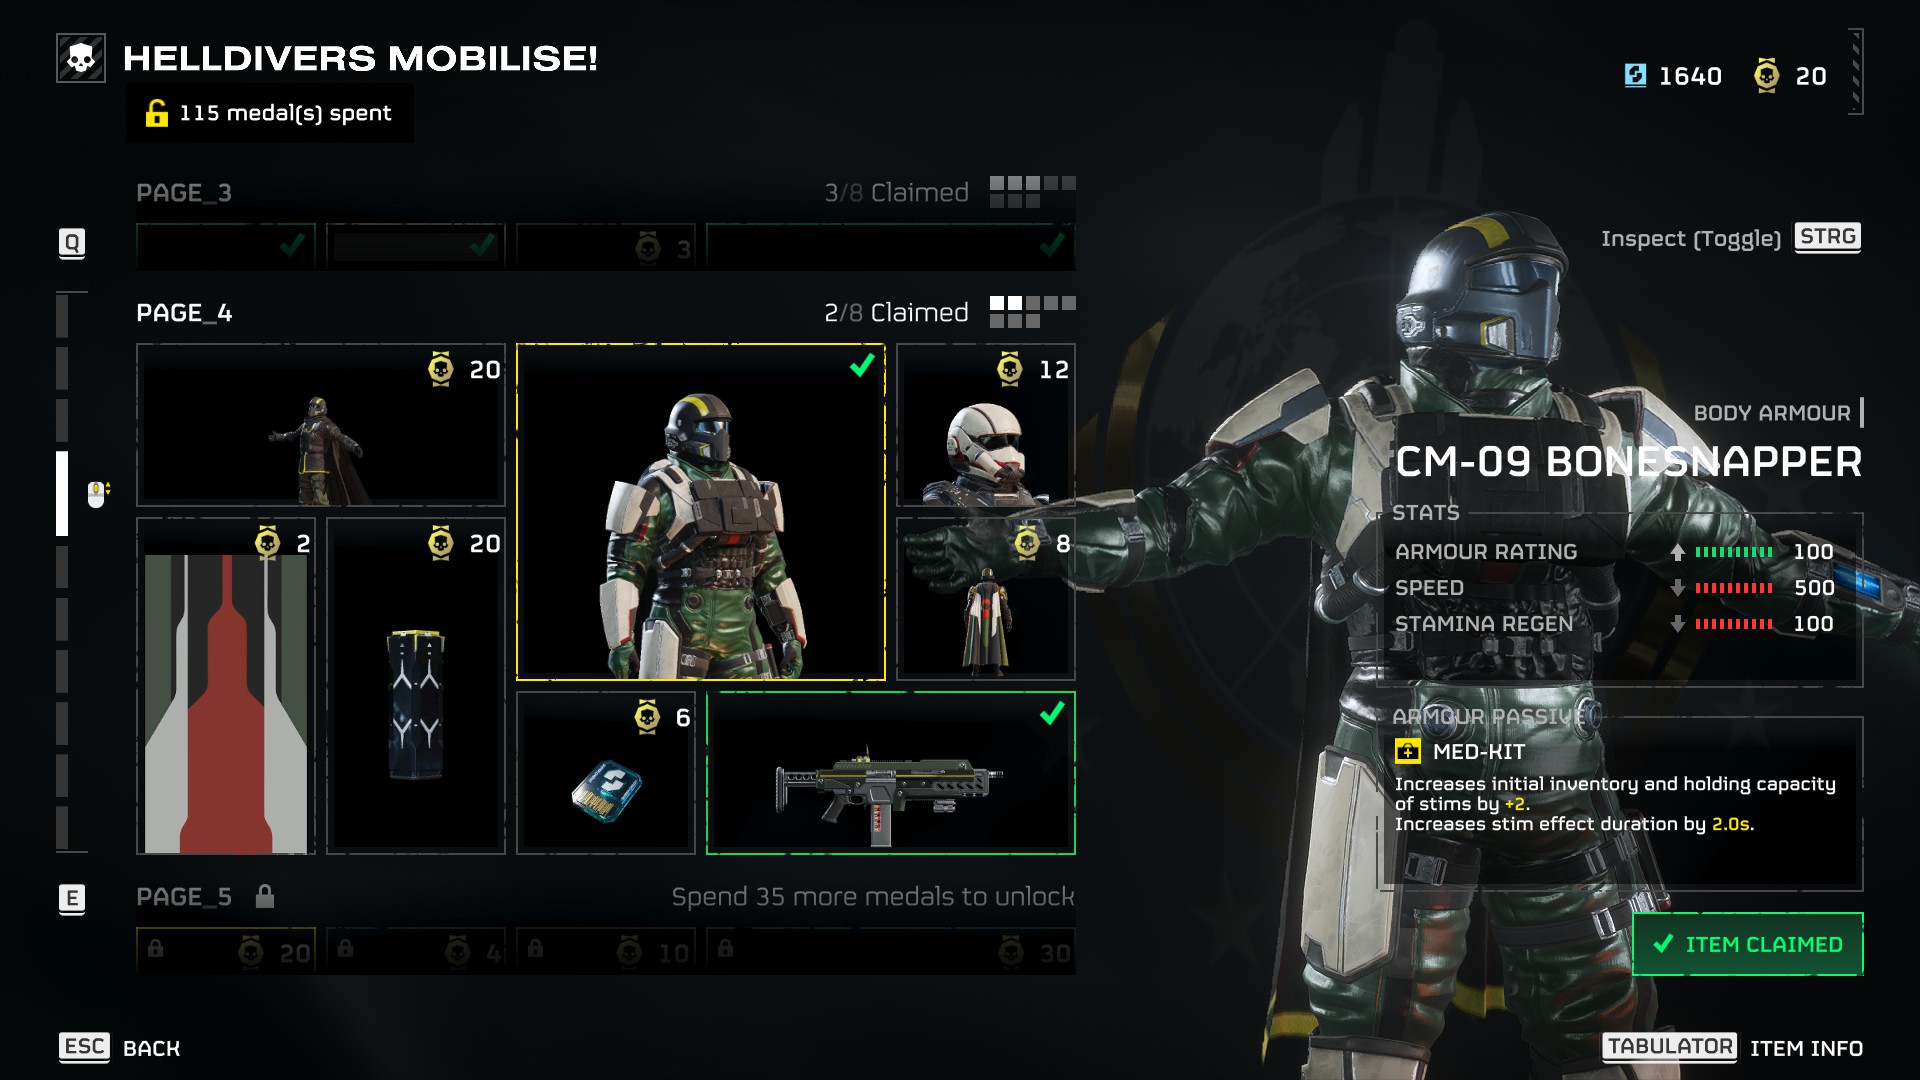
In addition to that, the Superstore items can have slightly different stats.
In rare cases it allows you a different playstyle than what the standard offers.
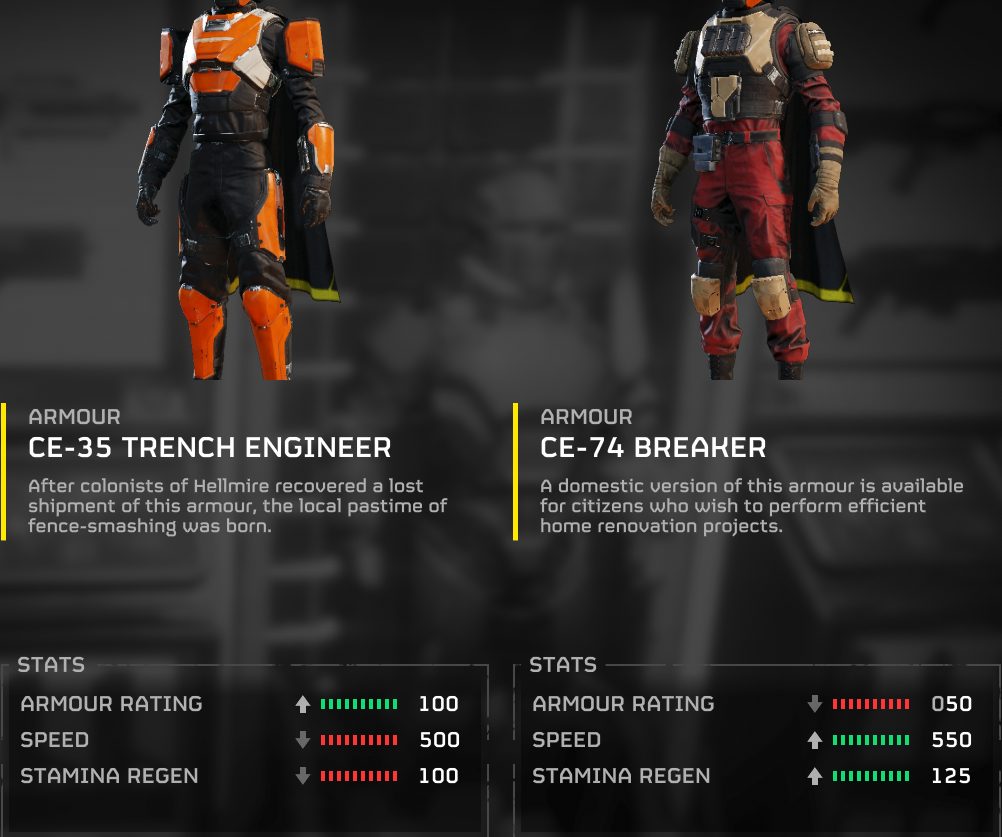
Example of a grenadier armour: left is what you get from the standard warbond, right from a Superstore sale. The right one comes with stats you normally have with scout armours. Encouraging a hit&run style while using grenades.
Trivia: Medic Armour
The medic armour is popular, not because people love to play medic. Using stims gives you semi-invincibility for the whole duration of the effect. Making the armour with extra stims and prolonged effect duration a top pick for players to be on the safe side.Do not waste your life. Waste the enemies' lifes!
Why Cutting Edge? And Why Not?
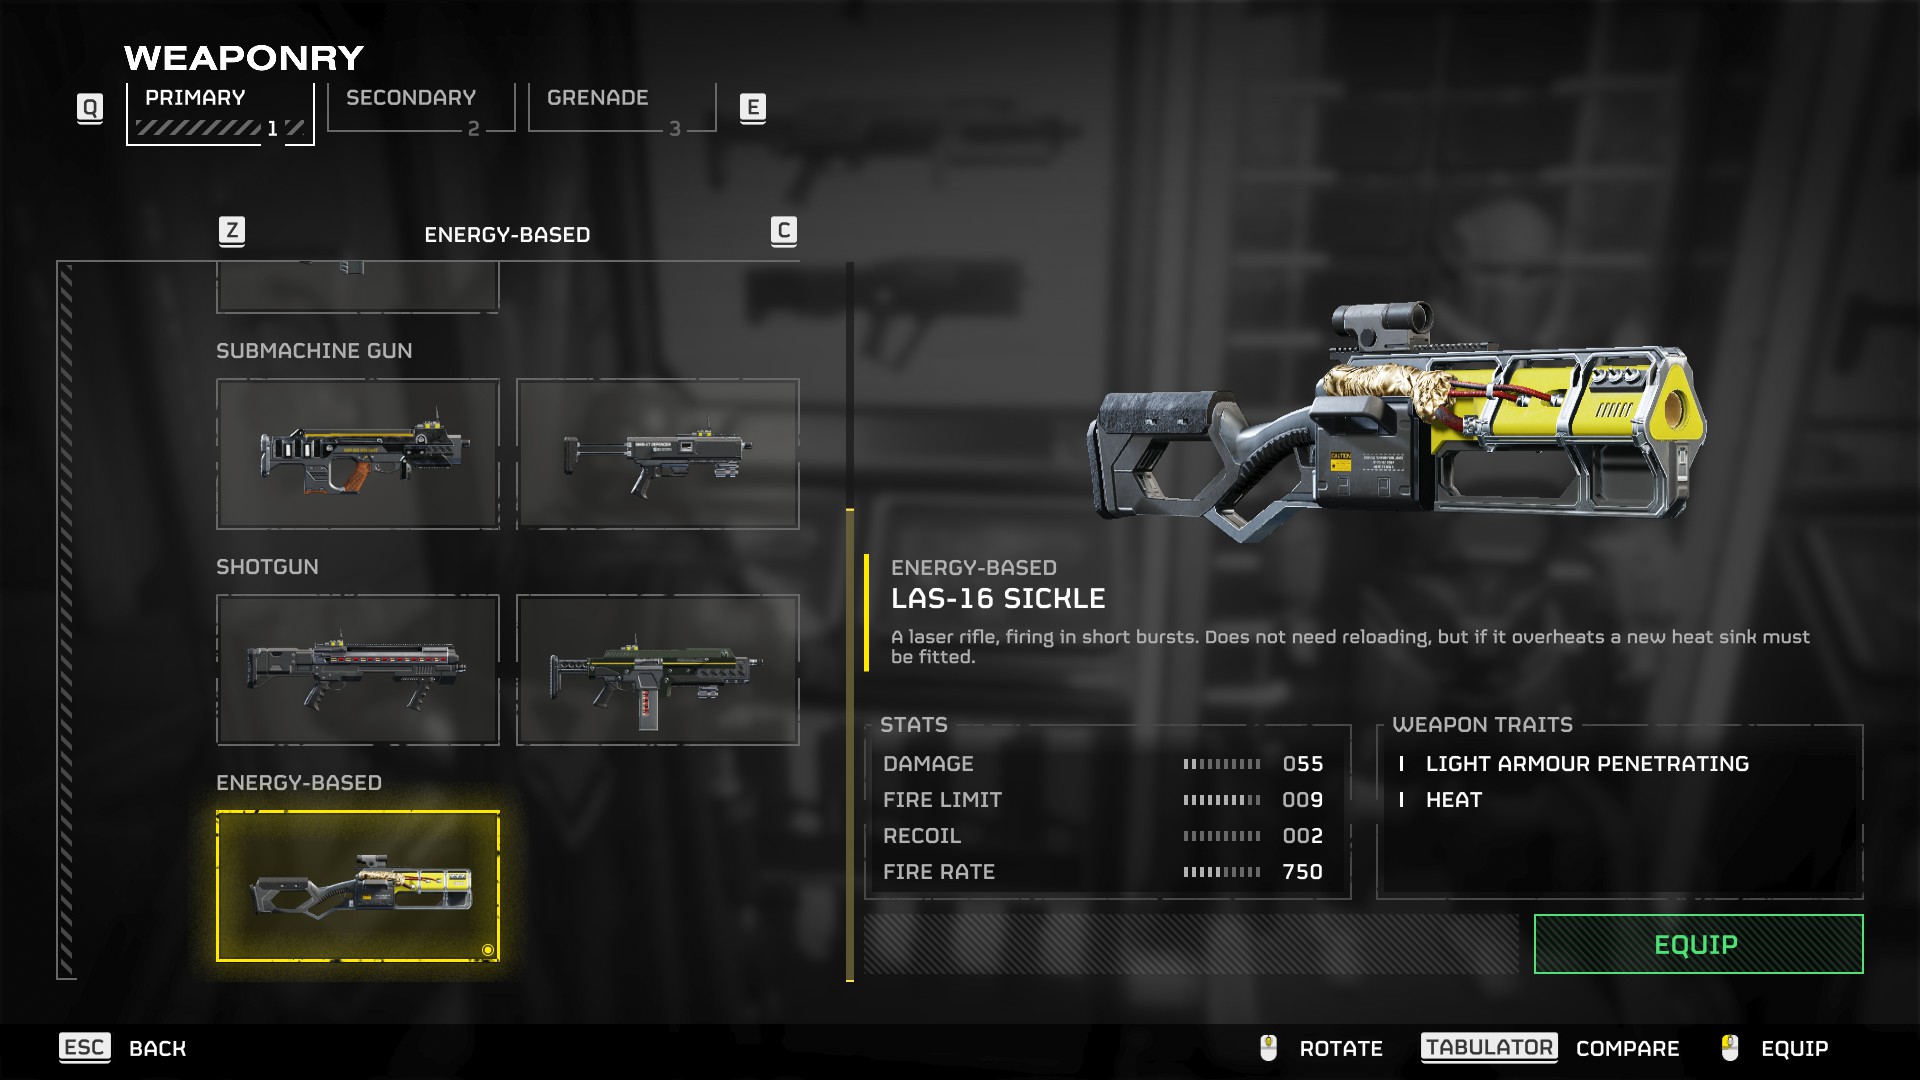
If veteran Helldivers recommend to you to get the Cutting Edge Warbond, it is because of the energy weapons, in particular the LAS-16 Sickle.
Do not go yet! I am not selling you the weapon!
I just explain why people recommend it and what you can learn from it!It has something to do with the general handling as the Sickle
- makes it easy to see the line of fire
- can be used without resupply
You read it right. Energy weapons can be used infinitely without reloading as they come with cooling cartridges. As long as you do not overheat the cartridges you can keep using them without ever having the need to resupply or scavenge for ammo, which makes them very comfortable weapons.
And that is the one of the reason why weapons like the LAS-16 Sickle, Arc Thrower and Quasar Cannon are top on the list.
A lot of players love it comfortable. In addition to that as secondary weapon the P-19 Redeemer gets recommended mostly.
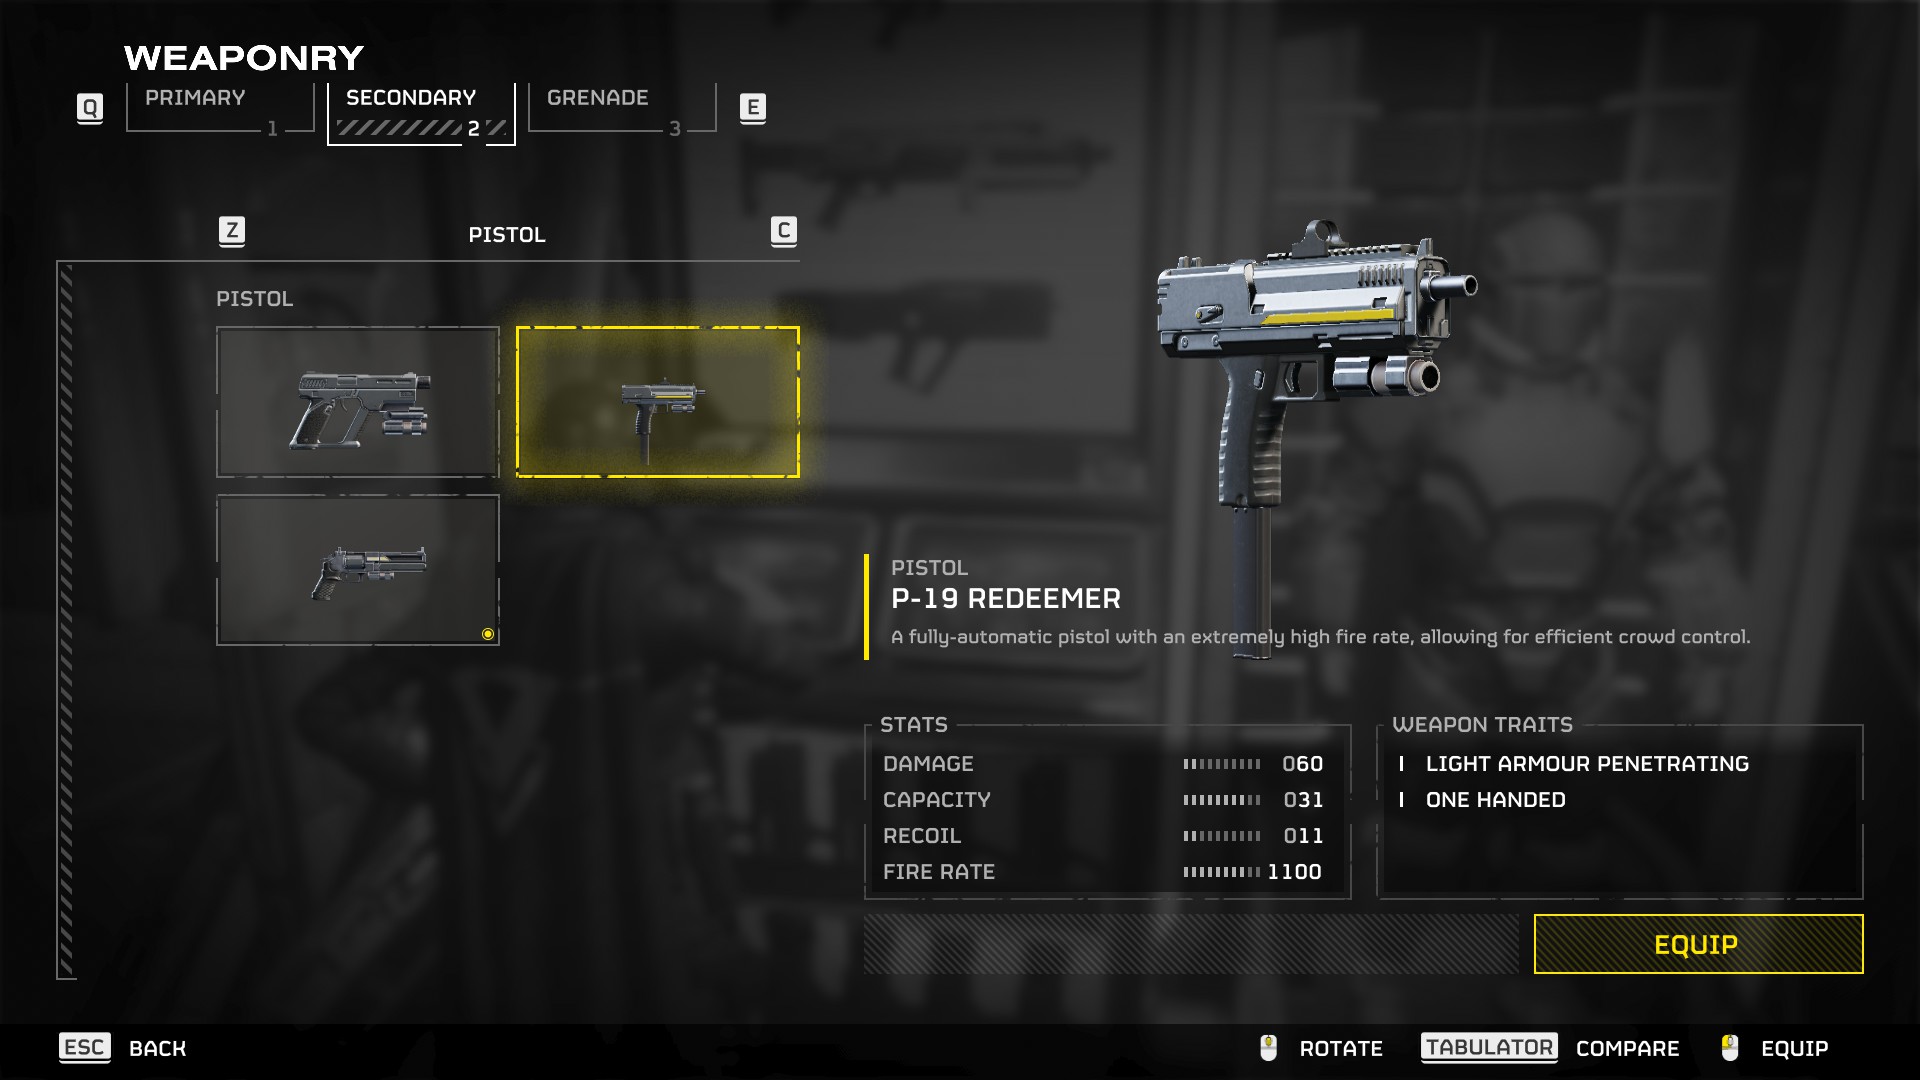
And I dislike both weapons.
I get where the liking for the weapons are coming from, and this is my attempt to explain it to you: the handling of weapons feel like worlds apart when you are playing either with keyboard or gamepad.
And it is fully understandable that players who play with gamepad have a harder time with fine-tuned-aiming than PC players who are used to fast-paced shooters, making some weapons the better choice overall depending on how you can handle them. That in addition to enemy weaknesses.
My point here is
Just because someone recommends you a weapon you do not have to like it or to use it. And it goes the other way around too. If you like a weapon very much and have better experience with your favourite weapon than what is recommended to you, there is a good chance that you are better off with your favourite weapon!Over the time when playing more Helldivers 2, you will get to learn enemy traits and weaknesses and you get plenty of chances to learn which weapon works best for you in which situation. Some weapons which might look insufficient at start might turn out awesome later on.
What matters is that You are having fun!
Not what equipment you select. But you will notice, the better you are equipped - the right tools for the right job - the more fun it becomes. Take advice and recommendations as gifts given to you by fellow players who want you to enjoy the game more together. But like any other gifts you alone have the right to decide whether to take it or to leave it.
Sometimes even the most experienced Helldiver forgets that not everyone is like them.
Even in a squad of battle-hardened stormtroopers, good scouts have their place. A good player will understand that. You will understand it the more you play. Provided you use the tools right.
Dive to Survive
My very first death I met in the tutorial.
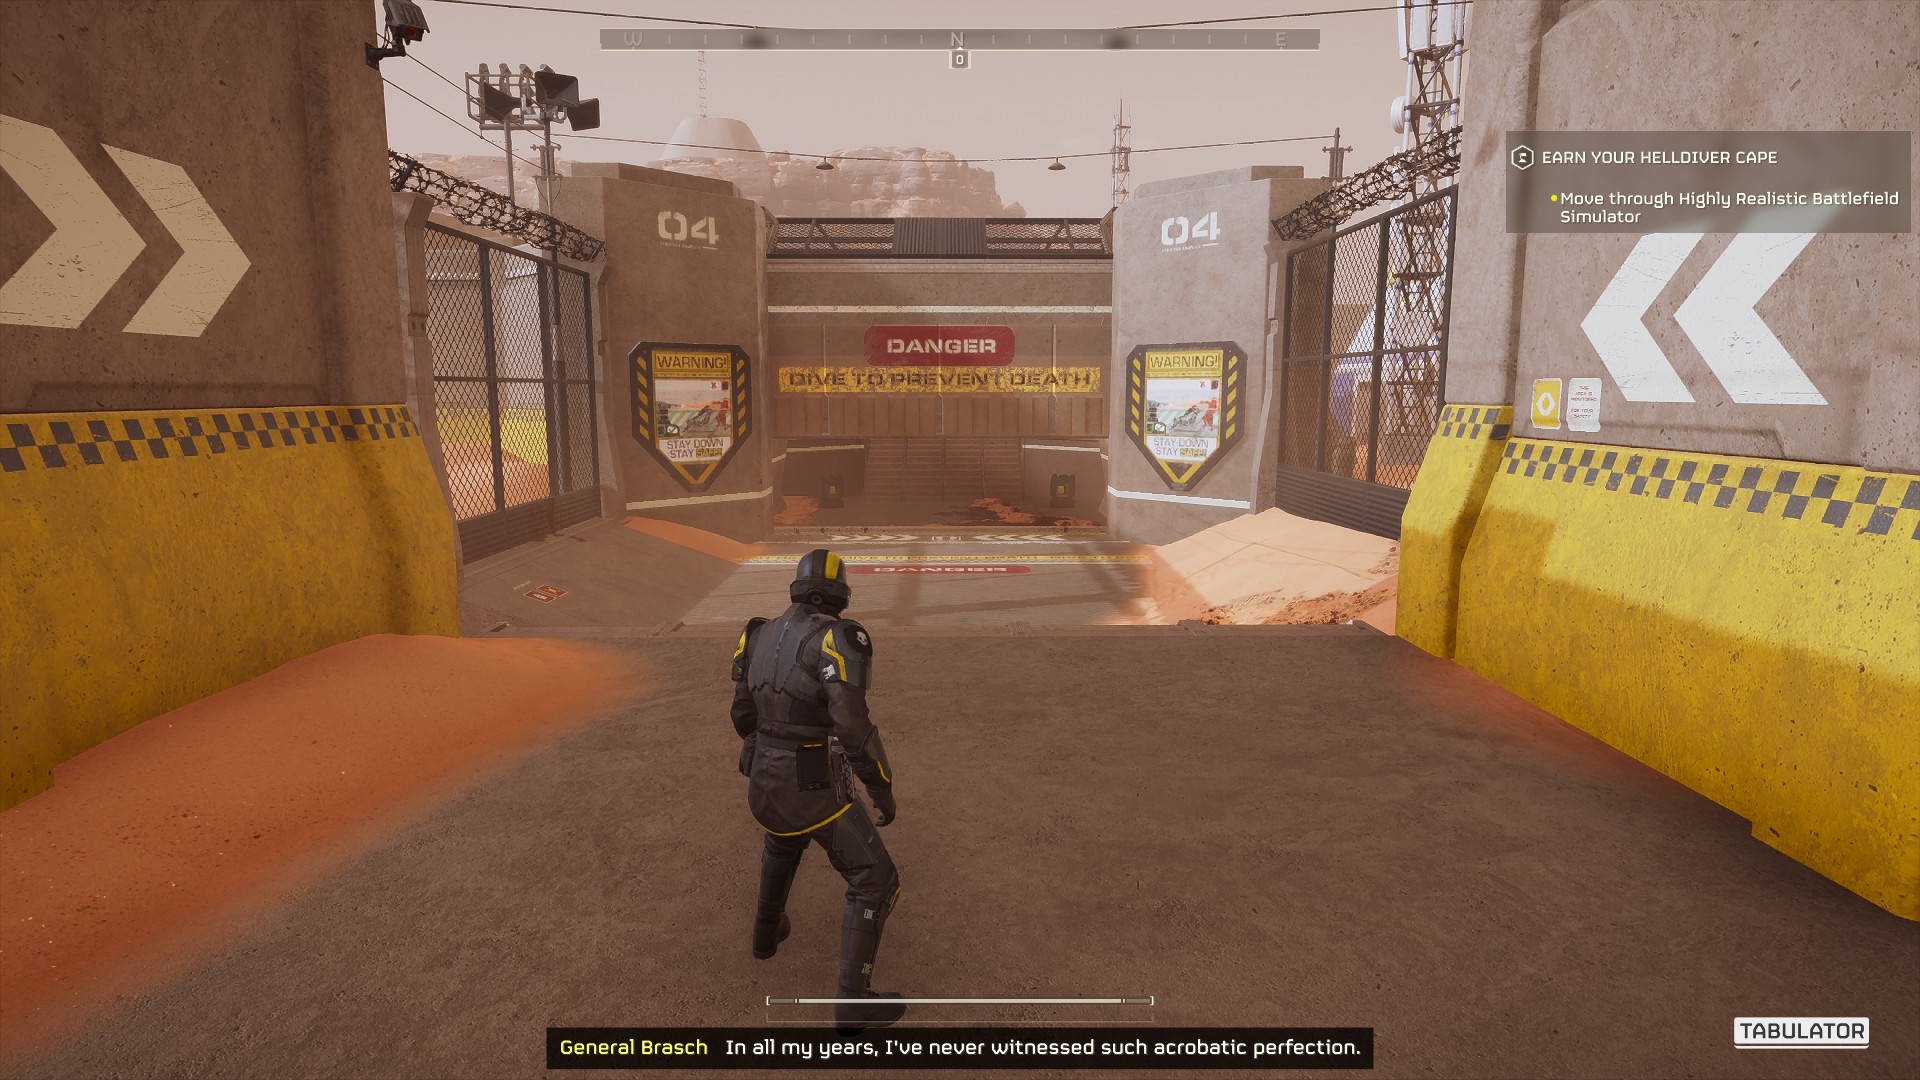
I dived as instructed but did hold the key to sprint - leading me to watching me dying by my character standing up right after diving. Do not hold the sprint key/button by accident like that.
Some enemy attacks cannot even hit you once you are prone on floor.
But for now take the advice with you that you should master diving as you would mastering a just-in-time dodge in other games. Even if you do not manage to dodge an attack, the game will treat you in the moment of diving as semi-invincible. "Semi" because I am sure you cannot survive a nuke if you try diving while being right next to it. At least I have not tried that for ... obvious reasons. Common sense.
I put it for easy usage on one of my mouse's side buttons.
I dived as instructed but did hold the key to sprint - leading me to watching me dying by my character standing up right after diving. Do not hold the sprint key/button by accident like that.
Magic of Diving
Aside from the obvious which is mentioned and shown in the tutorial, diving is much more important than it seems to be at first. It not only makes you harder to hit, but it actually gives you significant resistance to injuries. Some enemy attacks cannot even hit you once you are prone on floor.
But for now take the advice with you that you should master diving as you would mastering a just-in-time dodge in other games. Even if you do not manage to dodge an attack, the game will treat you in the moment of diving as semi-invincible. "Semi" because I am sure you cannot survive a nuke if you try diving while being right next to it. At least I have not tried that for ... obvious reasons. Common sense.
Tip: Going Prone
To go prone you do not need to dive. On keyboard the default key to go prone is set to "Z" / "Y" (depends on your regional keyboard layout, best put next to "X"). I put it for easy usage on one of my mouse's side buttons.
Samples & Loot are Shared
Whether you find samples or other loot which you can bring back - all of those are shared.
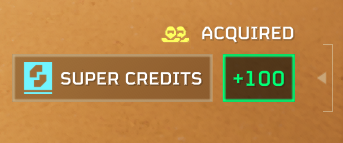
So if someone in your squad finds Super Credits it is great for everyone!
10 Super Credits for everyone in the squad!
Important about samples is: the carrier must make it out of the mission alive.
(Super Credits are hard locked and cannot be lost that way)
Whenever the carrier of samples dies, the samples count as lost until picked up again. For that reason there are two behaviours among Helldivers, one more common than the other.
a) If someone dies, another player makes sure to grab the dropped samples just to secure them for the mission and for the team. That has nothing to do with "stealing" them, as it does not matter who carry them as long as the carrier makes it out alive.
In fact: if you fail to extract but the other party members succeed with the sample, it is still a win for you - sample-wise. It is always preferred that all make it out alive together for maximum mission rewards.
b) Experienced players, especially team-players, use the tactic to drop their collected samples at the evacuation zone.
Beware of misunderstandings!
The reasoning is that, that way it is simpler to grab and dash for anyone who have the highest survivalbility chance, while the original carrier can move around the evacuation zone more freely.
Remember: if a carrier dies, you need to pick up the samples from their point of death.
Now imagine: if you run around while defending the evacuation zone, and you end up further away than intended - it can become quite a challenge for your fellow teammates to get to your spot to grab and collect and then get back. Anything you die against is dangerous for everyone else in the team as well, after all.
Hence the tactic: drop it conveniently at the evacuation zone, so once the Pelican lands ANYONE can easily grab and secure the samples from everyone, increasing the chances to get all/as many as possible back regardless of the situation.
But beware: unexperienced players might misunderstood that tactic as you dropping the samples to ruin their mission. Make sure to communicate that action accordingly to make the best of this advanced Helldivers tactic!
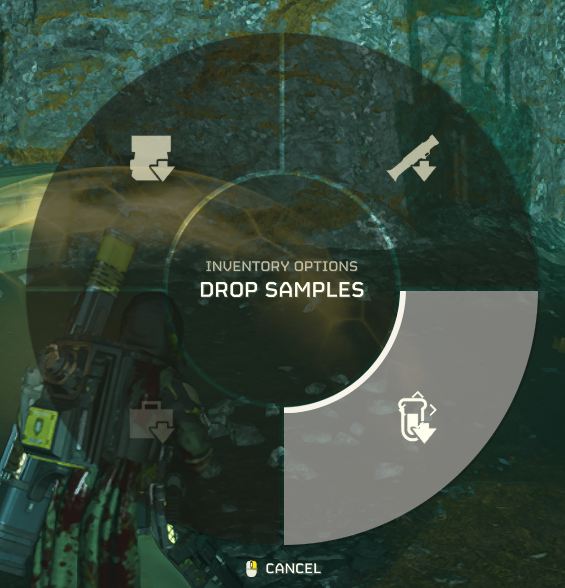
Press default "X" to access the inventory options wheel to drop items.
So if someone in your squad finds Super Credits it is great for everyone!
10 Super Credits for everyone in the squad!
Important about samples is: the carrier must make it out of the mission alive.
(Super Credits are hard locked and cannot be lost that way)
Whenever the carrier of samples dies, the samples count as lost until picked up again. For that reason there are two behaviours among Helldivers, one more common than the other.
a) If someone dies, another player makes sure to grab the dropped samples just to secure them for the mission and for the team. That has nothing to do with "stealing" them, as it does not matter who carry them as long as the carrier makes it out alive.
In fact: if you fail to extract but the other party members succeed with the sample, it is still a win for you - sample-wise. It is always preferred that all make it out alive together for maximum mission rewards.
b) Experienced players, especially team-players, use the tactic to drop their collected samples at the evacuation zone.
Beware of misunderstandings!
The reasoning is that, that way it is simpler to grab and dash for anyone who have the highest survivalbility chance, while the original carrier can move around the evacuation zone more freely.
Remember: if a carrier dies, you need to pick up the samples from their point of death.
Now imagine: if you run around while defending the evacuation zone, and you end up further away than intended - it can become quite a challenge for your fellow teammates to get to your spot to grab and collect and then get back. Anything you die against is dangerous for everyone else in the team as well, after all.
Hence the tactic: drop it conveniently at the evacuation zone, so once the Pelican lands ANYONE can easily grab and secure the samples from everyone, increasing the chances to get all/as many as possible back regardless of the situation.
But beware: unexperienced players might misunderstood that tactic as you dropping the samples to ruin their mission. Make sure to communicate that action accordingly to make the best of this advanced Helldivers tactic!
Press default "X" to access the inventory options wheel to drop items.
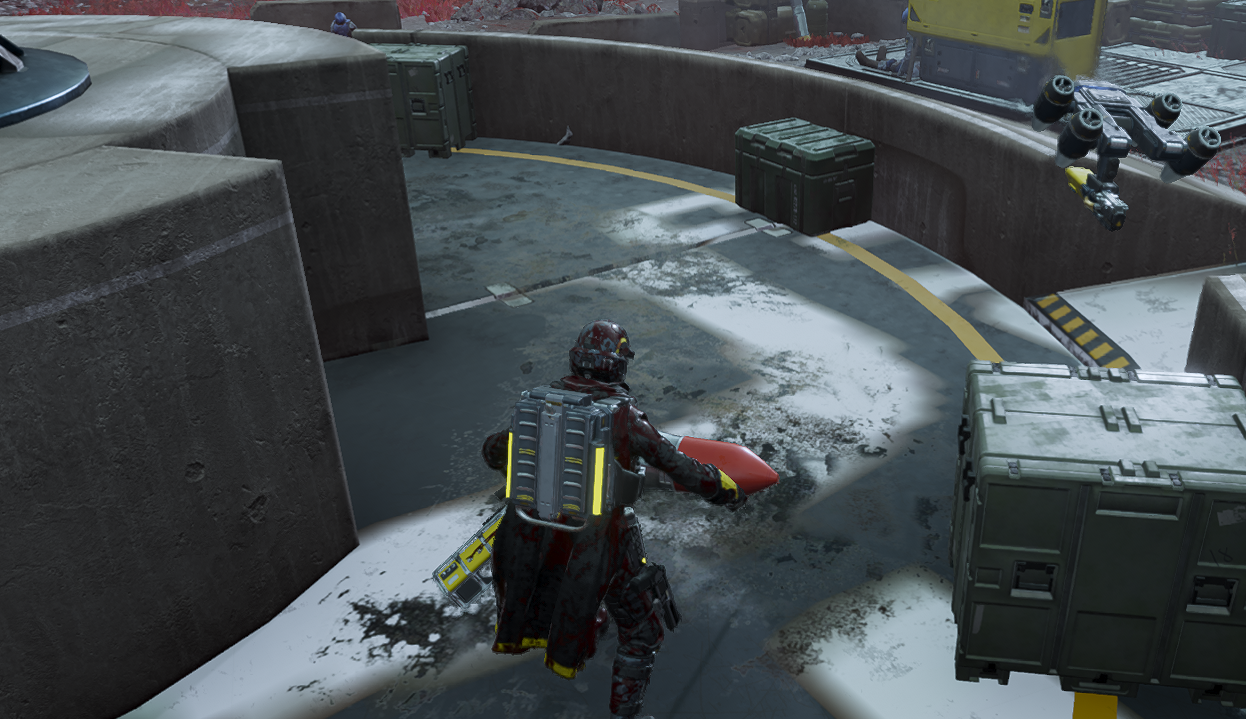
Loot Boxes aka Containers
Sometimes you can find containers filled with loot and ammunition and supplies nearby.
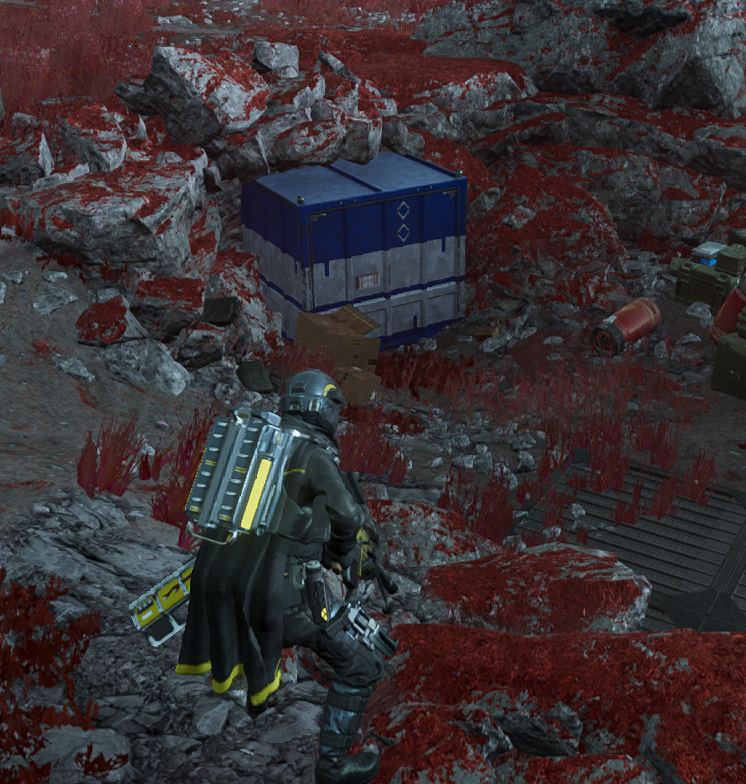
Use a grenade or other explosive weapons to break them open.
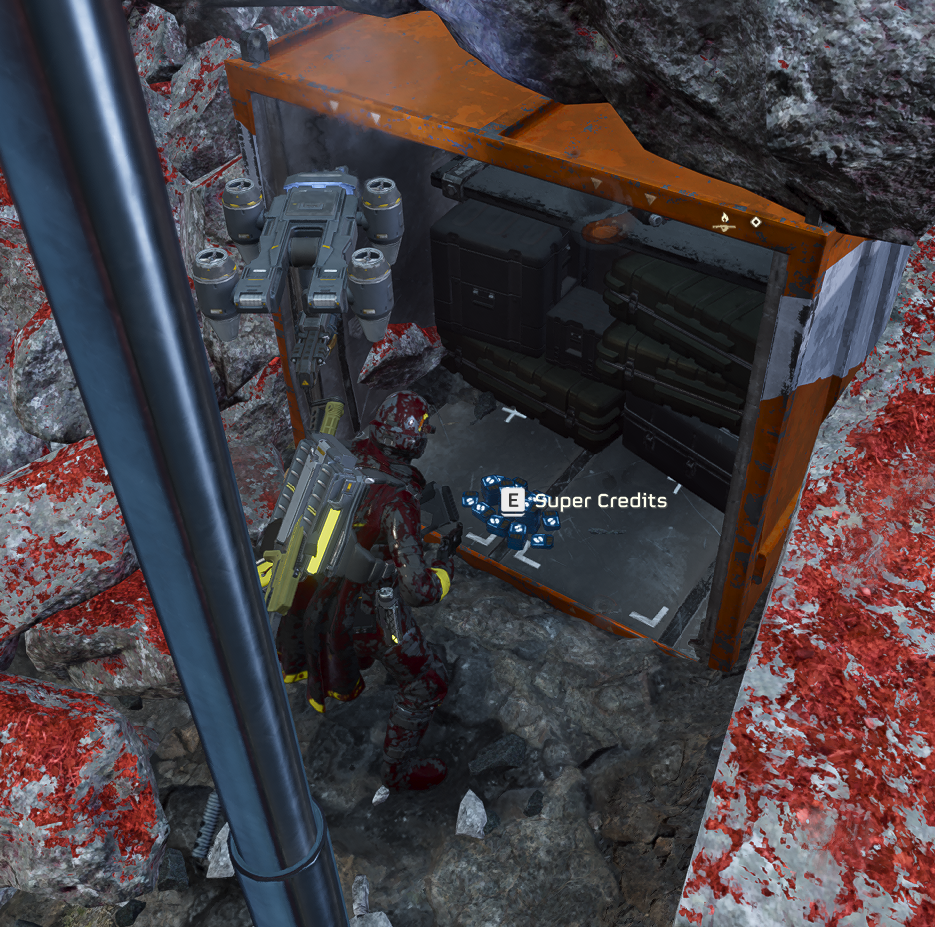
Allowing you access to more rare loot like Super Credits, Medals or Requisition Slips.
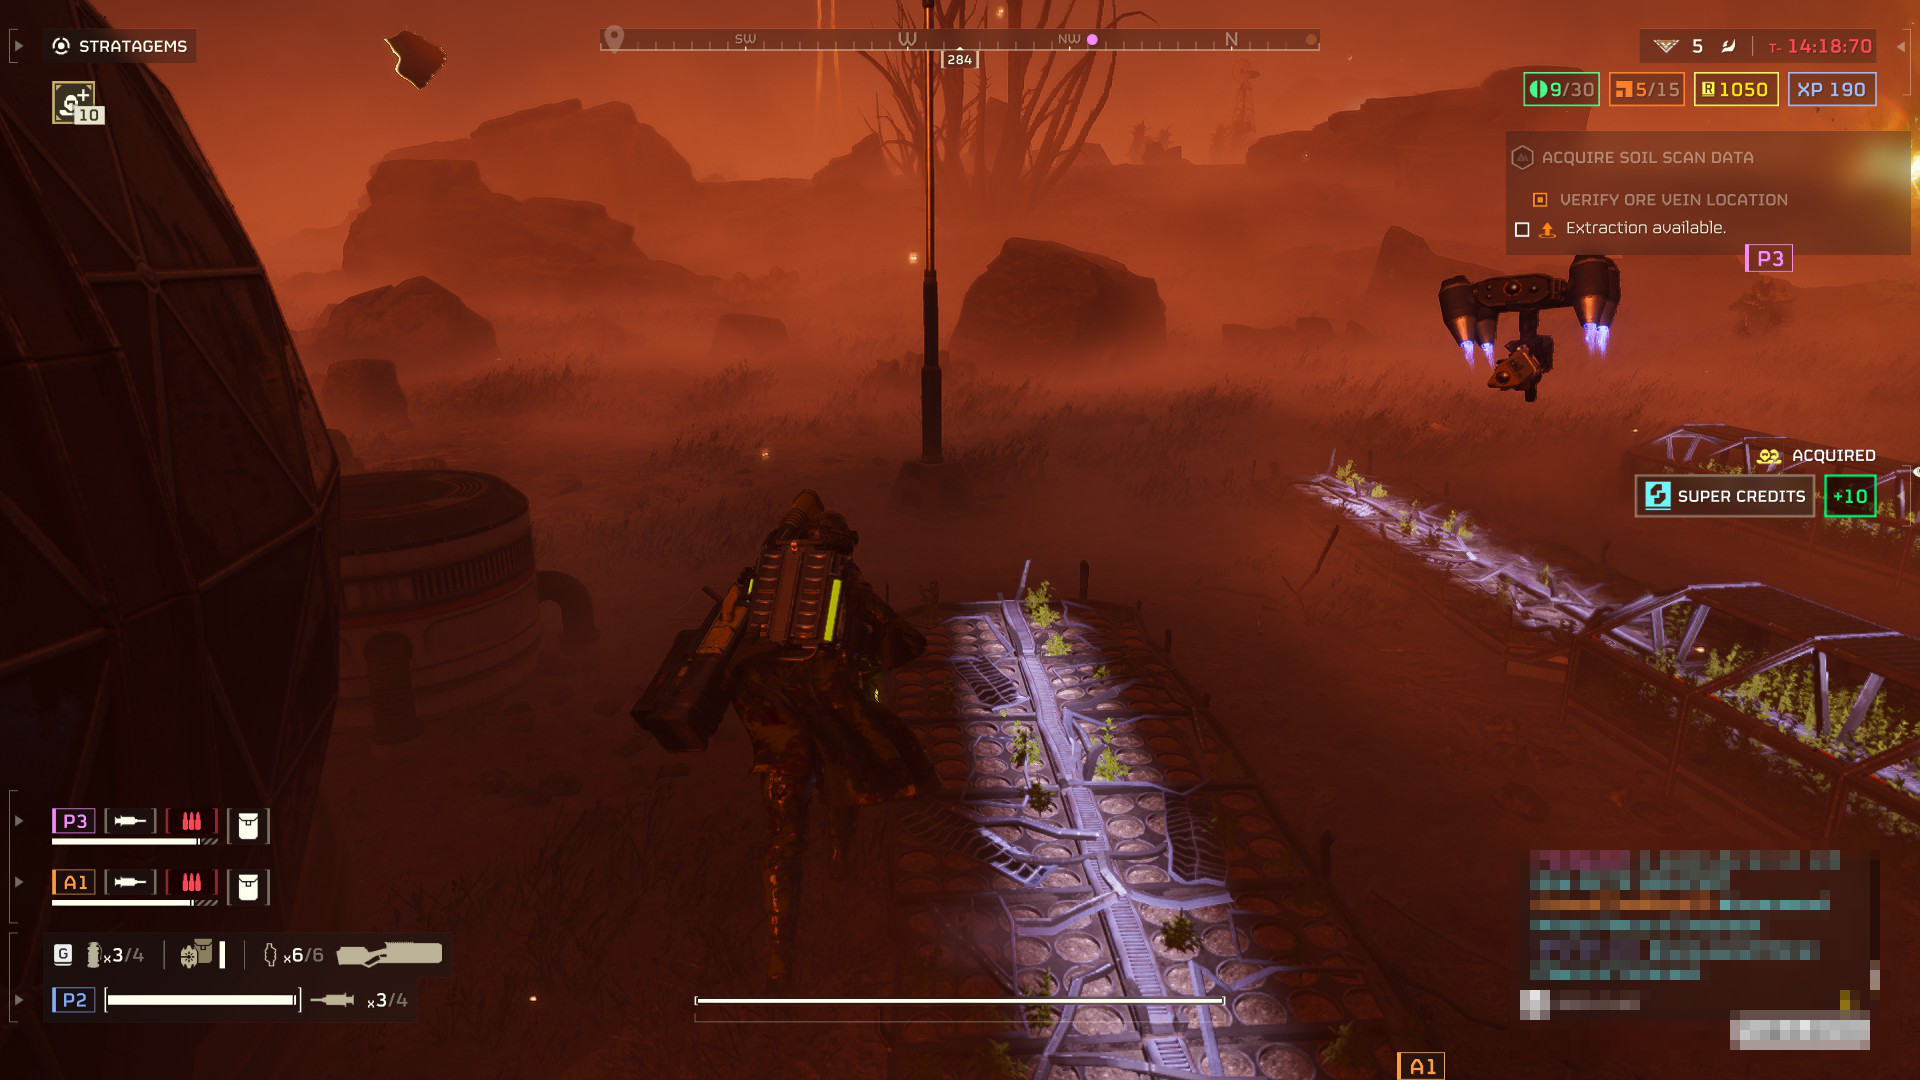
Reminder: Samples must be brought back with you safely via extraction. Super Credits, Medals and Requisition slips on the other hand are instantly shared with everyone and remain with you, even if you fail the mission. Making exploration worthwhile most of the time.
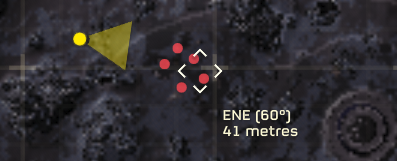
Minor Points of Interest appear as a question mark on your HUD Radar when you are near them.

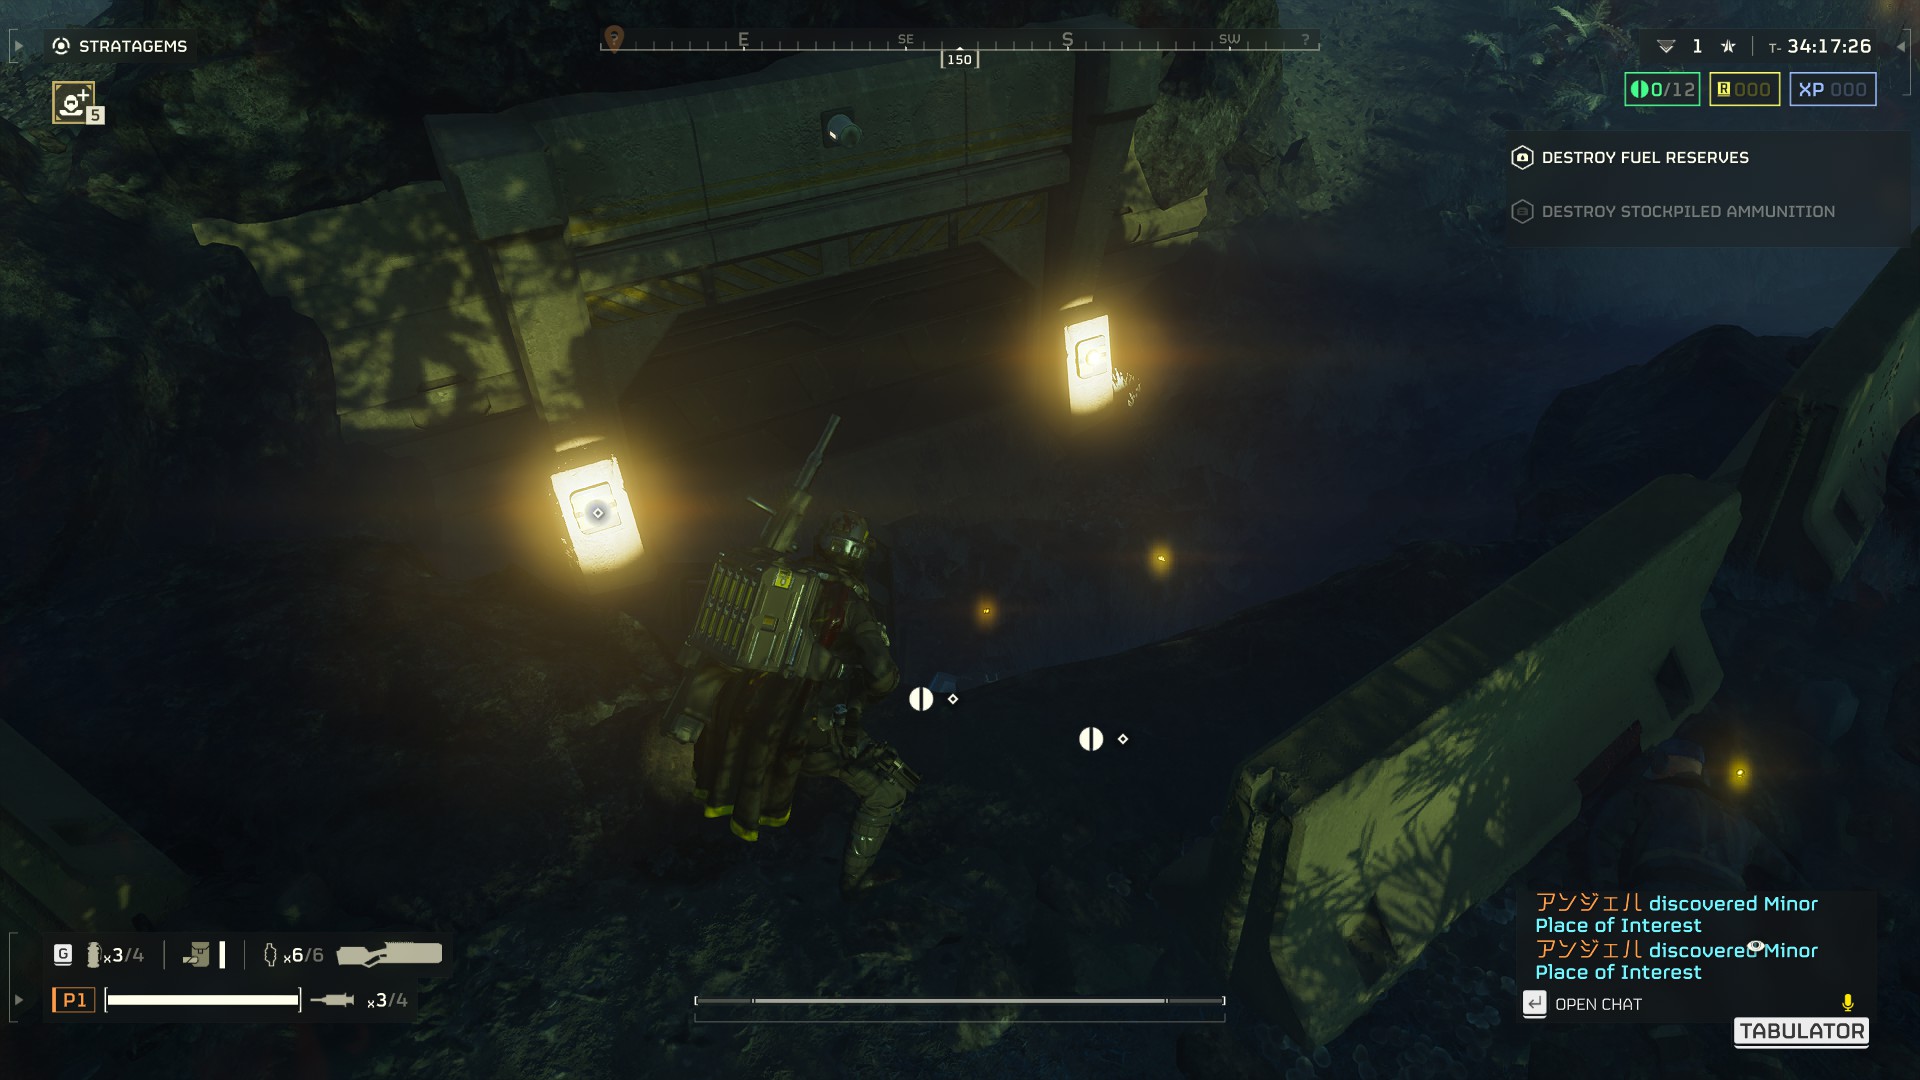
Some containers, supply charges left behind, can be spotted due to their yellow beacons.

In other cases you might come across failed Hellbombs.
Those Hellbombs can be shot at from a distance to trigger them.
Giving them a use after luring enemies to that location.
Use a grenade or other explosive weapons to break them open.
Allowing you access to more rare loot like Super Credits, Medals or Requisition Slips.
Reminder: Samples must be brought back with you safely via extraction. Super Credits, Medals and Requisition slips on the other hand are instantly shared with everyone and remain with you, even if you fail the mission. Making exploration worthwhile most of the time.
Minor Points of Interest appear as a question mark on your HUD Radar when you are near them.
Some containers, supply charges left behind, can be spotted due to their yellow beacons.
In other cases you might come across failed Hellbombs.
Those Hellbombs can be shot at from a distance to trigger them.
Giving them a use after luring enemies to that location.
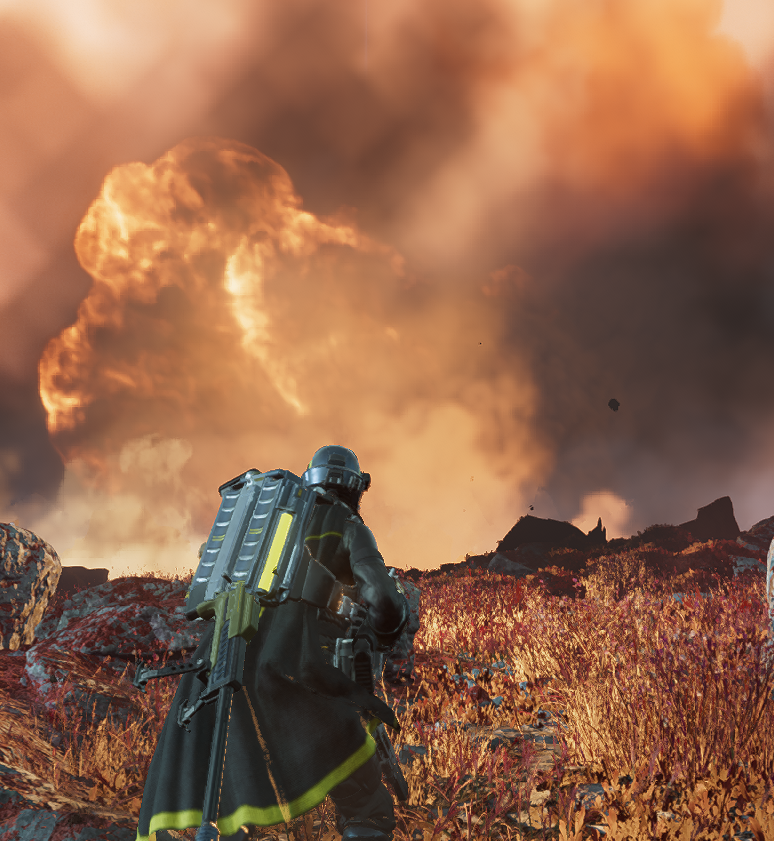
First Ship Module Upgrade
The most value you can get from Liquid-Ventilated Cockpit in combination with Eagle Airstrike.
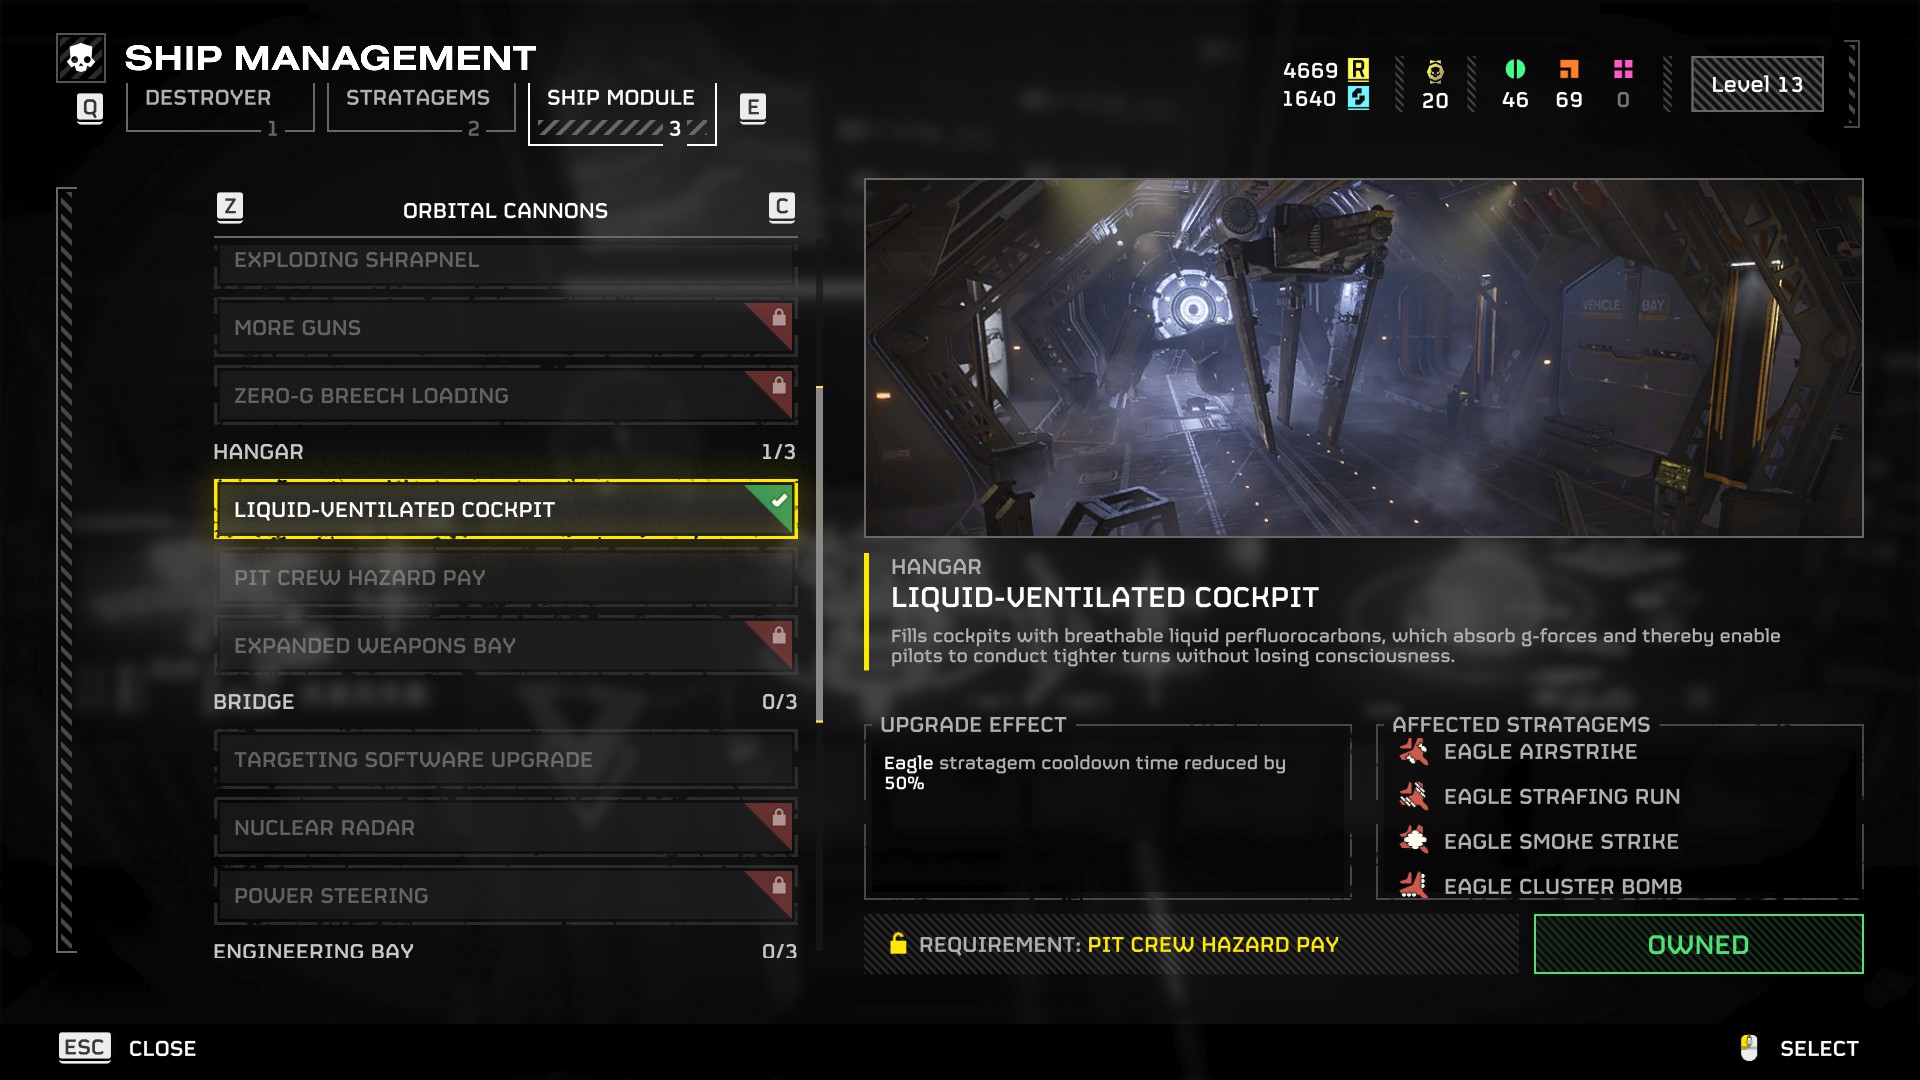

For me it was misleading that the number of uses with Eagle Airstrike is described as just two.
After deploying payload twice, the Eagles go back to your ship for rearming. Reducing that time by 50% is without doubts grand, especially with that specific Stratagem. Not only does it field quite a vast area, but the attack can also destroy many buildings, making it a great combo to enjoy learning by doing for beginners.
Personal Level Matters
You can have a high level player who has spent a lot of time playing Helldivers and still be doing things sub-optimally.
You can have low level players who are extremely good just because they are used to fast action team shooters.
The reason certain groups require a minimum level before you can join their squad is because of the unlocks. Specifically, the ship module upgrades.
While it matters what armour, boosters, weapons and stratagems you bring with you, the biggest change in gameplay comes from ship module upgrades that reduce cooldowns or improve accuracy. Being able to launch Eagle Strikes twice as fast, as an example mentioned above, makes a huge difference.
Without this, it would be easy to say that experience is more important than level. As you learn more about the enemies, their behaviours and weaknesses, as well as basic combat tactics and strategies. It is more than just pointing and shooting at the enemy. It is about being aware of the environment, getting a feel for how long actions take, and quickly identifying whether to engage or run away for the sake of the mission.
Weapons and support items can also be shared.
Boosters are for Everyone
When preparing the mission, remember it is about the right tools for the right job!
The booster you select counts for the whole squad. So if you have a selection to make a choice, make sure that every player has a different booster from which everyone can benefit altogether.
Exploration for the Win
Selecting Landing Zone
When you first start playing, everyone's first impulse is to land close to the mission objectives. This is a viable and logical option. However, as mentioned earlier, there is valuable loot to be found throughout the map, and it is all about having fun together.
Throughout the map there are unmarked sub-goals that you will need to find on your own.
The red areas are good indicators of outposts and nests, allowing you to plan your mission with your squad in advance to collect the maximum amount of samples and other possible loot, such as Super Credits.
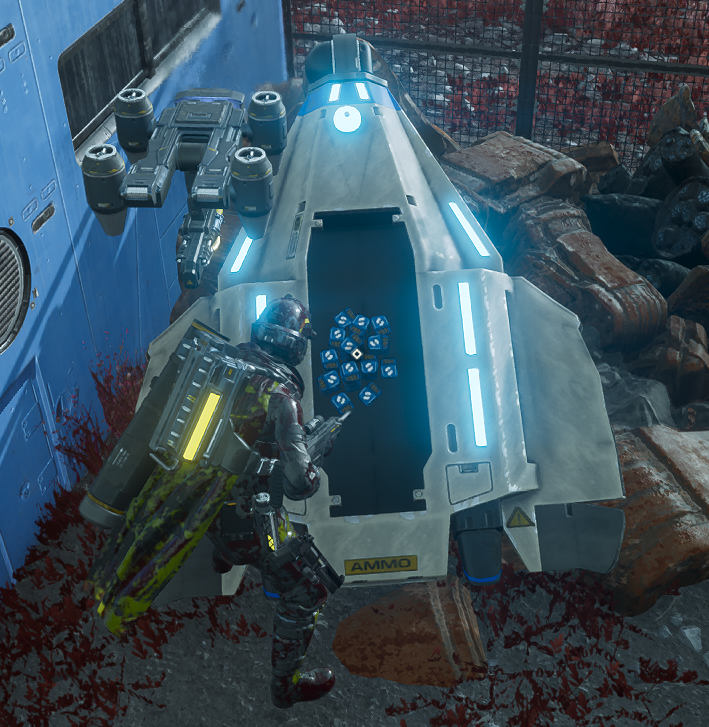
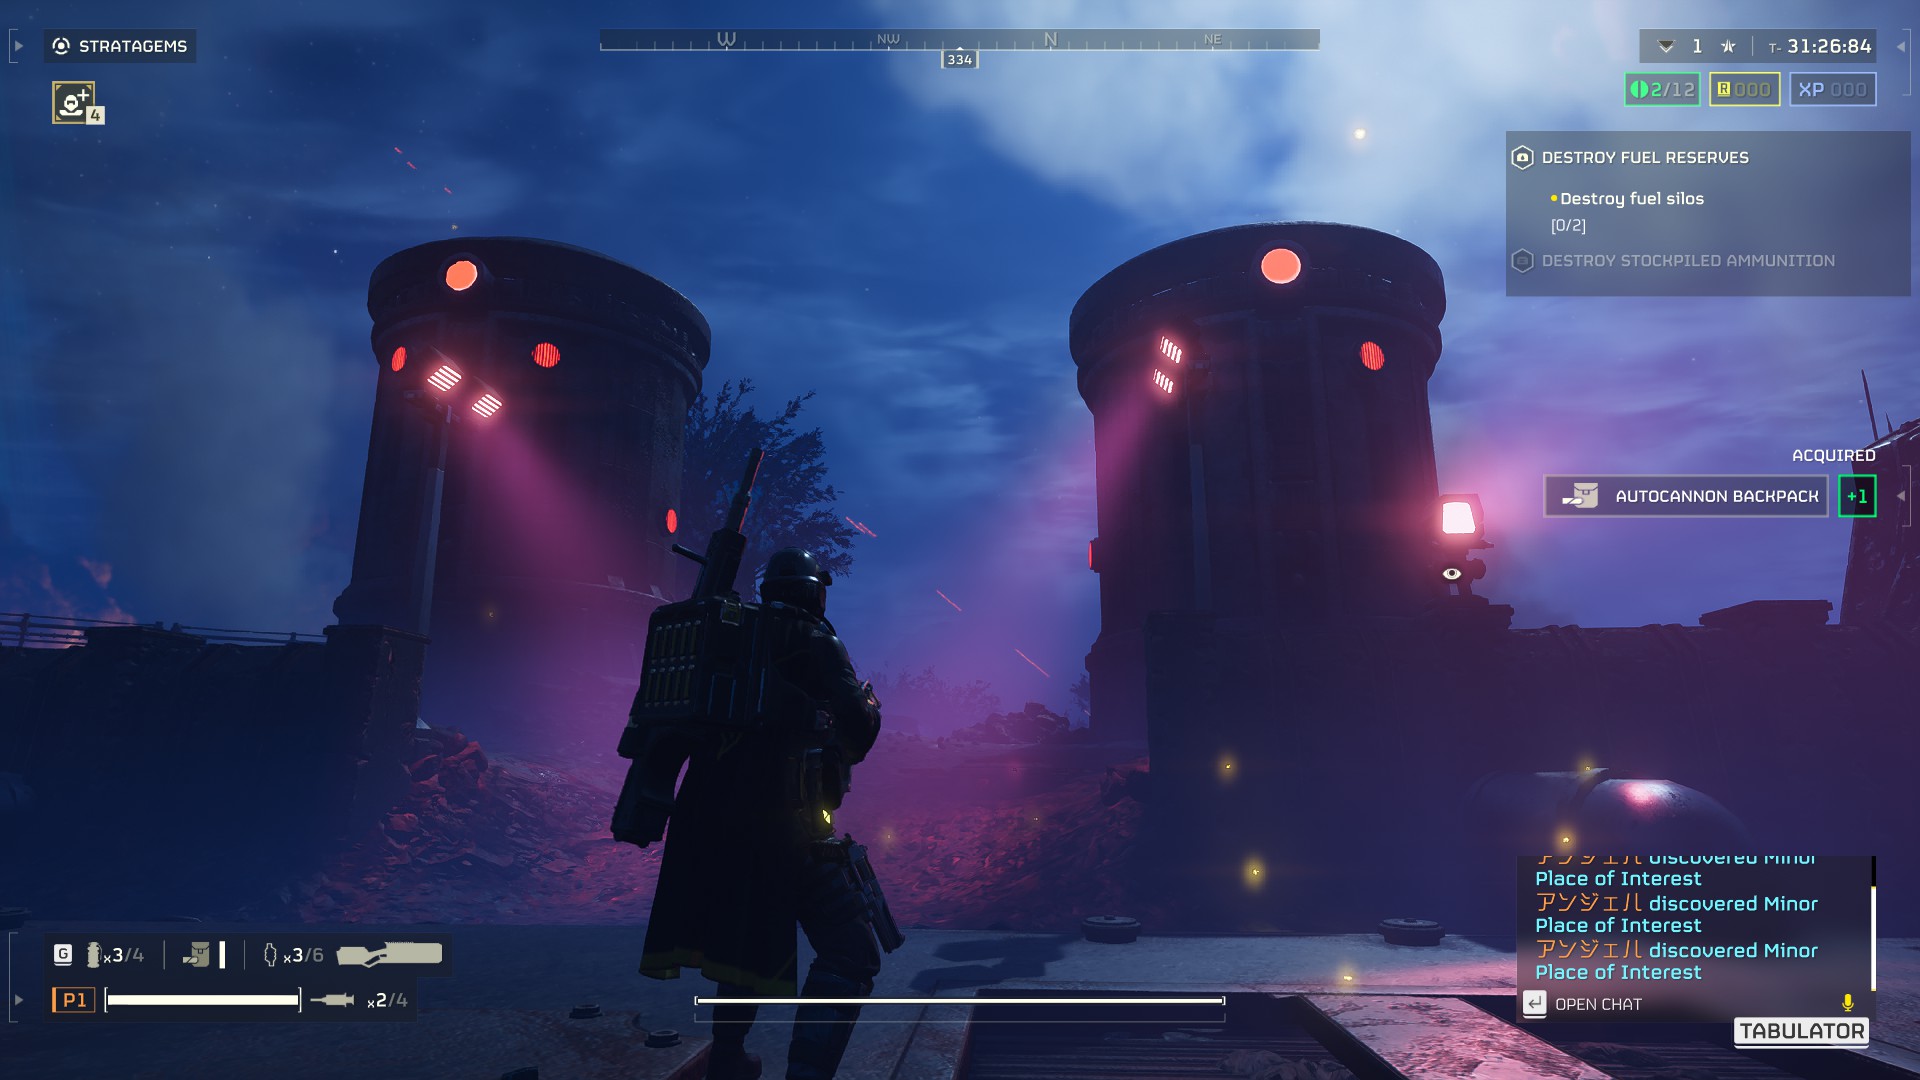
Landing Zone Preparations
In addition to select a safe landing zone, from where you travel either your exploration route or have good access to the mission objectives, you also call your equipment down first before heading out.
That includes
- your support weapon
- your support backpack
- supply pack
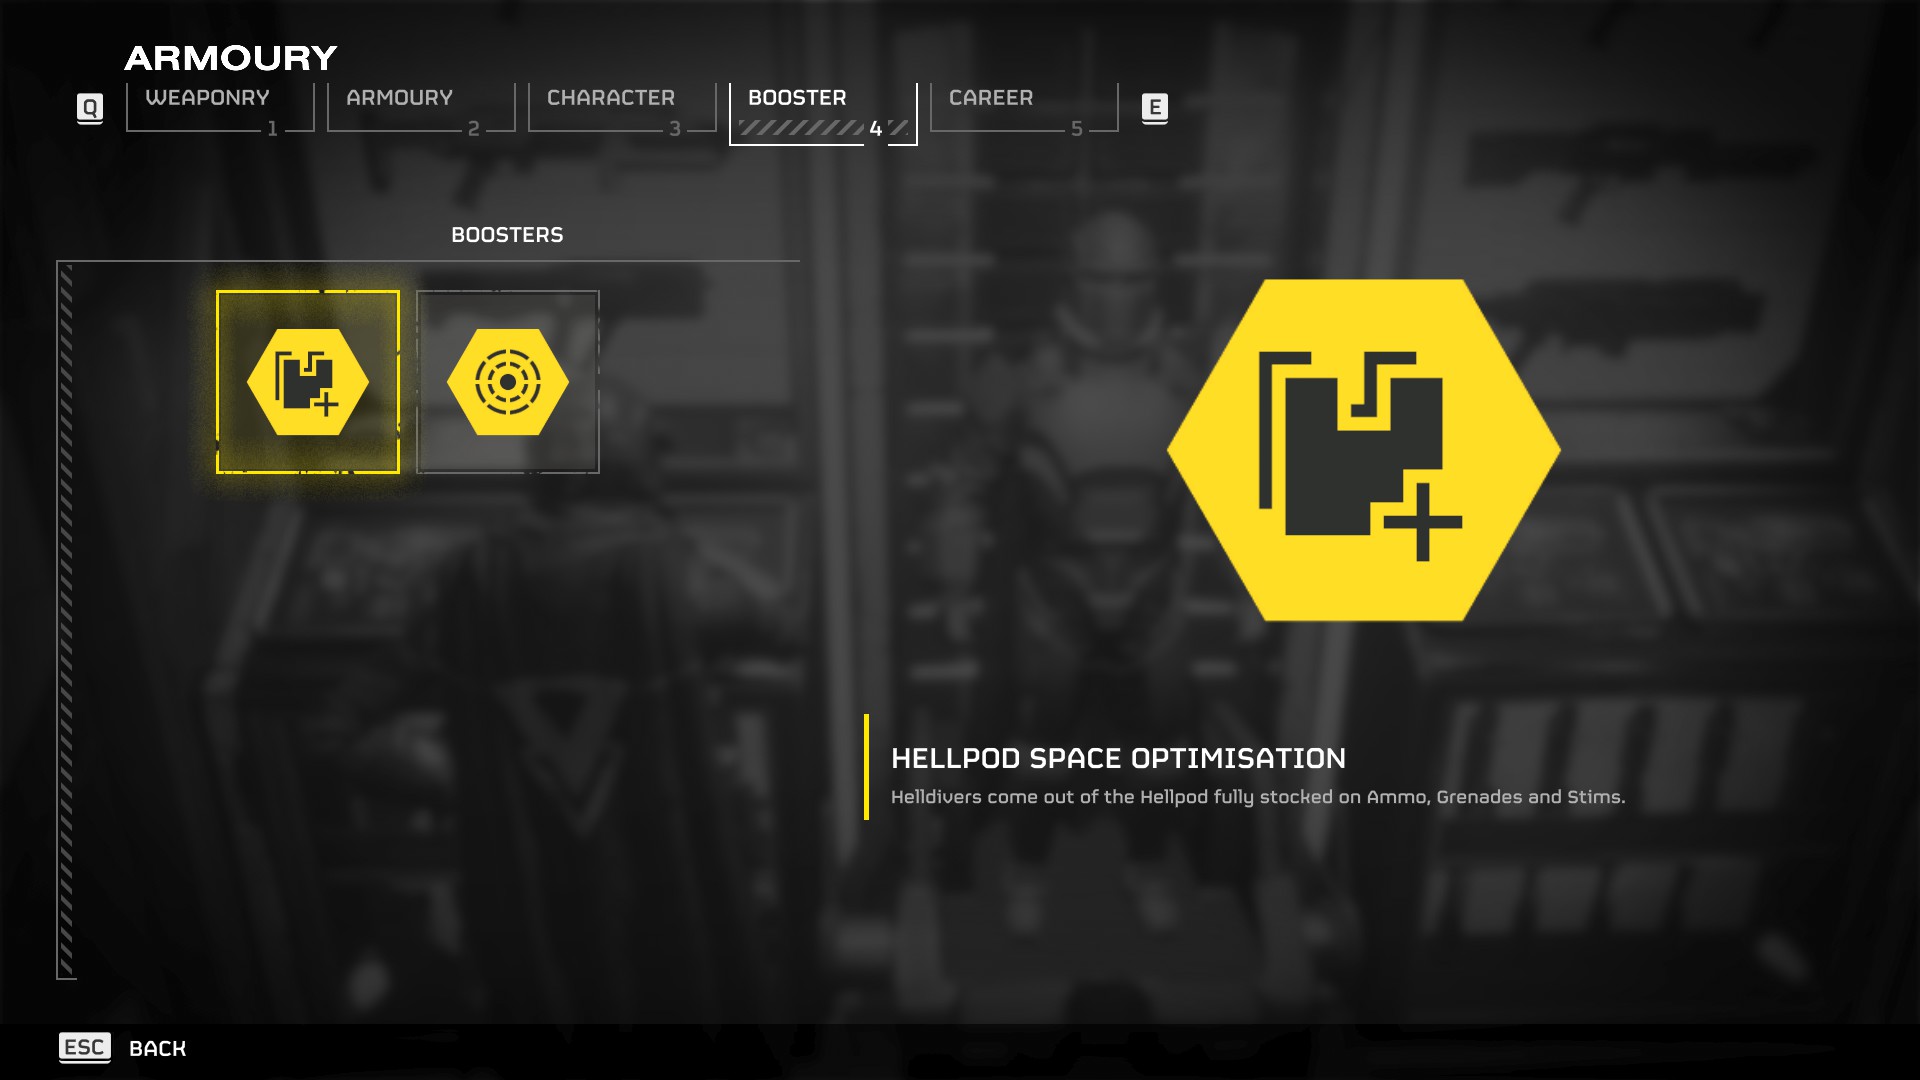
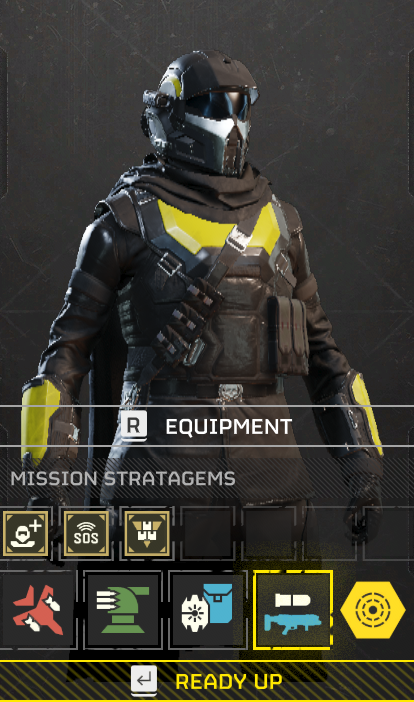
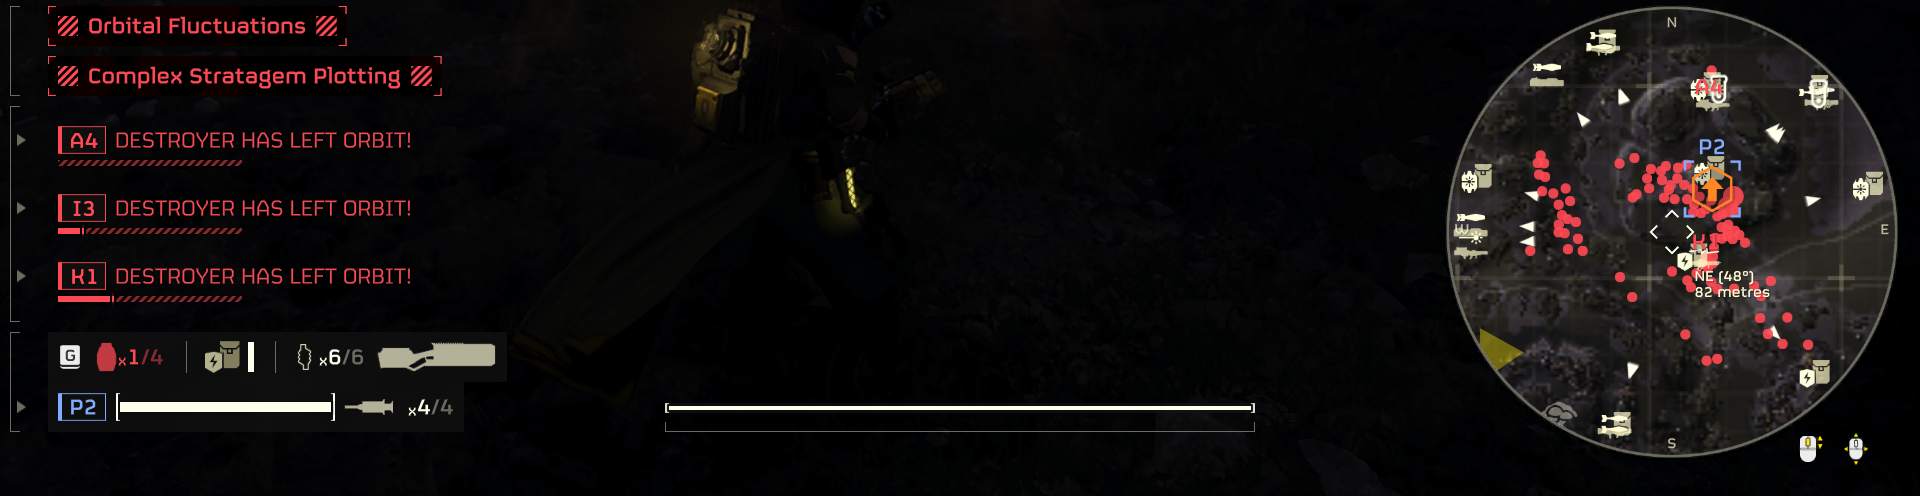
Unless someone has brought the Hellpod Space Optimisation booster, you will always start with less ammunition / health stims / grenades than the maximum. It makes sense to be prepared as good as possible straight from the start. Also, the earlier you call the supplies, the sooner the cooldown timer starts, making the pack ready the next time you need it again.

The number on the left shows you how much ammunition/grenades etc. you have, while the number on the right shows you the maximum. In the example above, I have 3/4 (three out of a maximum of four) grenades. Without Hellpod Space Optimisation, everyone starts with 75% of the maximum by default. So in a party of four, it makes sense for everyone to take a supply pack at the start of the mission to maximise their inventory.
The Hellpod Space Optimisation allows you to always spawn with maximum ammo and grenades. This makes it one of the must-have boosters in a squad. It is less about starting the mission with a maximum, but more about getting a maximum every time you respawn - every time you call a reinforcement. For example, if you die because you run out of grenades or ammo, you can give the enemy a full payback thanks to starting out with maxed out grenades and ammo again. Giving it the actual worth of a supply pod after every reinforcement.
Even if there are no stratagems available.
That includes
- your support weapon
- your support backpack
- supply pack
Unless someone has brought the Hellpod Space Optimisation booster, you will always start with less ammunition / health stims / grenades than the maximum. It makes sense to be prepared as good as possible straight from the start. Also, the earlier you call the supplies, the sooner the cooldown timer starts, making the pack ready the next time you need it again.
The number on the left shows you how much ammunition/grenades etc. you have, while the number on the right shows you the maximum. In the example above, I have 3/4 (three out of a maximum of four) grenades. Without Hellpod Space Optimisation, everyone starts with 75% of the maximum by default. So in a party of four, it makes sense for everyone to take a supply pack at the start of the mission to maximise their inventory.
The Hellpod Space Optimisation allows you to always spawn with maximum ammo and grenades. This makes it one of the must-have boosters in a squad. It is less about starting the mission with a maximum, but more about getting a maximum every time you respawn - every time you call a reinforcement. For example, if you die because you run out of grenades or ammo, you can give the enemy a full payback thanks to starting out with maxed out grenades and ammo again. Giving it the actual worth of a supply pod after every reinforcement.
Even if there are no stratagems available.
Advanced Landing Zone Preparations
Once you have gotten more experiences, upgraded your ship and stratagem perks, there are a few more things you can do to make a successful drop- watch carefully where you are landing to identify early on threats, whether to eliminate them or to take cover; later on you unlock a ship upgrade which allows you additional maneuverability of your Hellpod, which is not only great to kill enemies but also to land in safety or on top of e.g. Automaton Fabricators, destroying those in the process
- use your map to identify enemy facilities and points of interests based on their structures you can recognise on the map
- and always remember to dive/go prone to avoid enemy detection as long as possible, unless your landing zone is hot and you have to escape as quick as possible
Sharing is Caring
A high-level Mentor will do their best to not only keep their samples, but also their equipment. This is one of the reasons why, whenever possible, a Helldiver will try to respawn near their last location before being killed.
That way, they can quickly re-equip and rearm without having to call for their support weapons again.
Instead, this allows high-level players to share their support equipment with newbies.
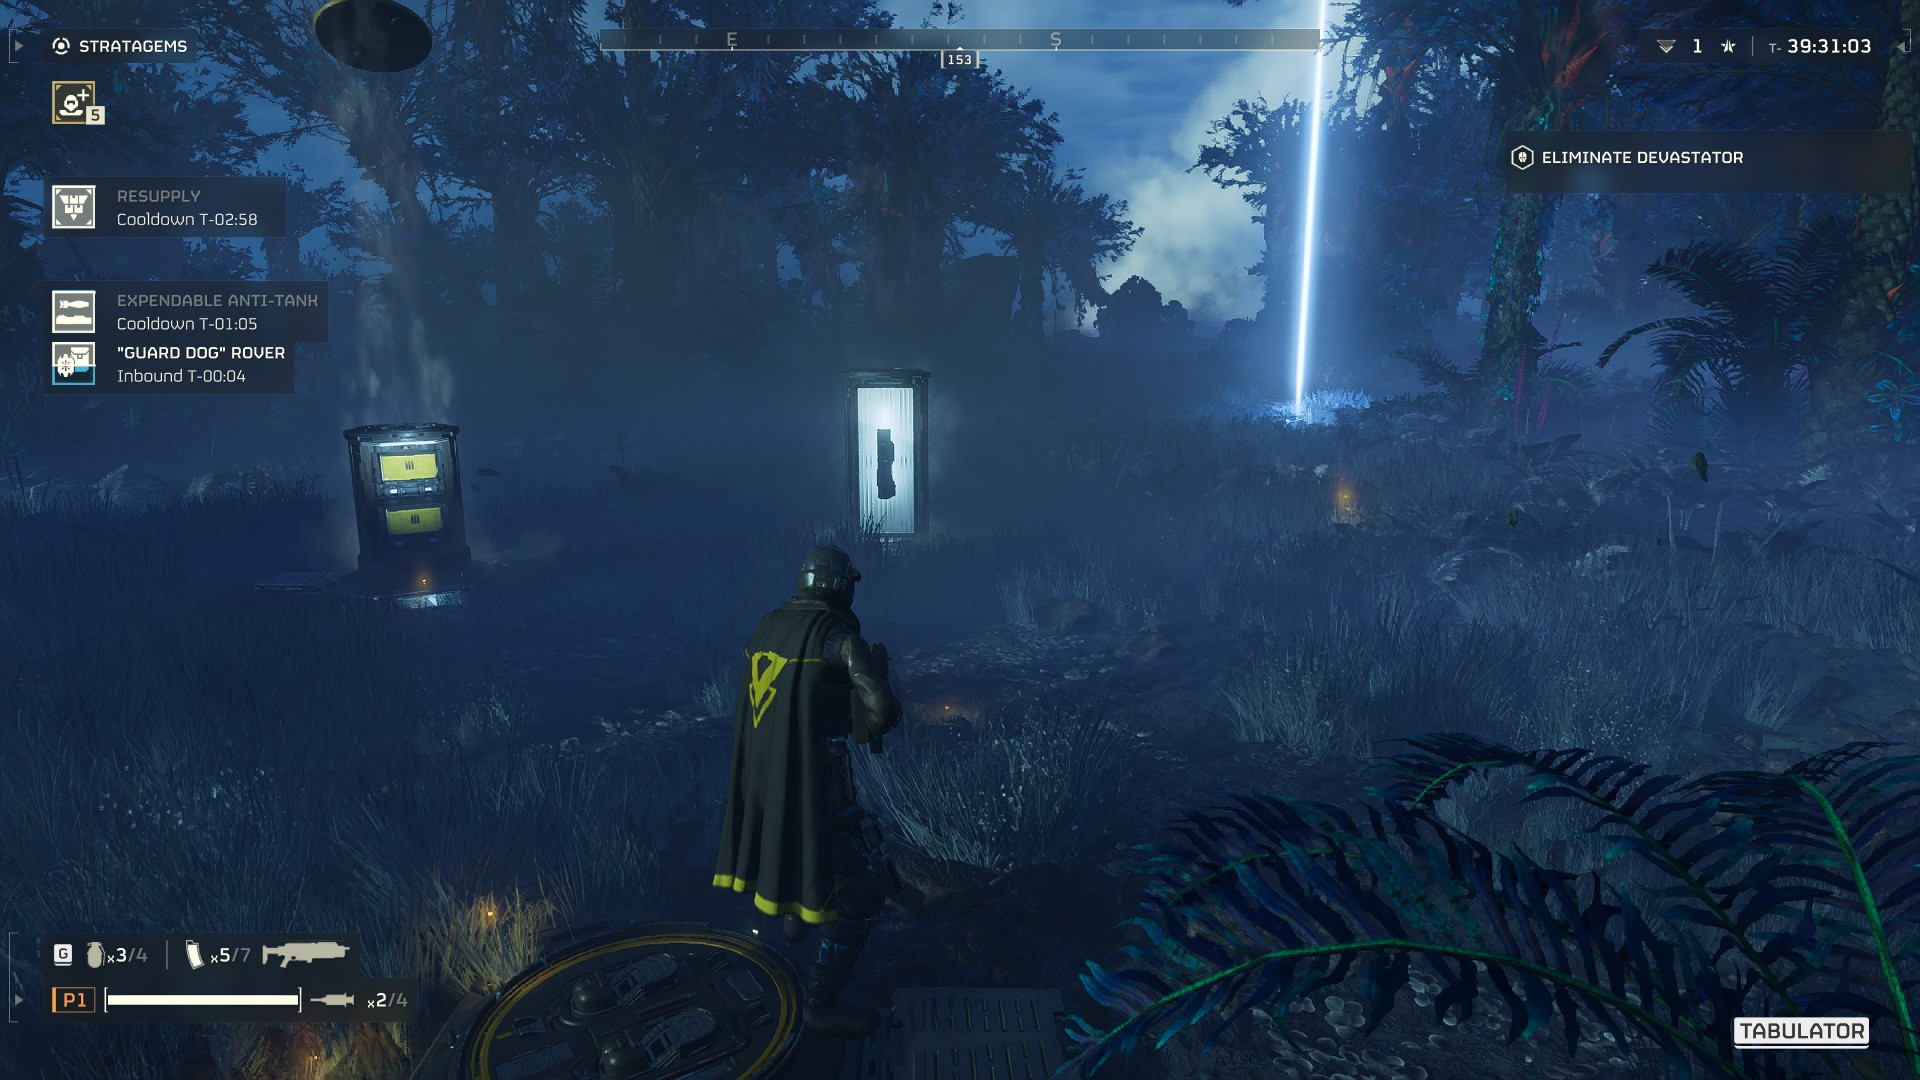
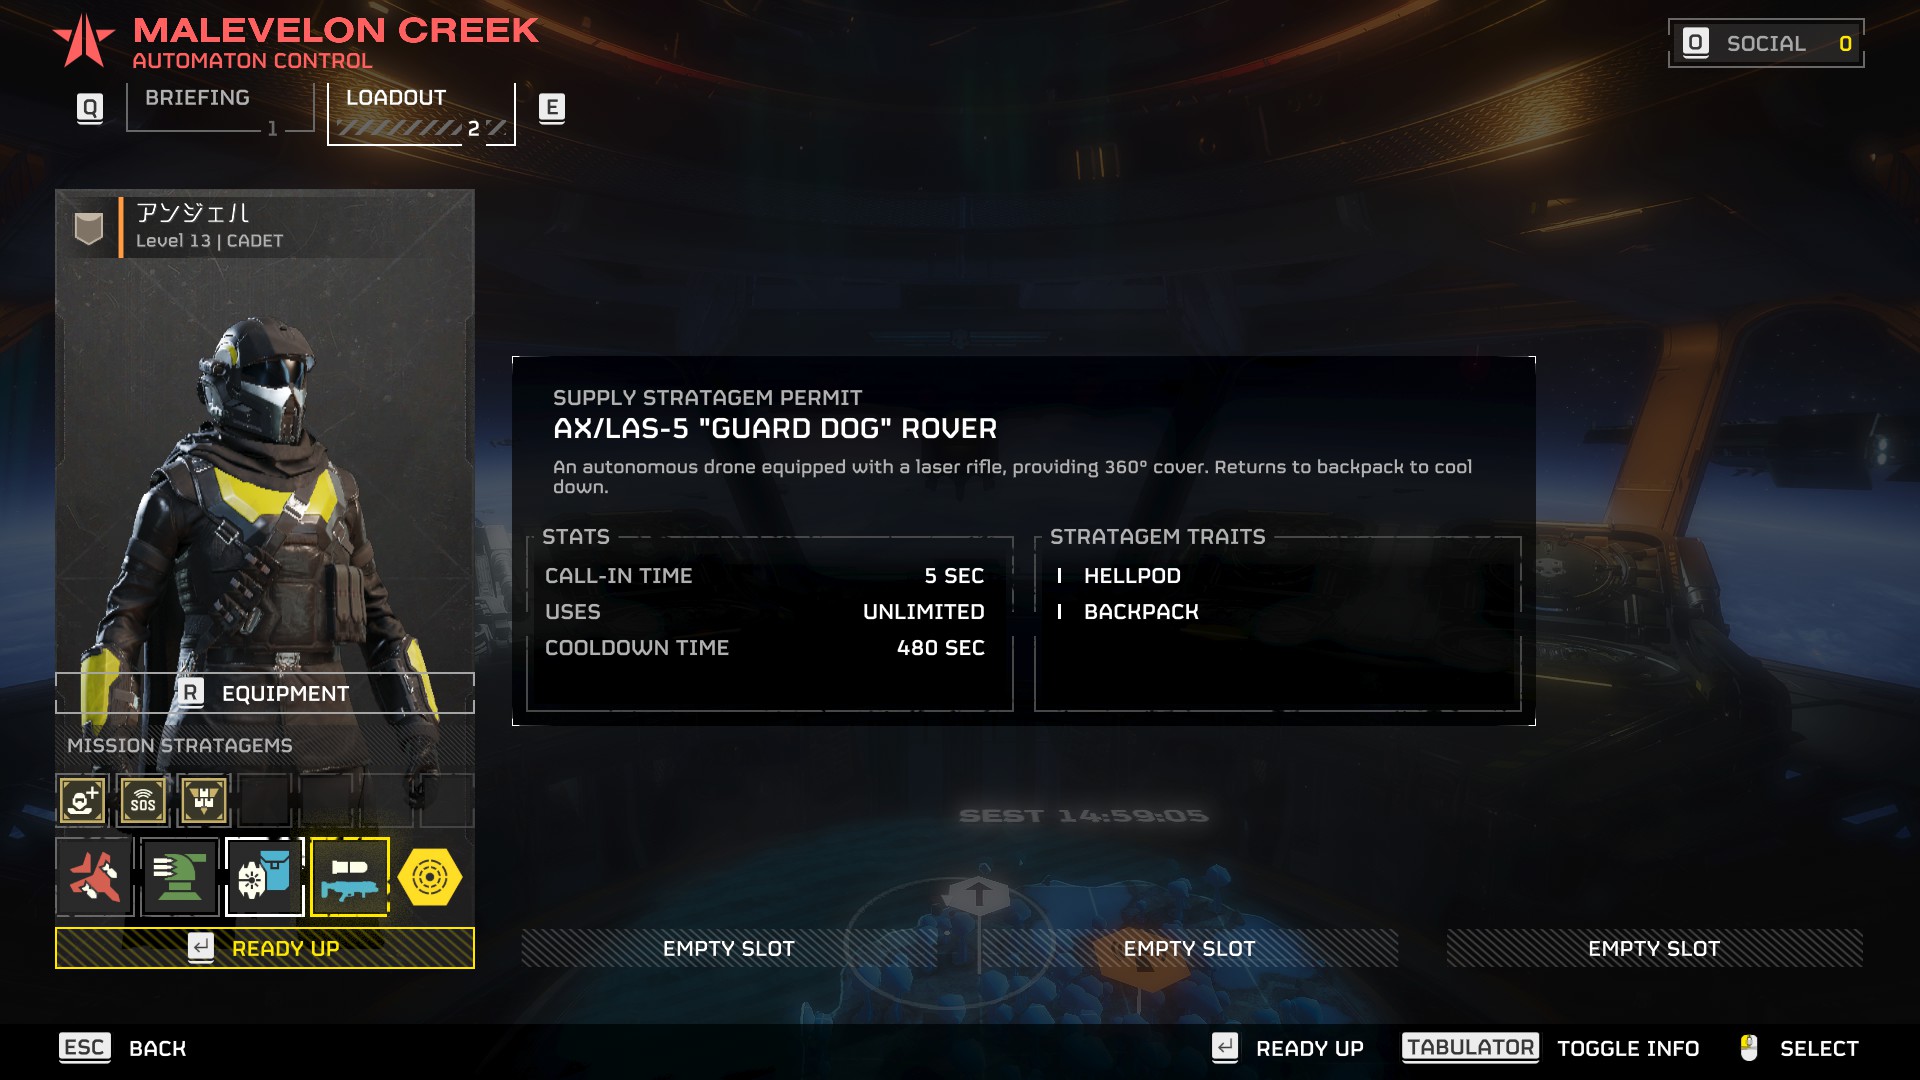
After a certain amount of time, 480 seconds / 8 minutes by default, you will be able to summon the same support items again. If your mentor is good, they will share their support drone / support weapon with you to give you an advantage in combat.
The primary weapon can also be safely looted by anyone who wants to try it, as anyone will always respawn with their selected primary weapon. So if e.g. someone dropped a LAS-16 Sickle from the Warbond you do not own, and you wish to try it out - go ahead, give it a try when its drop!
Just be careful not to loot other people's bodies without asking your fellow Helldiver.
Follow proper etiquette and help each other retrieve equipment from the fallen.
That way, they can quickly re-equip and rearm without having to call for their support weapons again.
Instead, this allows high-level players to share their support equipment with newbies.
After a certain amount of time, 480 seconds / 8 minutes by default, you will be able to summon the same support items again. If your mentor is good, they will share their support drone / support weapon with you to give you an advantage in combat.
The primary weapon can also be safely looted by anyone who wants to try it, as anyone will always respawn with their selected primary weapon. So if e.g. someone dropped a LAS-16 Sickle from the Warbond you do not own, and you wish to try it out - go ahead, give it a try when its drop!
Just be careful not to loot other people's bodies without asking your fellow Helldiver.
Follow proper etiquette and help each other retrieve equipment from the fallen.
Toggle Info to Learn
Playing with experienced teammates can feel overwhelming.
Especially if you have no idea what many of the icons mean.
Remember to Toggle Info to make it easier to understand and learn which stratagems, support weapons and other items are used by experienced players that you may not have access to.
Especially if you have no idea what many of the icons mean.
Remember to Toggle Info to make it easier to understand and learn which stratagems, support weapons and other items are used by experienced players that you may not have access to.
Use Correct Weapon Mode
The first time I found out that you could change the modes of your weapons was when I was bothered by the flashlight on some weapons making it difficult to aim. Pressing default "R" for long will bring up the Weapon Modes menu, where you can adjust the fire mode, flashlight and scope, if the options are available.
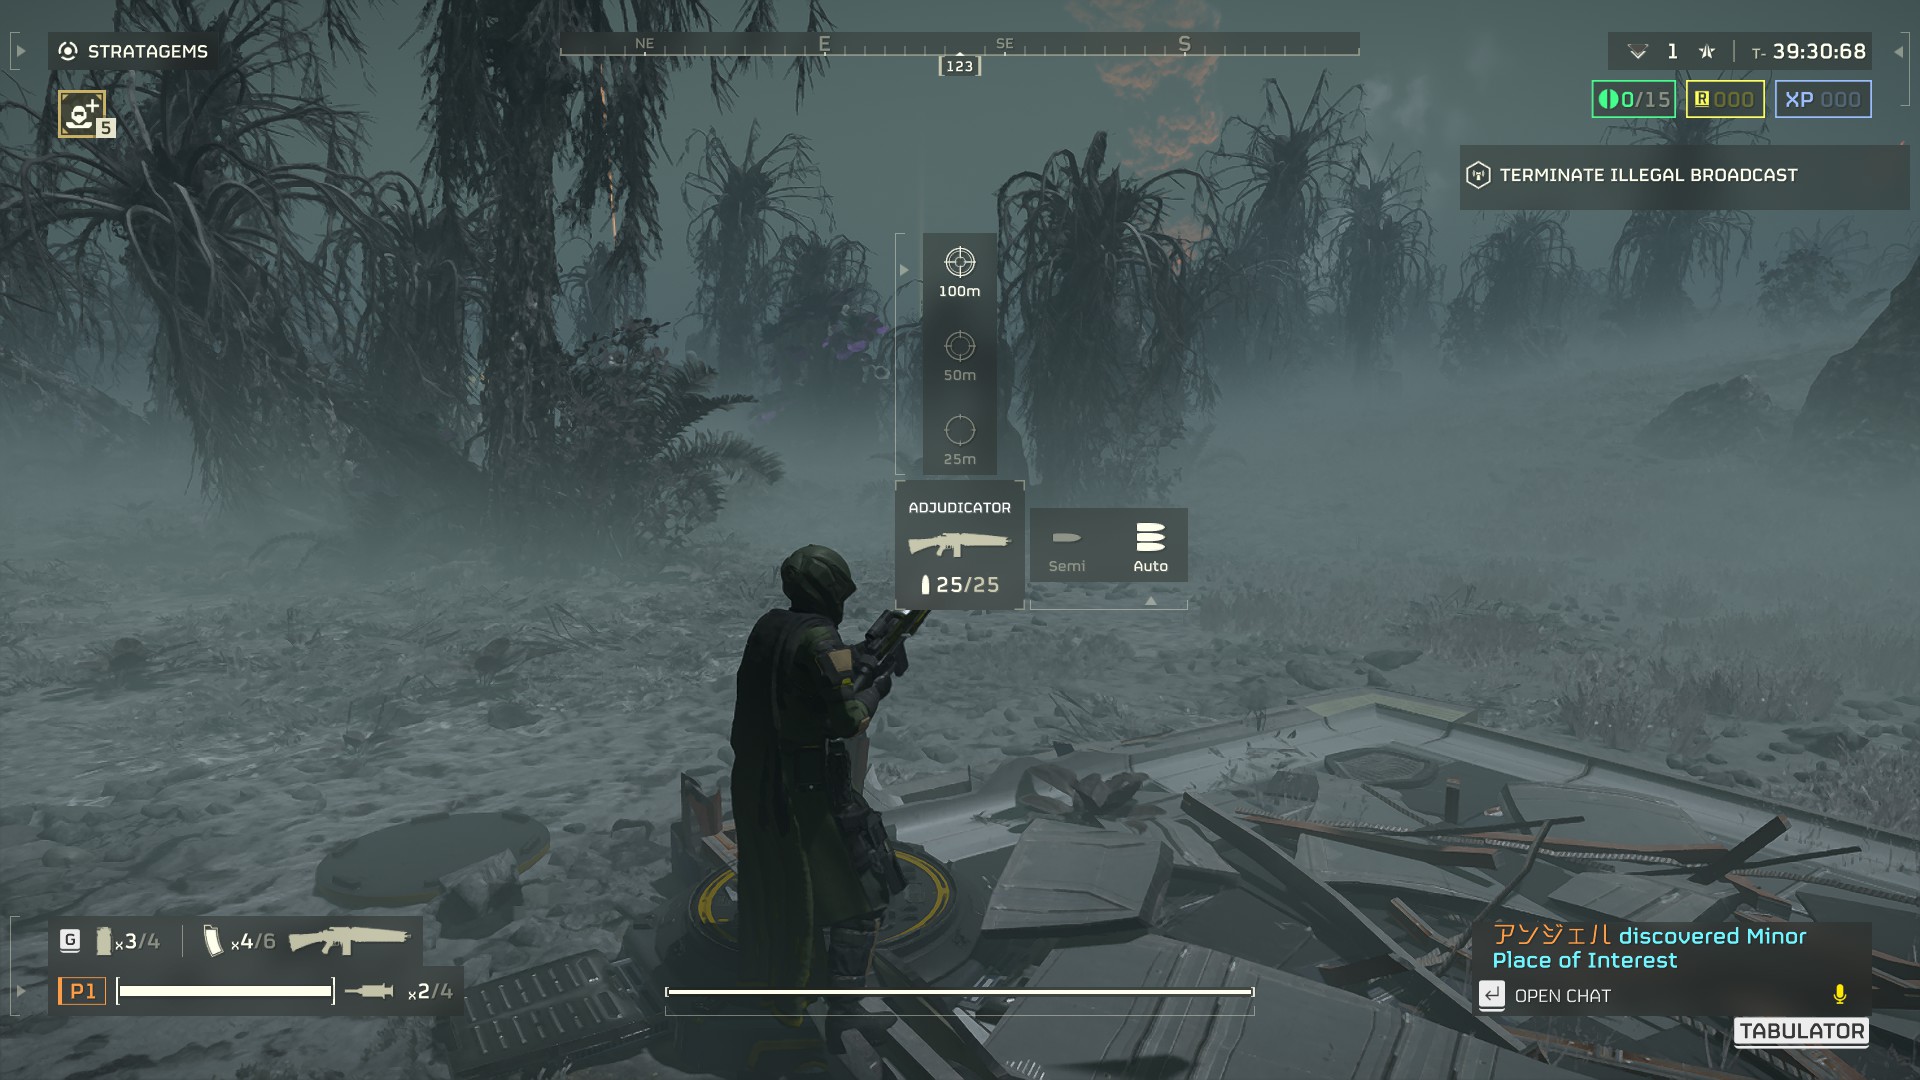
Choosing the right scope helped me immensely in improving my aim, as the default is set to the lowest, which is often meant for close combat. Using the first-person view helps with aiming in general. Using the right scope for the right distance makes this feature even more powerful and your damage output even stronger, as you can hit enemy weak points even better.

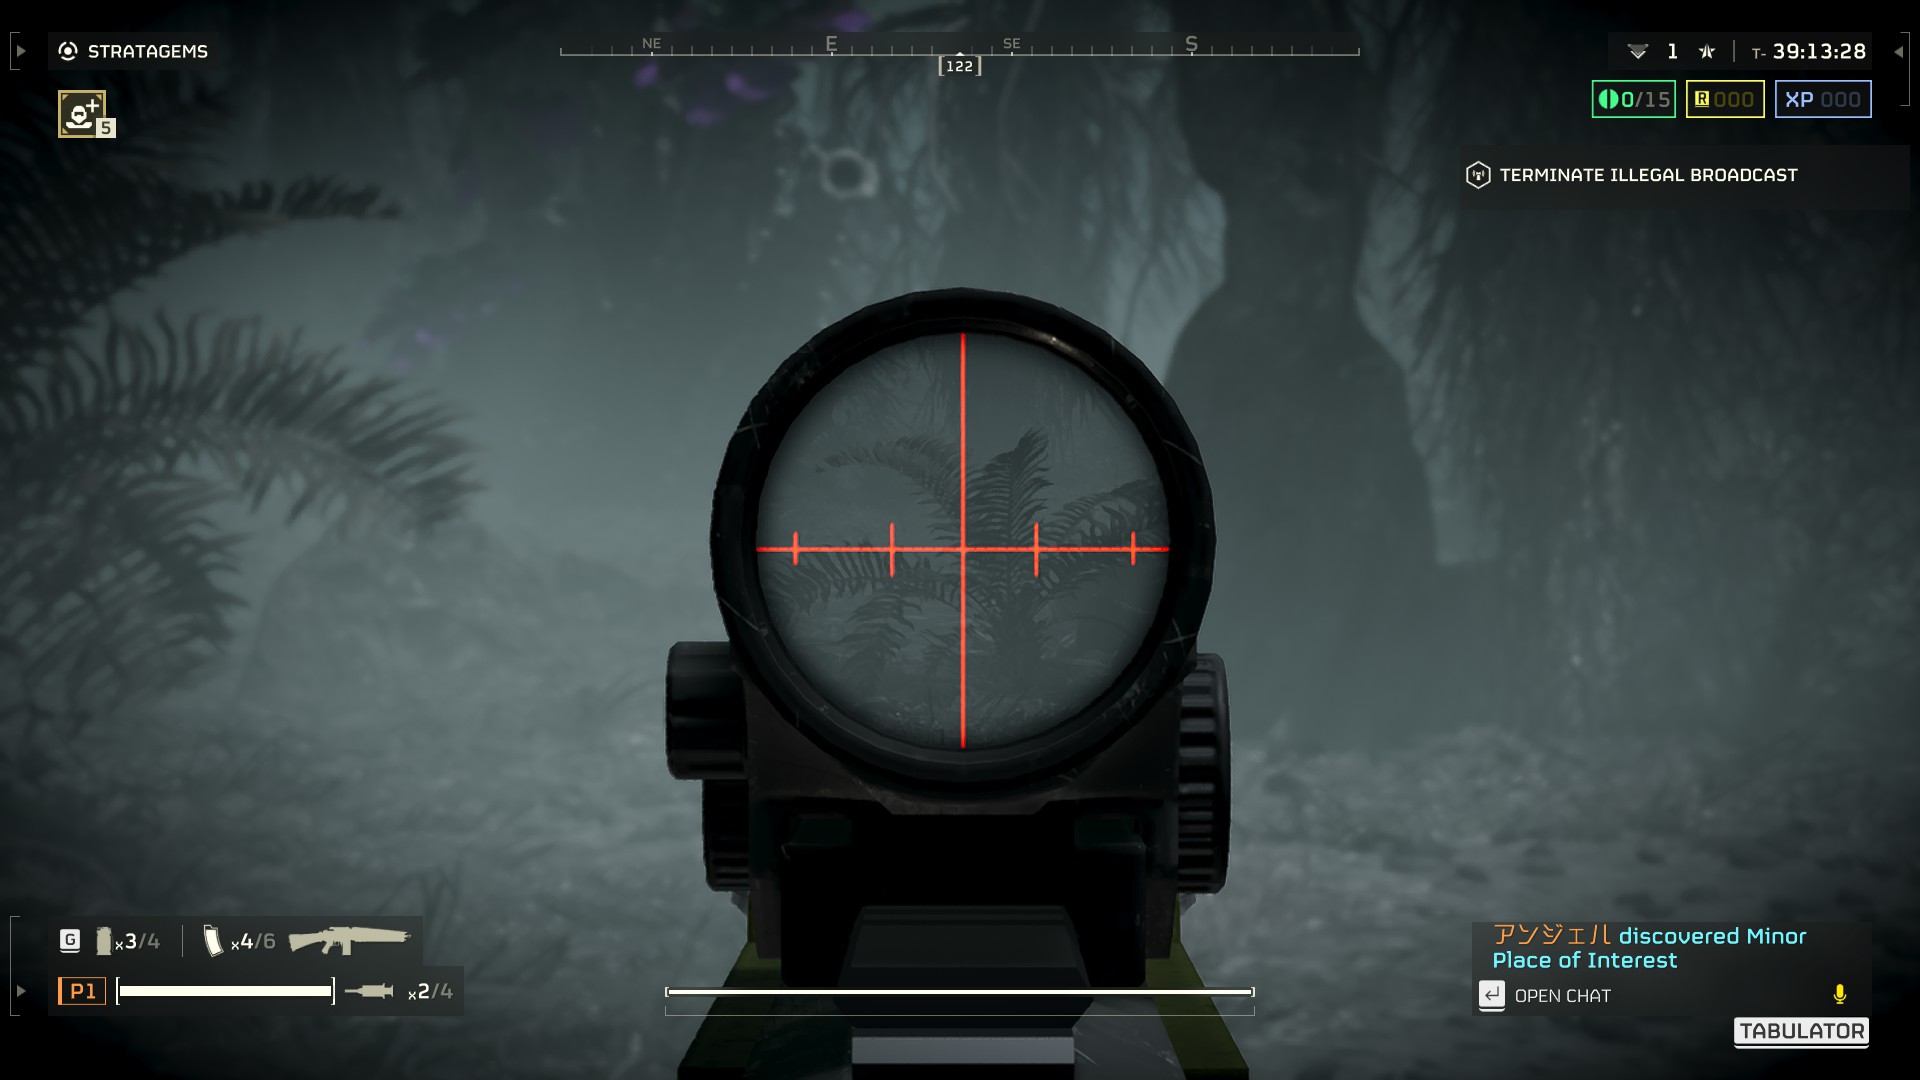
The screenshots above show the difference with the Adjucator's scope while staying at the same spot. Allowing you precise aiming over long distance much better than the default setting would.
Switching between scopes can be a bit of a hassle at times.
However, the improved gameplay that results is well worth the effort.
Choosing the right scope helped me immensely in improving my aim, as the default is set to the lowest, which is often meant for close combat. Using the first-person view helps with aiming in general. Using the right scope for the right distance makes this feature even more powerful and your damage output even stronger, as you can hit enemy weak points even better.
The screenshots above show the difference with the Adjucator's scope while staying at the same spot. Allowing you precise aiming over long distance much better than the default setting would.
Switching between scopes can be a bit of a hassle at times.
However, the improved gameplay that results is well worth the effort.
Use Stratagems while Running

Per default it is set that you hold control on your keyboard while using WASD to enter the stratagems commands. But there is a popular alternative which allows you to keep moving, running even while entering stratagems!
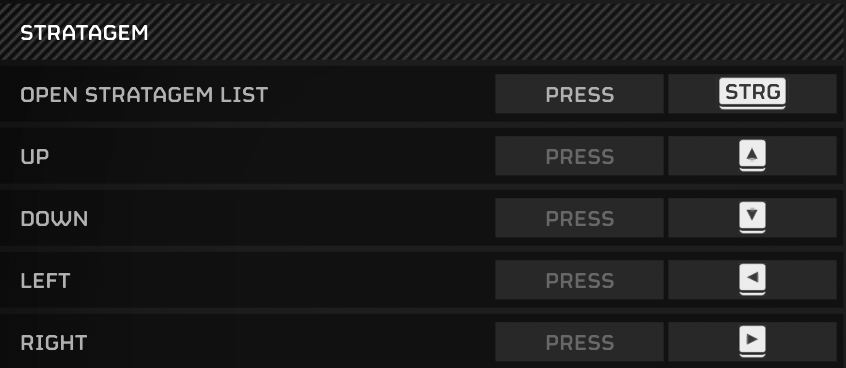
By putting the arrow commands onto the arrow keys and changing the stratagem menu to Press instead of Hold, you can call support on the move. It might need some time to get used to after getting used to the default settings before. But the retraining is absolutely worth it.
Just remember terminal commands which use arrows are also using the same arrow keys input.
Settings Recommendations
Gameplay
- Remember Aim Mode: Per Weapon
- Remember Weapon Functions: Yes
- Switch Weapon on Pickup: No
- Window Notifications: On
I recommend especially to disable the automatic Switch Weapon on Pickup. The reason is, that it mainly gets triggered by the support weapon by default.
Display
- Camera Shake Strength: Off
Players with weaker PCs also tend to disable Motion Blur, Depth of Field and Bloom, while maximizing Sharpness und selecting Performance over Quality. It can help wit the game's performance, but it is nothing which I feel needs to be point out.
I personally have set everything to maximum quality to enjoy the game's beautiful presentation while maintaining a stable FPS performance. It is not a competitive shooter, so I do not need to fight for every last possible bit of performance.
My advice: take your time with the settings available and adjust everything, not only Display related settings, to your personal liking.
Audio
- Midnight Mode: On
Essential for high difficulty stealth.
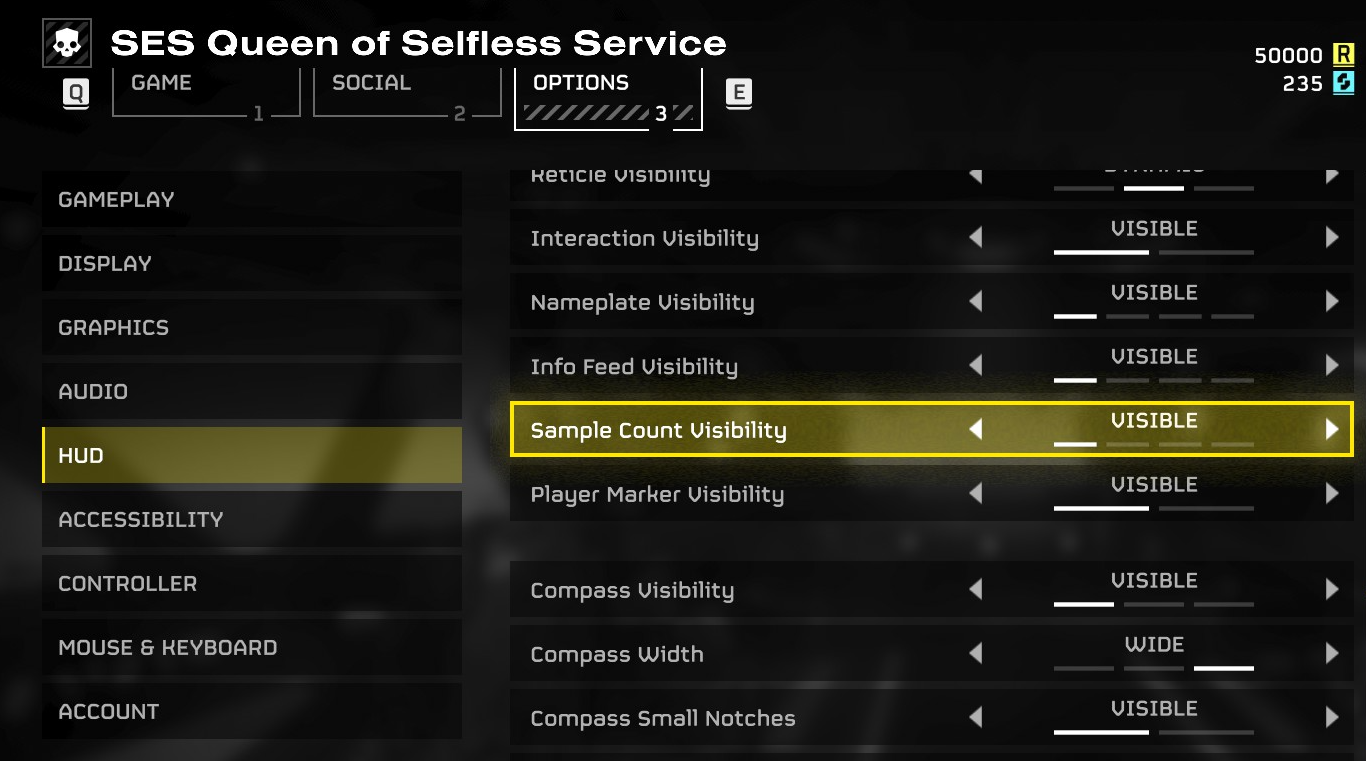
HUD
- Primary Objective Visbility: Always Visible
- Nameplate Visibility: Always Visible
- Sample Count Visibility: Always Visible
- Compass Width: Wide

Having certain items, such as the Sample Count always visible can be very helpful to keep track of what your squad already have gathered, without the need to call upon the map.
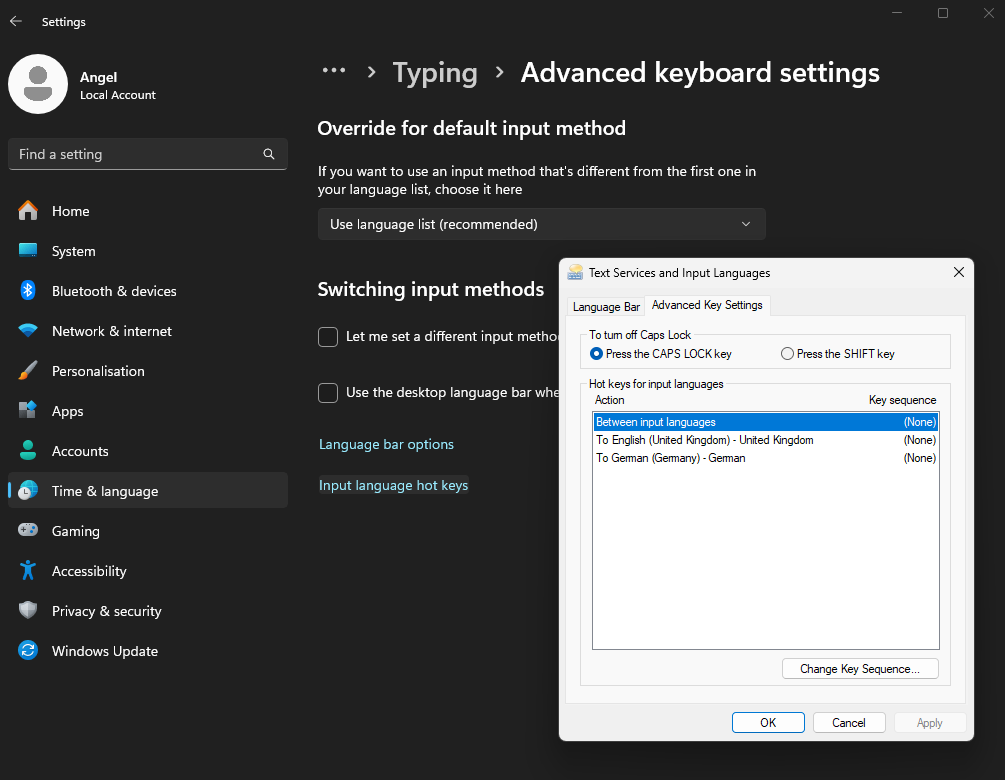
Bonus Tip: Disable Everchanging Keyboard Layout
Or rather: disabling the default Windows hotkey for changing the keyboard layout. Players who are having more than one keyboard layout installed often find themselves with an everchanging keyboard layout while playing Helldivers 2.That is because the standard hotkey for changing the keyboard from e.g. QWERTZ to QWERTY is SHIFT+Left-ALT. A combination easily triggered by diving while sprinting. You can disable that hotkey in the Windows settings. Interestingly, disabling the hotkey is absolutely harmless as WIN+SPACE still work to trigger the same intended effect for changing the keyboard layout without being triggered as easily as SHIFT+Left-ALT.
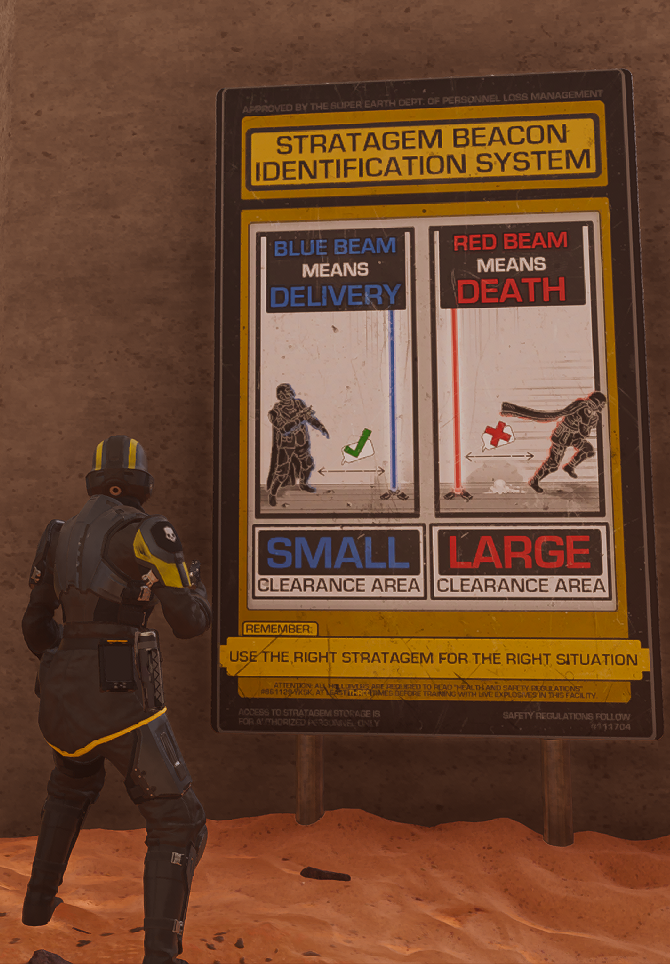
Objective Specific Stratagems
Some objectives are described clearer than others. For example, if you find a bug nest, you can destroy it by throwing grenades into the holes, or you can bombard it with heavy ordinance.
In the early stages of the game you will not have access to the latter.
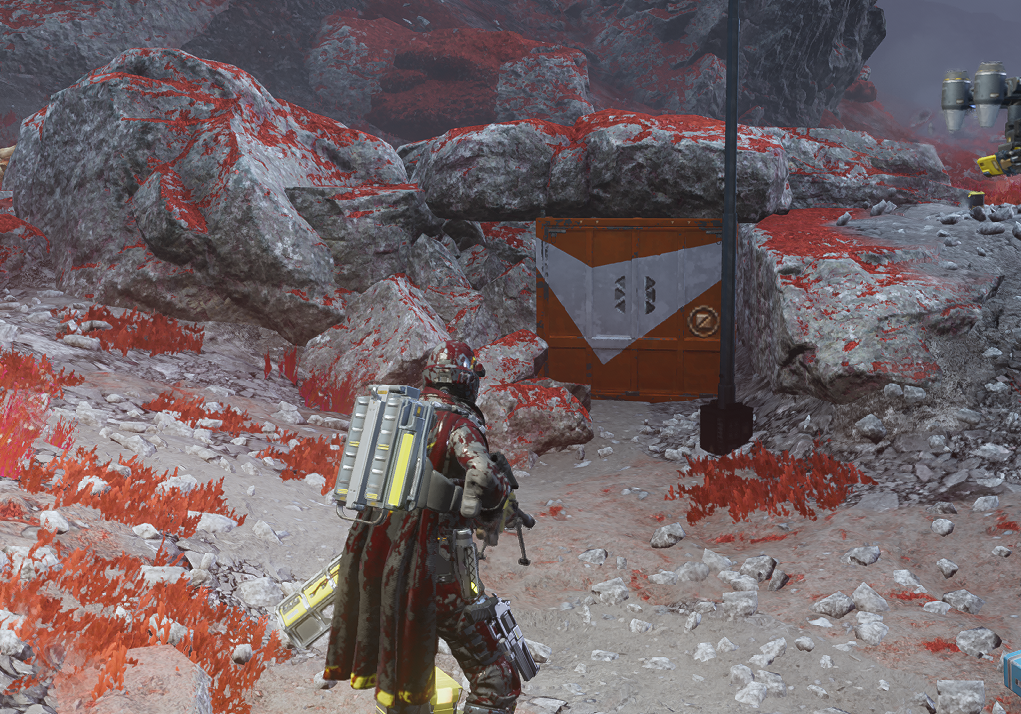
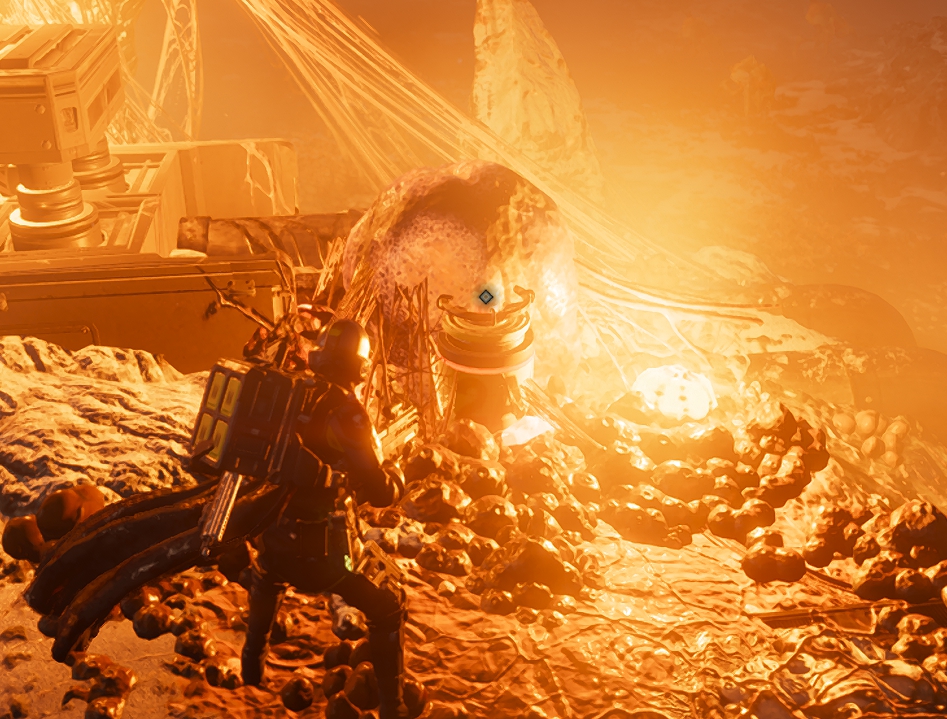
Be aware that there are some objective-specific stratagems that are not well explained in the game. One of those examples are Hellbombs when destroying certain structures.
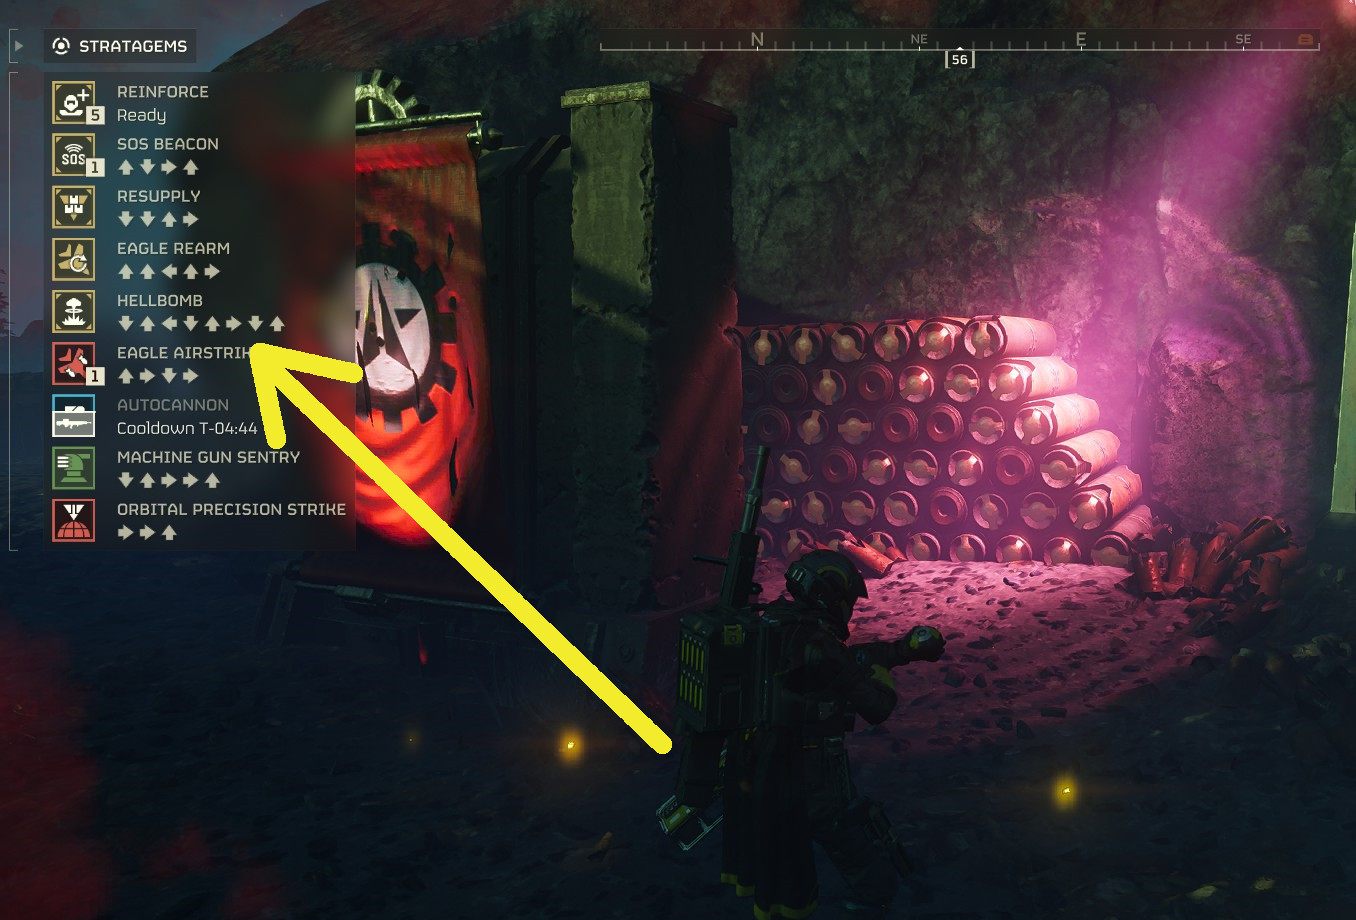
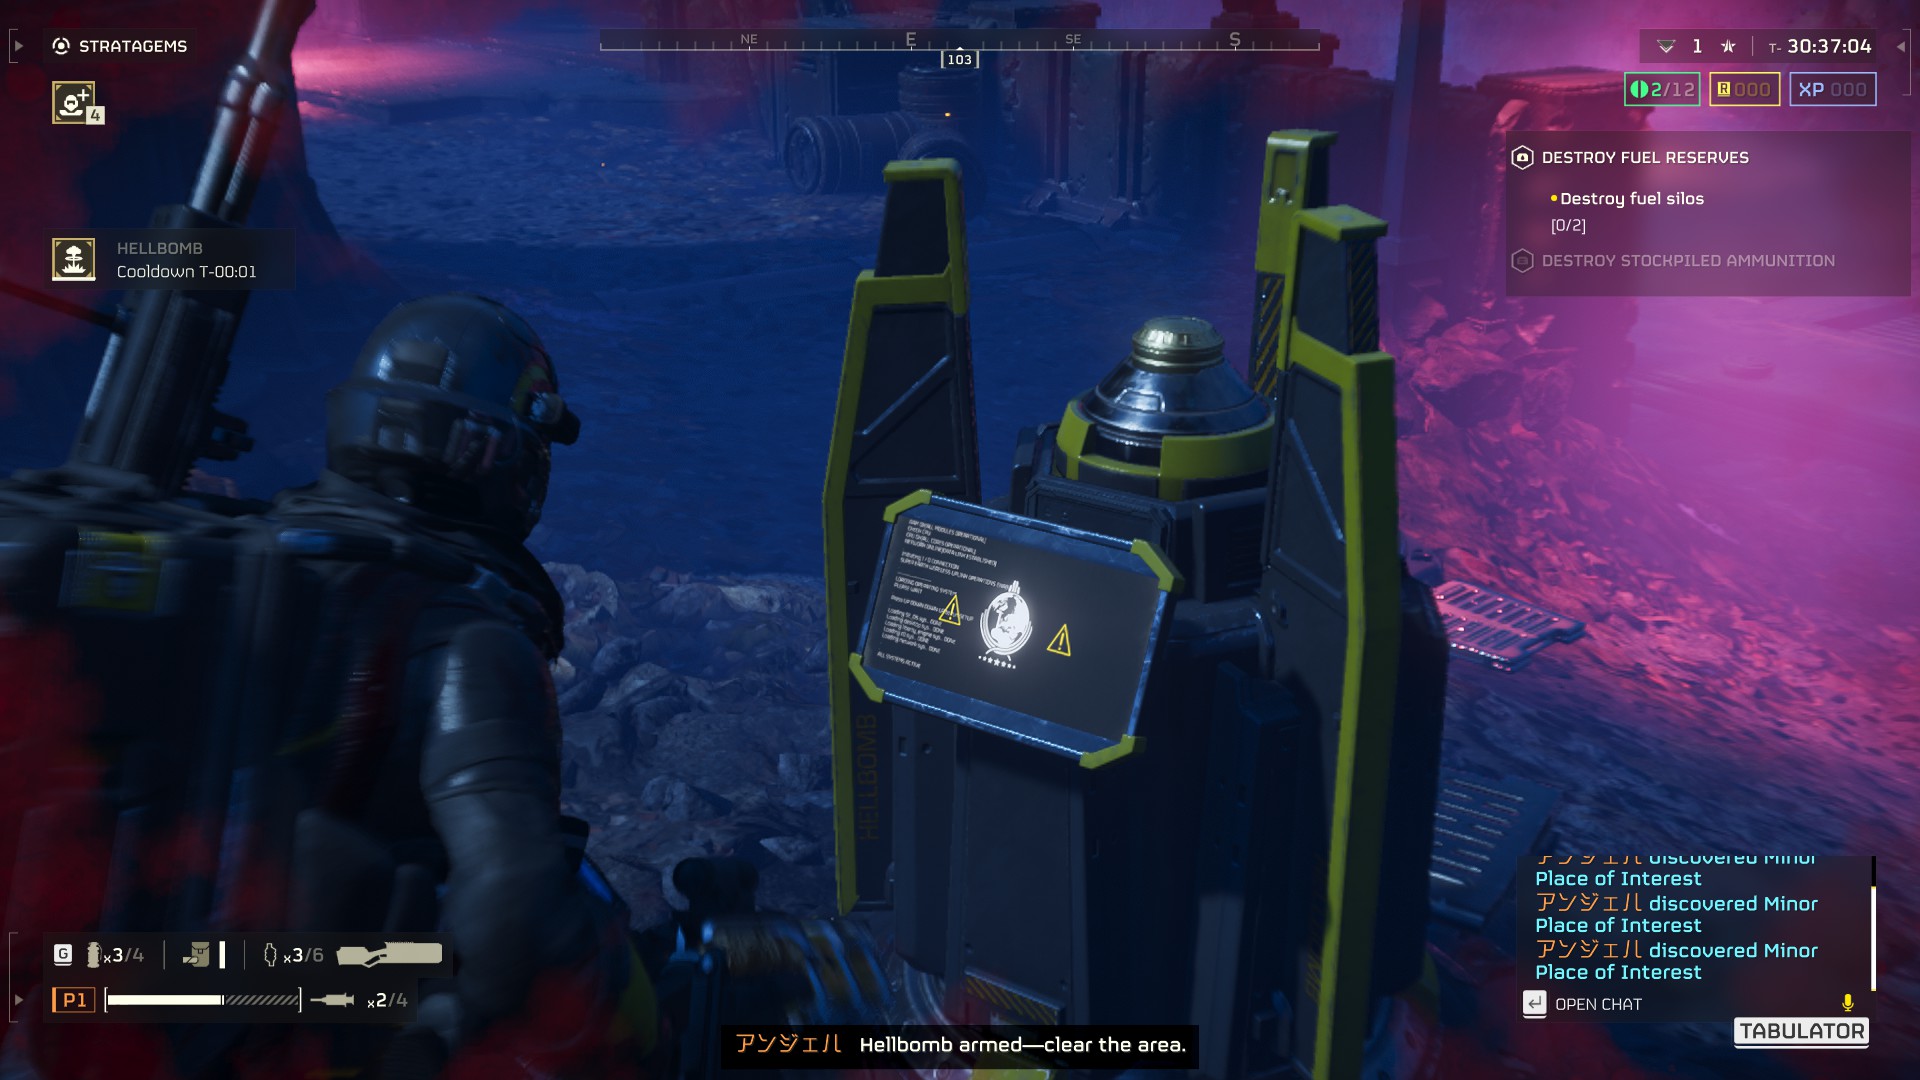
Use the special area limited stratagem to call upon objective items.
In this case: arm the Hellbomb and clear the area as quick as possible.
Other objectives demand you to use e.g. a drill, or have you run between the terminal and a satellite dish. The latter speaks for the game's D.N.A. in being a multiplayer based game. Playing solo is more an exception, but also possible. Except for opening security vaults/bunkers which often have the most valuable loot on the map.
Security vaults need two Helldivers activating both security panels at the same time.
If you play solo you have to skip those. Better together.
In the early stages of the game you will not have access to the latter.
Be aware that there are some objective-specific stratagems that are not well explained in the game. One of those examples are Hellbombs when destroying certain structures.
Use the special area limited stratagem to call upon objective items.
In this case: arm the Hellbomb and clear the area as quick as possible.
Other objectives demand you to use e.g. a drill, or have you run between the terminal and a satellite dish. The latter speaks for the game's D.N.A. in being a multiplayer based game. Playing solo is more an exception, but also possible. Except for opening security vaults/bunkers which often have the most valuable loot on the map.
Security vaults need two Helldivers activating both security panels at the same time.
If you play solo you have to skip those. Better together.
SEAF Artillery Basics
Super Earth Armed Forces (S.E.A.F.) Artillery
Sometimes, if you are lucky, you can find still usable SEAF Artillery outposts on the map. Beyond that being an optional sub-quest it also gives you five optional ranged strikes stratagems.
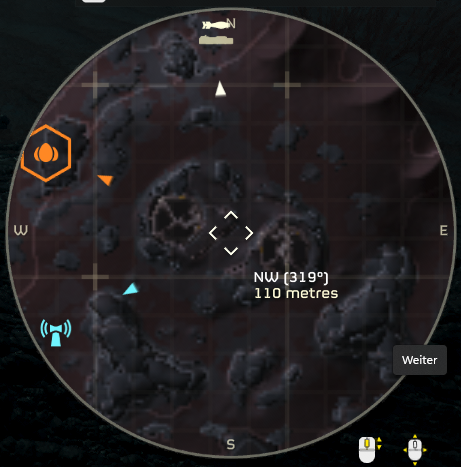
On the map they are quite easy to identify by the two neighbouring circles.
Load the SEAF Artillery with the shells you can find lying around and enjoy the bonus stratagem!
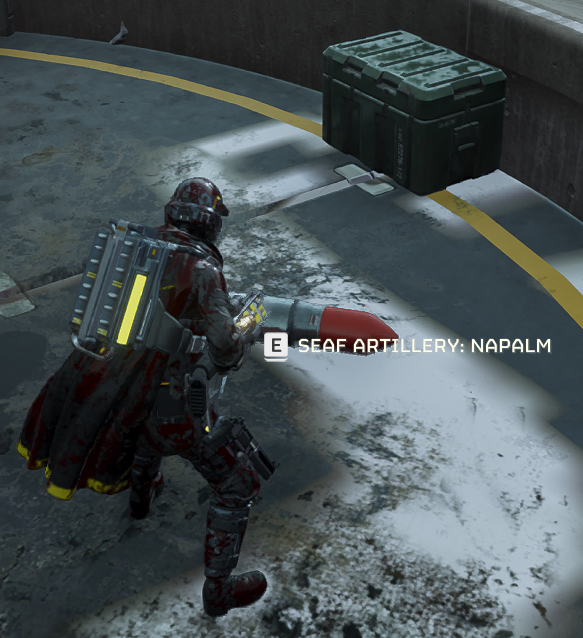
There are different types of shells available. I feel always especially lucky when I find a mini nuke which is also able to destroy structures! Pick the ones you want as there are usually more shells than slots available. Then make sure to memorise the load order.
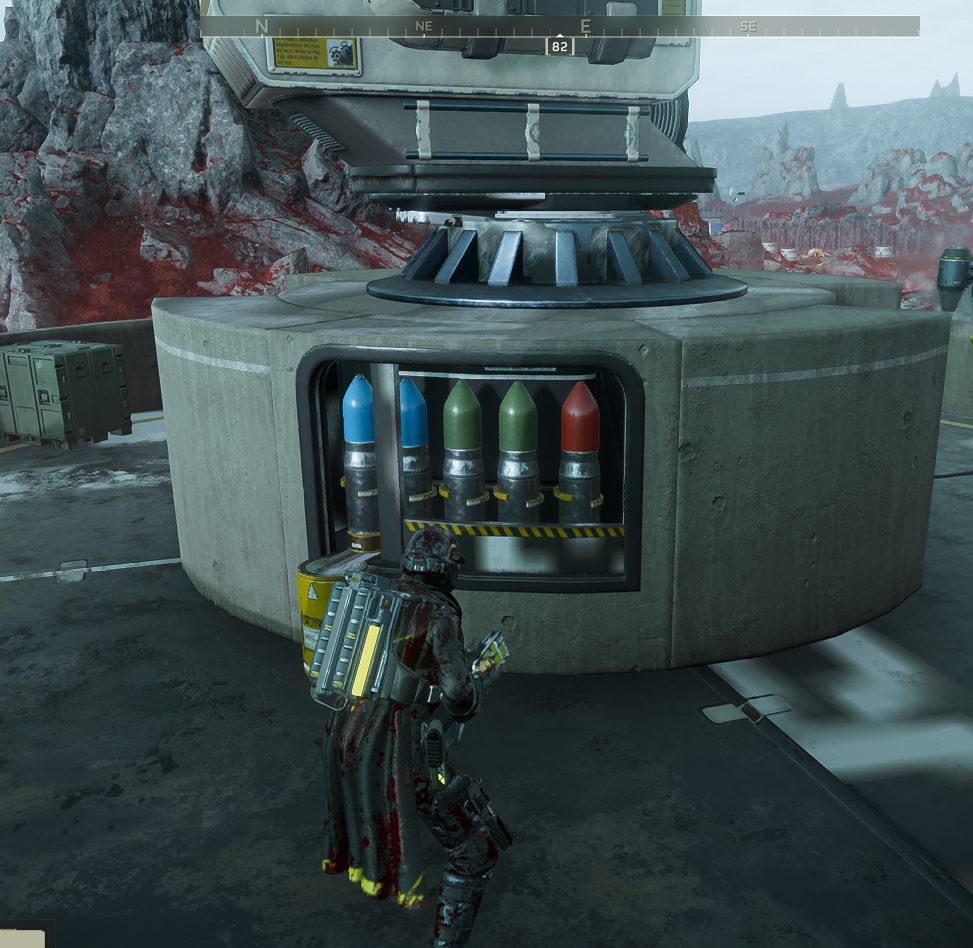
The first shell you loaded is used in the first shot, and so on. In this example above the SEAF Artillery gives
Napalm Strike
Explosion Strike
Explosion Strike
Static Charge Strike
Static Charge Strike
So I know the first one will leave a napalm carpet behind and the two which follow will be explosive, similar to an orbital precision strike in their effects. While the final two shells can be used to stun enemies.
The colour code for the shells are
⚫ Mini Nuke - black
🟡 High Yield Explosive - yellow
🟢 Explosive - green
🔴 Napalm - red
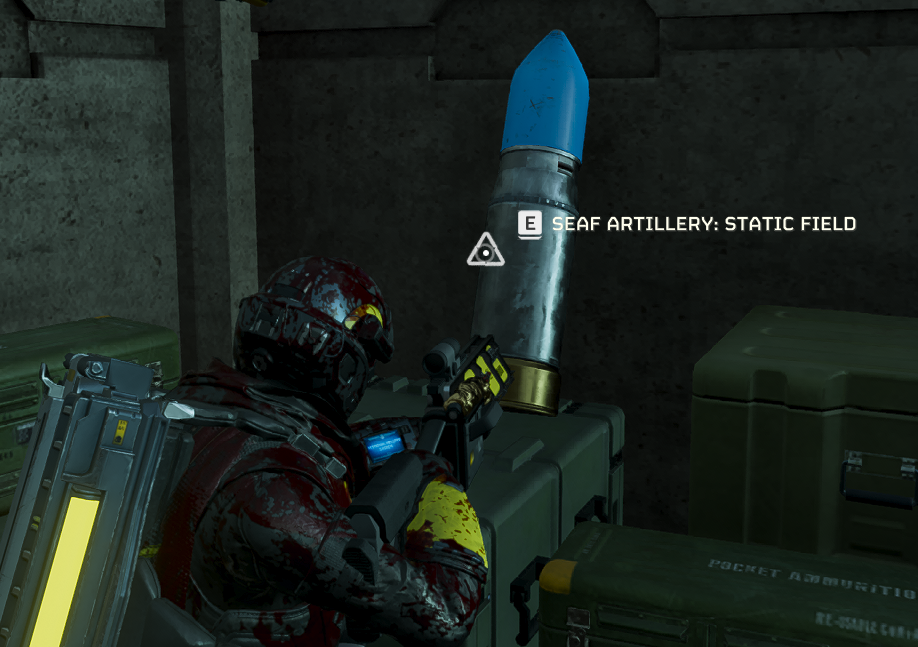
🔵 Static - blue
⚪ Smoke - grey
The Mini Nuke has an effect like a Hellbomb which can be found randomly as point of interests on the map, making it stronger than a 500kg bomb delivered via Eagle.
The explosives have similar effects to an Eagle Airstrike, wheras the high yield version is affecting a slightly larger area / is more potent in general. All explosive shells can also be used to destroy structures, wheras the Mini Nuke is the most effective one, as you can destroy structures with it where you normally would need to order a Hellbomb for.
Napalm creates a flame carpet on impact. Dealing impact damage plus fire damage over time.
Static creates an area of effect which stun enemies inside, while smoke breaks the line of sight for the enemies on the players. Although many players tend to ignore Smoke effects, it is still a very useful effect when used correctly. I often use it to increase the chances of a successful safe retreat.
Smoke has often helped me and other players to cover certain actions. Whether it is a tactical retreat, a hot evacuation, or protecting Hellbombs while arming, Smoke's tactical use and benefit to the squad is far greater than most players realize. Just remember to always use the right tool for the right job. --- and yes, I survived that mission with everyone else dead, no stratagems, on Helldive difficulty - and I brought 33 samples back for the whole squad to enjoy.
If you repeatedly hit "E" / interact while carrying the payload, you could fasten up the transport. it sounds weird, but it works! Keep letting go of the shell and repeatedly picking it up, let go, pick up again, letting it go again, and so on in a quick manner makes your character seemingly skip a step or two while transporting the payload. I surely would never do that in reality with something which could blow up anytime, but as a Helldiver what matters are the results!
Basic Tactics & Etiquette
Basic Tactics
- select the right tools for the right job; meaning fire weapons are good for Terminids but not for Automatons
- use the armour correctly; scouts pin to scan, storm troopers use medic armour to drug themselves to get semi-invincibility while being surrounded by enemies, servo-assisted make good use of stratagems ordinance
- check the map frequently for location and enemies; set pins to orientate yourself
- make good use of your magazine before reloading, so you do not waste rest ammunition in the clip - do not waste ammunition, waste enemies!
- dive, dive, dive, and dive harder!
- active diving, going prone does not only give you like 90% resistance against explosions, it also can help you survive from burning by putting out the fire; if you burn, dive first heal after
- do not forget about your melee attack! (default "F"); while it does not do much against most enemies it is against weak ones whenever you are in a pinch
- use "Q" (default) frequently to mark enemies and points of interest to increase your squads enviromental awareness
- make it clear whether you want to use voice chat or not; if you have to kick someone from your squad because of either, tell them in chat why you kick them if playing together is not possible - mind you: I am good with voice chat and without, and when my microphone broke, people who played often with me found me equally good without voice chat simply because I mark stuff and use the chat wheel (default "Q" long press)
- by the end of the day communication and cooperation is everything in Helldivers
- beware when setting up sentires as they do not check the line of fire for friendlies; make clear everyone knows when you set them up and mark their locations, especially mortars
- non-EMS mortars are rarely suited for defense; keep that and the risks included in mind
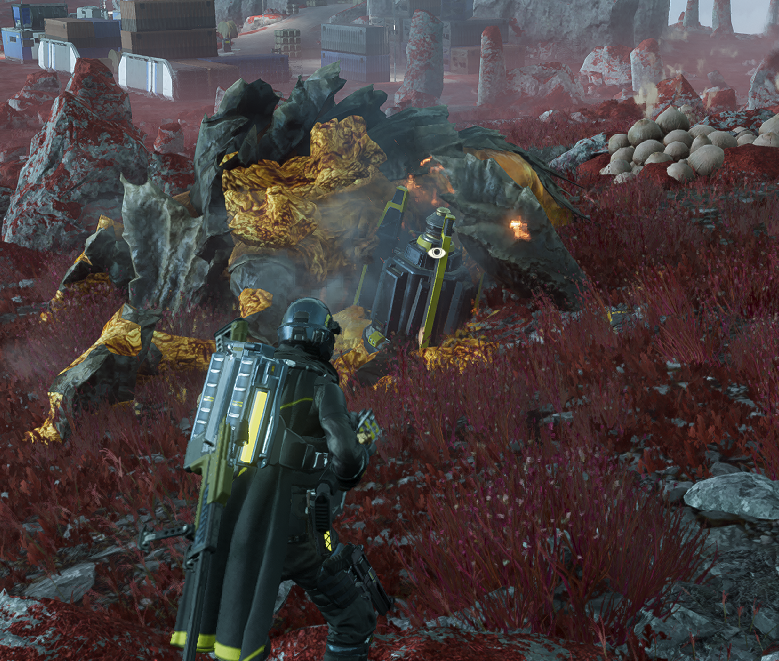
- pick your fights carefully; you have limited time for exploration - not every enemy needs to be dead for them to lose the war
- it can happen that objective related objects are obstructed by "other" destructible objects; e.g. during pumping oil missions valves can be hidden beneath "dried bug slime" which can be shot at to make the object accessible
Valve (objective) beneath the bug slime. If you do not know it is there, it is easy to miss - you can shoot lamps to destroy them, should you ever need to "turn the lights off"

Etiquette
- greet each other in lobby
- communicate; either via chat or voice chat
- it is a co-op game and you are playing with fellow players, not NPCs
- respect your fellow Helldivers
- work together towards the mission and help each other
- if you misbehave expect to be kicked rightfully
- if you have to kick, warn the to be kicked player in chat twice, and give them 15 seconds to react so they have a chance to learn from their mistake
- never kick someone else without warning
- remember; you want to have fun while playing, so does everyone else
- do not spoil someone elses fun neither by misbehaving nor silent kicking; you do not want to be at either ends
Priority Equipment
Which to get first to have an -relatively- easy entry:
- Eagle Airstrike
- Liquid-Ventilated Cockpit (Ship Module)
- different armour types for different gamestyles; chest piece suffice but I prefer the full set for the looks!
- booster
- G-16 Impact Grenade; explodes on impact, giving an entirely different handling than the standard
- EAT-17 Expendable Anti Tank
- Orbital EMS Strike; good for beginners as the stun effect is non-lethal but effective against any enemies, making it great to learn the feeling of the area of effect for stratagems
- AX/LAS-5 "Guard Dog" Rover; there is also a projectile version - the laser version is recommended for beginners since the line of fire is more visible, making it reliable assist
- against Terminids: FLAM-40 Flamethrower
- against Automatons: AC-8 Autocannon
- Eagle 500kg Bomb; the bomb among bombs - can blow up most structures without the need for a Hellbomb
- Orbital Laser
Rule of thumb: fire weapons against Terminids and explosives against Automatons are quite effective
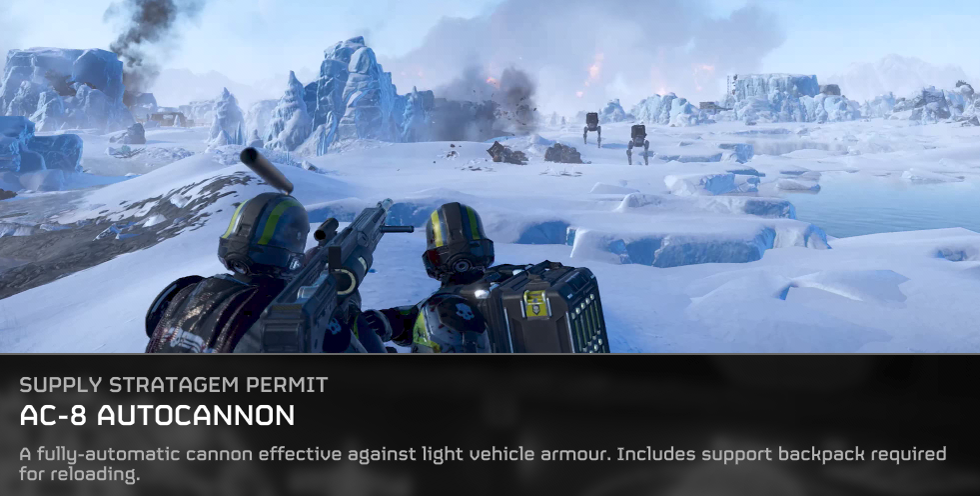
Despite the autocannon clip shows two people using the gun, one to shoot the other to reload, you can actually use it solo. The assist reload is fully optional and allows teamplay advantages.
Premium / Warbonds Expansion (optional)
- LAS-16 Sickle; easy to use, making it in fact the perfect beginner weapon - maybe too easy (Cutting Edge)
- SG-225IE Breaker Incendiary; great against Terminids (Steeled Veterans)
- R-36 Eruptor; great and versatile sniper rifle which shoots explosive rounds - the area of effect makes it an awesome weapon for people who love to play sniper without the need for > 96% accuracy (Democratic Detonation)
- G-13 Incendiary Impact; while the G-10 Incendiary grenade (Steeled Veteran) is not bad, the impact grenade version you can get is much better suited for crowd control (Polar Patriots)
- Anti-Tank Emplacement; a powerful defensive stratagem that makes short work of enemy armoured units (Urban Legends)
My personal Red Herrings*
- Donation Access License (Ship Module); calling supply pack at start cost nothing, using Hellpod Space Optimisation booster cost nothing, the follow up upgrades are negligeble with just 10% reduction and absolutely obsolete if you always pick up your equipment again
- MG-206 Heavy Machine Gun; there are much better choices available
- SMG weapons; the occassions when you actually want enemies close for maximum effect is very limited to non-existing
- SH-20 Ballistic Shield Backpack; prevents you from carrying something better and has very limited use
- Mines; unfortunately very hard to communicate and very hard to spot by fellow Helldivers - on the other hand it speaks for their effectiveness that they can kill easily Helldivers...
- Increased/Flexible Reinforcement Budget; you do not want to die, so why aiming for something which needs you to die to be effective?
* Red Herrings in this case used as: choices which are obsolete/invaluable to distract you from actual good choices
What about ...?
The lists here are not my way of telling you "use this or that". Take this purely as a recommendation based on my personal experience as a beginner. Every other equipment that I have not mentioned as a red herring has its use and value. Some are more flexible than others, such as Smoke, but that does not make them bad choices. It is important to think on two levels as you become more experienced with Helldivers 2. The first is the personal use of certain equipment.
The second is using them as part of a squad, where synergy is very important.
While playing alone can make stratagems such as Smoke completely useless, playing in a team where one person can cover the attack or retreat with Smoke while the other flanks the enemies or calls in heavy ordinance can synergize to great effect.
Even items that seem useless when playing alone can become invaluable gems in certain situations and when playing with a team that understands each other. Make your choices based on what you like. Like SMG? Then ignore my distraction warning about it! Like to try out Sniper? Give it a go! Just because other players may not like this or that does not mean the items are bad. It usually just means that they have not got into a situation where they can turn that equipment into gold. But maybe you can!
Advanced Tactics
Advanced Tactics & Battlefield Knowledge
- the mission timer is not an absolute timer; you still can get extracted once the timer runs out - what matters is to finish the main objectives within that timer
- when the mission timer runs out your Super Destroyer will leave the area; making stratagems unavailable - no reinforcements, no resupply, no support weapon, etc. - but as long as you survive and get extracted you are good
- after calling down the extraction Pelican wait until everyone is ready; the extraction ship will wait far longer than you could imagine as long as no one enters the ship - once a Helldiver enters the ship a timer starts; as long as you do not trigger the timer you have plenty of time, enough to e.g. reinforce a killed Helldiver for the mission bonus
- a lot of structures can be destroyed by using Eagle Airstrike / 500kg Bomb or even the Orbital Precision Strike - for example instead of terminating an illegal broadcast by setting up the terminal right, just call for an Eagle Airstrike on the broadcast tower from afar to deal with that mission objective
- simple obstacles, such as fences can often be blasted away with explosives to create shortcuts / making them accessible
- spore towers and shriekers nests can be taken out from afar with a long range explosive weapon which hits
- shriekers and stalkers will keep spawning once you got close to their nests; make their nests and lairs a priority as you do not want and endless spawn of two of the deadliest types of enemies
- when calling the map you can see in the upper right corner the amount of samples you have collected and the possible amount of samples available on the map; I put it in the settings to be always visible for me to have a general idea how many of the maximum me and my squad have found already - saving us time in searching for more when we are already satisfied or no more are to be found
Take your time to adjust your HUD to your needs and likings. That can make many things easier/more comfortable during gameplay.
- in nearly all objectives and sub-objective areas there are samples to be found; once you have destroyed a nest, tower or fabricators make sure to search the area for samples
- the final tier of samples, Super Uranium, can be exclusively found near a very specific landmark which resembles a natural stone tower in the form of an upstanding chicken drumstick; of course you only need to look out for it once you start playing on higher difficulty and know that in the mission such samples can be found - once you are used to it, make it one of your personal primary objectives to secure them for last tier Ship Module upgrades
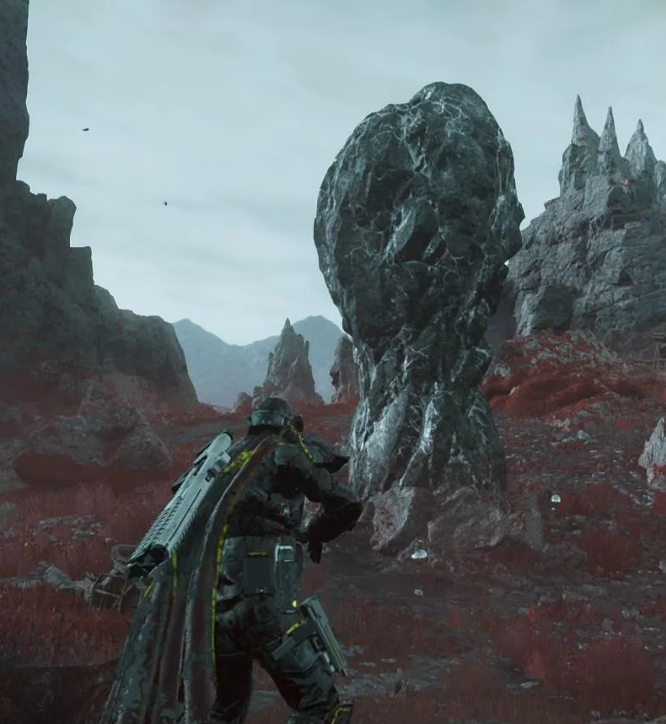
Kinda reminds you of a chicken drumstick...
- the burning area of effect last circa 10 seconds; Terminids entering that area will get a damage over time status reducing and eventually killing them with burn damage, making flamethrowers great weapons to set defensive areas or to affect bug tunnel (breach) entries significantly - a similar use for the Eagle Napalm Strike
- energy weapons benefit on cold planets from faster cooling; allows you to reuse them quicker/longer - on the other hand they are in disadvantage on hot planets
- I recommended the impact grenade for the reasoning of handling: they might be less good when trying to get a grenade into a specific hole, but if you ever experienced a grenade bouncing back and blowing you up you might still learn to prefer impact grenades which detonate instantly on impact
- sentry towers feel weak at first not because due to their low health, but rather due to their low ammunition; take that into consideration when upgrading the ship to avoid red herrings
- the Laser Cannon is especially good against the Automatons while the Orbital Rail Cannon Strike something you want to have strongly against the biggest threats on the field
- on the matter of Orbital Rail Cannon feel free to place that specific stratagem next to allies, as it will automatically lock into the largest enemy nearby and only attack that specific enemy - making it a very safe to use offensive stratagem
- if you can tell from the map that the next encounter might be in another few minutes and you are not engaging any enemies until then, you can send your Eagle support back early to rearm and have them back in time fully loaded for the next enemy encounter - this becomes especially powerful with the Hangar upgrades
- the upper limit for resources are 50,000 for Requisition, 500 Common Samples, 250 Rare Samples, 100 Super Samples - if you collect any more that it will not count for you - so better spend your resources in time before reaching the caps
- mind the arc of the Arc Thrower as it jumps from entity to entity; ignoring whether the entity is friendly or hostile as long as they stand close to each other to your target
- learn the enemies type names as quick and as good as possible - it matters to communicate whether the enemy you see and the others do not yet is e.g. a Charger or a Bile Spewer as both are similar large on the radar but differ in challenge to deal with
- use "Q" (default) frequently to mark enemies and point of interests alike
- listen closely: not only is the radio chatter by your avatars helpful when they tell you about a marked "heavy" or point of interest - enemies make also very specific sounds and that knowledge can be used to identify enemies and/or avoid them early on if e.g. you hear an incoming patrol
- turn on Midnight Mode in doubt
- only engage a patrol if you must or you are certain that you can take everyone out before they can call reinforcements
- by fulfilling the main objective, the spawn rate of patrols increases by circa 400%; plan ahead to be ready for that by e.g. doing sub-objectives first and main objective last - however, make sure to finish the main objective for the guaranteed win regardless whether you extract or not
- use the map and pings often to orientate, scan, analyse and plan; often enough you can spot that way enemies coming at you (in numbers) from a blindspot - if you cannot turn around to check your surroundings properly while in combat, make sure to check the radar at least
- when extraction is available it is always visible throughout the whole map by a blue pillar of light beacon; use that to orientate yourself, especially when the radar becomes unavailable e.g. due to an ion storm
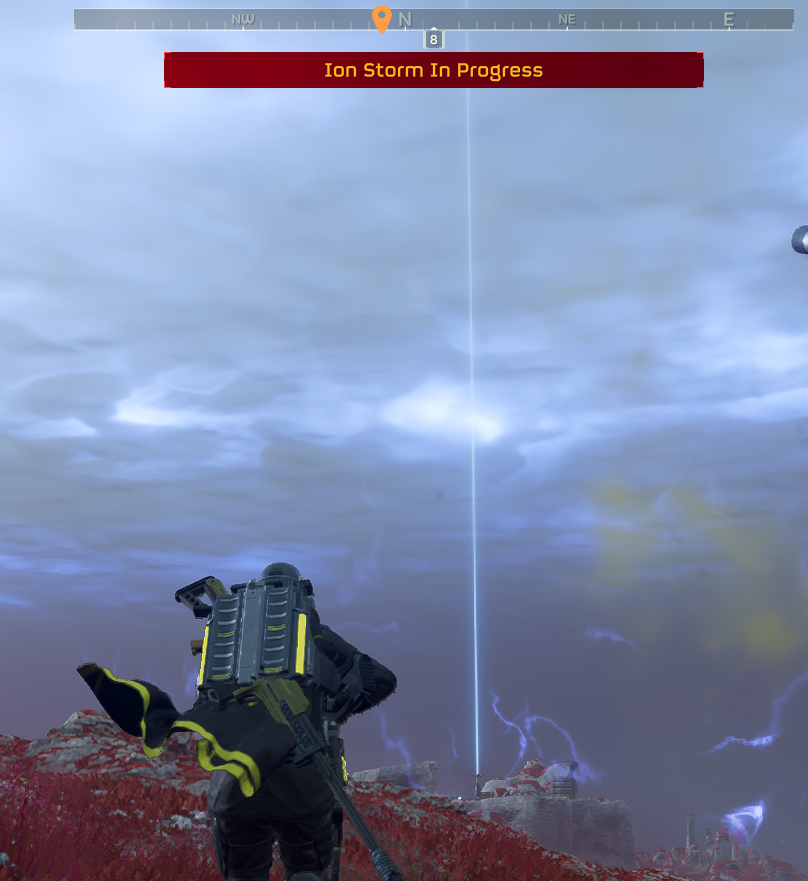
No radar, no problem finding the extract zone - as long as you follow the beacon.
- if you see someone limping it means they are probably out of stims; you can share yours in an emergency until the resuppy drop becomes available again - go to the affected player and inject them a stim - helping your fellow squad mates increases your own survival chances
- enemies have weak points; in doubt take your time to learn from low difficulty mission - that knowledge will help you dealing with those enemies better on higher difficulties
- Shriekers e.g. are very dangerous if you are unaware of them yet surprisingly easy to deal with by aiming at their wings and using spread shot weapons like e.g. Breaker shotgun - make it a priority to take out their spawn point (nest) as only that will stop them permanently in your current mission
Unlike the Stalkers Lairs, Shriekers nest are easily visible from afar - the sooner you take them out the less you have to deal with that menace.
Personal Tactics
My Personal Tactics Explained
The first people I played with did not see the Scout skills the way I did. Unlike me, they played on Playstation 5 and followed the mainstream "meta" information about things. At first I wondered how helpful it would be to follow their advice, as my personal experience was very different from theirs. Now I can tell you with certainty: trust your gut.
I am a Scout. A successful one, who has no trouble completing high difficulty maps solo and has the highest survival rate in multiplayer, simply because of the power of information and how I use it.
What mainly differ in my personal loadout are:
- I use always light armour with scout passives (SC-34 Infiltrator / SC-30 Trailblazer Scout)
- I use always Hellpod Space Optimisation / Stamina Enhancement / Muscle Enhancement; in that priority order
- I use very long range support weapons (AC-8 Autocannon / APW-1 Anti-Materiel Rifle / EAT-17 Expendable Anti-Tank / MLS-4X Commando / LAS-98 Laser Cannon / LAS-99 Quasar Cannon / FAF-14 Spear / GR-8 Recoilless Rifle)
- I use weapons which kill very quick and reliably (SG-8 Punisher / SG-8S Slugger / SG-225(IE) Breaker (Incendiary) / JAR-5 Dominator / Plas-1 Scorcher / R-36 Eruptor)
- I use always the P-4 Senator Revolver
- I use G-16 / G-13 Incendiary Impact Grenades against Terminids
- I use Smoke
Alltime favourite: Eagle Airstrike for its flexibility.
The rest of the Stratagems I choose depends on the overall squad loadout and mission.
Power of Scout
The Scout's greatest advantage, and the one that makes them invaluable in a well-coordinated party, is their long-range scanning ability. They can see far ahead on their radar what is waiting for them and what is nearby. This allows them to not only avoid enemy patrols, but also to see what kind of enemies to expect and in what numbers.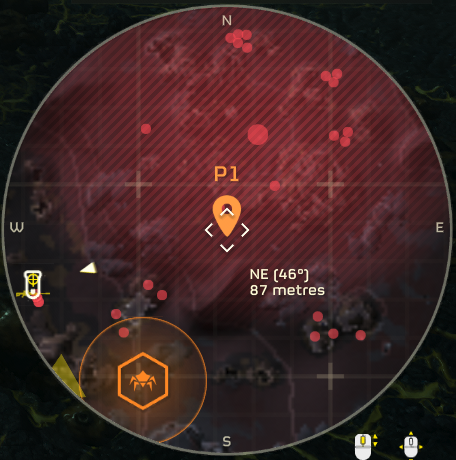
In the example above, I was even able to see where my mission objective was. The ability to avoid patrols is invaluable in keeping the overall map difficulty manageable. Not only will patrols call for reinforcements, but in the worst case scenario you could end up in a never-ending stream of enemies.
Being stealthy also has its advantages.
And you do not need to wear Scout armour to benefit from it.
The first thing I do when I drop is to go prone before scanning the area and calling for supplies. This prevents me from accidentally drawing the attention of nearby patrols. And by staying out of sight while prone, you can become semi-invisible. This is how I manage to complete multiple objectives solo at mission points before the rest of the squad can close in, because with training and experience I can get past most enemies undetected.
Experience plays a big part in this, as I only try to engage enemies if I can make sure they are unable to call for reinforcements. For example, when dealing with an enemy patrol from a distance, I will only fire if I can ensure that I kill them all before any of them can call for reinforcements. If I cannot, I will avoid fighting. But if I can take them out for sure, the sniper rifle is my best friend.
Playing on a PC with mouse and keyboard gives me an undeniable advantage over console players with their gamepads.
But it is not just about solo play.
I also frequently mark enemies and points of interest (using "Q" by default) and use (voice) chat to tell my fellow Helldivers about enemies and their locations in the area. This way, not only me, but everyone in the party, whether they have Scout armour or not, can benefit from my passive abilities.
I also use melee more often than any other player I have played with, as it allows for a relatively silent kill in addition to the usual handling where small fries can be easily dispatched with a well-placed punch.
The reason I use the P-4 Senator Revolver is for its stopping power. It is not my "panic button" weapon, but rather a supplement to deal with enemies who are too close and too strong for a single hit. While it takes longer to reload than the other weapons, it has a remarkable stopping power that makes it viable against strong enemies.
Some might argue that it is difficult to use. And yes, you must not miss to get the most out of it. But as a sniper with good aim, you can get more out of this weapon than most players. Especially when you compare mouse and keyboard to gamepad.
My personal play style may look weak compared to other players. But whether I play solo or in a group, it has its advantages. I may not be able to kill as many enemies at once as others, but I can take out important targets quickly and reliably. This makes it a fun playstyle to have on the game's highest difficulty.
There were often situations where all seemed lost due to overwhelming enemy forces. I was able to get out, lure them away and sneak back into the objective areas, completing missions where others were struggling. Playing Scout requires a lot of patience as well as experience. But if this playstyle is for you, you can enjoy a whole different level of the game, one that goes beyond "shoot everything that isn't a Helldiver".
After one week of playing Helldivers 2 I got to Helldive with success with my playstyle.
Advanced Tactics II
Four Types of Enemies
There are static guards, who will generally not move from their posts unless provoked.Patrols, which spawn at regular intervals and roam the map in a certain pattern (see recommended guides).
Reinforcements, summoned by either static guards or patrols.
Spawns, which are created on the spot by Nests and Fabricators when a player is detected nearby or the Extraction Shuttle is called.
Patrols and reinforcements can despawn provided all players are far enough away from them and out of their line of sight/awareness. On higher difficulties, retreating when encountering overwhelming forces is a viable tactic, as you would need to eliminate all enemies before the next patrol appears and/or enemy reinforcements are summoned.
Taking into account the cooldown for enemy reinforcements to be summoned, it is also a tactic to provoke an enemy reinforcements call far away from your actual target location.
Think of it like this: you and your squad are tasked with rescuing civilians, but it is nearly impossible to keep the waves of enemies coming at your position. The advanced tactic here is to draw the enemies away from the target location and keep them busy far away while one or two squad members deal with the actual rescue of the civilians.
As long as the enemies are kept busy elsewhere, and provoked to call for reinforcements from far away, even if a patrol makes it to the target location, they will be unable to call for reinforcements as they will still be on cooldown. This makes an almost impossible challenge possible.
This tactic is also often used while waiting for the extraction shuttle, as it gives the caller more room to manoeuvre without running the risk of being overwhelmed by enemies at the landing zone on higher difficulties.
Making Pelican Wait: Free Invincible Turret
As you know, the Extraction Shuttle is armed with a powerful turret, which is used to help clear the landing zone when it comes to pick up the Helldivers.To call the Extraction Shuttle, there must be at least one Helldiver within 50 metres of the landing zone. Otherwise the extraction will be aborted. But there is more!
As soon as the timer on the extraction call runs out, Pelican will start the descent. At that moment, before the extraction shuttle touches the ground, if you leave the 50 metre radius around the landing zone, Pelican will be forced to hover and wait for you without actually landing. During this time, it will continue to use its turret to assist you with enemies until you actually make it to the landing zone - providing long-range cover fire until the mission is over.
Turning the extraction shuttle essentially into a free landing zone turret with quite a range.
IMPORTANT
Keep in mind, this is an advanced tactic. You can only call the extraction shuttle if all main mission objectives are completed. That means also, you should not aim for this early, as completing all main mission objectives also increases effectively the spawn rate for enemy patrols significantly! (circa four times more patrols plus the nest/fabricators spawns unless you have destroyed them)
Mortars for the Win: Defence Mission
As I mentioned before: Mortars are rarely good for defending. This is mainly due to the fact that the enemy will be coming at you relentlessly, which will inevitably put you and your squad members in mortar range and area of effect. There is, however, an exception to this rule in the form of the defence mission, where you have to protect power generators from incoming hordes.The best loadout for this mission is for all squad members to bring EMS as well as the standard mortar to continuously stun and damage enemies. This, along with bringing armour-busting support weapons such as the Spear or recoilless rifle, and having a constant focus on any heavy enemy that appears, makes the defence mission one of my favourite relaxing and easy missions.
Make sure to keep your eyes on the clock and keep refreshing your mortars whenever the Stratagems become ready again, while eliminating heavy threats as soon as possible with all squad members working together. Add some devastating Eagle bomb to the mix or Orbital Laser and you will have an easy time in holding the line.
Count Like Goblin Slayer
The Goblin Slayer always counts his kills during an encounter. Do you know why? Because when he was younger, he once lost sight of a target and almost got killed because he forgot there was one left. He saw his target at the beginning of the fight, but the stress of it all made him lose track of it, which almost cost him his life.
When attacking an enemy post or patrol, it makes sense to count your kills, as Goblin Slayer would do, after checking the map for the number of enemies to expect. This way you will not be surprised by enemies behind a wall/container and you will less likely miss on important targets. Nothing hurts more than successfully taking out a guard post, only to miss one last target and then seeing them call in enemy reinforcements, which could have been prevented.
Expert Mapping
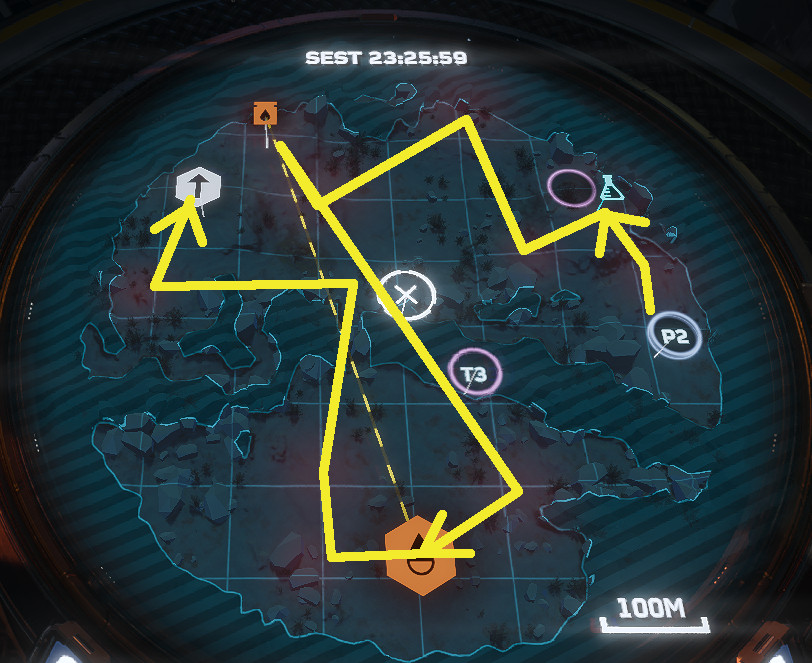
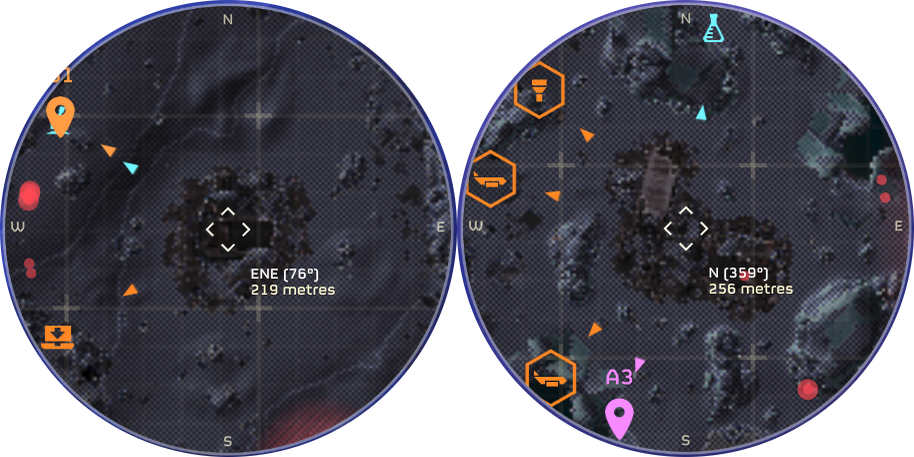
The map not only reveals mission objectives when you get close enough - it is enough if you manage to pinpoint them on the map, long before you even know what lies ahead.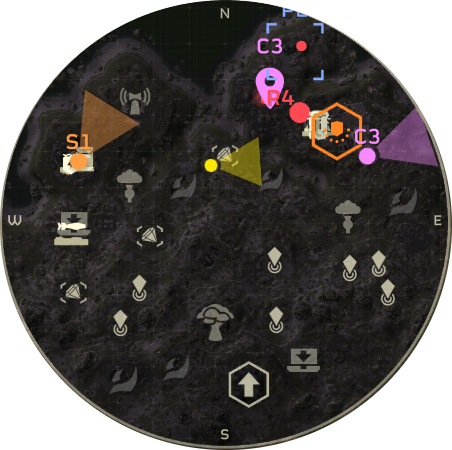
In the example above, you can see that the blue marker from P2 (that is me) has highlighted an unknown mission objective. If you look at the compass at the top of the screen, you can see that this is a Stalker Lair.
By systematically clicking around the map, you can find additional mission objectives as soon as you drop the Hellpod, so you can be prepared for any threats from the start. --- patched in version 01.000.300
Drop the Dropships
What do you think? Is it worth shooting down Automaton Dropships?They will not hurt you, but their cargo will.
If you manage to shoot down a Dropship before it reaches the drop zone, you will not only destroy the Dropship, but also its entire cargo of enemy units. This effectively denies the enemy their reinforcements.
However, if the Dropship is already at the drop zone, it will begin unloading immediately. The dropped enemy units will survive even if the dropship is destroyed and drops on top of them.
The most surprising experience I had with this was seeing my Orbital Strike blocked by the Dropship with the cargo intact. In another situation, the units trapped underneath the dropship even survived explosions. Basically, they benefit from the fact that the Dropship has landed on top of them, providing a very effective cover for the enemy, even if they are trapped for a moment. They still shoot, though.
Take advantage of the small window of time before a Dropship's cargo is dropped. Once that moment has passed, think twice about attacking an otherwise harmless dropship. You might want to aim for its cargo instead for a better result.
Learn the Rhythm
Helldivers 2 is certainly not a music game, but there are certain rhythms that are worth learning. Like the fact that enemies take two seconds to notice you. Or that they have about four seconds (depending on the enemy) between reloading and firing. This allows you to time your dive to dodge incoming attacks.In particular, the fact that enemies do not immediately notice you can be used to your advantage, as you can retreat unnoticed if you accidentally come into enemy detection range. It takes training and experience to fully master it, but once you have, it allows you to sneak past enemies into their bases and much more better than ever before.
Advanced Tactics III
You Cannot Swim - Can You?
Yes - and no. It might be less surprising if I just told you "no". And this is where the previous tip about rhythm comes in. You can actually survive in deep water for about two seconds before you start to drown. During that time, you can still reach for the shore and climb to safety. Knowing this, you can get around certain water obstacles by diving to the shore on the other side, or by using a jump pack to cross most of the water obstacle before swimming the last two metres.https://steamcommunity.com/sharedfiles/filedetails/?id=3256441872
This trick not only opens up shortcuts. Best of all, enemies will not be able to follow you through the water. They definitely cannot swim, so they will avoid deep water at all costs.
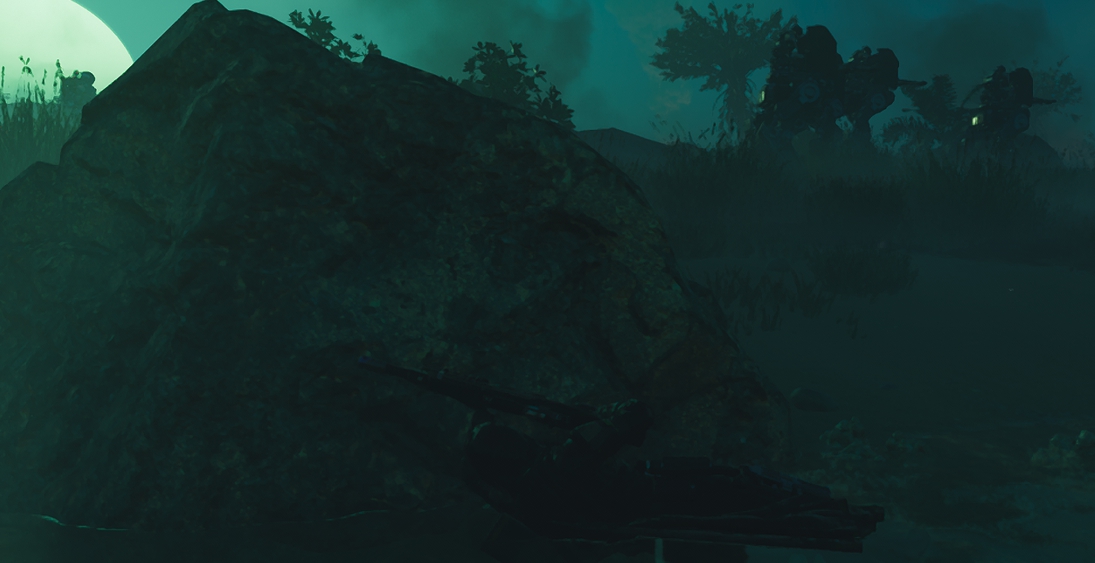
Dropping Correctly
Remember I mentioned how I always go prone right after a drop?Using this tactic when I introduced the higher difficulties of the game to beginners, we were able to hide from Automatons gunships even though our drop zone was next to their factory. The gunships did launch, but they just flew over us, giving us a chance to prepare and destroy the facility before it became a real threat. Mind you, with beginners who had never seen gunships before.
If that is not a great way to demonstrate the importance of going prone immediately after the drop, I do not know what is.
Pay close attention to the surroundings when dropping into the match, to make good use of available covers, staying either clear of enemy encampments or aim straight forward to take out nests/fabricators by landing right on top of them.
Breaking Line of Sight
Enemies are not very good at tracking you beyond what they can actively see. Therefore, an effective tactic to lose them is to break their line of sight by hiding behind cover or using smoke grenades. The enemy is unable to intelligently search for you, and will always check where you were last seen.This is particularly noticeable with the Automatons, as they will keep shooting at the spot where you were last seen. If you still get hit while running away behind cover, you are either still being spotted by at least one enemy, who will report your location to the others, or you have just been unlucky with a stray hit.
Smoke grenades and Eagle Smoke Strikes are great for breaking the enemy's line of sight if necessary.
Knowing Your Squadmates Cooldowns
When using the map you can also see the cooldowns on stratagems for your squadmates, allowing you to plan ahead for encounters.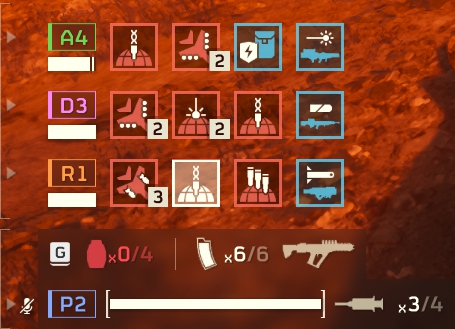
Calling Out Enemies (Ping!) is Loud
An unexpected trigger for presence detection by the enemies are calling out targets (by pressing default "Q"). No matter how far they are/a location is, if you ping something, and it happens that you are within an enemy's detection range, they will react to you as if you just shot. When doing stealth be aware of your surroundings and careful about the right timing to call out an enemy/a location.Unexpected Stratagems Usage
Eagle Smoke Strike can be used against most Automatons Fabricators. Not only do they get destroyed in the process, it also delivers an effective smoke screen to take out the targets nearby quick or allowing a quick escape with a hit and run tactic.The projective of the Orbital Gas Strike can be used to take out Automaton Jammers and Detector Towers.
Having a mix of Orbital Strikes and Eagle Strikes in your loadout, allows to overcome cooldown issues and challenges by anti-air placements which would inhibit your Eagle Strikes. Also, while Orbital Strikes hit seemingly less, they can be used more precise than Eagle Strikes.
Expert Mapping II
Although it is no longer possible to mark out a sub-objective in advance, it is still possible to study the map to identify sub-objectives. Some locations are easier to identify than others. Knowing the threats way ahead, ideally identifying them right away after dropping onto the map gives you a signifcant advantage.
Gunship Facilities are L-shaped
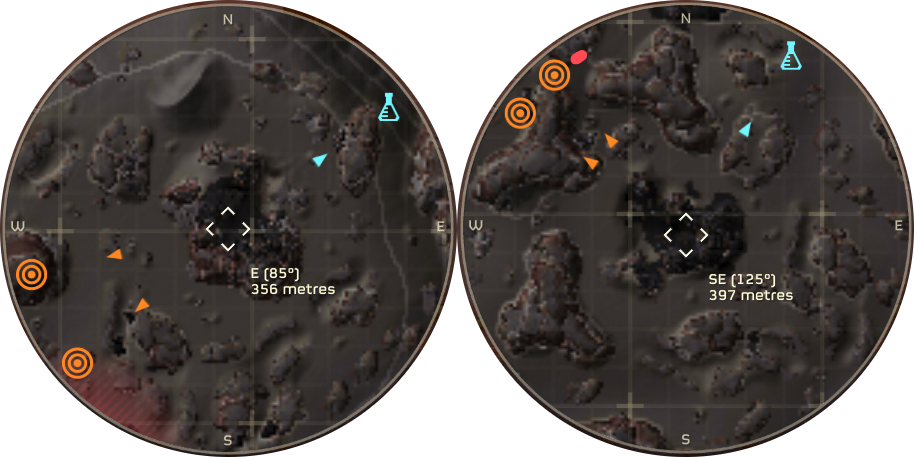
Stalker Lairs are recognisable by their gamepad-shaped mounds.
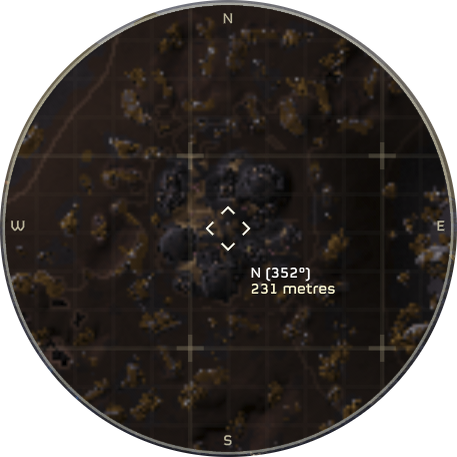
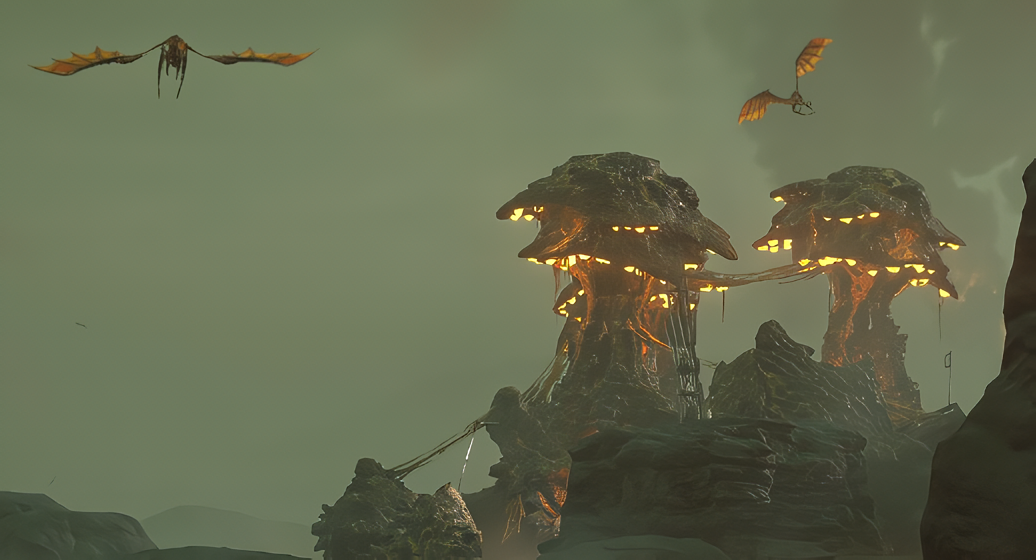
Shrieker's Nests can be recognised by their mounds of mushroom-like towers
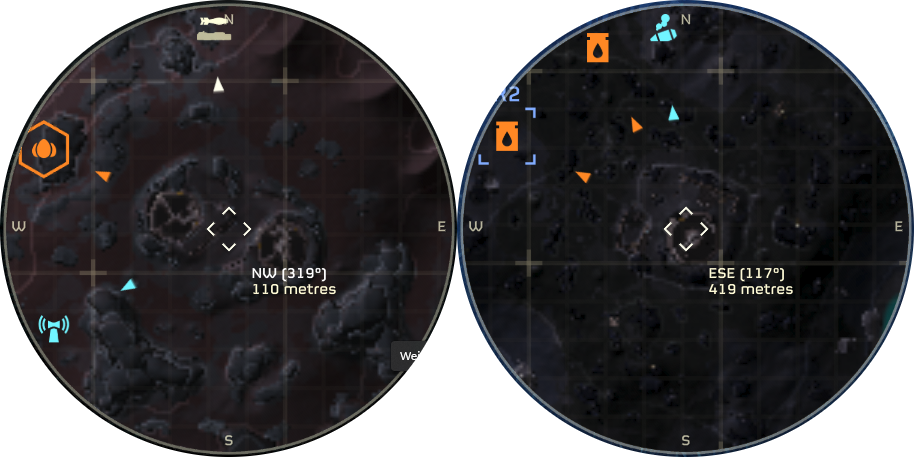
Super Earth Armed Forces Artillery are easily spotted on the map by their mounds
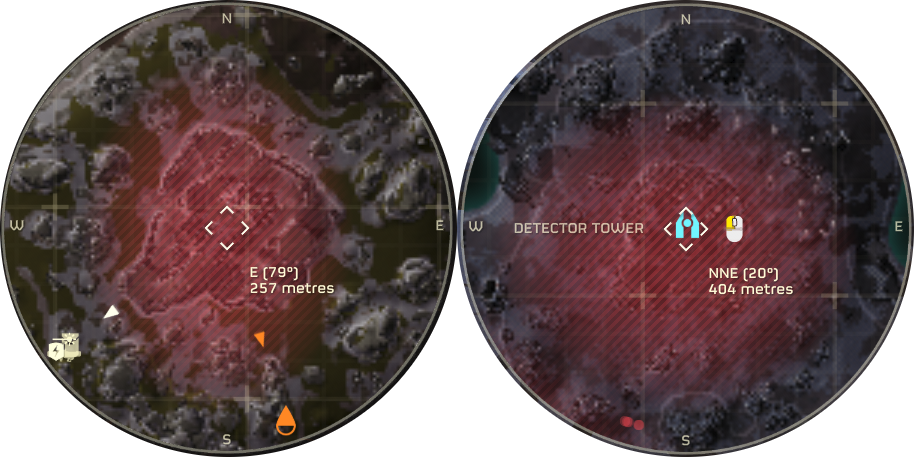
Automaton structures, such as Jammers, Detector Towers, Anti-Air Placements and Mortar Encamptments, can be recognised by their walled layout. However, it can sometimes be difficult to tell them apart from normal outposts, as they come often with Fabricators, causing the radar heat.
Tip: destroying a Fabricator which is right next to a special structure can lead to chain reactions, blowing up said special structure alongside. Try it e.g. with a Jammer which has a Fabricator right next to it.
Gunship Facilities are L-shaped
Stalker Lairs are recognisable by their gamepad-shaped mounds.
Shrieker's Nests can be recognised by their mounds of mushroom-like towers
Super Earth Armed Forces Artillery are easily spotted on the map by their mounds
Automaton structures, such as Jammers, Detector Towers, Anti-Air Placements and Mortar Encamptments, can be recognised by their walled layout. However, it can sometimes be difficult to tell them apart from normal outposts, as they come often with Fabricators, causing the radar heat.
Tip: destroying a Fabricator which is right next to a special structure can lead to chain reactions, blowing up said special structure alongside. Try it e.g. with a Jammer which has a Fabricator right next to it.
About Progression

At the end of this guide, I would like to say a few final words, in addition to thanking you for reading this guide.
It took me seven days to go from being a fresh Helldiver Cadet to a regular Helldiver in every mission type. I started over the Easter holidays, playing an average of four hours a day. I do not recommend such long sessions to anyone. In my defence, I usually do not have much more than 30 minutes a day to play during the working day, so I certainly made the most of the holidays.
The reason I avoid writing anything in this guide that sounds like "use this weapon and this armour" is because I firmly believe that exploring the game on your own is part of the whole Helldivers 2 experience. Part of the fun of playing the game. Participating in the community and following the official developer news presented as social media lore.
What I can and want to tell you is this: I finished Helldive at level 19. Luckily by then I already had the appropriate Stratagems and supporting Ship Modules. And you can do the same by spending medals and samples on "the right things". Even if you only choose 3/4 of the right things to upgrade, you can have everything you need by level 19 to successfully complete the Helldive difficulty with Terminids and Automatons.
By level 20 you could have unlocked everything recommended for Helldive, and by level 25 you will have access to everything (available by 08.04.2024 - more is coming with future updates!), whether you choose to unlock them now or later, when you have saved up the necessary resources.
It is important that you do not rush to the highest difficulty. There is little to no reason, unless you are already an experienced player and played challenging co-op team shooters before. I have seen players who had no idea how to tackle some mission objectives if they are without a certain Stratagem. And I have seen players brimming with arrogance while being just bad. Because they skipped low difficulty missions and/or had someone carried them without to bother even once learning essential game mechanics.
Worst of all: they denied their own enjoyment for the game.
Every weapon and every armour in the game has their use.
Even if it is just for a short while before unlocking an upgrade.
Even for me as a Helldive difficulty player there is great joy just to take the standard Liberator and join low difficulty missions, as it is the right tool for the right job.
I recommend new players to do two operations per difficulty level with a maximum variety of missions for all available enemy factions. Because the low level difficulty missions give a great progression feeling and teaches the specialities of certain enemy types - something which can become nearly impossible trying to learn properly when playing only on higher difficulties.
Put all that learning aside, why should anyone cut their time of joy with the game short?
Play the game in your own pace, take your time, learn to enjoy the game to the fulliest, and do not fall for spoilsports who want to tell you what to do and what not.
My guide is not telling you to become good as me. I am telling you to become the best version of yourself, by you making the best experiences by yourself. For that you have guidance here in form of tips, but the real fun is up to you. If you think the way you handle your weapon is fun, then keep at it. If you like to improve and seek out inspiration, try the suggestions. By the end of the day, do not become the best copycat, but the best Helldiver you personally are.
And above all: have fun with the game.
If you are having fun, then you already won. Thanks for reading!
Loadout Suggestions
Loadout Suggestions for Beginners
I have mentioned before that some Stratagems are more useful than others, especially if you are just starting out and just want to contribute to the team. If you still feel lost, here are two loadout suggestions I can recommend to anyone just starting out in Helldivers 2.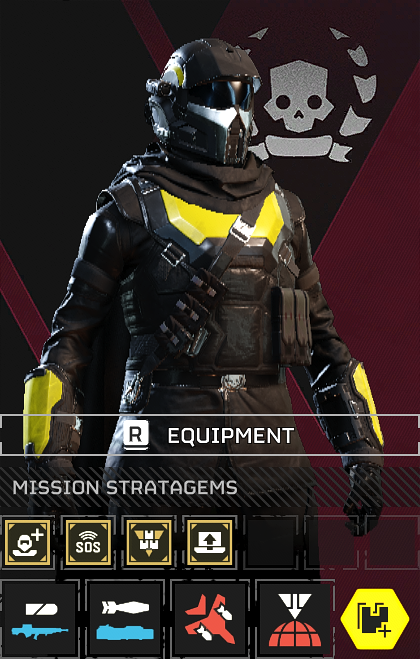
 The loadouts consist of
- EAT-17 Expendable Anti-Tank (Level 3)
- Eagle Airstrike (Level 2)
- Orbital Precision Strike
- Hellpod Space Optimisation Booster (Warbond page 3)
As armour I recommend the SC-34 Infiltrator which can be easily unlocked within the first page of the standard Warbond. Weapons you may pick as you like, though I recommend to aim for the G-16 Impact Grenade as soon as possible.
What make these Loadouts very good for Beginners
EAT-17 Expendable Anti-TankAlthough the weapon can only be used once before you need a new one (each call gives you two), the very short cooldown makes it viable from very early on into the endgame. Not only do you get one of the strongest anti-tank weapons with explosive armour penetration, but you can also use the stratagem drop itself as a weapon in a pinch.
Eagle Airstrike (Level 2)
Although the description says it only has two uses, it actually has unlimited uses throughout the mission as long as the Super Destroyer is available. The Eagle-1 will rearm with bombs once you have used all your air strikes. This gives you a reliable bombardment with a relatively short cooldown and versatile use, such as destroying lightly armoured buildings and nests.
Orbital Precision Strike
Orbital bombardment. Nothing more. Nothing less. Can take out even endgame enemies with ease, as long as you use it with skill. Its very short cooldown makes it a great and reliable orbital support until you have unlocked alternatives. It also can destroy lightly armoured buildings and nests with ease.
Hellpod Space Optimisation Booster
A must have which allows you to start fully loaded with ammo, grenades and stims. The more people in the squad, and the more often you have to die, the more value this booster brings to the entire match.
AC-8 Autocannon or AX
Despite it is easily accessible early on, with level 10, the Autocannon is probably the most versatile support weapon. In the hands of a skilled Helldivers there is no enemy which the Autocannon cannot bring down.
LAS-5 "Guard Dog" Rover
Only recommended when playing against Terminids, the Rover is a great choice to provide you early on protection against closing in enemies, as its laser is high visible and the equipment does not need to be reloaded, unlike its ballistic alternative the AX/AR-23 "Guard Dog".
Armour and weapons are your personal choice, although I still recommend getting used to the scout gameplay with the SC-34 Infiltrator as soon as possible. It will save your nerves later on, based on my personal experience. Other than that, any armour is viable, although the standard B-01 Tactical remains a good choice with its extra padding at the cost of additional passive bonuses.
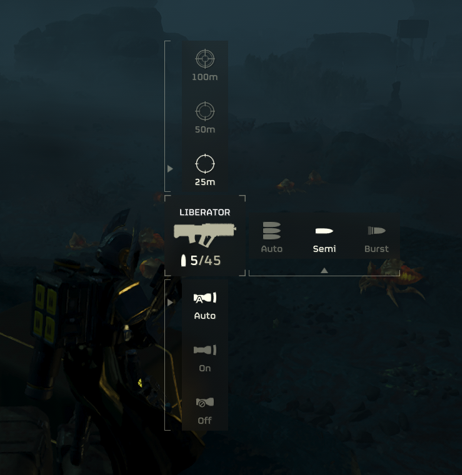
Not forgetting the different weapon modes. The AR-23 Liberator can be a reliable and powerful partner for a long time, and with the right settings you can even use it as a mid-range sniper weapon.
My Endgame Loadouts for Reference
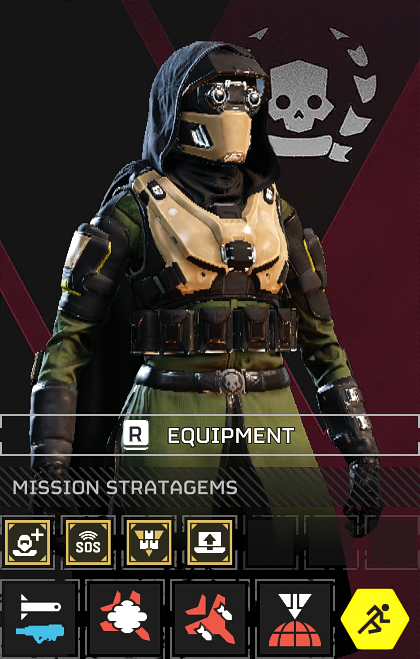
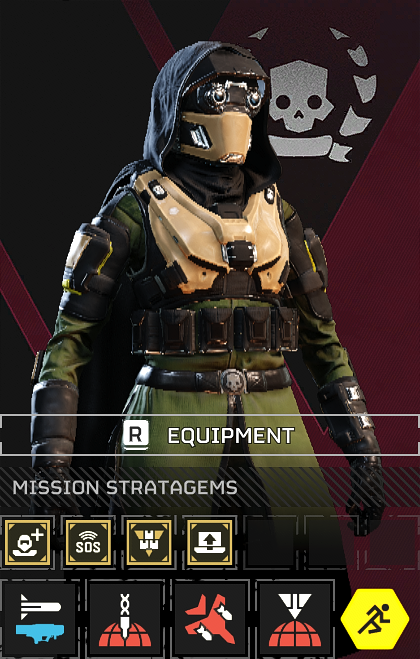
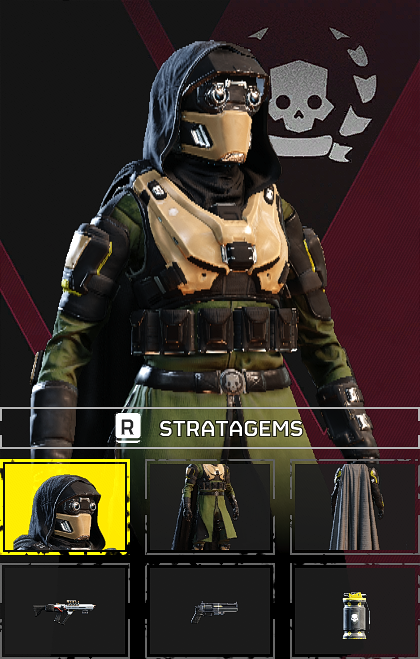
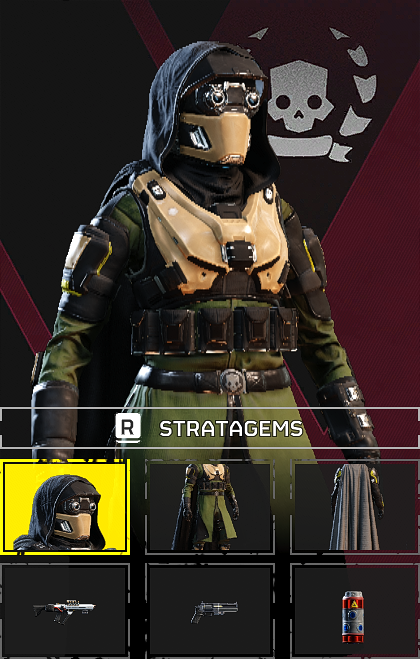 Left for Automatons, right for Terminids
For Illuminates see here; I will write more once they have more to offer than just four units
These loadouts are just for standard missions. I can use these loadouts without worrying about the composition of the squad. Depending on the squad and the mission, I may change the items accordingly. Such as taking Orbital Laser instead of Orbital Precision Strike to cut an Automaton's Commando Bunker's time short.
For Eradication / Defence missions I use different sets, depending on the type of the mission. There I switch to heavy armour / medium armour as I do not need to run long distances and there is no chance to hide from the enemy.
In Eradication missions I prefer Eagle Strikes through and through, knowing it is almost inevitable to die, I do my best to take out as many enemies as possible in a short period of time. Even if it means to die with an activated 500kg bomb stratagem in hand.
In Defence missions I take Mortars (EMS to slow the enemy + standard to damage the enemy) in combination with something which take heavy enemies out quickly. Most of the time, if the team is equipped well, it is just the heavies we need to take care of as the rest is made into scraps/mincemeat reliably by the Mortars.
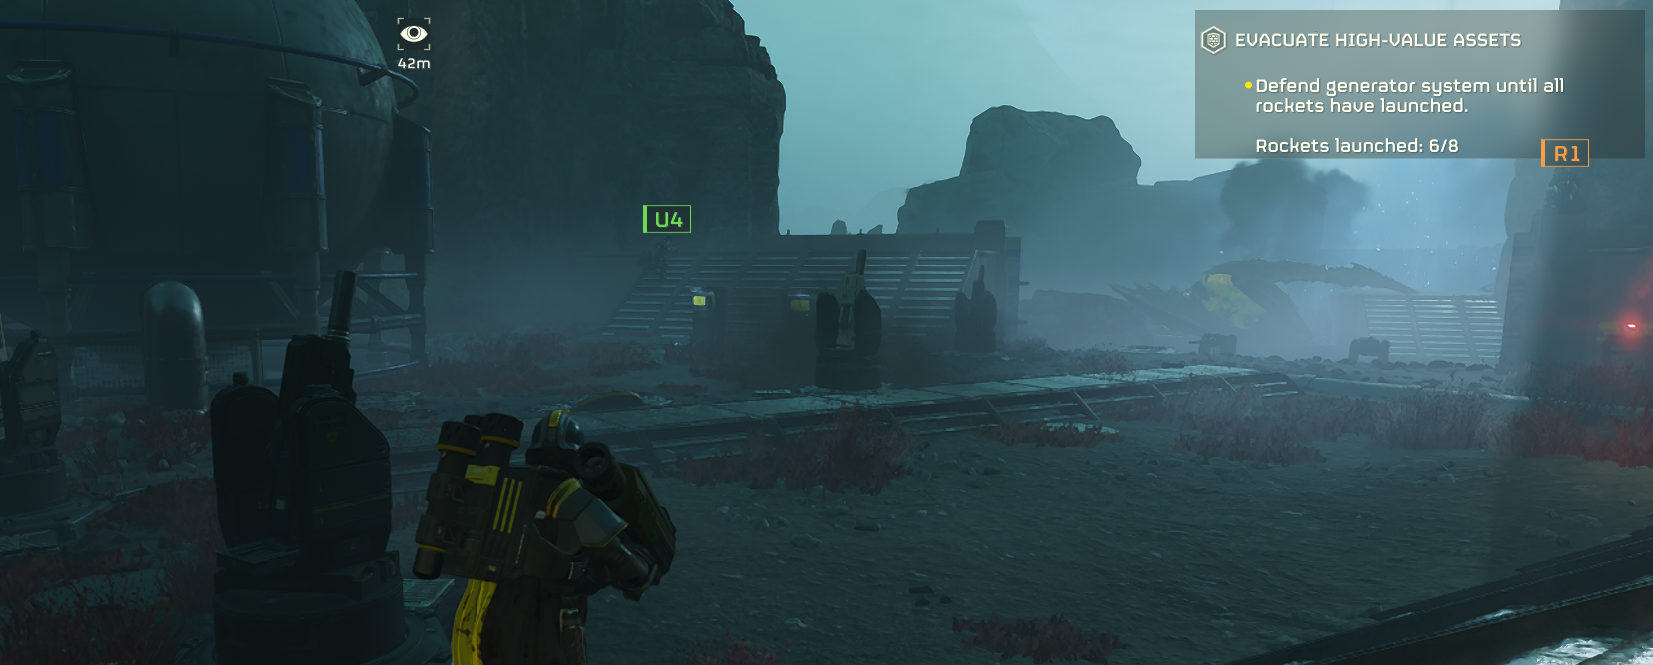
Use this information as a reference only if you feel really lost. Otherwise, I strongly encourage you to have fun and try things out to your liking. Remember, everything the game has to offer in terms of equipment can be useful in the right situation. Just have fun!
Thank You for Your Service!
In honour of all the men and women of Super Earth who are willing to take up arms so that their loved ones do not have to, to protect their families.
Recommended Guides
These guides about the patrols mechanics in Helldivers 2 are so good that I highly recommend them to increase your knowledge of the game's mechanics.
https://steamcommunity.com/sharedfiles/filedetails/?id=3183960900
https://steamcommunity.com/sharedfiles/filedetails/?id=3210768641
With a lot of PC players reporting Memory Leak issues, make sure to check on ISLC if you have not done that yet. It works not only with Helldivers 2 but any game which actually has memory leak!
https://steamcommunity.com/sharedfiles/filedetails/?id=3223025516
And here are troubleshooting guides of mine, to help you having a good time with every patch & update of the game.
https://steamcommunity.com/sharedfiles/filedetails/?id=3235564264
https://steamcommunity.com/sharedfiles/filedetails/?id=3389607883
https://steamcommunity.com/sharedfiles/filedetails/?id=3389857968