Phase 2 and up factory blueprints
 ForestG
(123 ratings)
Dec 18, 2024 @ 3:40pm9,580591
Crafting
Introduction
For
- Iron Plate, Iron Rod, Screws,
- Wire, Cable, Copper Sheet,
- Steel Beam, Steel Pipe
- Encased Industrial Beam,
- Modular Frame,
- Reinforced Iron Plate,
- Rotor,
see this guide: https://steamcommunity.com/sharedfiles/filedetails/?id=3330603251 I found these blueprints quite excellent.
I will continue to add new guides as I progress through the game. Please note, that these factories are sometimes ment to be optimized / expanded as you progress through the game - I will note this in late game templates.
Notes & Tips for building
- Build from a Bird's-Eye View
Use the Lookout Tower to plan and construct your base from above. Assign it to a keybind for quick access. - Add Mergers and Splitters Everywhere
Always include mergers/splitters at every input/output point. This ensures better organization and allows for easier factory expansion in the future. - Bring Materials Closer to Your Base
Instead of constantly traveling between your base ("shop") and distant factories, prioritize transporting raw materials closer. It saves time and energy in the long run. - Travel Efficiently on Foot
Master the "bunny hop" technique to move faster while traveling on foot. Learn more here: https://steamcommunity.com/app/526870/discussions/0/3722818378185022467/ - Boosted Hypertube Connections
For multiple factories or bases, build a boosted hypertube connection to save commuting time. Boost it at least 10x for optimal speed. Learn how to create one here: https://satisfactory.fandom.com/wiki/Tutorial:Hypertube_cannon - Somersloop
MAM Research spolier alert: You can multiply the output for many producers with Somersloop - while keeping the input requirements the same (Alien Technology, rightmost branch). This is quite useful, especially for Phase projects. But you can also use that to multiple any equipment, ammo - even slugs, - No room? Use Slugs
If you are refactoring something, if you run out of space e.g. in a fixed factory level, you can always use slugs to increase the input/output for some producers. 2 slugs = 2x input and output speed, hence, you got 2 producers for 1. - For a lot of other useful tips, see this reddit thread
- Ultimate tool for planning
A tool which can generate any factory layout for any given input. [satisfactory-calculator.com] This site can also read you save file and show you many useful information. - Use Templates to Save Time
Keep templates of frequently used setups ready. This helps streamline construction and reduces repetitive tasks.

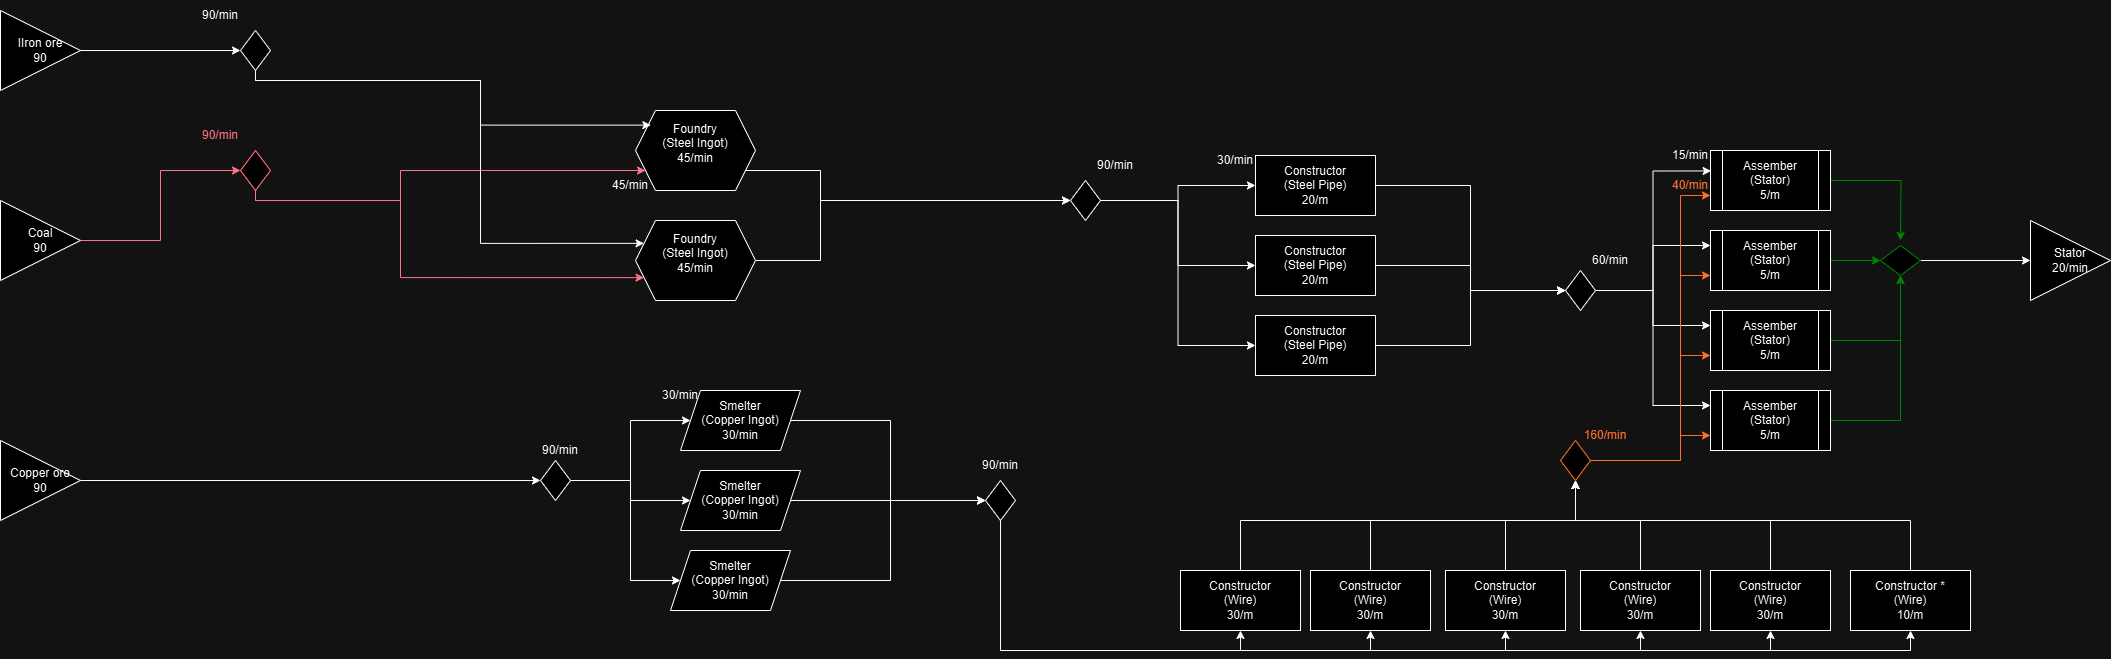
Stator (20/min)
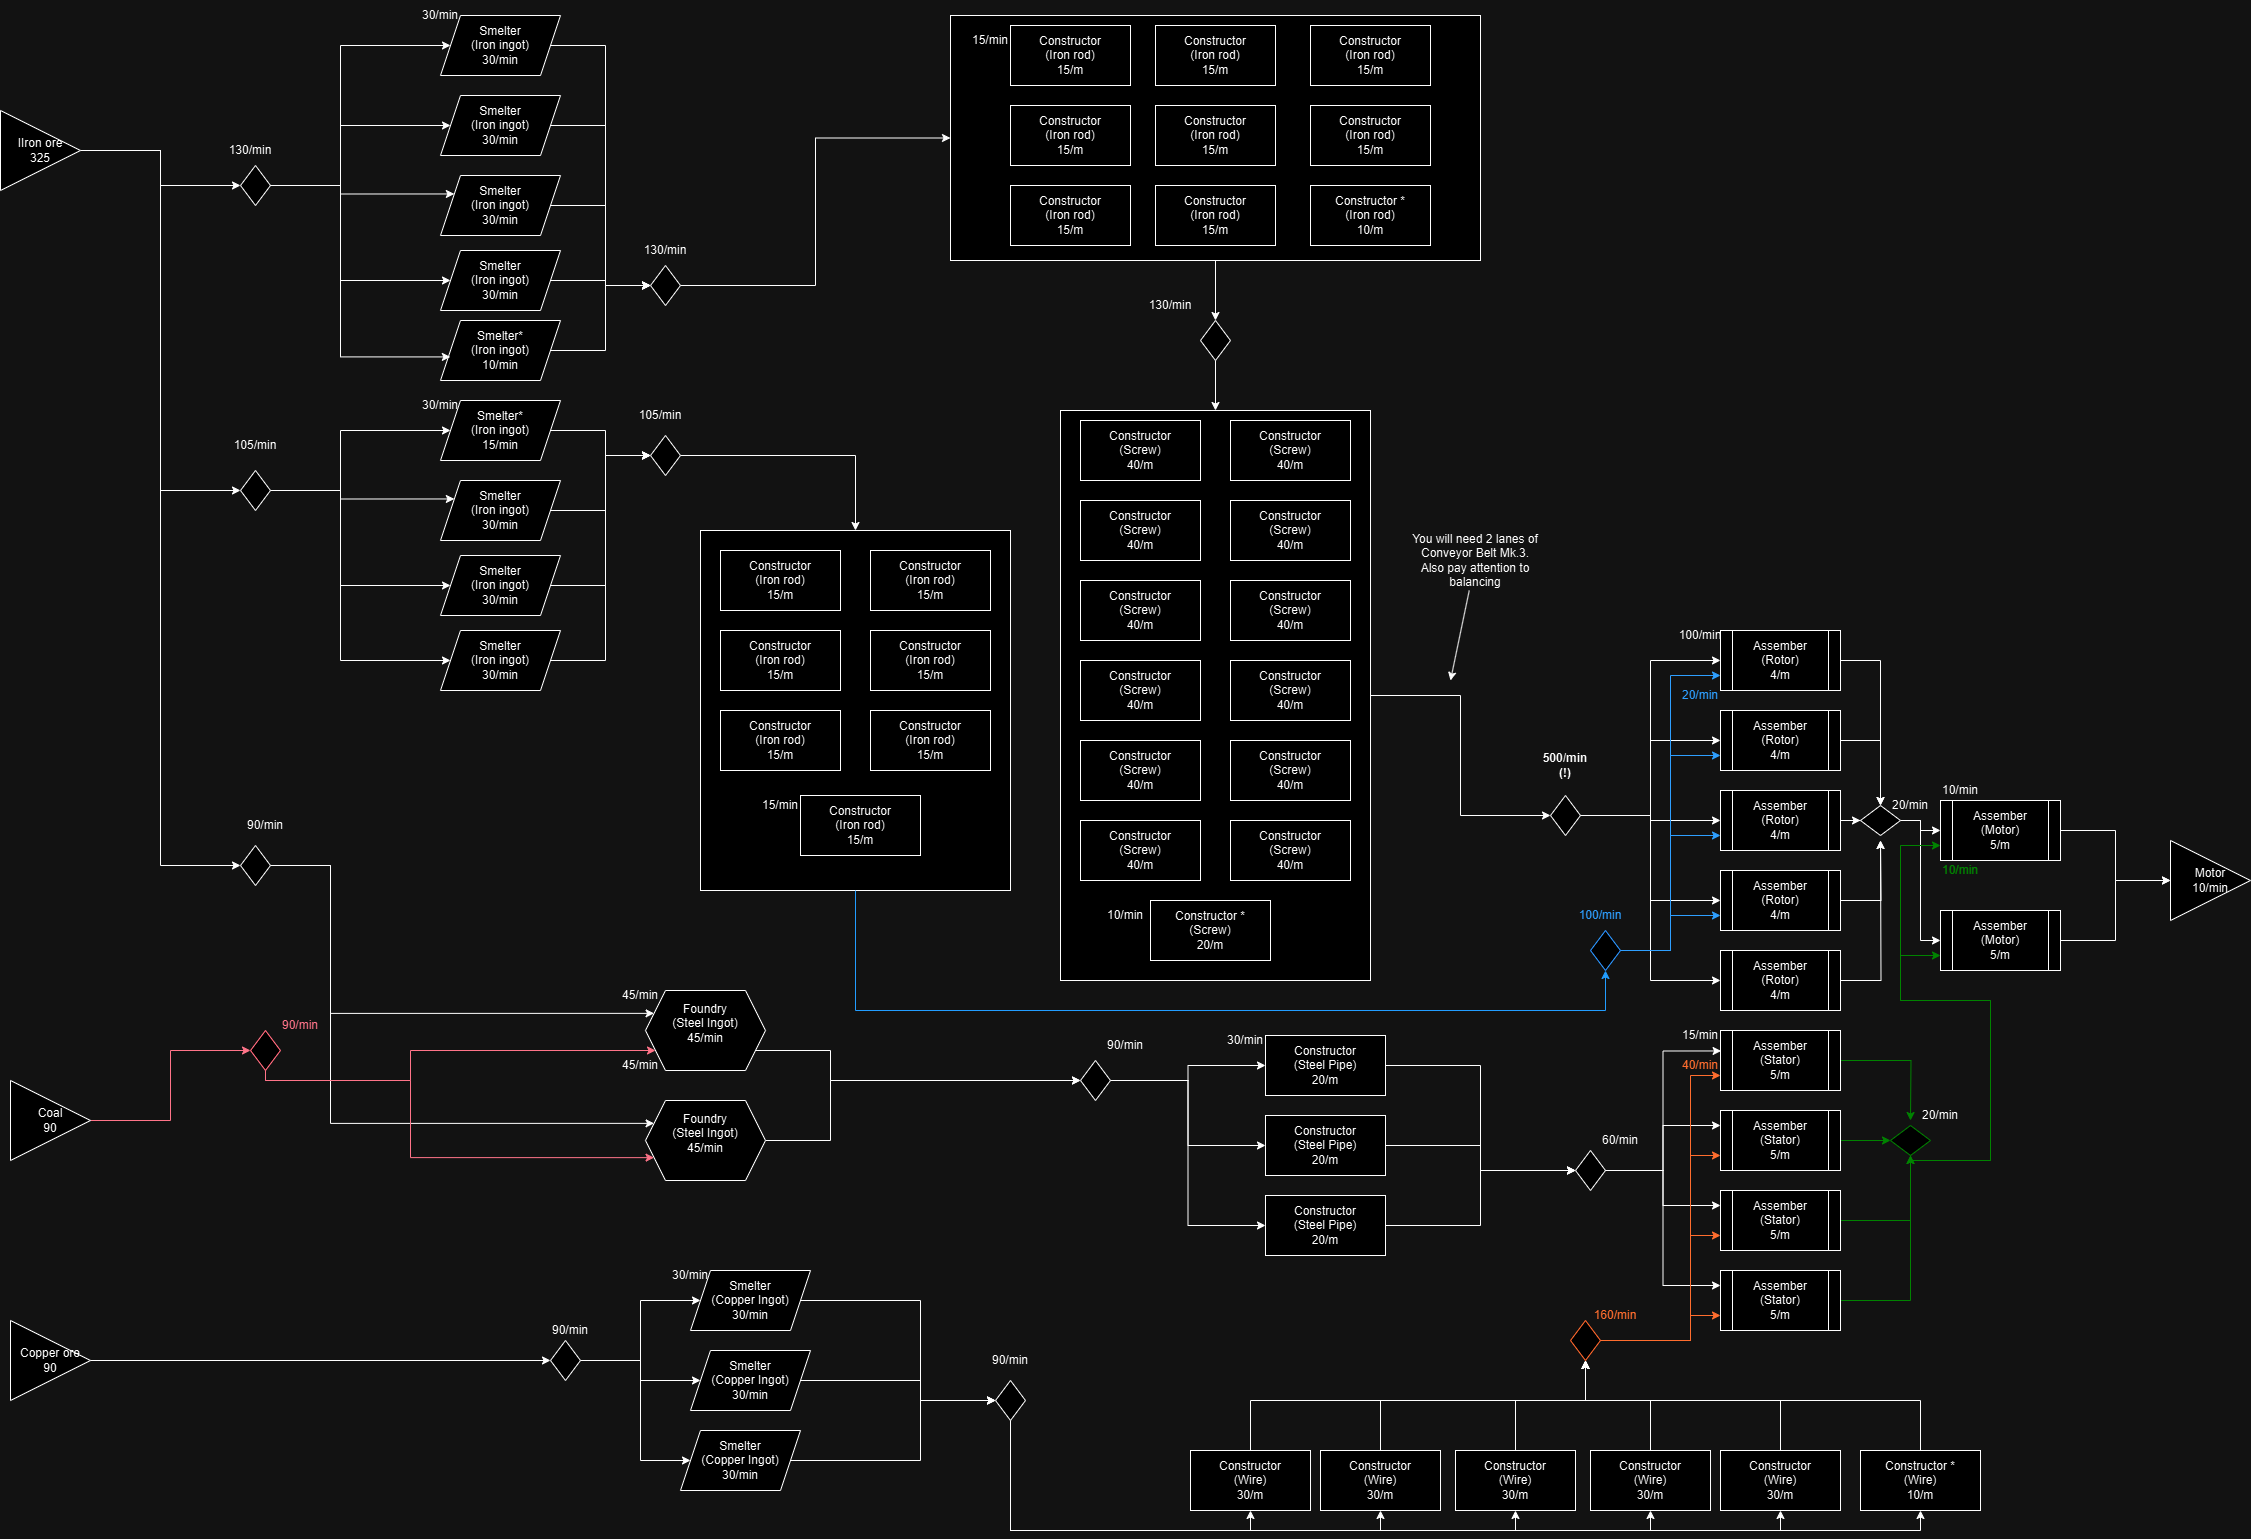
Motor (10/min)
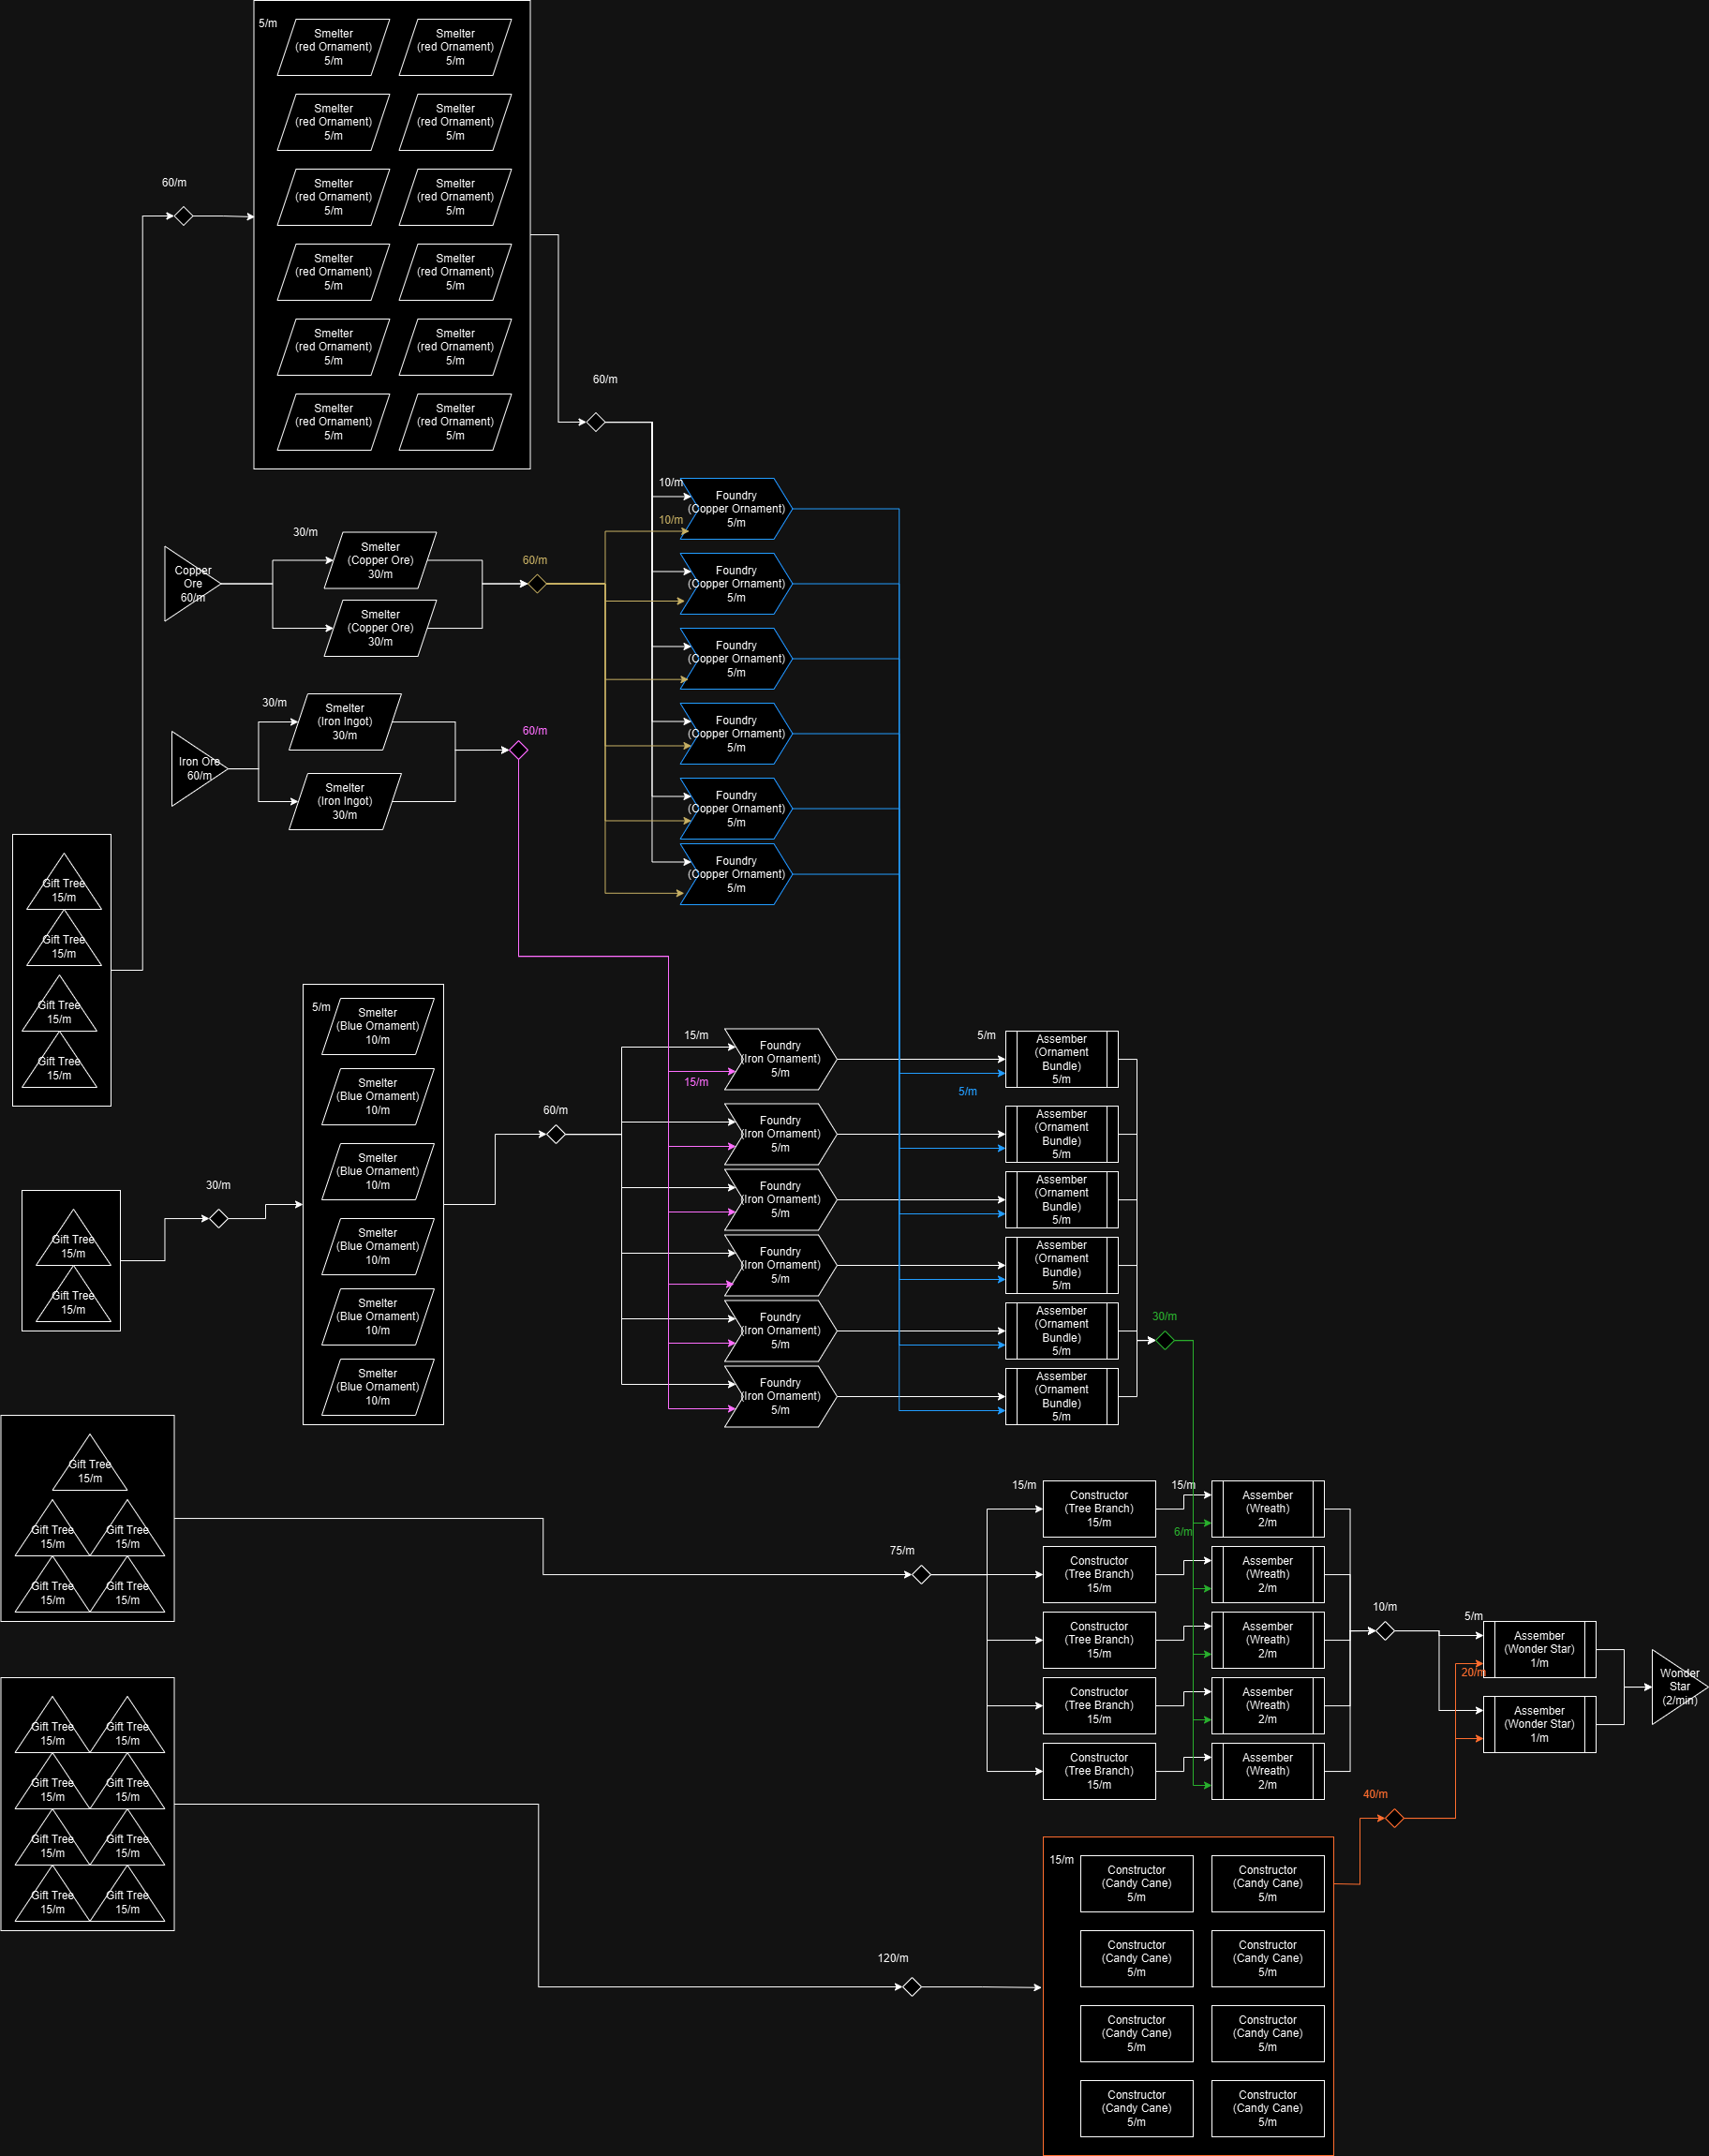
FICSMAS Wonder Star (2/min - Holiday event)
Oil Refinery #1 Fuel (300/min) + Bonus materials Plastic, Rubber)
Note: While the factory produces 100 Plastic/min and 100 Rubber/min when all the fuel is consumed(!), it is not a reliable source for sustained production. Excess fuel can slow your whole operation. For large-scale production, prioritize more dependable sources. Consider any additional outputs, such as plastic or rubber from this factory, as a bonus rather than a primary resource. For example, you can turn 30 oil to 90 plastic like this
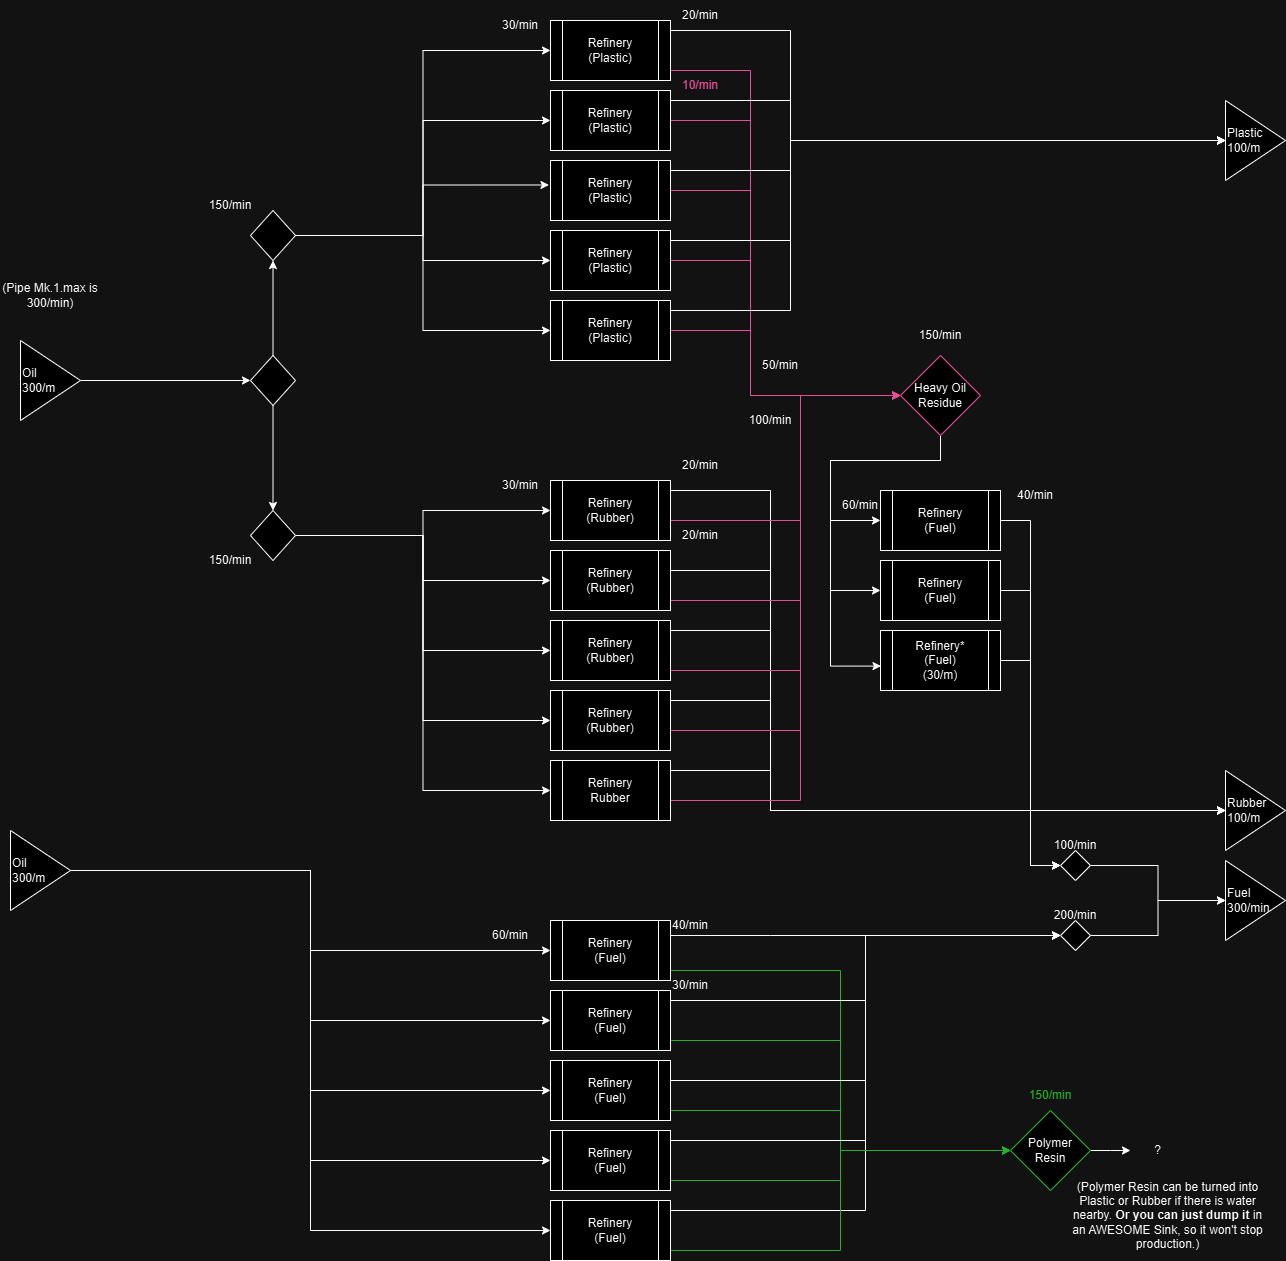
Oil Refinery #2 Plastic (160/min) + Bonus Power
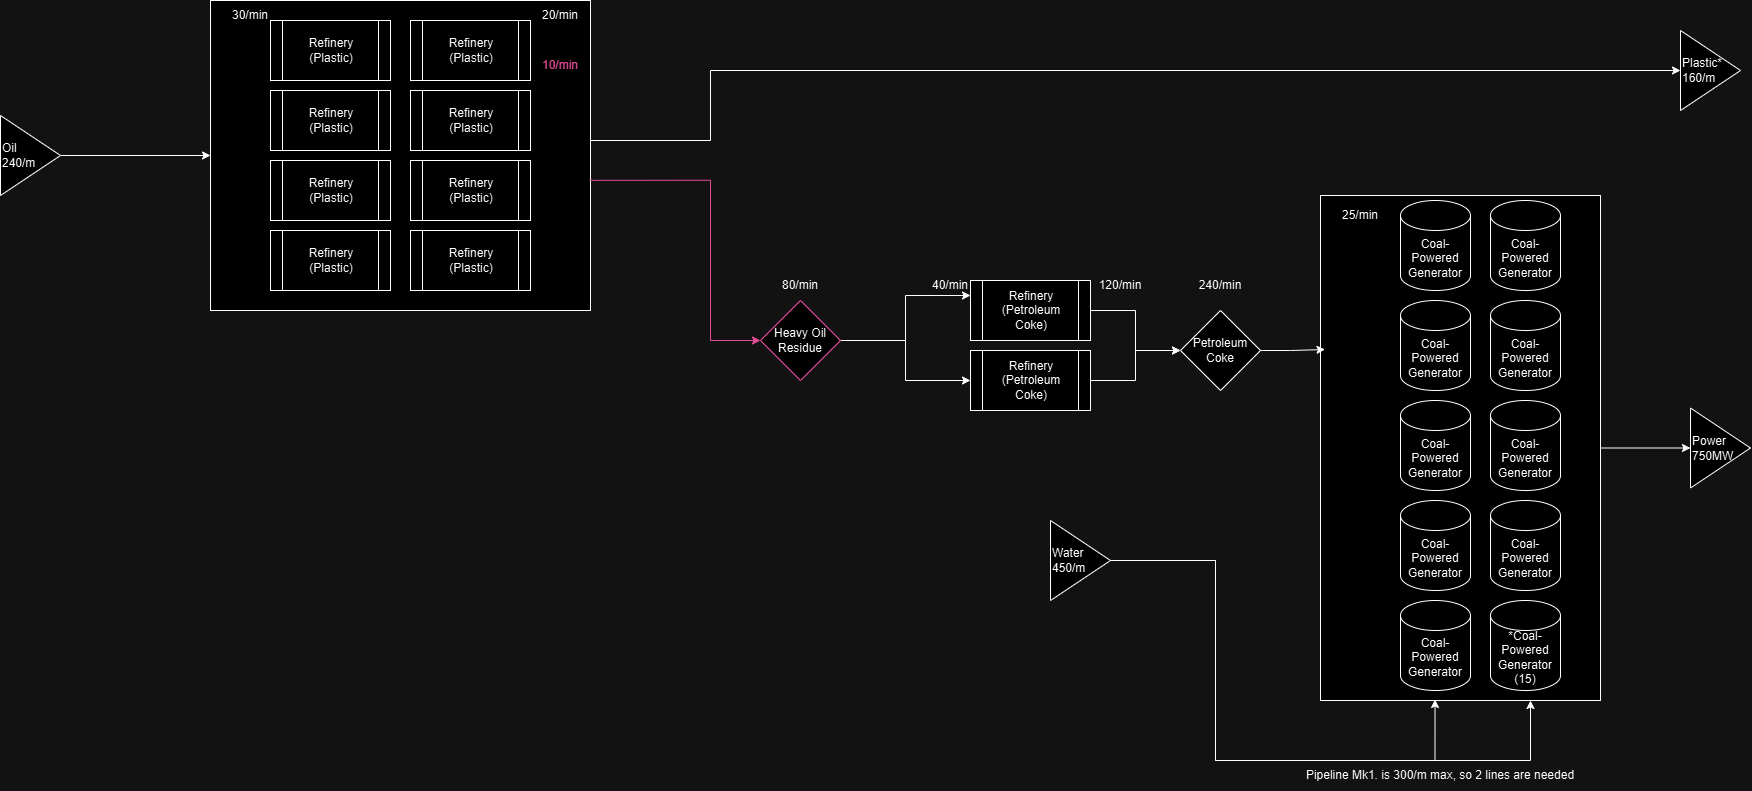
Take note: Total Power output is 750 MW, but if the Plastic output piles up, this can stop the production of Power. So the easy fix is to channel any leftover Plastic to an AWESOME Sink - or if you don't need the power, channel the Petroleum Coke to the AWESOME Sink right away.
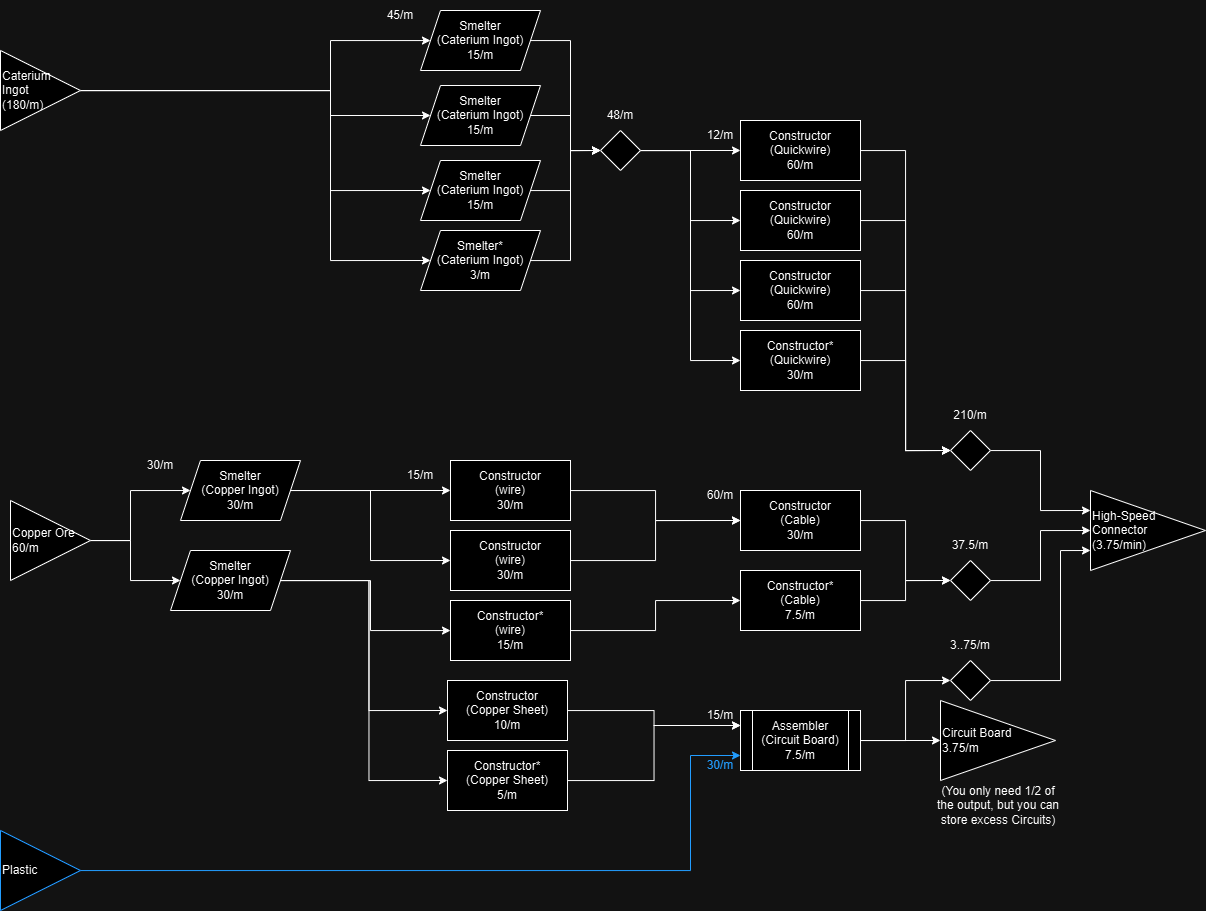
High-Speed Connector (3,75/min) + Bonus Circuit Board (3.75/min)
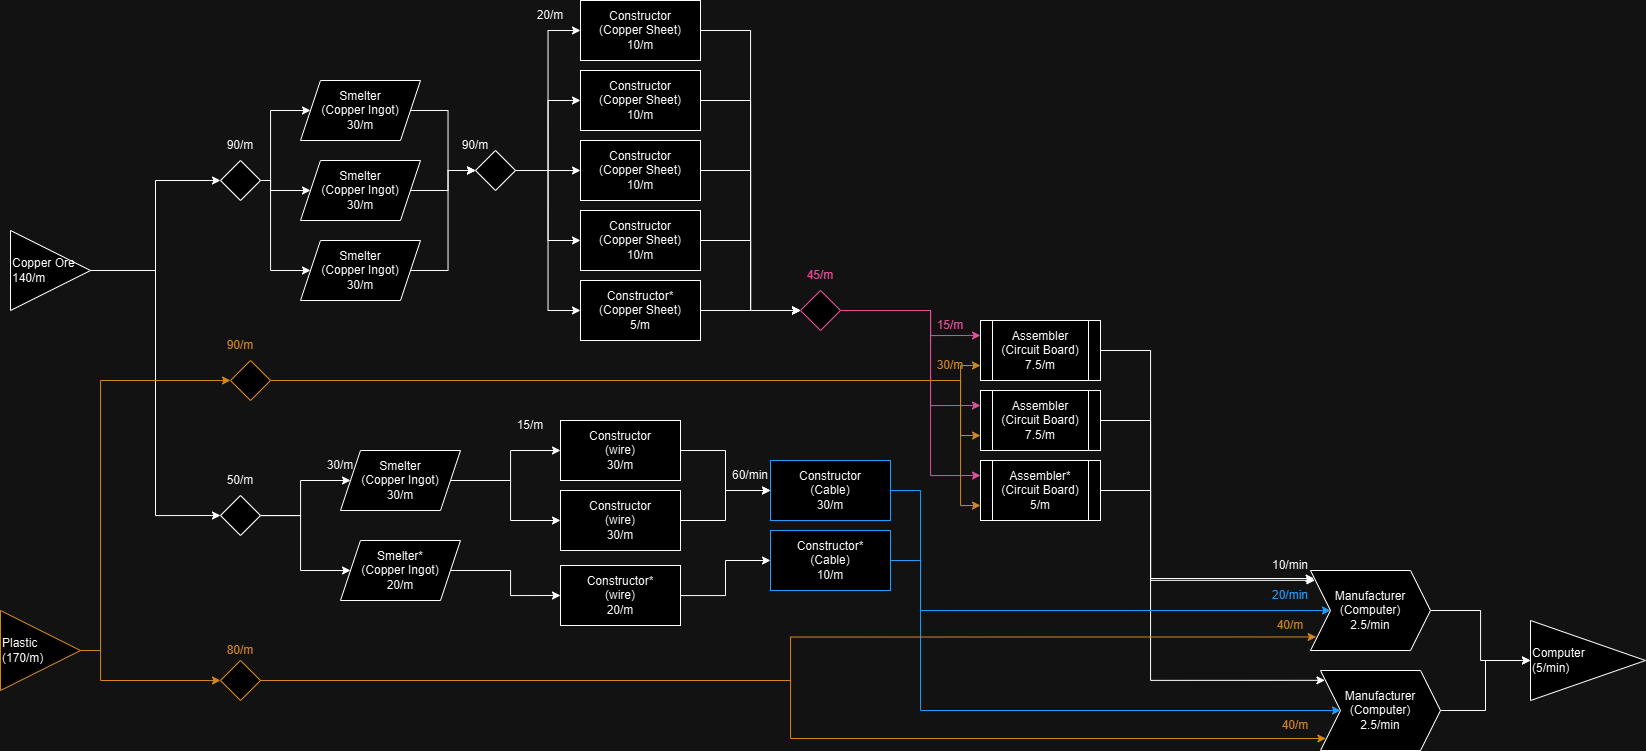
Computer (5/min)
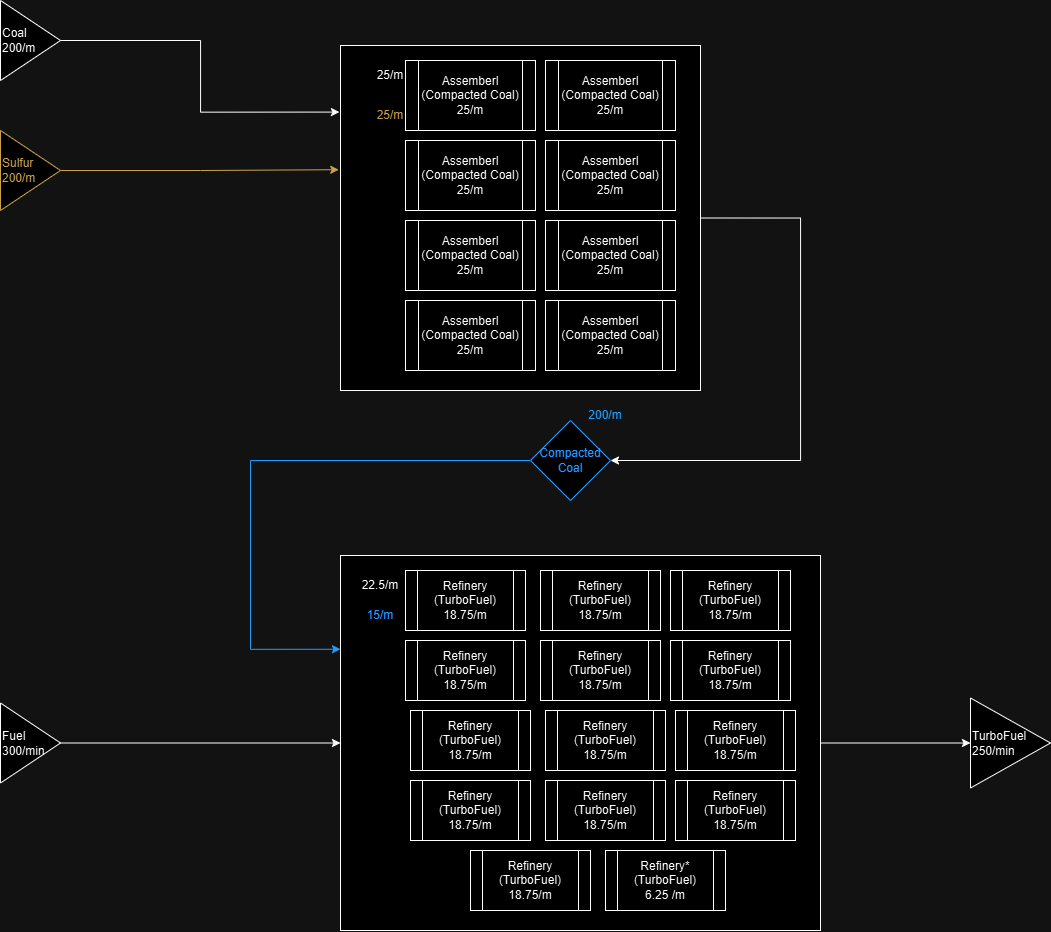
Turbofuel (250/min)
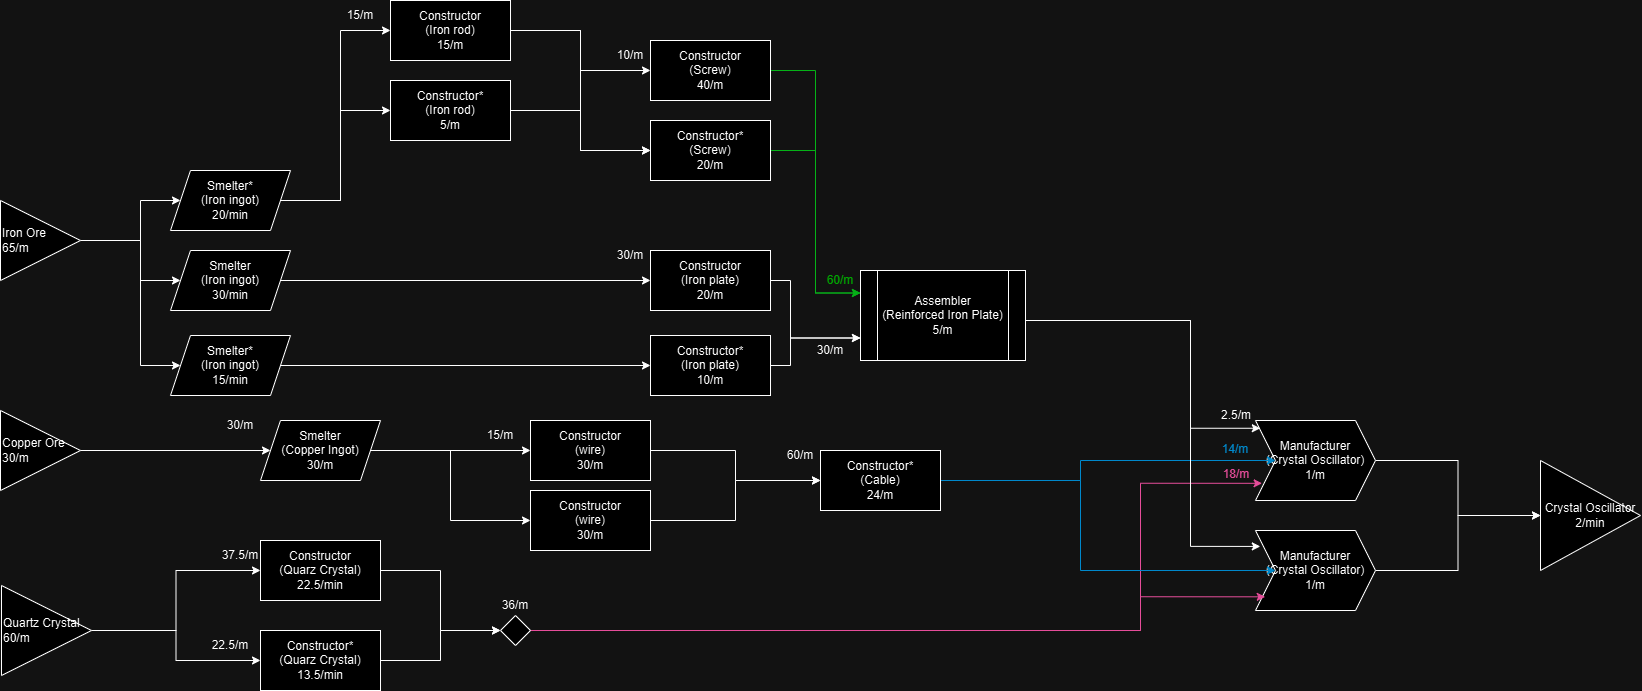
Crystal Oscillator (2/min)
Space Elevator Phase 2-3.
These items are unique, as they are required exclusively for specific amounts during the Space Elevator Phases.
For details on the "black boxes," refer to the other blueprints provided here or in the guide mentioned in the preface. In theory, you can simply branch off from your existing production lines to accommodate these requirements.
Most of these blueprints are basically a combination of earlier ones. As this recipe is also ment only for a fix amount, you can safely re-use the inputs mentioned here while you fulfil the order.
For latter recipes, If you want to produce only the required amount, sometimes it is worth it to transport the items by hand and place them in a Storage Container instead of belt spaghetti
Also, check out the relating note in the Notes section, about Somersloop.
Most importatnly: keep the excess item you get! You will need them later. This is a generic good advice, to have a Buffer for each of your outputs, by putting one single Container on all exit points: as long as the belts can take the items to somewhere useful (to an another factory, or to your workshop containers etc.) they won't fill up, but after that they can help you in many ways by keeping a reserve.
![]()

For details on the "black boxes," refer to the other blueprints provided here or in the guide mentioned in the preface. In theory, you can simply branch off from your existing production lines to accommodate these requirements.
Most of these blueprints are basically a combination of earlier ones. As this recipe is also ment only for a fix amount, you can safely re-use the inputs mentioned here while you fulfil the order.
For latter recipes, If you want to produce only the required amount, sometimes it is worth it to transport the items by hand and place them in a Storage Container instead of belt spaghetti
Also, check out the relating note in the Notes section, about Somersloop.
Most importatnly: keep the excess item you get! You will need them later. This is a generic good advice, to have a Buffer for each of your outputs, by putting one single Container on all exit points: as long as the belts can take the items to somewhere useful (to an another factory, or to your workshop containers etc.) they won't fill up, but after that they can help you in many ways by keeping a reserve.
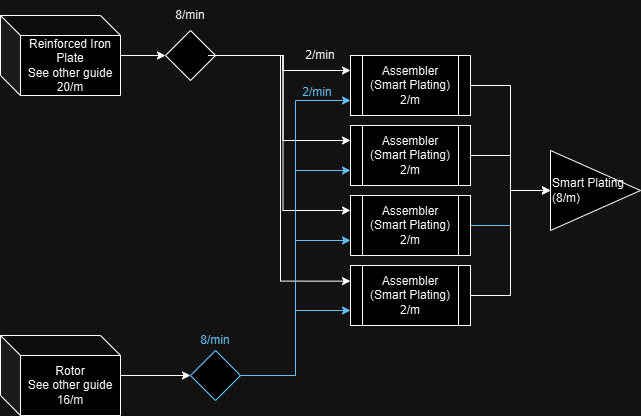
Smart Plating (8/m)
Automated Wiring
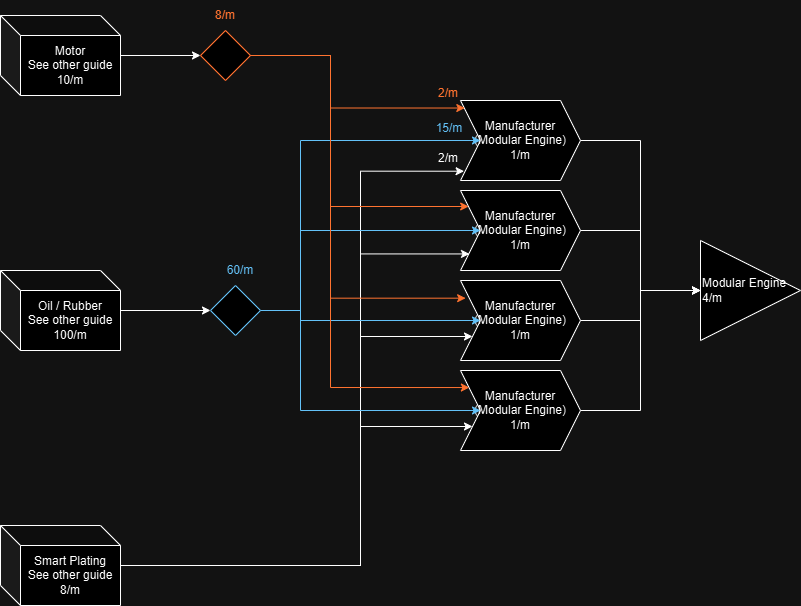
Modular Engine (4/m)
Heavy Modular Frame (2/m)
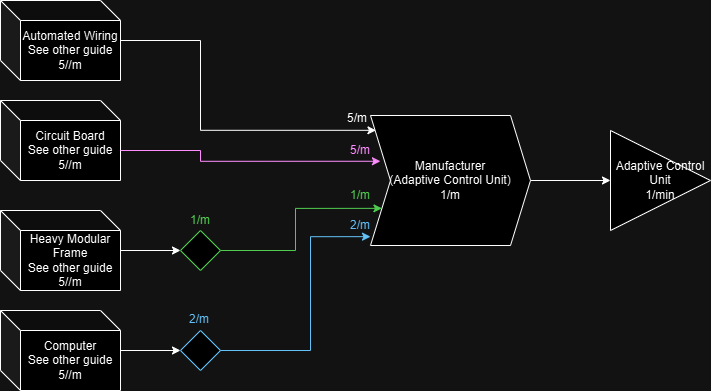
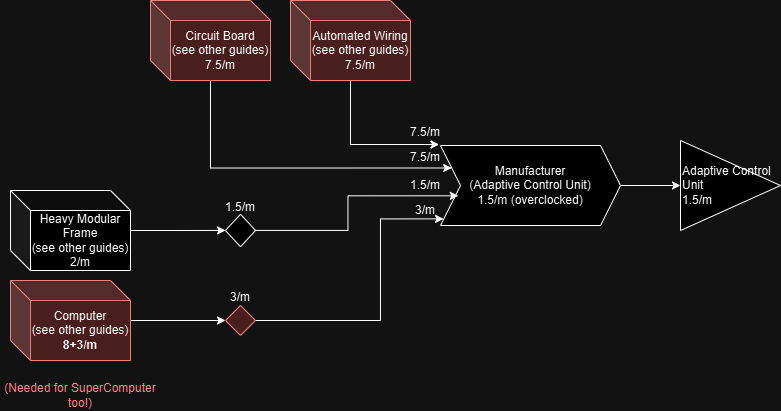
Adaptive Control Unit (1/m)
(note: maybe putting the sources in containers and have 1 assembler work on it while you do something else, is the most time-efficient)
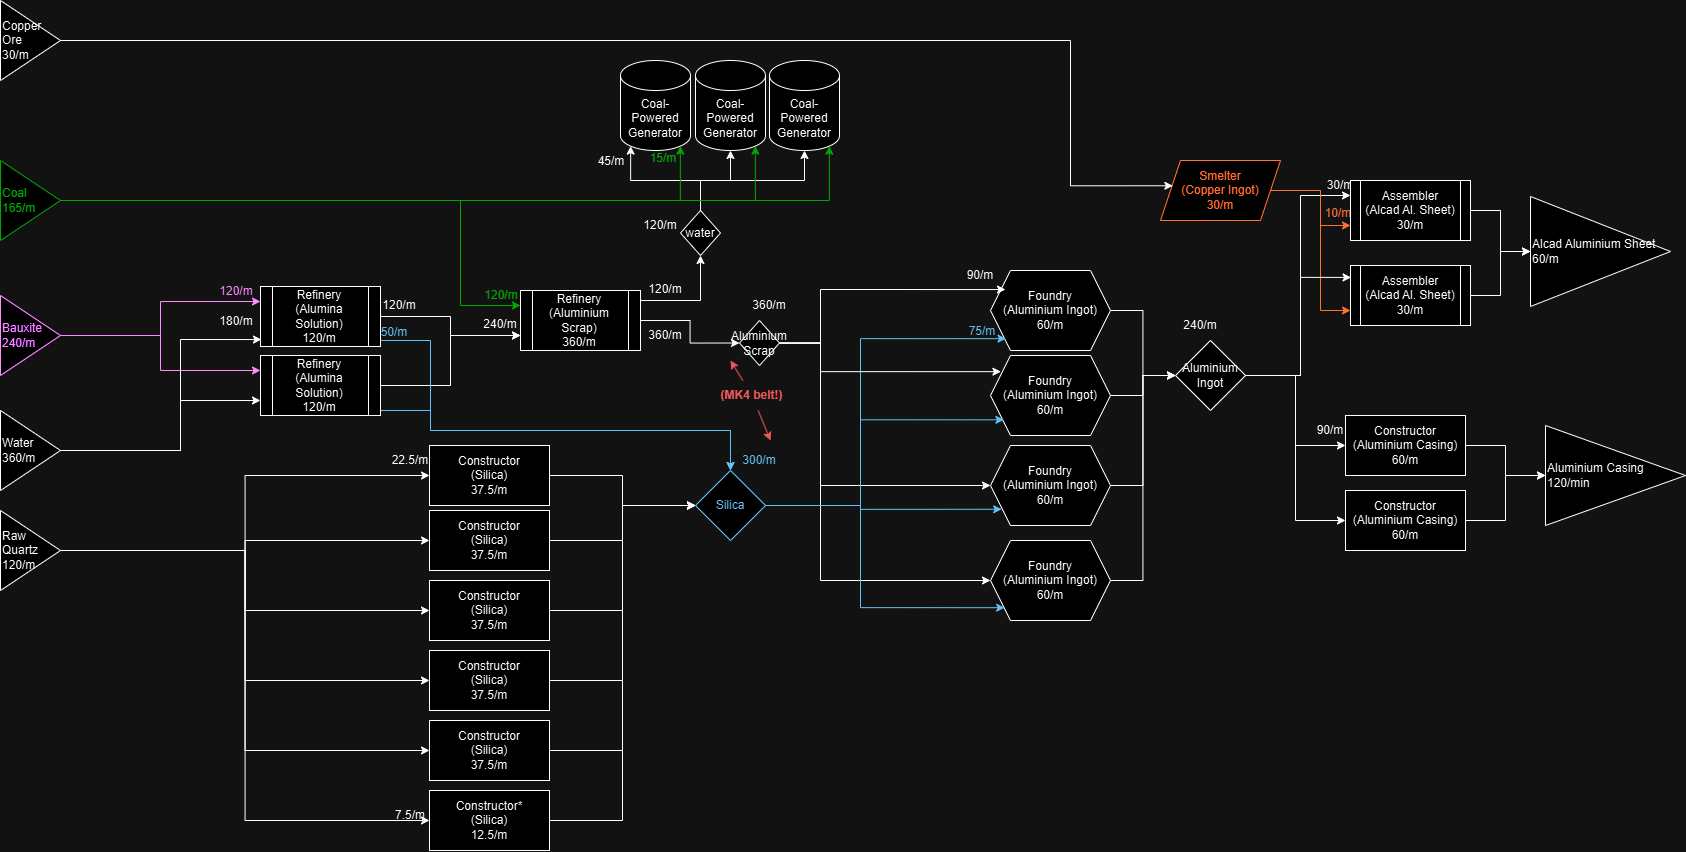
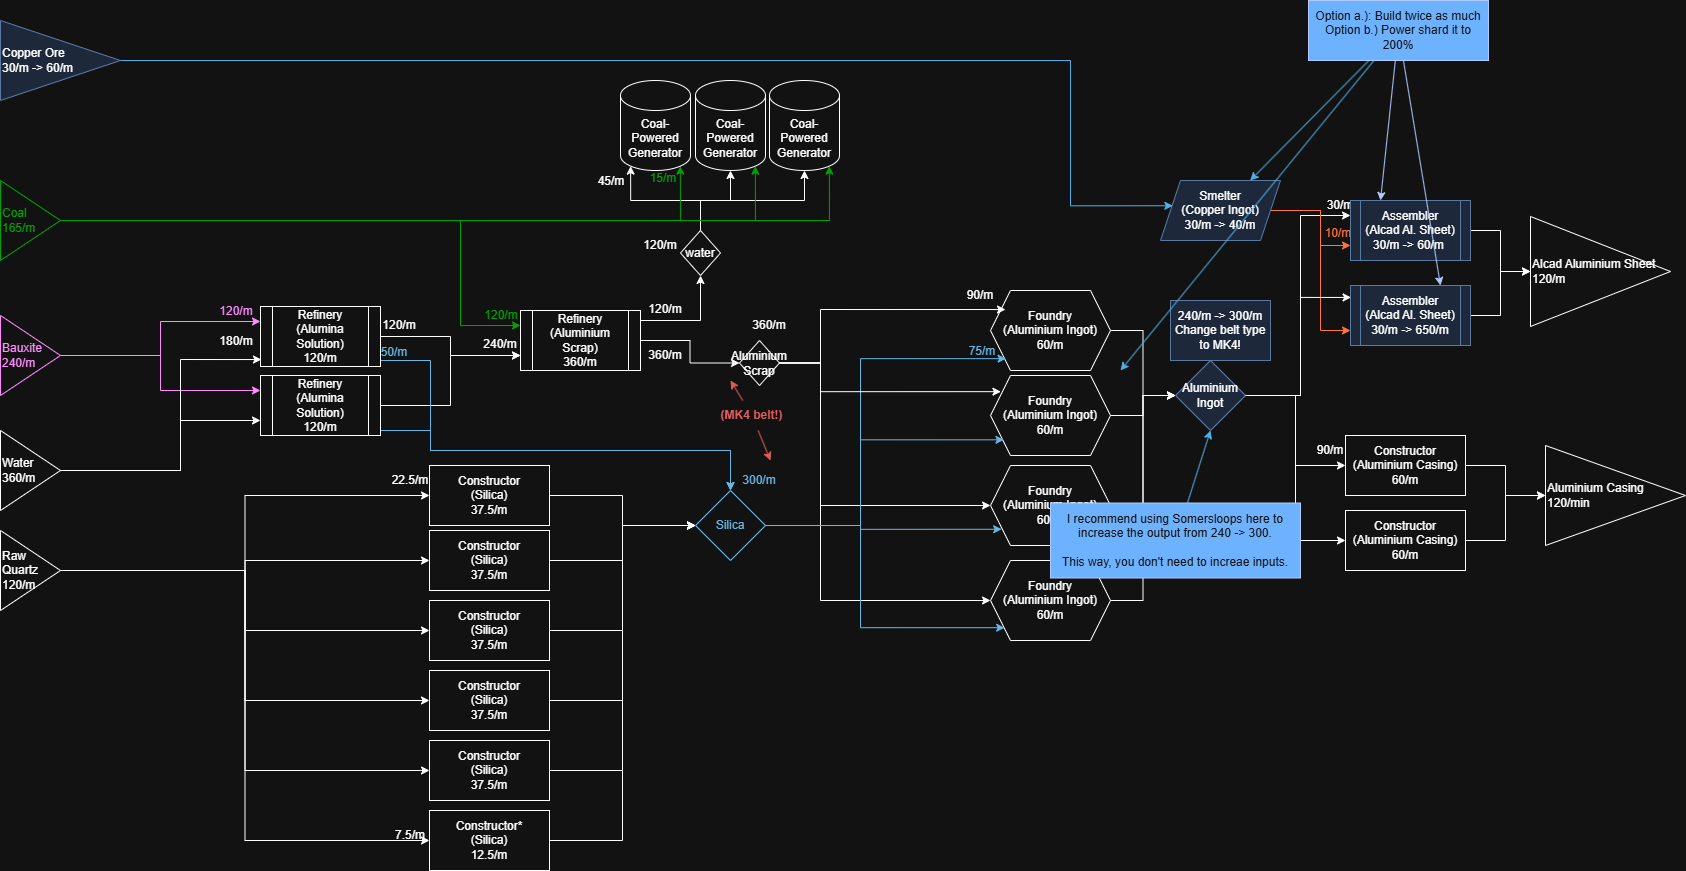
Aluminium (Sheet 60/m, Casing 120/m)
Note: I do not recommend looping back excess water. It can be a challange to properly set up valves / balance water out. It is much easier to burn any excess water in a coal power generator.
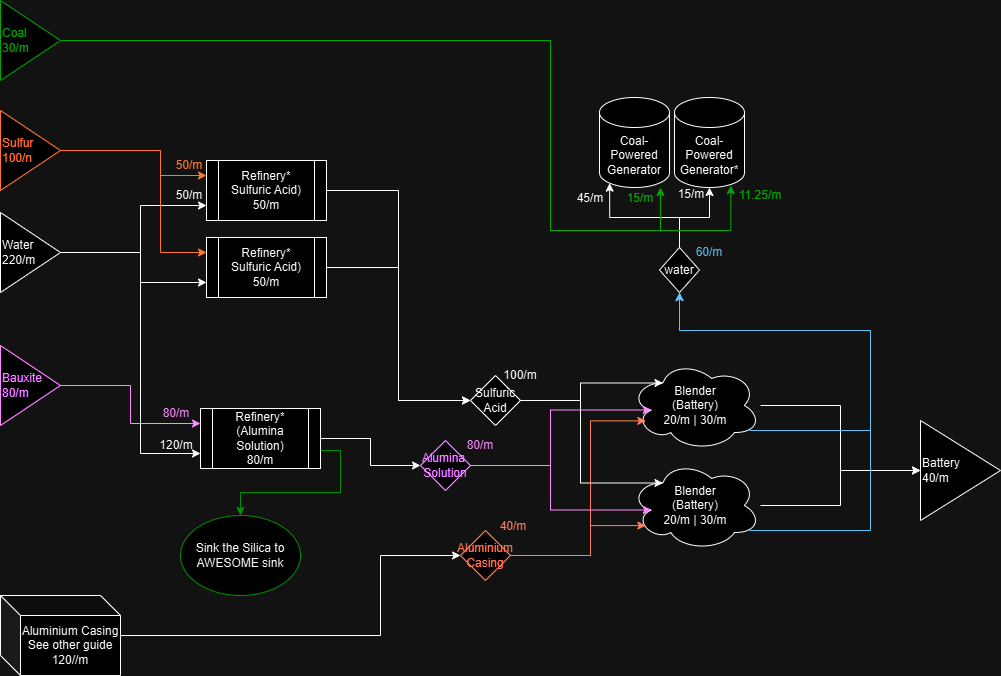
Battery (40/m)
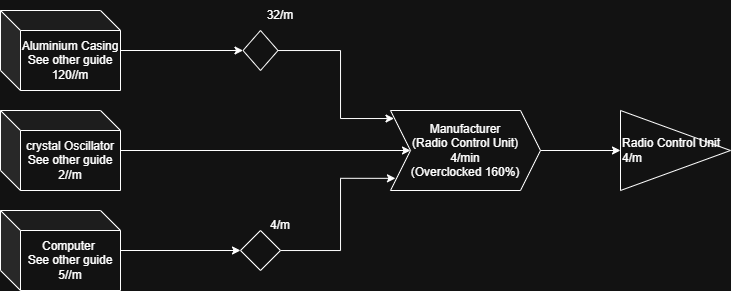
Radio Control Unit (4/m)
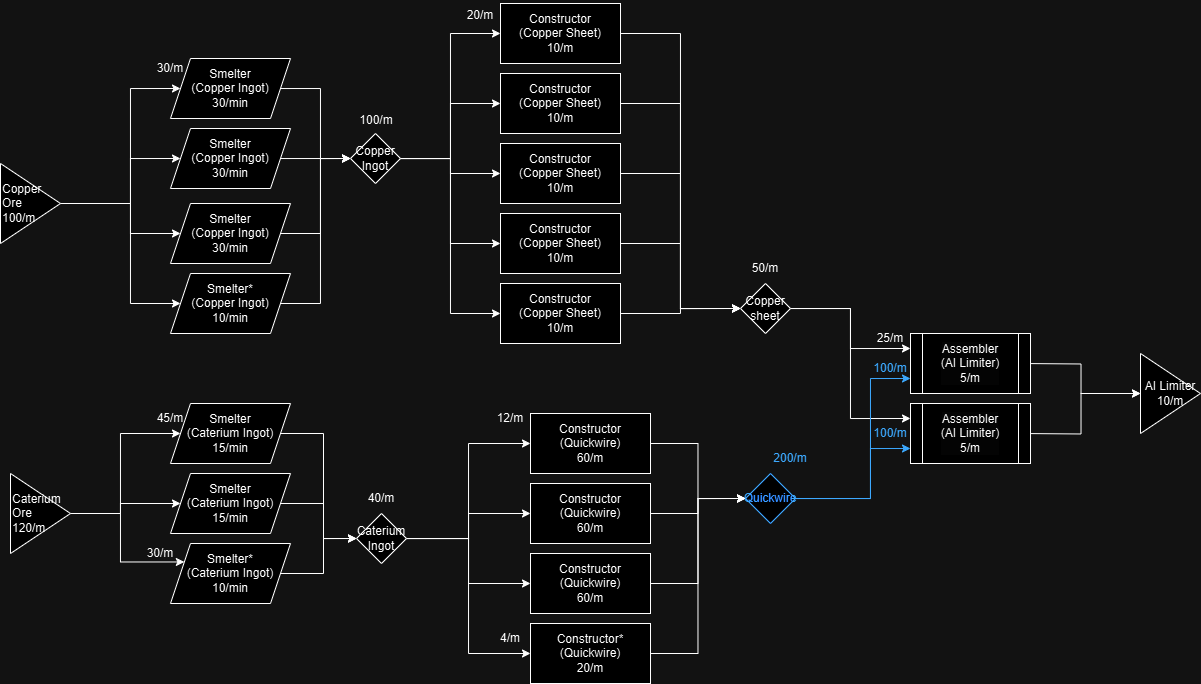
AI Limiter (10/m)
Space Elevator Phase 4.
If you followed my guides in the earlier sections, this is the point where you need to face a decision: simply linking together factories you build won't be enough on a constant rate.
You have 2 choices:
As there is a fix amount of items to provide for the Space Elevator, both approach is viable - especially if you have a lot of time sinken already, you probably have a lot of resources.
For the second approach, there is a quick win if you are smart. See my tips section about Somersloop for this easy way. You can set up your factories, and go exploring and use that precious slug / somersloop energy you find to speed up things :)
(You will probably need to temporarly dedicate to this, or increase your overall Plastic throughput as well. )
It makes sense now to create different items as separate factories - with a buffer container for them and connect them only, when needed. I also recommend putting large bilboards to indicate the item and the current output, to help with keeping track of things.
![]()
If you have the time, you can safely use this with 1/2 of the inputs, and sloop it for the same results.
You have 2 choices:
- You either pile up some resources from earlier Elevator Phase steps and manually insert them, or
- You refactor some of the factories (written with Red in the next guides) to increase the constant output.
As there is a fix amount of items to provide for the Space Elevator, both approach is viable - especially if you have a lot of time sinken already, you probably have a lot of resources.
For the second approach, there is a quick win if you are smart. See my tips section about Somersloop for this easy way. You can set up your factories, and go exploring and use that precious slug / somersloop energy you find to speed up things :)
(You will probably need to temporarly dedicate to this, or increase your overall Plastic throughput as well. )
It makes sense now to create different items as separate factories - with a buffer container for them and connect them only, when needed. I also recommend putting large bilboards to indicate the item and the current output, to help with keeping track of things.
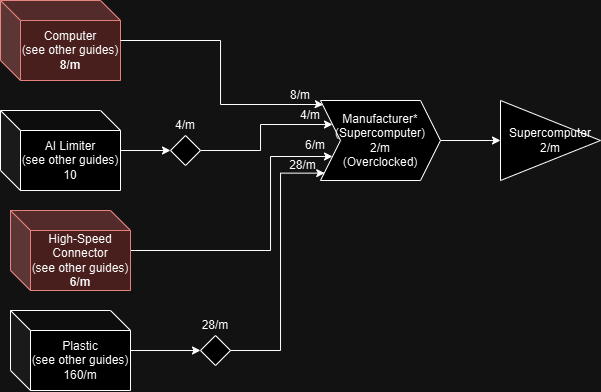
Supercomputer 2/m
Adaptive Control Unit 1.5/m
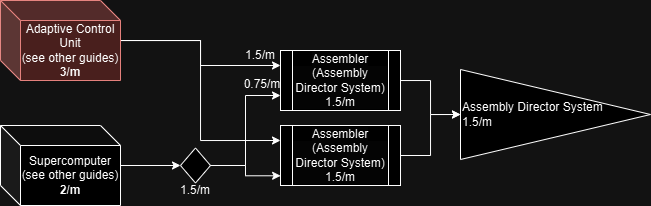
Assembly Director System 1.5/m
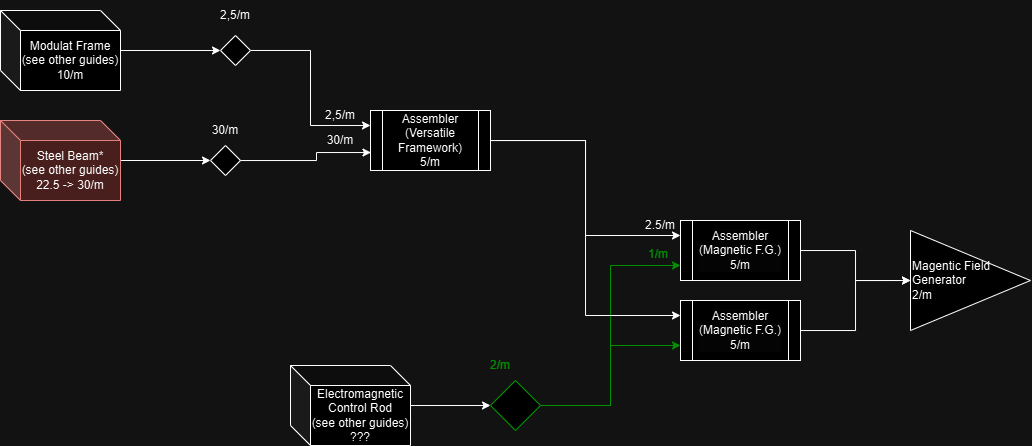
Magnetic Field Generator 2/m
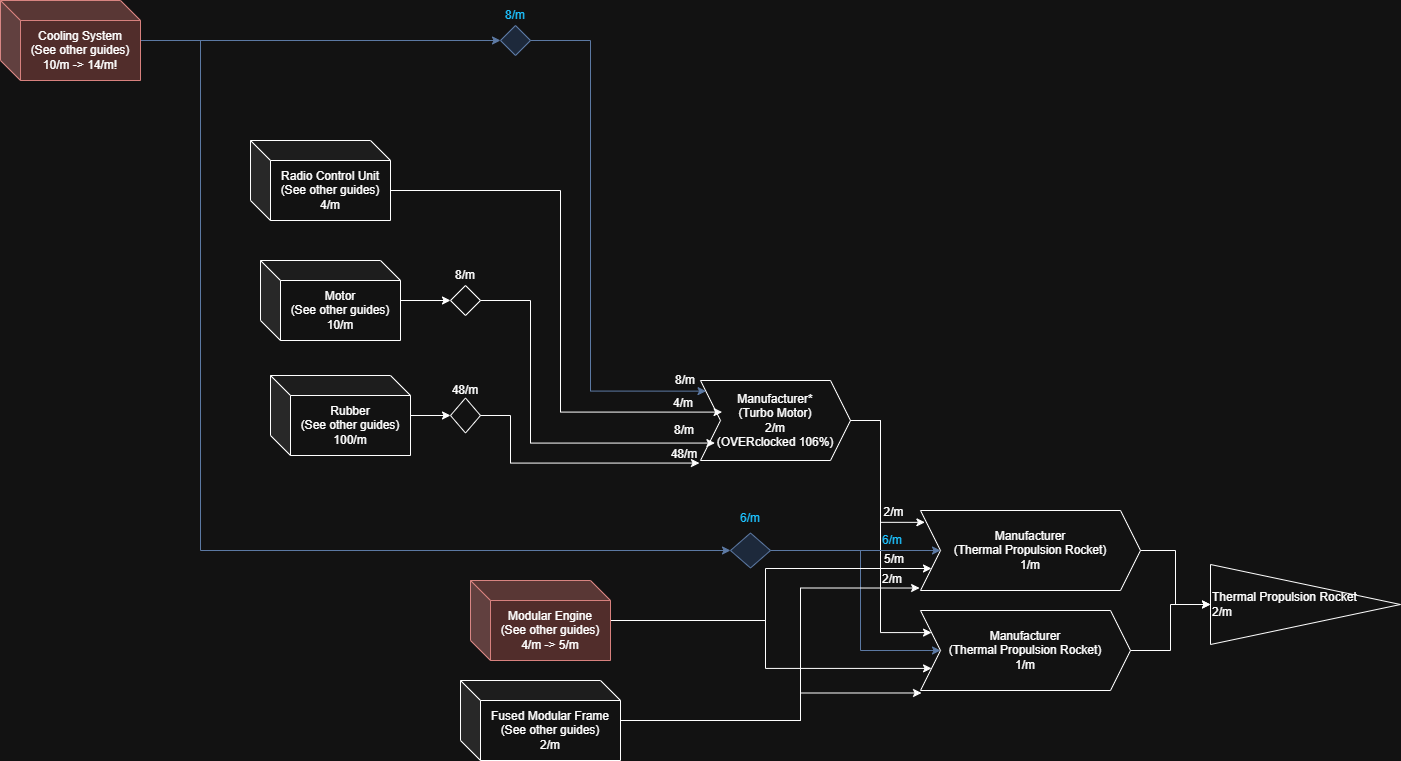
Thermal Propulsion Rocket
Note: This factory uses Computers indirectly (through Radio Control Unit) - make sure you have enough if you are using other Phase project objects at the same time so you won't starve both! If you have the time, you can safely use this with 1/2 of the inputs, and sloop it for the same results.
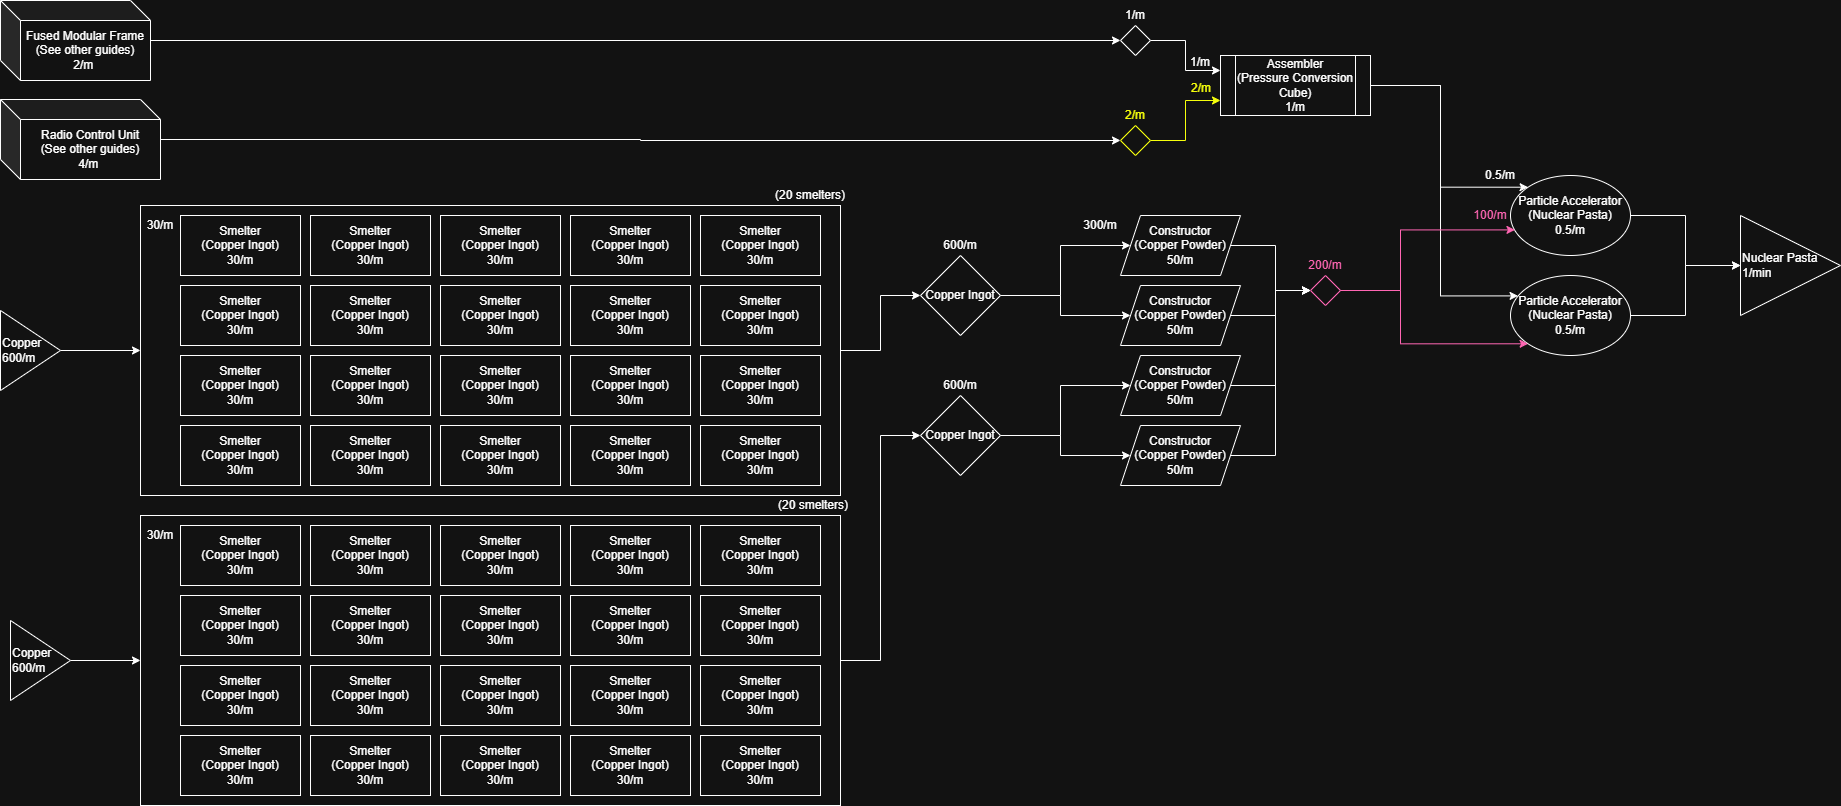
Nuclear Pasta
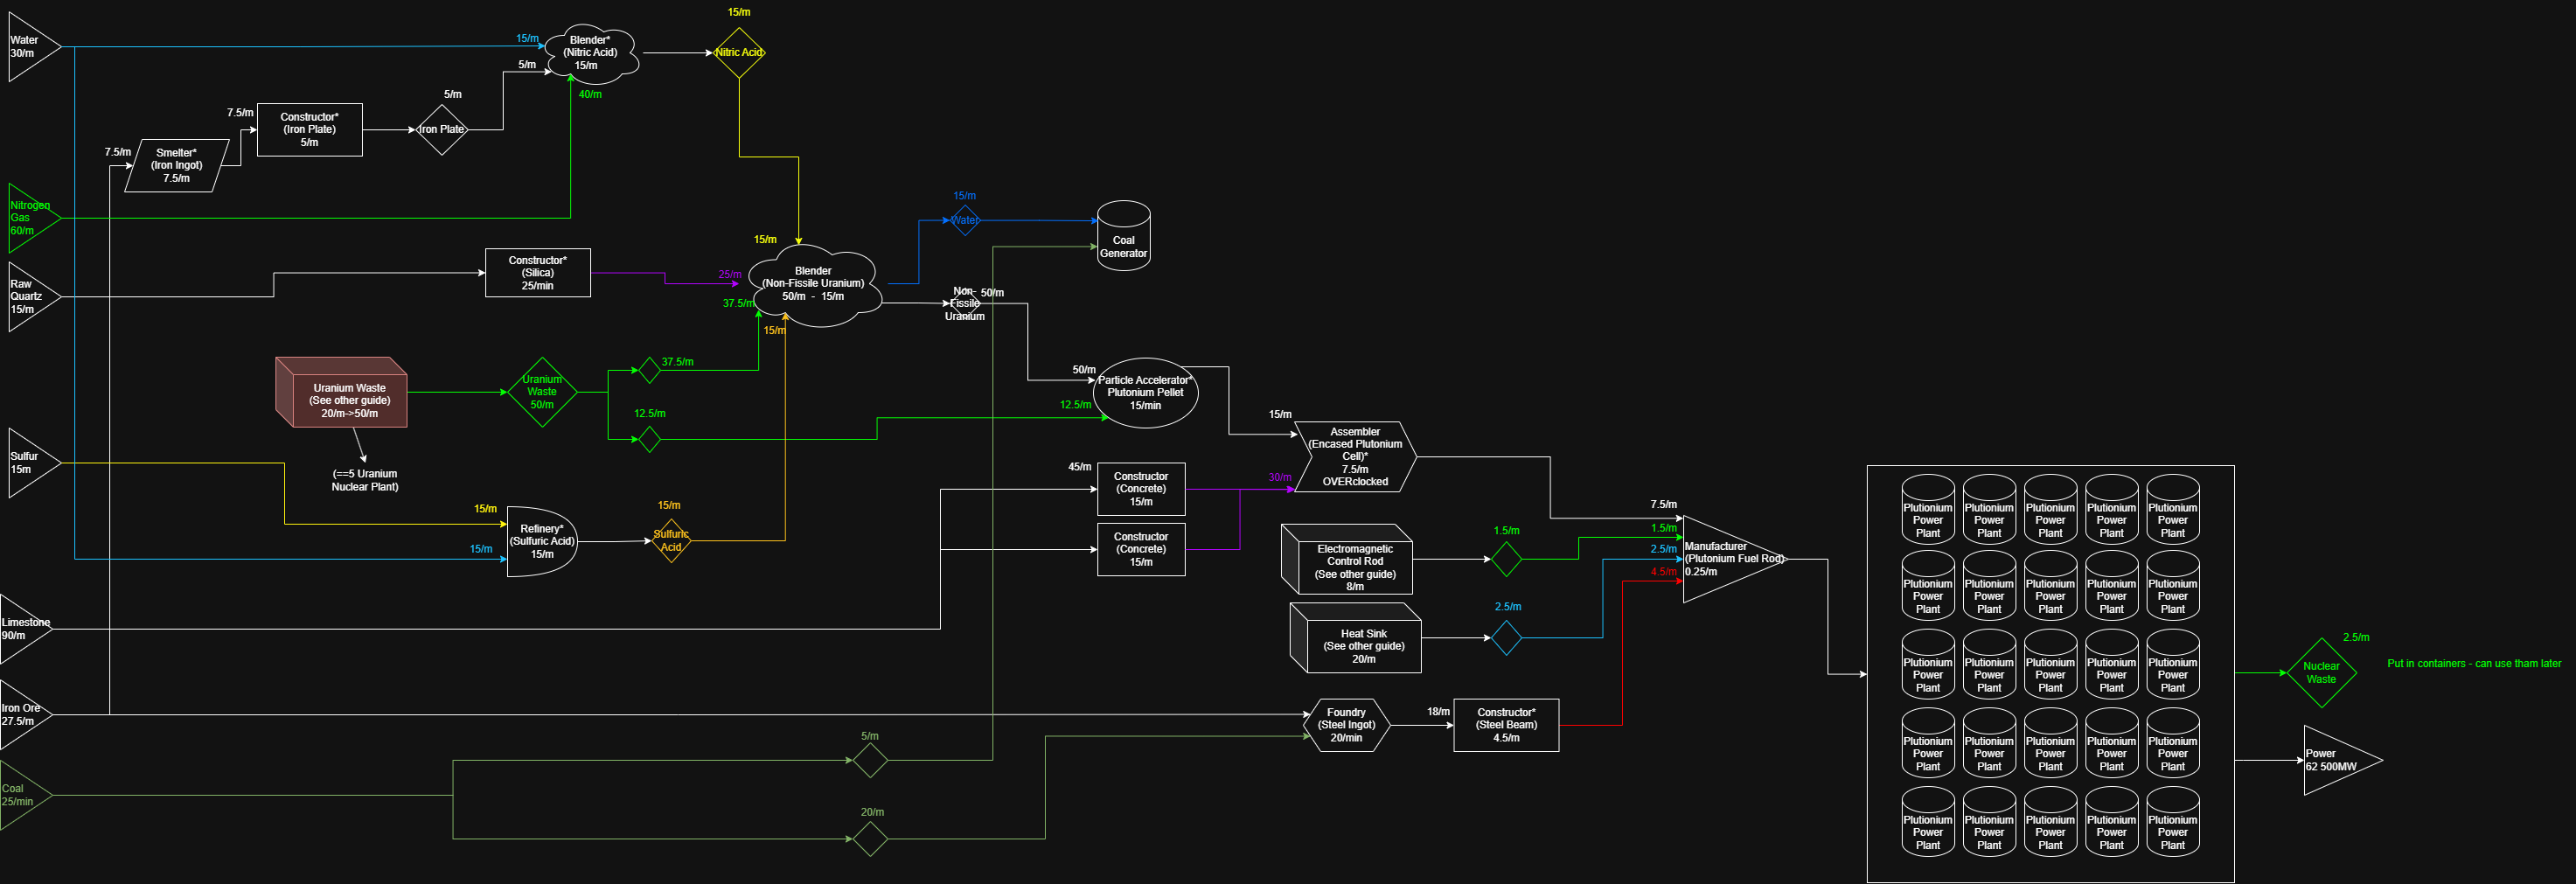
Uranium
Encased Uranium Cell (3/m)
Note: here, we channel back the excess Sulfiric Acid. With the clever use of valves, it should balance itself out - but it is possible that you might need to increase the valve at the beginning to start up the process. 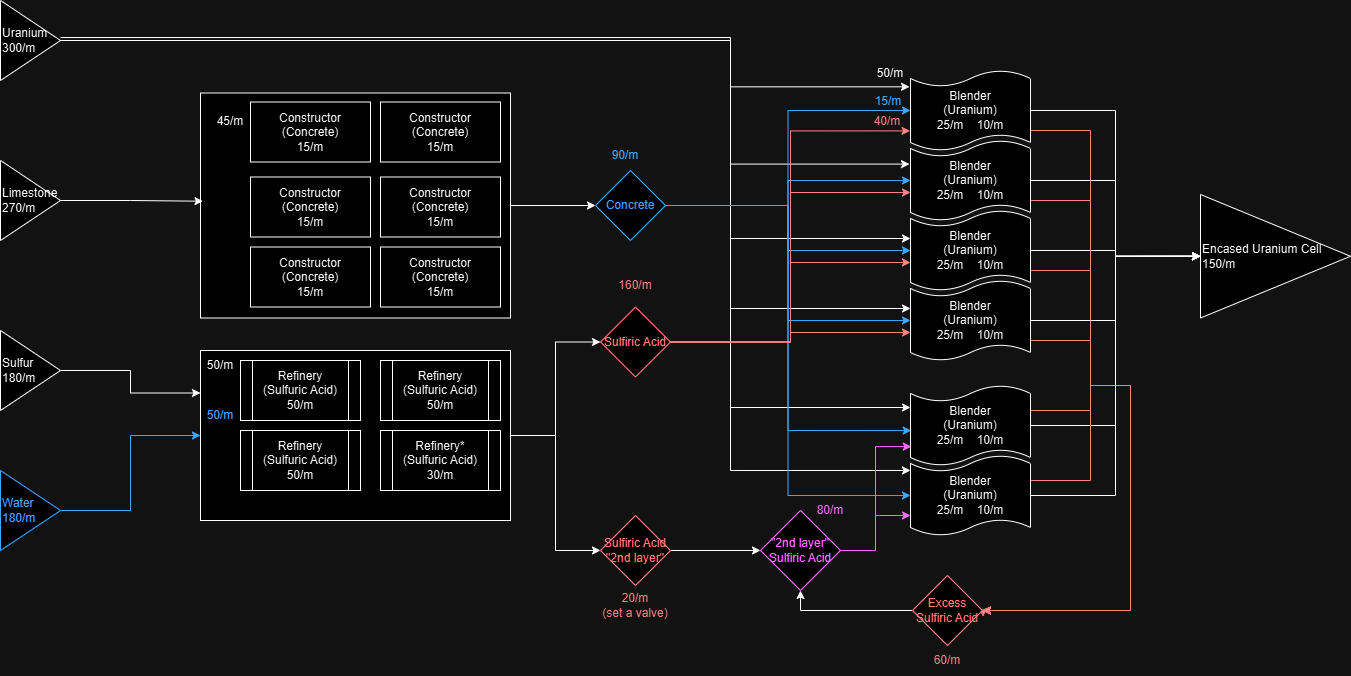
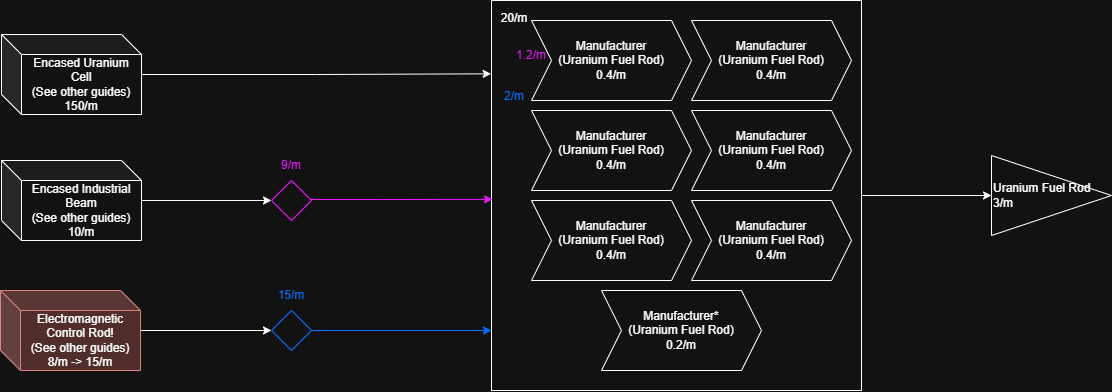
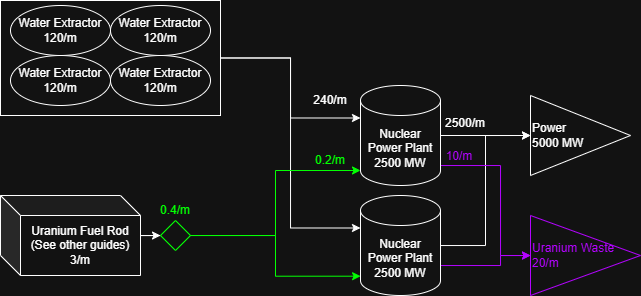
Uranium Fuel Rod (3/m)
Nuclear Power Plant (5000/m)
Note: channel the excess Uranium Waste to containers far away from your operations[satisfactory.wiki.gg]. Later in the game you can somewhat recycle them if needed. Depeding on what your Uranium resource output is, you can plant more of these of course. From the 300/m you can place 15 Nuclear power plants.
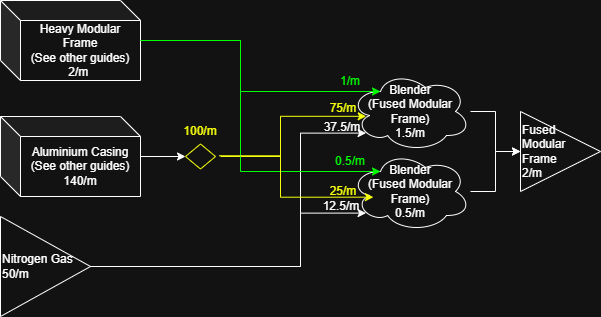
Fused Modular Frame (2/m)
Heatsink (20/m)
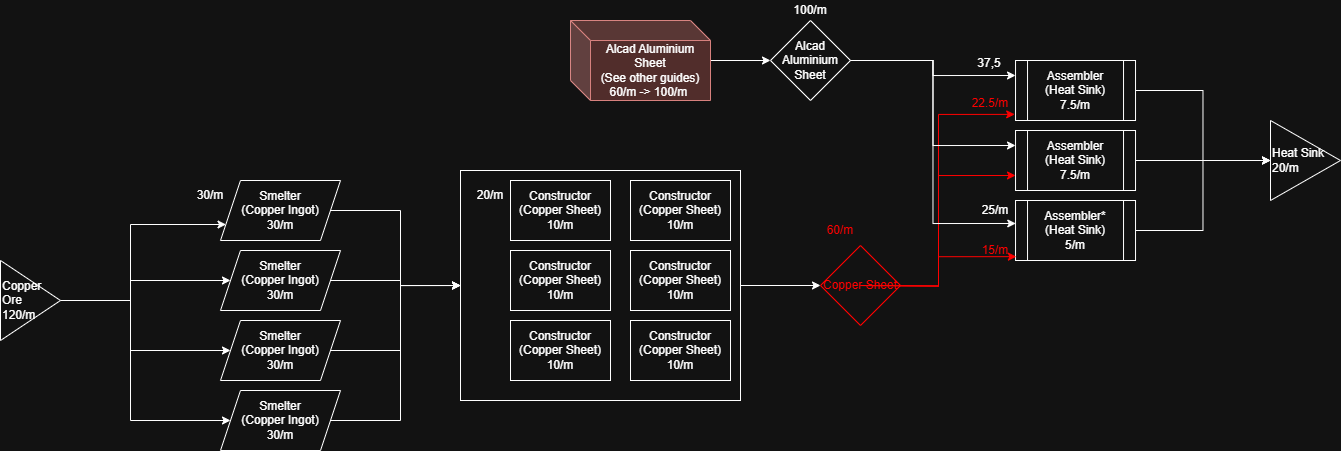
Tip: You can extend the "Aluminium" factory earlier in this guide: it already has enough Copper ore, and you can increase the Alcad Aluminium Sheet output to fit these requirements all at once.
Here is also an example of the the refactored Aluminium factory. Changes written in blue, but you can approach this opmitization in many different ways, this is just one of the many possible solutions for increasing output.
Electromagnetic Control Rod (8/m)

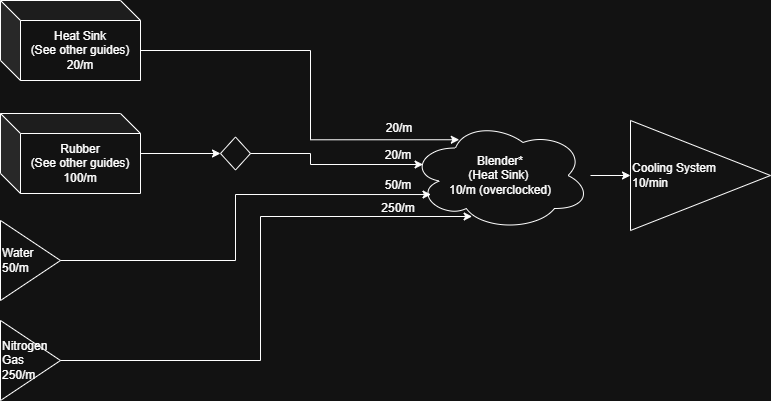
Cooling System (10/m)
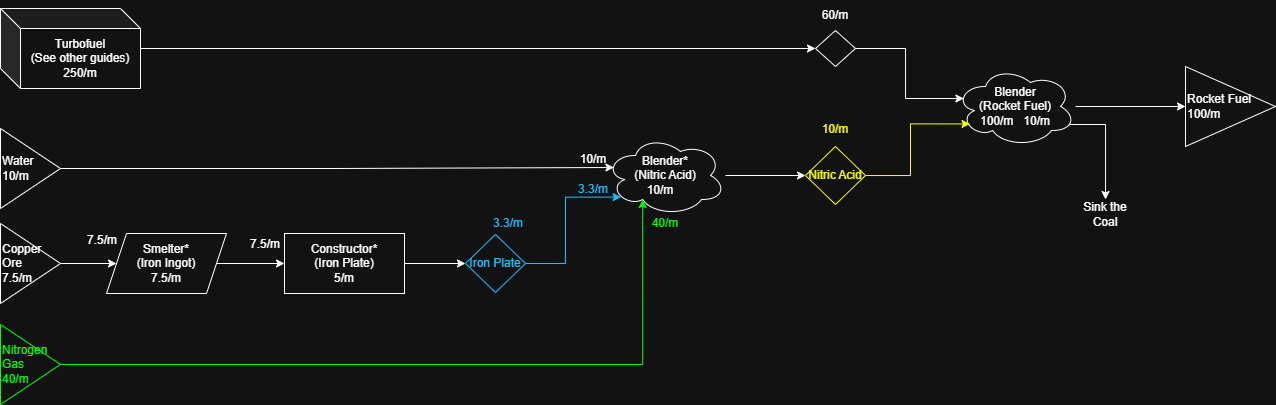
Rocket Fuel (100/m)
Note: If you need the extra power, and followed my guides so far, you can turn all the 250/m Turbofuel (33.3 Generators ~8.300 MW) to 416.6/m Rocket Fuel (100 Generators ~25.000 MW).
Plutonium (25 Nuclear Power Plant)
Phase 5, and endgame
At this point, you probably get the generic idea of the game :)
I stopped making blueprints at this point. Use https://satisfactory-calculator.com/ to plan out dedicated plants. I suggest re-using your earlier builds, and / or build dedicated new factories for exactly one (final) product with the endgame tier miners and belts.
Anything you create at this tier worth a lot of points in the AWESOME shop (with Ballistic Warp Drive being the most valuable item to sink).
After finishing the game, try to reconcile with relatives who haven't seen you in days. Or, follow the dev teams advice https://x.com/SatisfactoryAF/status/1848367394391052611?lang=en