ARC Raiders - Everything You Need To Know
 Kin
Kin(179 ratings)
Oct 30, 2025 @ 10:04am18,319334
CharactersClassesCraftingGameplay BasicsLootMaps or LevelsMultiplayerSecretsWalkthroughsWeaponsEnglish
Weapons
Usually personal preference. However, in most cases, you want to use weapons that take light ammo for dealing with players and heavy or medium ammo weapons for dealing with both players and robots. The light ammo has a hard time penetrating armoured targets, but can still do well against smaller ARC like wasps and Spotters as their thrusters are exposed. The medium and heavy rounds make excellent choices for those that are more armoured.
Some tips on weapons in ARC Raiders:
-Upgrading weapons offers a different buff for each weapon, often making them much better than the first level. Sometimes faster fire rate, reload speed or magazine size is the difference between life and death in ARC Raiders.
-Each weapon has a different time it takes to pull it out and be ready to fire - This means that a pistol as a secondary to switch to when your primary runs out of ammo is very useful in pvp.
Stitcher is great as a close quarters secondary to the ferro as it is both lightweight and is great for following up with a ferro shot on a player to finish them off.
Rattler - If you struggle with hitting shots on ARC thrusters with the ferro, this rifle is fine. It needs to be upgraded to be usable in pvp fights however, with each upgrade adding more rounds to a magazine (22 rounds at level 4).
Kettle - Good for pvp, surprisingly quiet. Make sure to have a backup weapon as this takes a long time to reload and, despite being an assault rifle, doesn't do well against armoured ARC (Fine for wasps and scouts).
Anvil - Very good pistol which can substitute the ferro as it has 6 rounds per reload and provides excellent armour penetration for taking down ARC. The added bonus that it is a handgun means you can pull it out quicker than a rifle.
Il Toro - A monster for close quarters combat, damage an enemy raider from a distance using something with more range and then charge onto their position with this shotgun to finish them off while they least expect it.
Arpeggio - Larger ammo capacity than a rattler, upgrading it allows you to shoot with quicker intervals. Good all round rifle.
Burletta - I prefer the anvil as a secondary weapon but this pistol is better suited for close quarters combat.
Torrente - An LMG that I like to think more of as a shotgun. It decimates everything close range, but good luck aiming it further even if you're crouched. Holds a nice 60 round magazine to empty into your enemies.
Renegade - Lever action rifle that features high headshot damage, accuracy and damage. This is an excellent all round rifle as it is not as awkward to use close range like the Osprey since there is no scope.
Venator - Double shot pistol that deals good damage and has a magazine upgrade slot. Good sidearm to have to deal that last bit of damage to players.
Tempest - An assault rifle with good fire rate, accuracy and mag size. Takes medium rounds and is just a good all round rifle to have.
Bobcat - Excellent close quarters raider shredder. It eats through light ammo, so make sure to bring enough of it.
Vulcano - A semi-auto shotgun. Easier to use than the Il Toro but for a tier 4 weapon it won't be as available and Il Toro does the job well enough.
Some tips on weapons in ARC Raiders:
-Upgrading weapons offers a different buff for each weapon, often making them much better than the first level. Sometimes faster fire rate, reload speed or magazine size is the difference between life and death in ARC Raiders.
-Each weapon has a different time it takes to pull it out and be ready to fire - This means that a pistol as a secondary to switch to when your primary runs out of ammo is very useful in pvp.
Tier 1 Weapons (White)
Ferro is going to be the main weapon you want to bring for taking down both Arc and Raiders.Stitcher is great as a close quarters secondary to the ferro as it is both lightweight and is great for following up with a ferro shot on a player to finish them off.
Rattler - If you struggle with hitting shots on ARC thrusters with the ferro, this rifle is fine. It needs to be upgraded to be usable in pvp fights however, with each upgrade adding more rounds to a magazine (22 rounds at level 4).
Kettle - Good for pvp, surprisingly quiet. Make sure to have a backup weapon as this takes a long time to reload and, despite being an assault rifle, doesn't do well against armoured ARC (Fine for wasps and scouts).
Tier 2 Weapons (Green)
Anvil - Very good pistol which can substitute the ferro as it has 6 rounds per reload and provides excellent armour penetration for taking down ARC. The added bonus that it is a handgun means you can pull it out quicker than a rifle.
Il Toro - A monster for close quarters combat, damage an enemy raider from a distance using something with more range and then charge onto their position with this shotgun to finish them off while they least expect it.
Arpeggio - Larger ammo capacity than a rattler, upgrading it allows you to shoot with quicker intervals. Good all round rifle.
Burletta - I prefer the anvil as a secondary weapon but this pistol is better suited for close quarters combat.
Tier 3 Weapons (Blue)
Osprey - A scoped sniper rifle that is better than the ferro in the sense that it can hold 8 rounds (and can be increased with a medium magazine), it has a scope for clearer target acquisition, and allows you to fire off rounds quicker. The only downside is that it has less armor penetration against ARC than a ferro. In my opinion this doesn't really matter too much as it makes up for it with the ability to fire quicker.Torrente - An LMG that I like to think more of as a shotgun. It decimates everything close range, but good luck aiming it further even if you're crouched. Holds a nice 60 round magazine to empty into your enemies.
Renegade - Lever action rifle that features high headshot damage, accuracy and damage. This is an excellent all round rifle as it is not as awkward to use close range like the Osprey since there is no scope.
Venator - Double shot pistol that deals good damage and has a magazine upgrade slot. Good sidearm to have to deal that last bit of damage to players.
Tier 4 Weapons (Pink)
Hullcracker - You might have seen this one for sale in the gun shop. Deals excellent damage to ARC. I would only grab this if you're hunting for bench upgrade materials that fall from the harder enemies or farming XP. It only works against ARC so you are giving up a weapon slot that could be better used by choosing more versatile guns (yes you can keep it in your backpack when not fighting ARC but consider the weight of the Hullcracker and it's special ammo).Tempest - An assault rifle with good fire rate, accuracy and mag size. Takes medium rounds and is just a good all round rifle to have.
Bobcat - Excellent close quarters raider shredder. It eats through light ammo, so make sure to bring enough of it.
Vulcano - A semi-auto shotgun. Easier to use than the Il Toro but for a tier 4 weapon it won't be as available and Il Toro does the job well enough.
Crafting/Looting Tips
- ARC Drivers - Make sure you read the description of these, some of them can be used as a grenade when you have none.
- Raider Hatch Keys - Keep these in your safepocket when entering a round, this will let you escape if the standard escapes are locked off or are covered with clankers and raiders. (Can be crafted or bought)
- To save space, recycle some items you have no need for mid-round to bring back stacks of the core materials or to stack them with other materials you might already have in your inventory (springs etc.)
- Recyclables - Don't be hasty when recycling items labelled as "Recyclable". Some can actually be used to upgrade workbenches.
- Tracking Recipes - Recipes can tracked to help you stay on top of what you need and what you don't. You can then check mid round what to look for in the map menu. Items needed in a recipe also have an eye icon when you hover over them.
- Fruit - Fruit can be found in baskets hidden throughout the map or by interacting with some trees and plants. For olives and apricots I recommend "Olive Grove" on the Blue Gate map. For prickly pear, go for the outskirts of the Space Station map. You won't find fruit on every plant, so keep searching. You can find these fruit on all maps, these are just my recommendations.
- Augments(Backpacks) - Once you've extracted with a free loadout, you can trade in your free loadout augment for a better one at the clinic merchant.
Workbench/Chicken(Scrappy) Upgrades Material List
Save these materials for better workbenches.
-50 Fabric
-6 ARC Alloy
Level 2:
-2 Cracked Bioscanner
-5 Durable Cloth
-8 Tick Pod
Level 3:
-3 Rusted Shut Medical Kit
-8 Antiseptic
-5 Surveyor Vault
-20 Metal Parts
-30 Rubber Parts
Level 2:
-3 Rusted Tools
-5 Mechanical Components
-8 Wasp Driver
Level 3:
-3 Rusted Gear
-5 Advanced Mechanical Components
-4 Sentinel Firing Core
-50 Chemicals
-6 ARC Alloy
Level 2:
-3 Synthesized Fuel
-5 Crude Explosives
-5 Pop Trigger
Level 3:
-3 Laboratory Reagents
-5 Explosive Compound
-3 Rocketeer Driver
-50 Plastic Parts
-6 ARC Alloy
Level 2:
-2 Damaged Heat Sink
-5 Electrical Components
-6 Snitch Scanner
Level 3:
-3 Fried Motherboard
-5 Advanced Electrical Components
-4 Leaper Pulse Unit
-60 Metal Parts
-5 ARC Powercell
Level 2:
-3 Toaster
-5 ARC Motion Core
-8 Fireball Burner
Level 3:
-3 Motor
-10 ARC Circuitry
-6 Bombardier Cell
-25 Plastic Parts
-30 Fabric
Level 2:
-3 Power Cable
-5 Electrical Components
-5 Hornet Driver
Level 3:
-3 Industrial Battery
-5 Advanced Electrical Components
-6 Bastion Cell
Medical Lab
Level 1:-50 Fabric
-6 ARC Alloy
Level 2:
-2 Cracked Bioscanner
-5 Durable Cloth
-8 Tick Pod
Level 3:
-3 Rusted Shut Medical Kit
-8 Antiseptic
-5 Surveyor Vault
Gunsmith
Level 1:-20 Metal Parts
-30 Rubber Parts
Level 2:
-3 Rusted Tools
-5 Mechanical Components
-8 Wasp Driver
Level 3:
-3 Rusted Gear
-5 Advanced Mechanical Components
-4 Sentinel Firing Core
Explosives Station
Level 1:-50 Chemicals
-6 ARC Alloy
Level 2:
-3 Synthesized Fuel
-5 Crude Explosives
-5 Pop Trigger
Level 3:
-3 Laboratory Reagents
-5 Explosive Compound
-3 Rocketeer Driver
Utility Station
Level 1:-50 Plastic Parts
-6 ARC Alloy
Level 2:
-2 Damaged Heat Sink
-5 Electrical Components
-6 Snitch Scanner
Level 3:
-3 Fried Motherboard
-5 Advanced Electrical Components
-4 Leaper Pulse Unit
Refiner
Level 1:-60 Metal Parts
-5 ARC Powercell
Level 2:
-3 Toaster
-5 ARC Motion Core
-8 Fireball Burner
Level 3:
-3 Motor
-10 ARC Circuitry
-6 Bombardier Cell
Gear Bench
Level 1:-25 Plastic Parts
-30 Fabric
Level 2:
-3 Power Cable
-5 Electrical Components
-5 Hornet Driver
Level 3:
-3 Industrial Battery
-5 Advanced Electrical Components
-6 Bastion Cell
Enemies
While it's best to avoid unnecessary confrontations if you can as it brings unwanted attention to you both from other raiders and ARC, sometimes you're forced to face them head on.
Avoid fights with some of the more challenging robots unless you're prepared to take them on and you're sure you won't get attacked by raiders or swarmed by more ARC while fighting an already dangerous foe.
Rocketeer - These guys can be deadly, if you're just starting out, avoid them at all costs. On the starter shield, it only takes about 2 rockets to kill you. This and the fact that it can sometimes shoot a barrage of rockets can kill most unexpecting players.
To take one down, I recommend teaming up with friends and taking shots at one of its wings at a time (usually with a ferro rifle). Make sure you have cover with a roof to hide under, only peeking to shoot it when it focuses it's fire on another teammate.
If you're planning to take it down as a solo player, find a small building with two entrance points and a roof, then take shots on it from on entrance then switch position to the other entrance. And don't take too long to aim unless you like rockets!
Leapers - The giant spider robot which isn't as scary as a rocketeer in my opinion as it does not do well with doors and small entrances, making it easy to escape. Taking it down requires aiming for it's leg joints or eye.
Hornet - These robots have 4 thrusters, the front 2 are protected by armour the rear 2 are not. If you can get behind or under the hornet and shoot out both of the rear, unprotected thrusters, great. Have one person lure the hornet's attention and the second player shoots out the rear thrusters to make quick work of them. It shoots a shocking dart that stuns you briefly and does a lot of damage, all of which can be avoided by sprinting to the side just before it shoots (you will hear it charging up the shot).
Wasp - The unarmoured version of the hornet. Instead of shooting an electric dart, it shoots light ammo rounds at you which can also be dodged by sprinting or moving to cover. While not too dangerous on its own, if you get swarmed by these and have no stamina you could be in trouble.
Sentinel - Fairly easy to take down with a ferro, Could pose a challenge if you're caught in it's sights without cover nearby. It is usually found on tall points of the map. If you're looking to kill it for the workbench upgrade, I recommend checking out "The Breach" location on the Dam Battlegrounds map. It isn't always there but its just one of the spots I've had the most luck with.
Bastion - This rapid firing ARC can catch many raiders off guard with his sudden damage output. If you plan on taking it out, don't group up with other players in one spot and shoot it when he changes focus to another player. The joints of his legs and the yellowish green canister on his back are his weakpoints. A few hullcracker rounds to these weakpoints can take him down swiftly.
Bombardier - Shells you from a distance with great accuracy. Unlike the rocketeer, you won't see the trajectory of the bombs like the rocketeer, so take cover if you're being targeted. This enemy always comes with two spotters which can be mistaken for snitches. The difference is that instead of calling in more ARC like the snitches, the spotters will call in bombs on your location. Destroying them keeps you safe from the Bombardiers shells for a short time. It has weakpoints similar to the Bastion.
Shredder - Although it's small, it will hurt if the shredder hits you. You can find this enemy on the Stella Montis map. He shoots shotgun shells 360 degrees around him. Keep your distance or take cover to survive when you hear him "charge up" his attack. It takes a few shots to take down. The way I like to deal with it without drawing too much attention to myself is lure it into a doorway, run out and lock the door behind you, trapping it in that room for other raiders to deal with.
Movement
There are various things to know about the movement in this game. These tips can make you move around more easily and freely on the map.
-Dodge Rolling On Landing - You're able to avoid taking fall damage (or reducing it) if you perform a dodge roll when falling from a height. Great for escaping a building by jumping out a window. Don't overdo it though, this won't make you invincible.
-Ledge Grabs - Another way to avoid fall damage when dropping from heights is to grab onto a ledge. You can also use this to drop from upper floors of buildings into lower floors, surprising enemy raiders.
-Ladders/Zip lines - You can perform a running jump onto zip lines, catching them mid air. Same with ladders, however you slide down the ladder a little when grabbing it after a fall. Using this knowledge, we can jump down ladders and zip lines and catch them at the last moment to descend quicker.
-Parkour - Parkour! By holding A or D and jumping from a ledge grab, you can move horizontally too, albeit still descending. Good for moving to specific windows you want to end up at.
Grenades/Utility
Sometimes all you need is bombs to take out raiders and ARC.
Wolfpack Grenade - Deals a huge amount of damage to nearby ARC upon detonating, deals no damage to players. One of these will take a rocketeer down if all of the fragments hit it (destroy surrounding wasps and hornets so the grenade focuses the rocketeer).
Lure Grenade - As the name says, lures ARC to it's location. Handy for luring ARC away from yourself and friends, or towards enemies. Especially lethal if you're able to lure one of the tougher ARC to an enemy location. Be mindful of your surroundings though, as if you hit a wall with it that's close to you, the attention will fall on you.
Smoke Grenade - Take some spare to provide temporary cover for yourself or teammates while they're using the extraction console or to provide some cover while reviving a downed teammate.
Tagging Grenade - People might choose damage dealing grenades over these, but for maps like Buried City, especially on a Night Raid, these are essential for entering the dark rooms. Throw one of these in before you enter to know who to expect and where to expect them.
ARC Drivers - Provides some utility in a pinch. One that I like to throw at enemies in the open is the snitch driver. It calls arc over to the location you threw it at, making a perfect distraction for your foes. One snitch driver spawns 2 drones on its location, you can throw more than one to summon an army of drones. Be cautious though, they will also attack you if you're not careful.
Zipline - Allows you and your team to both escape from high ground, attack opponents who hold high ground, and set traps for unsuspecting victims by placing trap grenades at the destination of the zipline.
Snap Hook - This legendary grappling hook is rare but allows one player to be extremely mobile and dangerous. It lets its user to pull themselves to a target by aiming and shooting it when the crosshairs turn white. If it is aimed at a ledge, the player pulls themselves up and onto the ledge when they arrive. Not only can the Snap Hook be used to travel vertically, it can also allow you to go from point A to B very quickly, allowing you to close a gap, move from cover to cover (a doorway to reach a downed teamate for example) or simply to traverse the map. It is multi use, however there is a recharge time and durability to watch out for.
Locations
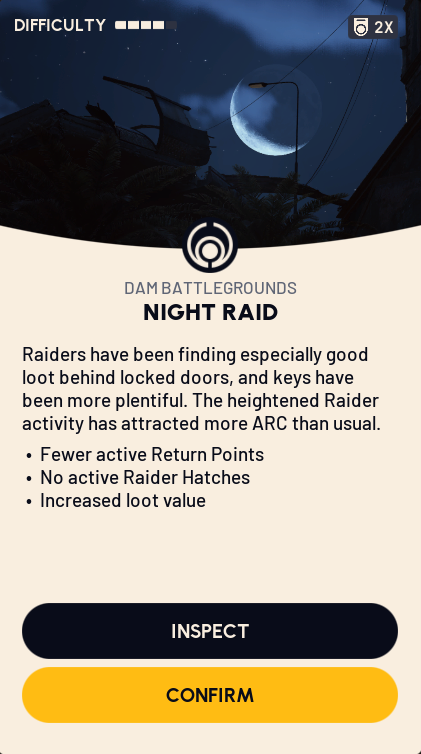
Night Raids - Keep an eye out for this variation of your favourite map if you're looking to fight more ARC for their parts which are needed for upgrading your workbenches. Along with more ARC, there is increased valuable loot to be found here. The only con is that you have to fight in the dark and there are fewer extraction points, meaning you will likely encounter more players.
Dam Battlegrounds
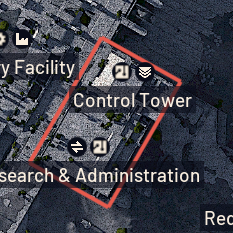
Control Tower Secret Room Entrance(Removed, only has some containers in its place now. Not worth the risk.) - If you climb up to the roof of the Control Tower (NOT the Research & Administration Building), there is a little slope that leads to a ledge. You want to drop off this ledge very gently and try to catch the ledge below. This leads you to a loot room where you can find weapons, ammo and misc crafting items.
Misc
Other Useful Tips
One feature you might have missed is the ability to expand your stash. Simply click the "expand" button at the top of your stash menu. Note that it increases in price with each expansion. Maximum amount of slots currently is 280.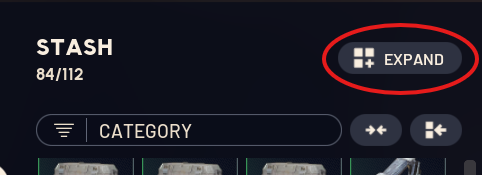
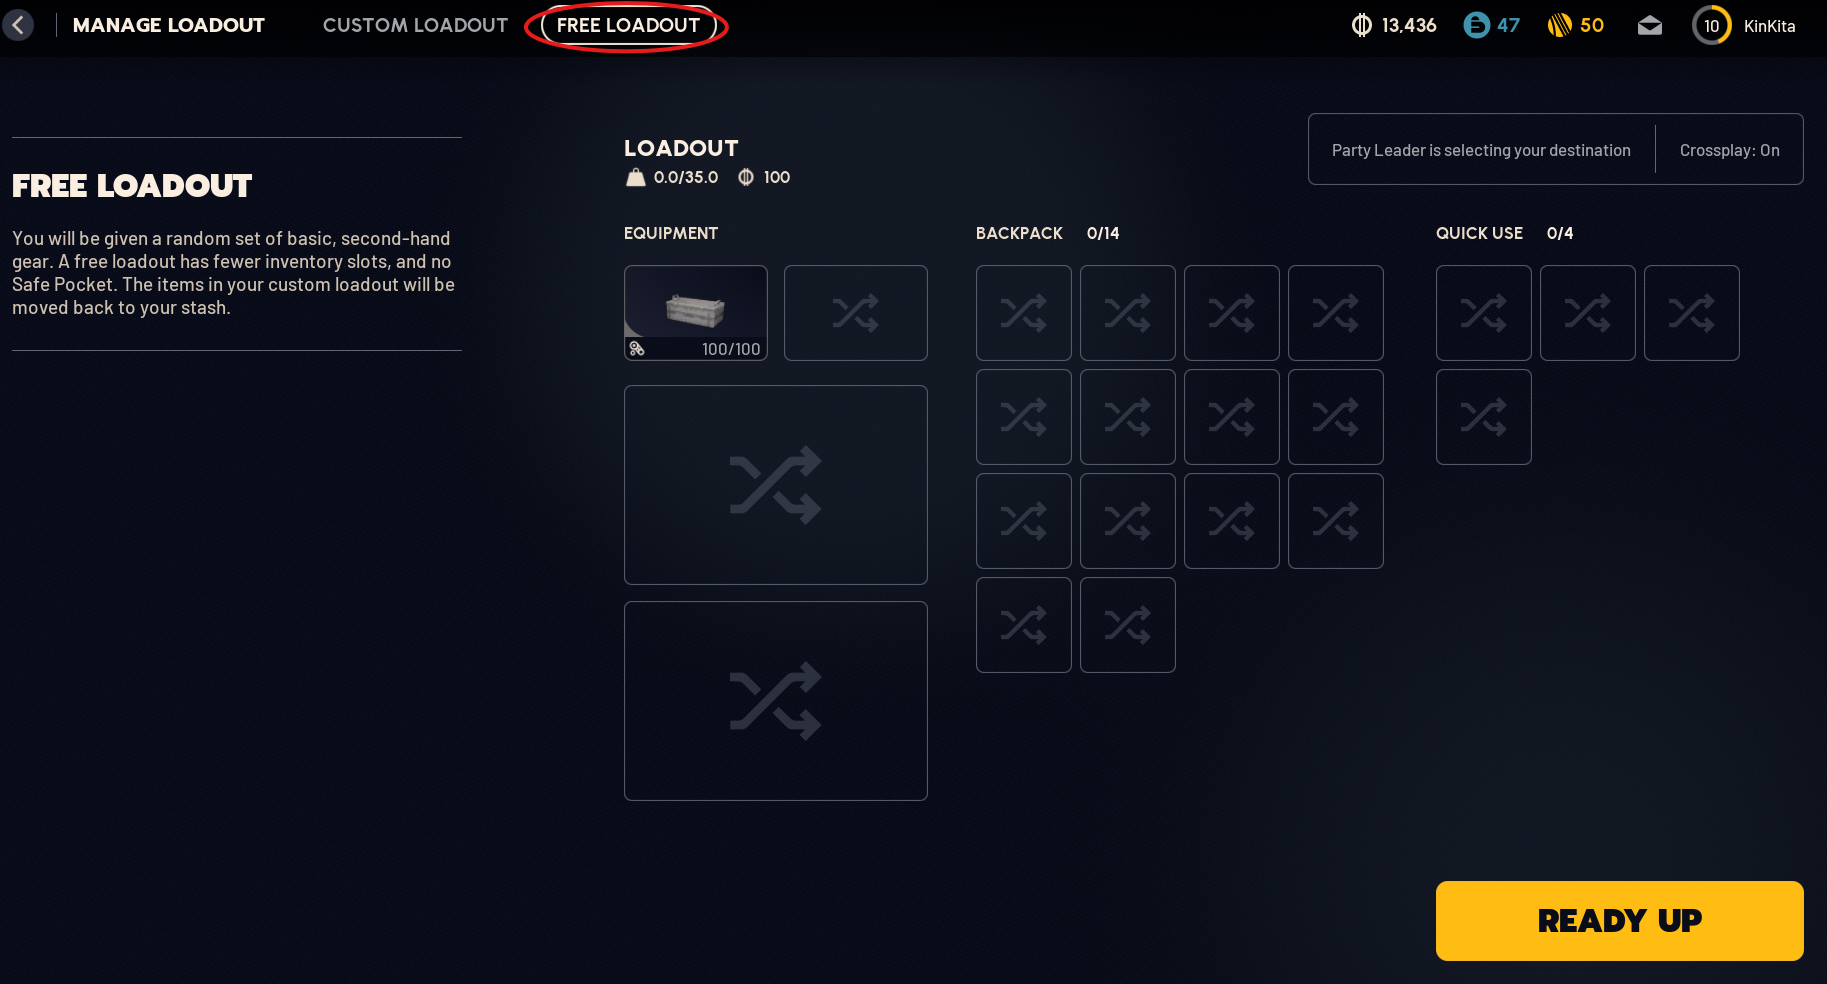
Free Loadouts - When you're starting out, you can head into a round with a free kit which you can choose to equip by selecting the tab at the top just before starting a round.
Some things to consider however:
-This gives you a gun, some ammo, and some tools and meds.
-Everything you get from this kit is random.
-The weight and storage slots are very limited on the free kit.
Safepockets - Don't forget to use your Safepockets! As soon as you find something you need for a quest or crafting, make sure it goes straight into your safepocket so that you keep it even if you die.
Keep in mind that the free loadout doesn't give you one of these safepockets.
Assorted Seeds - Keep these as they are a currency for one of the vendors. Handy to buy materials in a pinch.
Skills (Ignore this for now, it isn't well thought out)
Some skills are good to unlock before others, here's a few to keep an eye out for.
Looter's Instincts - Reveal loot faster. Good for looting bodies for shields or ammo in the middle of a fight as they're not always revealed first. Saves you time in general.
Traveling Tinkerer - Lets you craft even more items mid round. Locked behind 15 points in Survivalist.
Broad Shoulders - Lets you carry more weight, handy for extracting when you're filled up with another player's weapons and gear. Locked behind 15 points in Survivalist.
Security Breach - Lets you break into security lockers. Offers great loot inside. Locked behind 36 points in Survival. Security lockers are easy to miss, they're dull grey lockers with two doors.
Youthful Lungs - Increases max stamina.
Carry The Momentum - Saves stamina after a sprinting dodge roll.
Effortless Roll - Dodge rolls cost less stamina. Locked behind 15 points in Mobility.
Heroic Leap - Dodge roll further after sprinting. Locked behind 15 points in Mobility.
Crawl Before You Walk - Lets you crawl to teammates or the extraction point faster when you're downed (Ignore this if you plan to play solo). Locked behind 15 points in Mobility.
Proficient Pryer - Useful if you're looking to pry open a lot of loot beacons quickly, spending minimal time out in the open.
Sky-Clearing Swing - Handy for stealth runs where you want to attract the least amount of attention. Locked behind 15 points in Conditioning.
-Secondly, max out Youthful Lungs and Marathon Runner
-Max Looter's Instincts and Revitalising Squat.
-Suffer In Silence
-Travelling Tinkerer
-Broad Shoulders and Looters Luck.
-Effortless Roll
-Heroic Leap
-Good As New
-Security Breach
-Fight Or Flight
-Proficient Pryer
Survivalist Tree:
In-Round Crafting - This lets you craft very useful items in the middle of a round. Items that can help in combat such as shields and bandages if you've run out.Looter's Instincts - Reveal loot faster. Good for looting bodies for shields or ammo in the middle of a fight as they're not always revealed first. Saves you time in general.
Traveling Tinkerer - Lets you craft even more items mid round. Locked behind 15 points in Survivalist.
Broad Shoulders - Lets you carry more weight, handy for extracting when you're filled up with another player's weapons and gear. Locked behind 15 points in Survivalist.
Security Breach - Lets you break into security lockers. Offers great loot inside. Locked behind 36 points in Survival. Security lockers are easy to miss, they're dull grey lockers with two doors.
Mobility Tree:
Marathon Runner - Less stamina used moving around.Youthful Lungs - Increases max stamina.
Carry The Momentum - Saves stamina after a sprinting dodge roll.
Effortless Roll - Dodge rolls cost less stamina. Locked behind 15 points in Mobility.
Heroic Leap - Dodge roll further after sprinting. Locked behind 15 points in Mobility.
Crawl Before You Walk - Lets you crawl to teammates or the extraction point faster when you're downed (Ignore this if you plan to play solo). Locked behind 15 points in Mobility.
Conditioning:
Fight Or Flight - Regain some stamina when you take damage. Has a cooldown.Proficient Pryer - Useful if you're looking to pry open a lot of loot beacons quickly, spending minimal time out in the open.
Sky-Clearing Swing - Handy for stealth runs where you want to attract the least amount of attention. Locked behind 15 points in Conditioning.
My Picks
-Rush In-Round Crafting-Secondly, max out Youthful Lungs and Marathon Runner
-Max Looter's Instincts and Revitalising Squat.
-Suffer In Silence
-Travelling Tinkerer
-Broad Shoulders and Looters Luck.
-Effortless Roll
-Heroic Leap
-Good As New
-Security Breach
-Fight Or Flight
-Proficient Pryer